


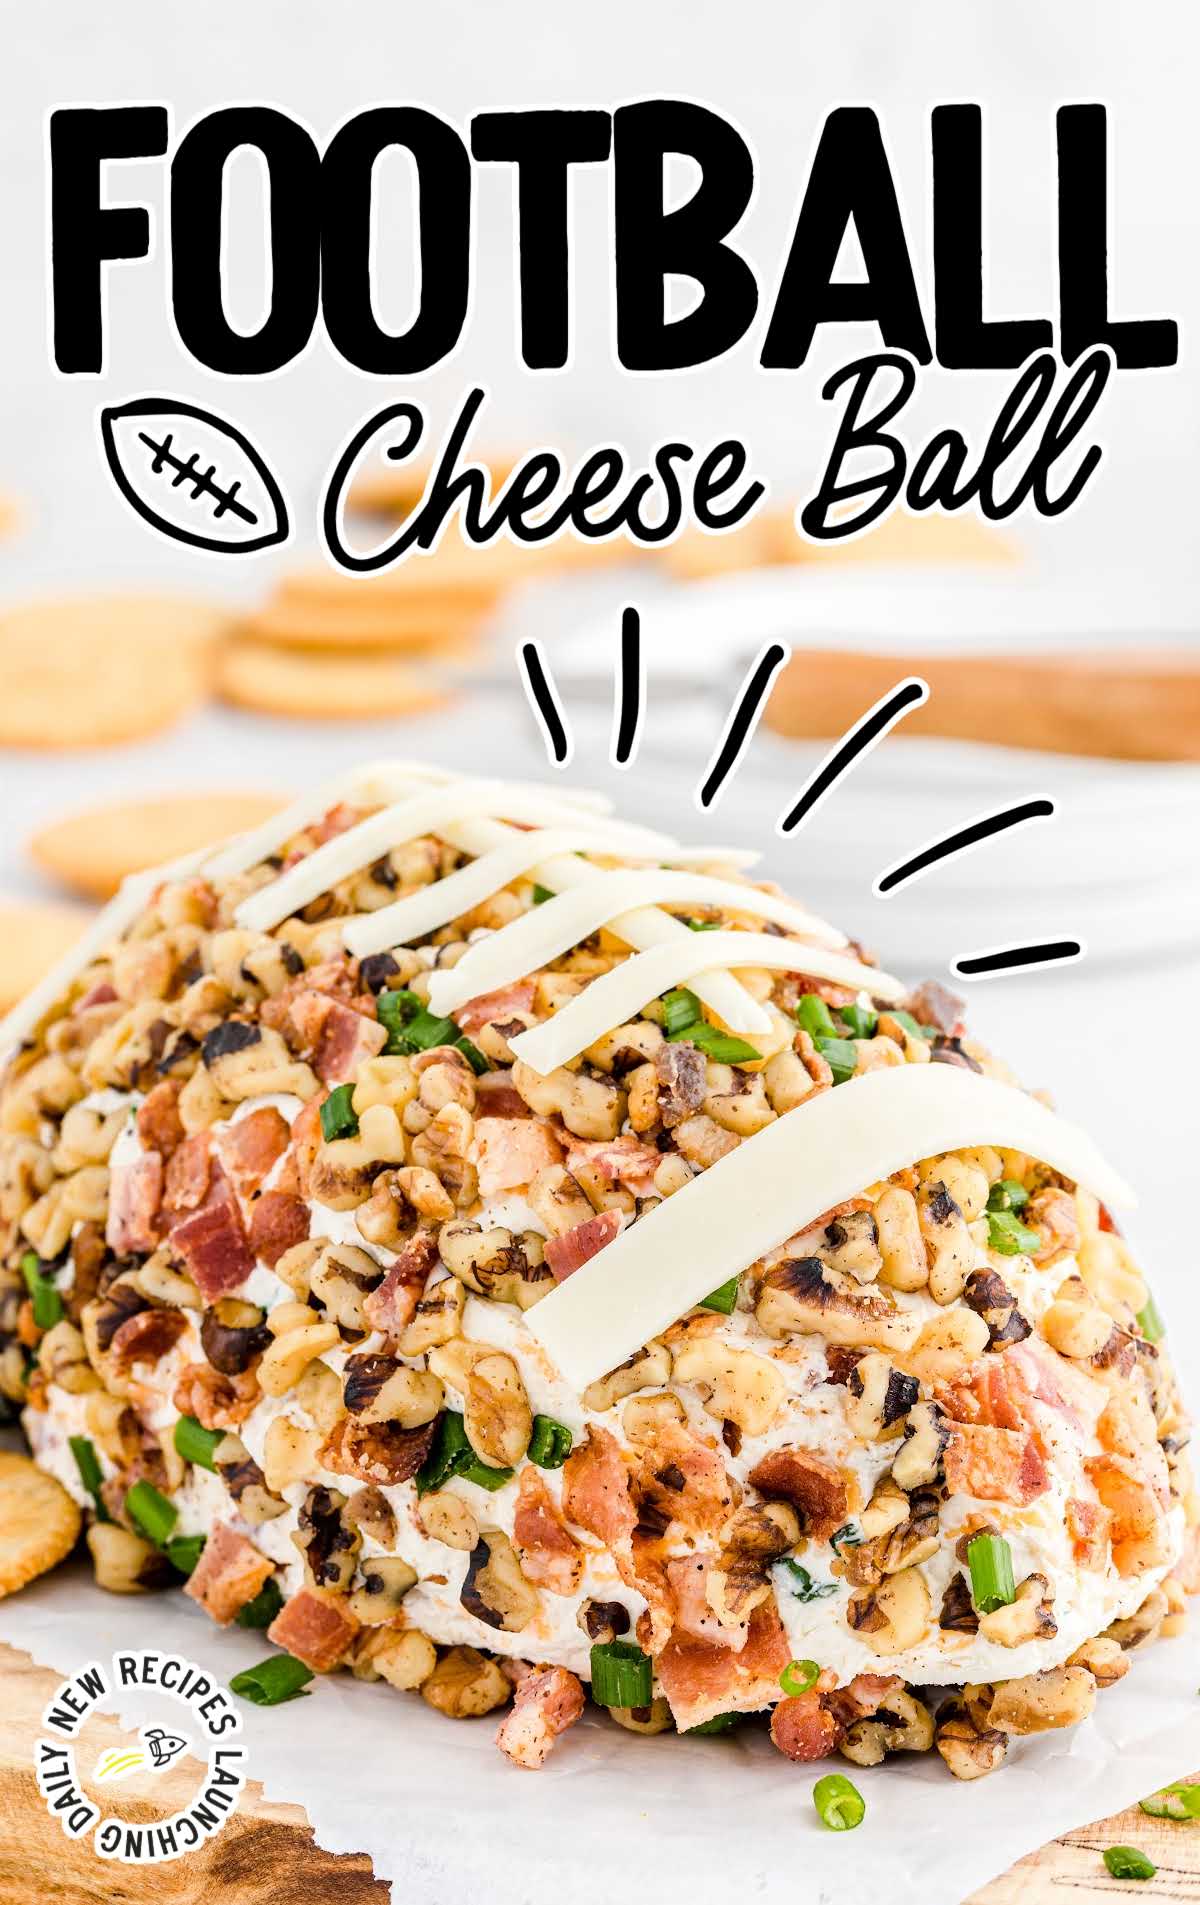
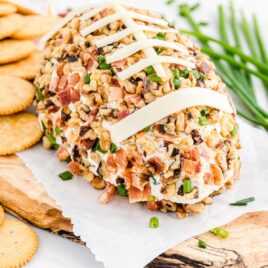
This football cheese ball is the perfect centerpiece for snacking when you are watching the big game. The irresistible combination of crispy bacon, cream cheese, and cheddar forms the base for this fun appetizer, which is then decorated to match the theme of the day.
Football Cheese Ball Ingredients
The football cheese ball is a creamy and indulgent treat loaded with all the classic ingredients, including bacon, cheese, and ranch.
To make this appetizer unique, we’ve shaped it into a football, ready for the big game.
You’ll need:
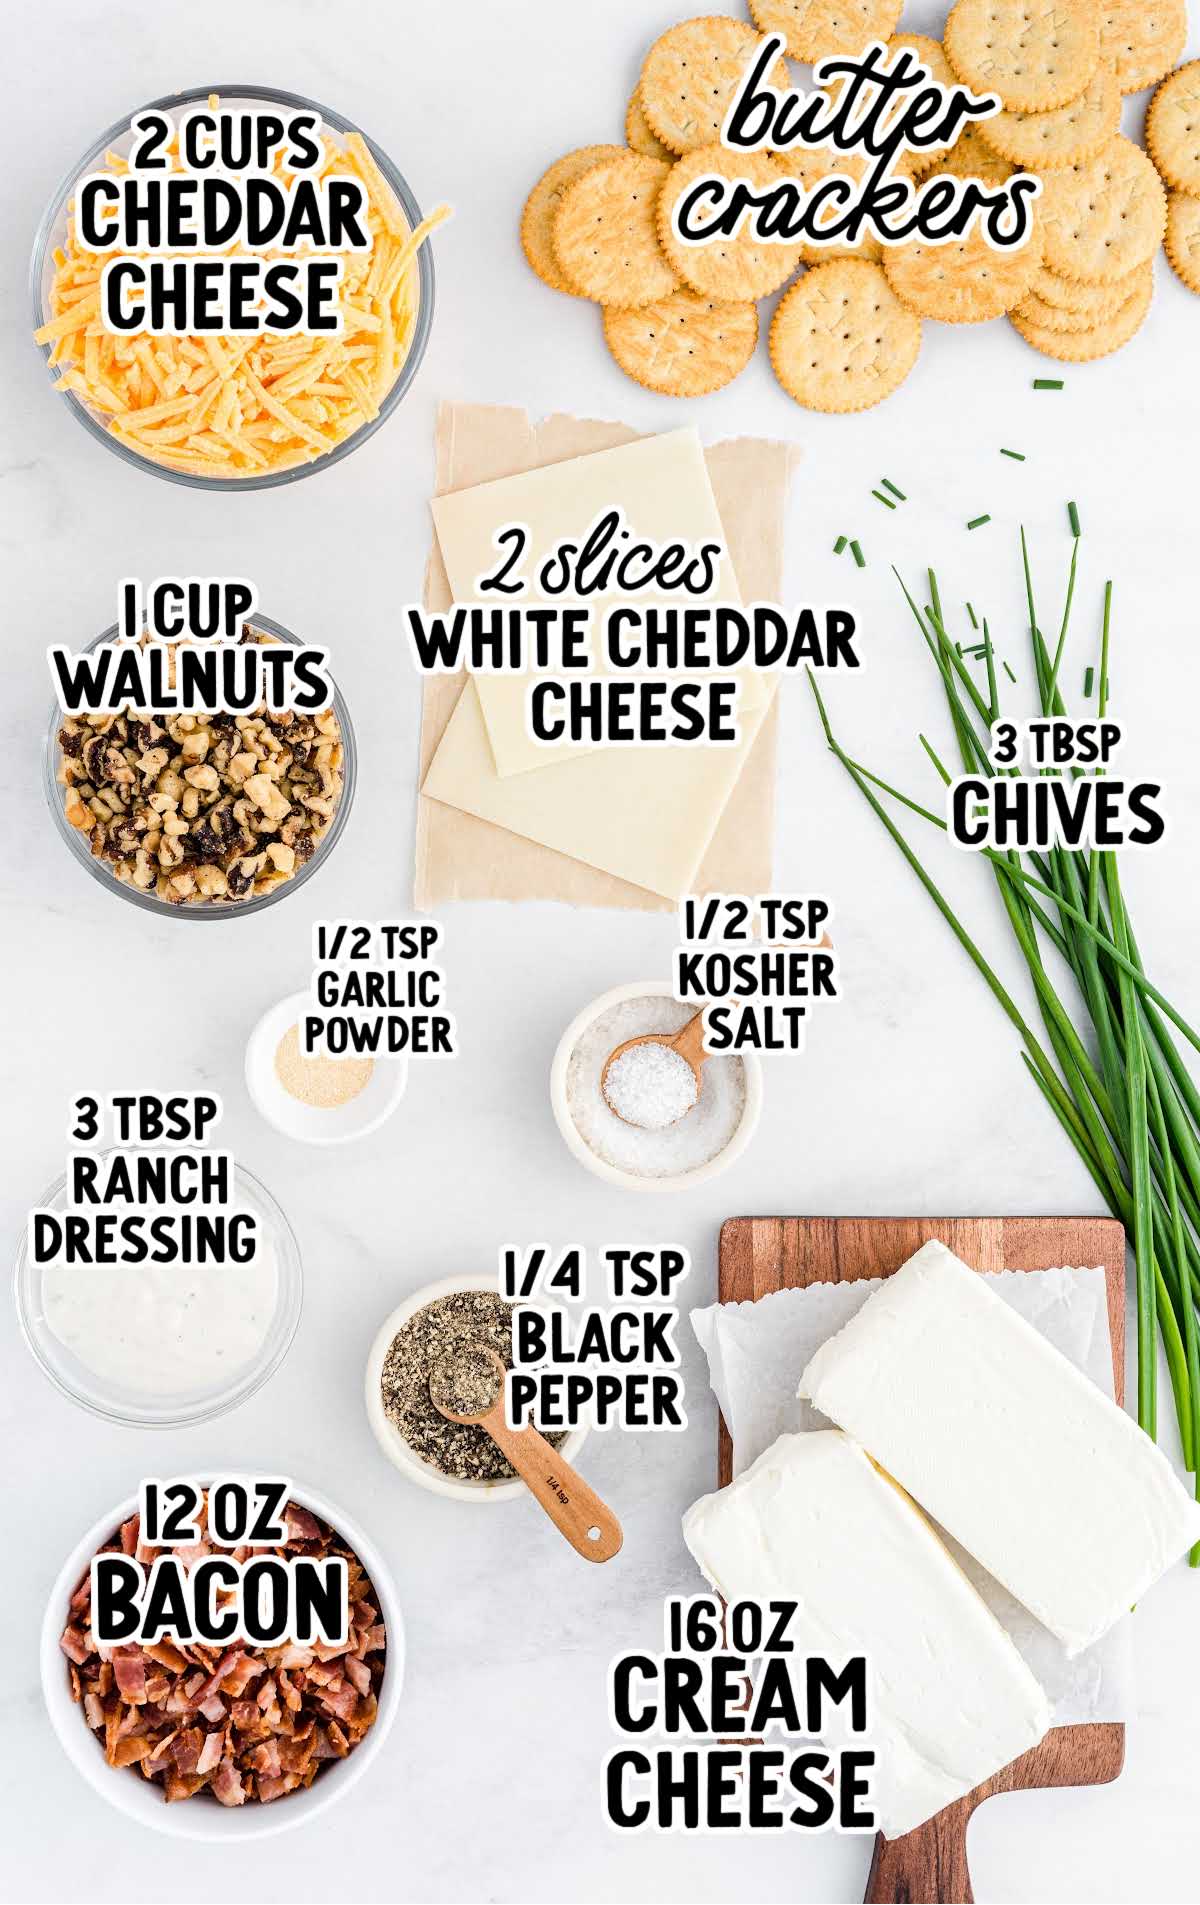
- 2 (8-ounce) packages of cream cheese, room temperature
- 3 tablespoons of bottled ranch dressing
- ½ teaspoon of garlic powder
- ½ teaspoon of kosher salt
- ¼ teaspoon of black pepper
- 3 tablespoons of chopped chives, divided into 2 tablespoons and 1 tablespoon
- 2 cups of sharp cheddar cheese, finely shredded
- 12-ounce package of center-cut bacon, cooked & crumbled, divided (this will yield about ¾ cup of bacon crumbles)
- 1 cup of walnuts, finely chopped
- 2 slices of white cheddar cheese from the deli and sliced thin
- butter crackers for serving
PRO TIP:
If you do not want to get your white cheddar cheese from the deli, you can use a block of white cheddar cheese to make the football laces. You will want to make sure to cut it thin enough so that the cheese is pliable.
You can also use a string cheese stick the same way by cutting it lengthwise into long strips then into smaller strips.
Substitutions And Additions
BACON: Do not use thick-sliced bacon for the bacon bits in this recipe. Center cut works best because it is less fatty and not too thick to mix with the cream cheese.
Another great option is the Ready-Cook bacon.
Just cook it according to package directions in the microwave, and make sure that you have three-quarters of a cup total of bacon crumbles.
This is a great option if you do not like to make a mess in the kitchen cooking your bacon on the stovetop. You can also use your oven to cook the bacon.
RANCH: For the bottle of ranch dressing, feel free to use your favorite brand. My suggestion is to use a thicker and creamier one.
Another option is to mix three tablespoons of sour cream with two tablespoons of dry ranch packet mix.
You will add that to your cream cheese instead of the bottled ranch dressing.
CHEESE: Feel free to experiment with other types of cheese like Pepper Jack cheese for a spicy kick, Gouda for a smoky flavor, or Swiss for a milder taste. Mozzarella cheese would be smooth and mild.
SPICE: Kick it up a notch by adding a dash of hot sauce to the cream cheese mixture. You could also use crushed red pepper flakes.
NUTS: If you prefer the taste of pecans more than walnuts, then they make a great alternative for this cheese ball. You could also use almonds or cashews. Each nut offers a unique flavor and crunch.
For a nut-free version, roasted pumpkin seeds or sunflower seeds can be a great alternative, providing a similar texture and toasty flavor.
GREEN ONIONS: Green onions or finely chopped shallots can be an excellent addition. They provide a mild onion flavor without overpowering the other ingredients. Chives add a subtle garlicky note, enhancing the overall taste.
WORCESTERSHIRE SAUCE: Add one to two teaspoons to introduce a new depth of flavor to your cheese ball.
How To Make This Football Cheese Ball Recipe
We’ll show you with our step-by-step instructions on how to make this cheesy appetizer.
It’s helpful to have your cream cheese at room temperature before starting to make it easier to mix.
STEP ONE: In a large skillet, on medium-low heat, cook your bacon until crisp. This can take anywhere between ten to 15 minutes.
Once cooked, drain your bacon on a paper towel-lined plate.
Once cooled, chop your bacon, then set it aside.
PRO TIP:
I like to pre-chop my raw bacon before cooking it. It cooks a little faster and yields more evenly sized bacon crumbles. You can use kitchen scissors to make this a fast process.
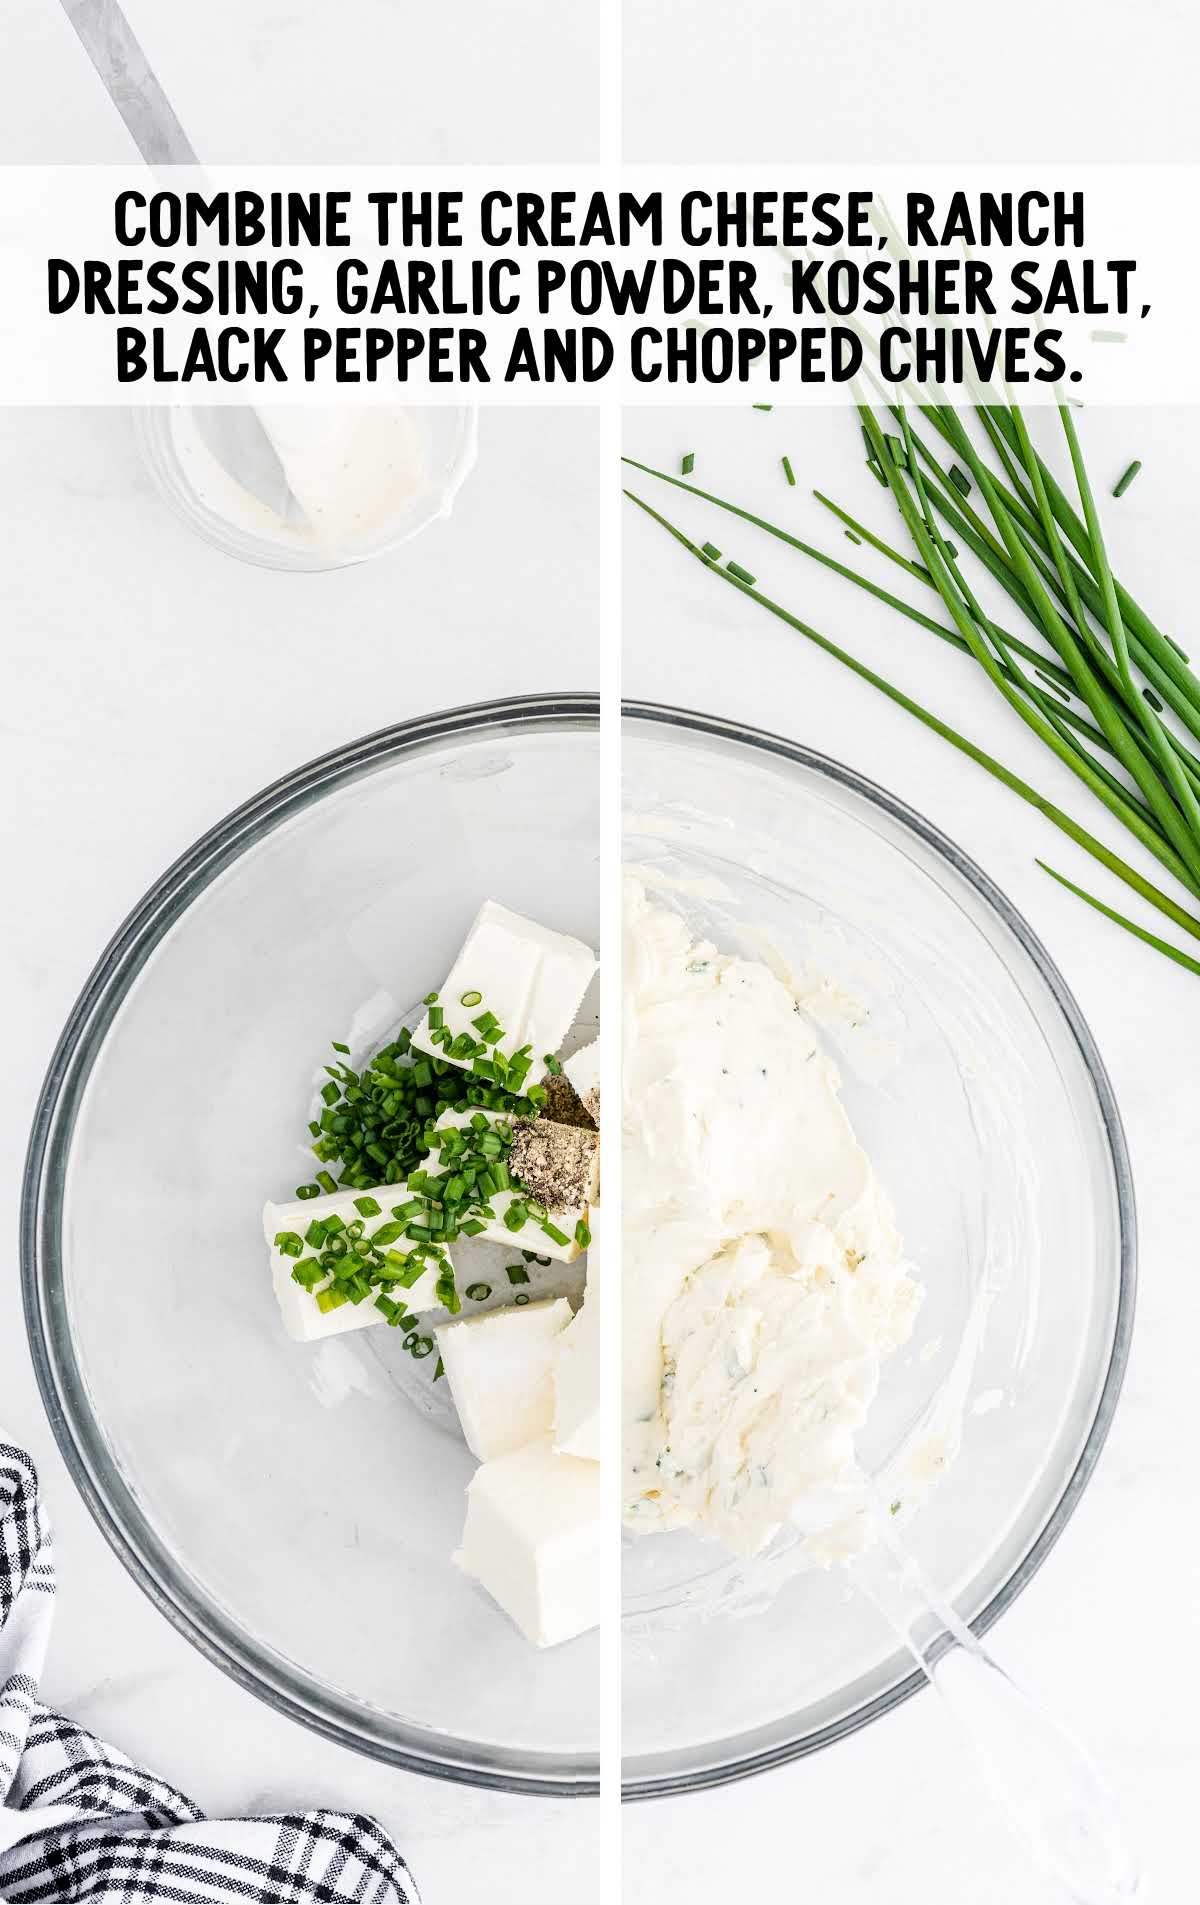
STEP TWO: In a large bowl, with a rubber spatula, combine the cream cheese, ranch dressing, garlic powder, kosher salt, black pepper, and two tablespoons of chopped chives.
Cream together until smooth and all the ingredients are evenly incorporated.
You could also use an electric handheld mixer if you’d like.
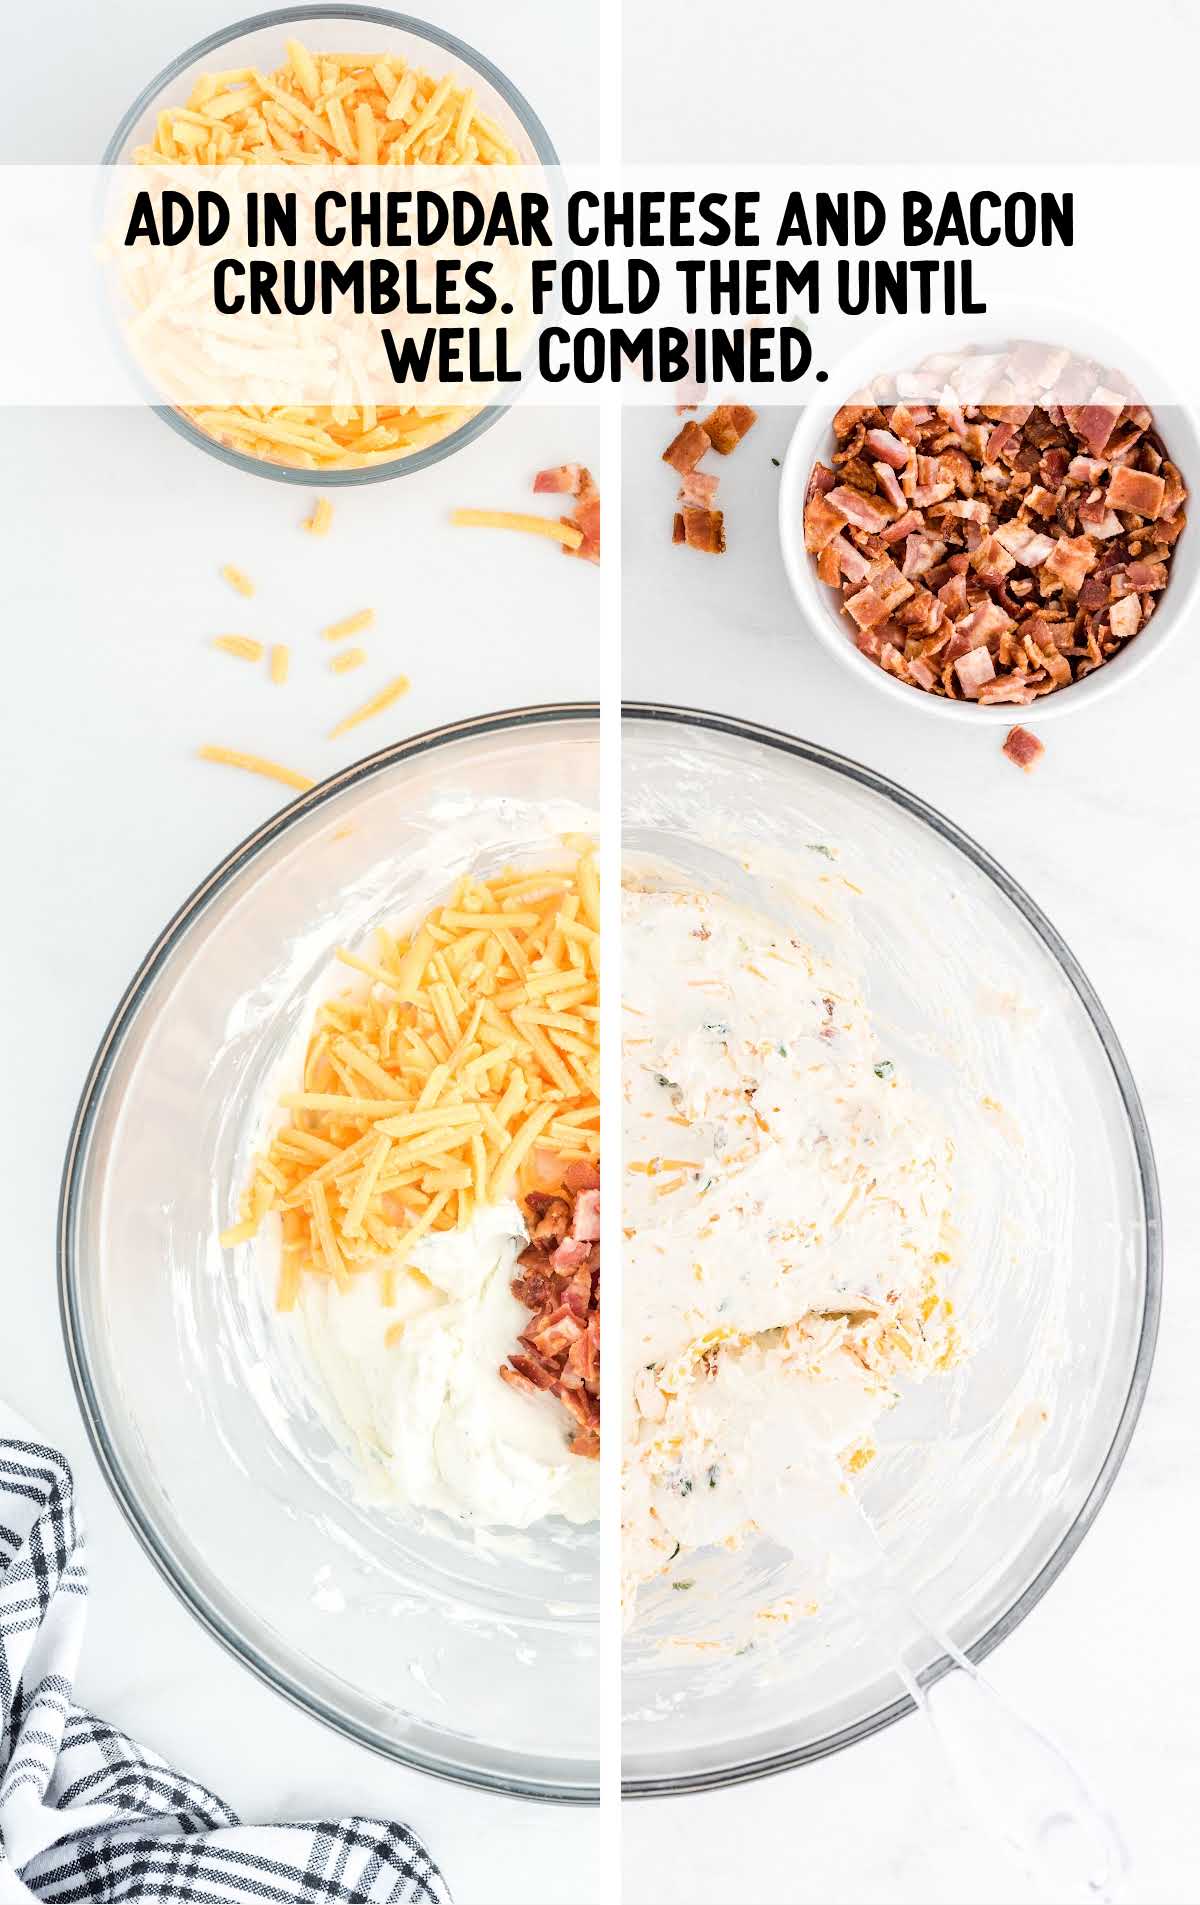
STEP THREE: Add the finely shredded cheddar cheese and a half cup of the bacon crumbles.
Gently fold them into the cream cheese mixture until all the ingredients are thoroughly combined.
PRO TIP:
I like using the bagged, pre-shredded cheese for this recipe because you can buy the very finely shredded kinds, and it tends to mix into the cream cheese better and not clump up.
However, if you prefer to shred your own cheese, I suggest you place your block of cheese into the freezer about 20 minutes prior to shredding it. It helps the cheese shred better on the fine side of your box grater.
STEP FOUR: Lay a large piece of plastic wrap on your counter or cutting board.
You will transfer all your bacon cheddar ranch mixture to the center of the plastic wrap in a rough ball.

STEP FIVE: Pull up the two long sides of the plastic wrap to cover the cheese mixture and gently shape the mixture into the shape of a football.
It is much easier to do this while the plastic wrap is covering the cheese mixture.
As you shape the cheese football, you will just tuck in the short sides of the plastic wrap to ensure that the cheese mixture is covered completely.
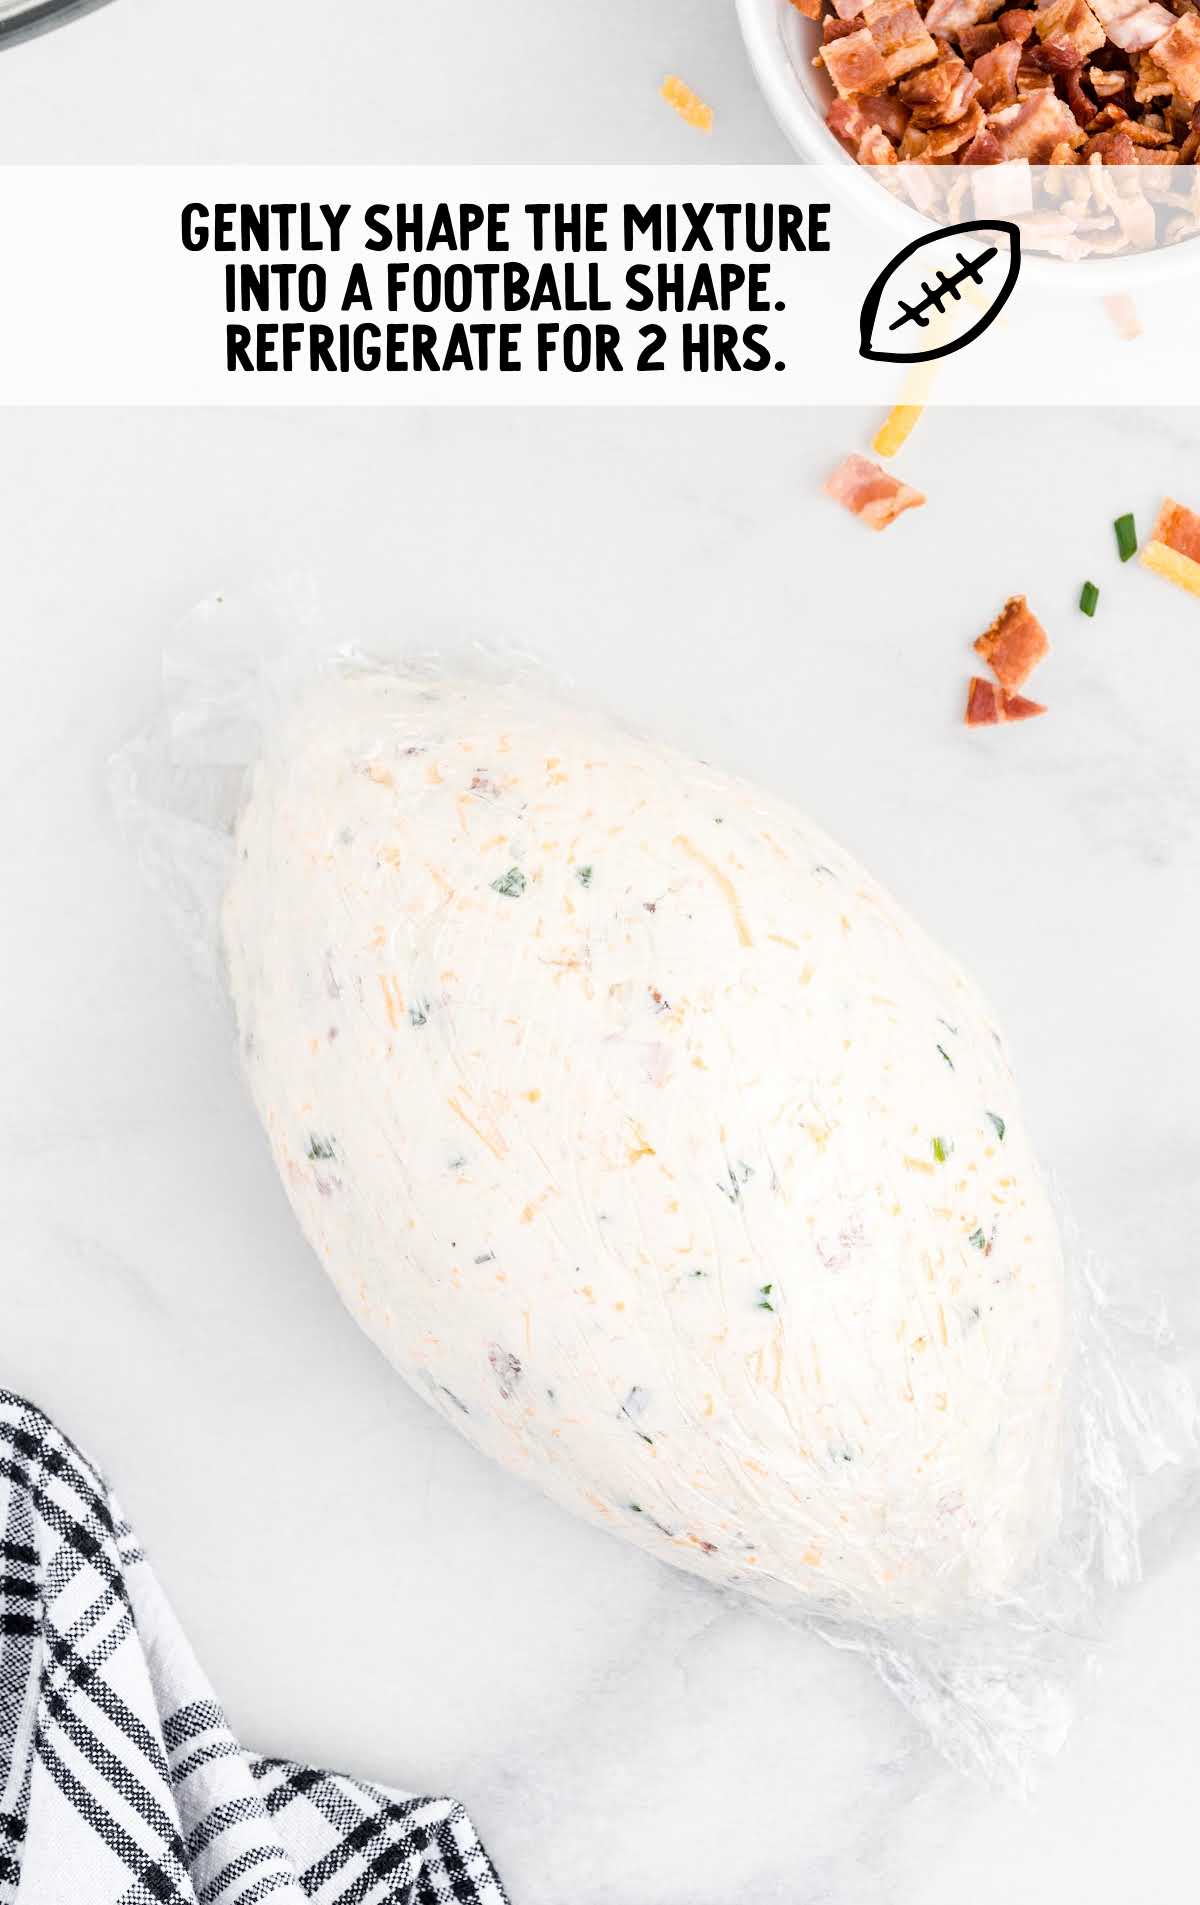
STEP SIX: Transfer the football-shaped bacon cheddar ranch cheese ball, while still wrapped in the plastic wrap, onto a plate.
Refrigerate for two hours to allow the cream cheese ball to hold its shape as a football.
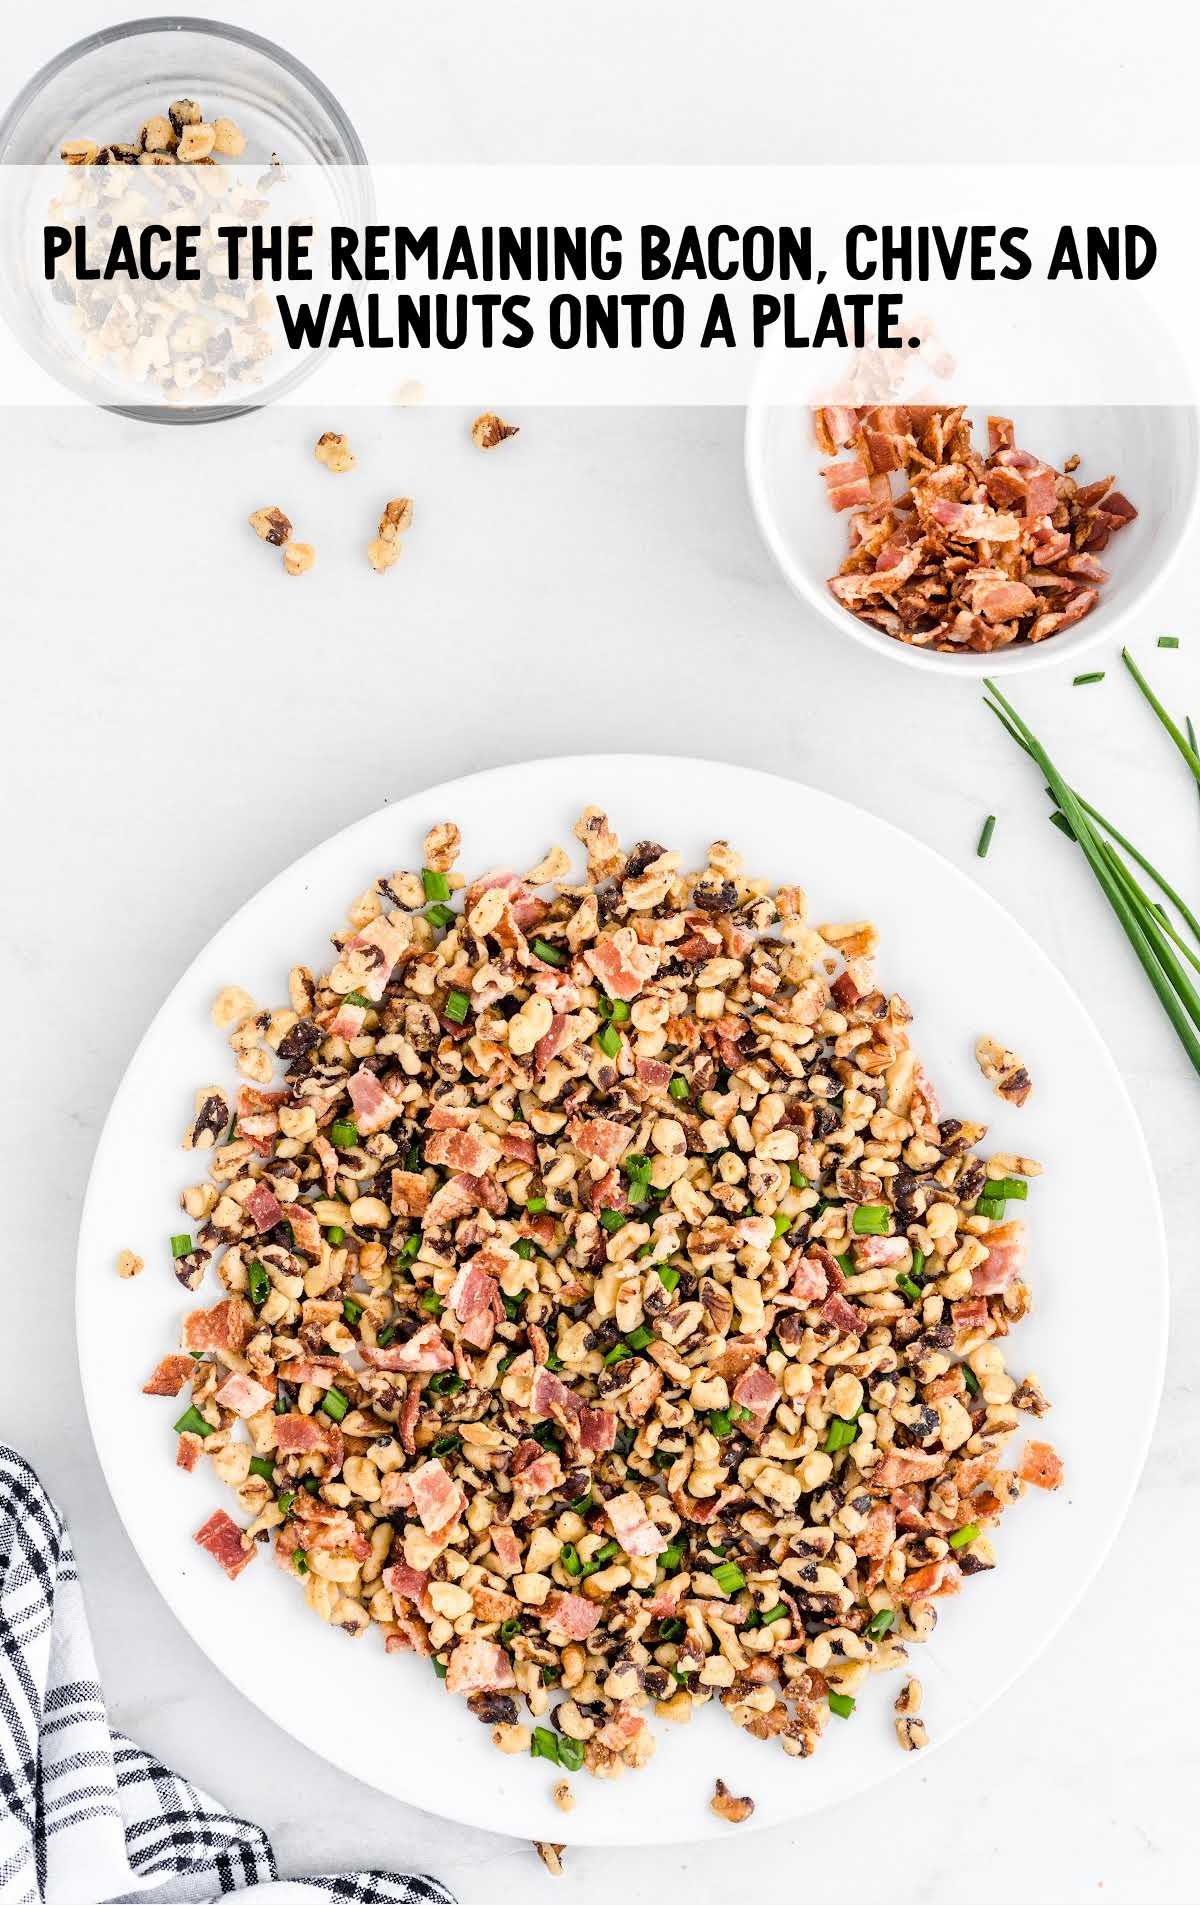
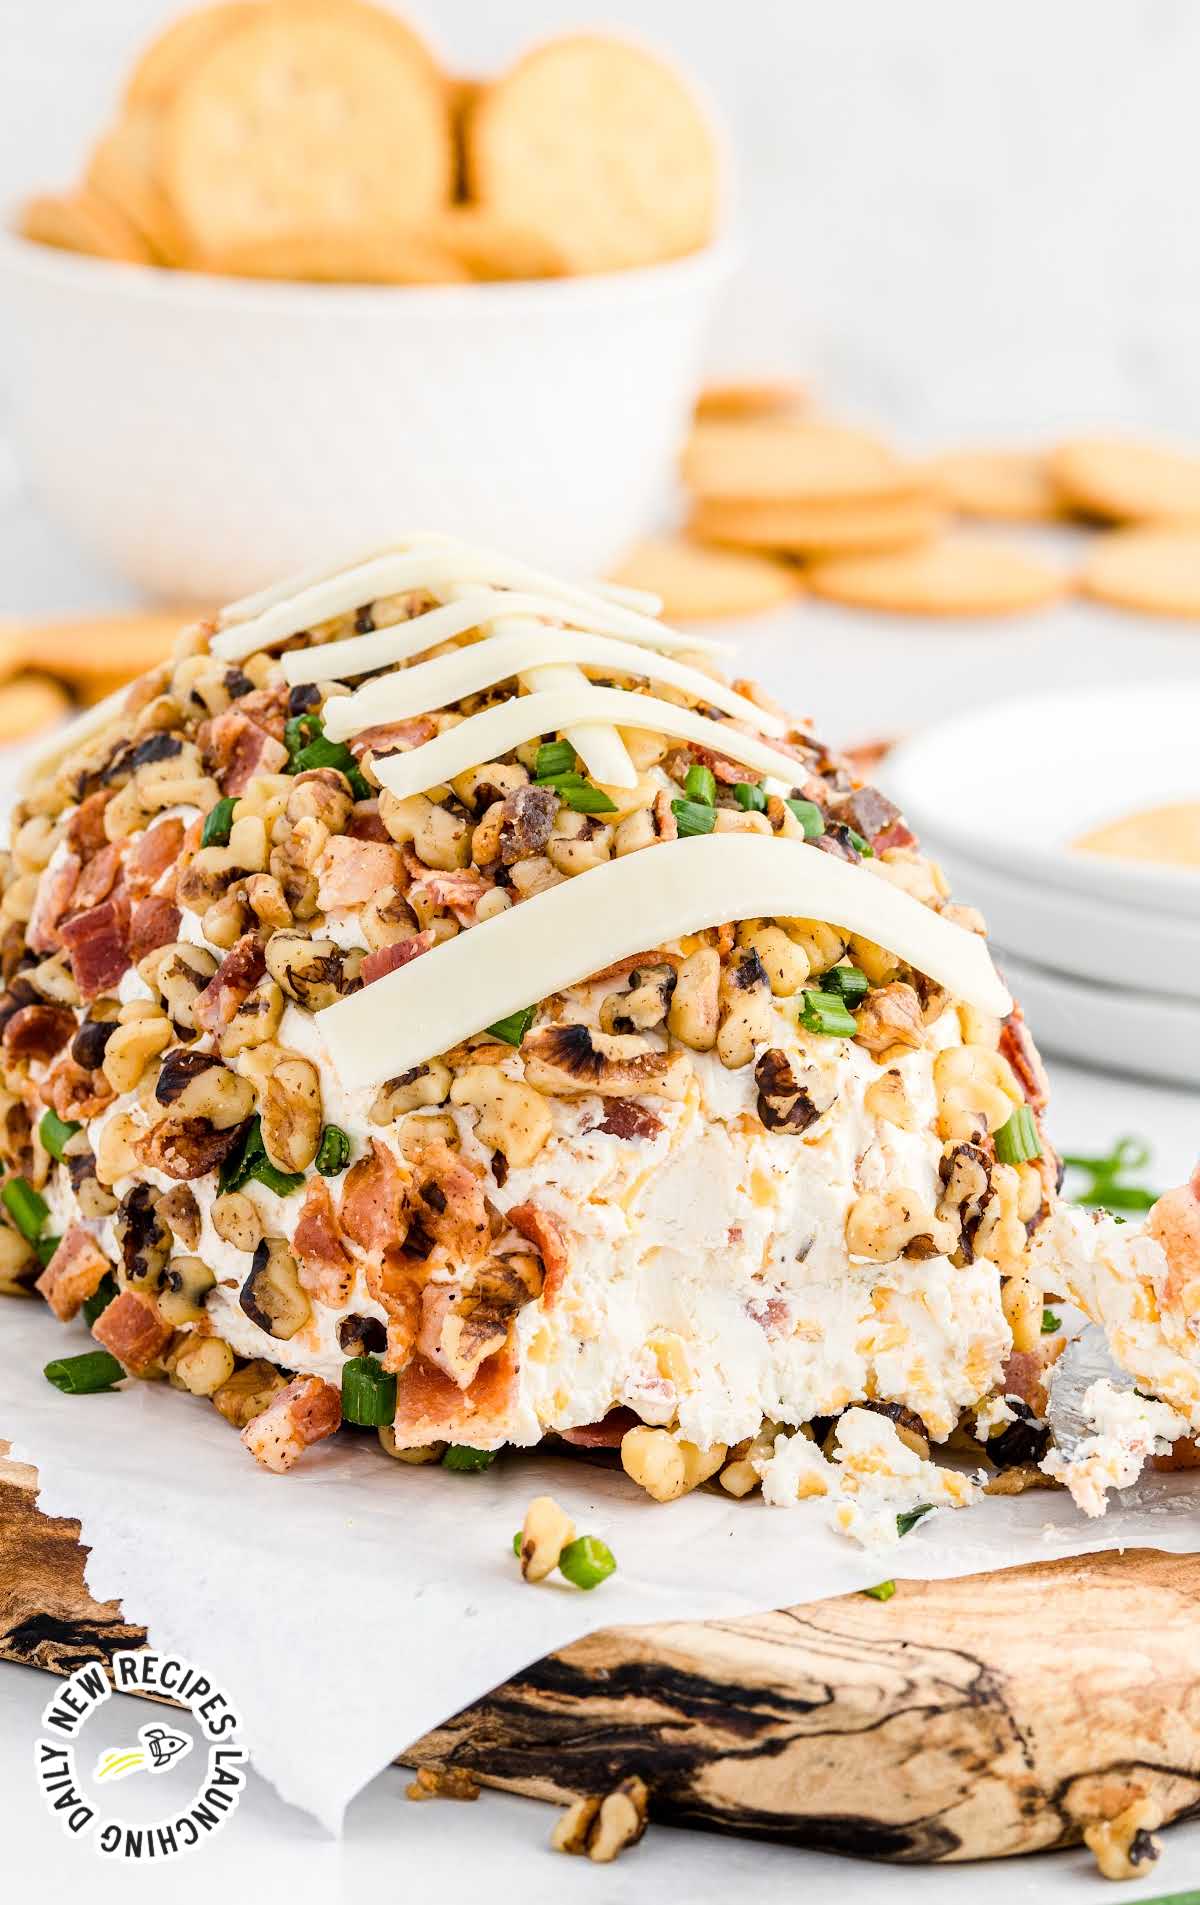
STEP SEVEN: Once your bacon cheddar ranch cheese football has been refrigerated, you can place the remaining bacon, chives, and chopped walnuts onto a large plate.
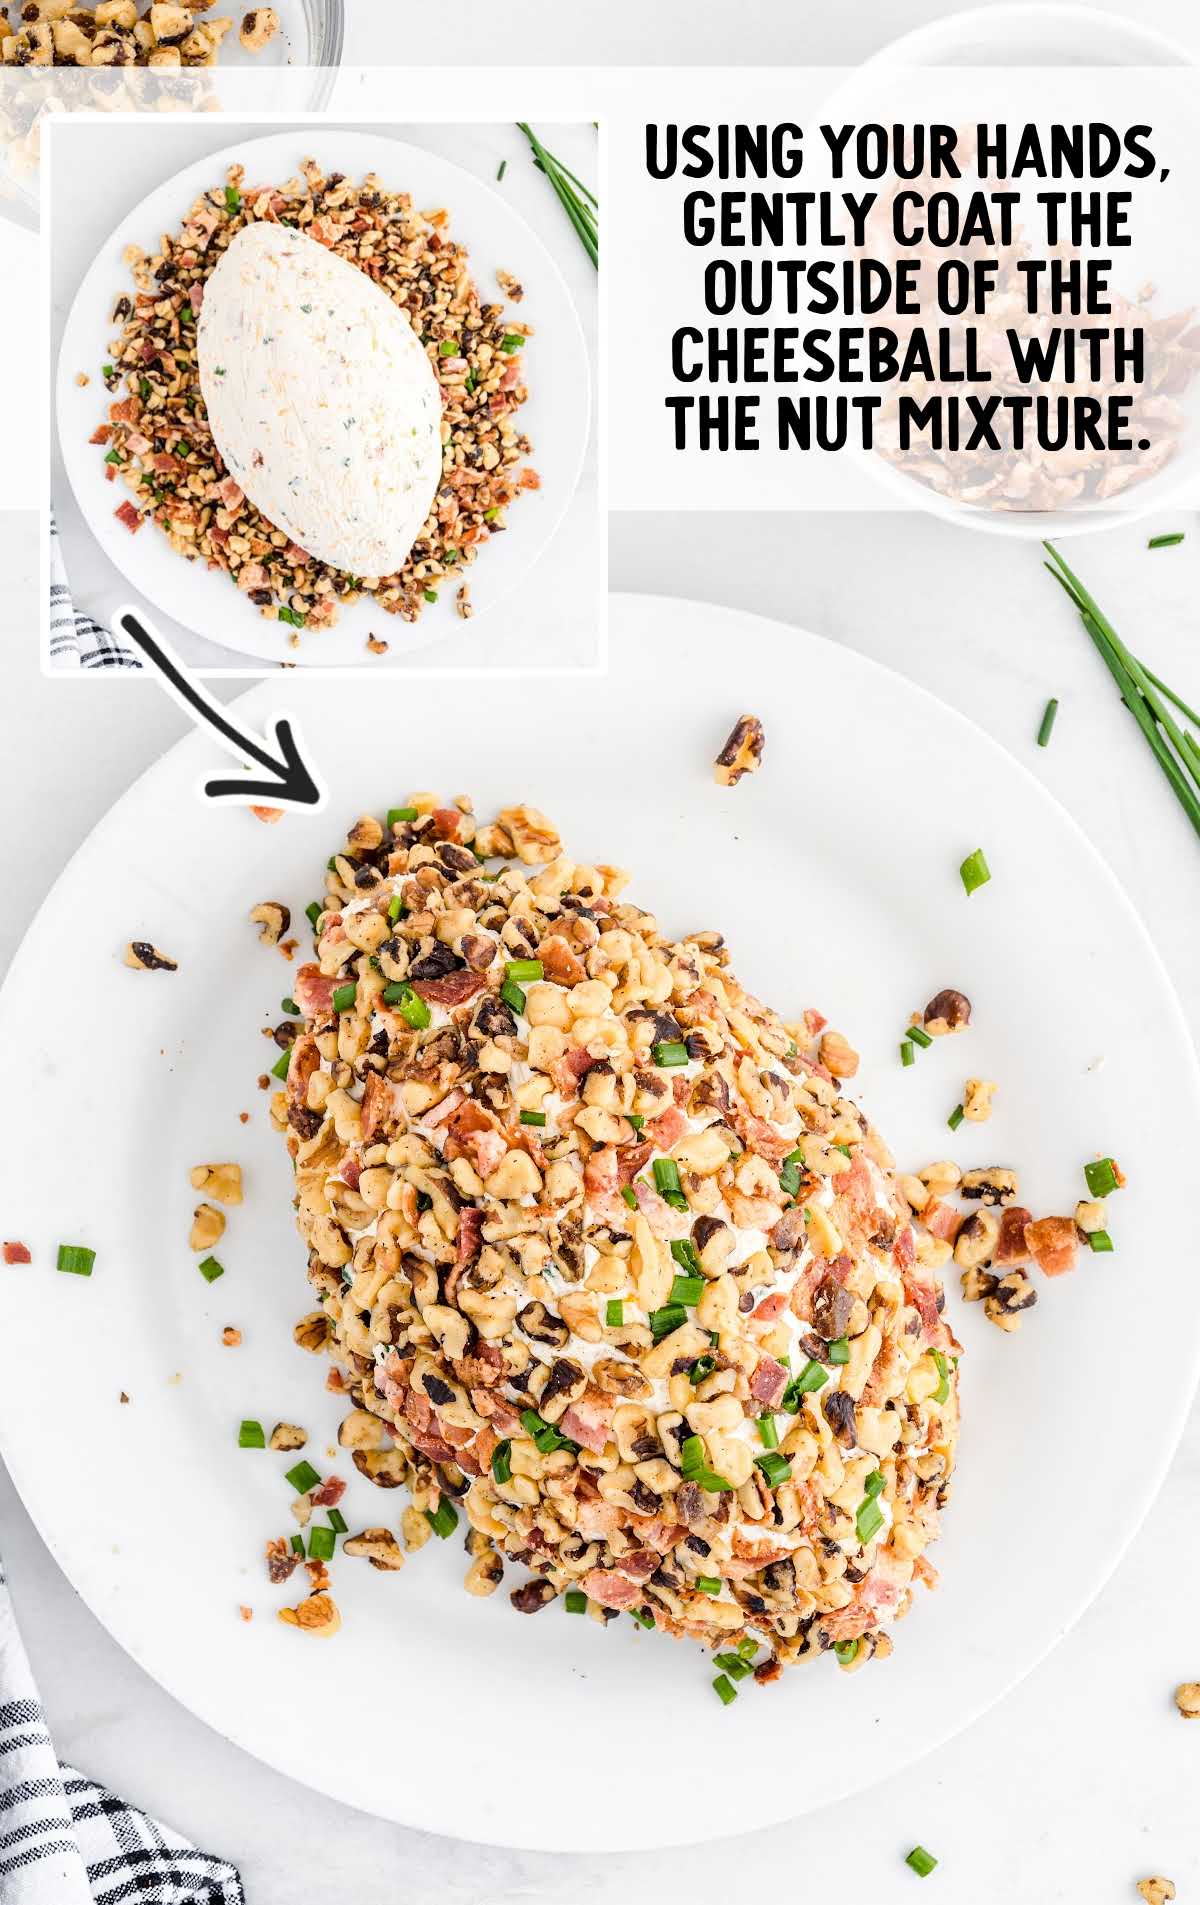
STEP EIGHT: Unwrap your football cheeseball and very carefully place it onto the plate of chopped walnut mixture.
Using your hands, gently coat the outside of the cheeseball with the nut mixture, being careful to keep the football shape.
Once your cheese football is completely covered, then transfer it to your serving plate.
PRO TIP:
If you prefer, you can lightly toast your walnuts before chopping them. This adds a great elevated flavor but is not necessary.
STEP NINE: You will garnish your football with “cheese” laces.
To do this, you will slice two thin strips, about ¾-inch thick, from the long edge of one of the pieces of the deli-sliced white cheddar cheese.
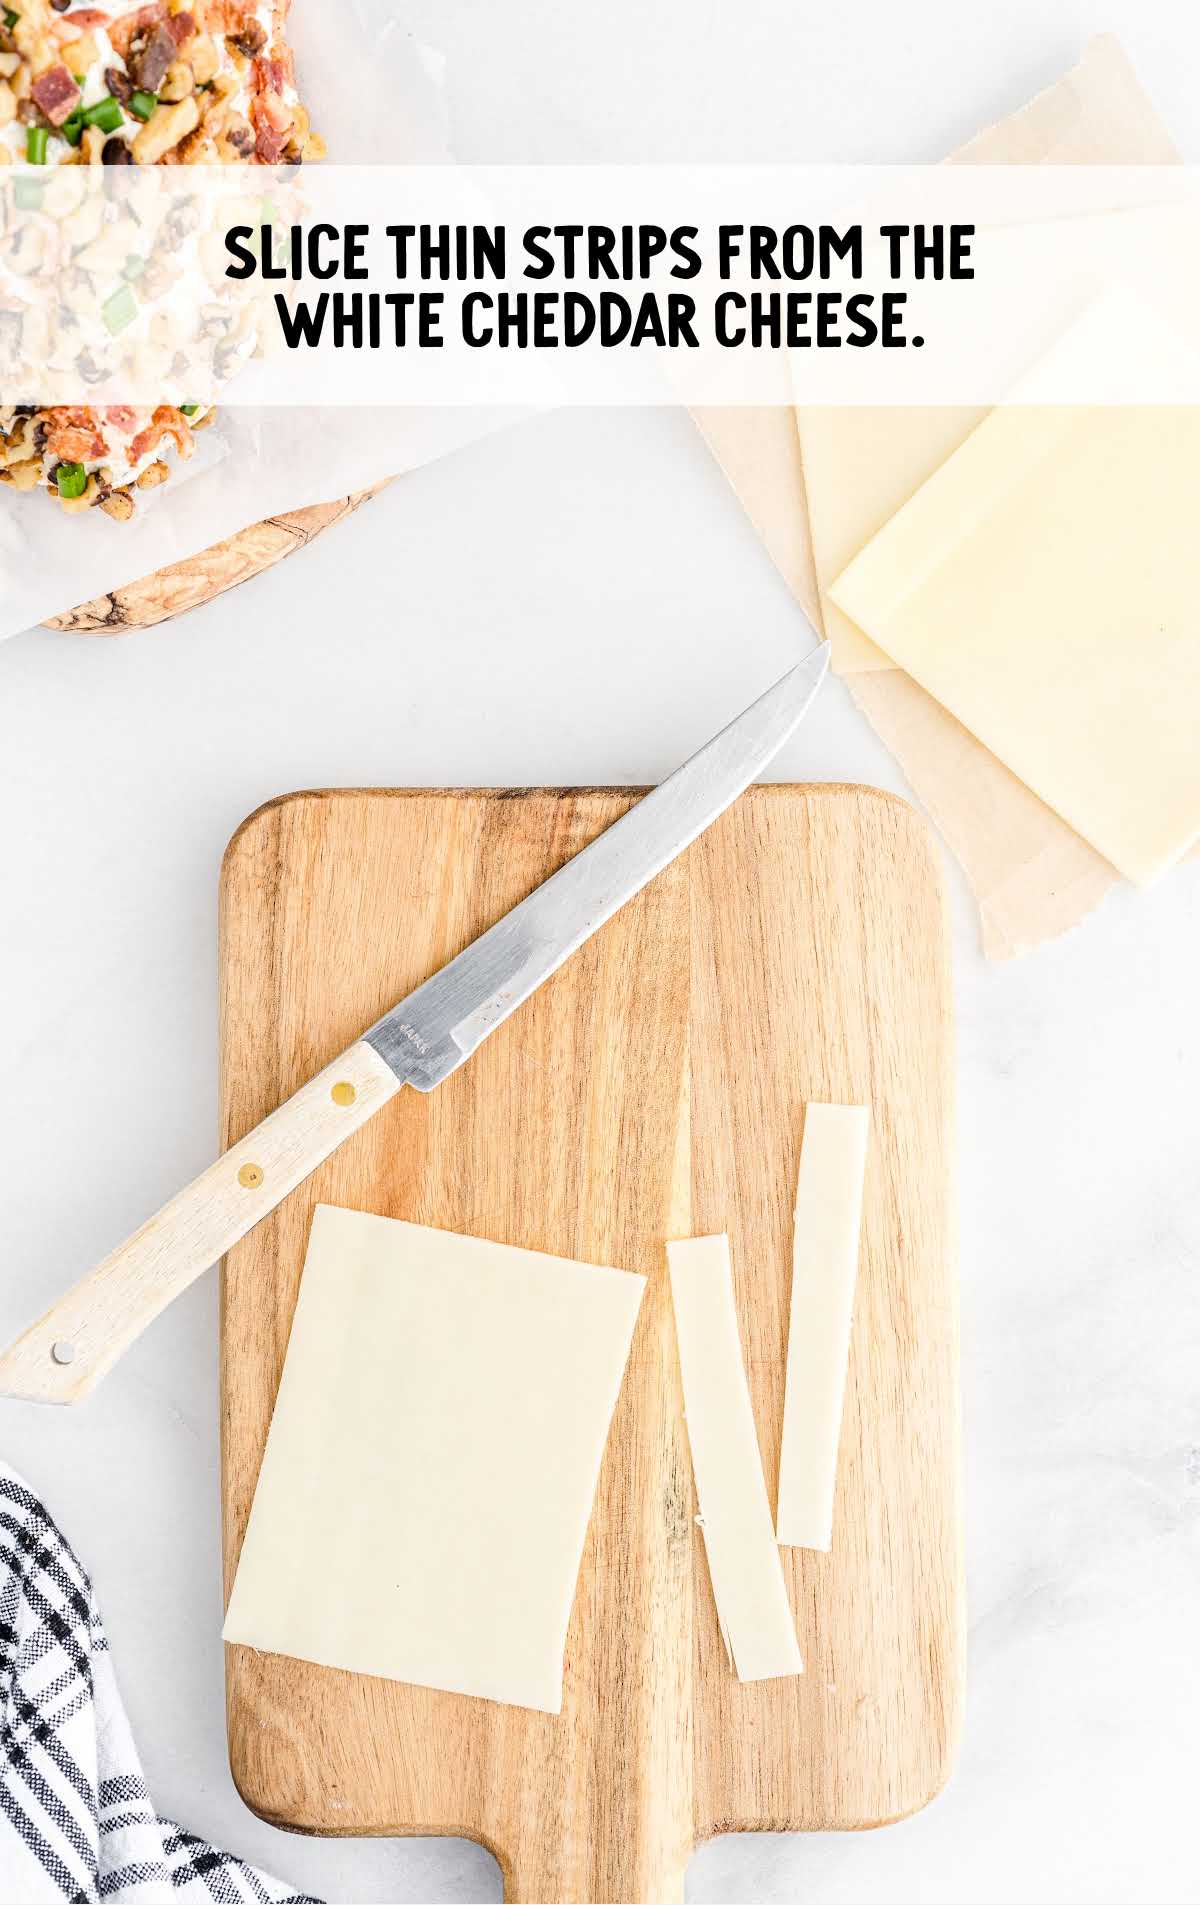
STEP TEN: You will then slice, lengthwise, another two thin pieces, this time about an ⅛ to ¼ inch thick, of the deli white cheddar cheese.
You will cut one of these very thin slices into four equal parts.
STEP ELEVEN: Using the two thick strips of white cheddar cheese, lay one strip on one end, making sure that it drapes from one side to the other on top of the football.
Repeat with the other piece on the opposite side of the football.
You want to place these pieces about two to three inches up from each point on the football shape.
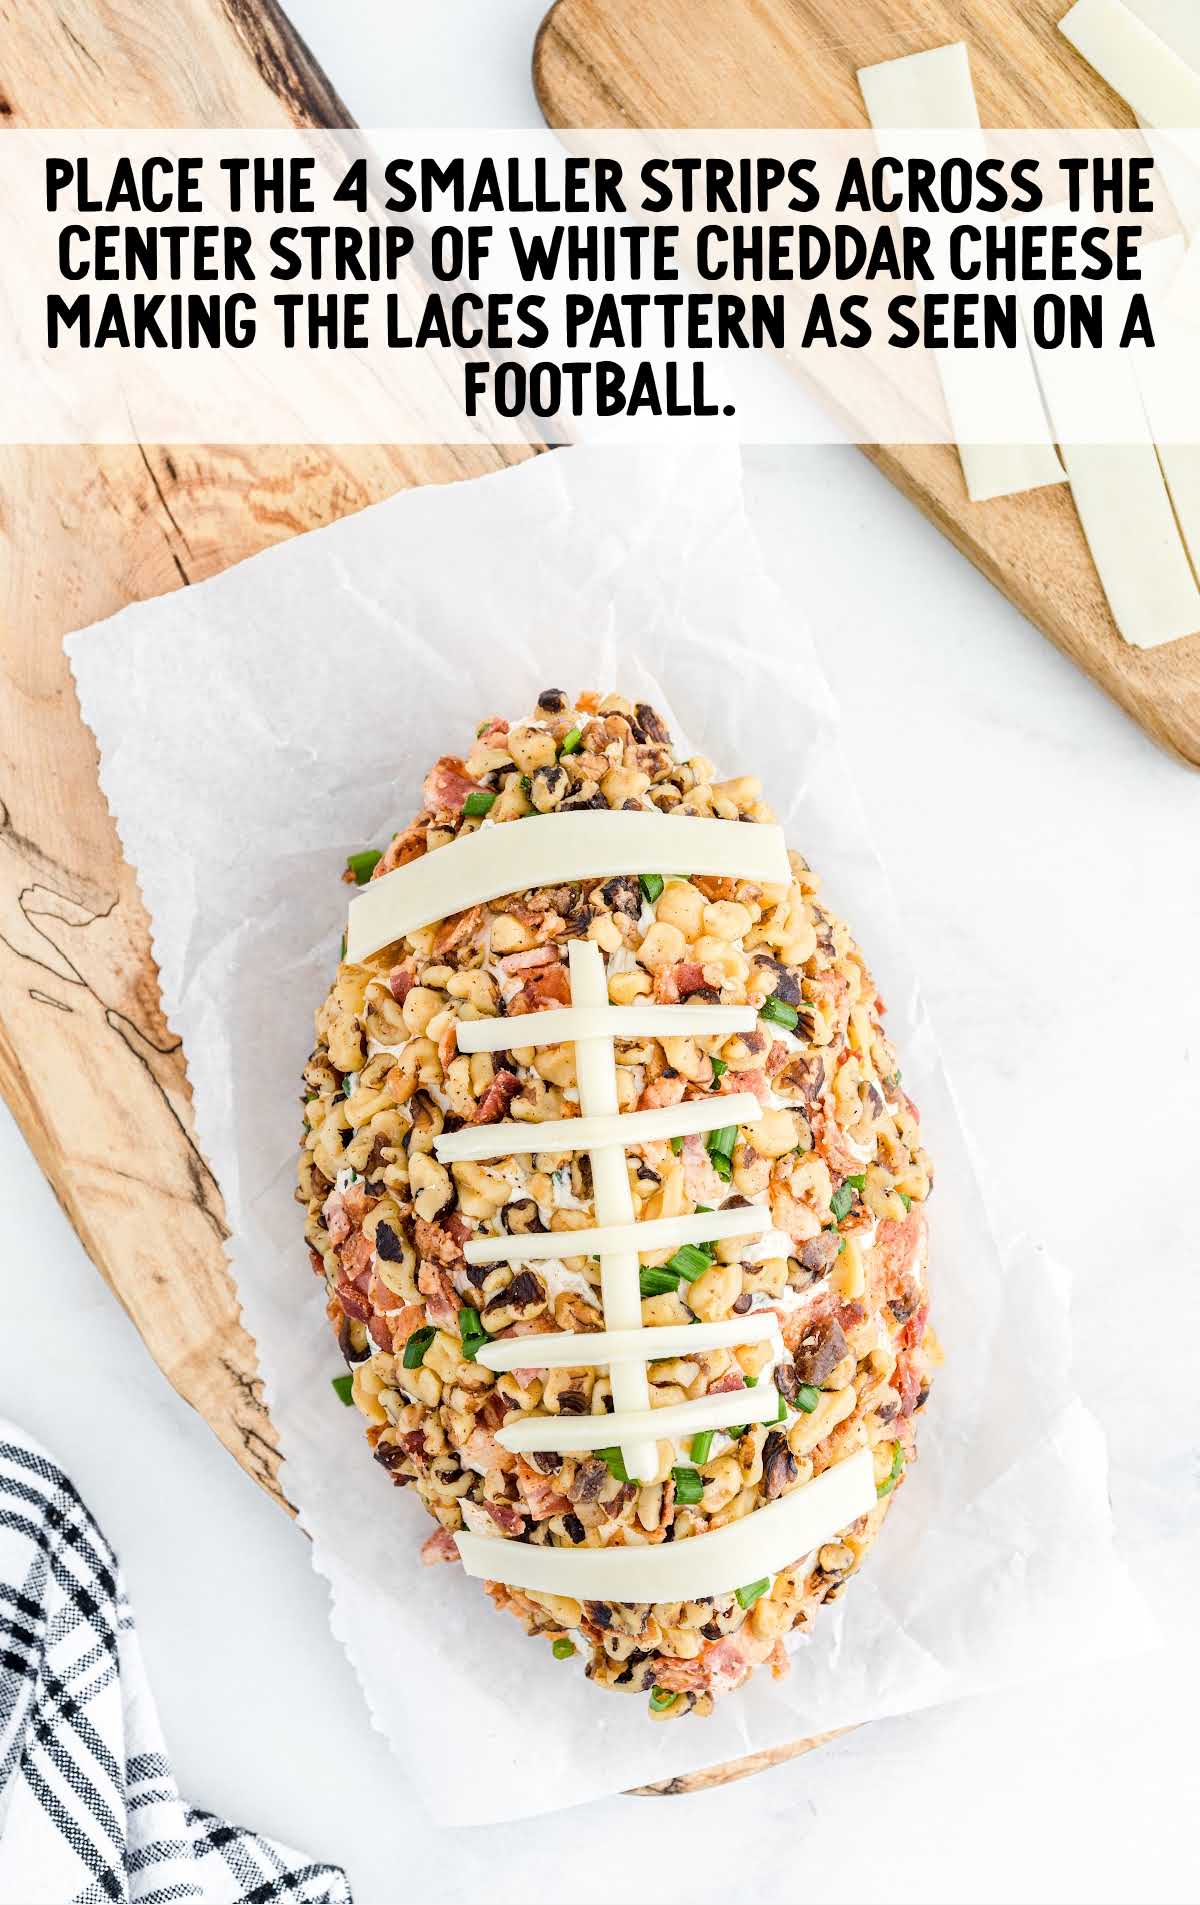
STEP TWELVE: With the very thin pieces, you will place the long strip going lengthwise down the center of the middle of the football shape.
You may need to trim your piece slightly so that it does not go all the way end to end and touch the thicker strips.
Place the four smaller strips across the center strip of white cheddar cheese, making the laces pattern as seen on a football.
How to Serve a Football Cheese Ball
Guests at your Super Bowl party will love this sports-themed dish. It’s not only fun to look at, but it is also delicious.
Serve your cheesy football with a variety of dippers around the edge of the serving platter.
Add Ritz crackers, pretzel chips, carrot sticks, celery sticks, or any other items you like.
Cheese balls are a classic choice to serve to guests, and they always seem to disappear in a flash.
Check out our mini cheeseball bites and cheeseball recipe to add to your menu.
To satisfy your sweet tooth at your next day game day celebration, serve graham crackers along with booty dip or cherry cheesecake dip.
When to Serve a Football Cheese Ball
Game Day Parties: It’s a perfect fit for football game watch parties, adding a fun and thematic touch to your snack spread.
Tailgating Events: Easy to transport and serve, it’s great for tailgating before a football game.
Sports-Themed Gatherings: Beyond football, any sports-themed event or party can be enhanced with this playful snack. It would be perfect at a kid’s football themed birthday party.
Casual Get-Togethers: Serve it at casual gatherings like family reunions, friend meetups, or barbecues.
Holiday Parties: During sports seasons, it can be a unique addition to holiday parties like Thanksgiving or Super Bowl Sunday.
Potlucks and Picnics: Its ease of preparation and serving makes it ideal for potlucks and picnics.
Remember, the cheese ball is best served at room temperature, making it more spreadable and flavorful.
MORE SUPER BOWL FOOD RECIPES
Storage Tips for This Cheese Ball
Let’s go through some winning tips to ensure your cheese ball stays in top-notch condition.
MAKE AHEAD: Simply prepare the cheese ball without the final coating of nuts and bacon.
Wrap it tightly in cling film, and it can chill out in your fridge for a couple of days.
When game time approaches, just roll it in the bacon, chives, and nuts to give it that fresh, crunchy exterior before serving it to your fans.
IN THE FRIDGE: This football cheese ball with bacon can be made up to 24 hours ahead of time.
It can be stored, tightly wrapped in plastic wrap, for up to three days in total.
IN THE FREEZER: We do not recommend freezing this cheese ball as the cream cheese would become watery when thawed.
Why This is the Best Football Cheese Ball
GAME DAY THEMED: Shaped like a football, this cheese ball is not only delicious but also a festive centerpiece for any game day spread.
FLAVORFUL COMBINATION: With rich cream cheese, tangy ranch dressing, sharp cheddar, and smoky bacon, each bite is a perfect blend of flavors.
TEXTURE: The creamy interior contrasted with the crunchy exterior of bacon bits and walnuts offers a satisfying texture experience.
Football season just got even better with the perfect appetizer. Favorite foods like smooth cream cheese, tangy cheddar, and salty bacon combine to make this tasty football cheese ball that helps you celebrate all the wins and excitement of the game.
Creamy, cheesy, and loaded with bacon, this one belongs right in the middle of the snack table—find more Super Bowl recipes for game day.
Frequently Asked Questions
This is the perfect appetizer to make the day before. Wrap it in plastic wrap and store it in the fridge for up to 24 hours before serving.
The cheese ball ingredients are entirely customizable. If you would like to add other ingredients such as other spices, herbs, or cheese, you should give it a try.
Any cheese blend or type of shredded cheese can be used in this football cream cheese ball recipe.
More New Recipes You’ll Love


Football Cheese Ball
Ingredients
- 16 ounces cream cheese, room temperature (two 8-ounce packages)
- 3 tablespoons bottled ranch dressing
- ½ teaspoon garlic powder
- ½ teaspoon kosher salt
- ¼ teaspoon black pepper
- 3 tablespoons chopped chives divided
- 2 cups sharp cheddar cheese finely shredded
- 12 ounces center-cut bacon, cooked & crumbled, divided (this will yield about ¾ cup bacon crumbles)
- 1 cup walnuts finely chopped
- 2 slices white cheddar cheese, from the deli and sliced thin
- butter crackers like Ritz brand, to serve with
Instructions
- In a large skillet, on medium-low heat, cook your bacon until crisp (this can take anywhere between 10 to 15 minutes). Once cooked, drain your bacon on a paper towel-lined plate. Once cooled, chop your bacon, then set it aside.
- In a large bowl, with a rubber spatula, combine the cream cheese, ranch dressing, garlic powder, kosher salt, black pepper, and 2 tablespoons chopped chives. Cream together until smooth and all the ingredients are evenly incorporated.
- Add the finely shredded cheddar cheese and ½ cup of the bacon crumbles. Gently fold them into the cream cheese mixture until all the ingredients are thoroughly combined.
- Lay a large piece of plastic wrap on your counter surface. You will transfer all your bacon cheddar ranch mixture to the center of the plastic wrap in a rough ball.
- Pull up the two long sides of the plastic wrap to cover the cheese mixture and gently shape the mixture into a football shape. It is much easier to do this while the plastic wrap is covering the cheese mixture. As you shape the cheese football, you will just tuck in the short sides of the plastic wrap to ensure that the cheese mixture is covered completely.
- Transfer the football-shaped bacon cheddar ranch cheese ball, while still wrapped in the plastic wrap, onto a plate and refrigerate for 2 hours to allow the cheese ball to hold its shape as a football.
- Once your bacon cheddar ranch cheese football has been refrigerated, you can place the remaining bacon, chives, and chopped walnuts onto a large plate, or a large pie plate works well also.
- Unwrap your football cheeseball and very carefully place it onto the plate of chopped walnut mixture. Using your hands, gently coat the outside of the cheeseball with the nut mixture, being careful to keep the football shape. Once your bacon cheddar cheese football is completely covered, then transfer it to your serving plate.
- You will garnish your football with “cheese” laces. To do this, you will slice two thin strips, about ¾ inch thick, from the long edge of one of the pieces of the deli sliced white cheddar cheese.
- You will then slice, length-wise, another two thin pieces, this time about an ⅛ to ¼ inch thick, of the deli white cheddar cheese. You will cut one of these very thin slices into four equal parts.
- Using the two thick strips of the white cheddar cheese, lay one strip on one end, making sure that it drapes all the way from one side to the other, and repeat with the other piece on the opposite side of the football. You will want to place these pieces about 2 to 3 inches up from each point on the football shape.
- With the very thin pieces, you will place the long one going lengthwise down the center of the middle of the football shape. You may need to trim your piece slightly so that it does not go all the way end to end and touch the thicker strips. Place the four smaller strips across the center strip of white cheddar cheese, making the laces pattern as seen on a football.
Notes
- If you do not want to get your white cheddar cheese from the deli, you can use a block of white cheddar cheese to make the football laces. You will want to make sure to cut it thin enough so that the cheese is pliable. You can also use a string cheese stick the same way by cutting it lengthwise into long strips then into smaller strips.
- I like to pre-chop my raw bacon before cooking it. It cooks a little faster and yields more evenly sized bacon crumbles.
- I like using the bagged, pre-shredded cheese for this recipe because you can buy the very finely shredded kinds, and they tend to mix into the cream cheese better and not clump up. However, if you prefer to shred your own cheese, I suggest you place your block of cheese into the freezer about 20 minutes prior to shredding it. It helps the cheese shred better on the fine side of your box grater.
- If you prefer, you can lightly toast your walnuts before chopping them. This adds a great elevated flavor but is not necessary.
Nutrition


Comments
Stacy says
Very tasty and fun for a party!