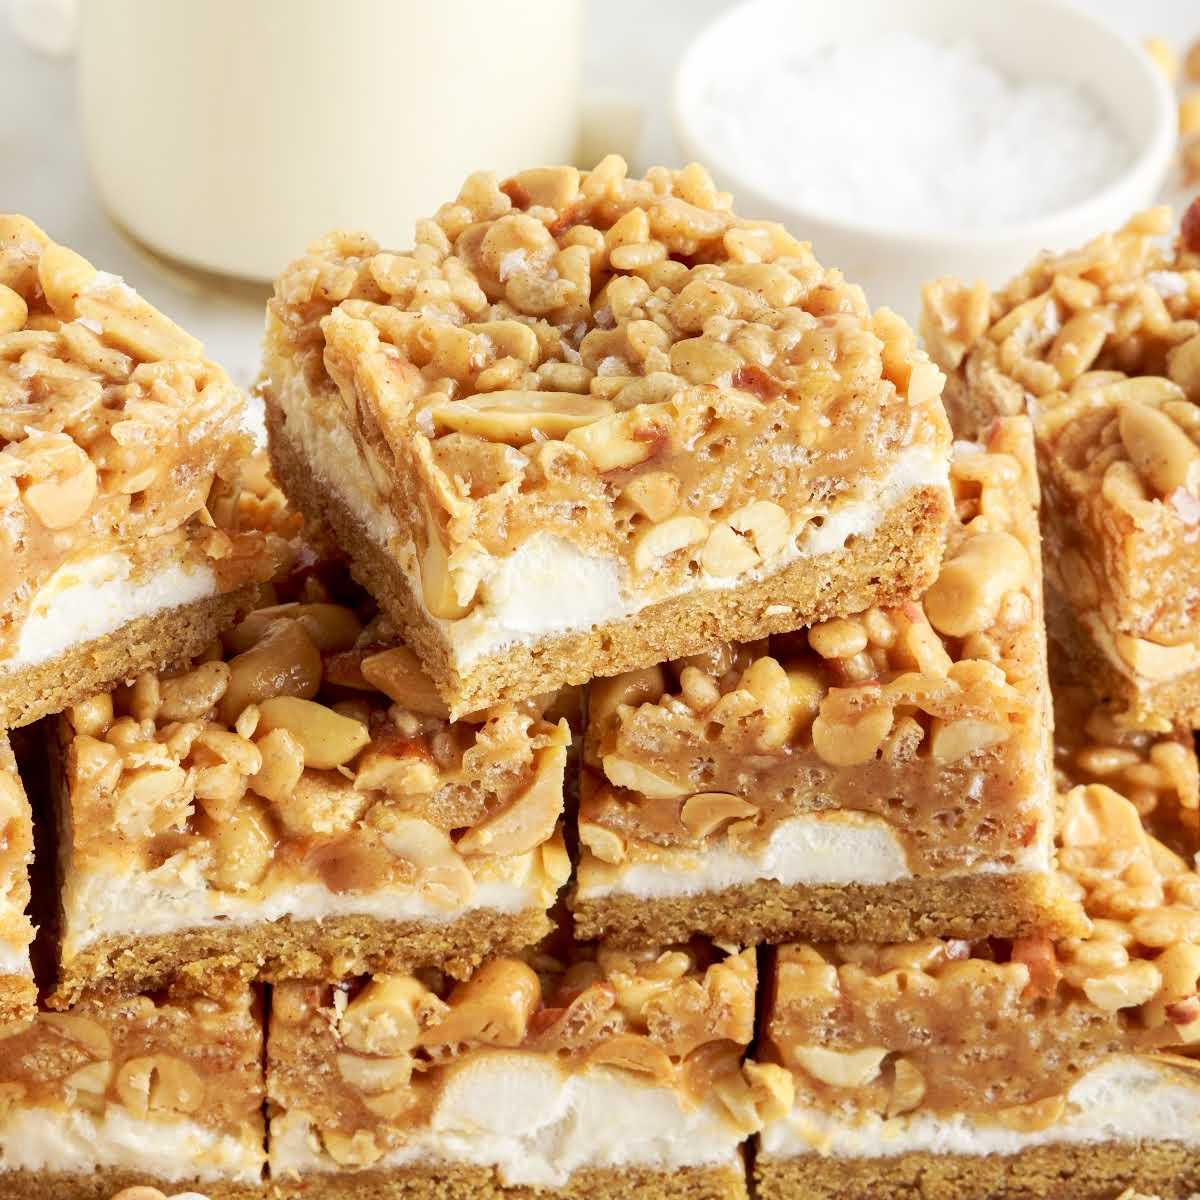

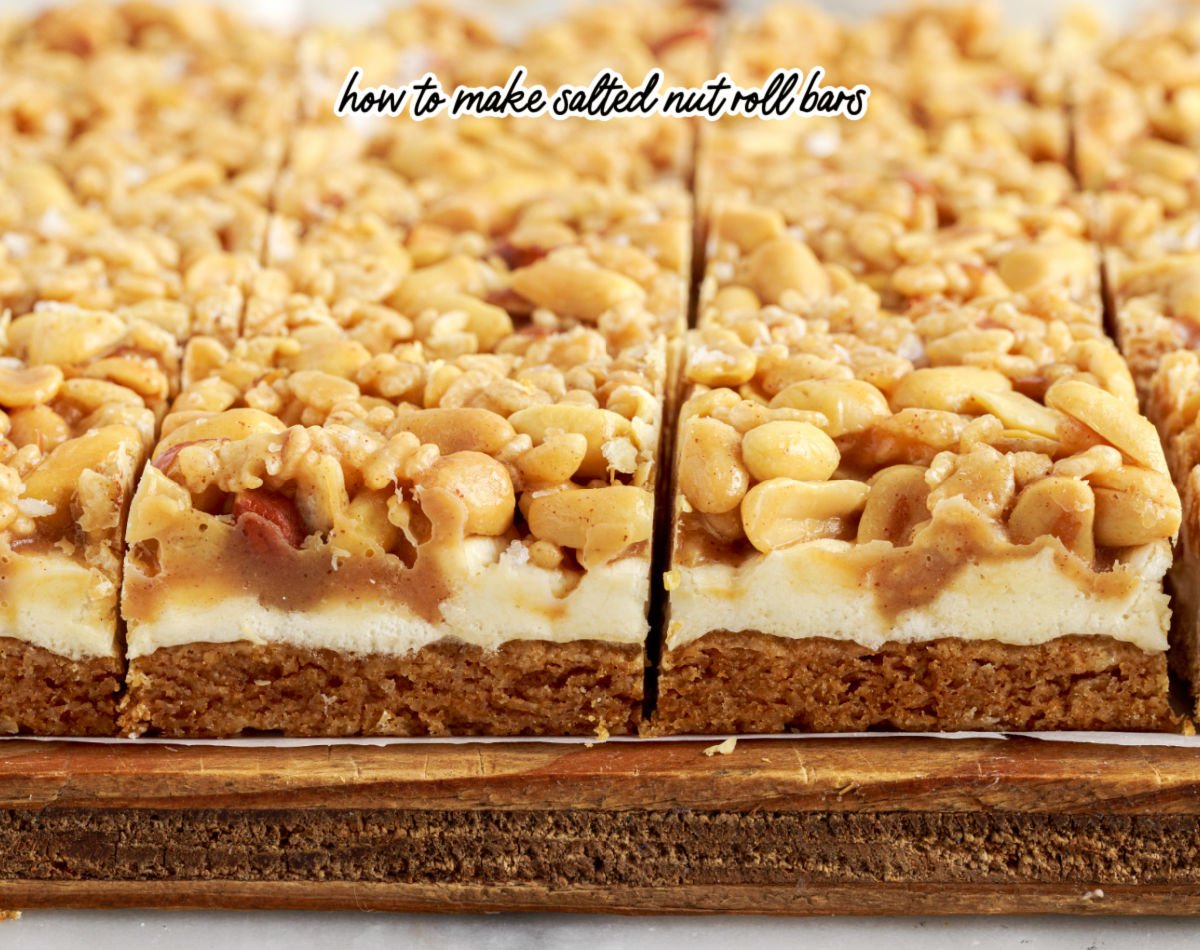
If you grew up loving Salted Nut Rolls, this baked version is going to ruin you (in the best possible way). These dessert bars hit every note: a soft cookie base, a marshmallow layer that turns golden and puffy, and a warm peanut-butter–caramel coating that settles into a salty-sweet top.
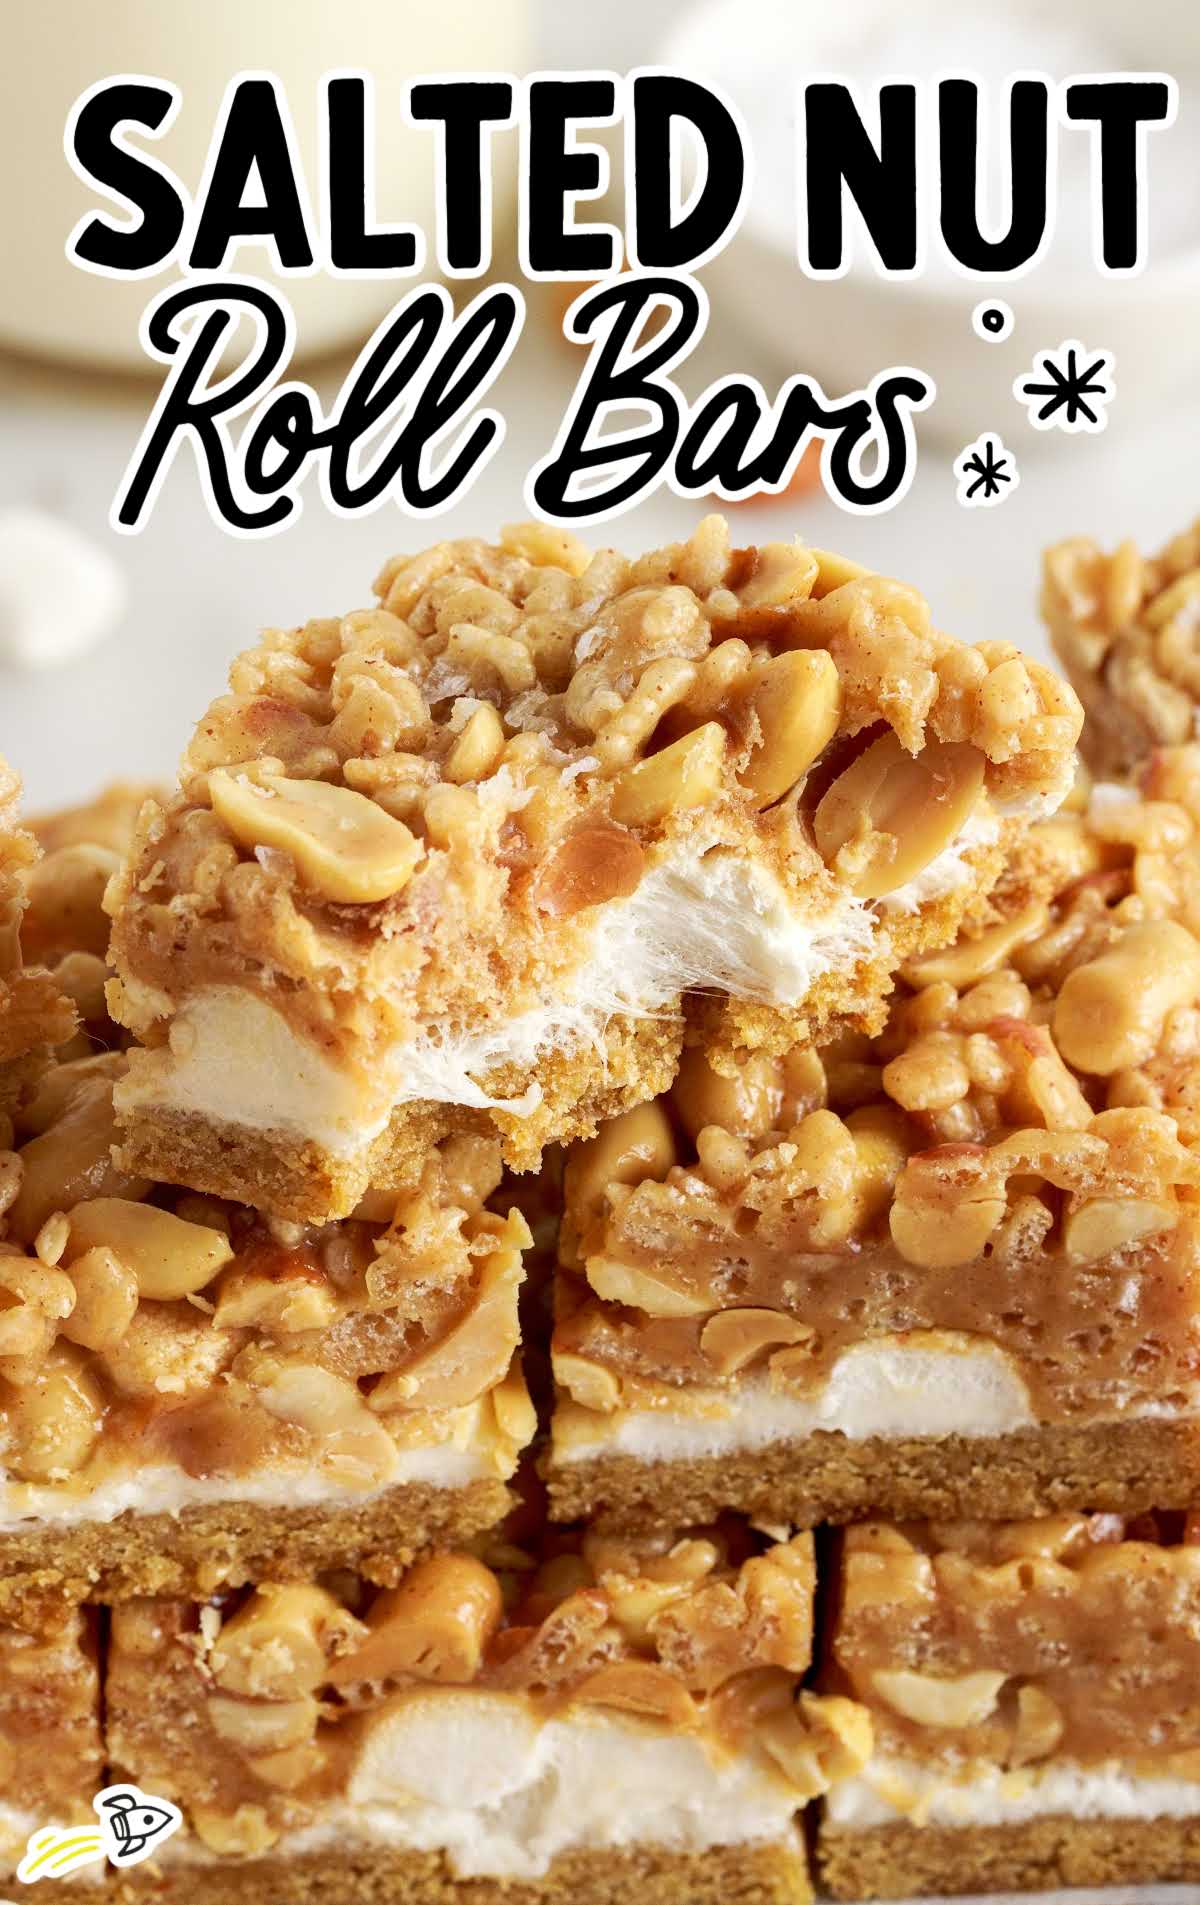
This recipe has lived in my kitchen for years because it works—every time. There’s no candy thermometer, no finicky timing, and no mystery steps. These salted nut roll bars slice clean, carry well, and always disappear first on dessert trays.
What Goes Into These Salted Nut Roll Bars
Ingredient Substitutions
MARSHMALLOWS: You can use either miniature or full-size marshmallows in this easy recipe; just make sure it adds up to four cups.
LIGHT BROWN SUGAR: If you’re out of light brown sugar, you can use dark brown sugar. It has a deeper molasses flavor, which can add a richer taste to the bars.
Step-by-Step Notes
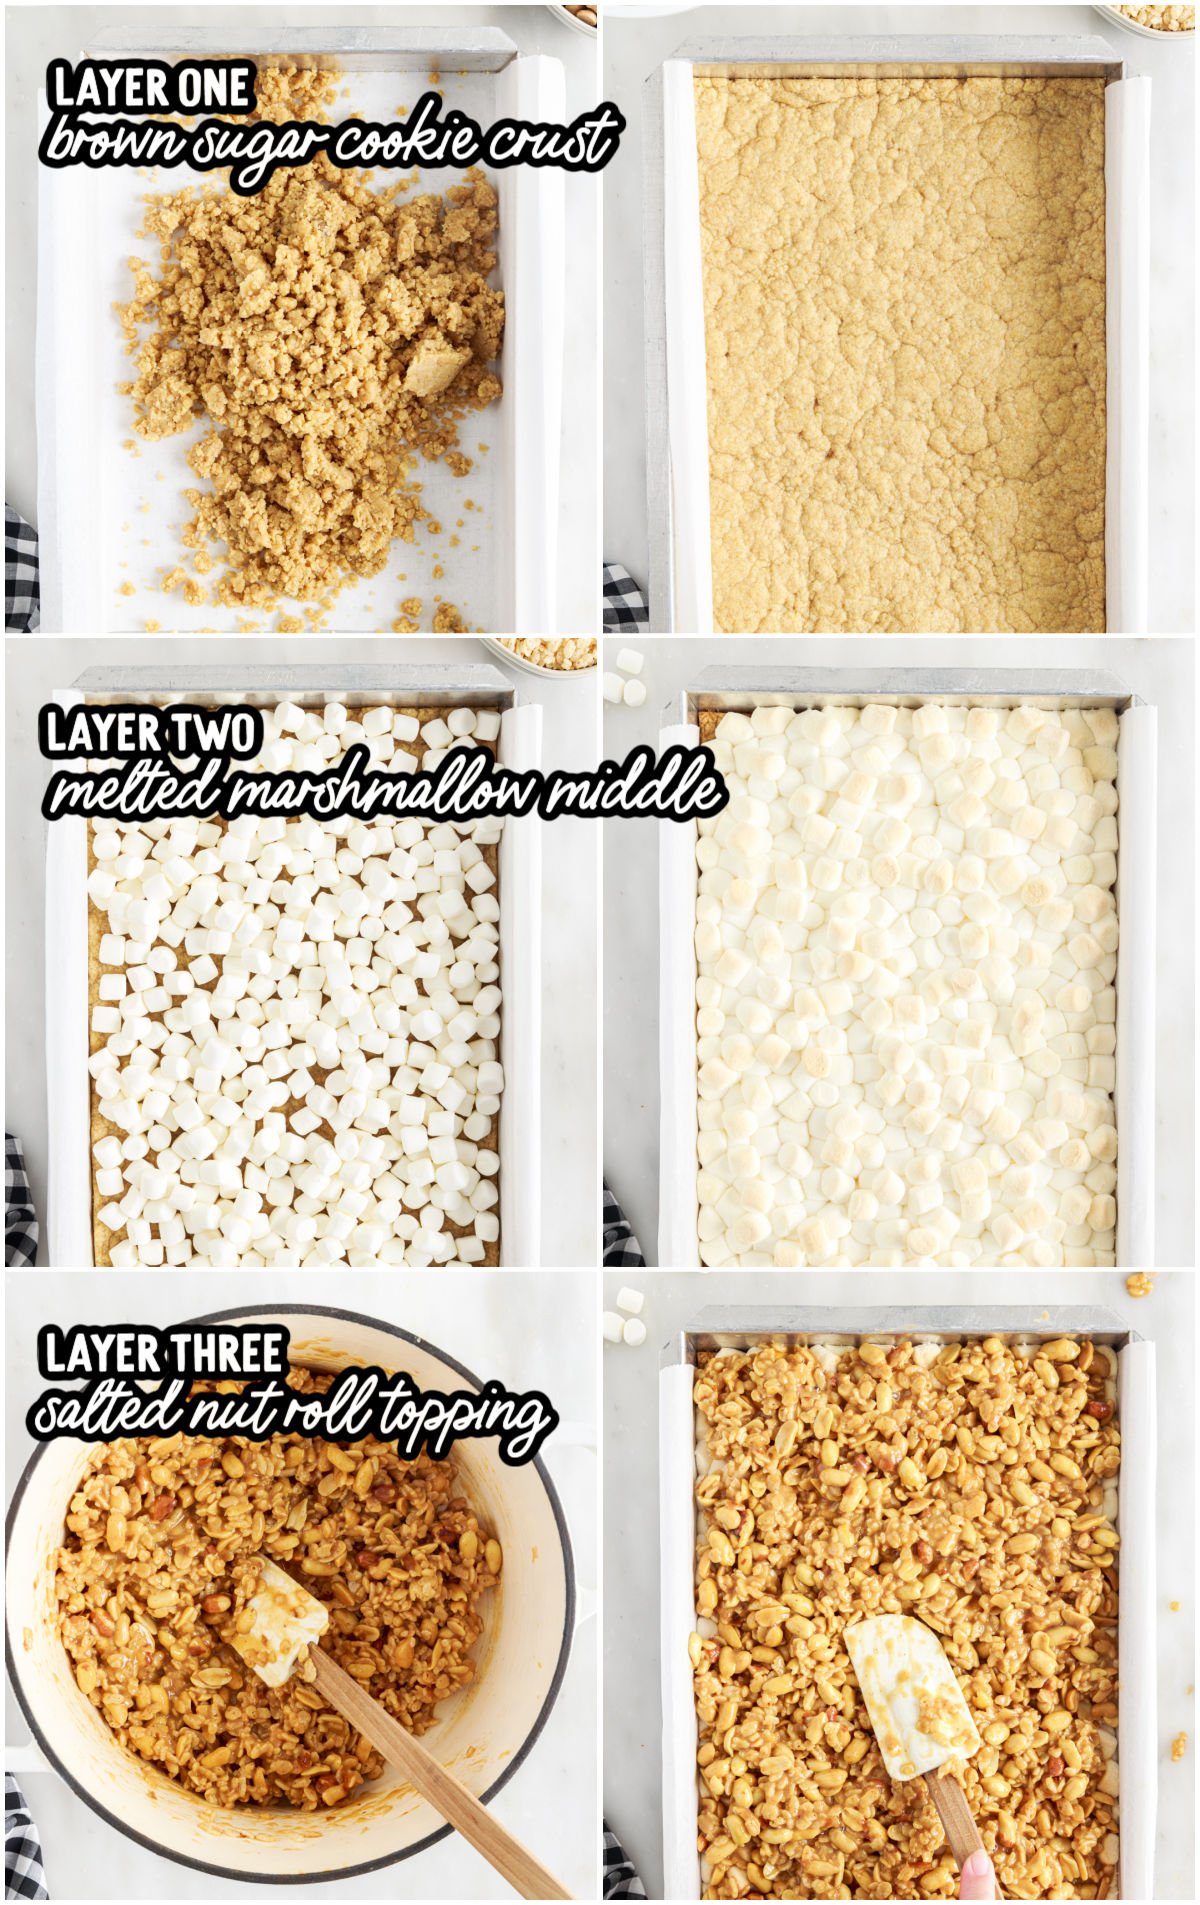
1. Bake the crust until just set. Don’t look for browning — that will make the bottom firm once chilled. Pull it at 12 minutes; it will finish firming up as you add the marshmallows.
2. Work quickly with the marshmallows. Pour them on while the crust is hot so the bottoms soften. This prevents them from rolling around and ensures even puffing.
3. Start the topping as soon as the marshmallows go in. The marshmallows melt in minutes so you’ll want the topping ready to go.
PRO TIP: To prevent the melted marshmallows and gooey topping from sticking to everything, spray your spatula or other utensils with nonstick cooking spray.
4. Stir gently once the peanuts and cereal go in. Overmixing crushes the Krispies and turns the topping dense instead of textured.
5. Press the topping lightly, not firmly. Use a lightly greased spatula to encourage it into the marshmallow layer, but don’t compact it — you want soft chew + crisp peanut crunch.
Make-Ahead, Storing & Serving
These bars are even better after they’ve cooled completely and rested for a few hours. The topping sets, the marshmallows settle, and the base softens slightly.
- Room temperature: Up to four days in an airtight container
- Refrigerator: Up to one week (firmer chew, very clean slices)
- Freezer: Up to three months, double-wrapped; thaw at room temp
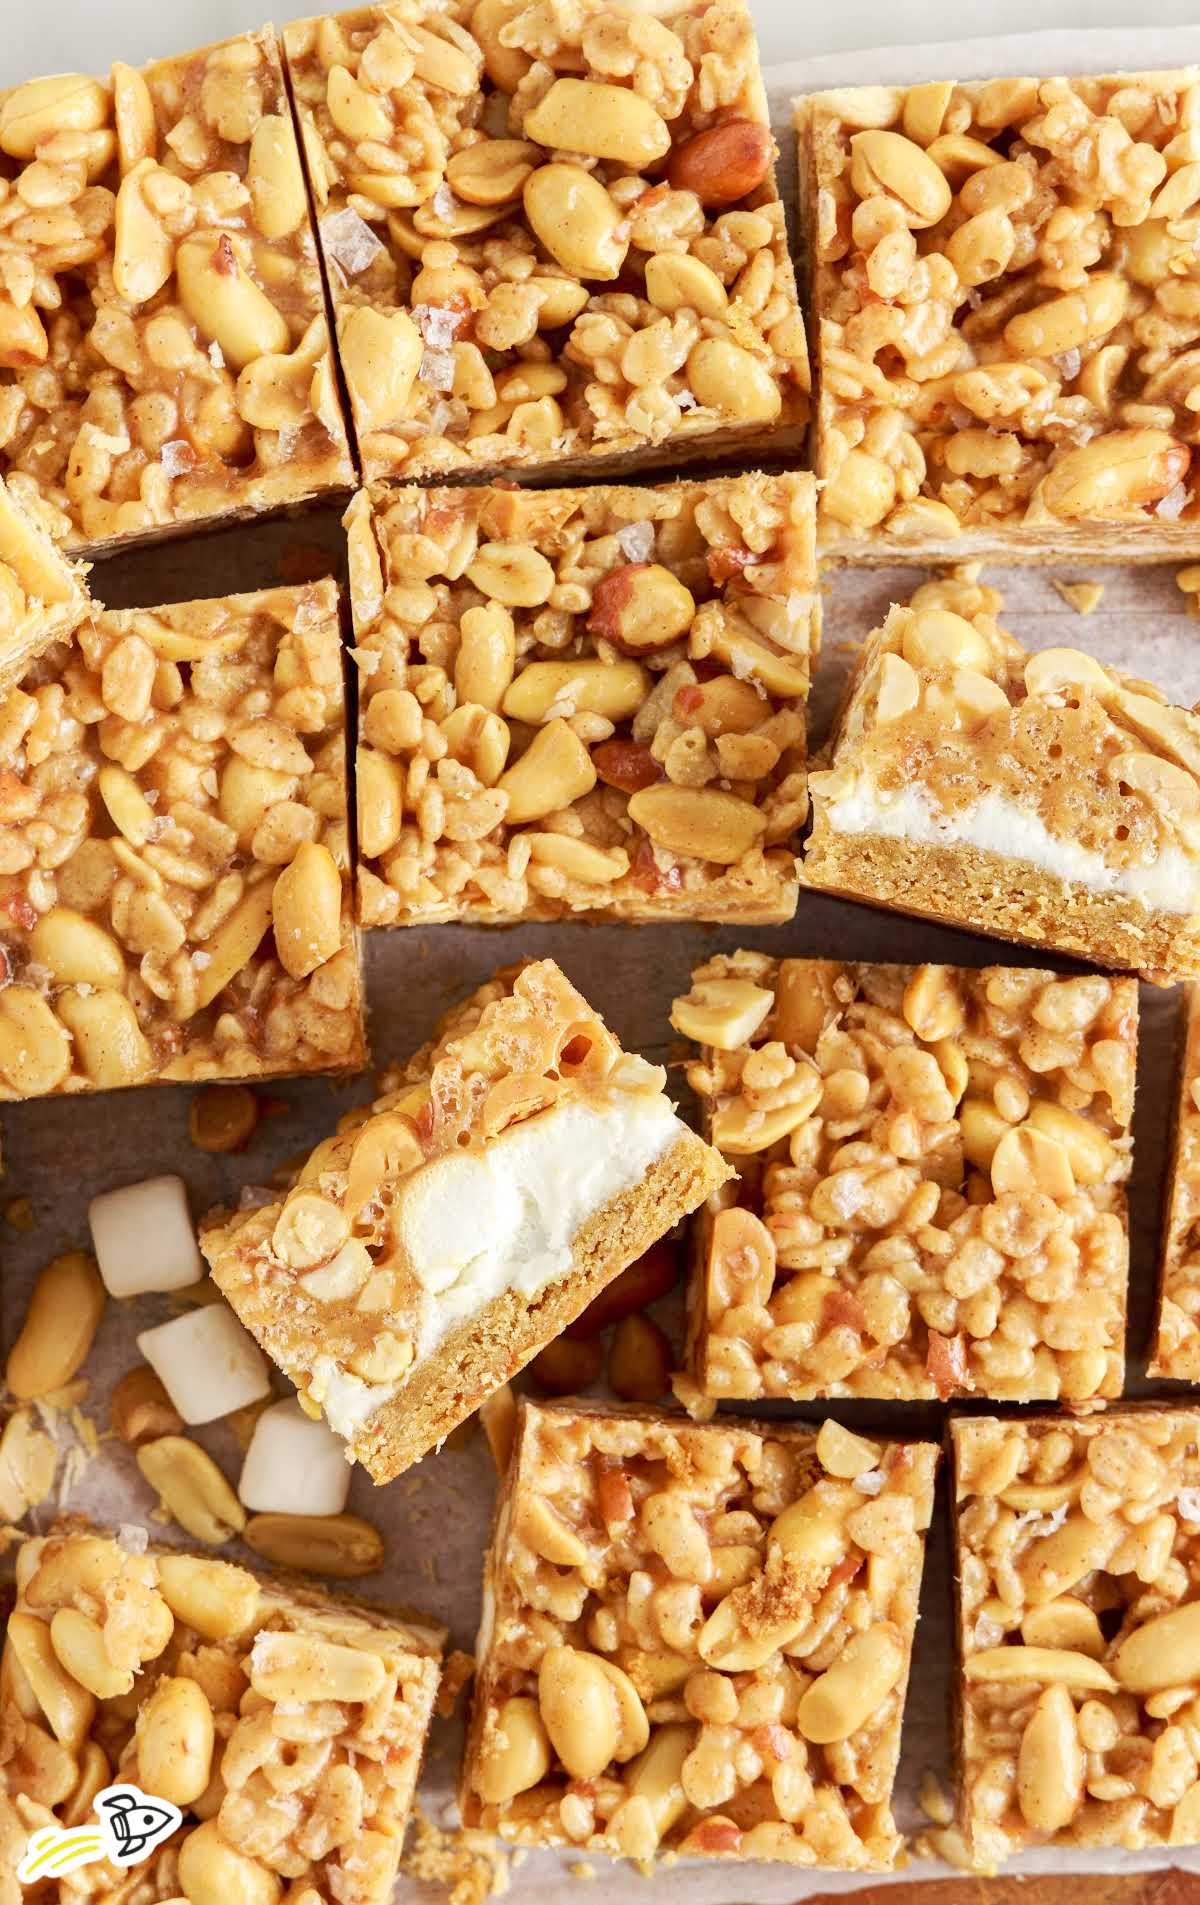
- To cut clean bars: Use a long serrated knife and wipe between cuts.
These are fantastic for potlucks, cookie exchanges, Christmas cookie trays and lunchbox treats because they hold up very well without refrigeration.
More Dessert Bar Recipes
- Magic Cookie Bars
- Chocolate Chip Cookie Bars
- Rolo Stuffed Brownies
- Buckeye Bars
- Peanut Butter Rice Krispie Treats


Salted Nut Roll Bars
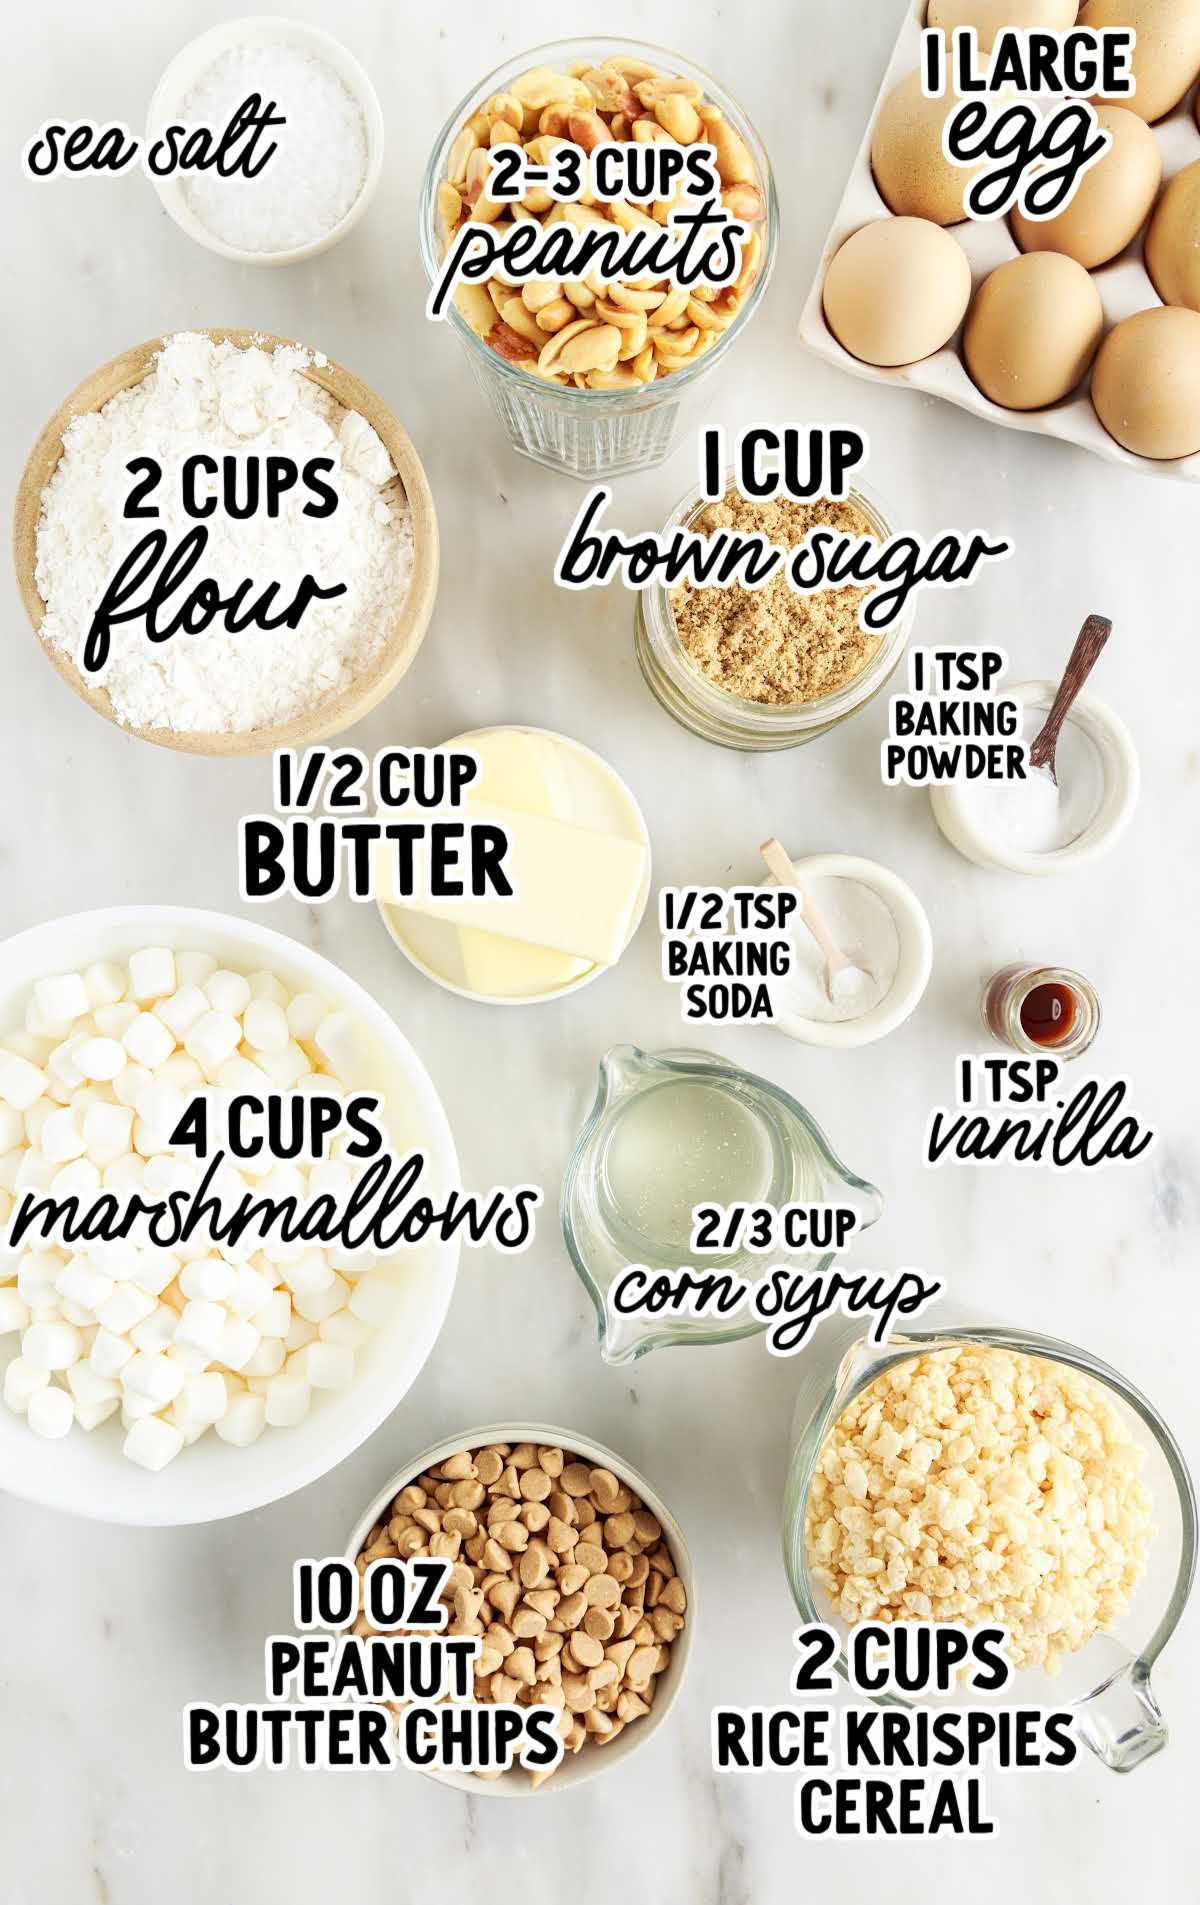
Ingredients
Crust
- 2 cups all-purpose flour
- 1 cup packed light brown sugar
- 1 teaspoon baking powder
- ½ teaspoon baking soda
- 1 large egg
- ½ cup unsalted butter, melted
- 1 teaspoon vanilla extract
Topping
- 4 cups miniature marshmallows
- 10 ounce bag peanut butter chips
- ⅔ cup light corn syrup
- ½ cup unsalted butter
- 2 to 3 cups salted peanuts
- 2 cups Rice Krispies cereal
- Flaky sea salt, optional
Instructions
- Preheat the oven to 350°F.
- In a medium mixing bowl, beat together all of the crust ingredients until well combined. Press mixture into a 9×13 baking pan lined with parchment paper.
- Bake for 12 minutes.
- Remove the crust from the oven and immediately spread the mini marshmallows over the crust. Place the baking dish back into the oven and bake until the marshmallows puff and begin to turn golden, another 12 to 15 minutes.
- Meanwhile, combine the peanut butter chips, corn syrup, and butter in a medium saucepan and stir over medium heat until melted and fully combined.
- Stir in the peanuts and Rice Krispies.
- Spread the topping mixture over the puffed and golden marshmallows and leave the baking dish to cool completely.
- When cooled, lift from the baking dish and cut into bars.
Notes
- You can vary the amount of Rice Krispies and peanuts you add to the topping. I wouldn’t add more than about 3 cups of peanuts as the balance of salty and sweet will start to lean toward too salty.
- Oven temperatures vary and may need to be recalibrated periodically to ensure they are accurate. Make sure to keep a close eye on your crust as the suggested baking time approaches.
- The topping mixture takes just a couple of minutes to melt and come together. Start making the topping about 5 minutes after you have put the marshmallow-topped cookie base back into the oven.
- When you add the topping over the marshmallows, use a lightly greased spatula to press the topping down into the marshmallows and form a flat top.
Nutrition


Leave a Comment