October 20, 2023
Review RecipeSkillet Chicken Pot Pie

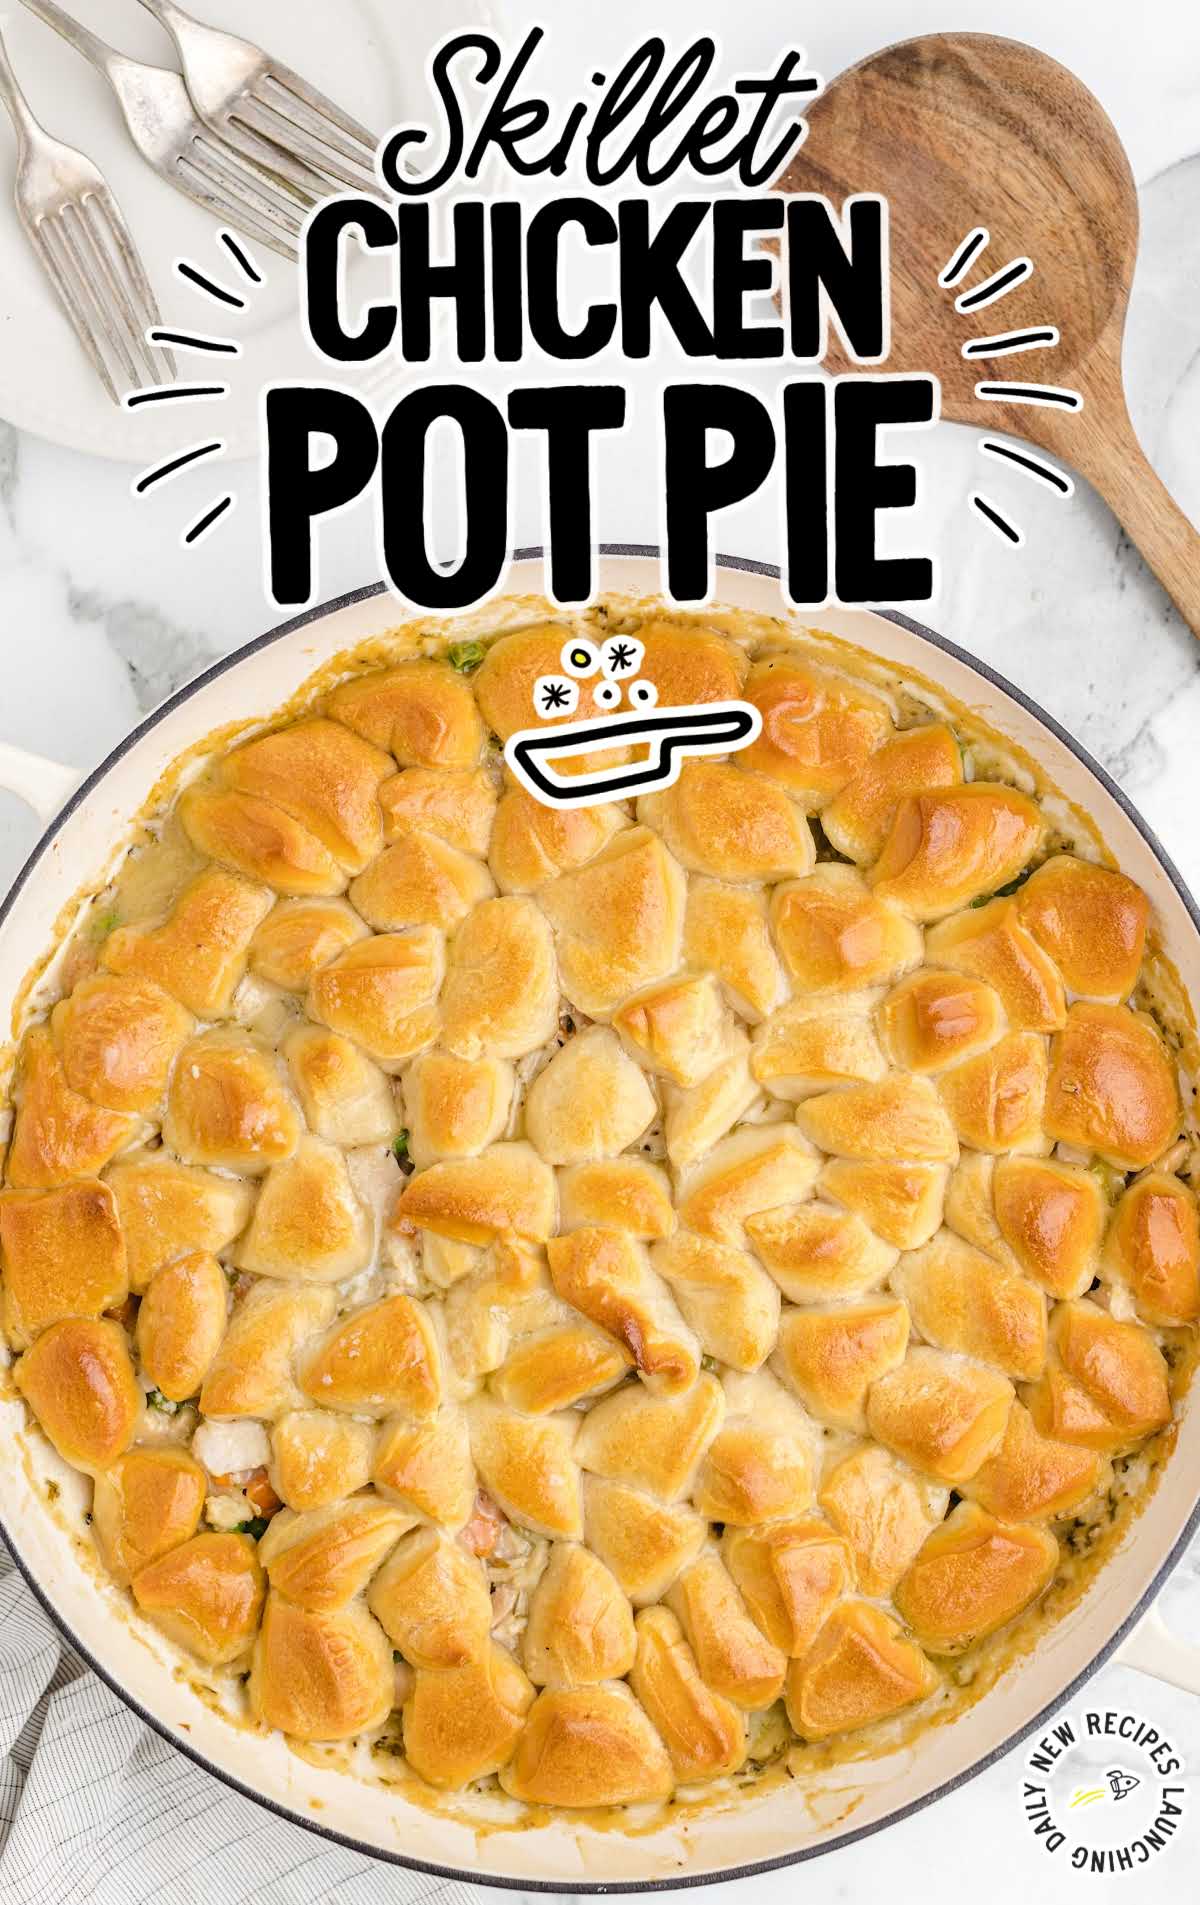
Skillet chicken pot pie uses just a single skillet and results in a delicious meal packed with rich flavor.
Jump to Recipe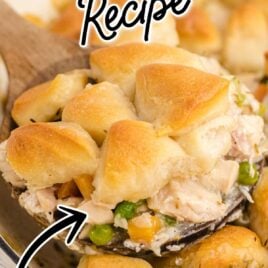

Table of Contents
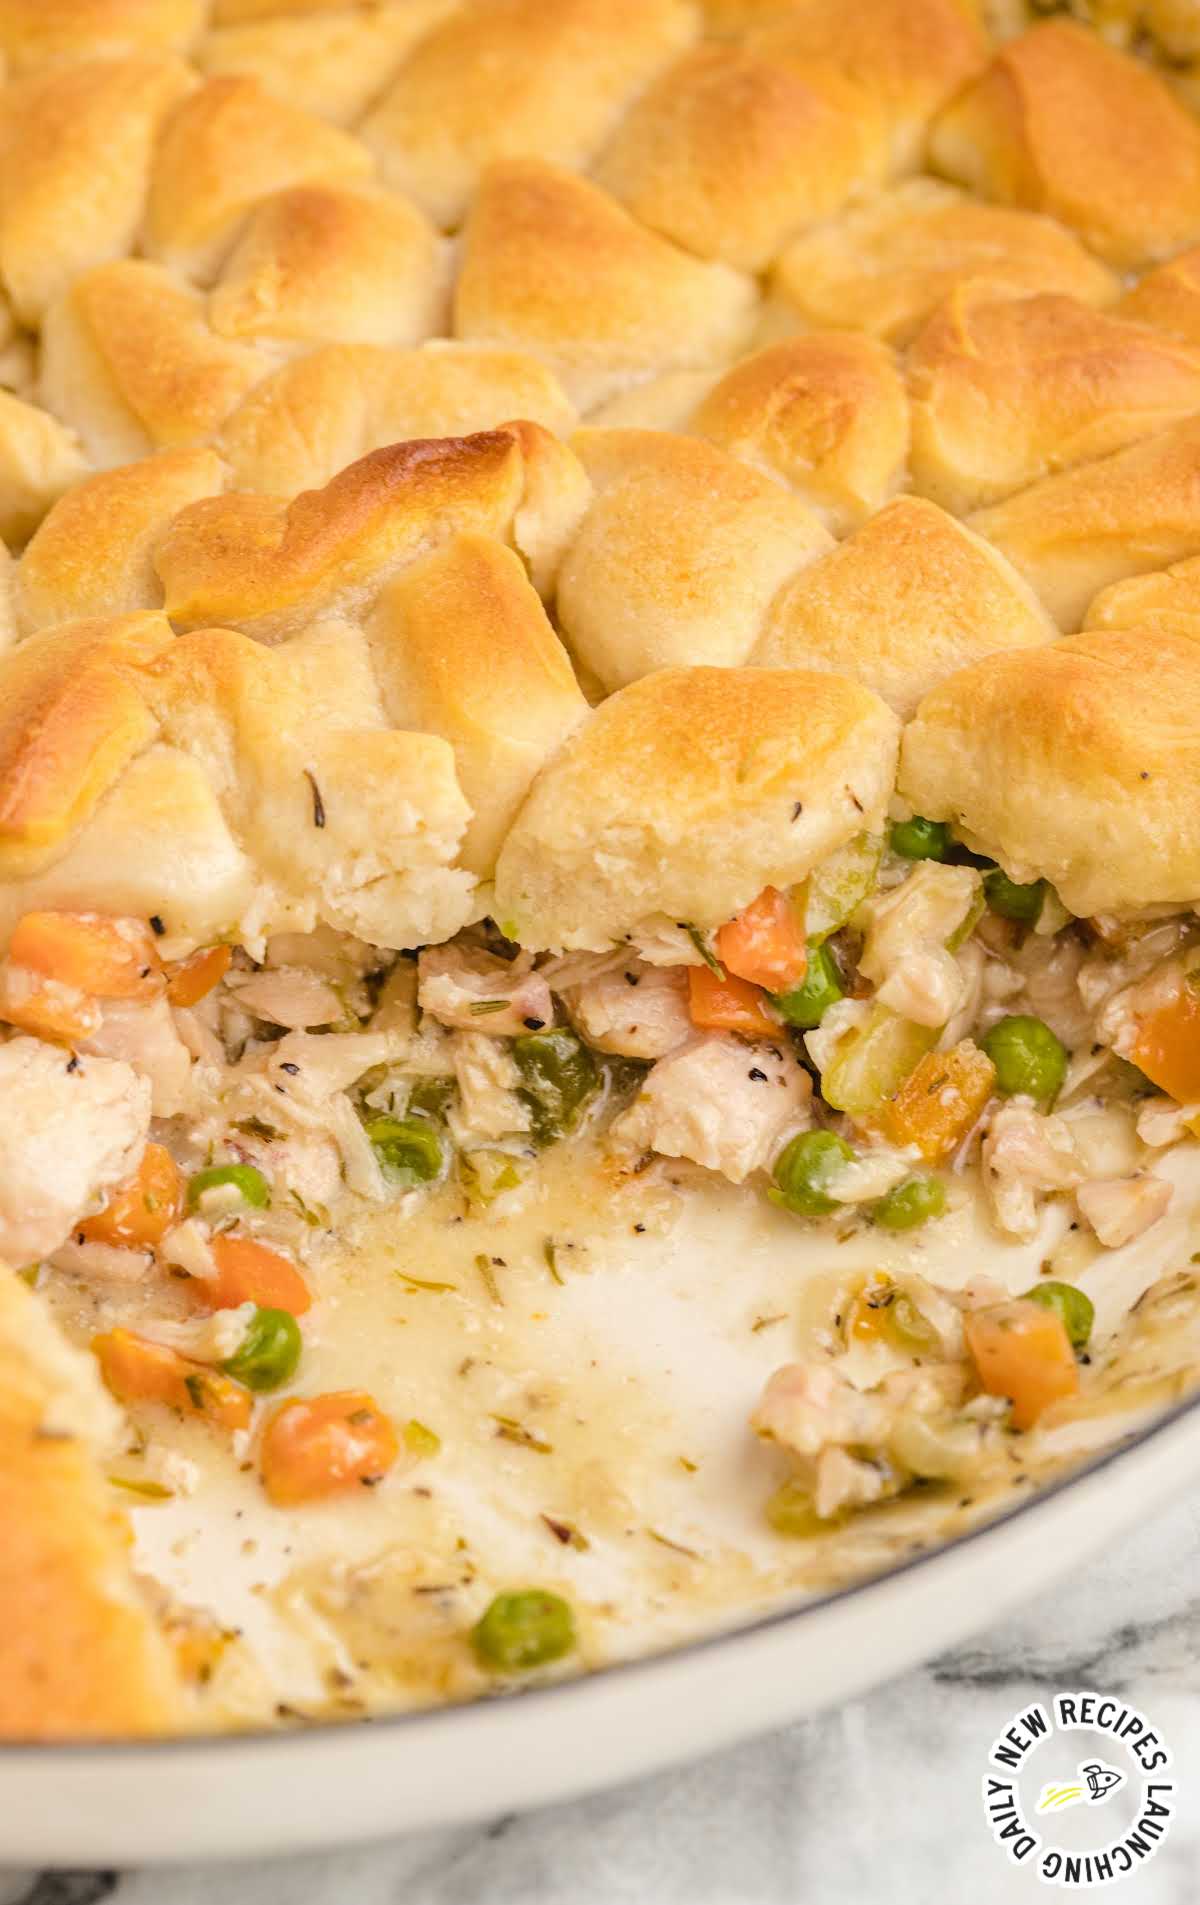
This skillet chicken pot pie is the perfect no-fuss recipe, made entirely in a single pan. Warming, hearty and flavorsome, it features tender chicken and veggies simmered in a creamy sauce and topped with buttery biscuits for the ultimate comfort food on cold winter nights.
For more variations on this classic skillet chicken pot pie with biscuits recipe, take a look at this Chicken Pot Pie Casserole and our delicious Chicken Pot Pie Noodles.
Skillet Chicken Pot Pie Ingredients
You’ll need:
For the Filling:
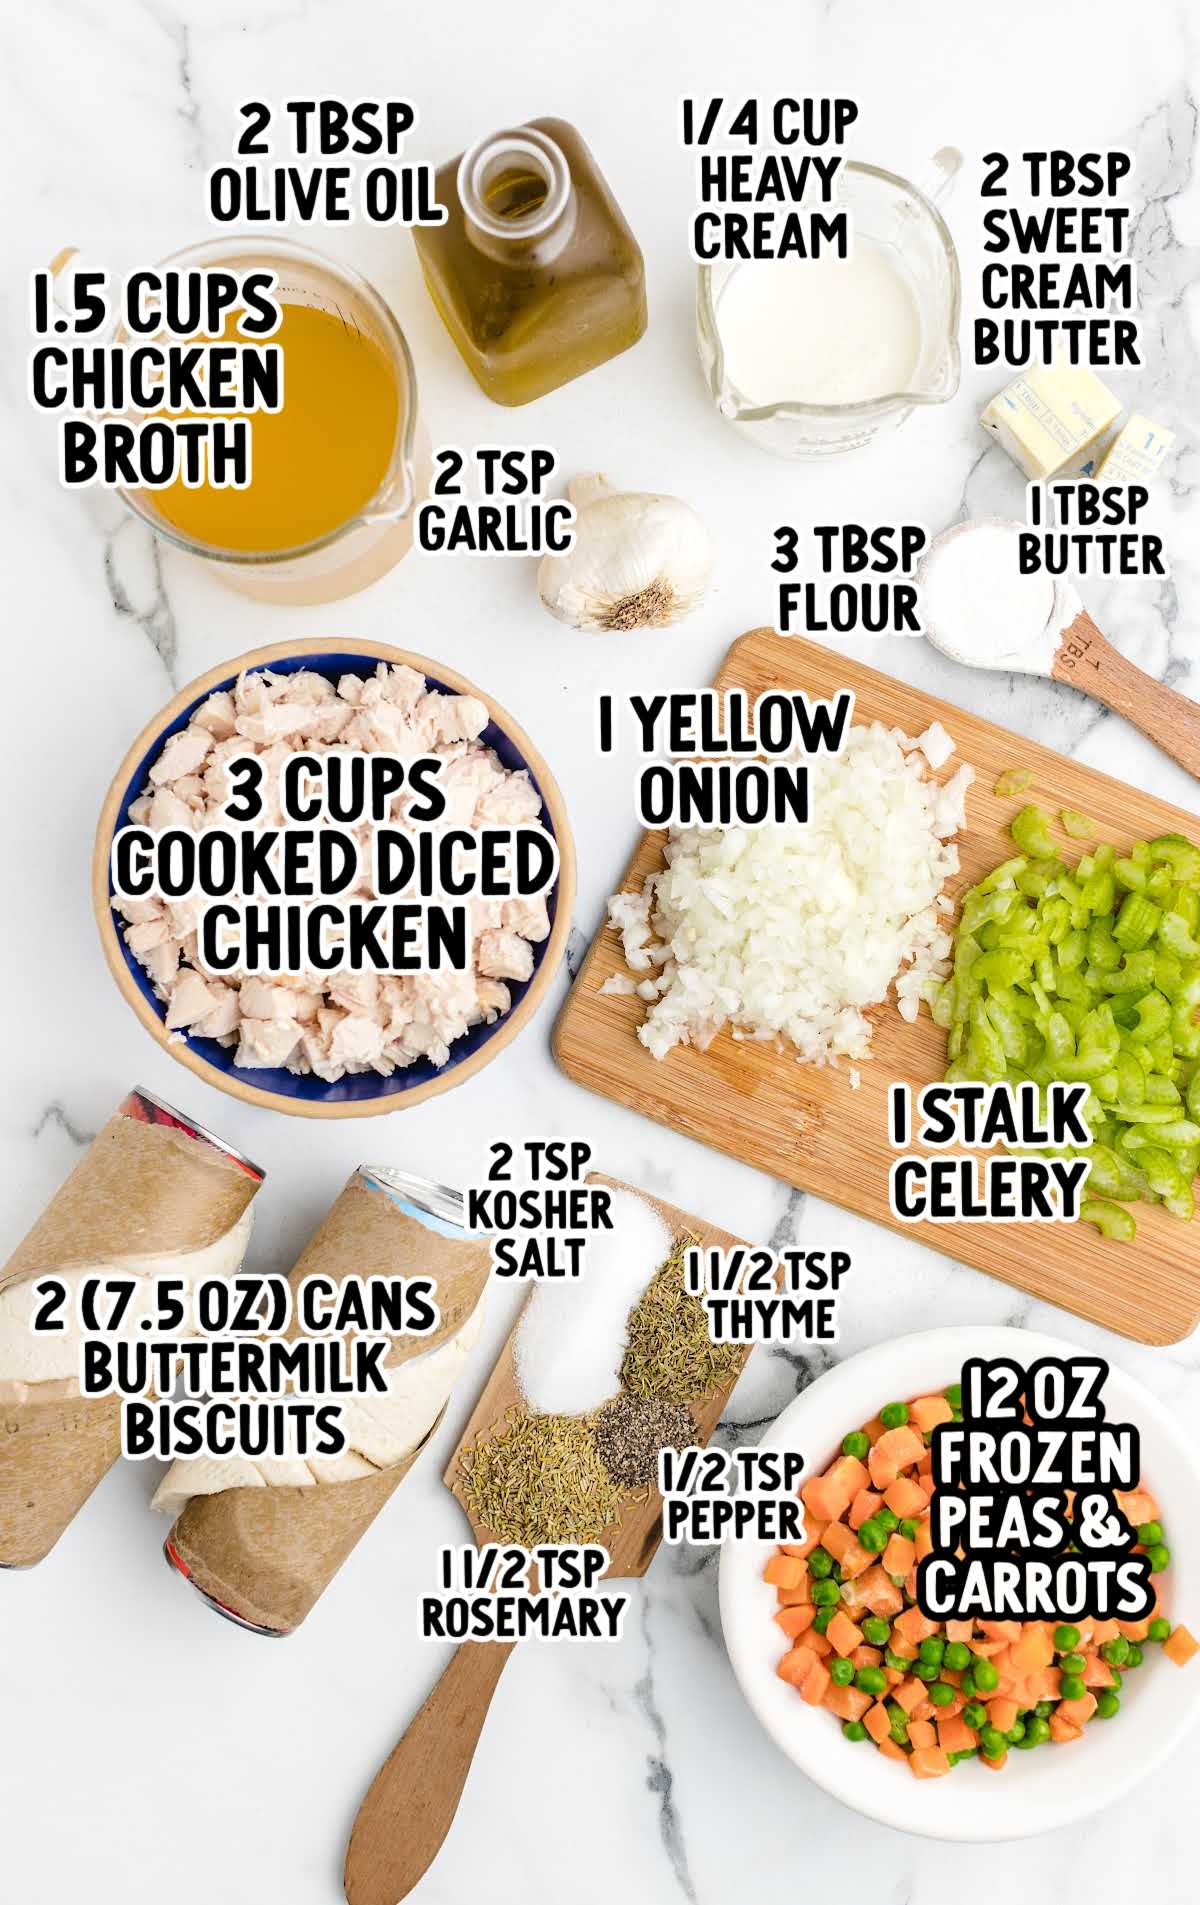
- 2 tablespoons of olive oil
- 1 small yellow onion, finely diced
- 1 stalk of celery, thinly sliced (slivered)
- 2 teaspoons of fresh minced garlic
- 2 tablespoons of salted sweet cream butter
- 3 tablespoons of all-purpose flour
- 1½ cups of chicken stock or chicken broth
- ¼ cup of heavy cream
- 1½ teaspoons of dried rosemary
- 1½ teaspoons of dried thyme leaves
- 2 teaspoons of kosher salt (you can reduce the salt to 1 teaspoon if you are sensitive to salt)
- ½ teaspoon of black pepper
- 3 cups of cooked chicken, diced or shredded
- 12-ounce bag of frozen peas and carrots
For the Topping:
- 2 (7.5-ounce) cans of buttermilk biscuits
- 1 tablespoon of melted butter, to brush on top of the biscuits immediately after coming out of the oven
PRO TIP:
Pick up a rotisserie chicken from the grocery store for an easy option in this recipe.
SUBSTITUTIONS AND ADDITIONS
CHICKEN STOCK: You can substitute this for chicken broth, or use vegetable stock if you prefer in this easy recipe.
CHICKEN: This is a great recipe to use up leftover rotisserie chicken or you can use cooked boneless skinless chicken breasts. You could even change it up and use leftover Thanksgiving turkey instead of chicken in this recipe.
VEGETARIAN: To make a vegetarian version of this chicken dish, you could substitute the diced or shredded chicken for your favorite chicken-style pieces.
KOSHER: If you don’t have this, you can use coarse sea salt or regular table salt in a pinch.
VEGETABLES: If you have any other vegetables that need using up, such as potato, broccoli, green beans, or mushrooms, then don’t hesitate to add these into the creamy filling too.
How To Make This Skillet Chicken Pot Pie Recipe
STEP ONE: Preheat the oven to 350°F.
STEP TWO: Heat a 12-inch ovenproof cast-iron skillet over medium-high heat and add olive oil to the bottom of the skillet.
PRO TIP:
If you don’t have a cast iron pan or ovenproof skillet, you could prepare the filling and then transfer it to a baking dish before adding the biscuits on top and baking.
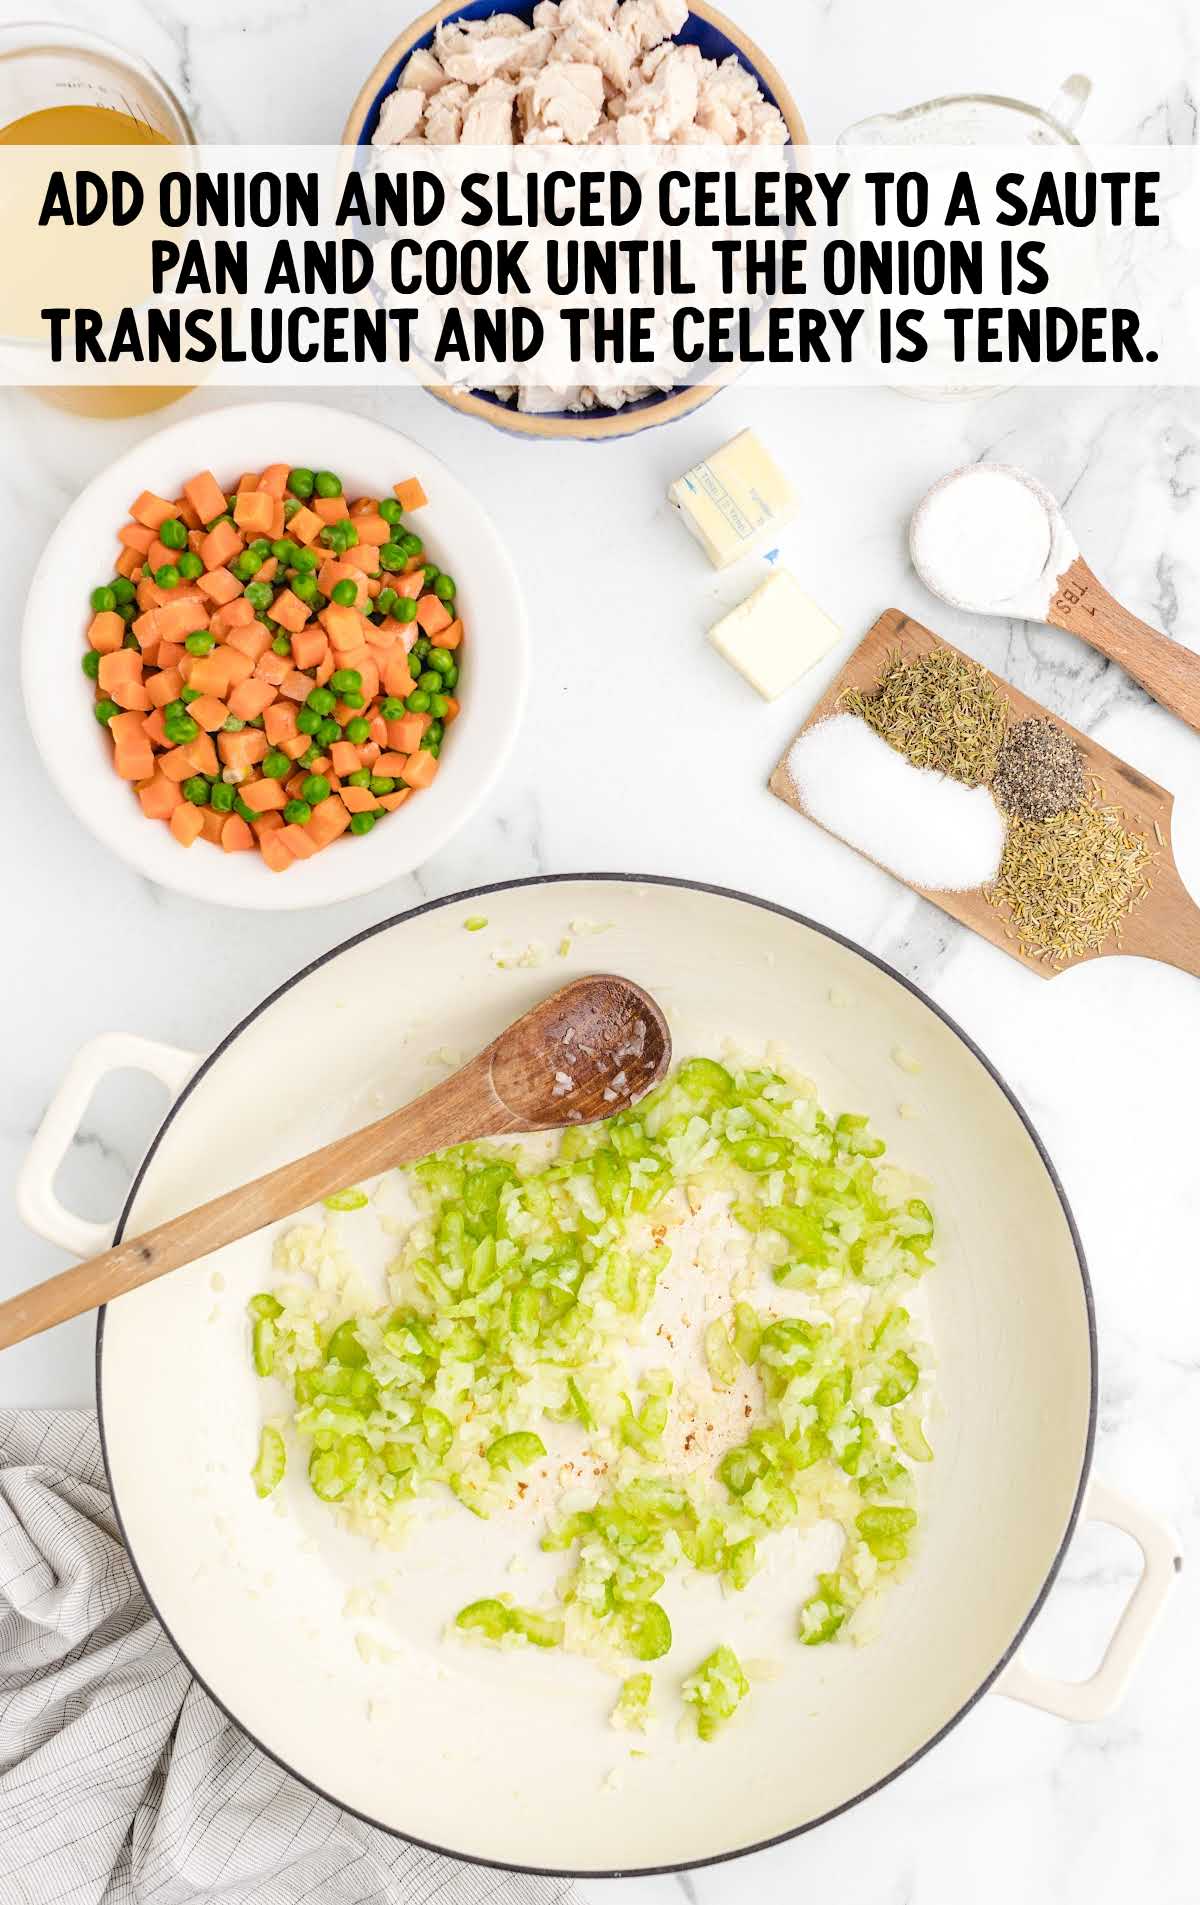
STEP THREE: Add the onion and celery to the skillet. Sauté for five to seven minutes, until the onion is translucent and the celery is tender.
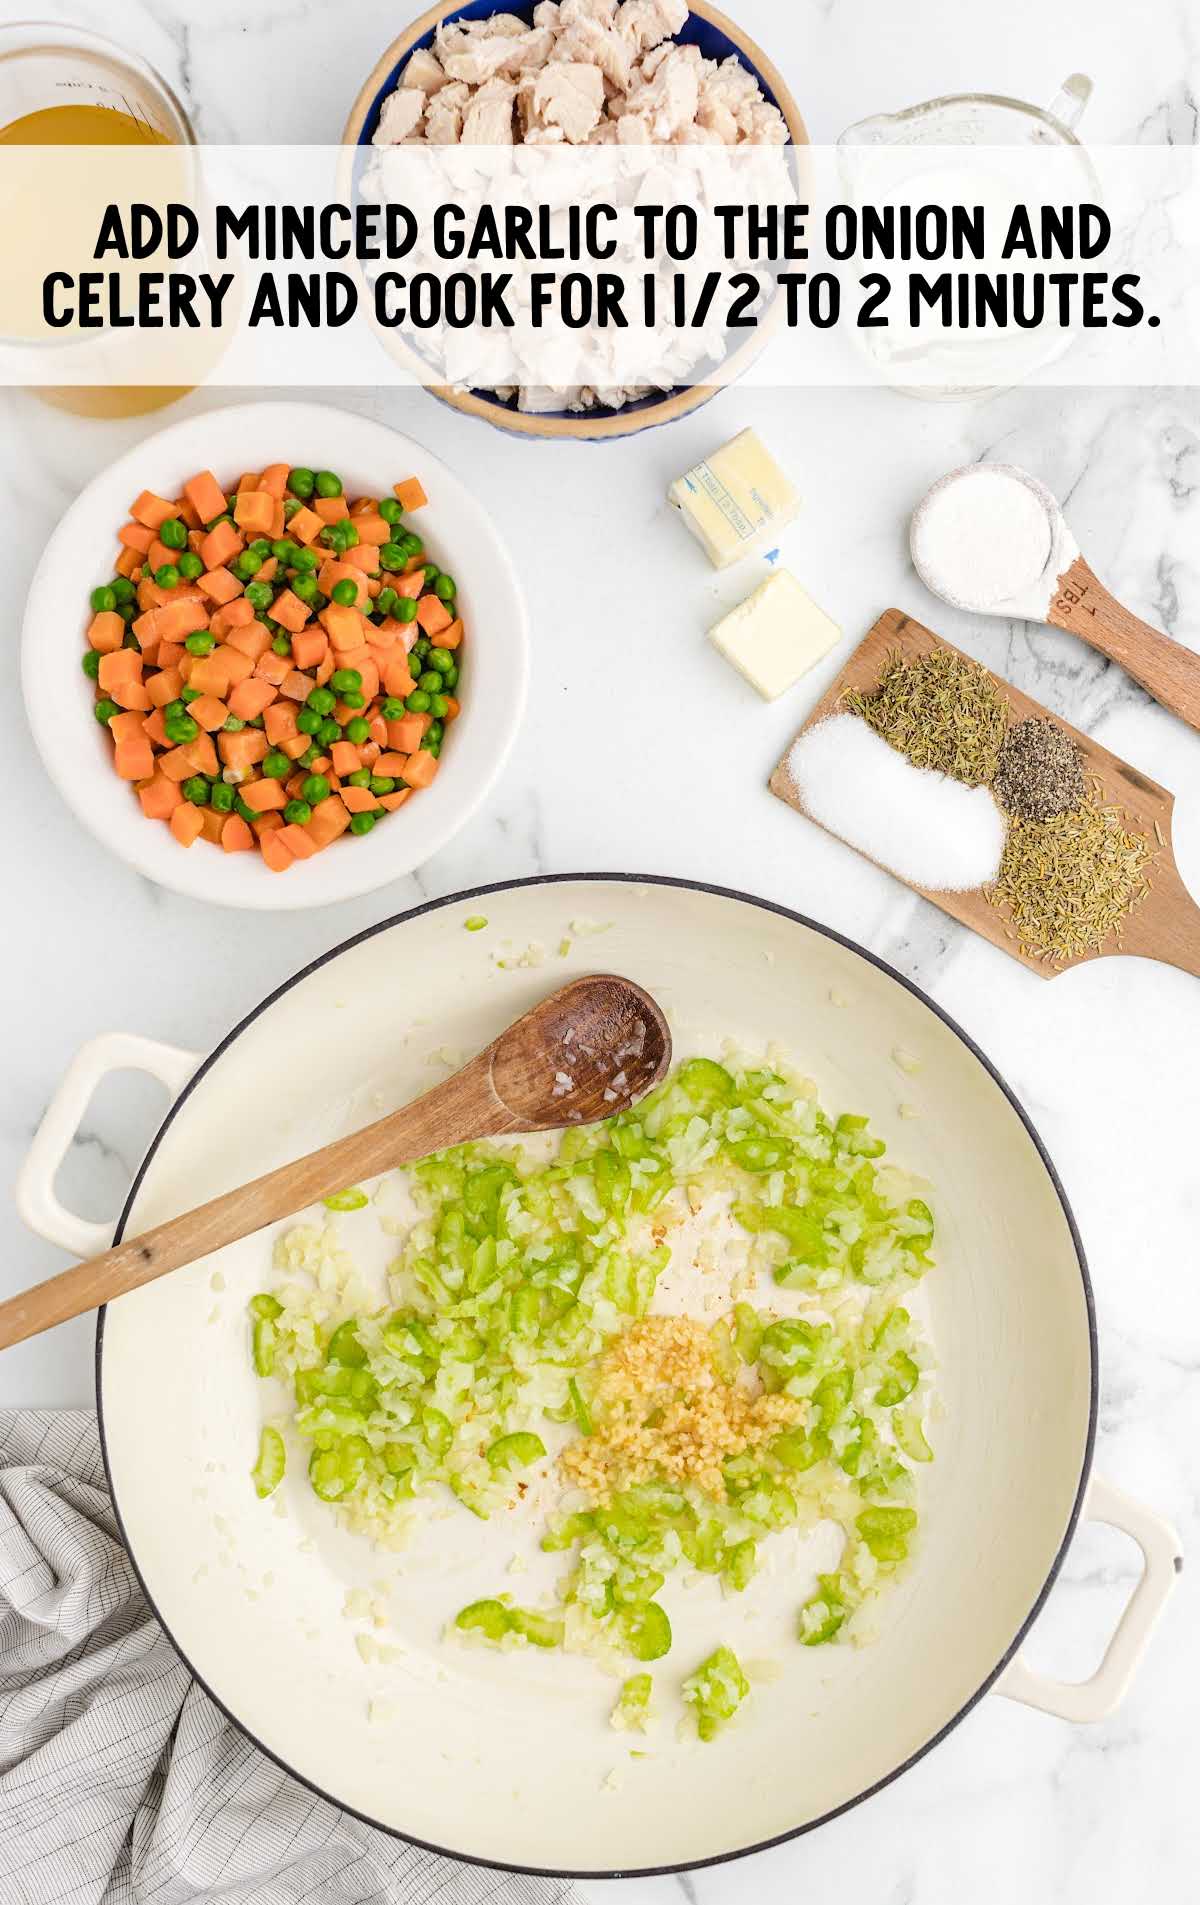
STEP FOUR: Reduce the heat to medium-low. Add the fresh minced garlic. Sauté for up to two minutes.
PRO TIP:
Stir continuously to avoid burning the garlic. Burnt garlic tastes very bitter.
STEP FIVE: Transfer the cooked onion, celery, and garlic to a bowl or plate and set aside.
STEP SIX: Return the skillet to the stovetop and keep the heat at medium-low, add the 2 tablespoons of butter.
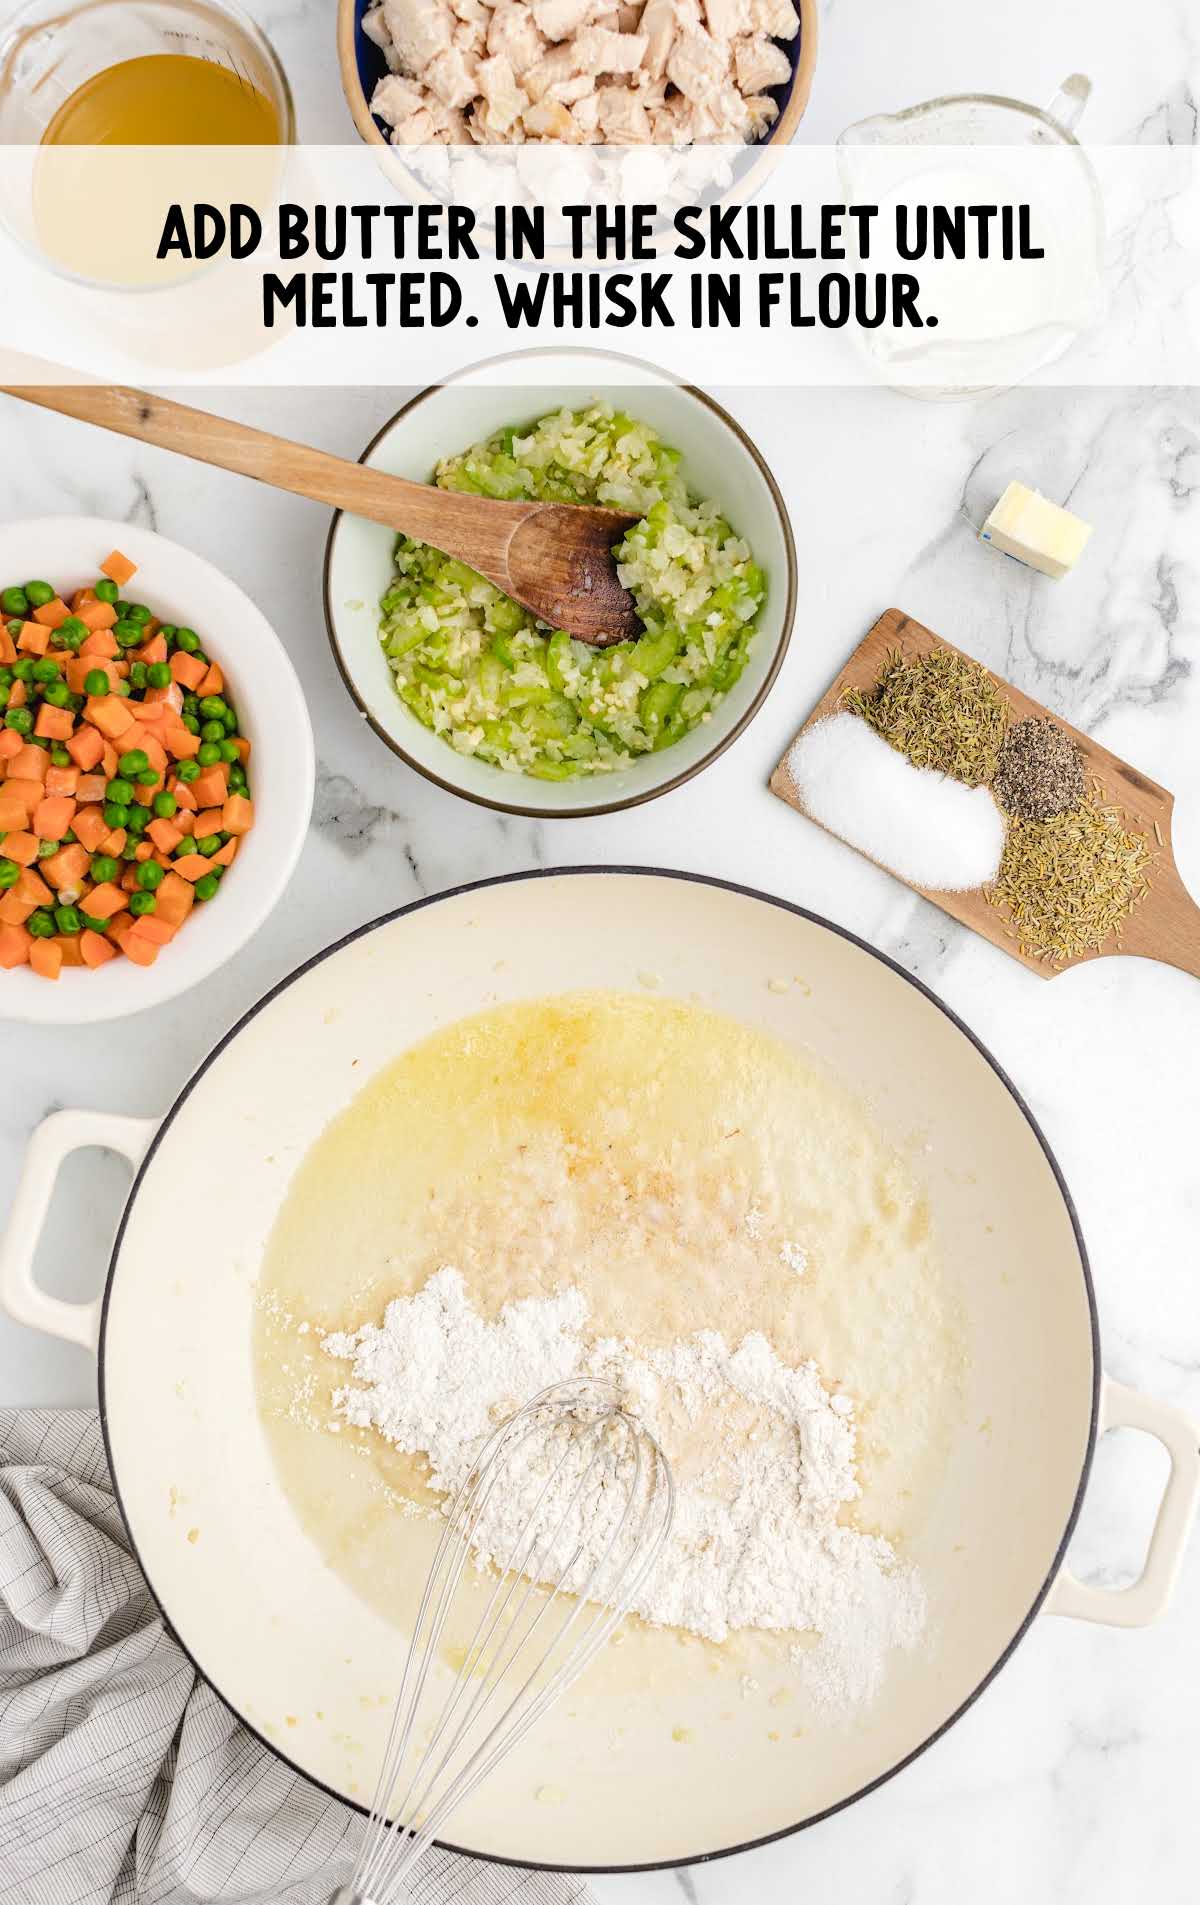
STEP SEVEN: Once the butter has melted, whisk in the 3 tablespoons of flour. Continue whisking until the flour has absorbed the butter, for about 30 seconds to 1 minute.
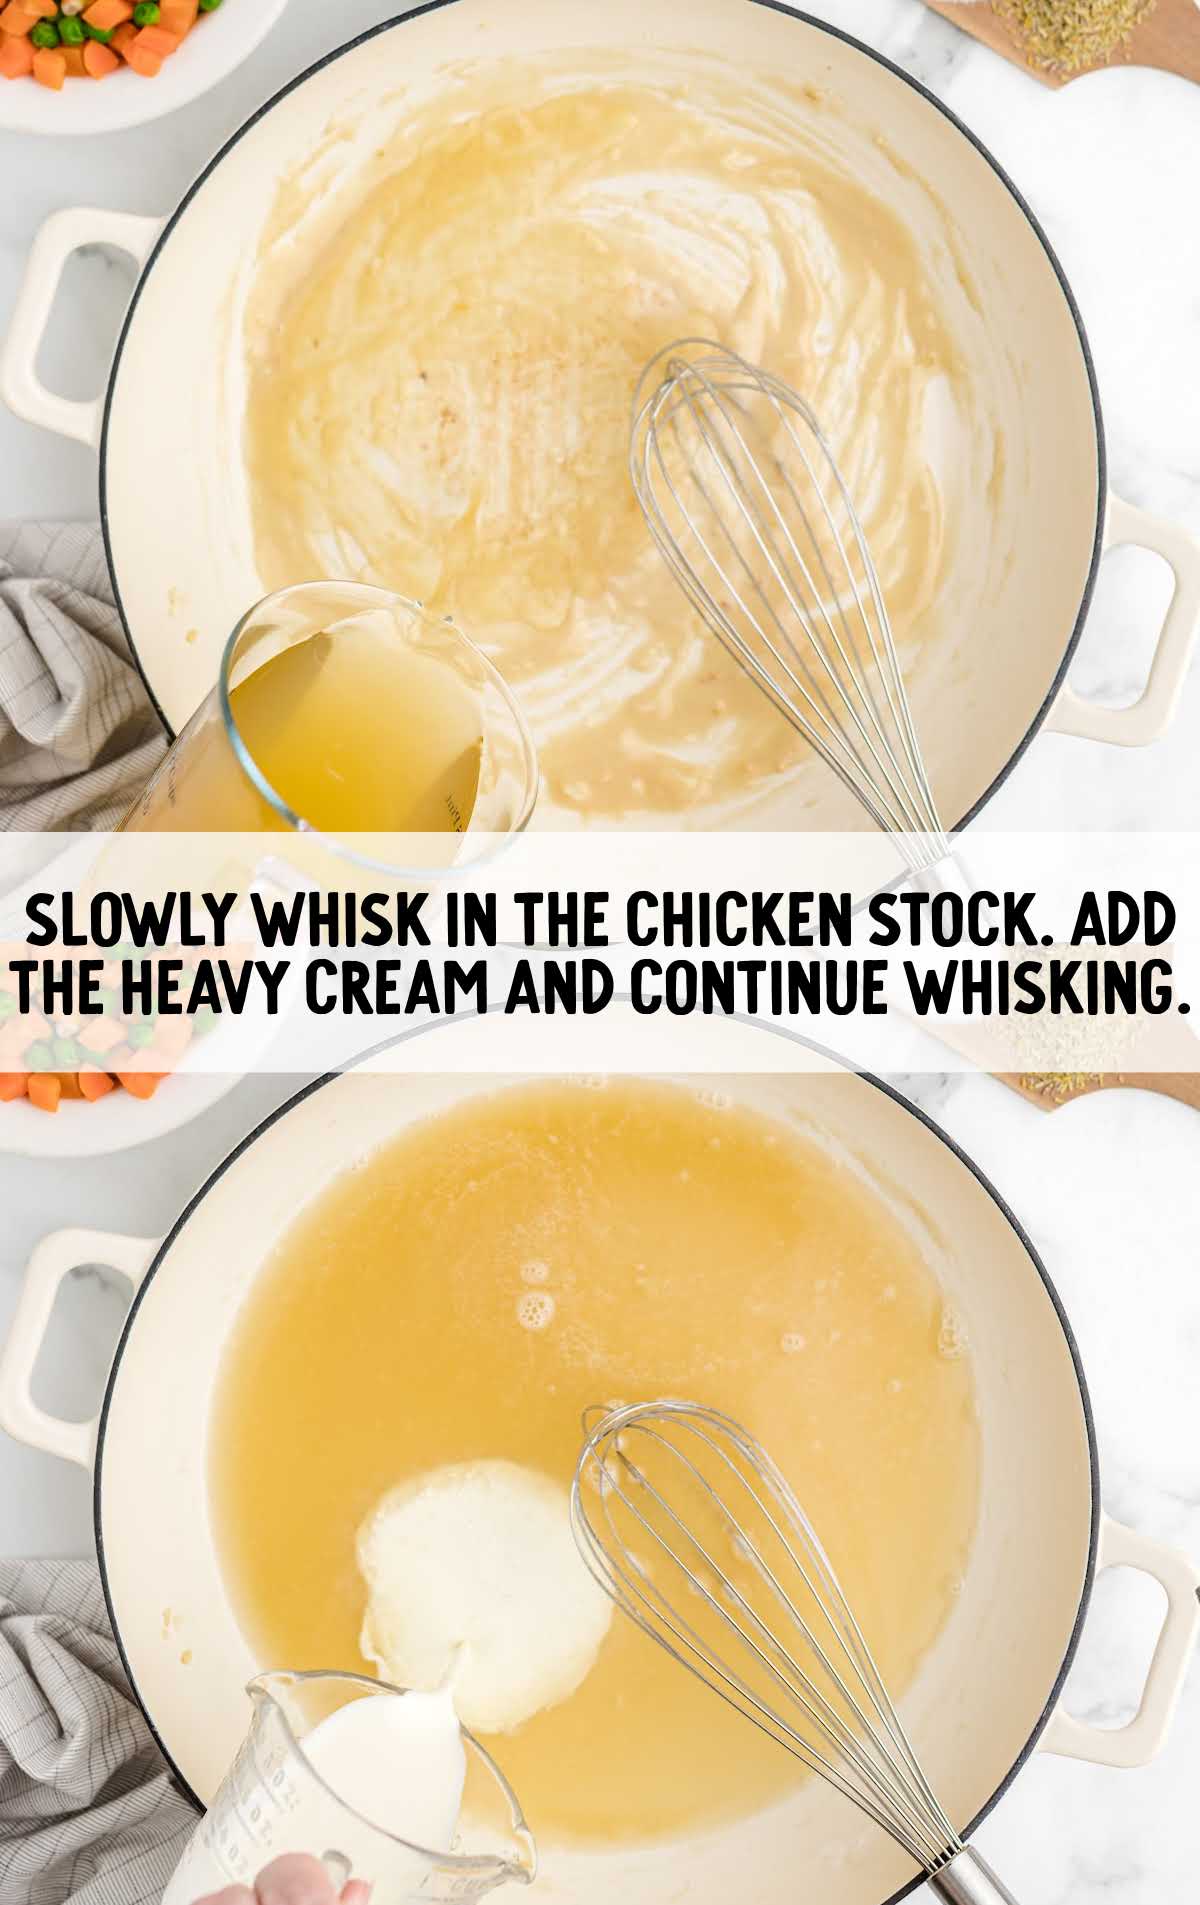
STEP EIGHT: Keeping the heat at medium-low, slowly whisk in the chicken stock. Once the mixture is smooth, slowly whisk in the heavy cream and continue whisking.
STEP NINE: Allow the broth mixture to come to a low simmer and begin to thicken. This may take 3 to 5 minutes.
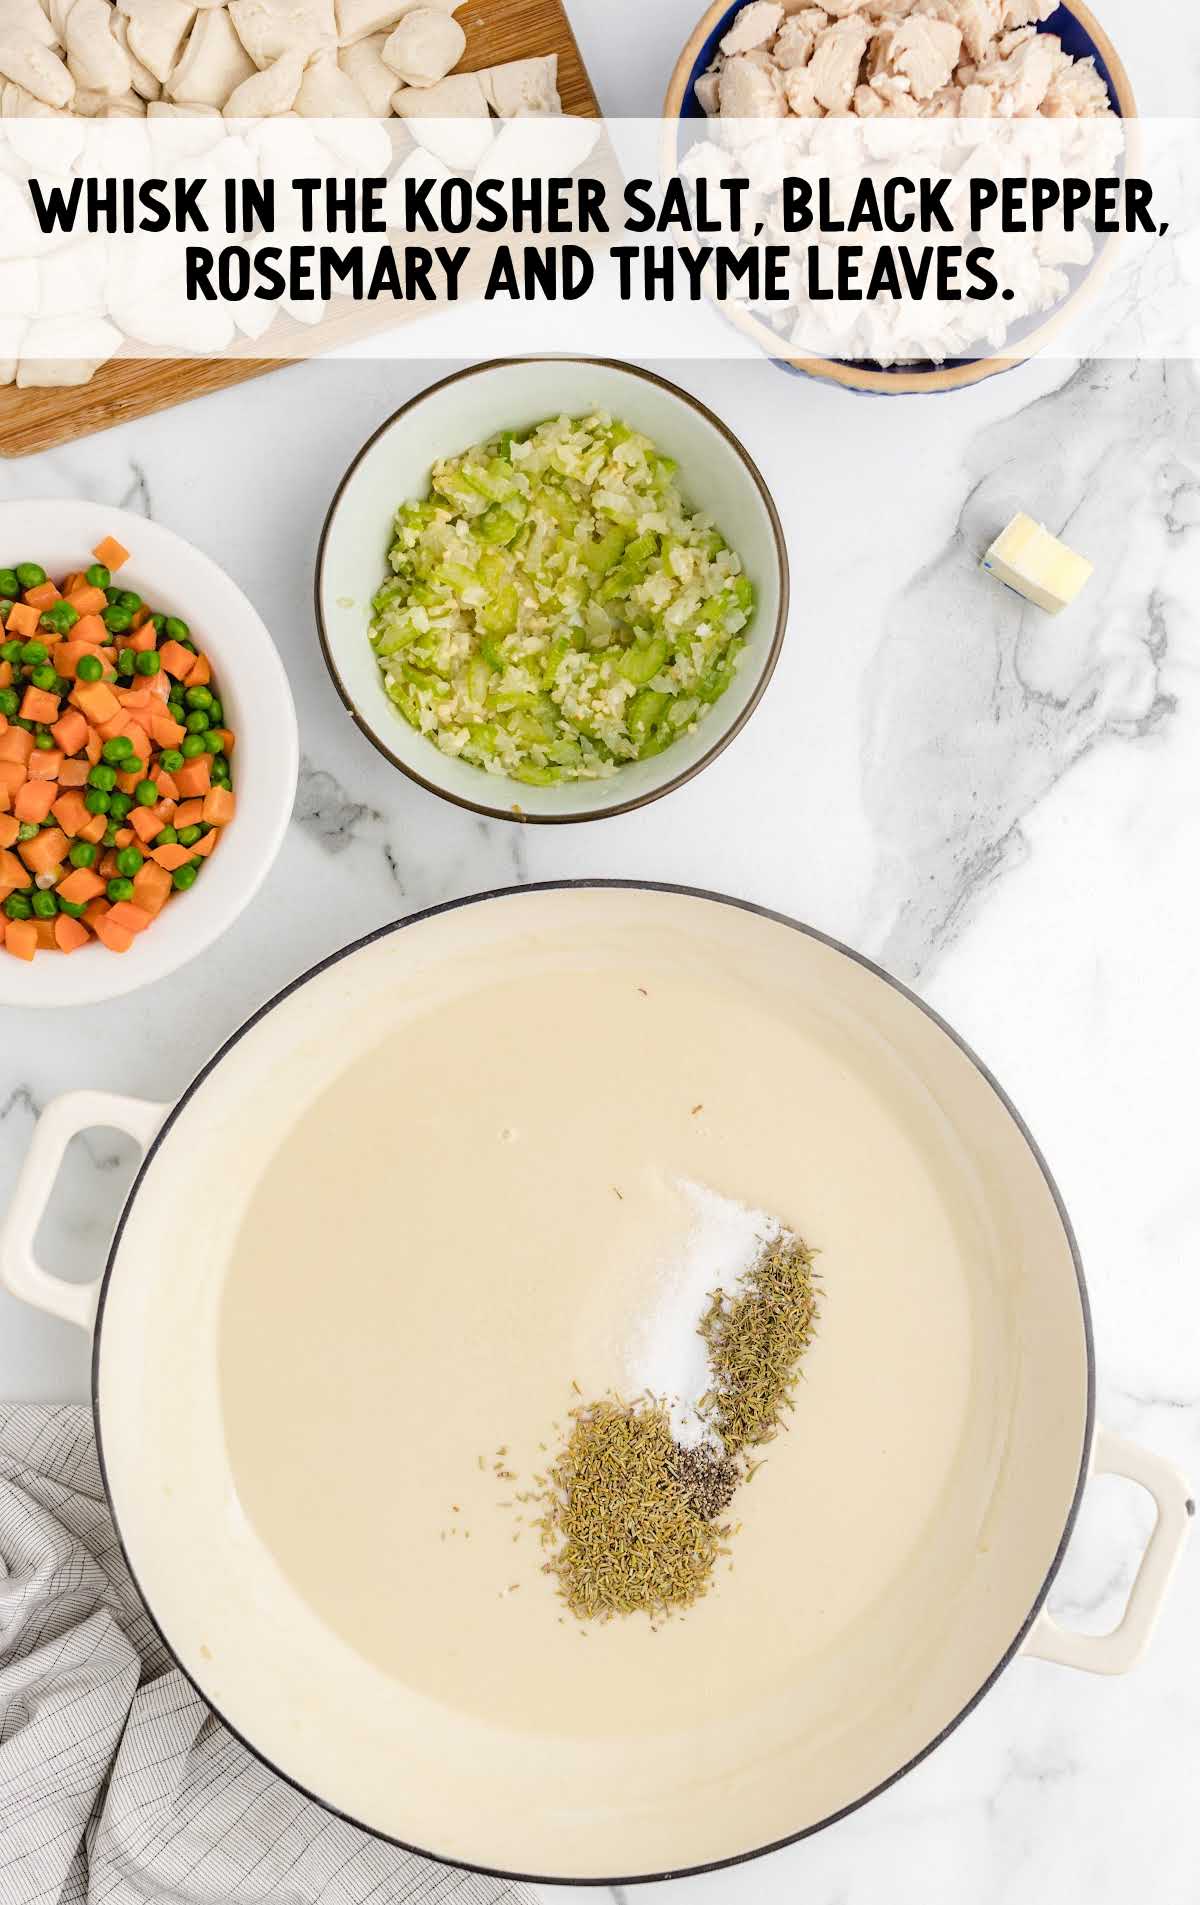
STEP TEN: Once the broth mixture is thickened, whisk in the kosher salt, black pepper, rosemary, and thyme leaves.
STEP ELEVEN: Once the seasoning is well incorporated, remove the skillet from the heat.
STEP TWELVE: Return the onion, garlic, and celery back to the broth mixture. Use a large wooden spoon to stir the mixture.
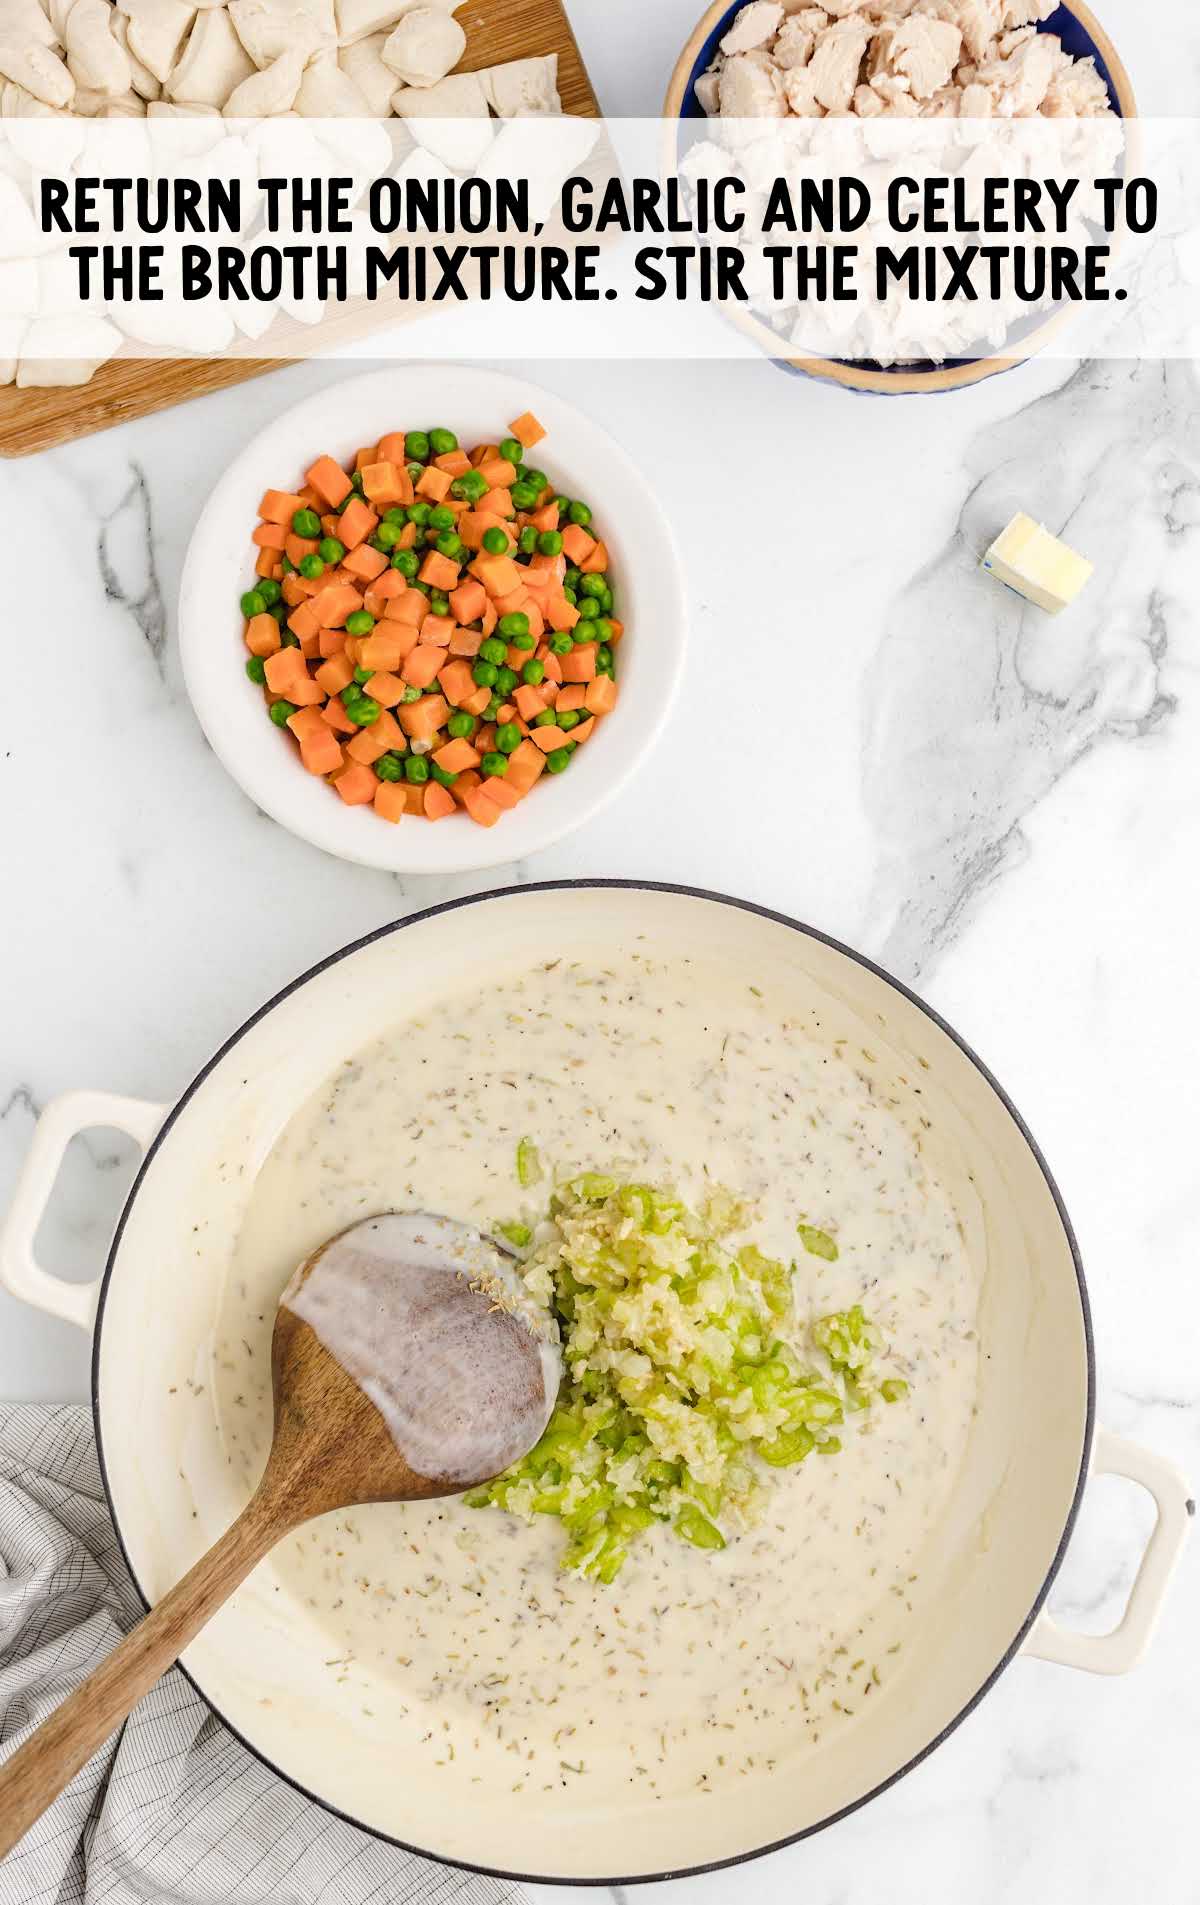
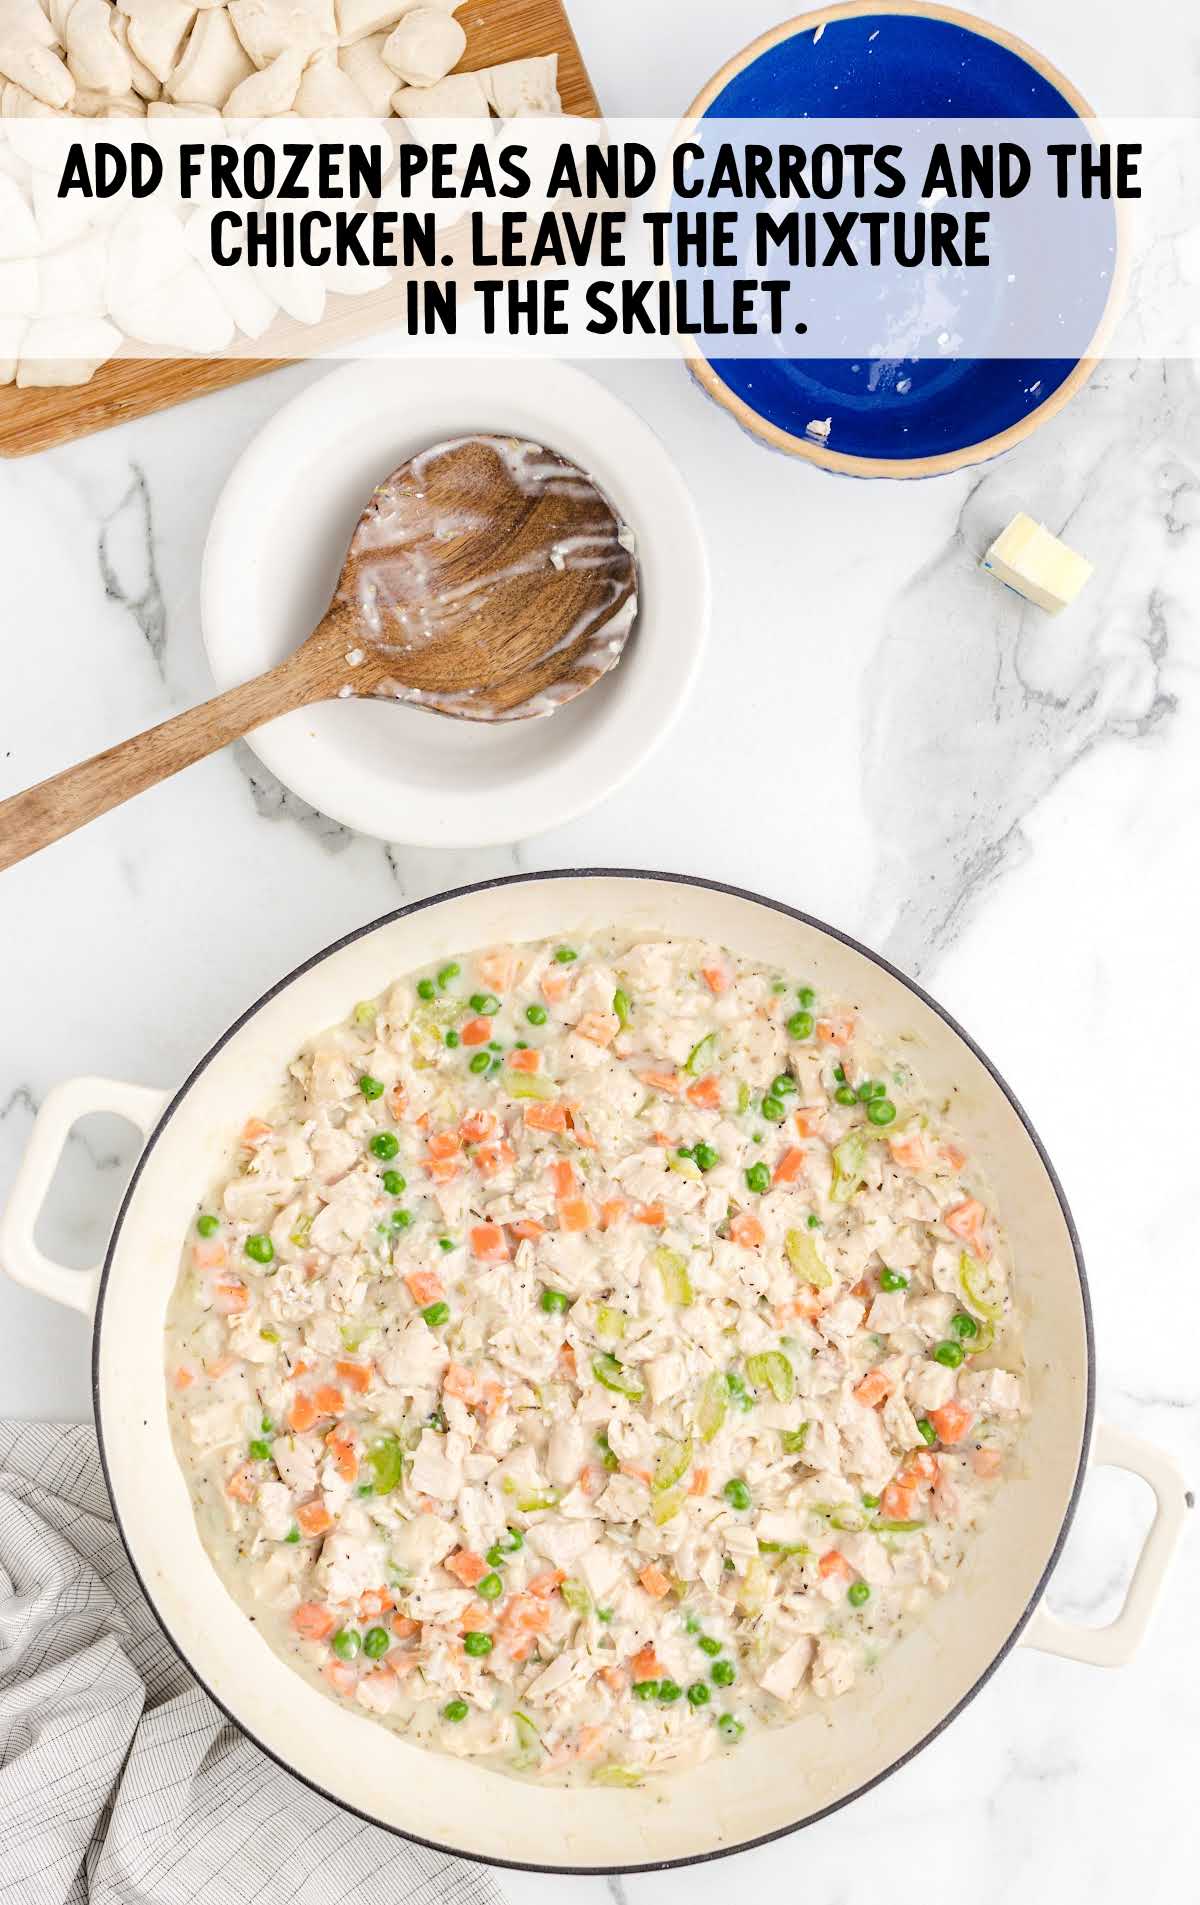
STEP THIRTEEN: Continue to stir, then add the frozen peas, carrots, and chicken. Stir until the peas and carrots and the chicken are entirely coated and evenly distributed. Leave the chicken mixture in the skillet.
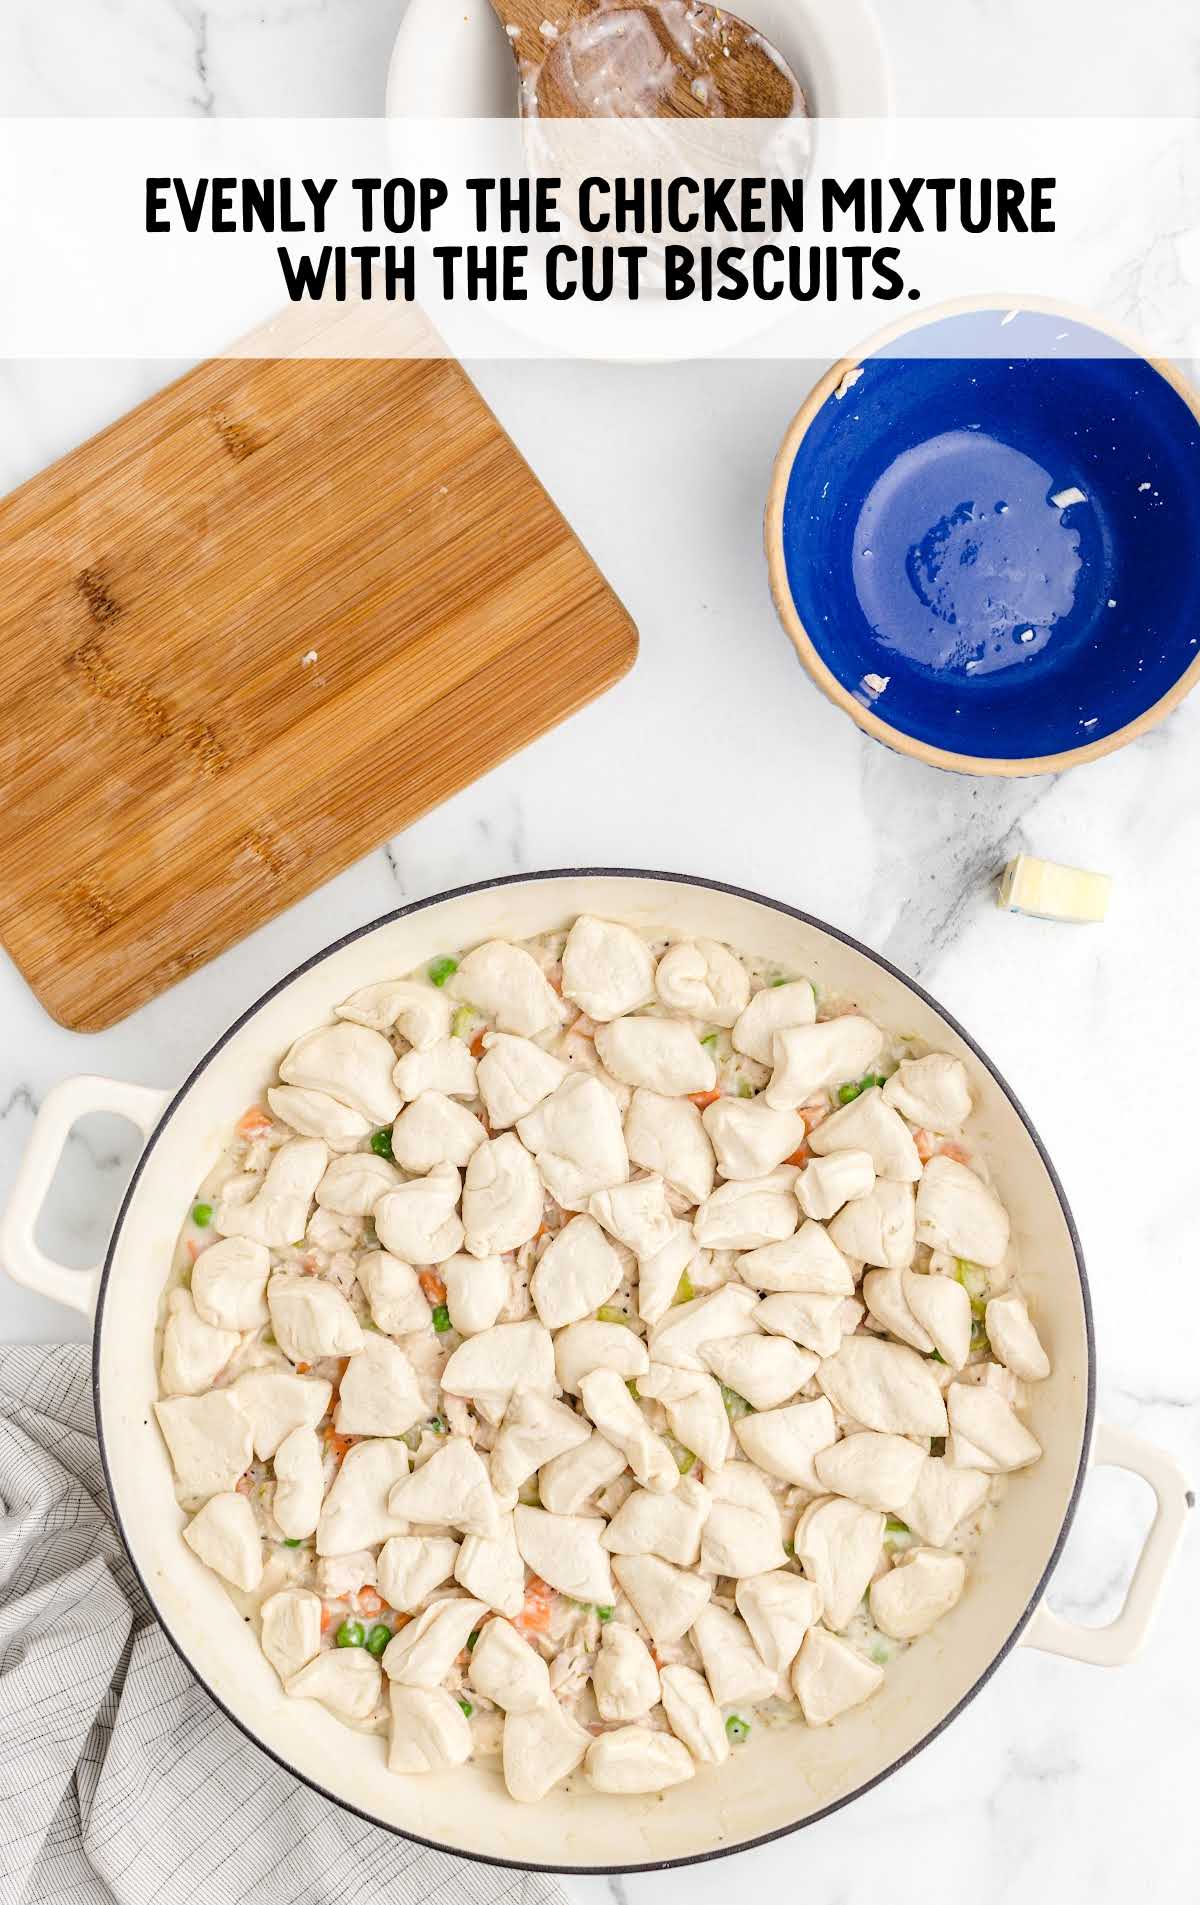
STEP FOURTEEN: Open the 2 canisters of biscuit dough. Cut each biscuit in half with a sharp knife, then in half again. Evenly top the chicken pot pie filling with biscuits.
STEP FIFTEEN: Bake the pot pie for 30 minutes or until the biscuits are golden brown.
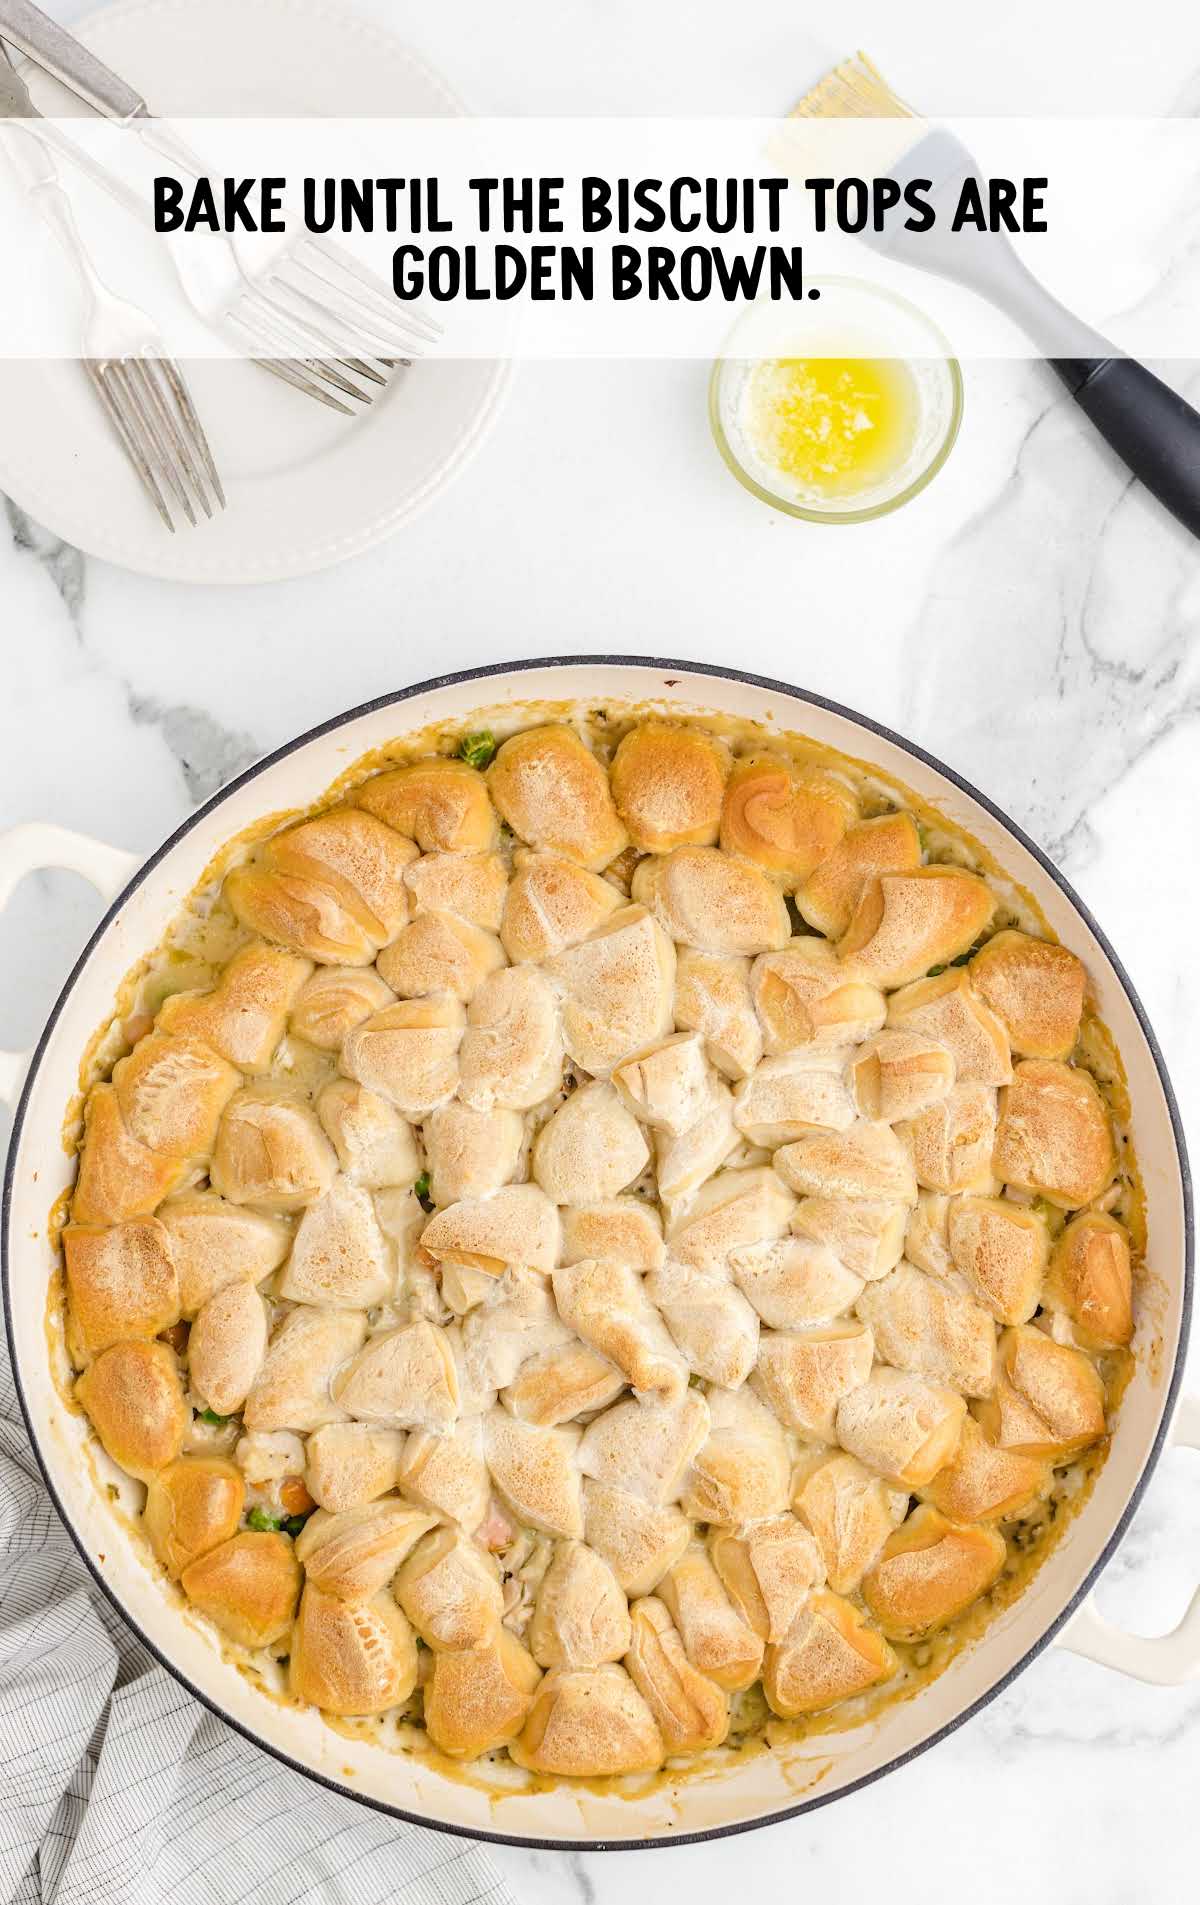
STEP SIXTEEN: Melt the final tablespoon of butter. After removing the pan from the oven, using a pastry brush, evenly coat the tops of the biscuits
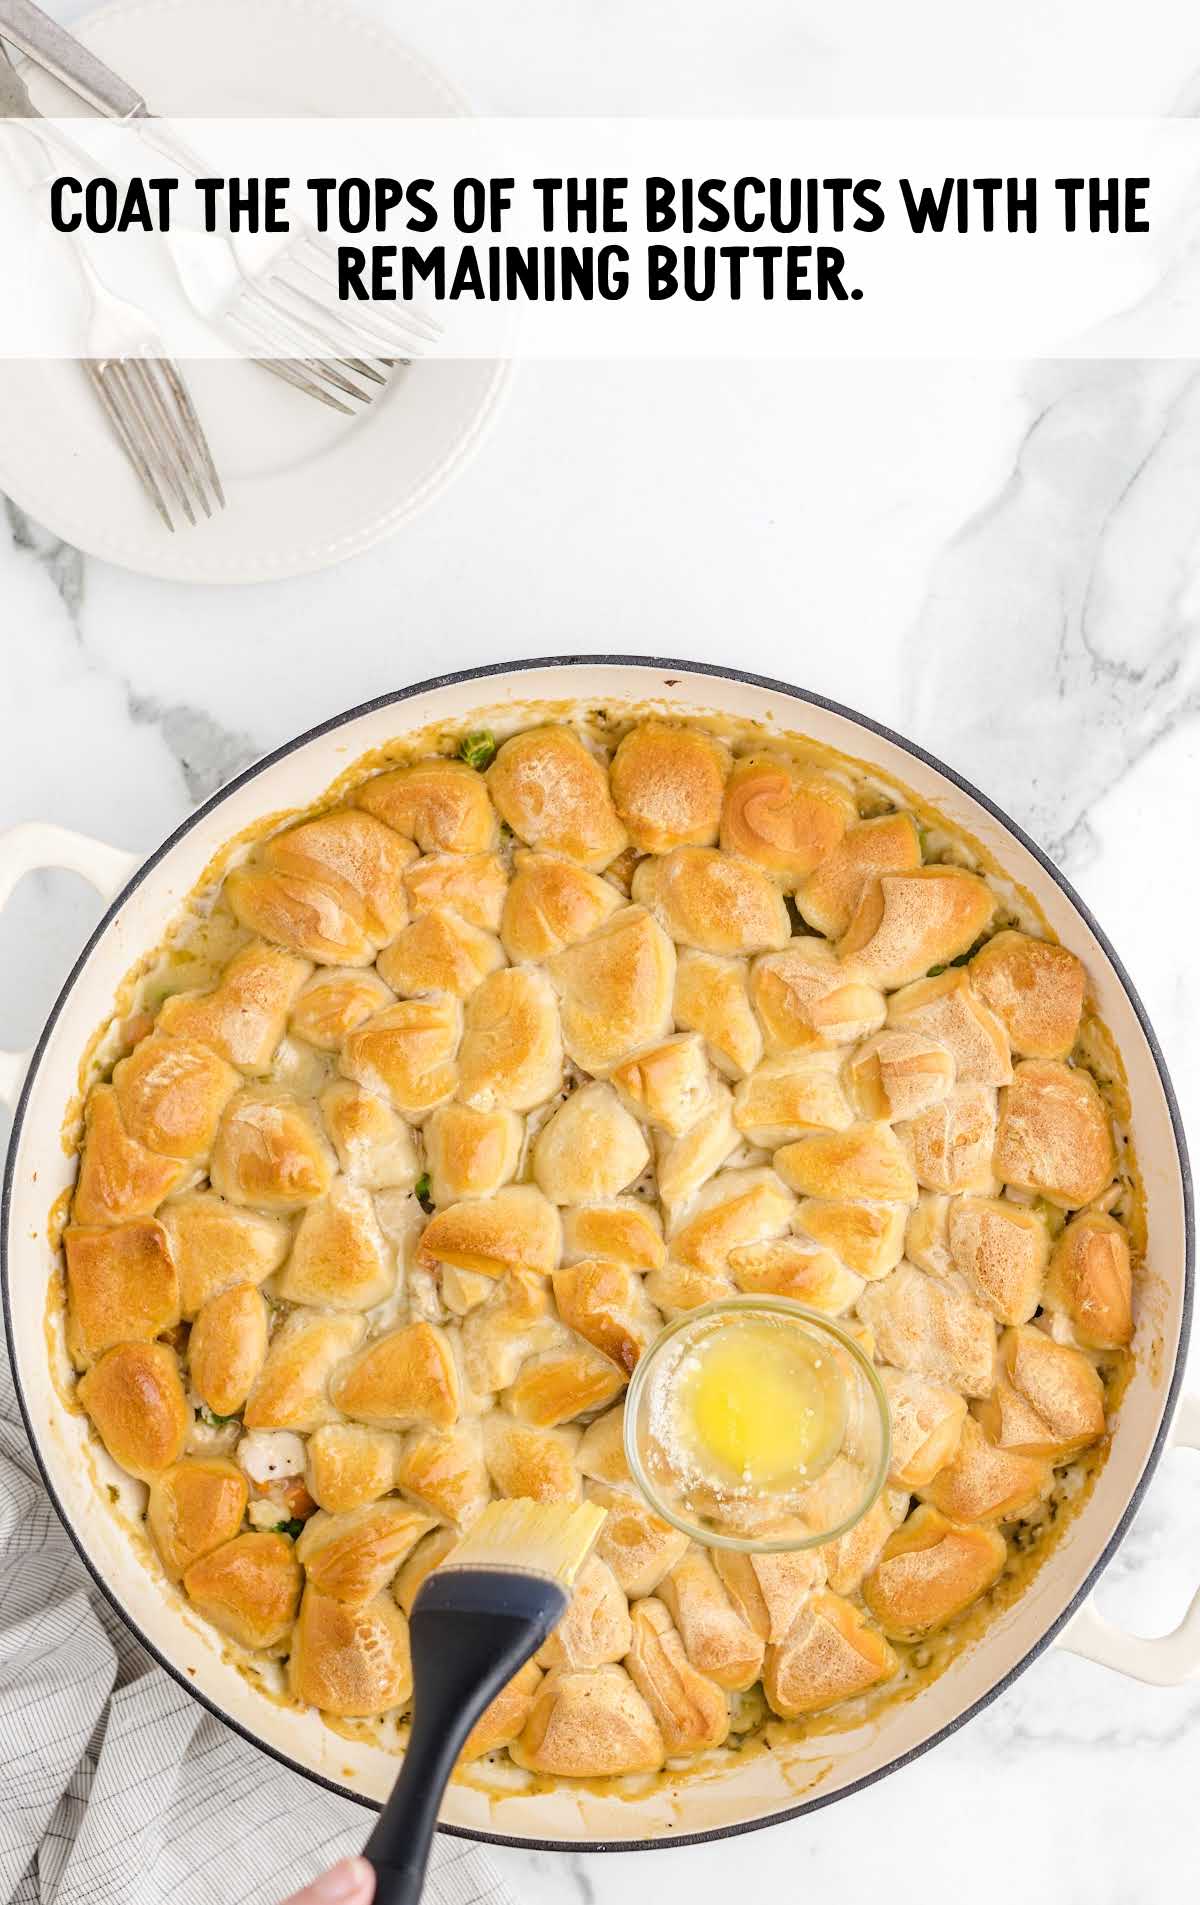
STEP SEVENTEEN: Serve while hot.
How To Serve
The whole family will gobble up this easy skillet chicken pot pie recipe. The biscuits are the perfect way to mop up all that yummy creamy chicken gravy. Add a simple Caesar salad for added greens in your meal.
MORE CHICKEN POT PIE RECIPES


Storage
IN THE FRIDGE: You can store leftover chicken skillet pot pie in the fridge for up to three days in an airtight container. Bear in mind that the biscuits will soften so they won’t be as crispy as when fresh out of the oven.
IN THE FREEZER: If you plan to make this one-skillet chicken pot pie in advance, then it’s best to freeze it before you bake it. Cover with aluminum foil and store in the freezer for up to three months. You can then bake the pie straight from the freezer.
Cast iron skillet chicken pot pie requires nothing more than a single skillet. While you could spend the whole day making a homemade pie crust for a traditional chicken pot pie, this version, which uses canned biscuits to top the hearty filling, is easy enough to make on a busy weeknight.
FREQUENTLY ASKED QUESTIONS
Can I substitute other poultry for the chicken in this recipe?
This skillet recipe would be delicious with chunks of turkey as well.
Can I make this recipe ahead of time?
This easy chicken pot pie recipe can be made in advance, covered in aluminum foil, and frozen before baking.
Can I make this recipe vegetarian?
You can turn this into a vegetarian recipe by omitting the chicken and increasing the veggies. If you have a preferred alternative protein or chicken substitute, you can add that as well.
More Recipes You’ll Love
- Chicken Casserole
- Ultimate Chicken Casserole
- Freezer Ready Chicken Pot Pie
- Mini Chicken Pot Pies
- Cast Iron Banana Bread
- Tater Tot Casserole
- Easter Bunny Cake
- Country Biscuits and Sausage Gravy Recipe
- Chicken Wild Rice Soup
- Biscuits and Gravy Casserole
- Chicken Pot Pie
- Instant Pot Turkey Breast
- Freezer Chicken Pot Pies
- Olive Garden Chicken Scampi
- Shepherds Pie
- Bacon Cheddar Biscuits
- Chicken Hand Pies
- Chicken Pot Pie Bake
- Oven Chicken Kabobs
- Broccoli Salad
- Italian Chicken Recipe
- Sloppy Joe Pie
- Easy Chicken Pot Pie
- Mashed Potato Casserole


Skillet Chicken Pot Pie
Skillet chicken pot pie uses just a single skillet and results in a delicious meal packed with rich flavor.
Prep Time 25 minutes
Cook Time 30 minutes
Total Time 55 minutes
Servings 4
Ingredients
Filling
- 2 tablespoons olive oil
- 1 small yellow onion finely diced
- 1 stalk celery thinly sliced (slivered)
- 2 teaspoons fresh minced garlic
- 2 tablespoons salted sweet cream butter
- 3 tablespoons all-purpose flour
- 1½ cups chicken stock or chicken broth
- ¼ cup heavy cream
- 1½ teaspoons dried rosemary
- 1½ teaspoons dried thyme leaves
- 2 teaspoons kosher salt (you can scale back to 1 teaspoon if you are sensitive to salt)
- ½ teaspoon black pepper
- 3 cups cooked chicken diced or shredded
- 12 ounces frozen peas and carrots
Topping
- 15 ounces buttermilk biscuits (two 7.5-ounce cans)
- 1 tablespoon melted butter
Instructions
- Preheat oven to 350°F.
- Using a 12-inch ovenproof skillet, over medium-high heat, add the olive oil.
- Add the onion and sliced celery. Sauté until onion is translucent and the celery is tender, stirring continuously for about 5 to 7 minutes.
- Lower the heat to medium-low. Add the fresh minced garlic to the onion and celery. Cook for about 1½ to 2 minutes. Be very careful to stir continuously and do not burn the garlic. Burning the garlic will make it taste bitter.
- Transfer the cooked onion, celery, and garlic to a bowl or plate and set aside.
- Return the skillet to the stovetop keeping the heat at medium-low and add the 2 tablespoons of butter.
- Once the butter is melted, whisk in the 3 tablespoons of flour. Continue whisking until the flour has absorbed the butter, for about 30 seconds to 1 minute.
- Keeping the heat at medium-low, slowly whisk in the chicken stock. Continue whisking until the stock and flour mixture are smooth. Add the heavy cream and continue whisking.
- Allow the broth mixture to come to a low simmer and begin to thicken. This may take 3 to 5 minutes.
- Once the broth mixture is thickened whisk in the kosher salt, black pepper, rosemary, and thyme leaves.
- Once the seasoning is well incorporated, remove the skillet from the heat.
- Return the onion, garlic, and celery to the broth mixture. Use a large wooden spoon to stir the mixture.
- Continue to stir and add the frozen peas, carrots, and chicken. Stir until it is entirely coated and evenly distributed. Leave the mixture in the skillet.
- Open the two cans of biscuits. Cut each biscuit in half, then in half again.
- Evenly top the chicken mixture with the biscuits.
- Bake the skillet chicken pot pie for 30 minutes or until the biscuit tops are golden brown.
- Melt the final tablespoon of butter. After removing the pan from the oven, using a pastry brush, evenly coat the tops of the biscuits.
- Serve while hot.
Video
Notes
Note: Pick up a rotisserie chicken from the grocery store for an easy option in this recipe.
Note: If you don’t have a cast-iron pan or ovenproof skillet, you could prepare the filling and then transfer it to a baking dish before adding the biscuits on top.
Note: Stir continuously to avoid burning the garlic. Burnt garlic tastes very bitter.
Recipe adapted from: iheartrecipes.com
Nutrition
Calories: 862kcal | Carbohydrates: 72g | Protein: 39g | Fat: 47g | Saturated Fat: 15g | Polyunsaturated Fat: 10g | Monounsaturated Fat: 19g | Trans Fat: 1g | Cholesterol: 125mg | Sodium: 2529mg | Potassium: 824mg | Fiber: 5g | Sugar: 6g | Vitamin A: 8690IU | Vitamin C: 13mg | Calcium: 120mg | Iron: 6mg
Have You Tried This Recipe?Follow me on Pinterest @spaceshipslb


Comments
Gloria says
This is so hearty and delicious!!!
Marian Brown says
Best chicken & dumplings my husband and I have ever eaten! I went exactly by your recipe (used 2 large chicken breast. Seasoned and seared them in a frying pan then let them simmer until they had 160 degrees internal temp. They were moist and tender and shredded easily). I used a large Dutch oven which was perfect. The dumplings were so tender and light!! There’s only my husband and I so it made more than we needed. When we finished eating, I scooped out the dumplings that remained and threw those away. I plan on using the leftovers to make a cream of chicken and rice soup for later in the week. This is so worth making! Thanks for sharing this…it’s a keeper!!
Tracey Cody says
Loved this! Even my kiddos loved it! Defiantly going to try in crockpot..