


If you only make one fancy-looking cookie this Christmas, make it this one. Candy cane cookies look like they took skill. They didn’t.
The dough is a soft peppermint sugar cookie dough, half of it dyed red, and the whole trick is rolling two little ropes and twisting them together. A six year old can do it. Honestly, grab the kids to help you with them, because rolling the ropes is the fun part. The no-bake Christmas wreath cookies are the other one kids can mostly make themselves.

If you’re looking for the ones with the chocolate kiss pressed in the middle, those are my candy cane kiss cookies.
Why This Dough Works When Other Recipes Don’t
This dough has two jobs that a regular sugar cookie dough doesn’t. It has to bend into a twist without cracking, and it has to keep that twist in the oven.
The bending comes from one tablespoon of heavy cream. I know one tablespoon doesn’t sound like enough to matter in three cups of flour, but the versions I tested without it cracked every time I twisted a rope, and the version with it rolls perfectly. If you’re out of heavy cream, half and half works in the same amount. Milk is too thin to do the same job, so don’t substitute it.
The shape holding comes from using far less baking powder than you’d expect. There’s an eighth of a teaspoon in this whole batch, and yes, that’s the real amount. A normal spoonful would puff these into round cookies and you’d lose the twist. This tiny amount keeps them soft and lets the twist keep its shape.
Keep The Dough Cold From Start To Finish
Here’s the thing nobody tells you about candy cane cookies: the dough has about a 20 minute window on the counter before it starts fighting you.
Warm dough cracks when you roll it, tears when you twist it, and slumps in the oven.
The rule is simple: only take out the dough you’re about to shape, and leave everything else in the fridge. That’s why the recipe works in halves, and why the dough balls get a short chill along the way.
What To Do If Your Rope Cracks
At some point a rope is going to crack on you, even with good dough and cold hands. It’s normal, and, thankfully, it’s a 10 second fix.
Just roll the cracked rope back into a ball, then roll the ball back into a rope, and it will almost always hold the second time.


The surface of the dough dries out as you handle it, and balling it up mixes that dryness back into the soft middle.
When this happened to me halfway through a test batch, I rerolled every cracked rope and still finished with all 48 cookies.
If ropes start cracking one after another, that’s not bad luck, that’s warm dough. Put everything back in the fridge for 15 minutes and go pour a coffee. 🙂
If Your Dough Cracks Straight Out Of The Fridge
If your very first rope cracks, straight out of the fridge, the dough itself is too dry. This usually means extra flour got packed into the measuring cup.
The good news is that you can fix the dough you have.
Knead in more heavy cream, a teaspoon at a time, until the dough rolls without splitting. Cream is what keeps this dough flexible in the first place. Don’t add too much. It shouldn’t take more than a tablespoon to get there.
On your next batch, spoon the flour into the cup and level it off instead of scooping.
How To Know When They’re Done
You can’t judge when these candy cane cookies are done by color the way you would most cookies. By the time the tops turn golden, they’re overbaked, and every bit of browning shows on the white dough.
When they’re done, they’ll look dry and set instead of soft and shiny.



If you’re not sure, check the bottom of one. Slide a spatula under a cookie and lift it up. The bottom should be pale, with barely any color.

In my testing, a dark baking sheet browned the bottoms, and the same dough on an insulated sheet baked evenly. If your bottoms keep browning even when you pull the cookies early, switch pans before you blame yourself or the recipe!
Make Ahead And Storage
The smartest way to get ahead for Christmas is to freeze the shaped cookies before they’re baked.
- Shape the candy canes, lay them close together on a parchment lined baking sheet, and freeze them until they’re solid.
- Move the frozen canes to a freezer bag, where they’ll keep for up to three months.
- When you want fresh cookies, bake them straight from the freezer and add a minute or two to the baking time.
- All the rolling and twisting is already done, and the house still smells like you baked that morning, because you did.
The dough also holds in the fridge for up to two days, wrapped tight. It will be too firm to roll after that long a chill, so let it sit on the counter for about 10 minutes before you start shaping.
Baked cookies keep about a week at room temperature in an airtight container. Skip the fridge, which dries them out. They also freeze for up to two months.

If you’re building out the rest of the tray, peppermint bark and peppermint meltaways cover the no-rolling end of the effort scale. And if you’re still deciding what else makes the cut this year, my Christmas cookie list is where I’d start.
This post was originally published in November 2020. I tested this dough in 2022, a second tester confirmed it in 2023, and I baked it again in January 2026 to make sure it still holds up. New photos were added in August 2026. This is the version that passed all three rounds.



Candy Cane Sugar Cookies
Ingredients
- 3 cups all-purpose flour
- ⅛ teaspoon baking powder
- 1 cup unsalted butter, softened (2 sticks)
- 1½ cups granulated sugar
- ½ teaspoon cream of tartar
- 1 tablespoon heavy cream
- 1 large egg, room temperature
- 1½ teaspoons pure peppermint extract
- 1¼ teaspoons clear vanilla flavoring
- ½ teaspoon red squeeze gel color
Instructions
- In a medium bowl, whisk together the flour and baking powder. Set aside.
- Using a stand mixer, or a handheld mixer and a large mixing bowl, on medium-high speed, cream the unsalted butter for 1½ to 2 minutes.
- Reduce the mixing speed to low and add the granulated sugar, cream of tartar and heavy cream. Increase the mixing speed to medium and continue to mix for 2 to 3 minutes or until the butter mixture is fluffy.
- Reduce the mixing speed on low and add the egg. Mix until well incorporated.
- Add the peppermint extract and clear vanilla flavoring.
- Keeping the mixer speed on low, slowly add the flour and baking powder, ½ cup at a time. Continue mixing just until the flour is well incorporated and no visible streaks of flour are showing.
- Divide the cookie dough into 2 equal dough balls. Wrap one dough ball in plastic wrap and return the other dough ball to the mixing bowl to be colored red.
- Add ½ teaspoon of red gel color to the dough ball in the mixing bowl. On low speed, mix until you reach a uniform color and no white streaks are visible.
- Wrap the red dough ball in plastic wrap. Refrigerate both dough balls for 1 hour.
- Remove the dough balls from the refrigerator and use a ½ tablespoon to scoop the dough and roll into a tight round ball, to make sure the dough rope holds its shape.
- Return to the refrigerator.
- Preheat the oven to 350°F and line 2 baking sheets with parchment paper.
- Cover your counter or a cutting board with a sheet of parchment paper. (This is to keep from staining the counter or cutting board red)
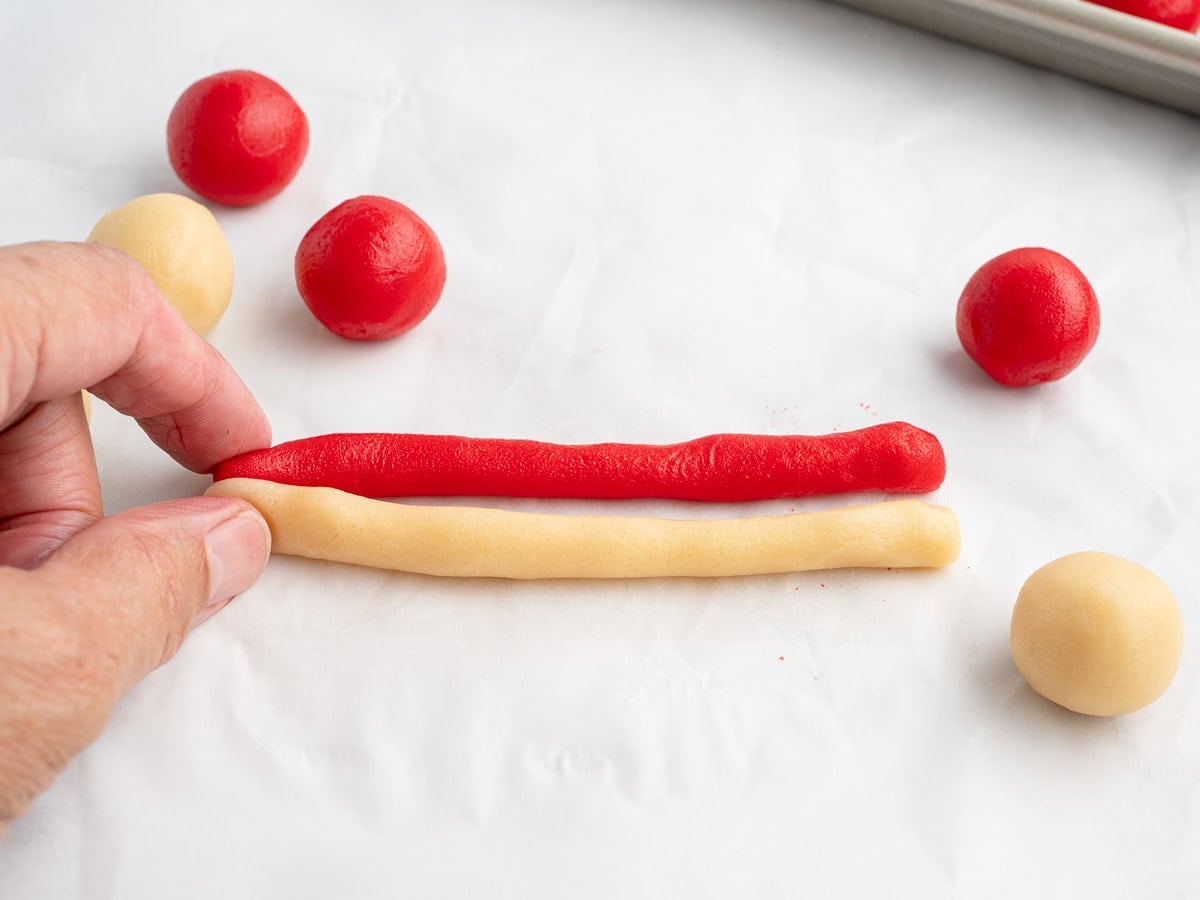
- Remove a few dough balls of each color at a time (I removed 6 balls of each color at a time.) Using your hand, gently roll a white and red dough ball into 5 inch long ropes. It is very important that your hands stay cool while you are rolling the ropes.
- Lightly press the bottoms of the 2 ropes together. Carefully and with light pressure, twist the ropes together. Be sure to keep the ropes rounded and do not flatten them out.
- Place the twisted rope onto the prepared baking sheet and curve the rope tops into the candy cane crook. Repeat the rolling and twisting process with the remaining dough. Place the cookies 2 inches apart. (I baked one cookie sheet of candy cane cookies while rolling and twisting the next batch of cookies.)
- Bake for 7-9 minutes.
- Allow the cookies to cool on the pan for 10 minutes before moving them to a cooling rack.
Notes
- Oven temperatures vary and may need to be recalibrated periodically to ensure they are accurate. Make sure to keep a close eye on your cookies as the suggested baking time approaches.
Nutrition












Comments
Gloria says
Our family loves these cookies – they are so easy to make and are so festive!