


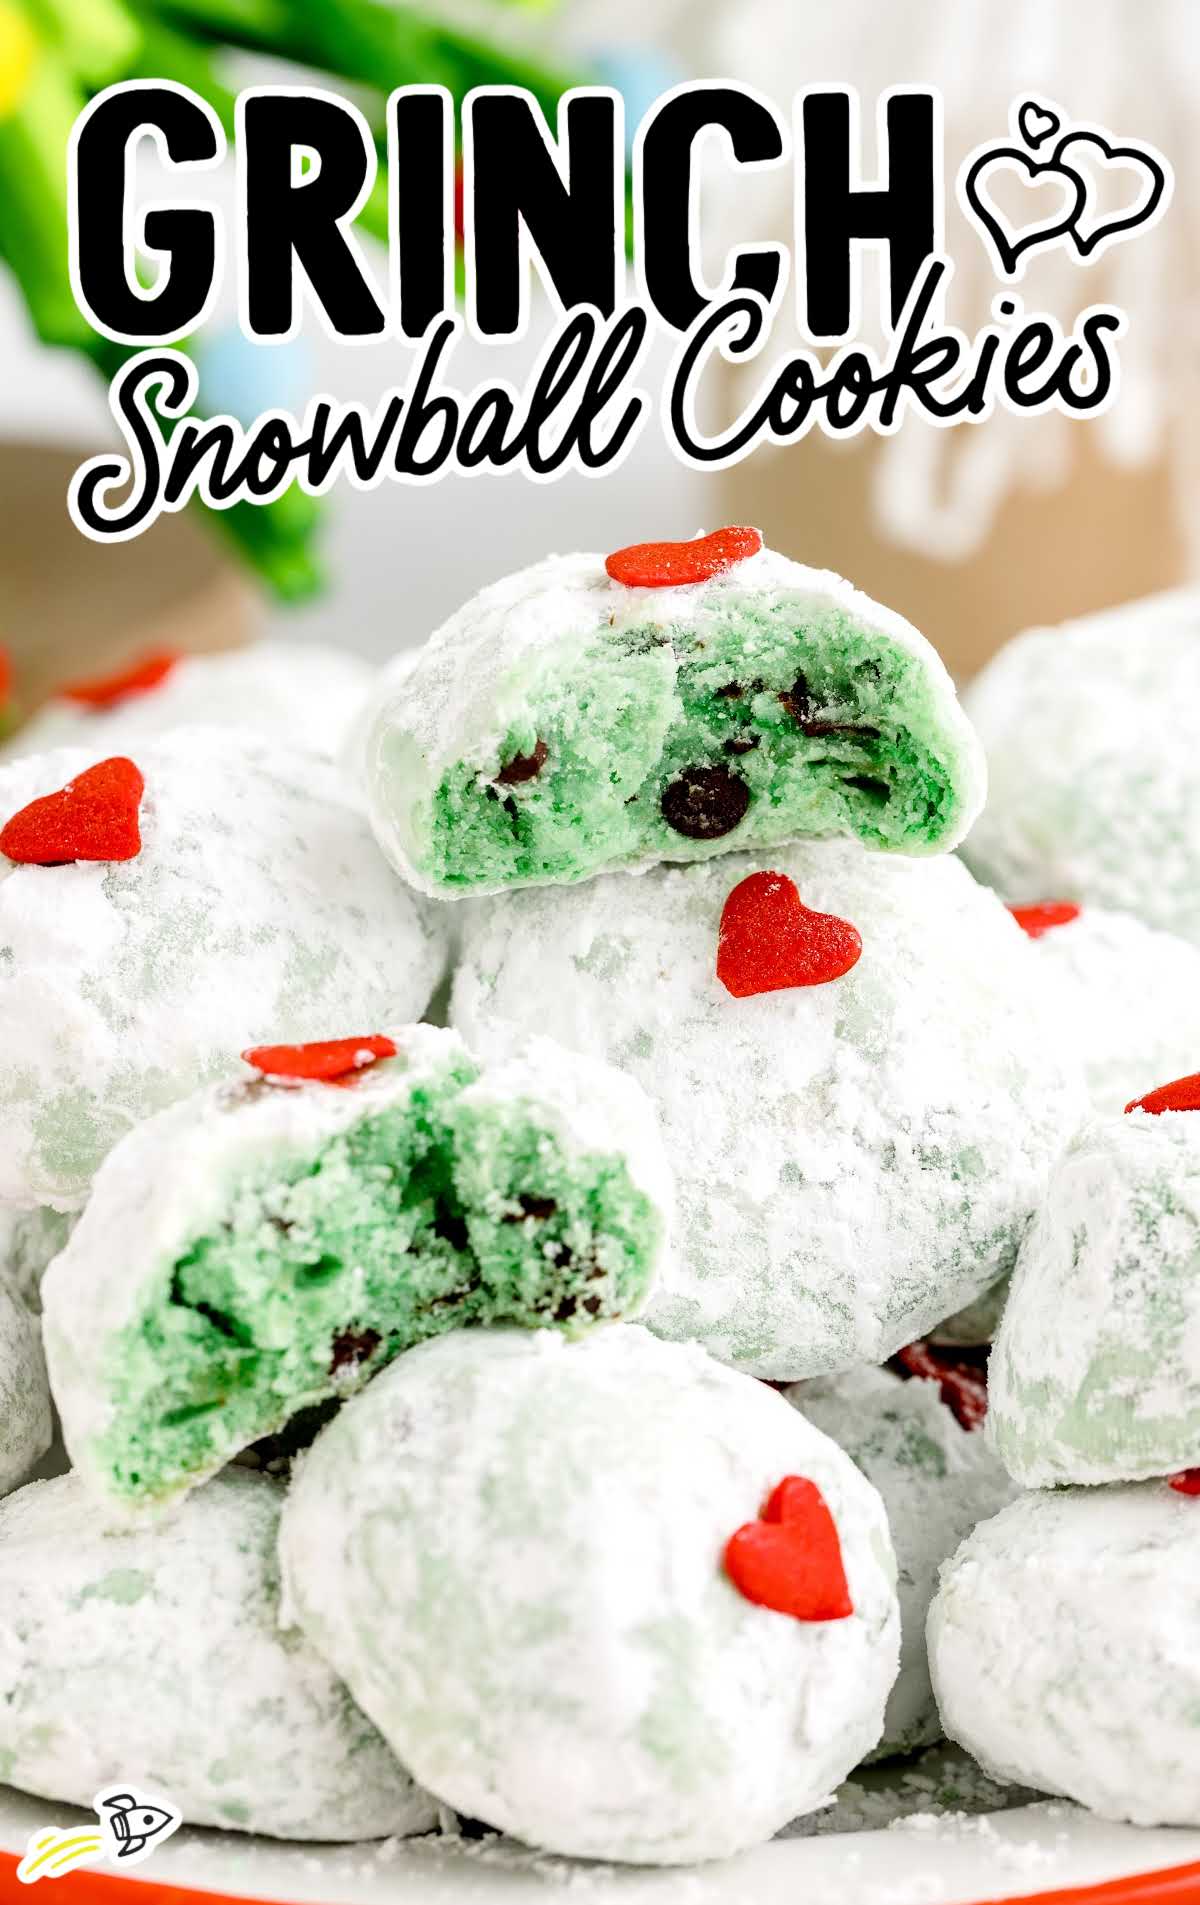
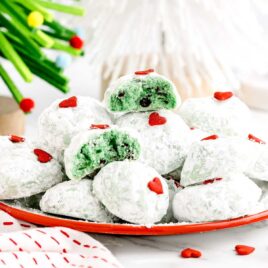
If you’re anything like us, holiday baking is one of the highlights of the season. These Grinch Snowball Cookies are sure to bring a little mischievous cheer to your kitchen.
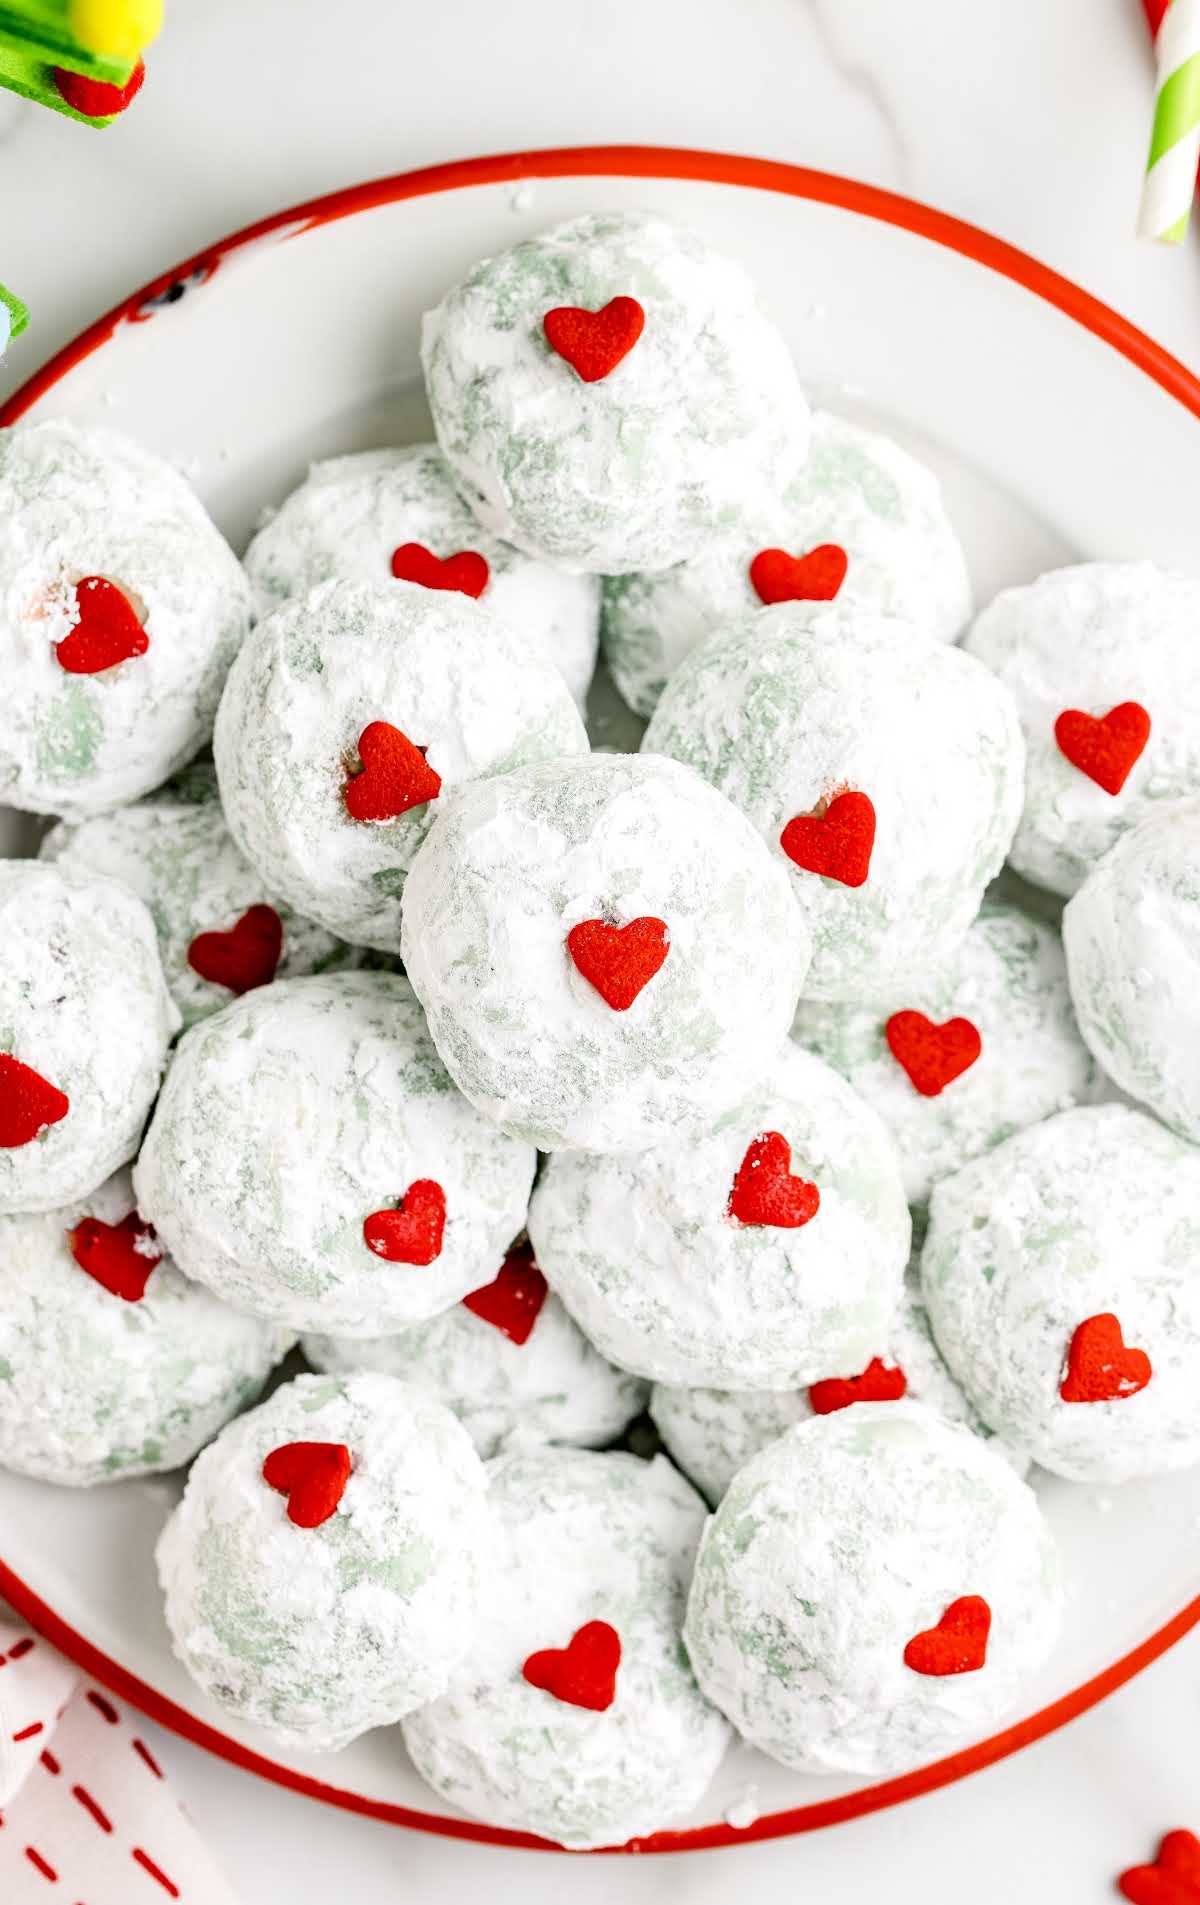
Buttery, melt-in-your-mouth snowball cookies with a playful twist, dyed Grinch-green and topped with a heart just like the one that grew three sizes.
They’re perfect for cookie exchanges, serving at holiday gatherings or simply indulging at home. Whether you’re a seasoned baker or just getting started, this recipe is festive, easy to follow, and guaranteed to spread some holiday spirit.
Let’s Dish: About These Christmas Cookies
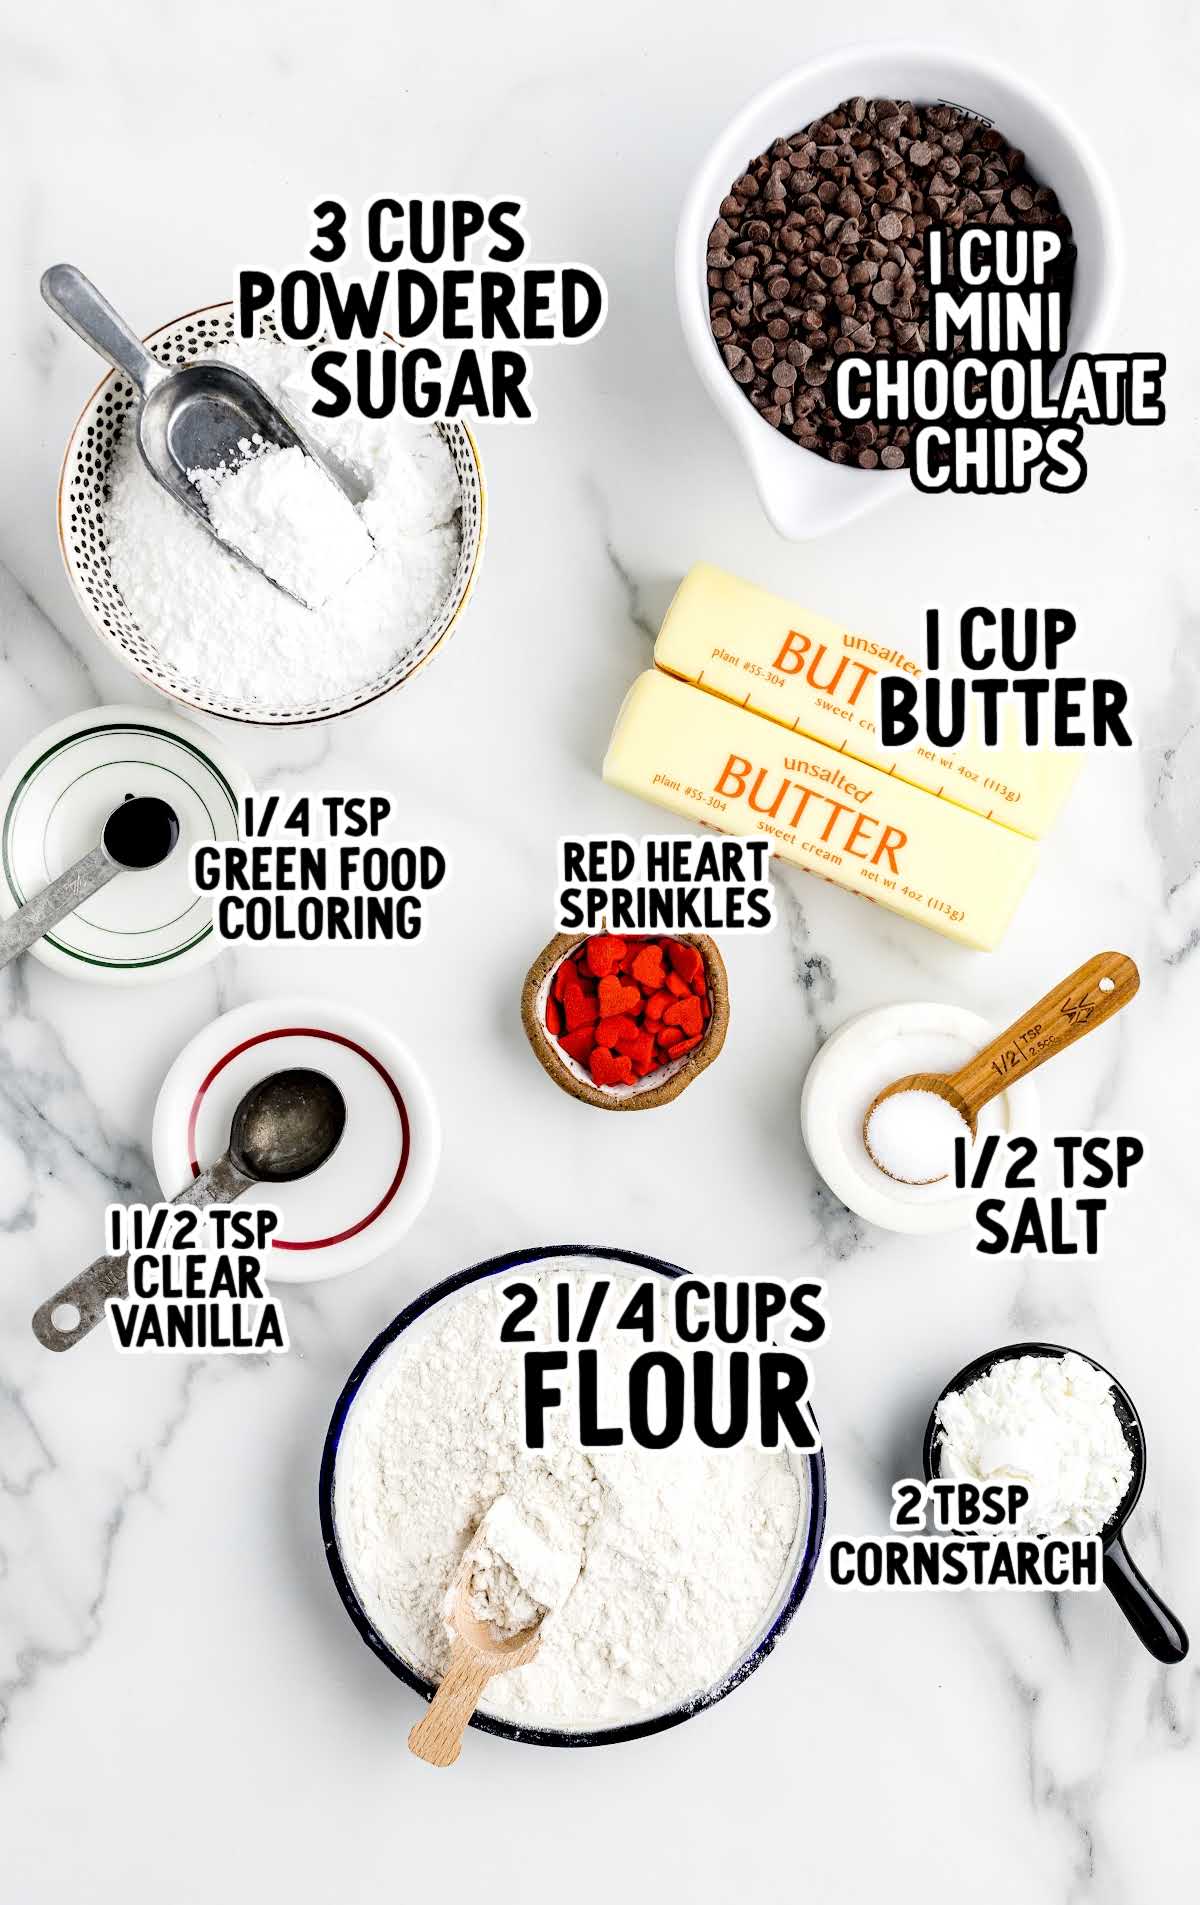
Main Ingredients: Powdered sugar, unsalted butter, vanilla extract, flour, cornstarch, salt, green food coloring, mini chocolate chips, red heart sprinkles.
Quick Steps: Make dough, add food coloring, shape into balls, bake, roll in powdered sugar, add heart sprinkles.
Total Time & Yield: 37 minutes, 32 cookies.
Why This Recipe
- This Grinch Snowball Cookie recipe stands out for its simplicity and festive charm.
- Unlike other versions that incorporate additional fillings like pecans, this recipe keeps it classic with buttery dough and chocolate chips, offering a straightforward and approachable cookie-making process.
- Other recipes may use fillings or chopped nuts that can add texture but complicate the process, while our recipe focuses on achieving a melt-in-your-mouth snowball with a burst of mini chocolate chips.
- The vibrant green dough and iconic red heart on top ensure these cookies capture the Grinch’s essence with ease.
Grinch Snowball Cookies Ingredients
Grinch snowball cookies will melt in your mouth! These treats start with an incredibly buttery and crumbly cookie base covered in a delectable powdered sugar coating.
You’ll find the cookie bursting with decadent chocolate chips the minute you take a bite, and the bright green color is sure to get you into the holiday spirit.
To make these festive cookies, you’ll need:
- 3 cups of powdered sugar, sifted and divided into 2 cups and 1 cup
- 1 cup of unsalted butter, softened
- 1½ teaspoons of clear vanilla extract
- 2¼ cups of all-purpose flour
- 2 tablespoons of cornstarch
- ½ teaspoon of salt
- ¼ teaspoon (10 to 12 drops) of liquid green food coloring
- 1 cup of mini semi-sweet chocolate chips
- Garnish: 32 large red heart sprinkles (one per cookie)
Grinch Cookie Recipe Substitutions And Additions
FOOD COLORING: We used liquid food coloring for a more pastel shade of green for this Grinch cookie recipe.
If you are using gel food coloring, you will likely end up with a more vibrant green.
Start with two to three drops and add more gel color to achieve your desired color dough.
VANILLA EXTRACT: I used clear vanilla extract, also known as clear vanilla flavoring, in this easy recipe because I find that the tint of the cookies stays true when using the clear extract.
You can certainly use a standard vanilla extract in this recipe, and it will still be delicious.
You may need to add an extra drop or two of the green liquid food coloring to the dough to mask the slight tan color that the darker vanilla extracts can cause.
CHOCOLATE CHIPS: While the recipe calls for mini chocolate chips, you can personalize your cookies by using white chocolate chips, dark chocolate chips, or even butterscotch chips.
Each option brings a unique richness to the cookies, allowing you to tailor the sweetness and flavor to your liking.
NUTS: If you do not want the mini semi-sweet chocolate chips in these Grinch snowball cookies, then you can swap them out with chopped walnuts or pecans for a more traditional snowball cookie flavor.
CANDY SPRINKLES: Add an extra festive touch by incorporating holiday-themed or colorful sprinkles into the dough.
This addition will not only give your cookies a joyful appearance but also introduce a subtle crunch and bursts of sweetness as you bite into the cookies.
CRUSHED CANDY CANES: Instead of rolling the cookies in confectioners’ sugar, consider rolling them in crushed candy canes for an extra festive look and a delightful peppermint crunch.
How To Make This Grinch Snowball Cookies Recipe
Make these Grinch snowball cookies to show off your holiday baking skills! You’ll mix the cookie dough before adding the chocolate chips and green food color to get that amazing Grinch-green hue.
Roll the spoonfuls of dough in between your palms, creating the snowballs.
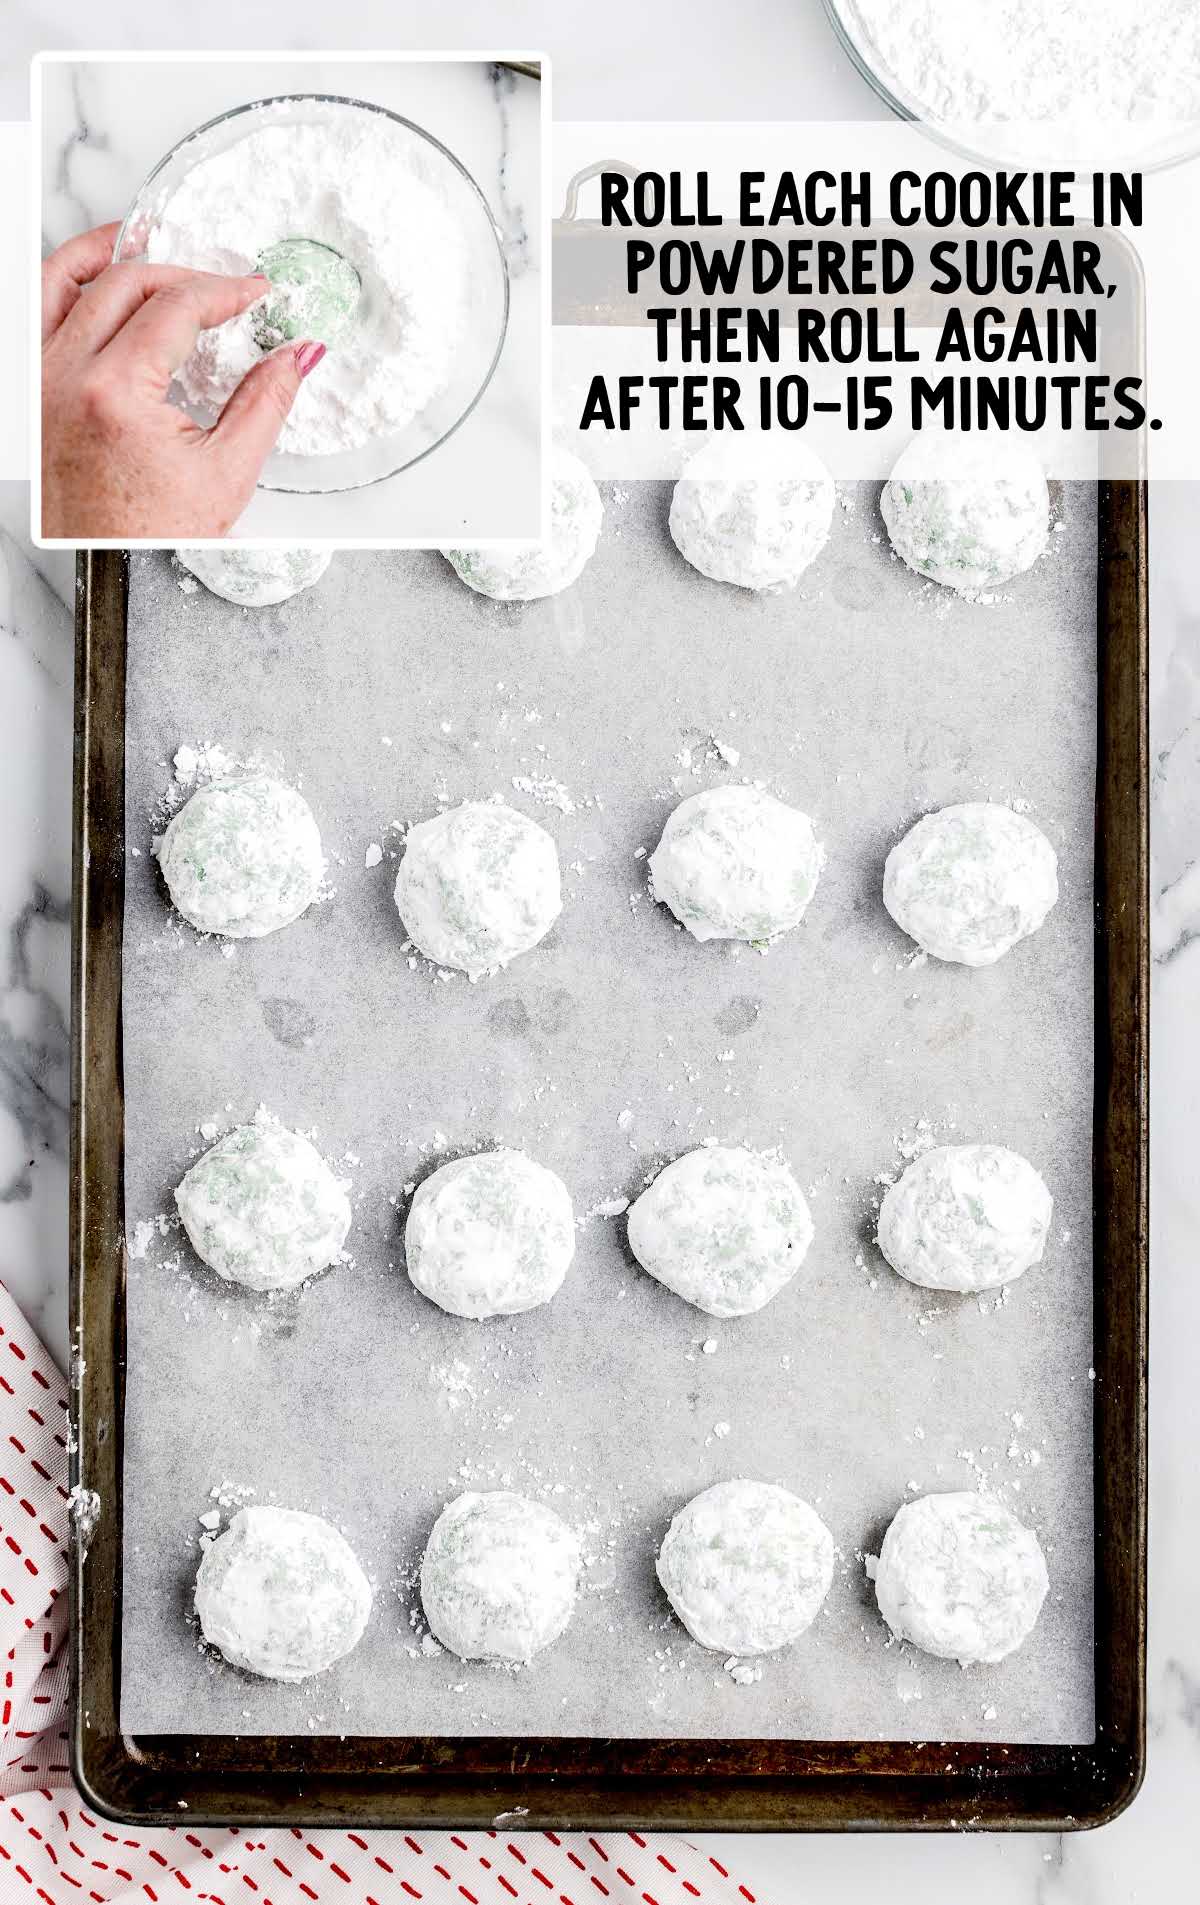
Once baked, roll the cookies in powdered sugar before adding a heart sprinkle for the perfect finishing touch.
OUR RECIPE DEVELOPER SAYS
For your softened butter in this recipe, you will want to make sure that it is just at room temperature and not overly soft.
You should be able to press your finger into the top of the butter and leave a slight impression. It should not be so soft that you can press your finger all the way through.
If your butter is too soft, your cookies will spread too much when baking, and you will not get the desired results for the recipe.
STEP ONE: Line two large baking sheets with parchment paper or silicone baking mats and set aside.
STEP TWO: Place two cups of the sifted powdered sugar in a bowl and set aside.
STEP THREE: In the bowl of a stand mixer fitted with a paddle attachment, or a hand mixer, beat the unsalted butter and one cup of powdered sugar on medium-low speed.
Beat for one to two minutes or until light and fluffy.
STEP FOUR: Add the vanilla extract and beat for an additional 30 seconds until completely incorporated.
STEP FIVE: Whisk together the all-purpose flour, cornstarch, and salt in a medium bowl.
STEP SIX: While your mixer is on low, spoon the flour mixture slowly into the mixing bowl.
Make sure the flour is incorporated after each addition before adding more to the mixing bowl.
STEP SEVEN: Once all your flour mixture has been added, increase the mixer speed to medium speed.
Beat the dough for an additional 30 to 45 seconds to ensure that all the ingredients are fully incorporated and that your dough is light and fluffy.
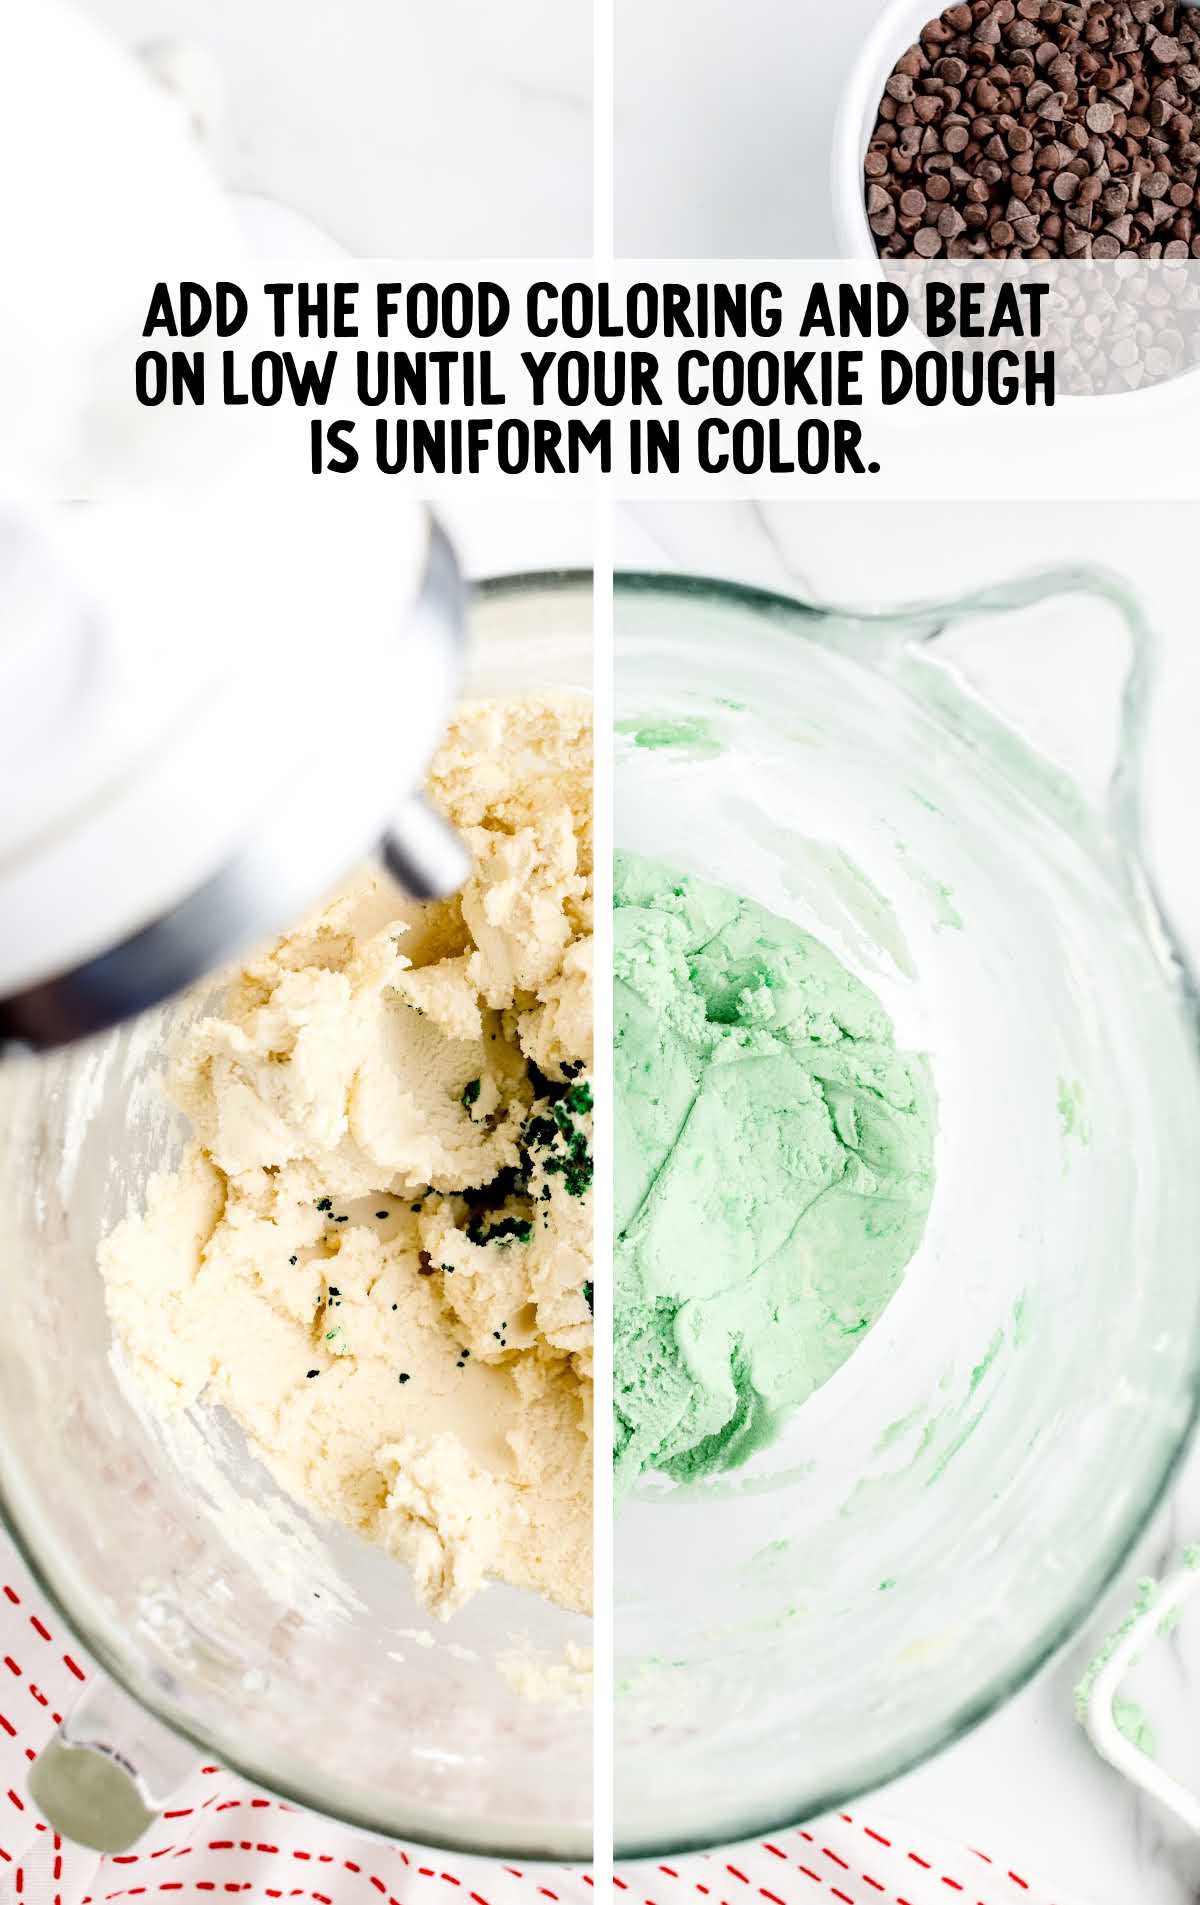
STEP EIGHT: Add the green liquid food coloring and beat on low until your cookie dough is uniform in color.
You can add a couple of extra drops if you want a darker green color for your dough.
STEP NINE: Lastly, mix in the mini semi-sweet chocolate chips until all the chips are fully incorporated.
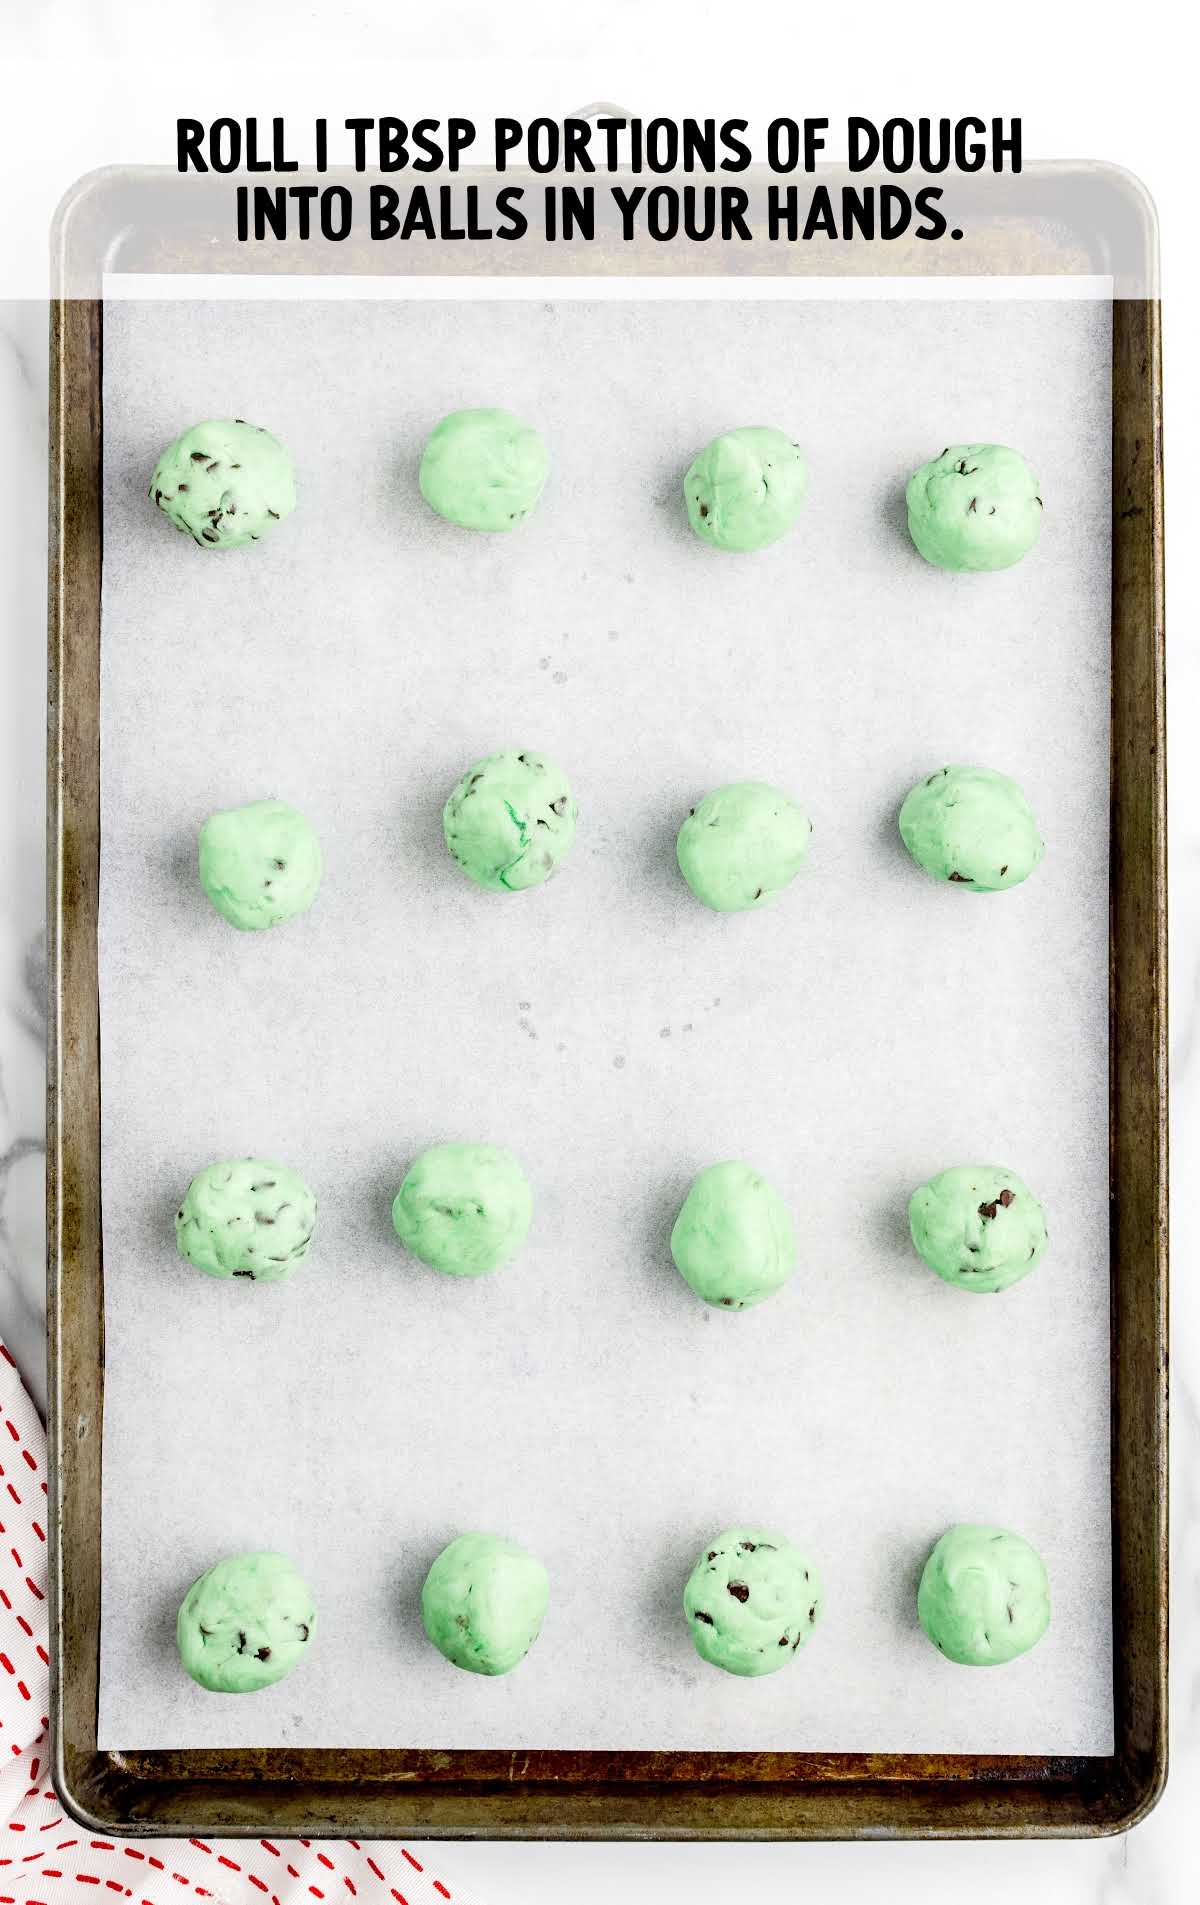
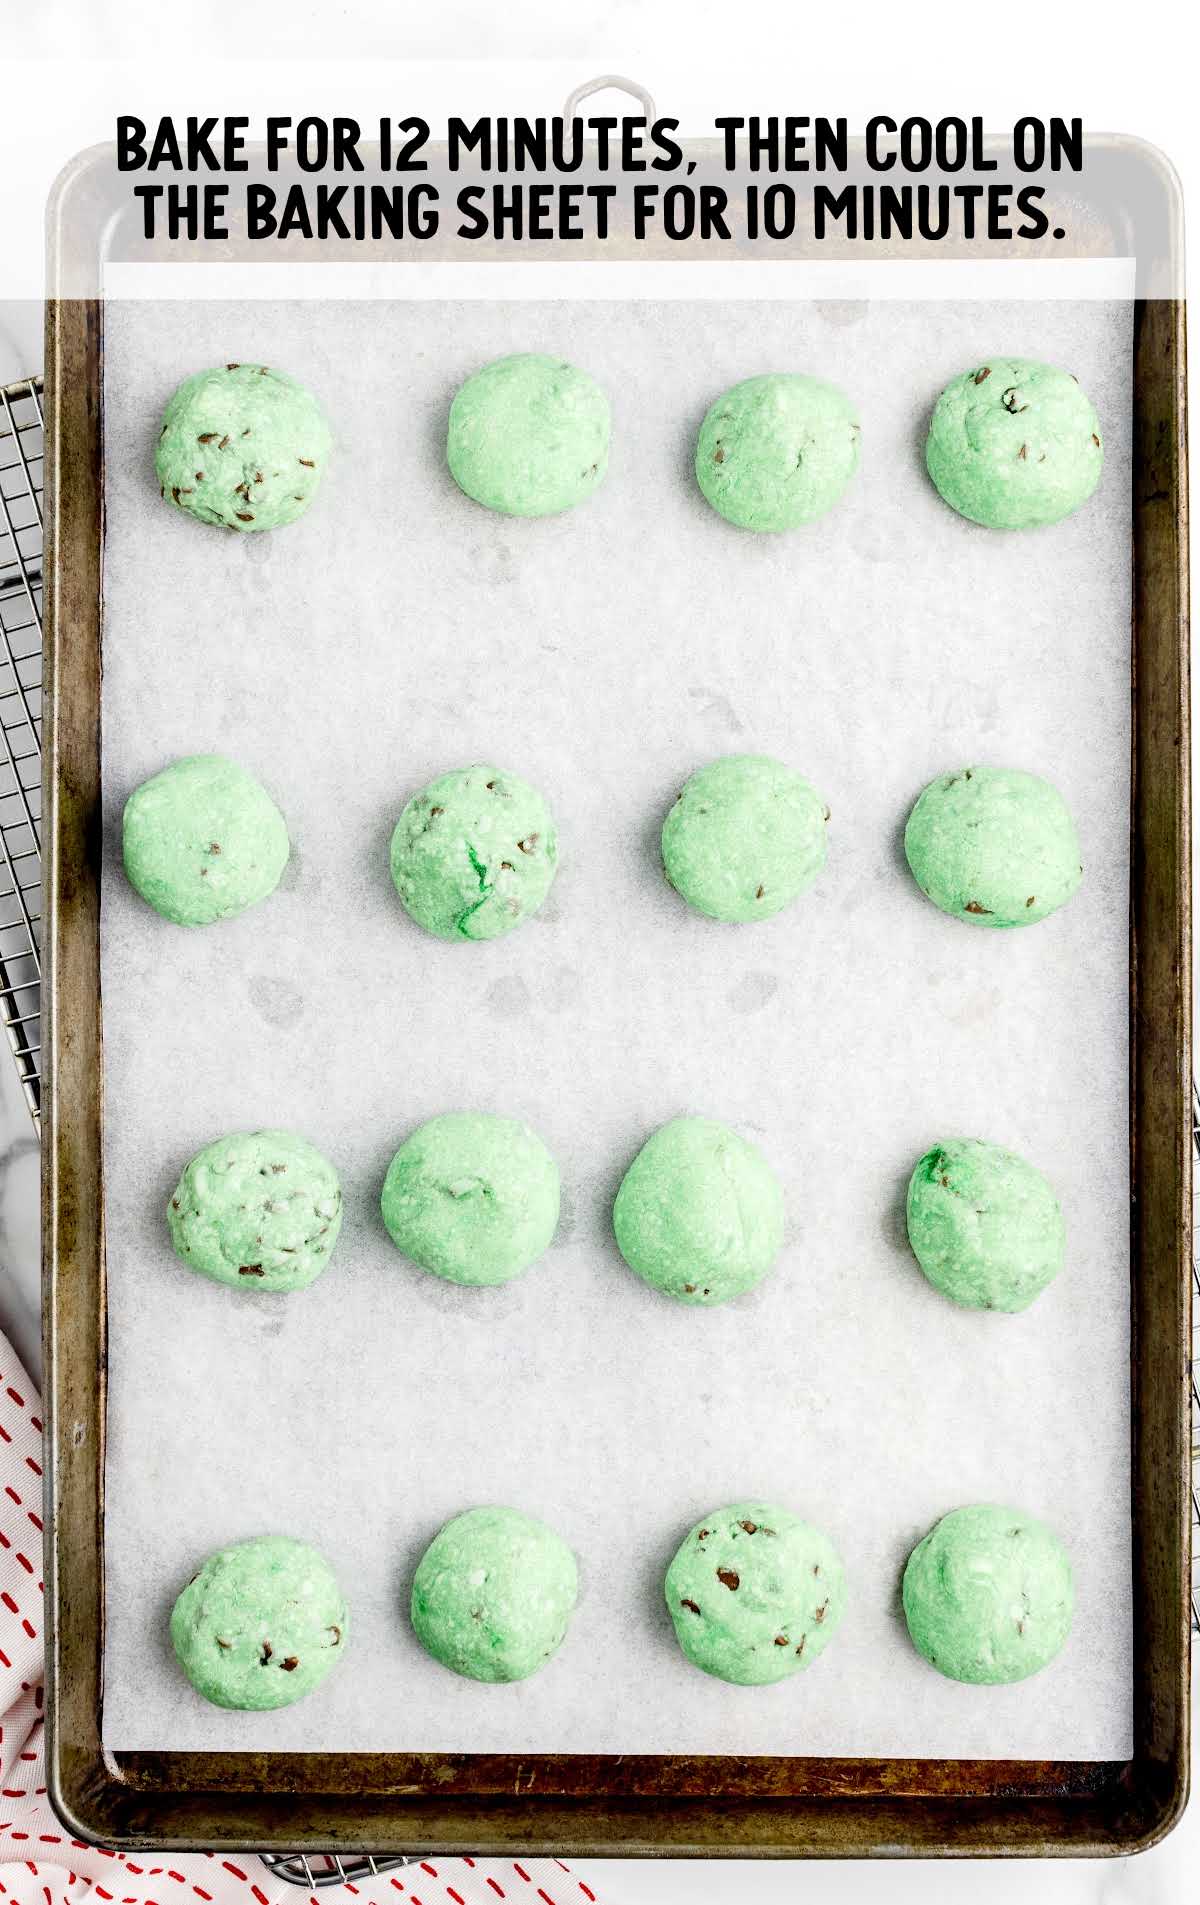
STEP TEN: Scoop the dough using a one-tablespoon cookie scoop. Roll the dough into balls in the palm of your hand.
STEP ELEVEN: Place the rolled cookie dough balls onto the prepared cookie sheets and refrigerate the dough balls for 15 minutes.
PRO TIP:
Chilling the dough balls before baking will help minimize any spreading of the cookies so that they keep that nice rounded shape.
STEP TWELVE: Preheat your oven to 350°F.
STEP THIRTEEN: Bake cookies for 12 minutes. Allow the cookies to cool on the baking sheet for ten minutes.
PRO TIP:
Oven temperatures vary and may need to be recalibrated periodically to ensure they are accurate. Make sure to keep a close eye on your cookies as the suggested baking time approaches.
STEP FOURTEEN: Roll each slightly warm cookie gently in the reserved bowl of powdered sugar.
Place them back on the cookie sheet to continue to cool completely.
Once they have cooled completely for an additional 10 to 15 minutes, you will roll each cookie in the powdered sugar for a second coating.
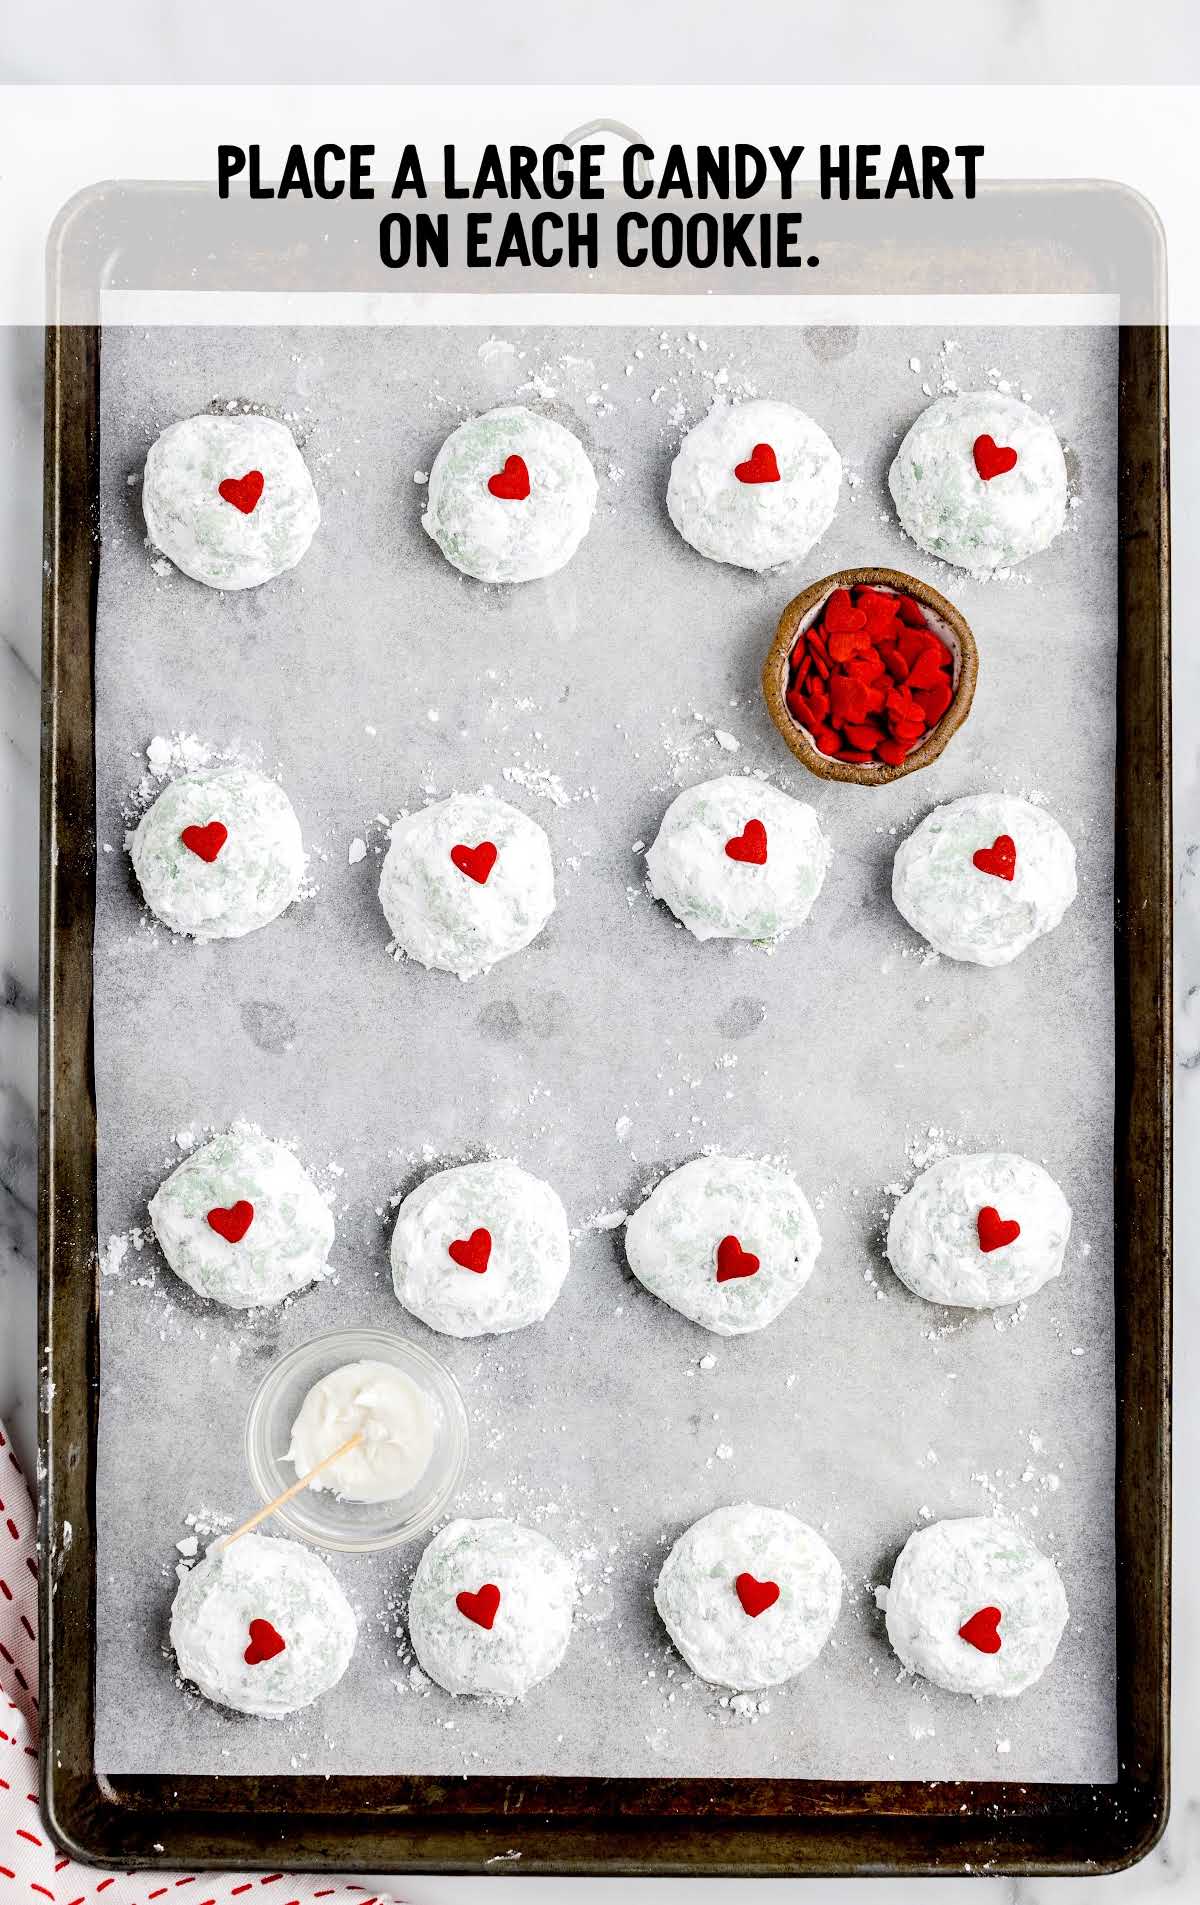
STEP FIFTEEN: Place a large red heart sprinkle onto the top of each powdered sugar-coated Grinch snowball cookie.
How To Serve Grinch Cookies
This holiday season, these adorable Grinch cookies will make the perfect addition to any cookie exchange or holiday cookie tray.
Add our Christmas pinwheels and Christmas sugar cookies for a variety of treats.
The soft sweetness of these treats pairs especially well with a cup of hot chocolate topped with whipped cream. Or consider adding a glass of chilled eggnog to the classic wintertime pairing.
Our peppermint snowball cookies and secret kiss cookies are two variations of these easy Christmas cookies that you will love sinking your teeth into.
Storage Tips for Grinch Snowball Cookies
After baking up a batch of these whimsical Grinch cookies, you might be wondering how to store them to keep their festive charm and deliciousness intact.
MAKE AHEAD: If you’re planning for a stress-free holiday season or simply want to prep ahead, these cookies are a great choice.
Follow the recipe up to the point of rolling the dough into balls and coating them with powdered sugar.
Instead of baking, place the dough balls on a baking sheet and freeze them until they’re firm.
Once they’re solid, transfer them to an airtight container or freezer bag. When you’re ready to enjoy, bake them straight from the freezer, adding a couple of extra minutes to the baking time.
ON THE COUNTER: You can store your Grinch snowball cookies in an airtight container at room temperature for up to four days.
IN THE FREEZER: You can freeze the cookie dough balls in a freezer-safe zip-top bag for up to two months.
Label the temperature and baking time right on the bag so that you have the instructions easily accessible.
You can bake your cookies from frozen; however, you will need to add an additional three to five minutes to your baking time.
Why Grinch Snowball Cookies are the Best
MERRY FUN: These cookies are a delightful and whimsical addition to any holiday gathering. Their vibrant green color and powdered sugar “snow” make them the perfect treat for celebrating the season.
EASY TO MAKE: This recipe is approachable and suitable for both novice and experienced bakers. The step-by-step instructions and simple ingredients make it a stress-free baking project, even during the busy holiday season.
BUTTERY SOFT: These cookies are incredibly melt in your mouth, thanks to the combination of butter and pecans. They have a delightful nutty flavor that pairs perfectly with the sweet powdered sugar coating.
Grinch Snowball Cookies Frequently Asked Questions
It’s best not to skip the chilling step, as it will help give you a more rounded snowball cookie.
If you didn’t measure your flour precisely, you might end up with dry, crumbly cookies. Make sure when you measure the flour, you level it off in the measuring cup.
The unbaked dough can be frozen for up to two months before you bake and enjoy these delicious cookies.
Just like the Grinch’s heart grew three sizes, these Grinch Snowball Cookies will expand your love for holiday treats! With their playful green hue and the signature red heart on top, these cookies are bound to win over even the grumpiest of holiday guests. So whether you’re making them for a cookie platter at a festive party or to bring some holiday cheer into your home, these cookies are a sweet way to transform anyone’s mood from grinchy to jolly.
Tender centers coated in powdered sugar with a festive twist keep these from feeling too heavy—see more in these Christmas cookie recipes.
More Christmas Desserts You’ll Love


Grinch Snowball Cookies
Ingredients
- 3 cups powdered sugar, sifted and divided
- 1 cup unsalted butter, softened
- 1½ teaspoons clear vanilla extract
- 2¼ cups all-purpose flour
- 2 tablespoons cornstarch
- ½ teaspoon salt
- ¼ teaspoon liquid green food coloring, (10 to 12 drops) I used McCormick brand
- 1 cup mini semi-sweet chocolate chips
- large red heart sprinkles, for garnish
Instructions
- Line 2 large baking sheets with parchment paper or silicone baking mats and set aside.
- Place 2 cups of the sifted powdered sugar in a bowl and set aside.
- In the bowl of a stand mixer fitted with a paddle attachment, beat the unsalted butter and 1 cup of the powdered sugar on medium-low speed for 1 to 2 minutes or until light and fluffy.
- Add the vanilla extract and beat for an additional 30 seconds until completely incorporated.
- Whisk together the all-purpose flour, cornstarch, and salt in a medium bowl.
- While your mixer is on low, spoon the flour mixture slowly into the mixing bowl. You will want to allow the flour to be incorporated after each addition before adding more to the mixing bowl.
- Once all your flour mixture has been added, increase the mixer speed to medium and beat the dough for an additional 30 to 45 seconds to ensure that all the ingredients are fully incorporated and that your dough is light and fluffy.
- Add the green liquid food coloring and beat on low until your cookie dough is uniform in color. You can add a couple of extra drops if you want a darker green color for your dough.
- Lastly, you will mix in the mini semi-sweet chocolate chips just until all the chips are fully incorporated.
- Using a one tablespoon scoop, scoop out the dough and roll them into balls in the palm of your hand.
- Place the rolled cookie dough balls onto the prepared cookie sheets and refrigerate the dough balls for 15 minutes.
- Preheat your oven to 350°F.
- Bake for 12 minutes. Allow the cookies to cool on the baking sheet for 10 minutes.
- Roll each slightly warm cookie gently in the reserved bowl of powdered sugar. Place the coated cookies back on the cookie sheet to continue to cool completely. Once the cookies have cooled completely for an additional 10 to 15 minutes, you will roll each cookie in the powdered sugar for a second coating.
- Place a large heart candy onto the top of each powdered sugar-coated Grinch snowball cookie
Notes
- For your softened butter in this recipe, you will want to make sure that it is just at room temperature and not overly soft. You should be able to press your finger into the top of the butter and leave a slight impression, but NOT be able to press your finger all the way through the butter. If your butter is too soft, your cookies will spread too much when baking, and you will not get the desired results for the recipe.
- Chilling the dough balls before baking will help minimize any spreading of the cookies so that they keep that nice rounded shape.
- Oven temperatures vary and may need to be recalibrated periodically to ensure they are accurate. Make sure to keep a close eye on your cookies as the suggested baking time approaches.
Nutrition


Leave a Comment