October 18, 2023
Review RecipeBenihana Hibachi Chicken
This delicious Benihana hibachi chicken recipe tastes just like the famous restaurant dish, packed full of savory flavors.
Jump to Recipe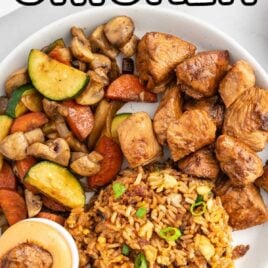
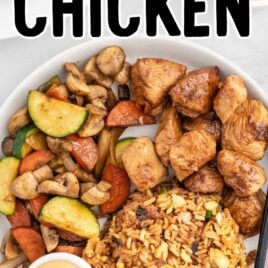
Table of Contents
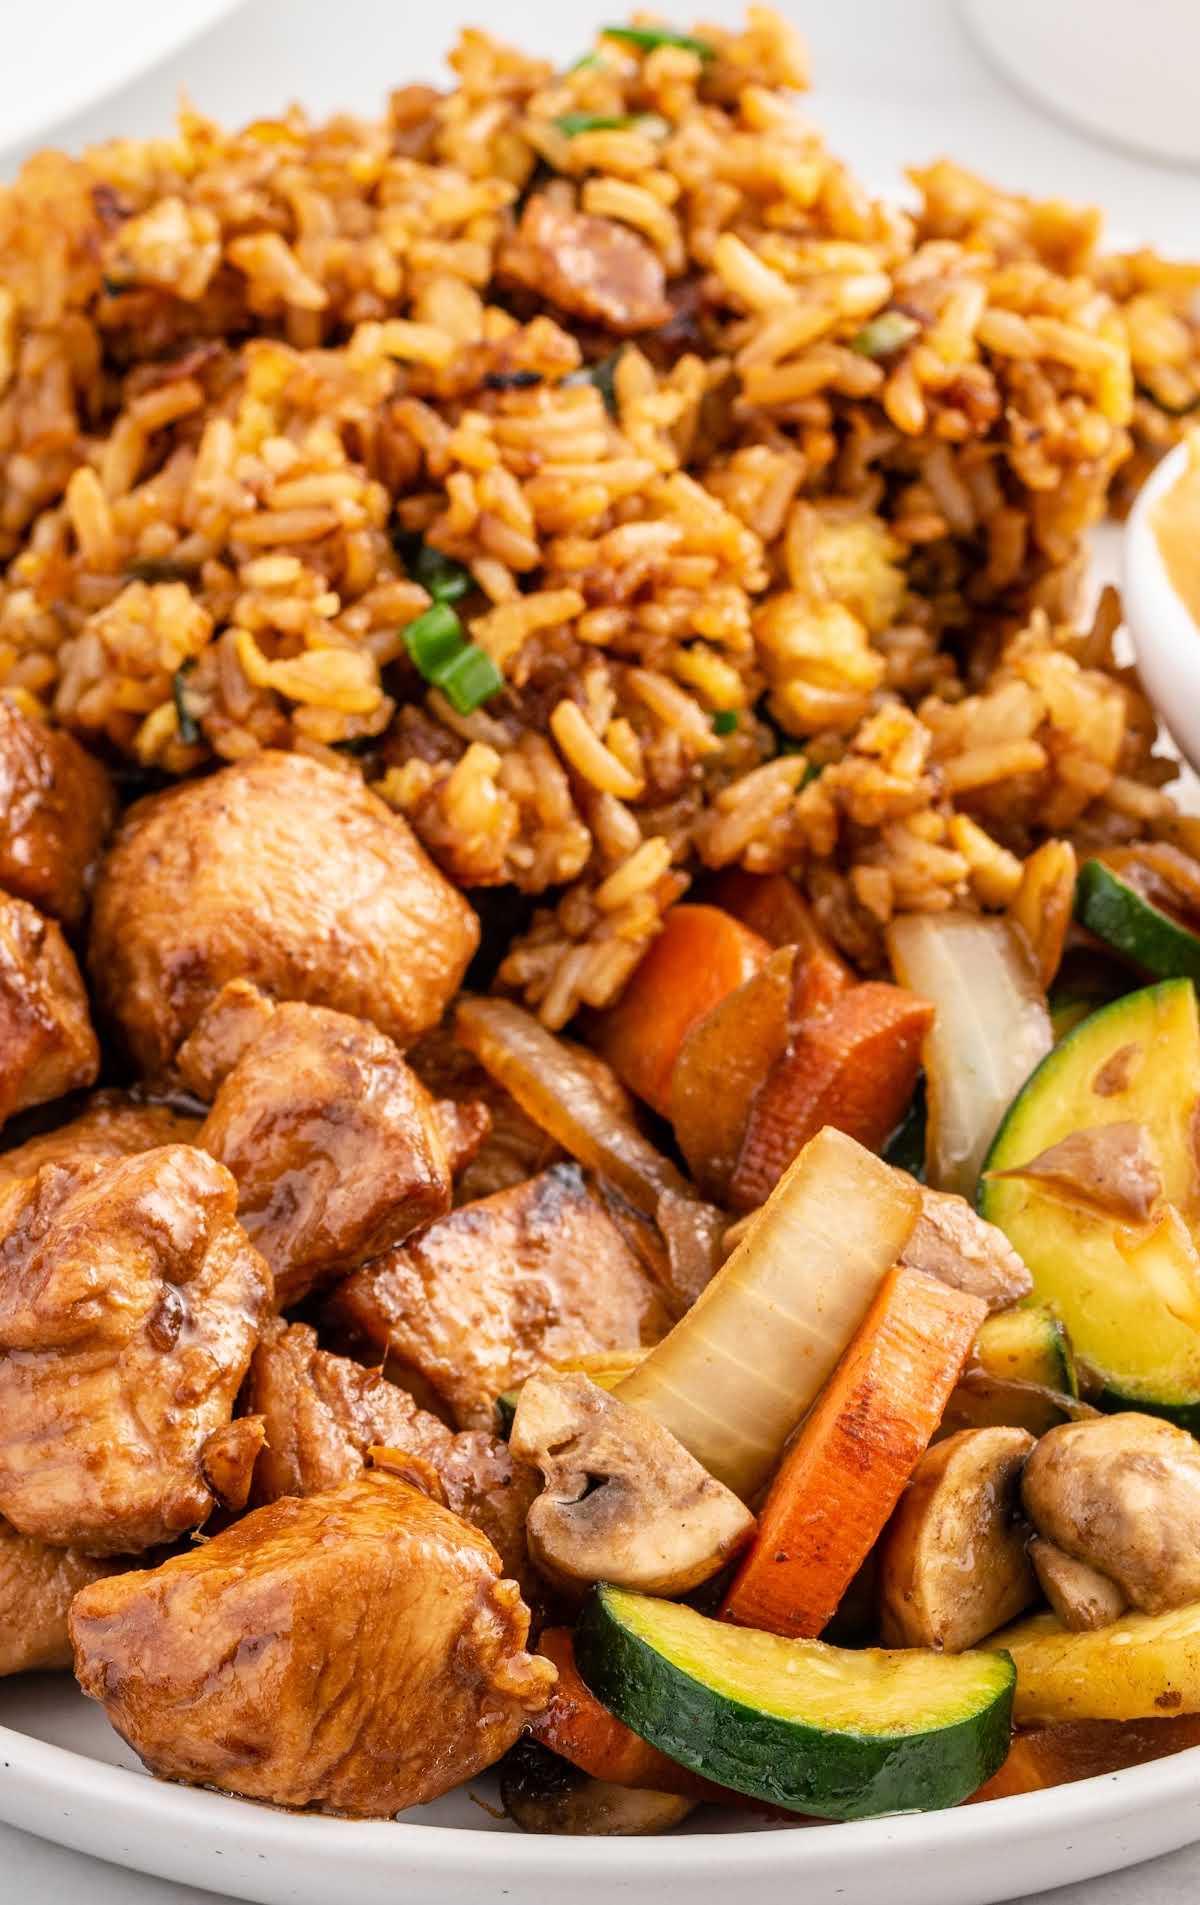
This Benihana hibachi chicken recipe takes the popular dish and recreates the restaurant experience right in your own kitchen. There is something truly delicious about the flavors of the juicy chicken, crisp vegetables, and yummy sauce in this recipe that you’ll want to add it to your menu.
Benihana Hibachi Chicken Ingredients
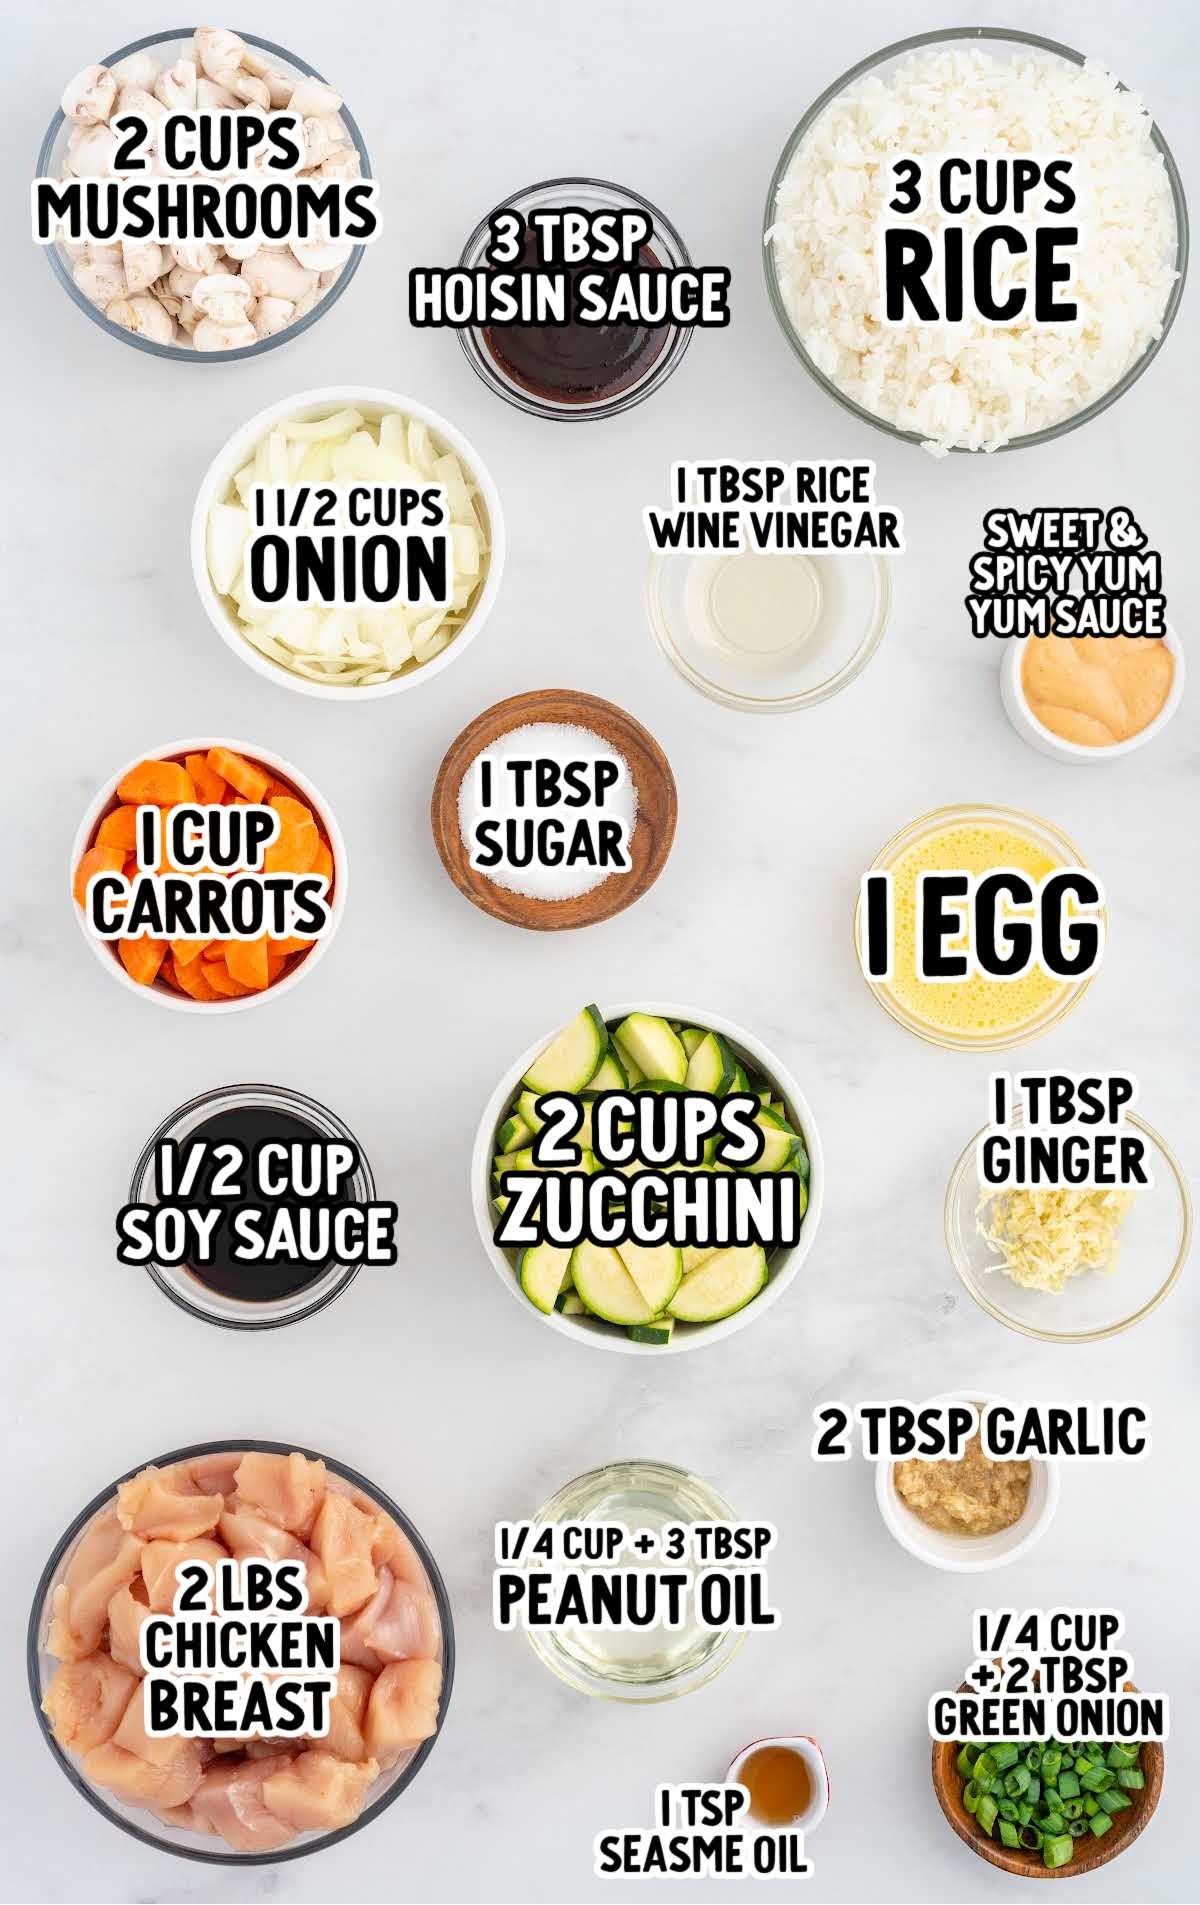
This recipe delivers a mouthwatering fusion of flavors. The marinated chicken boasts a savory, umami-rich taste with hints of ginger and garlic, complemented by the sautéed vegetables.
The fried rice, cooked with scrambled egg and green onions, provides a hearty and satisfying base, resulting in a delicious blend of savory and sweet flavors in every bite.
You’ll need:
For The Hibachi Chicken:
- ¼ cup of low-sodium soy sauce
- 3 tablespoons of hoisin sauce
- 1 tablespoon of fresh garlic, grated
- 1 tablespoon of fresh ginger, grated
- 1 teaspoon of toasted sesame oil
- 1 tablespoon of granulated sugar
- 1 tablespoon of rice wine vinegar
- 2 pounds of boneless skinless chicken breasts, cubed into 1-2-inch bite-size pieces
- 2 tablespoons of peanut oil
PRO TIP:
Fresh ginger can be hard to find in some areas during certain times of the year; however, a great alternative is the pre-grated fresh ginger in a tube. This can be found in your local grocery store where pre-packaged herbs are found.
For The Sauteed Vegetables:
- 1 tablespoon of peanut oil
- 1 cup of fresh carrots, cut into half circles
- 1½ cups of yellow onion, sliced
- 2 cups of mushrooms, quartered (baby bella or button mushrooms)
- 2 cups of zucchini, sliced into half circles
For The Fried Rice:
- ¼ cup of peanut oil
- 1 egg, scrambled
- 1 tablespoon of fresh garlic, grated
- ¼ cup + 2 tablespoons of green onions, chopped and divided (You will garnish with the additional 2 tablespoons)
- 3 cups of cooked jasmine rice (cooked and cooled according to package directions)
- ¼ cup of low-sodium soy sauce
For The Garnish:
- Bottled Sweet & Spicy Yum Yum sauce (I used Bibibop Asian Grill Brand)
Substitutions And Additions
VEGETABLES: You can use any of your favorite vegetables in the recipe. Broccoli florets, yellow squash, or snow peas are all great choices.
CHICKEN: An alternative to skinless boneless chicken breasts is boneless skinless chicken thighs if your family prefers dark meat over white meat.
RICE: I like to use jasmine rice, but any long-grain rice works well. Brown rice would be a great alternative as well.
There are also a lot of good quality, frozen bagged, pre-made fried rice (or make your own fried rice) blends that can be made according to package directions.
HOISIN SAUCE: If hoisin sauce is unavailable or you want a different flavor profile, substitute it with oyster sauce for a richer, seafood-inspired twist.
Alternatively, use teriyaki sauce for a sweeter note or barbecue sauce for a smoky, tangy kick.
MUSHROOMS: While baby bella or button mushrooms are commonly used, you can switch things up by trying shiitake or cremini mushrooms for a deeper, earthy taste.
How To Make This Benihana Hibachi Chicken Recipe
Let’s walk through the step-by-step instructions for assembling this favorite copycat recipe.
OUR RECIPE DEVELOPER SAYS
You will have two skillets going at the same time for this recipe, so you will need to read the complete directions before starting to prepare this dish.
While your chicken and vegetables are cooking in one skillet, you will cook your fried rice in a second large skillet. This way all your meal components are finished and hot at the same time.
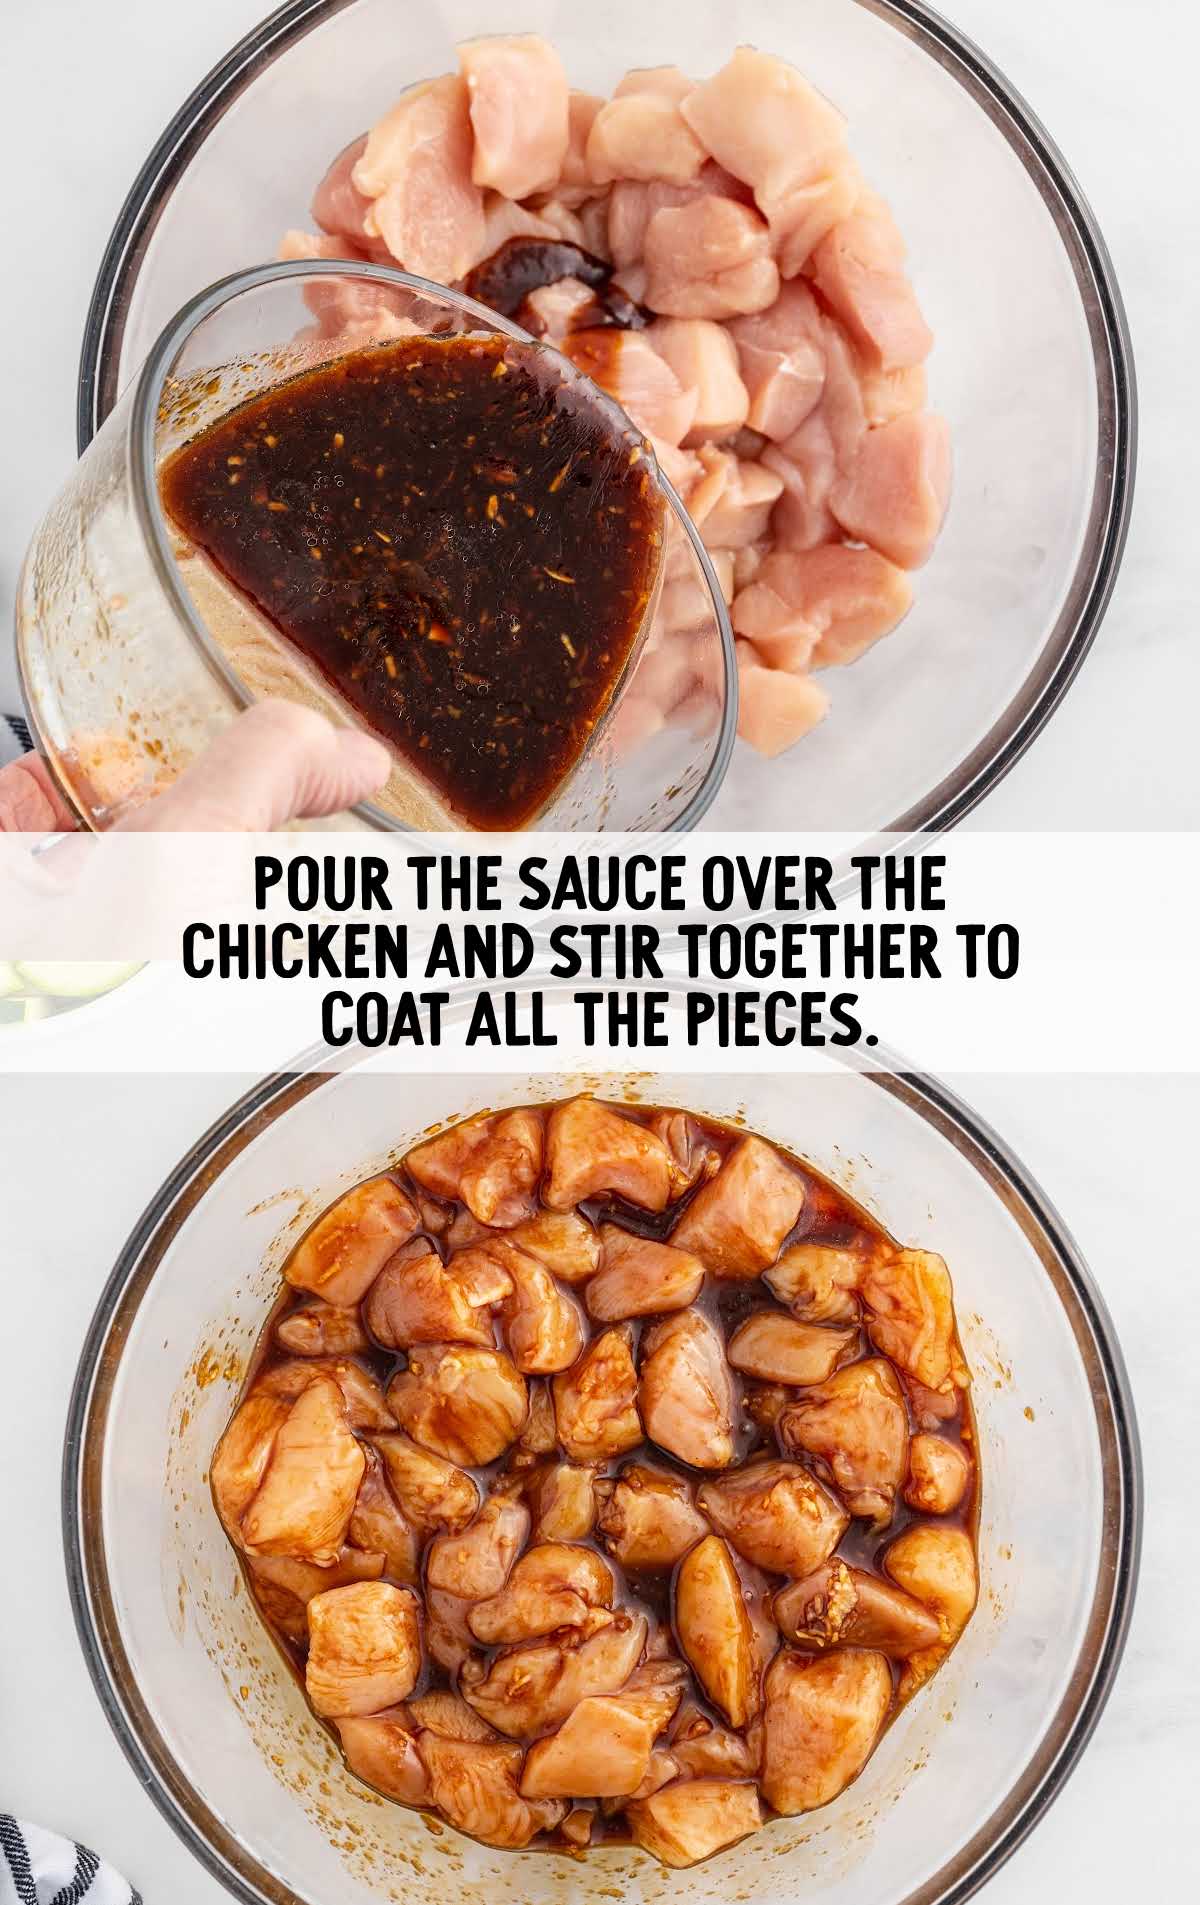
STEP ONE: In a small mixing bowl, stir together the ingredients for the sauce of the hibachi chicken.
Combine the soy sauce, hoisin sauce, grated garlic, grated ginger, sesame oil, granulated sugar, and rice wine vinegar.
STEP TWO: Place the cubed boneless skinless chicken breast into a large mixing bowl.
Pour the sauce over the chicken pieces, and stir together to coat all the chicken.
PRO TIP:
You will also want to make sure that you are letting the chill come off of your chicken before cooking it. If your chicken is too cold, it can drop the temperature of your skillet. That can also contribute to not being able to get a nice brown to your meat when cooking.
STEP THREE: To cook the chicken, you will use a very large, heavy-duty skillet on high heat and add two tablespoons of peanut oil.
Once the oil gets hot, add the chicken and sauce in a single layer. Do not move the chicken pieces for at least two to three minutes to allow the chicken to start to caramelize.
Continue to cook the chicken, stirring occasionally, for another three to four minutes or until cooked through.
PRO TIP:
I used a 12-inch (bottom surface area of the skillet), enamel-coated, cast-iron skillet for this recipe. It retains heat very well and is large enough to handle this amount of chicken and vegetables.
If your skillet is not this big or heavy-duty enough, then you will want to cook your chicken and vegetables in two batches to ensure that you are not overcrowding your pan.
If you overcrowd your pan, then you run the risk of too much moisture being trapped while cooking your chicken and vegetables, making them mushy and not brown and crisp.
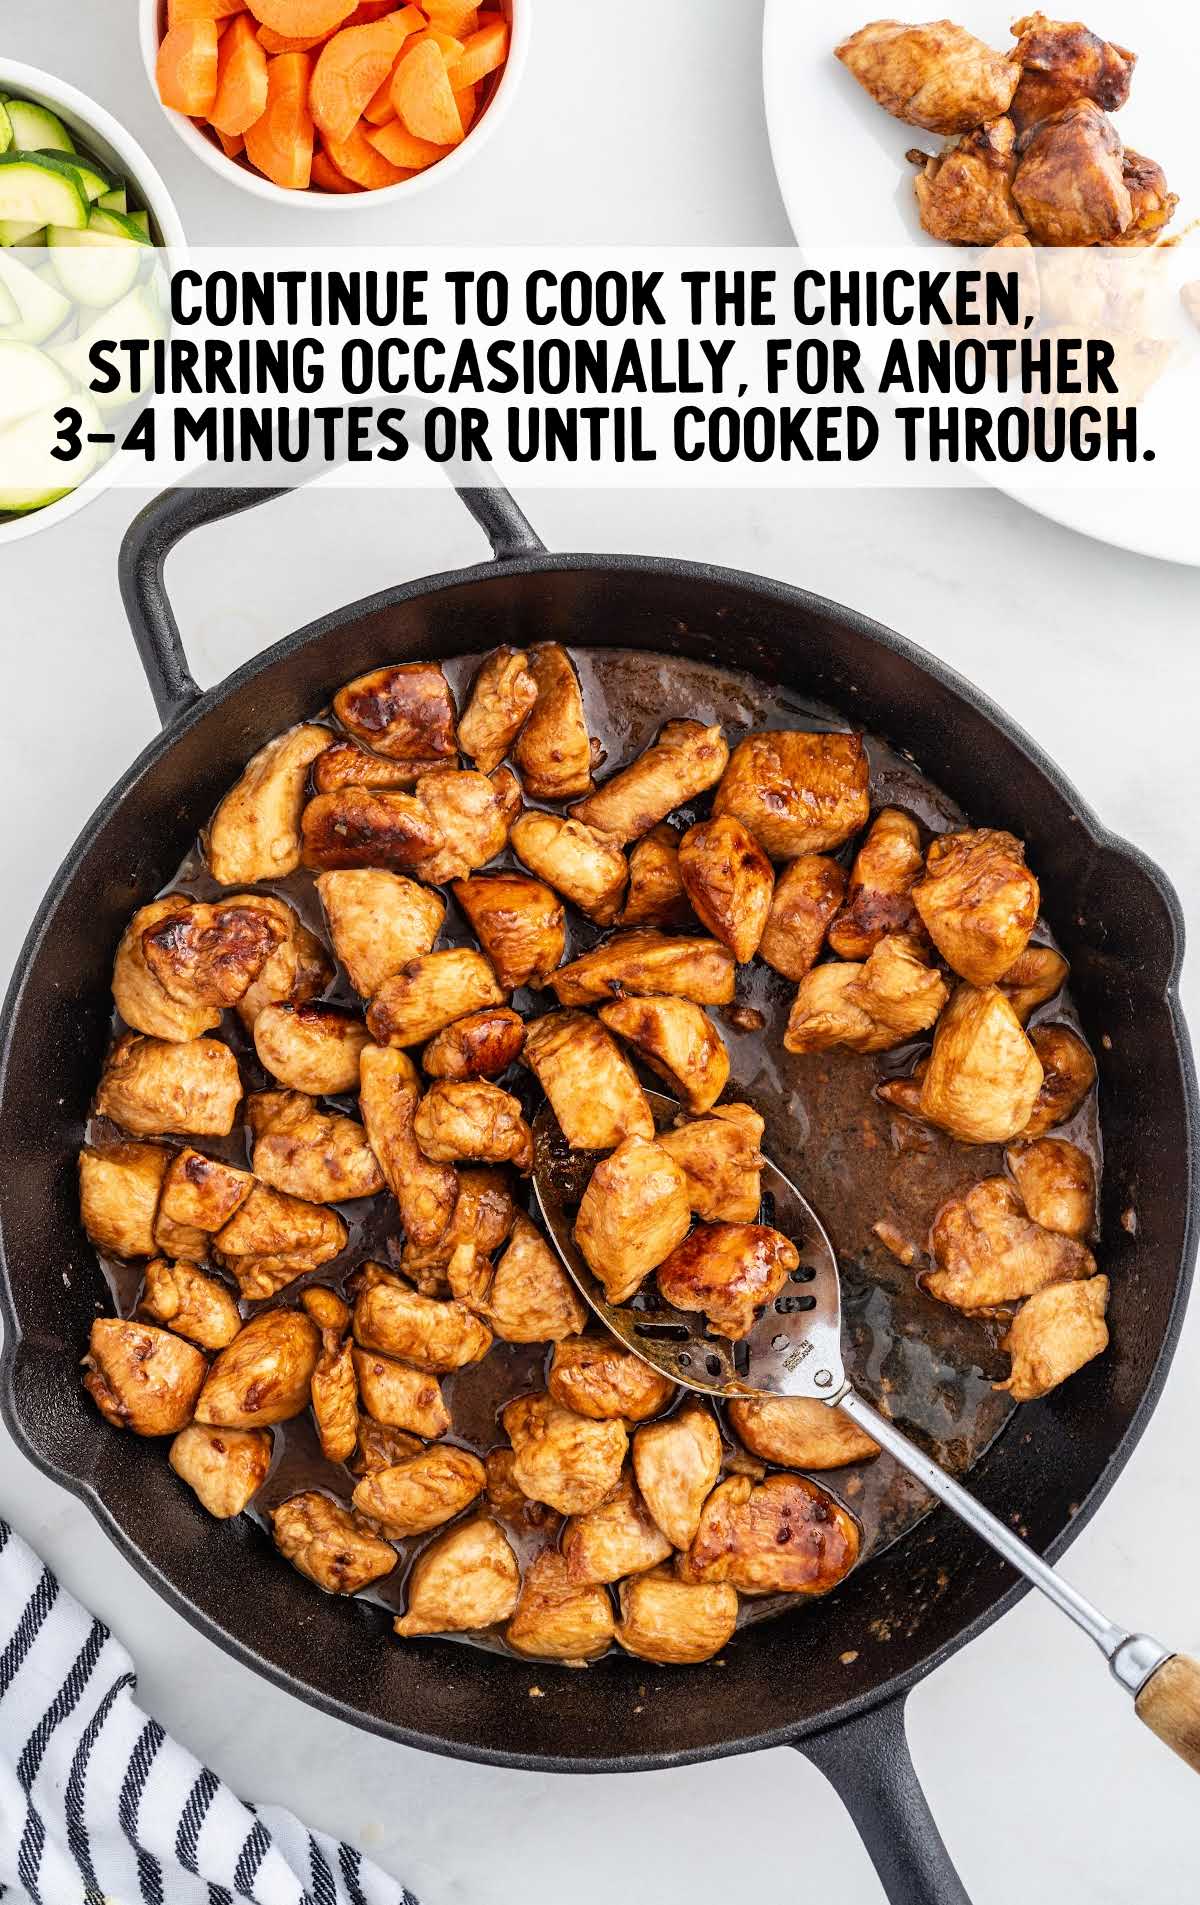
STEP FOUR: Transfer the cooked chicken, using a slotted spoon or fish spatula, to a large plate and set aside while you make the rest of the recipe.
STEP FIVE: If you have more than one to two tablespoons of liquid remaining in your skillet after you remove the cooked chicken, you will want to remove the excess liquid before adding the vegetables to sauté.
STEP SIX: Turn the heat down to medium-high heat and add one tablespoon of peanut oil to the hot skillet that the chicken was just cooked in.
Add the carrots and onions and cook for two to three minutes before adding the mushrooms and zucchini to the skillet.
Continue to sauté for an additional three to five minutes or until the vegetables are cooked to a crisp-tender texture.
Make sure to stir the vegetables occasionally to prevent burning.
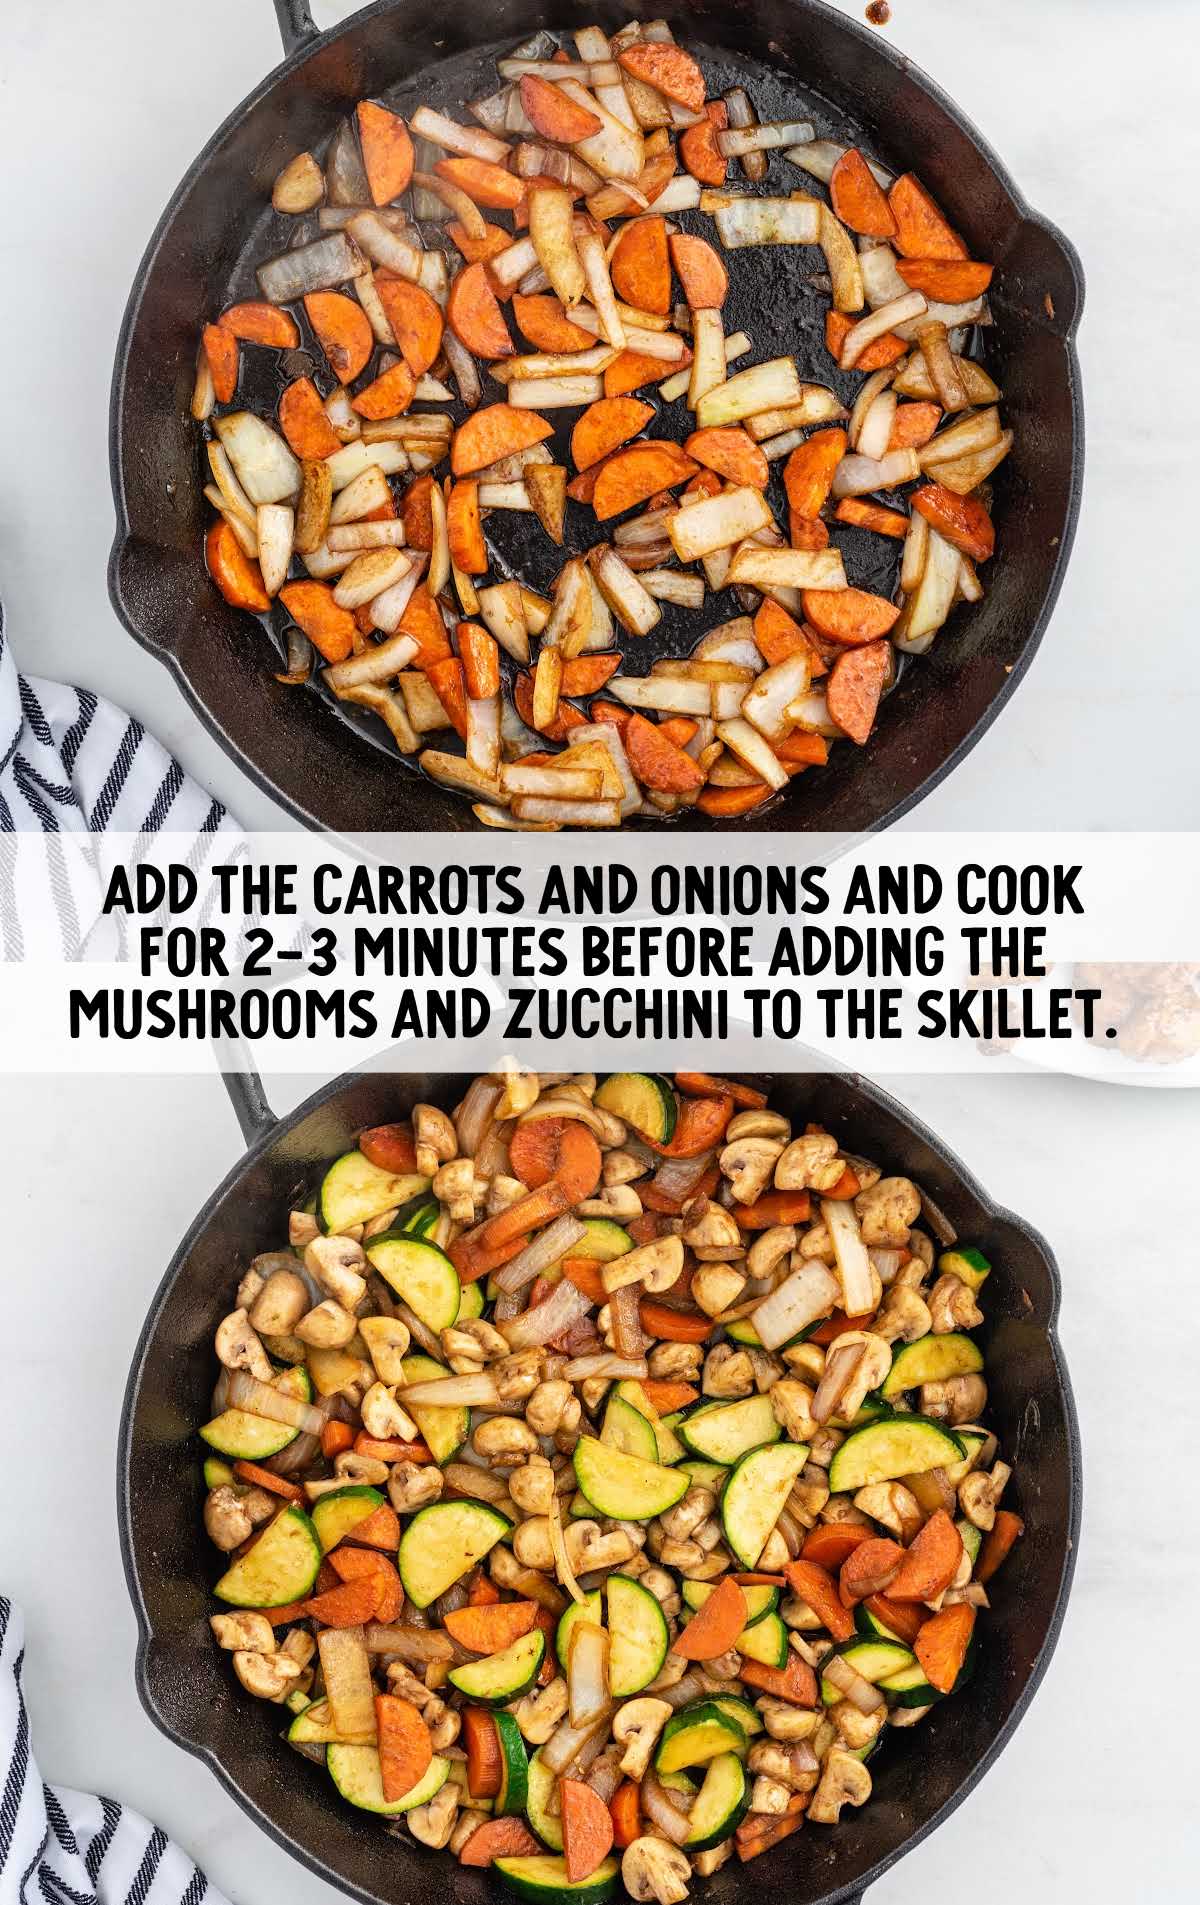
STEP SEVEN: Transfer the cooked vegetables to a large plate and set them aside.
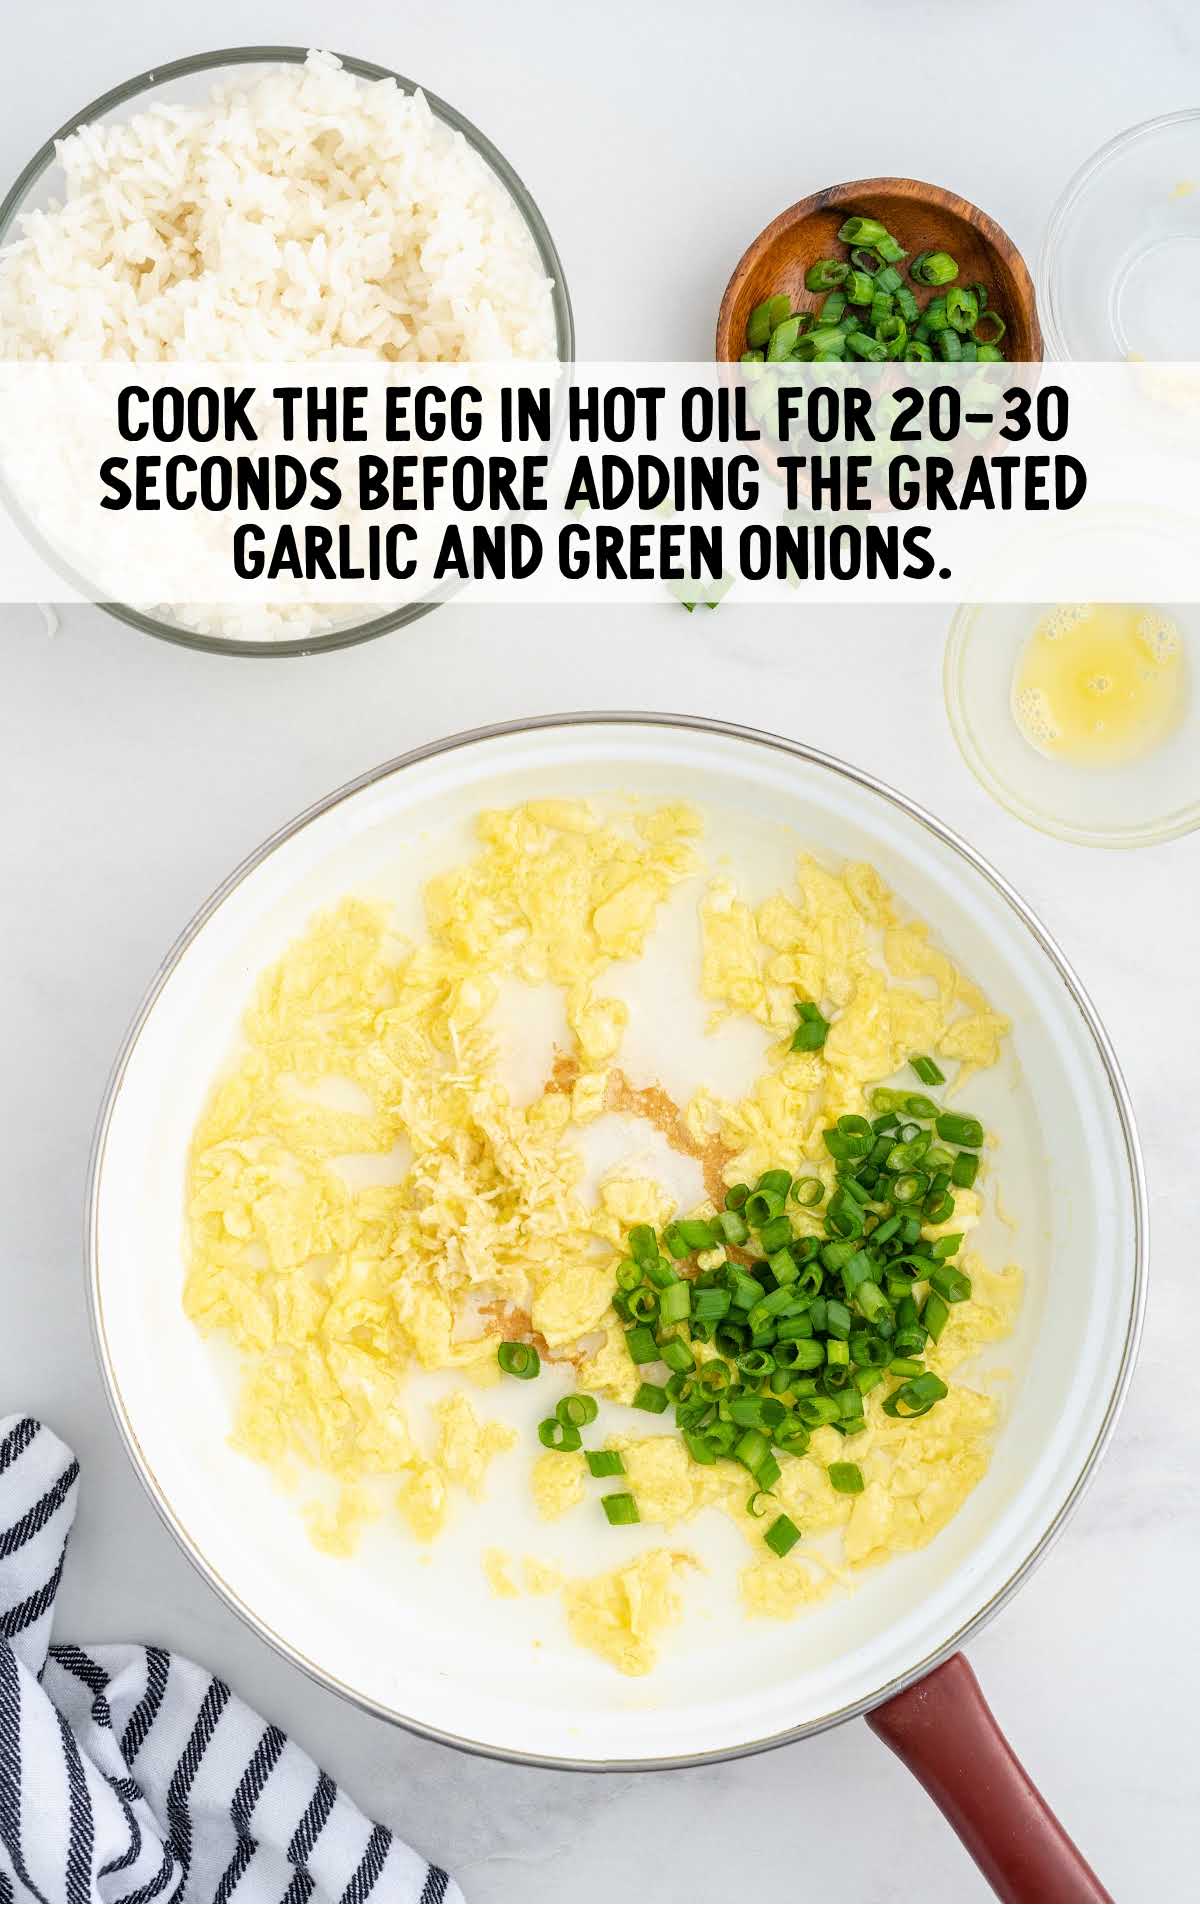
STEP EIGHT: To cook the fried rice, add a quarter of a cup of peanut oil into a separate large skillet on medium-high heat.
When the oil is hot, add the scrambled egg to the hot skillet and cook the egg for 20 to 30 seconds before adding the grated garlic and green onions.
Cook for another 30 seconds before adding the pre-cooked jasmine rice.
Stir to combine the rice with the other ingredients. Then spread the rice mixture into an even layer and allow the rice to fry in the pan, undisturbed, for three minutes.
This allows the rice to start to get a nice crisp to it. Give the rice a good stir from that point every two to three minutes for a total of ten minutes.
PRO TIP:
The fried rice portion of this recipe works best if the jasmine rice is cooked and cooled ahead of time. You can make the jasmine rice the day before and store it in a sealed container, in the refrigerator, until ready to use in the recipe.
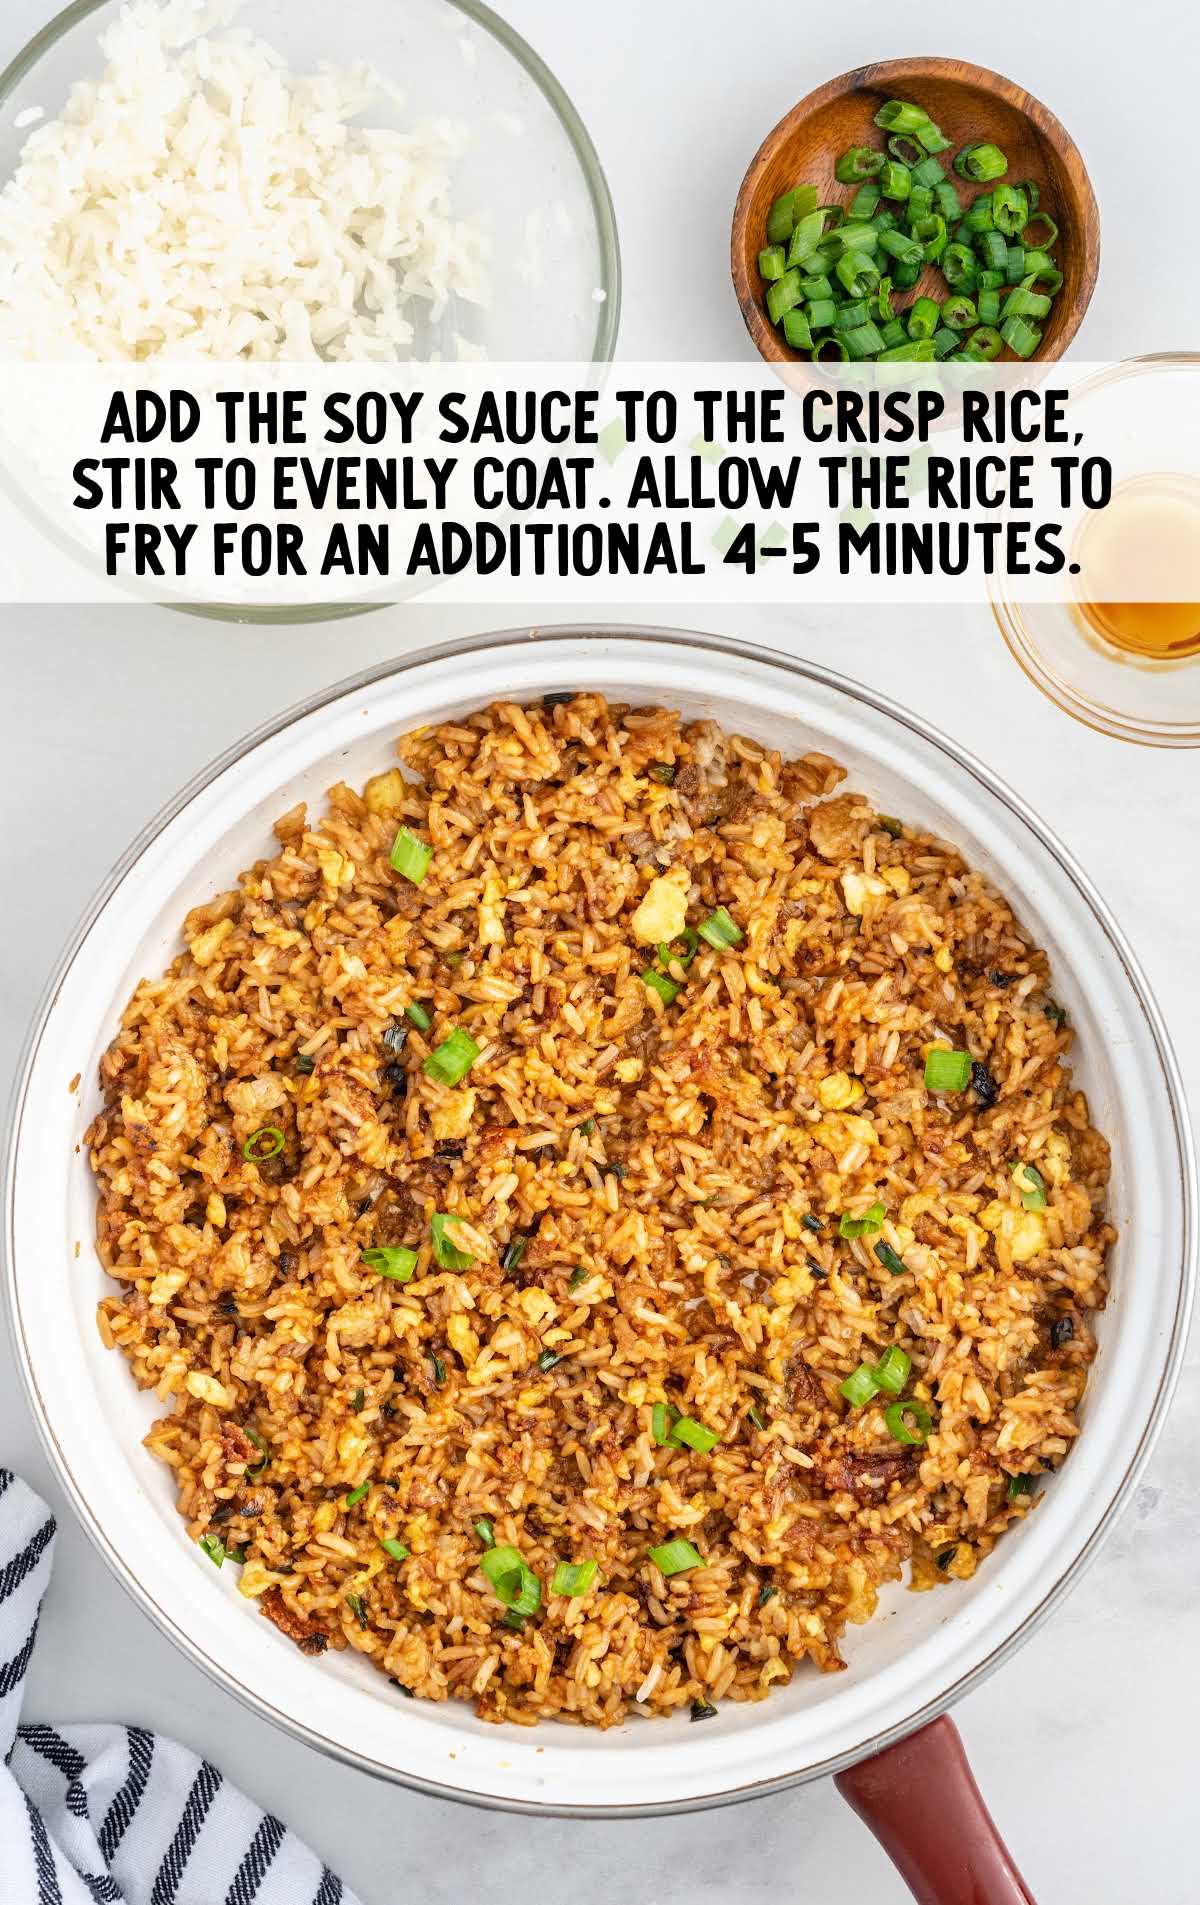
STEP NINE: Add a quarter cup of soy sauce to the crisp rice and stir to evenly coat all the rice with the soy sauce.
Allow the rice to fry for an additional four to five minutes or until the rice is nice and fried.
You will garnish your fried rice with a sprinkle of the additional two tablespoons of fresh green onions if desired.
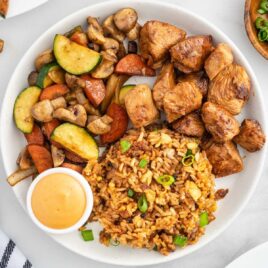
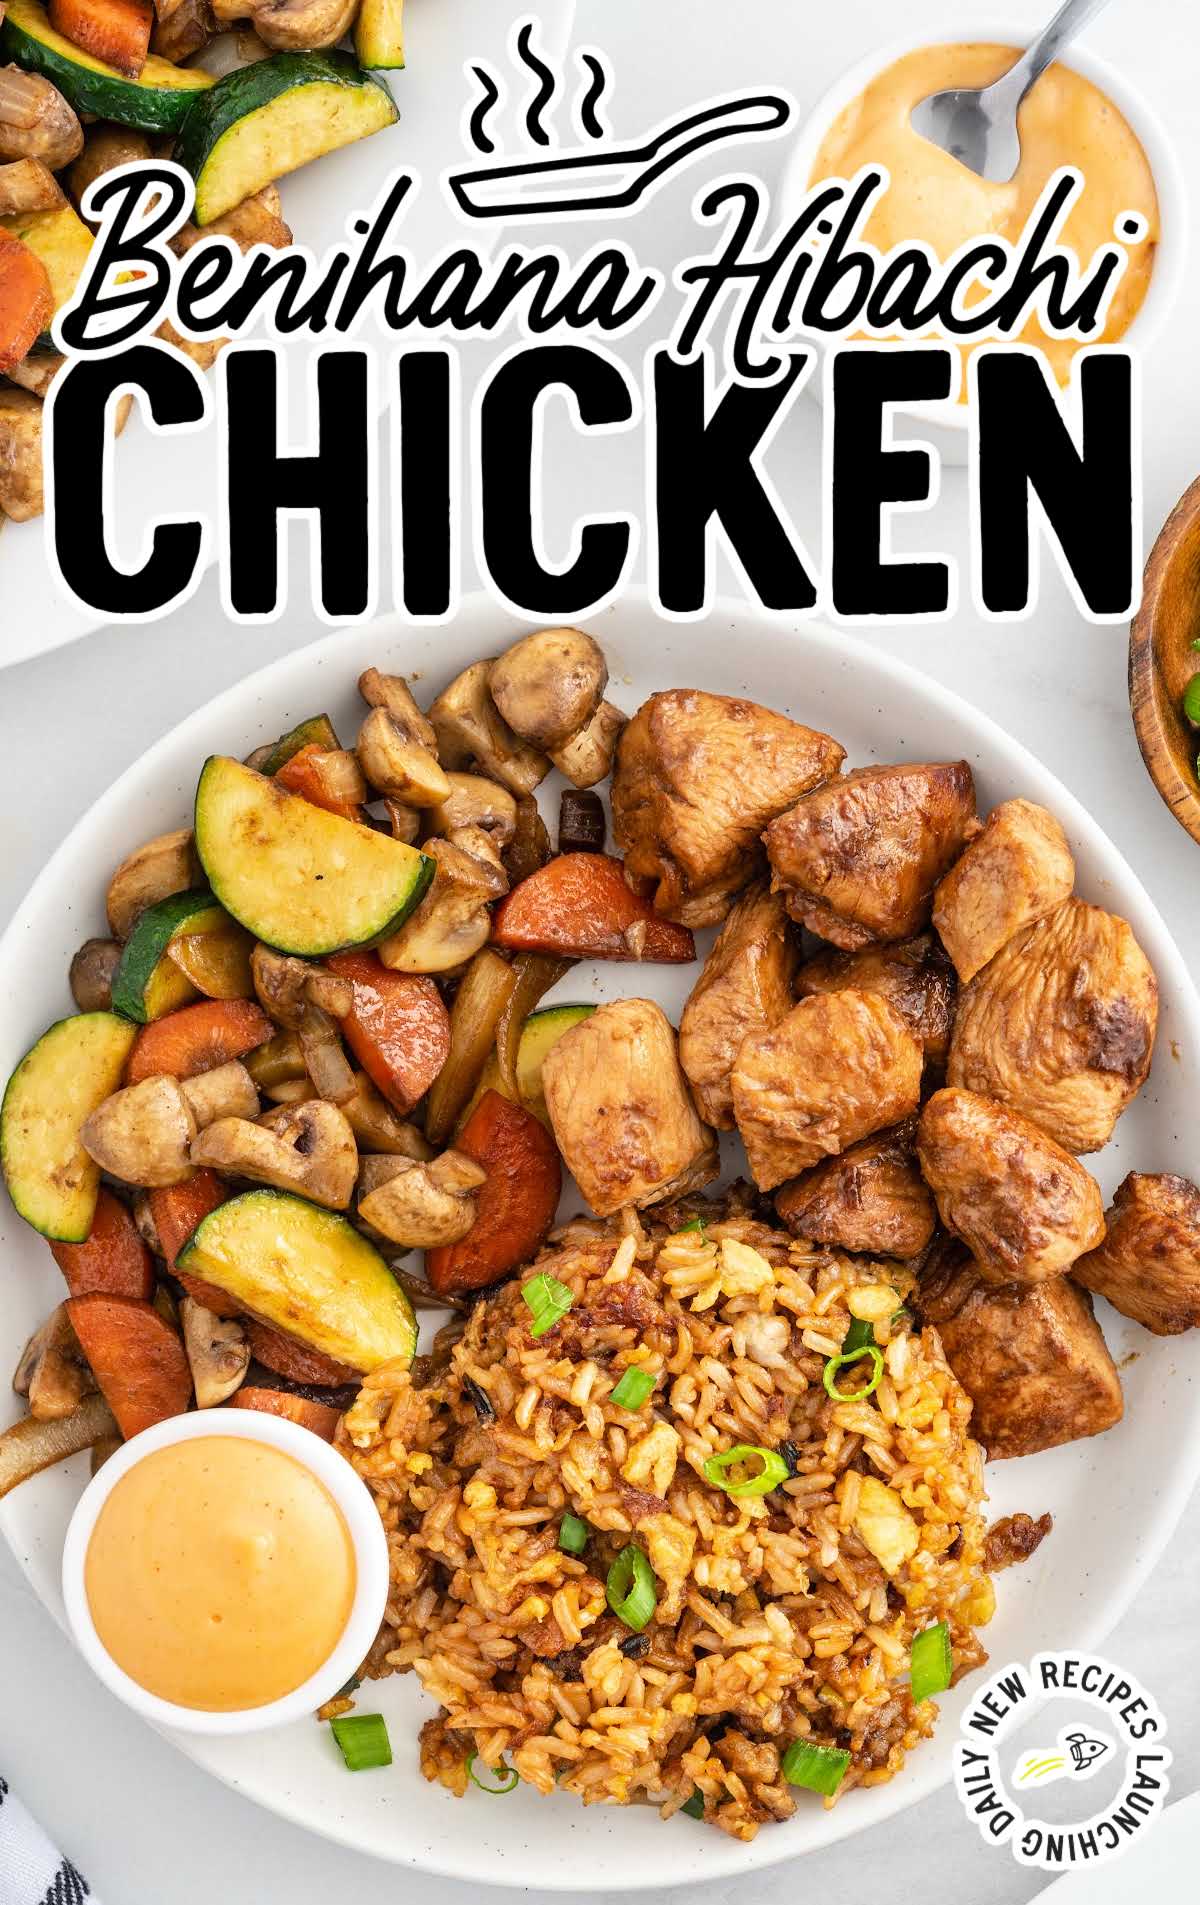
STEP TEN: Using a three-quarter cup dry measuring cup, portion out the fried rice between four dinner plates.
Add a three-quarter cup of mixed vegetables and a three-quarter to one-cup portion of cooked chicken to each plate. You’ll keep the fried rice, mixed vegetables, and chicken portions separated on each dinner plate.
Garnish each serving with a small bowl of Yum Yum sauce to dip the chicken.
PRO TIP:
This Benihana hibachi chicken with fried rice and vegetables should be served hot.
How To Serve
This Benihana hibachi chicken rice dish will definitely give you a flavorful meal experience.
This recipe provides you with all the components of a complete meal in one with tender meat, fried rice, and sauteed vegetables.
If you are looking for something extra, add dinner rolls on the side to mop up all of the tasty sauce.
For a fusion twist, turn the hibachi chicken into mouthwatering tacos.
Warm up some small tortillas and fill them with the chicken, sautéed vegetables, and a dollop of hoisin sauce or sriracha mayo.
For more Asian-inspired chicken recipes, check out our sesame chicken and Kung Pao chicken.
MORE ASIAN DISH RECIPES
Storage
Once you’ve savored every bite of your delicious Benihana hibachi chicken, it’s essential to know how to store any leftovers or make-ahead portions to ensure they stay fresh and tasty.
MAKE AHEAD: If you’re planning ahead, you can marinate the chicken in the sauce and prep the vegetables in advance.
Store the marinated chicken in an airtight container in the refrigerator for up to 24 hours. Keep the prepped vegetables in a separate container, ensuring they stay crisp.
IN THE FRIDGE: You can store leftovers in a sealed container, in the refrigerator, for up to three days.
You can keep the different components stored in separate containers for easier reheating.
IN THE FREEZER: All three parts of this meal: the chicken, rice, and veggies, can be frozen for up to three months.
Thaw and reheat in the pan. You can make additional sauce to coat your chicken when reheating.
Why We Love This Recipe
FLAVORFUL MARINATION: The chicken is marinated in a delectable blend of soy sauce, hoisin sauce, garlic, ginger, and more, infusing it with layers of savory, umami-rich flavors.
RESTAURANT QUALITY AT HOME: Enjoy the authentic taste of Benihana right in your own kitchen, impressing friends and family with a restaurant-quality dish.
EASY TO MAKE: With detailed instructions and simple steps, even novice cooks can achieve a flavorful and satisfying meal, making it a favorite for home cooks of all skill levels.
This Benihana hibachi chicken has an enticing grilled flavor made famous by the popular hibachi restaurant, but this recipe makes it easier to enjoy in the convenience of your home. This delicious recipe will be a hit when you are craving a Japanese-inspired meal.
Frequently Asked Questions
Can I freeze this dish?
This great recipe freezes well stored in an airtight container for up to three months.
Can I double this recipe?
This meal can very easily be doubled if you are feeding a crowd.
Can I use chicken thighs instead of chicken breasts in this recipe?
Chicken thighs will be just as delicious in this recipe, especially if your family prefers dark meat.
More Recipes You’ll Love


Benihana Hibachi Chicken
This delicious Benihana hibachi chicken recipe tastes just like the famous restaurant dish, packed full of savory flavors.
Prep Time 30 minutes
Cook Time 15 minutes
Total Time 45 minutes
Servings 4
Ingredients
Hibachi Chicken
- ¼ cup low-sodium soy sauce
- 3 tablespoons hoisin sauce
- 1 tablespoon fresh garlic, grated
- 1 tablespoon fresh ginger, grated
- 1 teaspoon toasted sesame oil
- 1 tablespoon granulated sugar
- 1 tablespoon rice wine vinegar
- 2 pounds boneless skinless chicken breasts, cubed into 1 to 2-inch bite-size pieces
- 2 tablespoons peanut oil
Sautéed Vegetables
- 1 tablespoon peanut oil
- 1 cup fresh carrots, cut into half circles
- 1½ cups yellow onion, sliced
- 2 cups mushrooms, quartered (baby Bella or button mushrooms)
- 2 cups zucchini, sliced into half circles
Fried Rice
- ¼ cup peanut oil
- 1 egg, scrambled
- 1 tablespoon fresh garlic, grated
- ¼ cup green onions, chopped
- 3 cups cooked jasmine rice, cooked and cooled according to package directions
- ¼ cup low-sodium soy sauce
- 2 tablespoons green onions, chopped (for garnish)
Garnish
- Sweet and Spicy Yum Yum sauce, I used Bibibop Asian Grill Brand
Instructions
- In a small mixing bowl, stir together the ingredients for the sauce of the hibachi chicken. Combine the soy sauce, hoisin sauce, grated garlic, grated ginger, sesame oil, granulated sugar, and rice wine vinegar.
- Place the cubed boneless skinless chicken breasts into a large mixing bowl, pour the sauce over the chicken pieces and stir together to coat all the chicken.
- To cook the chicken, you will use a very large, heavy-duty skillet on high heat and add the 2 tablespoons of peanut oil. Once the oil gets hot, add the chicken and sauce in a single layer. Do not move the chicken pieces for at least 2 to 3 minutes to allow the chicken to start to caramelize. Continue to cook the chicken, stirring occasionally, for another 3 to 4 minutes or until cooked through.
- Transfer the cooked chicken, using a slotted spoon or fish spatula, to a large plate and set aside while you make the rest of the recipe.
- If you have more than 1 to 2 tablespoons of liquid remaining in your skillet after you remove the cooked chicken, you will want to remove the excess liquid before adding the vegetables to sauté.
- Turn the heat down to medium-high and add the 1 tablespoon peanut oil to the hot skillet that the chicken was just cooked in and removed from, then add the carrots and onions and cook for 2 to 3 minutes before adding the mushrooms and zucchini to the skillet. Continue to sauté for an additional 3 to 5 minutes or until the vegetables are cooked to a crisp-tender texture. Make sure to stir the vegetables occasionally to prevent burning.
- Transfer the cooked vegetables to a large plate and set them aside.
- To cook the fried rice, add the ¼ cup peanut oil into a separate large skillet on medium-high heat. When the oil is hot, add the scrambled egg to the hot skillet and cook the egg for 20 to 30 seconds before adding the grated garlic and green onions. Cook for another 30 seconds before adding the pre-cooked jasmine rice. Stir to combine the rice with the other ingredients, then spread the rice mixture into an even layer and allow the rice to fry in the pan, undisturbed, for 3 minutes. This allows the rice to start to get a nice crisp to it. Give the rice a good stir from that point every 2 to 3 minutes for a total of 10 minutes.
- Add the ¼ cup soy sauce to the crisp rice, and stir to evenly coat all the rice with the soy sauce. Allow the rice to fry for an additional 4 to 5 minutes or until the rice is nice and fried. You will garnish your fried rice with a sprinkle of the additional 2 tablespoons of fresh green onions if desired.
- Using a ¾ cup dry measuring cup, portion out the fried rice between 4 dinner plates. Add ¾ cup of mixed vegetables and a ¾ to 1 cup portion of cooked chicken to each plate, keeping the fried rice, mixed vegetables, and chicken separated on each dinner plate. Garnish each serving with a small bowl of Yum Yum sauce to dip the chicken.
Notes
- Fresh ginger can be hard to find in some areas during certain times of the year; however, a great alternative is the pre-grated fresh ginger in a tube. This can be found in your local grocery store where pre-packaged herbs are found.
- While your chicken and vegetables are cooking in one skillet, you will cook your fried rice in a second large skillet so that all your meal components are finished and hot at the same time. You will have 2 skillets going at the same time for this recipe, so you will need to read the complete directions before starting to prepare this dish.
- You will also want to make sure that you are letting the chill come off of your chicken before cooking it. If your chicken is too cold, it can drop the temperature of your skillet, especially if it is not heavy-duty enough, and that can also contribute to not being able to get a nice brown to your meat when cooking.
- I used a 12-inch (bottom surface area of the skillet), enamel-coated, cast-iron skillet for this recipe. It retains heat very well and is large enough to handle this amount of chicken and vegetables. If your skillet is not this big or heavy-duty enough, then you will want to cook your chicken and vegetables in two batches to ensure that you are not overcrowding your pan. If you overcrowd your pan, then you run the risk of too much moisture being trapped while cooking your chicken and vegetables and making them mushy and not brown and crisp.
- The fried rice portion of this recipe works best if the jasmine rice is cooked and cooled ahead of time. You can make the jasmine rice the day before and store it in a sealed container, in the refrigerator, until ready to use in the recipe.
- This Benihana hibachi chicken with fried rice and vegetables should be served hot.
Nutrition
Calories: 773kcal | Carbohydrates: 59g | Protein: 58g | Fat: 33g | Saturated Fat: 6g | Polyunsaturated Fat: 10g | Monounsaturated Fat: 14g | Trans Fat: 1g | Cholesterol: 186mg | Sodium: 1570mg | Potassium: 1521mg | Fiber: 4g | Sugar: 14g | Vitamin A: 5692IU | Vitamin C: 24mg | Calcium: 89mg | Iron: 3mg
Have You Tried This Recipe?Follow me on Pinterest @spaceshipslb

Even More Easy Recipes
Chicken Recipes
- Chicken Fried Rice
- Baked Chicken Thighs
- Bacon Wrapped Chicken
- Chicken Mozzarella Bake
- Zucchini Mushroom Chicken


Leave a Comment