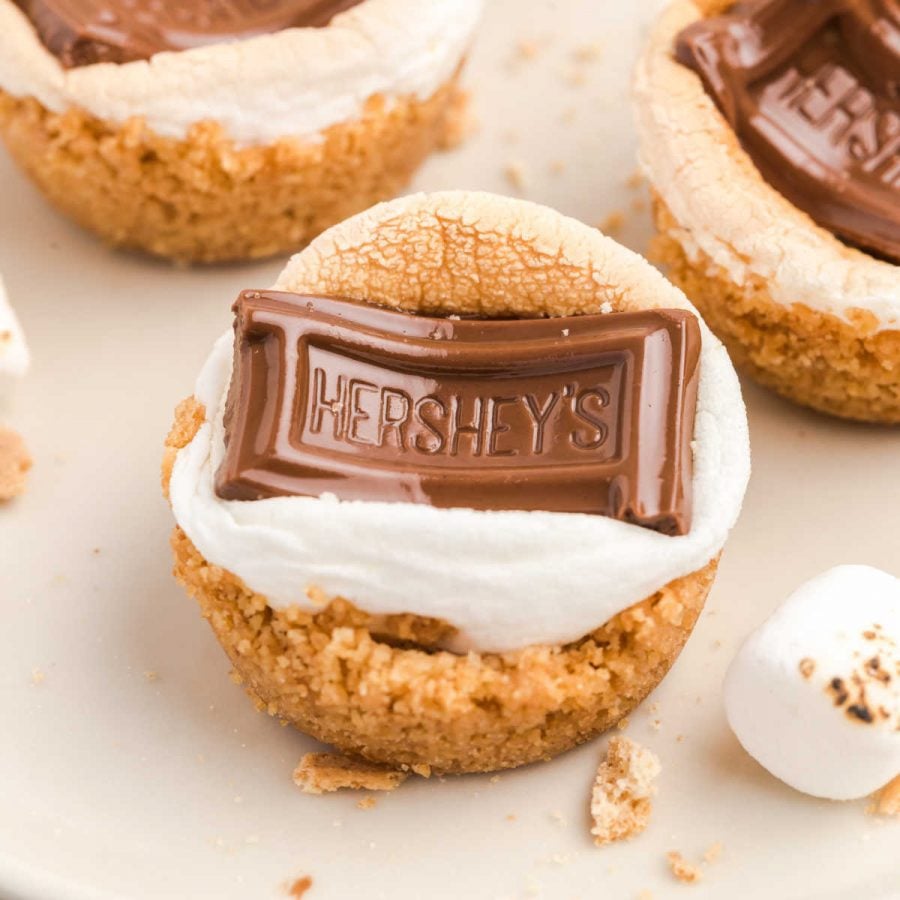


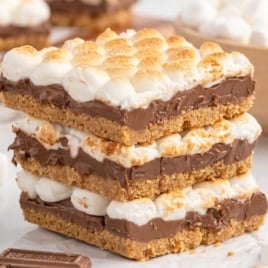
These s’mores bites are an easy way to make little s’mores in your oven. A buttery graham cracker crust filled with gooey marshmallows and melted chocolate makes this sweet dessert a winner. You don’t need a campfire to make these tasty treats — just a mini muffin pan and five simple ingredients.

S’mores Bites Ingredients
These s’mores bites are a delectable recipe that perfectly captures the essence of a classic campfire s’more.
The classic graham crackers, toasted marshmallows, and rich, creamy Hershey’s chocolate layers deliver a nostalgic and irresistible s’mores experience.
You’ll need:
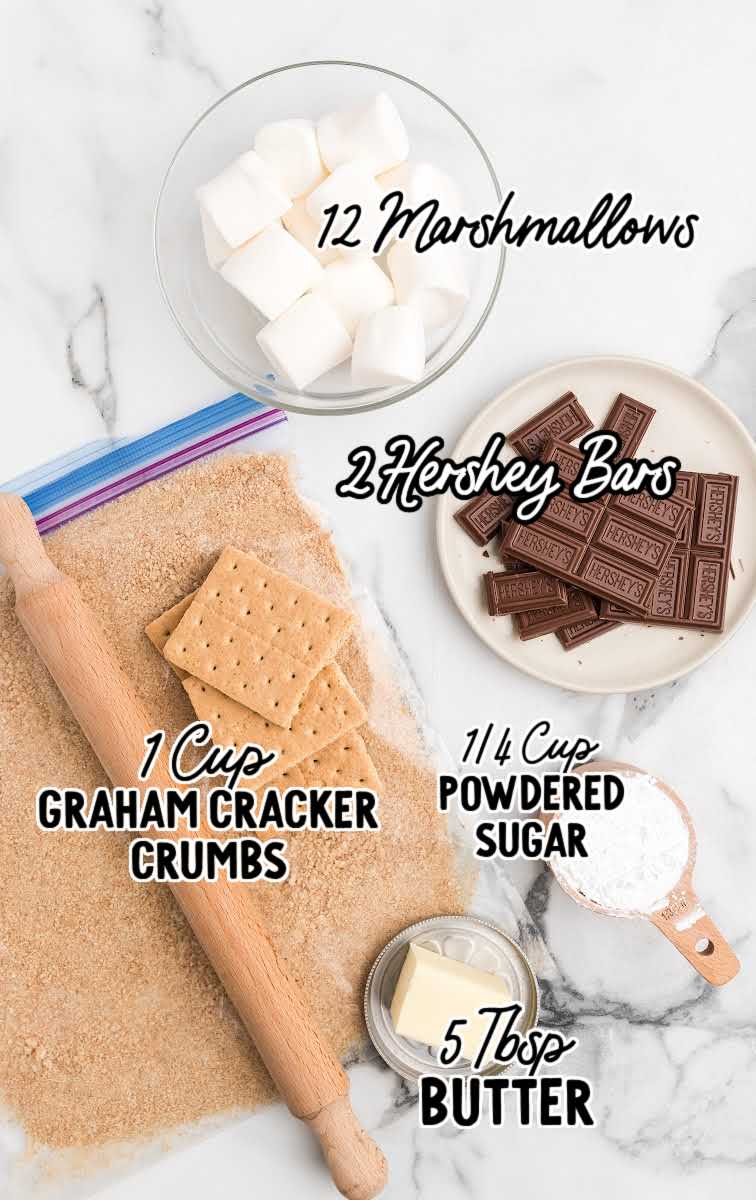
- 1 cup of graham cracker crumbs
- ¼ cup of powdered sugar
- 5 tablespoons of melted butter
- 12 marshmallows
- 2 (1.55-ounce) Hershey bars
PRO TIP:
You can make your own graham crumbs by running graham crackers through a food processor or put them in a Ziploc bag and crush them with a rolling pin.
Substitutions And Additions
CARAMEL: To make these s’mores bites extra gooey, add a piece of caramel candy on top of a section of a Hershey’s bar in each cup.
DARK CHOCOLATE: If you’re craving a rich chocolate flavor, swap out the original milk chocolate Hershey’s bars for dark chocolate ones.
HERSHEY’S CHOCOLATE: Instead of a square of Hershey’s chocolate, you could put a Hershey’s kiss on top of each of these sweet treats.
MINTS: Try using an Andes mint on top of it for a peppermint-flavored treat.
PEANUT BUTTER CUP: Add a miniature peanut butter cup to the top to try a new flavor combination.
MARSHMALLOWS: Get creative with flavored marshmallows to add a unique twist to your s’mores bites.
Options like chocolate-swirl, caramel, or even fruit-flavored marshmallows can infuse exciting new flavors into your treat without altering the baking process.
How To Make This S’mores Bites Recipe
Let’s have a look at how to make these unique s’mores treats in the oven.
STEP ONE: Preheat the oven to 350°F.
Grease a mini-muffin pan with non-stick butter spray.
OUR RECIPE DEVELOPER SAYS
Make sure to spray the pan well and rotate the pan as you spray. You don’t want any of the s’mores yumminess to stick!
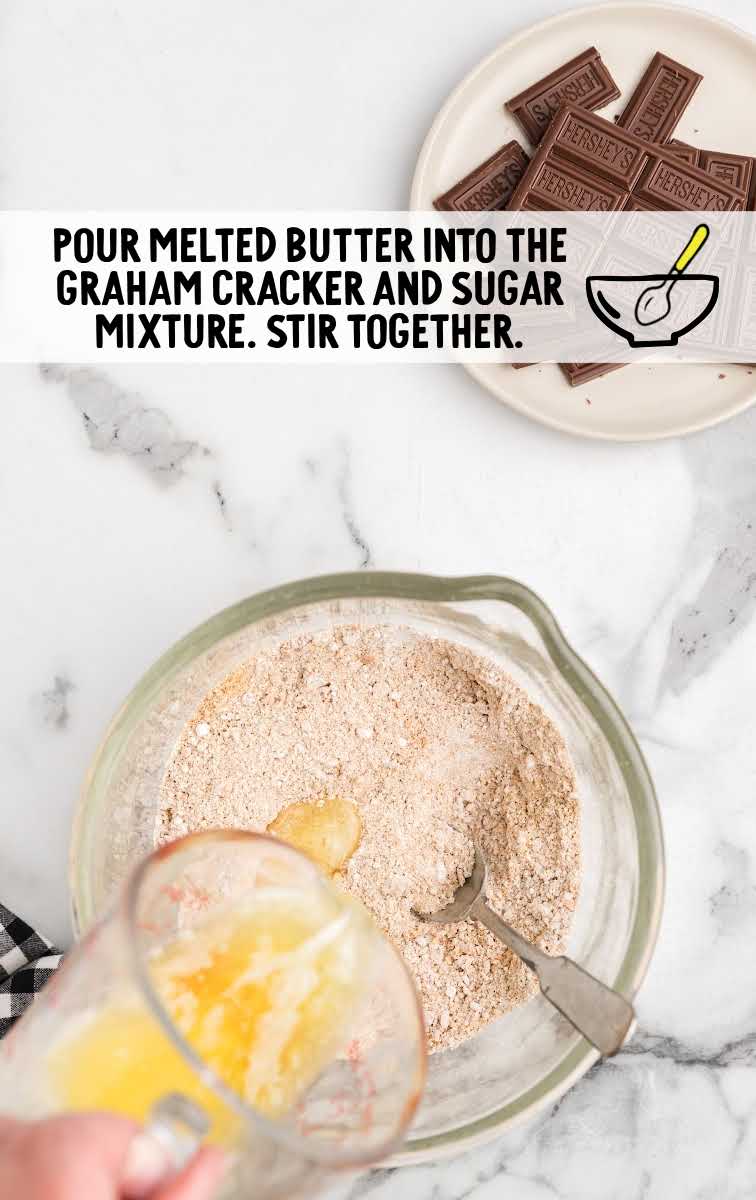
STEP TWO: In a medium-sized bowl, mix graham cracker crumbs and powdered sugar.
STEP THREE: Add melted butter to the mixture and mix with a spoon.
PRO TIP:
If your crumbs stick well together when you press the crumbs in your palm, that’s a good sign it should make a good crust.
NOTE ON THE CRUST: When adding the melted butter to the crust, some people find that there is too much butter, and it pools in the mixture.
You want the mixture to be moist but not wet. The butter should not pool and the mixture should stick together when you press it into the pan for the crust.
My recommendation is to slowly add the butter and mix it in a little at a time until your mixture looks like the picture below.
If you find your butter is pooling, or it is too wet, you should add some additional graham cracker crumbs and powdered sugar to achieve the consistency as pictured.
Some brands of graham crackers absorb differently, and this will determine how much butter you will want to add.
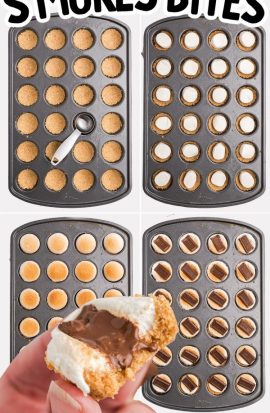
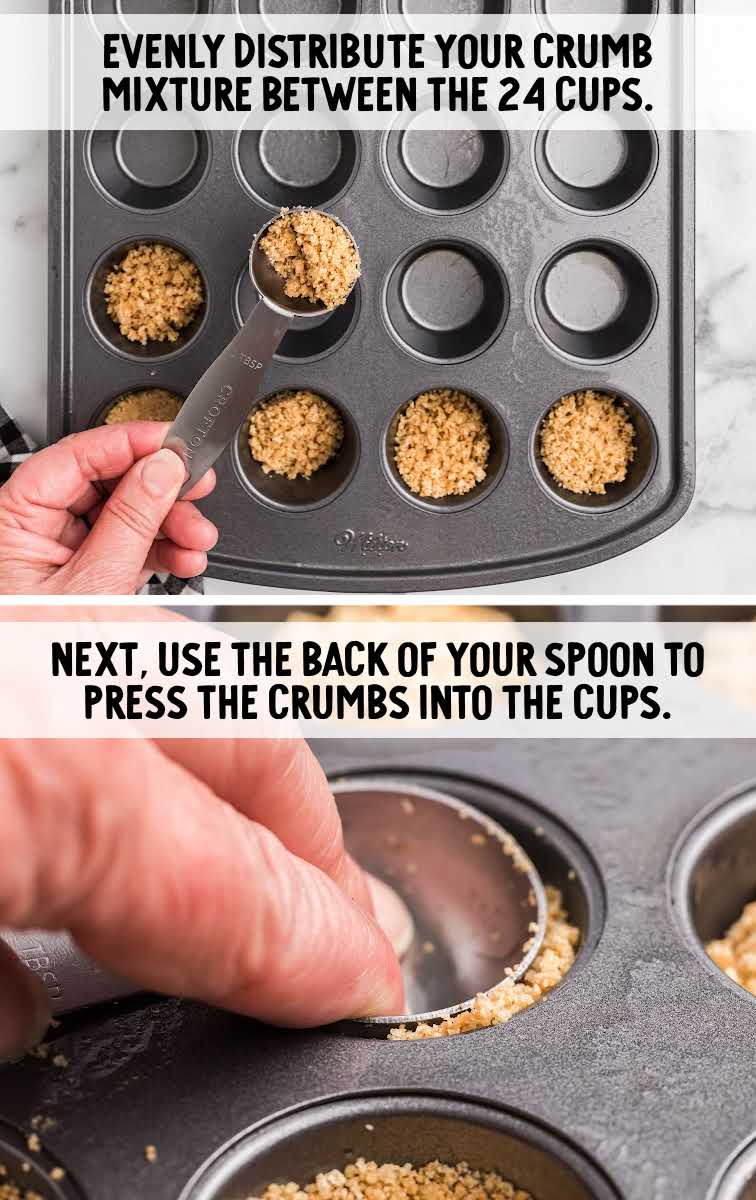
STEP FOUR: Evenly distribute the mixture to the 24 mini muffin cups.
Use a tablespoon measuring spoon and fill it about three-quarters full, not quite to the top.
Fill all of the 24 cups first before pressing down so you can make sure you have distributed the crumbs evenly.
Using the same tablespoon measuring spoon, press crumbs along the bottom and sides to make a “cup” shape.
Use firm pressure and kind of twist the spoon.
You can also use the edge of the measuring spoon to tamp down any loose crumbs, especially at the top edge of the cup.
STEP FIVE: Bake for five minutes.
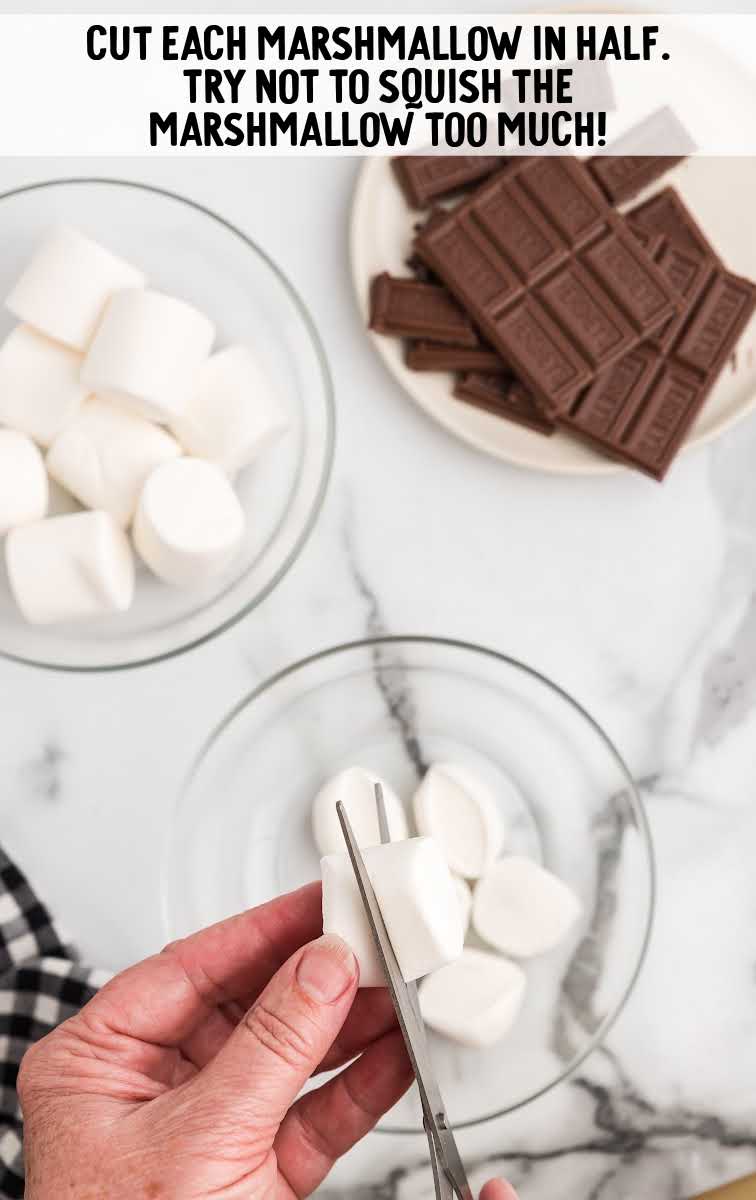
STEP SIX: While the graham cracker cups are baking, cut 12 large marshmallows in half.
PRO TIP:
Kitchen scissors sprayed with cooking spray make cutting marshmallows in half super easy.
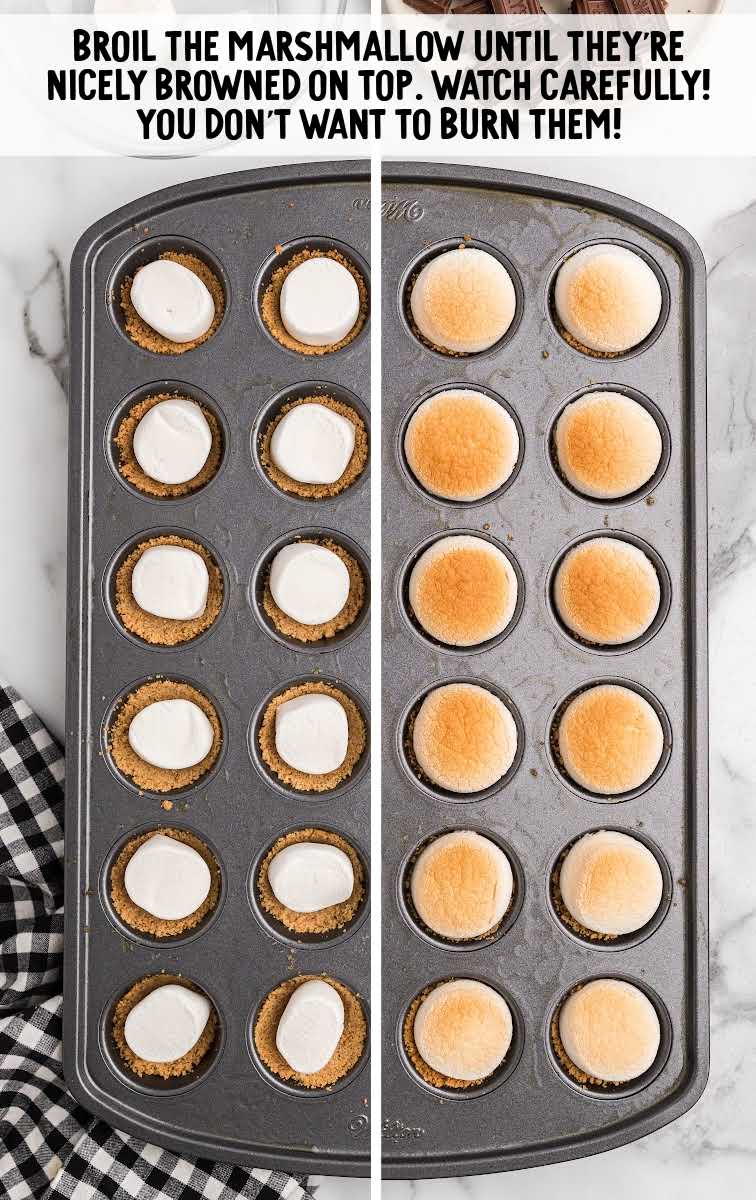
STEP SEVEN: Remove the pan from the oven and place the cut marshmallow half, cut side down, onto each mini graham cup in the middle.
STEP EIGHT: Set your oven to broil. The placement of the rack will depend on your oven. I have a gas oven and placed the rack about six inches from the broiler.
Broil for one to three minutes, watching closely so they don’t burn. Rotate the pan to get all marshmallows toasted evenly.
PRO TIP:
Keep a close eye on the marshmallows while they are in the oven as they will quickly turn from golden brown to burnt.
Depending on the oven, you may need less than a minute to brown them.
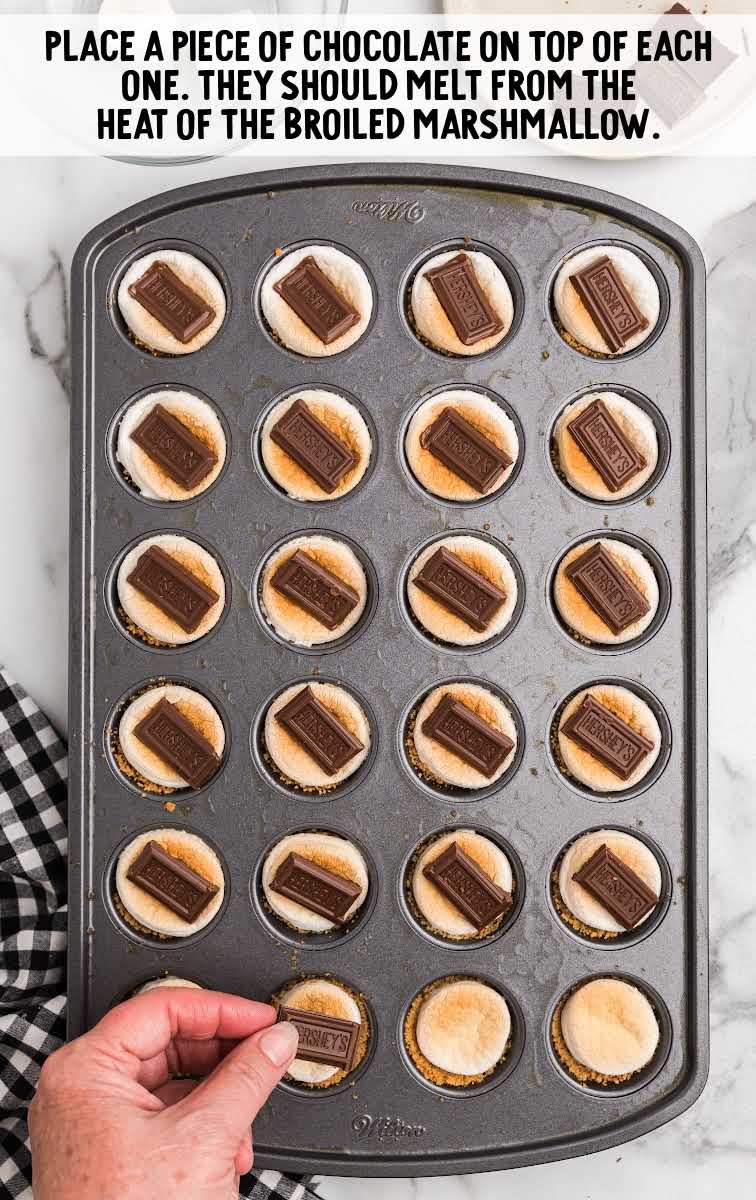
STEP NINE: Once the top of the marshmallows are toasted and golden brown, remove the pans from the oven.
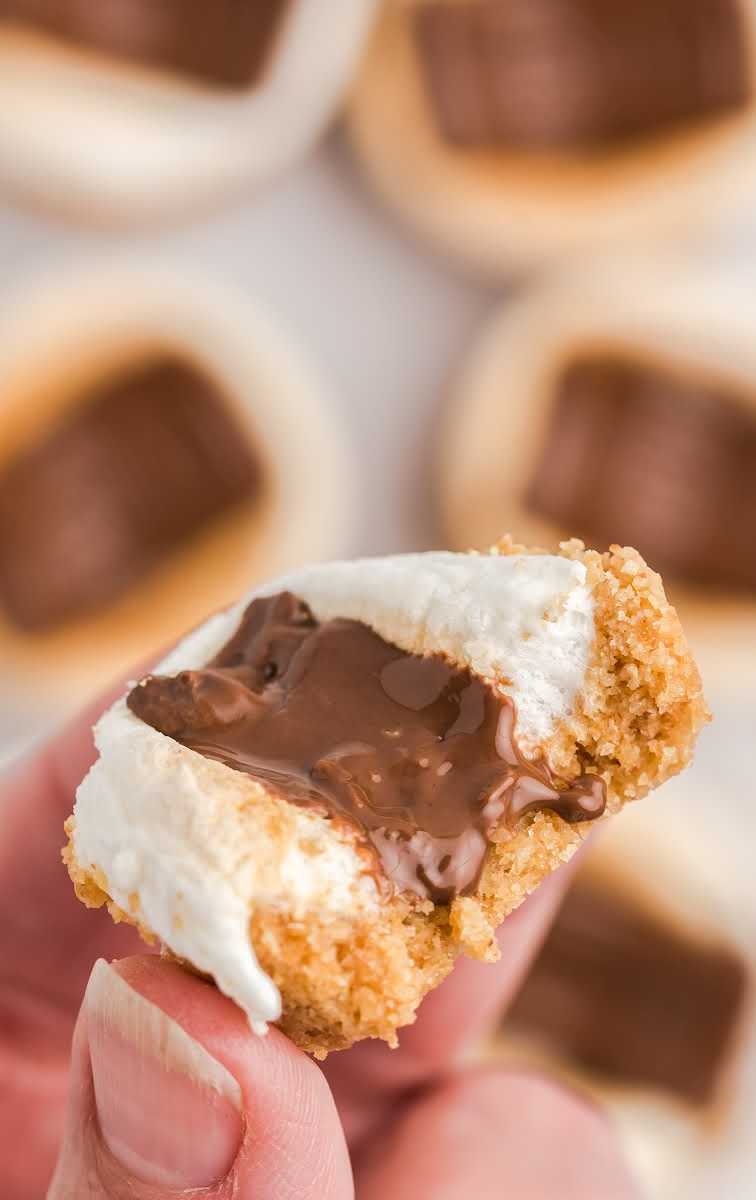
Place a square of Hershey’s chocolate bar on top of each marshmallow. The heat from the marshmallow will melt the piece of chocolate.
STEP TEN: Let cool for one hour.
STEP ELEVEN: Use a teaspoon or knife to wedge under the s’mores cups and pop each one out of the muffin tin.
PRO TIP:
These treats are one-bite treats. Cutting them may crack the crust, so go ahead and pop the whole thing in your mouth!
How To Serve
These mini s’mores cups are a great way to bring camping indoors.
Serve these treats on a summer night after a barbecue dinner of hamburgers and corn or in the winter after a comforting meal of shepherd’s pie.
Add a cold drink of iced tea, raspberry iced tea, sweet peach iced tea, or our southern strawberry sweet tea on the side to wash them down.
For two more fun ways to make s’mores, check out s’mores dip and s’mores hand pies.
MORE S’MORE RECIPES

Storage
Whether you plan to enjoy them immediately or save some for later, here’s a quick guide on how to store your s’mores bites:
MAKE AHEAD: These s’mores bites are a fantastic make-ahead treat.
After preparing and cooling them, place them in an airtight container or on a baking sheet covered with plastic wrap.
ON THE COUNTER/IN THE FRIDGE: Store these indoor s’mores bites in a single layer in an airtight container or plastic bag at room temperature or in your fridge.
They will keep for up to seven days. Be sure to cool them completely before storing them. The best way to store them is at room temperature.
IN THE FREEZER: It’s not recommended to freeze them as it will change the texture of the bites.
REHEATING: When it’s time to enjoy your s’mores bites again, there are a few ways to reheat them.
To maintain their gooey goodness, consider reheating in a preheated oven at 350°F for about five to seven minutes until they’re warmed through.
If you’re in a hurry, the microwave can do the trick too. Just zap them for 10-20 seconds, keeping a close eye to avoid overcooking.
The microwave method might not retain the same crispy texture as the oven, but they’ll still be deliciously gooey.
Why We Love This Recipe
EASY AND QUICK: This recipe is a breeze to make, even for beginners. With straightforward instructions and minimal prep time, you can whip up a batch of these delightful treats in no time.
CLASSIC S’MORES FLAVOR: These s’mores bites capture the nostalgic taste of traditional campfire s’mores. The combination of graham crackers, marshmallows, and chocolate brings that familiar, beloved flavor right to your kitchen.
These mini s’mores bites are a way to bring the fun of cooking around a campfire to the comfort of your own kitchen. They’re baked in a mini muffin tin in the oven as cookie cups with layers of chocolate and marshmallows.
Frequently Asked Questions
If you prefer, you could add a dollop of marshmallow creme on top of your graham cup base in this recipe. It will make your resulting bites quite gooey, but they will still taste amazing.
Marshmallows don’t tend to freeze well, so we wouldn’t recommend freezing these bites.
You can use two mini marshmallows instead of half of a large one.
While graham crackers are the classic flavor for s’mores, you could certainly switch up the base flavor. You can now buy chocolate graham crackers, so that would be a simple way to change the flavor and add more chocolate to your bars.
More Recipes You’ll Love
- Baked S’mores
- S’mores Cupcakes
- Disney Churros
- Indoor S’mores
- Fluffernutter Cookies
- Mint Chocolate Chip Cookies


S’mores Bites
Ingredients
- 1 cup graham cracker crumbs
- ¼ cup powderd sugar
- 5 tablespoons melted butter
- 12 marshmallows
- 2 Hershey’s chocolate bars, (1.55 ounce bars)
Instructions
- Preheat the oven to 350°F. Grease a mini-muffin pan with non-stick butter spray. Spray it really well! I sprayed the pan almost 4 times, rotating the pan with each spray.
- In a medium-sized bowl, mix graham cracker crumbs and powdered sugar. Add the melted butter and mix with a spoon. If your crumbs stick well together when you press the crumbs in your palm, that’s a good sign it should make a good crust.
- Evenly distribute the mixture to the 24 mini muffin cups (use a tablespoon measuring spoon and fill it about ¾ full, not quite to the top). Fill all of the 24 cups first before pressing down so you can make sure you have distributed the crumbs evenly. Use the same tablespoon measuring spoon and press the crumbs down into the cup. Use firm pressure and kind of twist the spoon. You can also use the edge of the measuring spoon to tamp down any loose crumbs, especially at the top edge of the cup.
- Bake for 5 minutes.
- While the graham cracker cups are baking, cut 12 large marshmallows in half.
- Remove the pan from the oven and place the cut marshmallow, cut side down, onto each mini graham cup in the middle.
- Set your oven to broil. The placement of the rack will depend on your oven (I have a gas oven and placed the rack about 6 inches from the broiler). Broil for 1 to 3 minutes, watching closely so they don’t burn. Rotate the pan to get all marshmallows toasted evenly.
- Turn your oven on broil. Put the pan back in the oven and broil for 2 minutes (keep a close eye on them)! Take them out as soon as they start to brown. Watch them while they are in the oven as they will quickly turn from brown to burnt.
- Once the top of the marshmallows are toasted and brown, remove them from the oven and place a square of Hershey’s chocolate on top of the hot marshmallow. The heat from the marshmallow will melt the chocolate piece.
- Let cool for one hour.
- Use a teaspoon or knife to wedge under the s'mores cups and pop each one out of the muffin tin.
Video
Notes
- You can make your own graham crumbs by running graham crackers through a food processor or put them in a Ziploc bag and crush them with a rolling pin.
- Make sure to spray the pan really well. You don’t want any of the s’mores yumminess to stick.
- If your crumbs stick well together when you press the crumbs in your palm that’s a good sign it should make a good crust.
- Kitchen scissors make cutting marshmallows in half super easy.
- Keep a close eye on the marshmallows while they are in the oven as they will quickly turn from golden brown to burnt. Depending on the oven, you may need less than a minute to brown them.
- These treats are one-bite treats. Cutting them may crack the crust so go ahead and pop the whole thing in your mouth!
- NOTE ON THE CRUST: When adding the melted butter to the crust, some people find that there is too much butter, and it pools in the mixture. My recommendation is to slowly add the butter and mix it in a little at a time until your mixture looks like the picture below. If it does not look like the photo and you are finding your butter is pooling, or it is too wet, you should add some additional graham cracker crumbs and powdered sugar to achieve the consistency as pictured. The graham crackers that you use absorb differently, and this will determine how much butter you will want to add. You want the mixture to be moist but not wet. The butter should not pool, but the mixture should stick together when you press it into the pan for the crust.
Nutrition


Comments
jay platte says
yummm, these are perfect for bonfires!!
Gayle says
How much powdered sugar?
Anna Hofmann says
Hiw much powdered sugar?
Layne Kangas says
1/4 cup. Enjoy!
Gloria says
We LOVE these – such a fun little treat!
Khalida Khyabani says
Do these freeze well? I’d like to make it as part of my wedding dessert table.
Layne Kangas says
Hi, Khalida – these do not freeze well.
Jeanne Pantano says
I used regular cupcake pan 12.cupcakes. recipe was easy & came out great I used dark chocolate the main difference was definitely 2 bites nor 1.
Huge hit