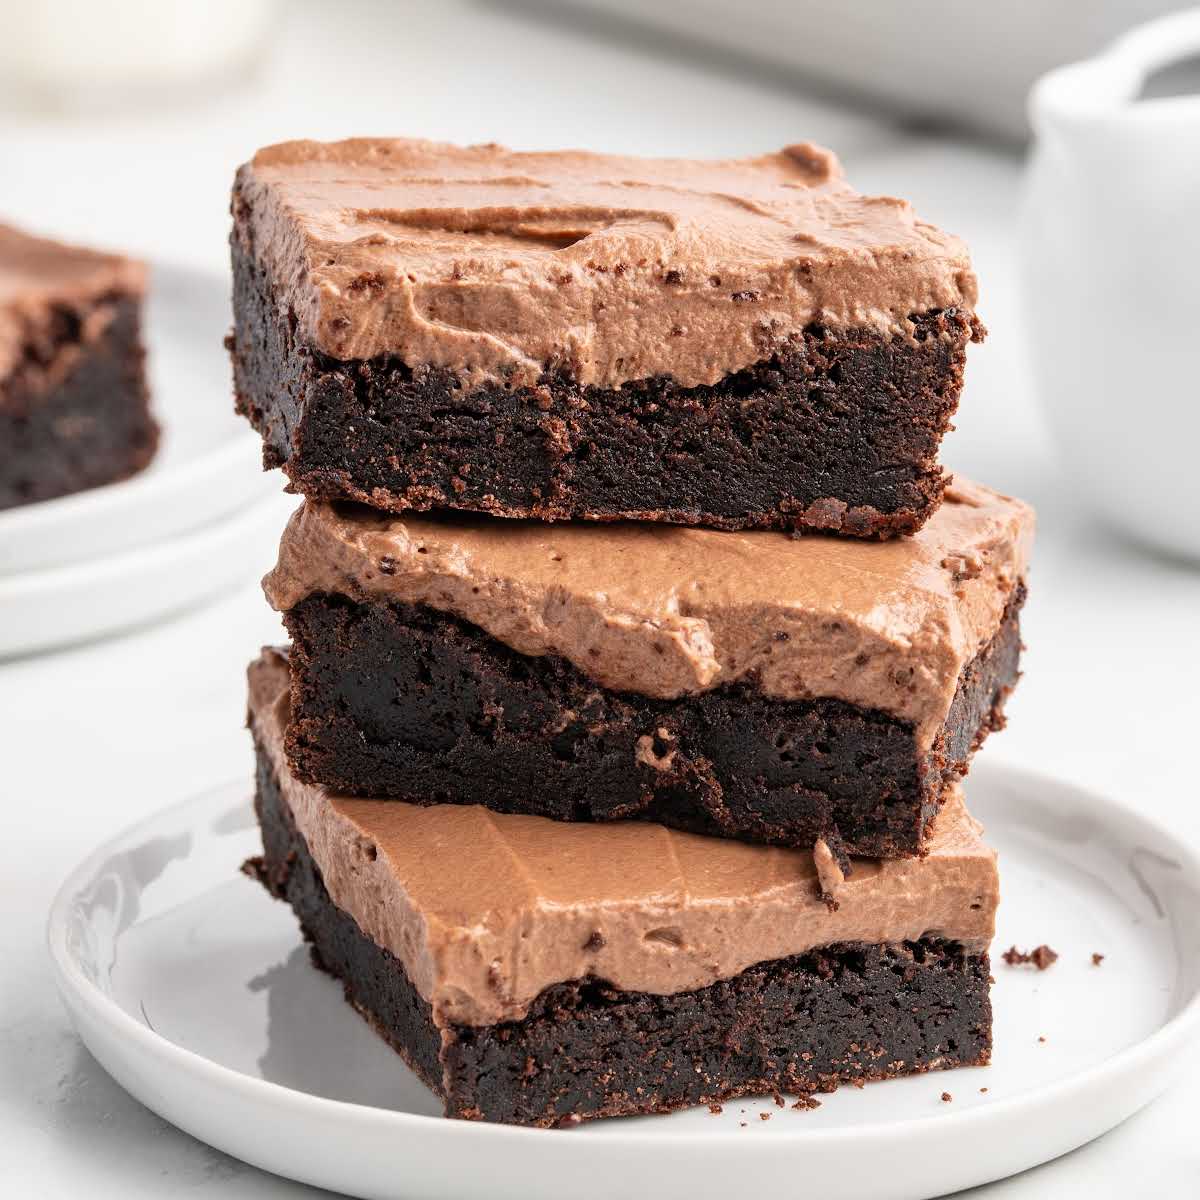
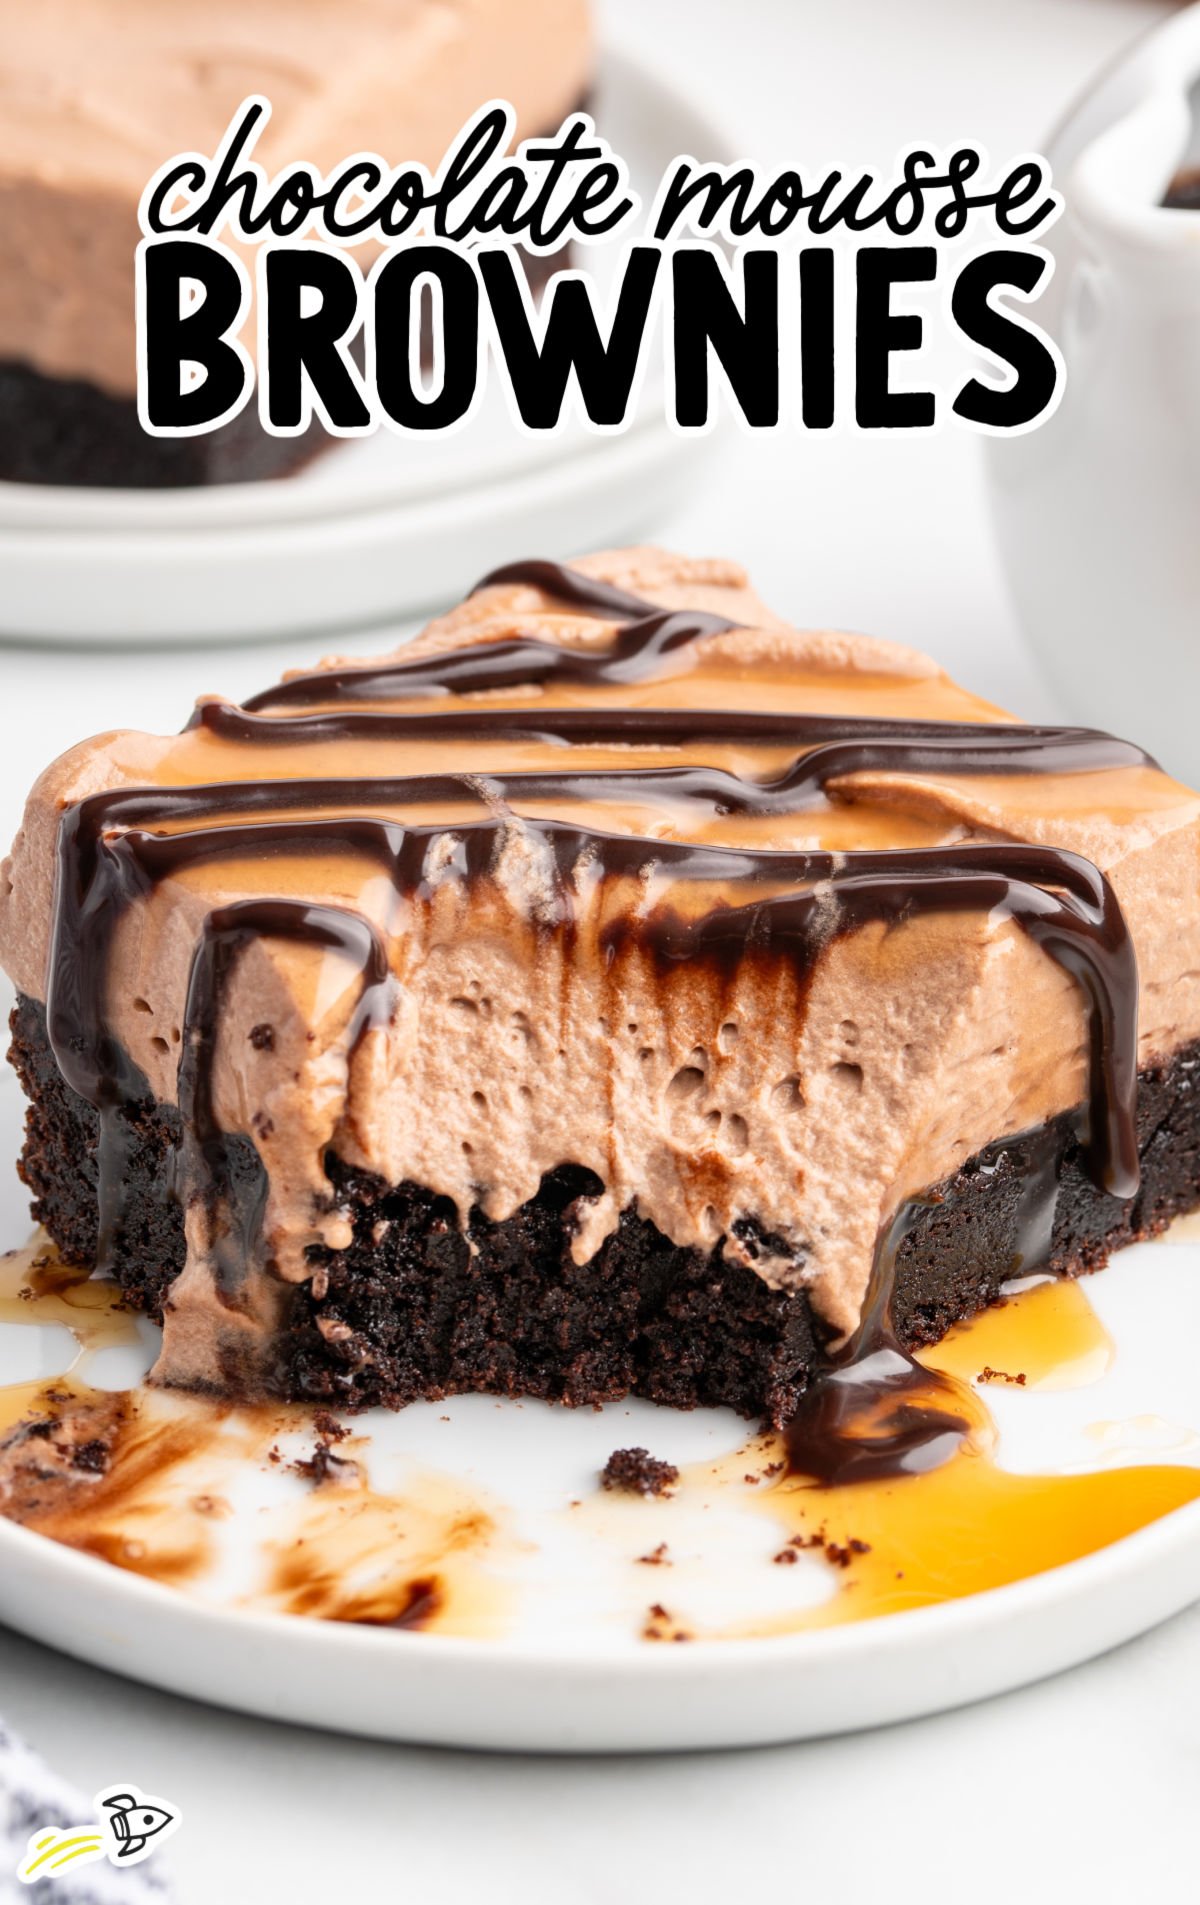
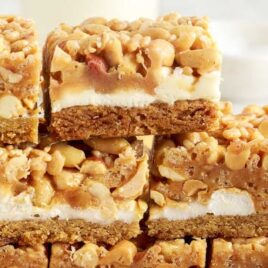
Today: Get My No Fail, Easy Cookbook Series for 60% OFF
Buy Now

Chocolate Mousse Brownies

Pin RecipeReview Recipe
a slice of Chocolate Mousse Brownie on a spatula
Chocolate mousse brownies combine rich, fudgy brownies with a light and creamy mousse topping. Easy to make and perfect for any occasion, these decadent treats will impress your guests.
Jump to Recipe
Table of Contents
  1. Chocolate Mousse Brownies Ingredients
  2. How To Make This Chocolate Mousse Brownie Recipe
  3. Chocolate Brownie Mousse Substitutions and Additions
  4. Chocolate Mousse Brownie Recipe Troubleshooting Tips
  5. How To Serve Your Brownie Chocolate Mousse Dessert
  6. How To Store Chocolate Mousse Brownie Desserts
  7. Why These Chocolate Mousse Brownies Are The Best
  8. Chocolate Mousse Brownies Frequently Asked Questions
  9. More Recipes for Chocolate Lovers
  10. JUMP TO RECIPE
  11. Even More Recipes You’ll Love

If you’re a fan of chocolate, these chocolate mousse brownies are about to become your new obsession. The contrast between the dense, fudgy brownie base and the light, airy mousse topping is a match made in dessert heaven. Perfect for chocoholics and casual dessert lovers alike, these brownies are the ultimate treat that will leave everyone reaching for seconds.

a slice of Chocolate Mousse Brownie on a plate with a fork
Don't want to lose this recipe? Get it emailed to you directly! Enter your email below. Plus you'll get a free e-cookbook and amazing recipes sent to you daily.

Brownies are a classic favorite, but why settle for ordinary when you can have extraordinary? These chocolate mousse brownies take the beloved brownie to new heights by adding a layer of luscious chocolate mousse. The result is a dessert that’s both indulgent and sophisticated, making it the perfect choice for impressing guests or satisfying your sweet tooth.

Chocolate Mousse Brownies Ingredients

Chocolate Mousse Brownies raw ingredients that are labeled

You’ll love making these chocolate mousse brownies. This recipe combines a rich, fudgy brownie base with a light and creamy mousse topping, creating a dessert that everyone will crave.

You’ll need:

For the Brownie Layer:

  • 1 cup unsalted butter, melted
  • 2 ¼ cups granulated sugar
  • 1 tablespoon vanilla extract
  • 4 large eggs, room temperature
  • 1 ¼ cups all-purpose flour
  • 1 cup Dutch-processed unsweetened cocoa powder
  • ¾ teaspoon salt

For the Chocolate Mousse Layer:

  • 2 tablespoons cold water
  • 2 teaspoons unflavored gelatin
  • 2 ½ cups heavy cream, very cold, divided (½ cup to melt the chocolate pieces and 2 cups to make the whipped cream)
  • 4 ounces semisweet baking bar, finely chopped
  • ¼ cup powdered sugar
  • ½ teaspoon vanilla extract

To Garnish:

  • 1 tablespoon Dutch-processed unsweetened cocoa powder, to dust the top of the chocolate mousse brownies

How To Make This Chocolate Mousse Brownie Recipe

This homemade brownies with chocolate mousse recipe is a treat that blends rich, fudgy texture with silky chocolate mousse for an exquisite dessert. This helpful guide is designed to assist you every step of the way. Follow along, and be sure to read through our troubleshooting guide for more tips and recipe notes.

PRO TIP:

Start by ensuring all your ingredients are measured and ready. Having everything prepared simplifies the process, so you can focus on the technique, crucial for perfect brownies.

STEP ONE: Preheat your oven and line your baking pan with parchment paper and a light spray of baker’s spray. This prevents sticking and allows for easy removal of the brownies once cooled.

STEP TWO: Combine the melted unsalted butter and granulated sugar in a large mixing bowl. Whisking until the sugar is dissolved helps create a smooth base for your batter.

STEP THREE: Incorporate the vanilla extract and eggs one at a time, whisking until each is fully incorporated. This method helps to build a stable emulsion, keeping the batter uniform.

vanilla extract and eggs combined in a bowl

STEP FOUR: Add the cocoa powder, all-purpose flour, and salt to your wet ingredients. Whisk gently to combine everything into a smooth, thick batter without overmixing, which could make the brownies tough.

cocoa powder, all-purpose flour, and salt combined in a bowl

STEP FIVE: Pour the batter into your prepared pan, smoothing the top with a spatula. Bake for 30-35 minutes, or until a toothpick inserted comes out mostly clean with a few moist crumbs.

brownie batter poured into the baking pan

STEP SIX: Allow the brownie base to cool fully in the pan on a wire rack to room temperature. This step is essential to prevent the mousse from melting when applied.

STEP SEVEN: Mix the cold water and gelatin in a small bowl and set it aside to let the gelatin fully hydrate and bloom.

STEP EIGHT: Heat half a cup of the heavy cream in the microwave until hot but not boiling, about 45 seconds. This will be used to dissolve the bloomed gelatin and melt the chocolate.

STEP NINE: Stir the bloomed gelatin into the hot cream until dissolved, then pour over the chopped chocolate. Let it sit for a minute before stirring until smooth.

STEP TEN: Allow the chocolate mixture to cool to room temperature. This prevents it from seizing when mixed with the cold whipped cream, which could ruin the texture of your mousse.

chocolate and warm cream added to the bowl

STEP ELEVEN: Whip the remaining heavy cream with powdered sugar and vanilla until it forms stiff peaks. This creates the light, airy texture characteristic of mousse.

STEP TWELVE: Gently fold one third the cooled chocolate mixture into the whipped cream until combined. Repeat, folding in another one third of the mixture.

Finally, fold in the remaining one third of the mixture until well combined and no streaks of white remain. This step is crucial for maintaining the mousse’s fluffy texture.

cooled chocolate mixture folded into the whipped cream

STEP THIRTEEN: Spread the mousse evenly over the cooled brownie base. Cover carefully with plastic wrap (try not to let it touch the creamy chocolate mousse) and chill in the refrigerator for at least six to eight hours, or ideally overnight, to set the mousse.

STEP FOURTEEN: Just before serving, dust the top of the mousse layer with cocoa powder for an elegant finish. Use the parchment paper overhang to lift the brownies from the pan and cut them into desired sizes.

PRO TIP:

Use a hot knife for clean slices, wiping the blade between cuts to ensure each piece is perfect.

dust the top of the mousse layer with cocoa powder

Chocolate Brownie Mousse Substitutions and Additions

Here are some suggestions for substitutions and additions you can make to the ingredients list. Remember, any substitutions may alter the taste and texture of the recipe, so use them at your own discretion.

Unsalted Butter: You can use salted butter instead, but reduce the added salt in the recipe to balance the flavors.

Granulated Sugar: Swap with an equal amount of brown sugar for a deeper, molasses-like sweetness and chewy brownies. 

Vanilla Extract: Try using almond extract or peppermint extract for a different flavor. Almond extract will add a nutty note, while peppermint extract will give a refreshing twist.

Dutch Processed Unsweetened Cocoa Powder: Dutch processed cocoa has a dark, rich chocolatey flavor and gives your recipe a deep brown color. Natural unsweetened cocoa powder can be used, but it may result in a lighter color and slightly different flavor due to its acidity.

Semisweet Baking Bar: Dark chocolate or milk chocolate can be used instead. Dark chocolate will make the mousse richer, while milk chocolate will make a white chocolate mousse that’s much sweeter and creamier.

Whichever chocolate you choose, we recommend using high-quality baking chocolate for the smoothest texture and best flavor. This recipe won’t work with a candy bar like a Hershey Bar.

Additions:

  • Add a teaspoon of espresso powder to the brownie layer to give it a more intense chocolate flavor
  • Fold in one cup of semi-sweet chocolate chips before baking the brownie layer
  • Swirl in a few dollops of peanut butter before baking the brownies
  • Fold up to one cup of mini marshmallows into the brownie layer before baking
  • Add a sprinkle of chopped nuts before baking
  • Make chocolate curls using a baking bar and a thin shaver to sprinkle over the mousse


Chocolate Mousse Brownie Recipe Troubleshooting Tips

Our recipe developers and testers provided these additional tips to help you as you make your chocolate brownie mousse dessert:

  • Room Temperature Ingredients: Make sure your eggs are at room temperature before mixing. This helps them blend more easily into the batter and contributes to a better texture.
  • Use Parchment Paper: When lining the pan with parchment paper, leave extra overhang on all sides. This makes it easier to lift the brownies out of the pan after they’ve cooled.
  • Mixing Technique: When incorporating the dry ingredients into the wet mixture, use a folding motion rather than vigorous stirring to avoid overmixing, which can lead to dense brownies. We don’t recommend using an electric mixer for making the brownie layer.
  • Baking Time: Start checking your brownies for doneness a few minutes before the recommended baking time. Oven temperatures can vary, and you don’t want to overbake the brownies.
  • Gelatin Blooming: Make sure the gelatin fully absorbs the water and becomes slightly firm before dissolving it in the warm cream. This ensures the mousse sets properly, and helps you avoid clumps of gelatin in the mousse.
  • Whipping Cream: You can chill your mixing bowl and beaters in the freezer for about 15 minutes before whipping the cream. Cold equipment helps the cream whip faster and to a better consistency.

How To Serve Your Brownie Chocolate Mousse Dessert

Whether you’re hosting a family gathering or a casual get-together, these ideas will help you make the most of your brownie dessert.

Classic Presentation: Serve the brownies on a dessert platter, dusted lightly with extra cocoa powder for a professional touch. Garnish with fresh berries like raspberries or strawberries to add a pop of color.

With Whipped Cream: A dollop of homemade whipped cream on each brownie piece adds an extra layer of creaminess. You can also sprinkle some shaved chocolate or cocoa nibs on top for added texture and flavor.

With Ice Cream: Serve the brownies warm with a scoop of vanilla or nutella ice cream. The contrast between the warm brownie and cold ice cream creates a treat that’s hard to resist.

Family Gatherings: Bring these brownies to your next family gathering. They are easy to transport and always a hit. Arrange them on a tiered dessert stand with other treats like cookies and mini cheesecakes for a visually appealing dessert table.

Beverage Pairings: A glass of cold milk is a classic choice that pairs well with brownies. For adults, consider serving with a cup of freshly brewed coffee or a glass of red wine, like a robust Cabernet Sauvignon, to enhance the chocolate flavors. For extra special visits with friends, serve with a homemade vanilla latte or an iced mocha.

Casual Gatherings: For a casual get-together, serve these brownies in small, easy-to-handle squares. Pair them with a variety of beverages like iced tea, lemonade, or even a selection of craft beers for a relaxed and enjoyable experience.

Because these brownie desserts are ultra-chocolatey comfort food, but also elegant, they’re ideal for every event from casual get-togethers to more formal celebrations. They make a great alternative to a traditional birthday cake, and make a lovely treat for Valentine’s Day or an anniversary party.

Guests of all ages will enjoy these tasty brownies at holiday events, too. Make them as a sweet ending to your Easter, Christmas, or Thanksgiving dinner.

How To Store Chocolate Mousse Brownie Desserts

Proper storage of your chocolate mousse brownies is essential to maintain their delicious texture and flavor. Here’s how you can store them to enjoy later.

MAKE AHEAD: You can make these brownies a day ahead of time. Prepare the brownies and the mousse as directed, then cover and refrigerate. This allows the mousse to set properly, making them easier to slice and serve.

IN THE FRIDGE: Store your brownies in an airtight container in the refrigerator. They will stay fresh for up to three days. Keeping them chilled ensures the mousse layer remains firm and the brownies stay moist.

IN THE FREEZER: For longer storage, you can freeze the brownies. Place them in a single layer in an airtight container or wrap them tightly in plastic wrap and then aluminum foil. They will last for up to two months in the freezer.

Thaw them overnight in the fridge before serving, but keep in mind, the mousse may not thaw with the same consistency.

Why These Chocolate Mousse Brownies Are The Best

Chocolate mousse brownies have quickly become a favorite for many reasons. They combine simplicity with indulgence, making them a go-to dessert for various occasions.

Rich Flavor: The combination of fudgy brownies and creamy mousse creates a dessert that’s packed with chocolate goodness.

Easy to Make: The recipe is straightforward, with clear steps that anyone can follow.

Make-Ahead Convenience: You can prepare these brownies in advance, making them perfect for busy schedules.

Versatile Serving Options: They can be dressed up for special occasions or enjoyed as a casual treat.

Chocolate Mousse Brownies Frequently Asked Questions

Can I use a different type of chocolate for the mousse?

Yes, you can use dark chocolate or milk chocolate instead of semisweet chocolate. This will change the sweetness and richness of the mousse.

How do I know when the brownies are done baking? 

Insert a toothpick into the center of the brownies. If it comes out clean or with a few moist crumbs, they are done.

Can I use a boxed brownie mix for this recipe?

If you prefer, you can use a family size boxed of store-bought brownies for this recipe in place of the “from scratch” brownies. You will need to follow the package directions for mixing and baking in a 9×13 pan if using a boxed brownie mix for this recipe.

Can I make this recipe without gelatin? 

Yes, you can use agar-agar as a vegetarian alternative to gelatin. Follow the package instructions for proper usage.

What size pan should I use for this recipe? 

Use a 9×13 inch straight-sided baking pan for best results.

How long should I let the mousse cool before adding it to the brownies?

Let the mousse cool to room temperature before adding it to the brownies to prevent melting.

Can I use a hand mixer instead of a stand mixer for the whipped cream? 

Yes, a hand mixer works just as well. Start on low speed and gradually increase to high speed.

Is it necessary to use parchment paper to line the baking pan? 

You don’t have to use parchment paper, but it helps lift the brownies out of the pan easily and prevents sticking.

Can I use regular unsweetened cocoa powder instead of Dutch-processed?

Yes, but the flavor and color may be slightly different. Dutch-processed cocoa gives a deeper flavor and darker color.

How can I prevent overmixing the brownie batter? 

Fold the dry ingredients gently into the wet ingredients until just combined. Overmixing can lead to dense brownies.

What can I do if my chocolate mousse doesn’t set properly? 

Make sure the gelatin is fully dissolved and the mousse is chilled for at least 6-8 hours or overnight to set properly. If the mousse will not set, it’s likely the cream wasn’t whipped long enough, or the gelatin didn’t bloom. You can try remaking the mousse. Scrape off the old mousse and replace with a fresh mixture it to try again.

Chocolate mousse brownies combine rich, fudgy brownies with a fluffy chocolate mousse topping, making them a hit at any gathering. Enjoy this easy-to-make dessert that everyone will love!

 slices of Chocolate Mousse Brownies

More Recipes for Chocolate Lovers

Get Recipes on Pinterest

get recipes on pinterest
get digital lazy cookbooks
Get a Free Cookbook
Subscribe now to receive our FREE Sweet & Treats digital cookbook with 15 amazing desserts inside!
a slice of Chocolate Mousse Brownie on a spatula

Chocolate Mousse Brownies

No ratings yet
Chocolate mousse brownies combine rich, fudgy brownies with a light and creamy mousse topping. Easy to make and perfect for any occasion, these decadent treats will impress your guests.
Prep Time 20 minutes
Cook Time 35 minutes
Total Time 8 hours 55 minutes
Servings 12

Ingredients
  

Brownie Layer

  • 1 cup unsalted butter, melted
  • 2 ¼ cups granulated sugar
  • 1 tablespoon vanilla extract
  • 4 large eggs, room temperature
  • 1 ¼ cups all-purpose flour
  • 1 cup Dutch processed unsweetened cocoa powder
  • ¾ teaspoon salt

Chocolate Mousse Layer

  • 2 tablespoons cold water
  • 2 teaspoons unflavored gelatin
  • 2 ½ cups heavy cream, very cold and divided (½ cup to melt the chocolate pieces and 2 cups to make the whipped cream)
  • 4 ounces semisweet baking bar, finely chopped
  • ¼ cup powdered sugar
  • ½ teaspoon vanilla extract

Garnish

  • 1 tablespoon Dutch processed unsweetened cocoa powder, to dust the top of the chocolate mousse brownies

Instructions
 

  • Preheat oven to 350° F. Line a straight-sided 9×13-inch baking pan with parchment paper (being sure to leave some of the parchment paper to overhang the sides of the pan) and lightly spray the sides with baker’s spray. This will make it easier to lift the brownies out of the pan to better slice and serve them. Set aside.
  • To a large mixing bowl, add the melted unsalted butter and granulated sugar. Whisk until the sugar has dissolved in the warm melted butter.
  • Add the vanilla extract and eggs, one at a time, whisking until each egg is fully incorporated before adding the next egg. Whisk until smooth and all the ingredients are fully incorporated.
  • To the butter mixture, add the cocoa powder, all-purpose flour, and salt. Whisk gently, being careful not to overmix, until all the dry ingredients are evenly mixed into the wet ingredients and the brownie batter is smooth and thick.
  • Spread the brownie batter into the prepared baking pan and bake for 30-35 minutes or until a toothpick inserted in the center comes out clean or with a couple of moist crumbs stuck to the toothpick.
  • Allow the brownies to cool completely on the counter before adding the chocolate mousse layer.
  • To a small bowl add the cold water and unflavored gelatin. Gently stir to combine then set aside to allow the gelatin to absorb the water completely.
  • To a 1-cup glass, microwave-safe, liquid measure cup, (or a small microwave-safe bowl) add ½ cup of the heavy cream. Microwave on high for 45 seconds to 1 minute to heat the heavy cream until steamy. You do not want to boil the heavy cream.
  • Using a fork, or small whisk, stir the gelatin into the warm heavy cream until it is fully dissolved.
  • To a medium bowl, add the finely chopped semi-sweet chocolate, then pour the warm heavy cream over the chopped chocolate. Be sure that you cover all the chocolate with the warm cream, and allow it to sit for 1-2 minutes or until the chocolate has melted. Stir until the chocolate is smooth and all the heavy cream has been incorporated. You may need to heat the chocolate and heavy cream for another 30-40 seconds, in the microwave to get the chocolate warm enough to stir to a smooth consistency.
  • Set aside to allow the chocolate to cool completely to room temperature. This is very important for the next step, as you do not want to add warm chocolate to the whipped cream for the mousse mixture.
  • In a large mixing bowl add the remaining 2 cups of heavy whipping cream and beat on high speed, using a handheld mixer starting on low speed and working up to high speed as the cream starts to thicken, and beat the heavy cream until soft peaks start to form. This should take 2 – 2 ½ minutes.
  • Add the powdered sugar and vanilla extract to the whipped cream then continue to beat the whipped cream for another 2 – 2 ½ minutes or until stiff peaks form.
  • Add ⅓ of the room temperature melted chocolate to the whipped cream and very gently fold it into the whipped cream using a rubber spatula.
  • Add another ⅓ of the melted chocolate to the whipped cream and very gently fold it in.
  • Finally, add the remaining ⅓ of the melted chocolate to the whipped cream, and fold until no white streaks remain and the chocolate mousse mixture is light and fluffy.
  • Using a small offset spatula, spread the chocolate mousse mixture evenly over the top of the cooled brownie pan.
  • Cover the baking pan with plastic wrap, being sure not to disturb the chocolate mousse layer, and refrigerate the chocolate mousse brownies for a minimum of 6-8 hours or up to overnight. You want to allow the chocolate mousse to set-up to a firm consistency so that you get nice clean cuts when sliced and served.
  • Once the mousse layer has fully set, lightly dust the top of the brownies with 1 tablespoon of additional unsweetened cocoa powder to garnish (do not do this until ready to serve), then run a sharp knife around the edges of the baking pan, to loosen the sides of the brownies, before gently lifting the chocolate mousse brownies out of the pan using the overhanging parchment paper. Using a large sharp knife, cut the brownies into 12 (3×3 inch) servings.

Notes

  • Room Temperature Ingredients: Make sure your eggs are at room temperature before mixing. This helps them blend more easily into the batter and contributes to a better texture.
  • Use Parchment Paper: When lining the pan with parchment paper, leave extra overhang on all sides. This makes it easier to lift the brownies out of the pan after they’ve cooled.
  • Mixing Technique: When incorporating the dry ingredients into the wet mixture, use a folding motion rather than vigorous stirring to avoid overmixing, which can lead to dense brownies. We don’t recommend using an electric mixer for making the brownie layer.
  • Baking Time: Start checking your brownies for doneness a few minutes before the recommended baking time. Oven temperatures can vary, and you don’t want to overbake the brownies.
  • Gelatin Blooming: Make sure the gelatin fully absorbs the water and becomes slightly firm before dissolving it in the warm cream. This ensures the mousse sets properly, and helps you avoid clumps of gelatin in the mousse.
  • Whipping Cream: You can chill your mixing bowl and beaters in the freezer for about 15 minutes before whipping the cream. Cold equipment helps the cream whip faster and to a better consistency.

Nutrition

Calories: 600kcal | Carbohydrates: 59g | Protein: 8g | Fat: 41g | Saturated Fat: 25g | Polyunsaturated Fat: 2g | Monounsaturated Fat: 11g | Trans Fat: 1g | Cholesterol: 159mg | Sodium: 191mg | Potassium: 285mg | Fiber: 5g | Sugar: 42g | Vitamin A: 1292IU | Vitamin C: 0.3mg | Calcium: 69mg | Iron: 4mg
Have You Tried This Recipe?Follow me on Pinterest @spaceshipslb

Get Recipes on Facebook

get recipes on facebook

Even More Recipes You’ll Love

Cheesecake Recipes

Cake Recipes

Cookies Recipes

Pie Recipes

Brownie Recipes

Dessert Recipes

Dinner Recipes

Christmas Recipes

Drink Recipes

Breakfast Recipe

Appetizer Recipes

Dip Recipes

Proudly Prepared by the Spaceships Kitchen

This recipe was developed, tested, cooked and photographed by the Spaceships Kitchen. From our dinner table to yours, we hope you think it's out of this world!

You May Also Like

get digital lazy cookbooks

Reader Interactions

Leave a Comment

Recipe Rating


Comments

16108

Free Membership!

Get all our new recipes straight to

your inbox plus a BONUS

download in your first email! โค