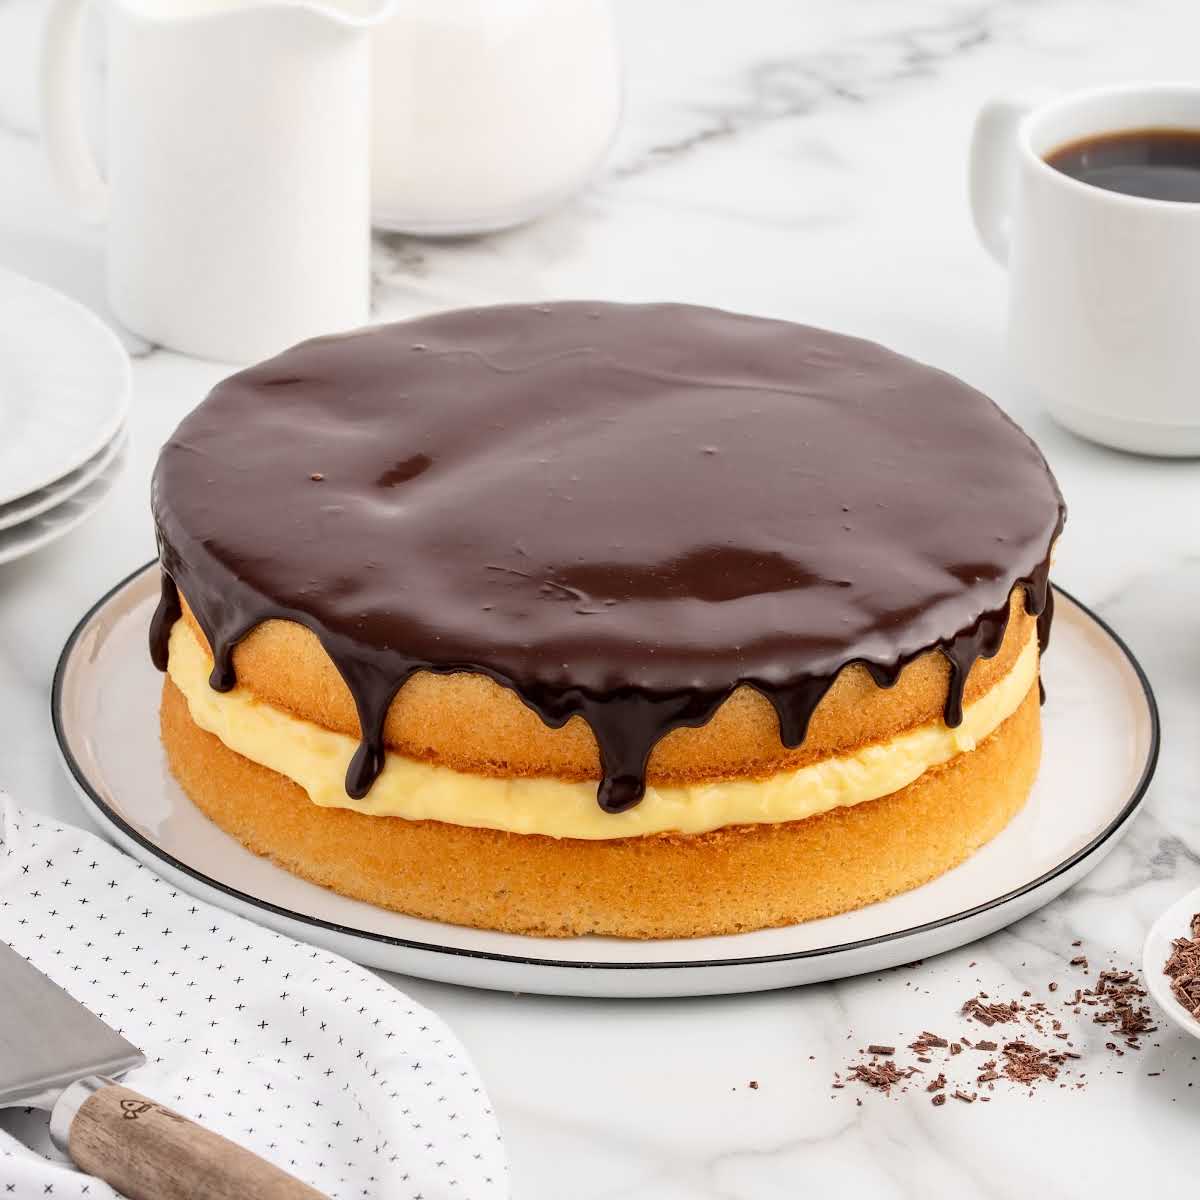


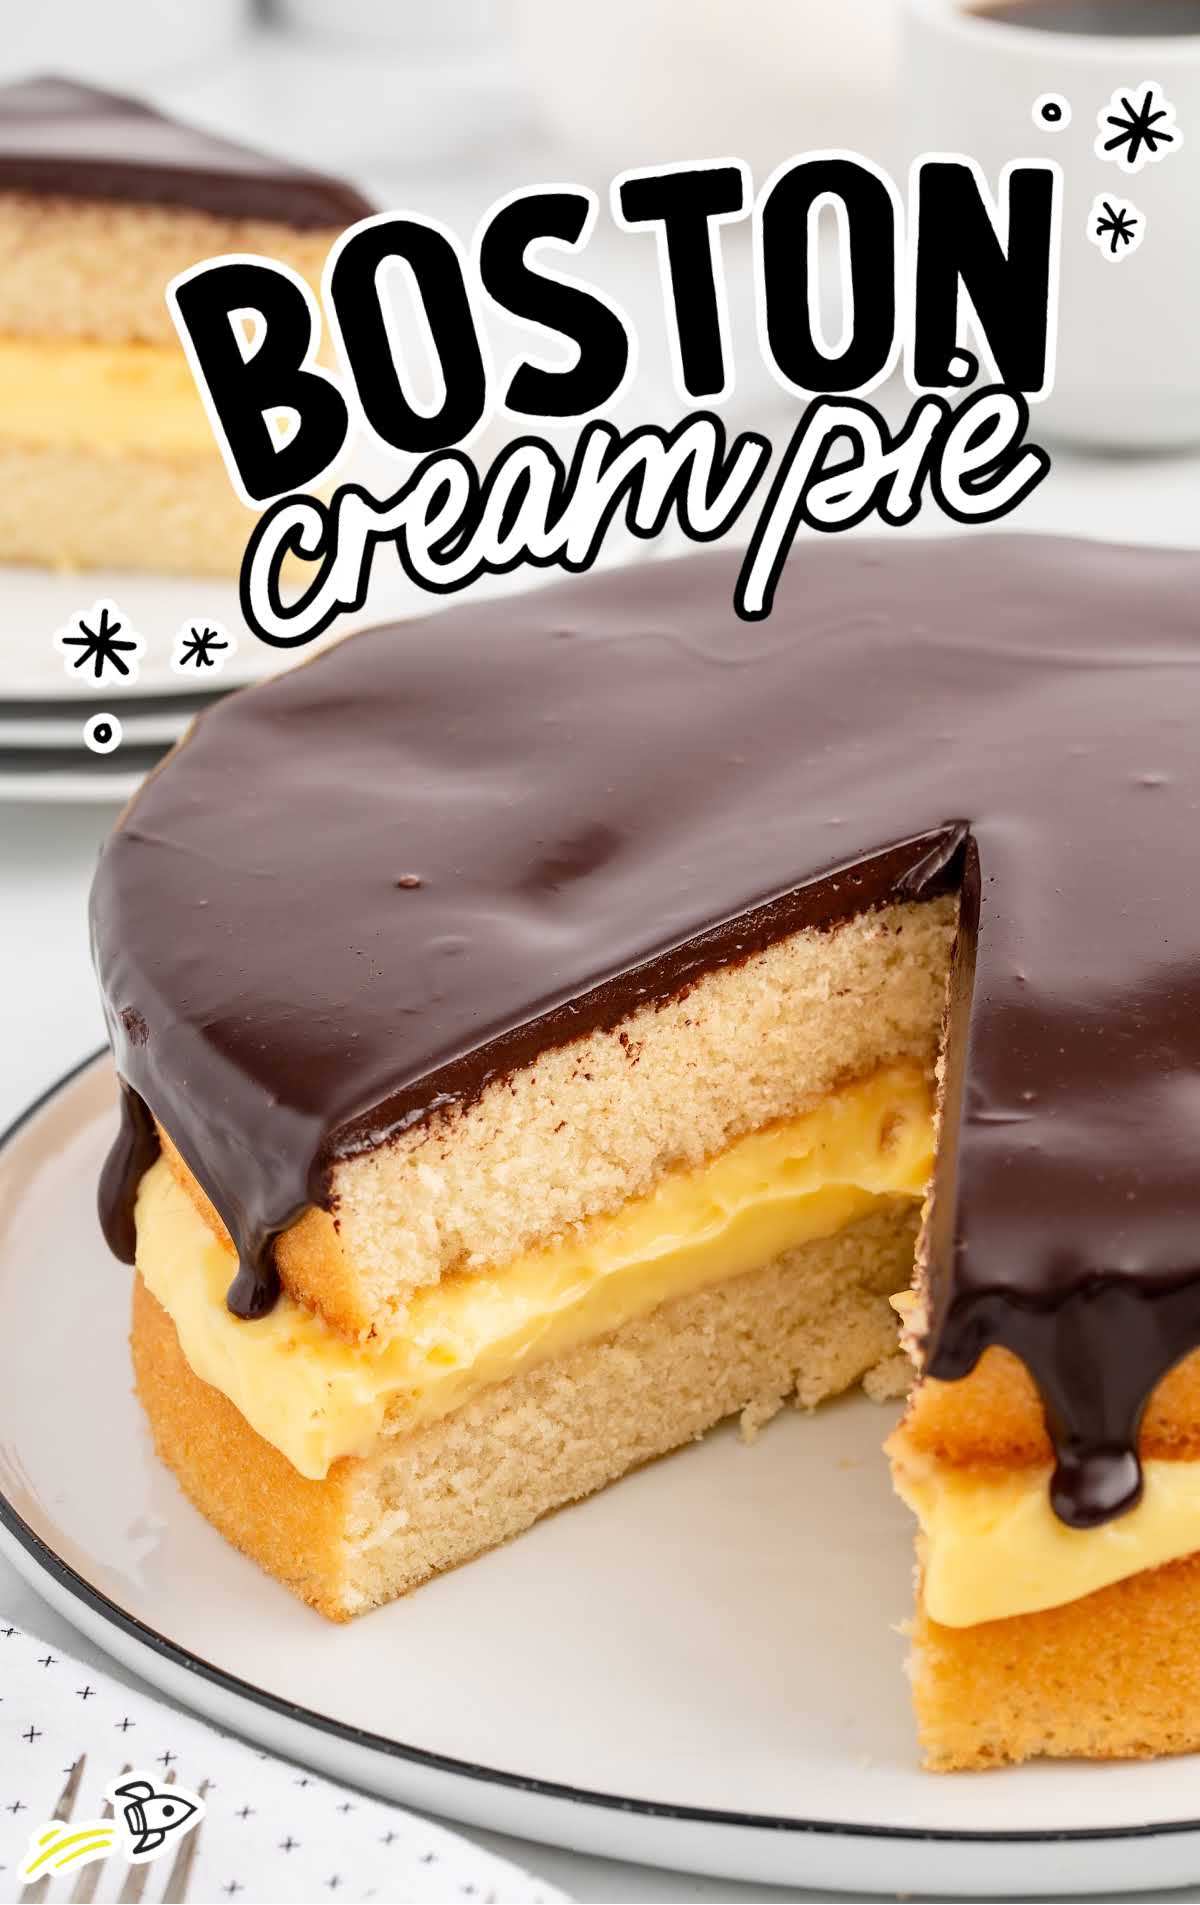
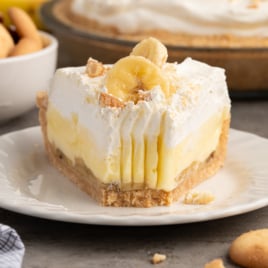
This recipe for Boston Cream Pie has all the vintage charm of a Boston cream donut, but in cake form. Tender yellow layers of sponge cake, velvety Boston cream filling, and decadent chocolate ganache create a dessert that’s sure to be gobbled up in no time.
This double-layer cake is a homemade masterpiece. It has a moist and flavorful vanilla cake and a thick layer of Boston cream filling that will make your family drool. Perfect for a summer picnic, birthday party, or holiday celebration, you’re unlikely to have leftovers, because it’s definitely hard to eat just one piece.
Boston Cream Pie Ingredients
Prepare to be delighted with the irresistible flavors of our Boston Cream Pie Cake. This iconic homemade dessert is made from scratch for that classic, old-fashioned taste you’ll love!
You’ll need:
For the Pastry Cream:
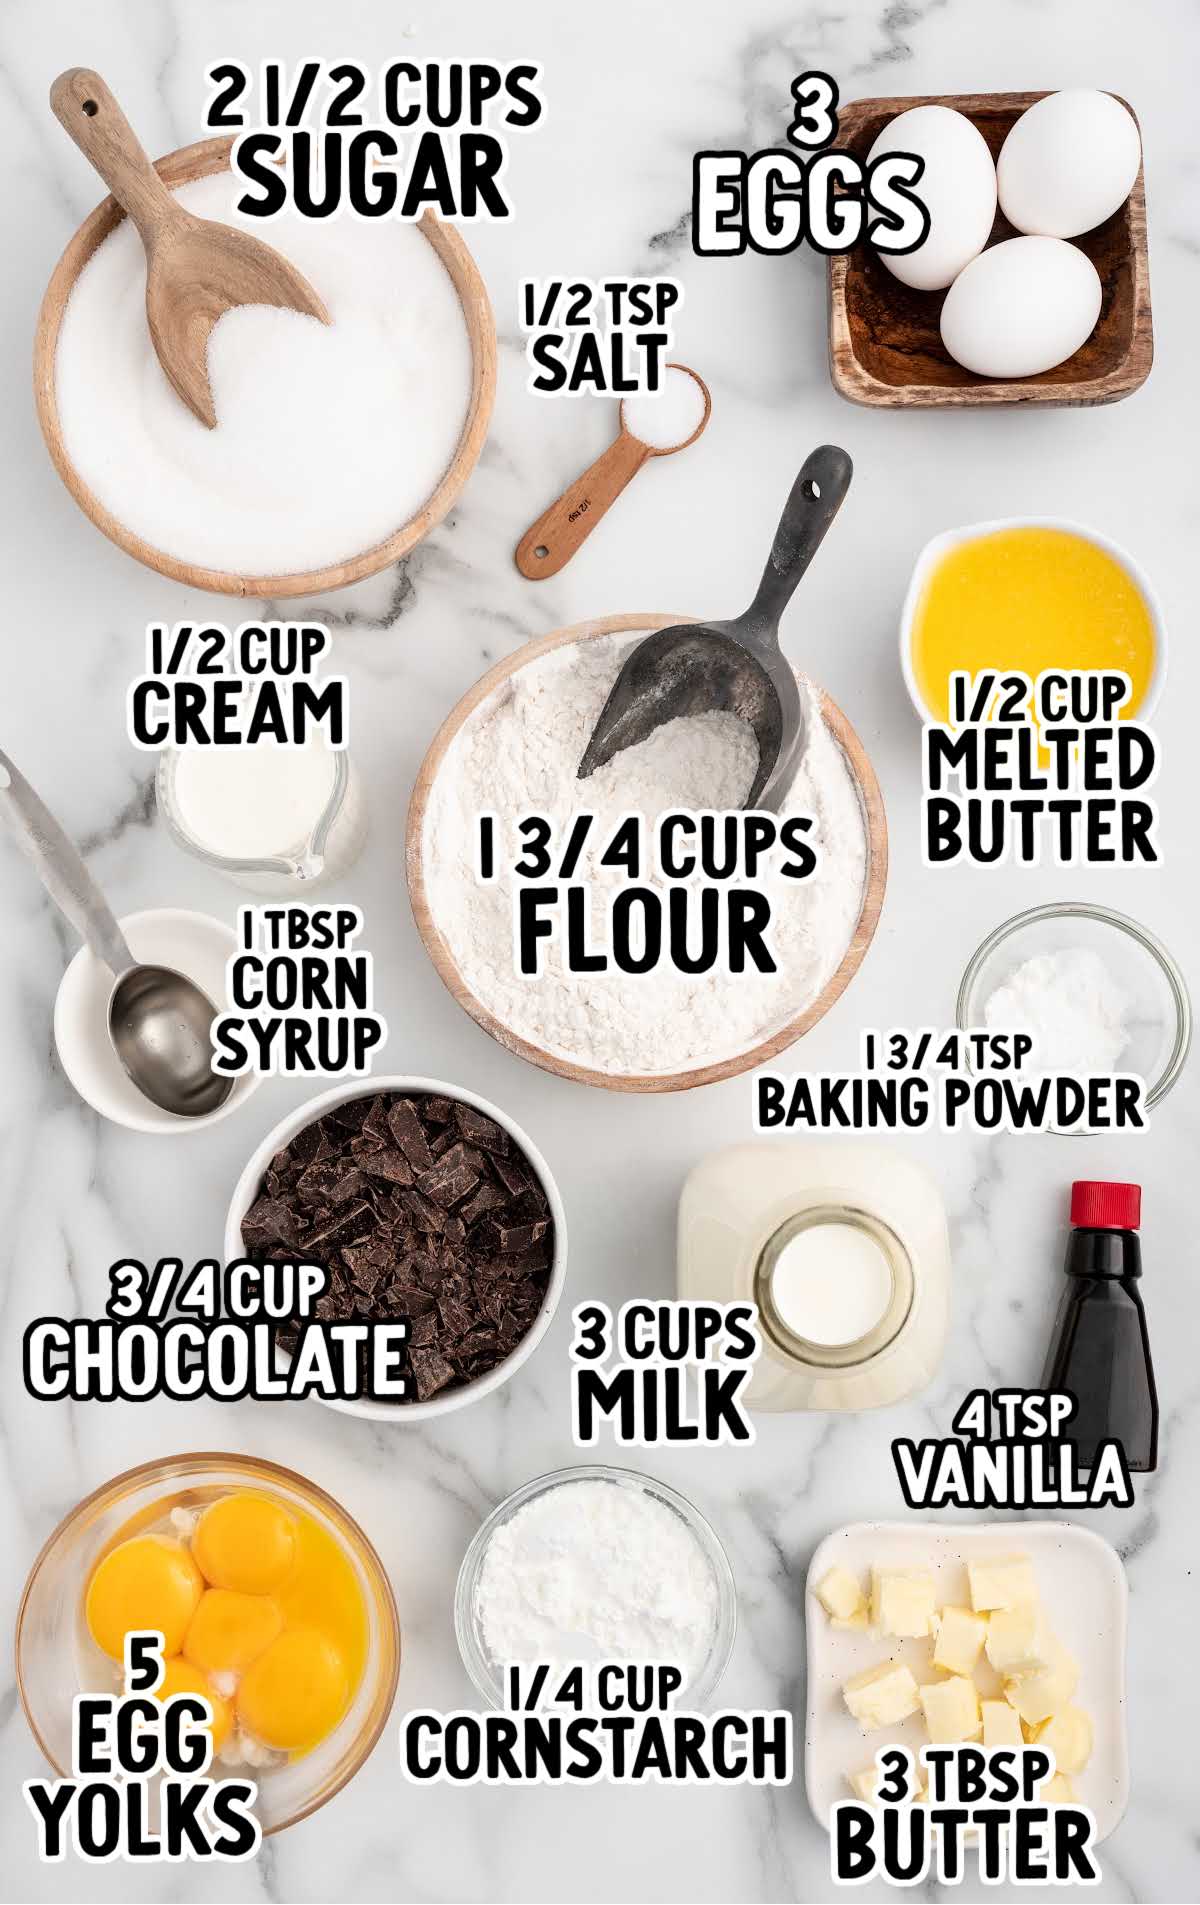
- 2 cups whole milk
- ¾ cup granulated sugar
- ¼ cup cornstarch
- 5 large egg yolks, room temperature
- 3 tablespoons unsalted butter, cold and cubed
- 1 ½ teaspoons vanilla extract
For the Cake:
- 1 ¾ cups all-purpose flour
- 1 ¾ teaspoons baking powder
- ½ teaspoon salt
- 1 ¾ cups granulated sugar
- 3 large eggs, room temperature
- 2 teaspoons vanilla extract
- 1 cup whole milk, heated to approximately 165-170°F
- ½ cup unsalted butter, melted
For the Chocolate Glaze:
- ¾ cup finely chopped bittersweet chocolate baking bar (60% cacao)
- ½ cup heavy cream
- 1 tablespoon clear corn syrup
- ½ teaspoon vanilla extract
Homemade Boston Cream Pie Substitutions and Additions
If you’re short on time or ingredients, you can make some quick substitutions so this Boston cream cake recipe comes together even quicker. You can also substitute some ingredients for items you might have in your pantry or fridge.
Substitutions For the Boston Cream Pie Filling:
WHOLE MILK: You can substitute with 2% for a lighter pastry cream. For an even richer cream, you can use a bit of half and half, too.
GRANULATED SUGAR: You can use an equal amount of powdered sugar if granulated sugar is unavailable.
CORNSTARCH: Arrowroot powder or tapioca starch can be used as a substitute for cornstarch in equal amounts, although the flavor and texture of the cream may vary slightly.
EGG YOLKS: If you prefer a lighter pastry cream, you can use 3 whole eggs instead of 5 egg yolks.
UNSALTED BUTTER: Salted butter can be used as a substitute, but adjust the added salt in the recipe accordingly.
Substitutions For the Cake:
USE A CAKE MIX: To simplify the recipe, you can swap in a yellow cake mix instead of making it from scratch. You can also experiment with other flavors like vanilla or even use a chocolate cake to make a chocolate Boston cream pie cake.
ALL-PURPOSE FLOUR: You can use cake flour for a softer texture. You can also use whole wheat flour, but the texture of the cakes will be denser.
GRANULATED SUGAR: Substitute with an equal amount of brown sugar for a deeper flavor or with coconut sugar if you prefer (but your cakes will have a slight coconut flavor).
EGGS: If you prefer to bake without eggs, you can use flax eggs (1 tablespoon ground flaxseed mixed with 3 tablespoons water per egg).
WHOLE MILK: Non-dairy milk, like almond or soy milk, can be used as a substitute. In a pinch, you can use water, but your cakes will be less moist and the flavor less rich.
UNSALTED BUTTER: Substitute with an equal amount of vegetable oil for a dairy-free option. Applesauce can also be used if you prefer.
Substitutions For the Chocolate Glaze:
BITTERSWEET CHOCOLATE BAKING BAR: Semi-sweet chocolate chips can be used as a substitute for bittersweet chocolate, although your ganache will taste sweeter. Don’t use an unsweetened baking bar or your ganache will be bitter!
HEAVY CREAM: Coconut cream or full-fat coconut milk can be used as a dairy-free substitute for heavy cream. You can also use whipping cream if you have some on hand.
CLEAR CORN SYRUP: Light corn syrup can be used as a substitute for clear corn syrup, but the flavor may vary slightly.
How To Make Boston Cream Pie
Let’s dive into making this yummy Boston cream cake with pastry cream filling. You’ll make the filling, cake layers, and ganache in stages, then assemble the complete pie at the end.
TO MAKE THE BOSTON CREAM CAKE FILLING:
STEP ONE: You’ll begin by making the Boston cream filling, so gather and measure out the ingredients you’ll need before you begin.
Pro Tip: Measure and cut your butter into cubes, but keep it in the fridge until your ready to use it. Remove the eggs from the fridge beforehand so they begin to come to room temperature. Separate the yolks and the whites. You can discard the whites, or save them to make an omelette.
STEP TWO: Set a medium saucepan over medium-high. Add the milk and use a candy thermometer to keep an eye on the temperature, bringing it to 170-180°F. Tiny bubbles will form along the edges of the saucepan, but you don’t want to allow the milk to boil. You only want to scald it. Remove the milk from the heat.
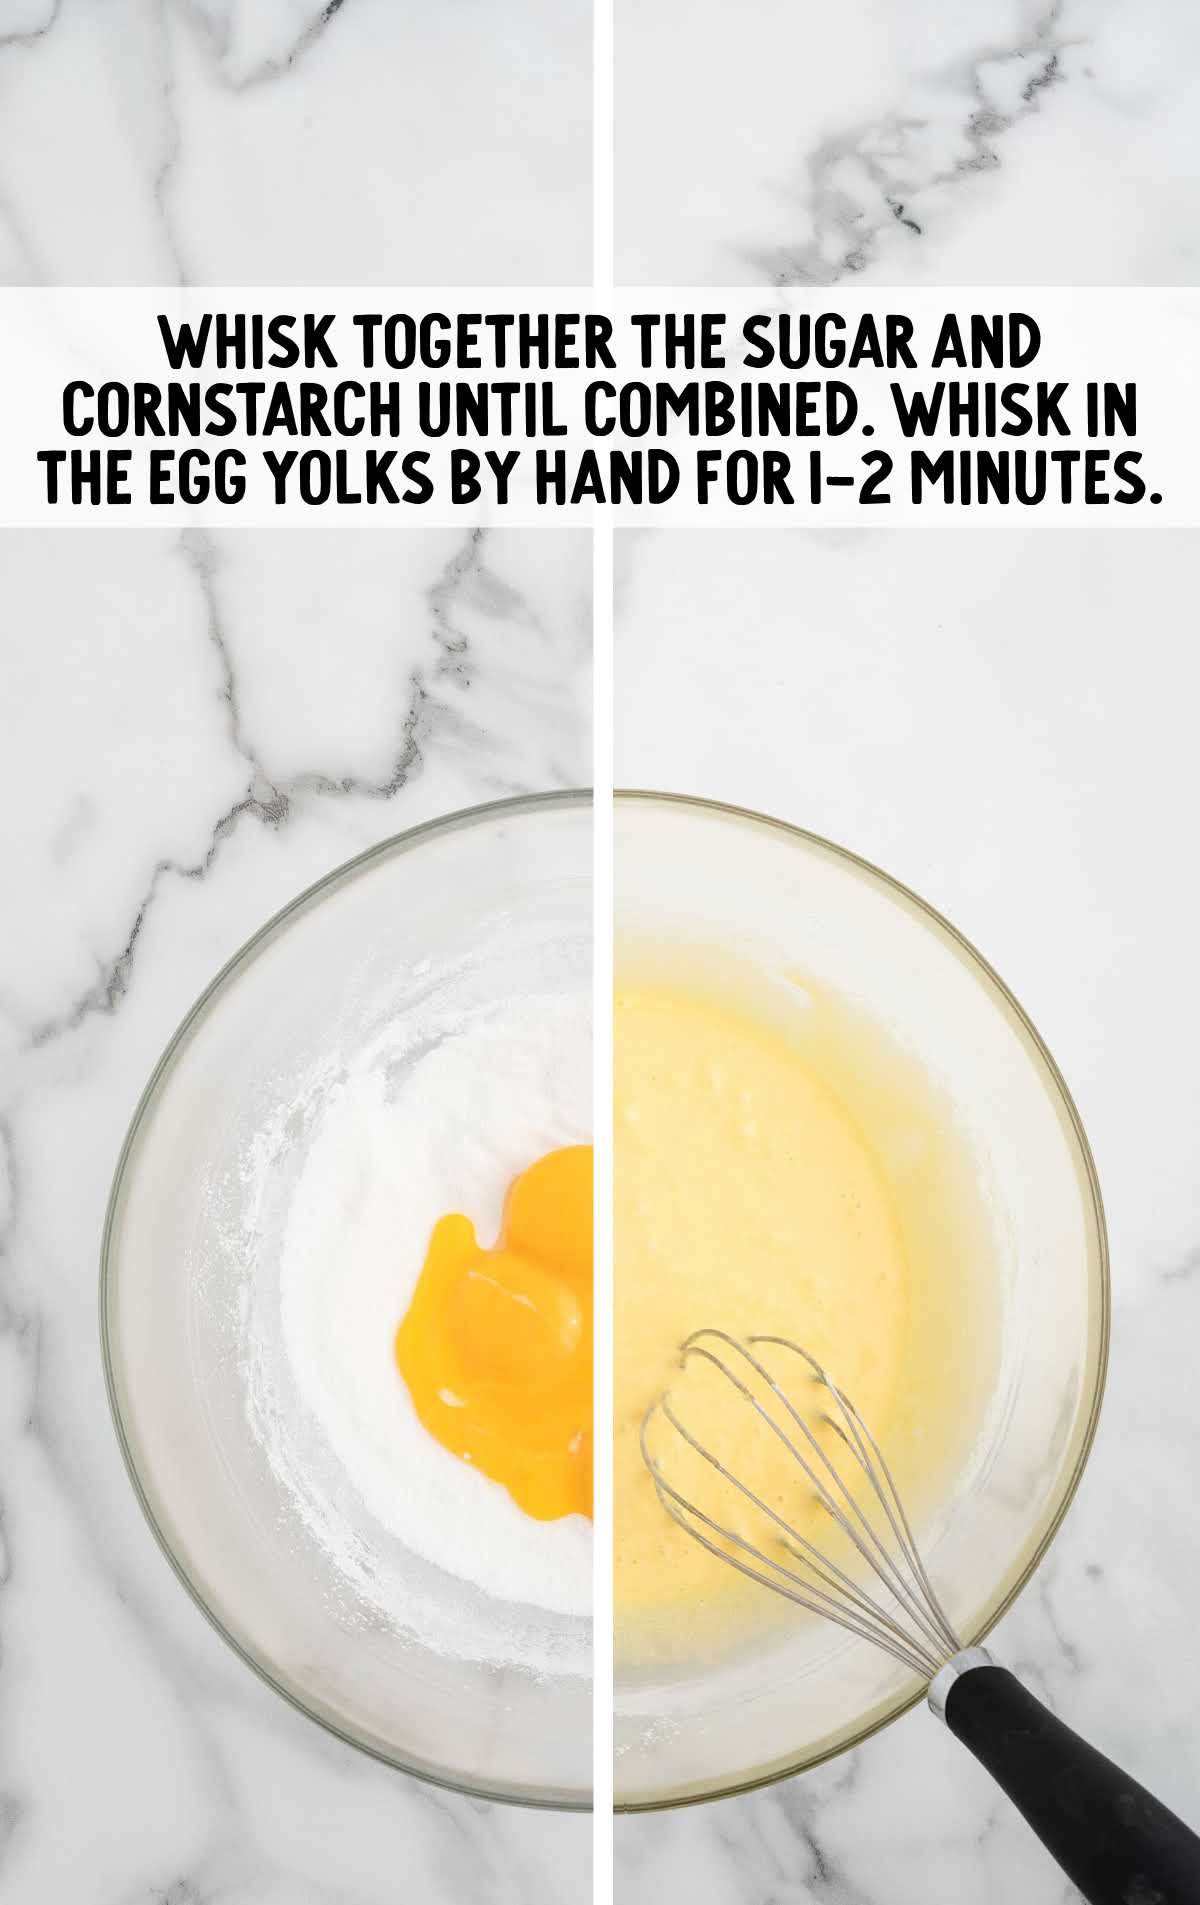
STEP THREE: Using a large mixing bowl, whisk together the granulated sugar and cornstarch until fully combined. Be sure no lumps from the cornstarch remain. Use a hand whisk to incorporate in the egg yolks. Whisk for a few minutes until smooth.
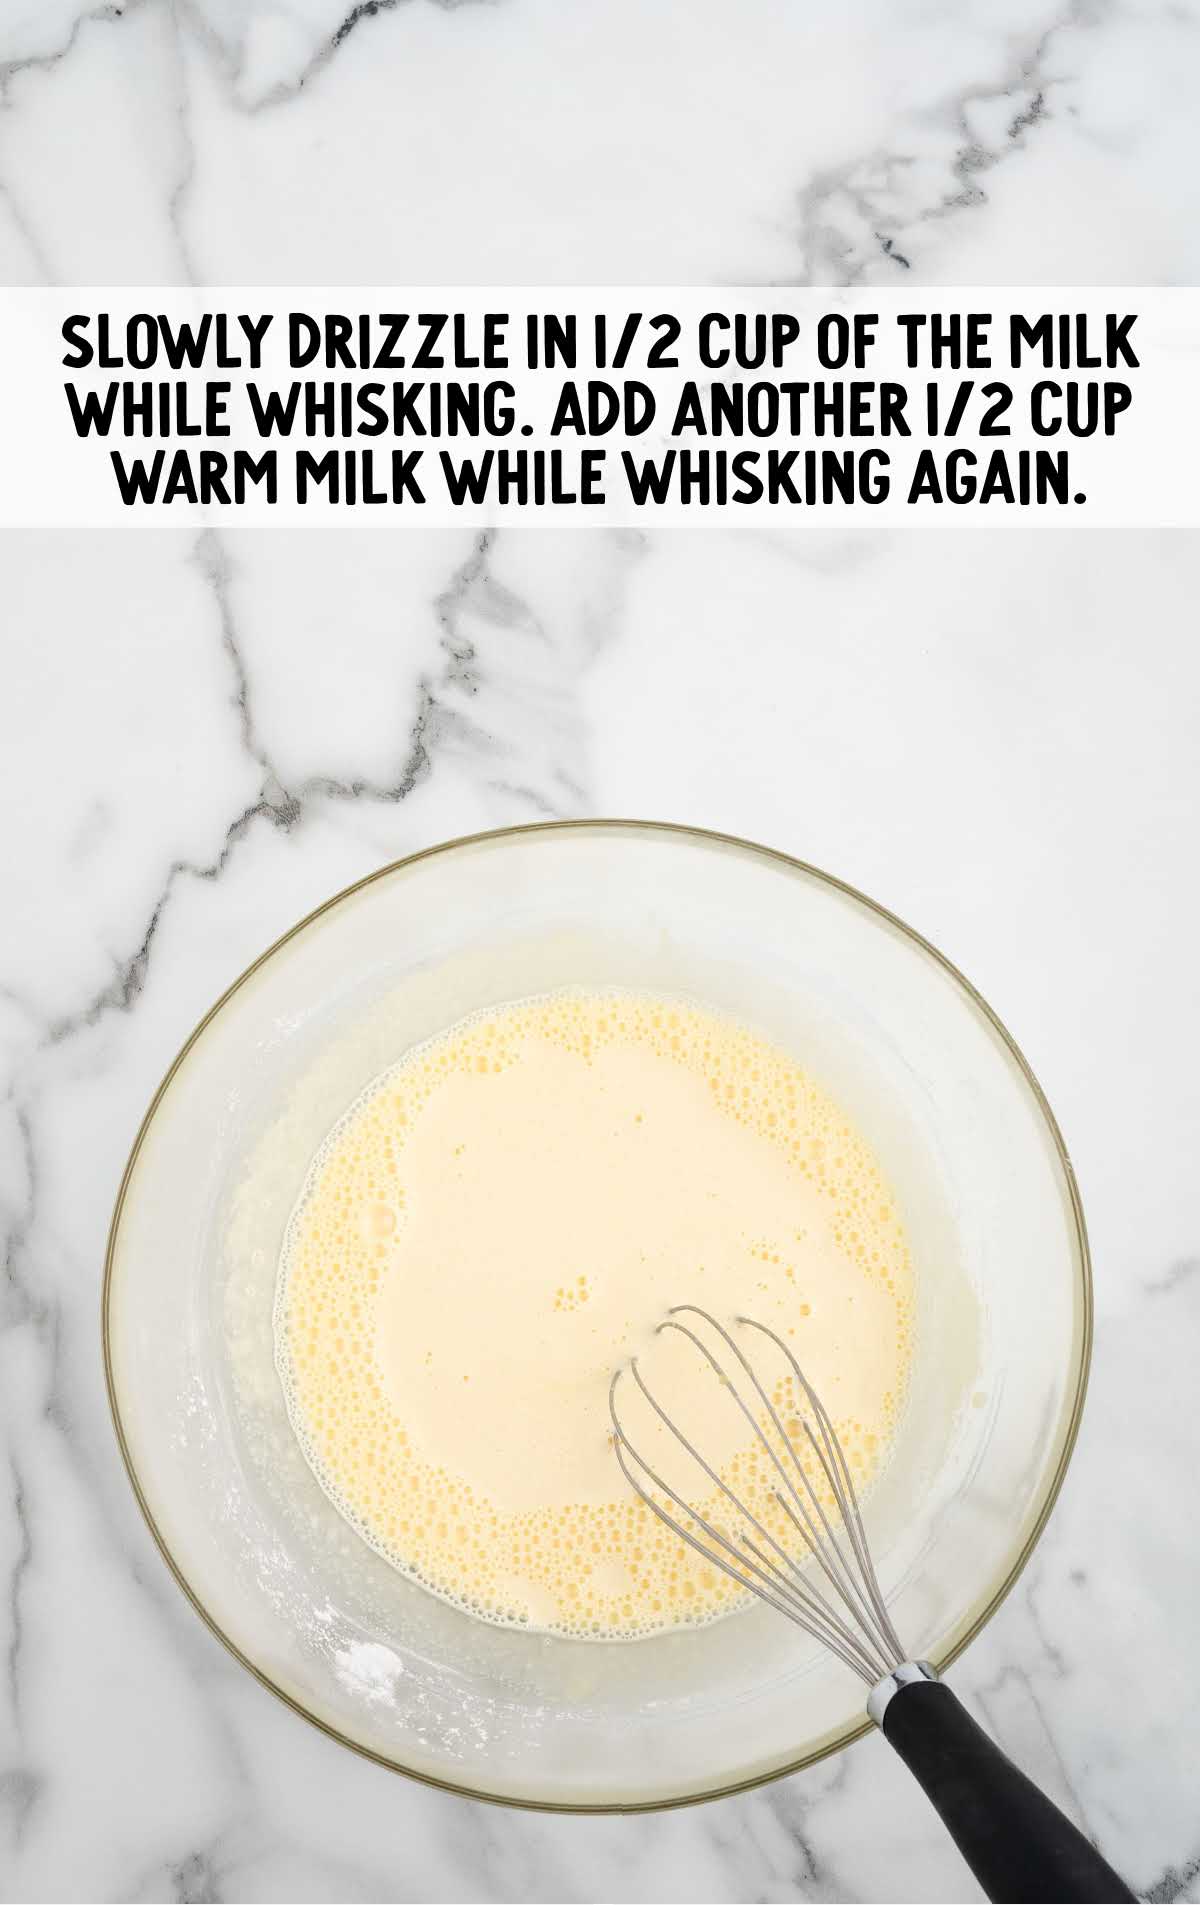
STEP FOUR: Slowly drizzle ½ cup of the scalded milk while whisking vigorously. Add another ½ cup while continuing to whisk again.
Pro Tip: This step is critical to temper the egg yolks. You’re slowly raising the temperature of the eggs so that they don’t scramble when you add them to the sauce.
STEP FIVE: Place the saucepan containing the hot milk back on the stove over medium heat. Before the milk gets too hot, slowly pour the bowl containing the milk and egg mixture into the pot while whisking constantly.
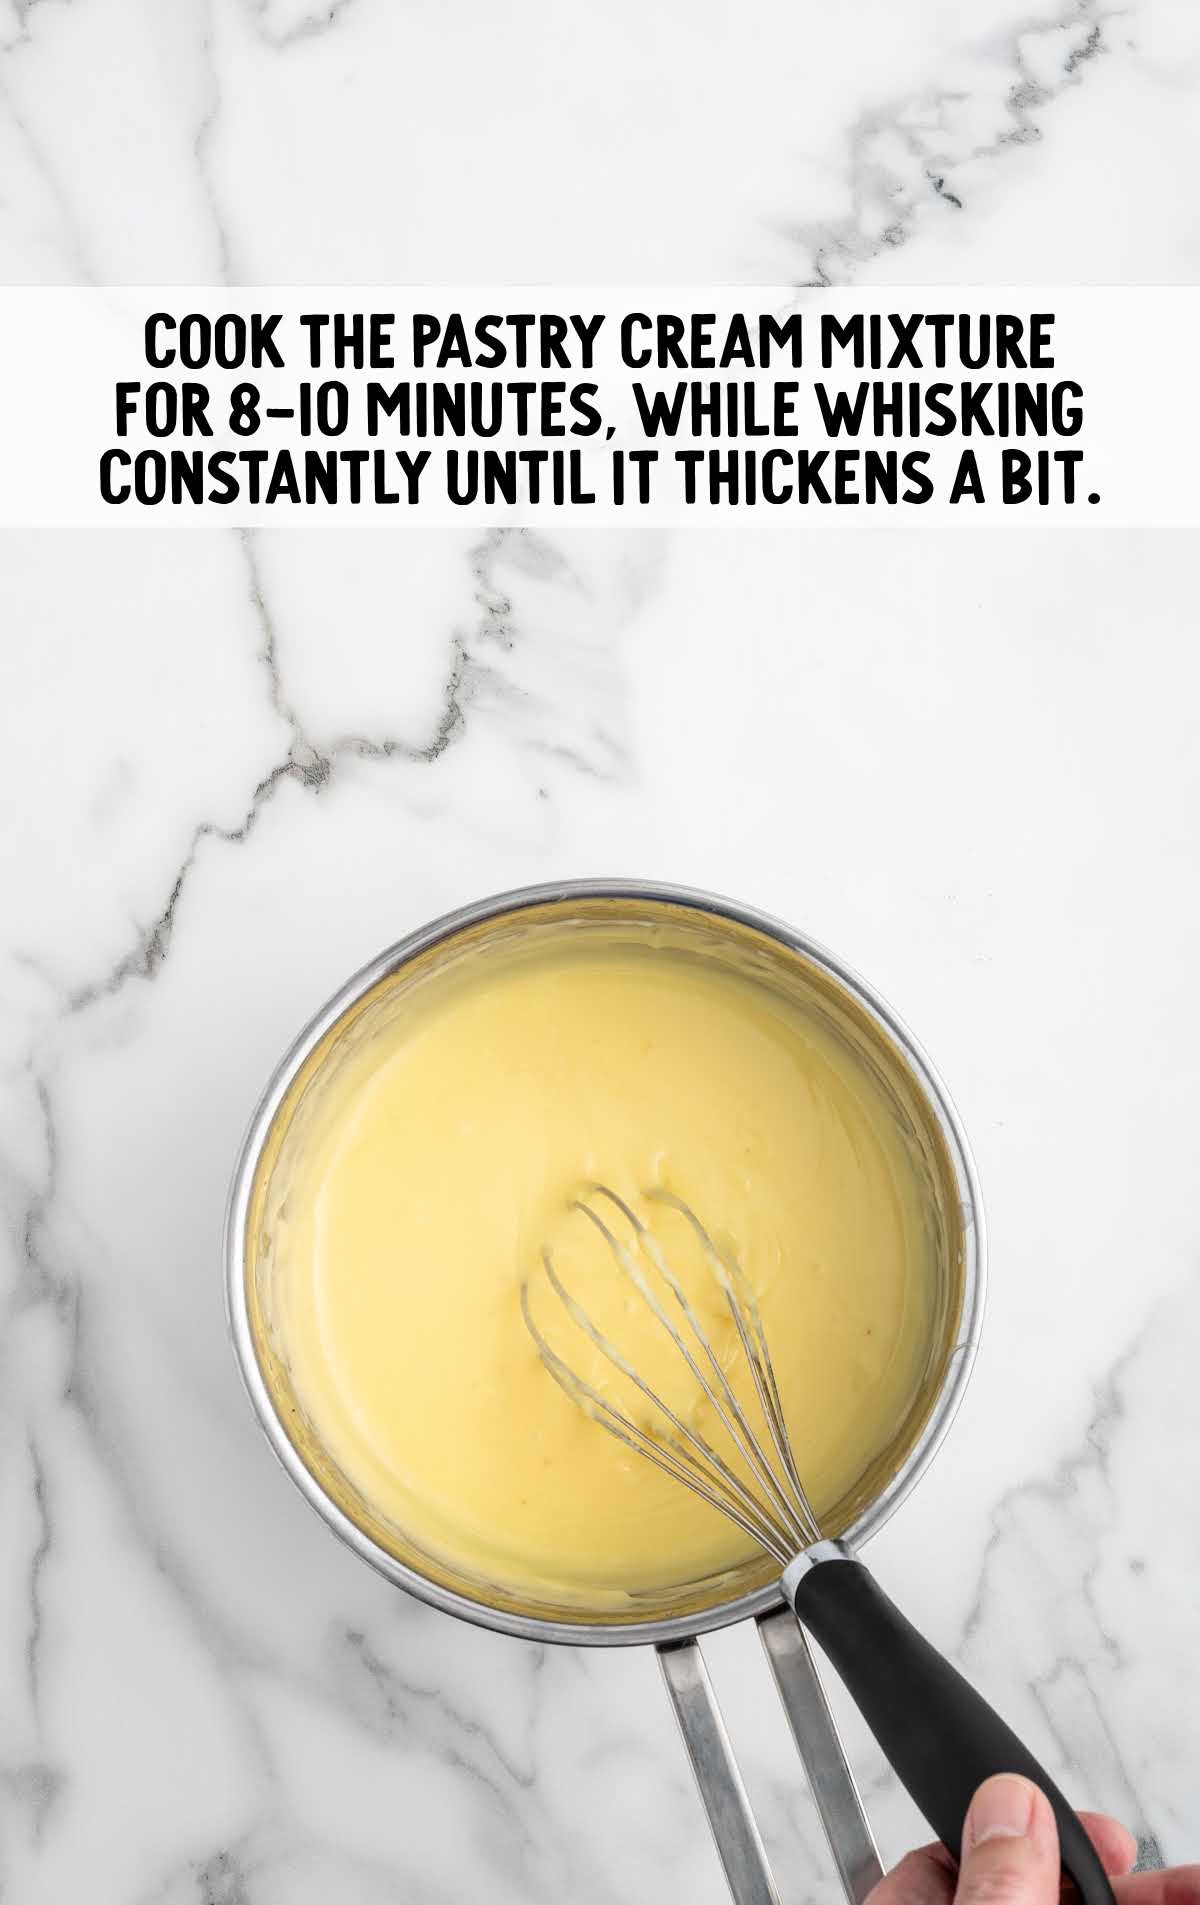
STEP SIX: Cook the pastry cream mixture for 8-10 minutes while whisking constantly to avoid burning, or until the hot milk mixture comes to a rolling boil and thickens a lot.
Pro Tip: Don’t walk away from the stove! The mixture will very quickly thicken once the pot begins to boil.
STEP SEVEN: Cook for 30 to 60 seconds more, and allow the mixture to thicken, then remove from the heat.
STEP EIGHT: Add the butter and vanilla extract to the cream and whisk vigorously until the butter is fully incorporated and the cream looks glossy and smooth.
STEP NINE: Use a spatula to scoop the pastry cream into a clean bowl. Cover with plastic wrap. Press the plastic wrap directly onto the entire surface of the pastry cream so that a ‘skin’ doesn’t form on the surface of the cream as it cools.
STEP TEN: Refrigerate the pastry cream for 2-4 hours of until it’s fully chilled before adding it to the cooled cake layers.
TO MAKE THE CAKE LAYERS:
STEP ONE: Prepare the cake ingredients so they’re ready for use. Heat the milk to 165-170°F. Your eggs should be at room temperature, and your butter should be melted and cooled slightly.
STEP TWO: Preheat your oven and prepare your cake pans by spraying them with cooking spray and lining them with parchment paper. Set aside for now.
STEP THREE: In a small bowl, whisk together the all-purpose flour, baking powder, and salt.
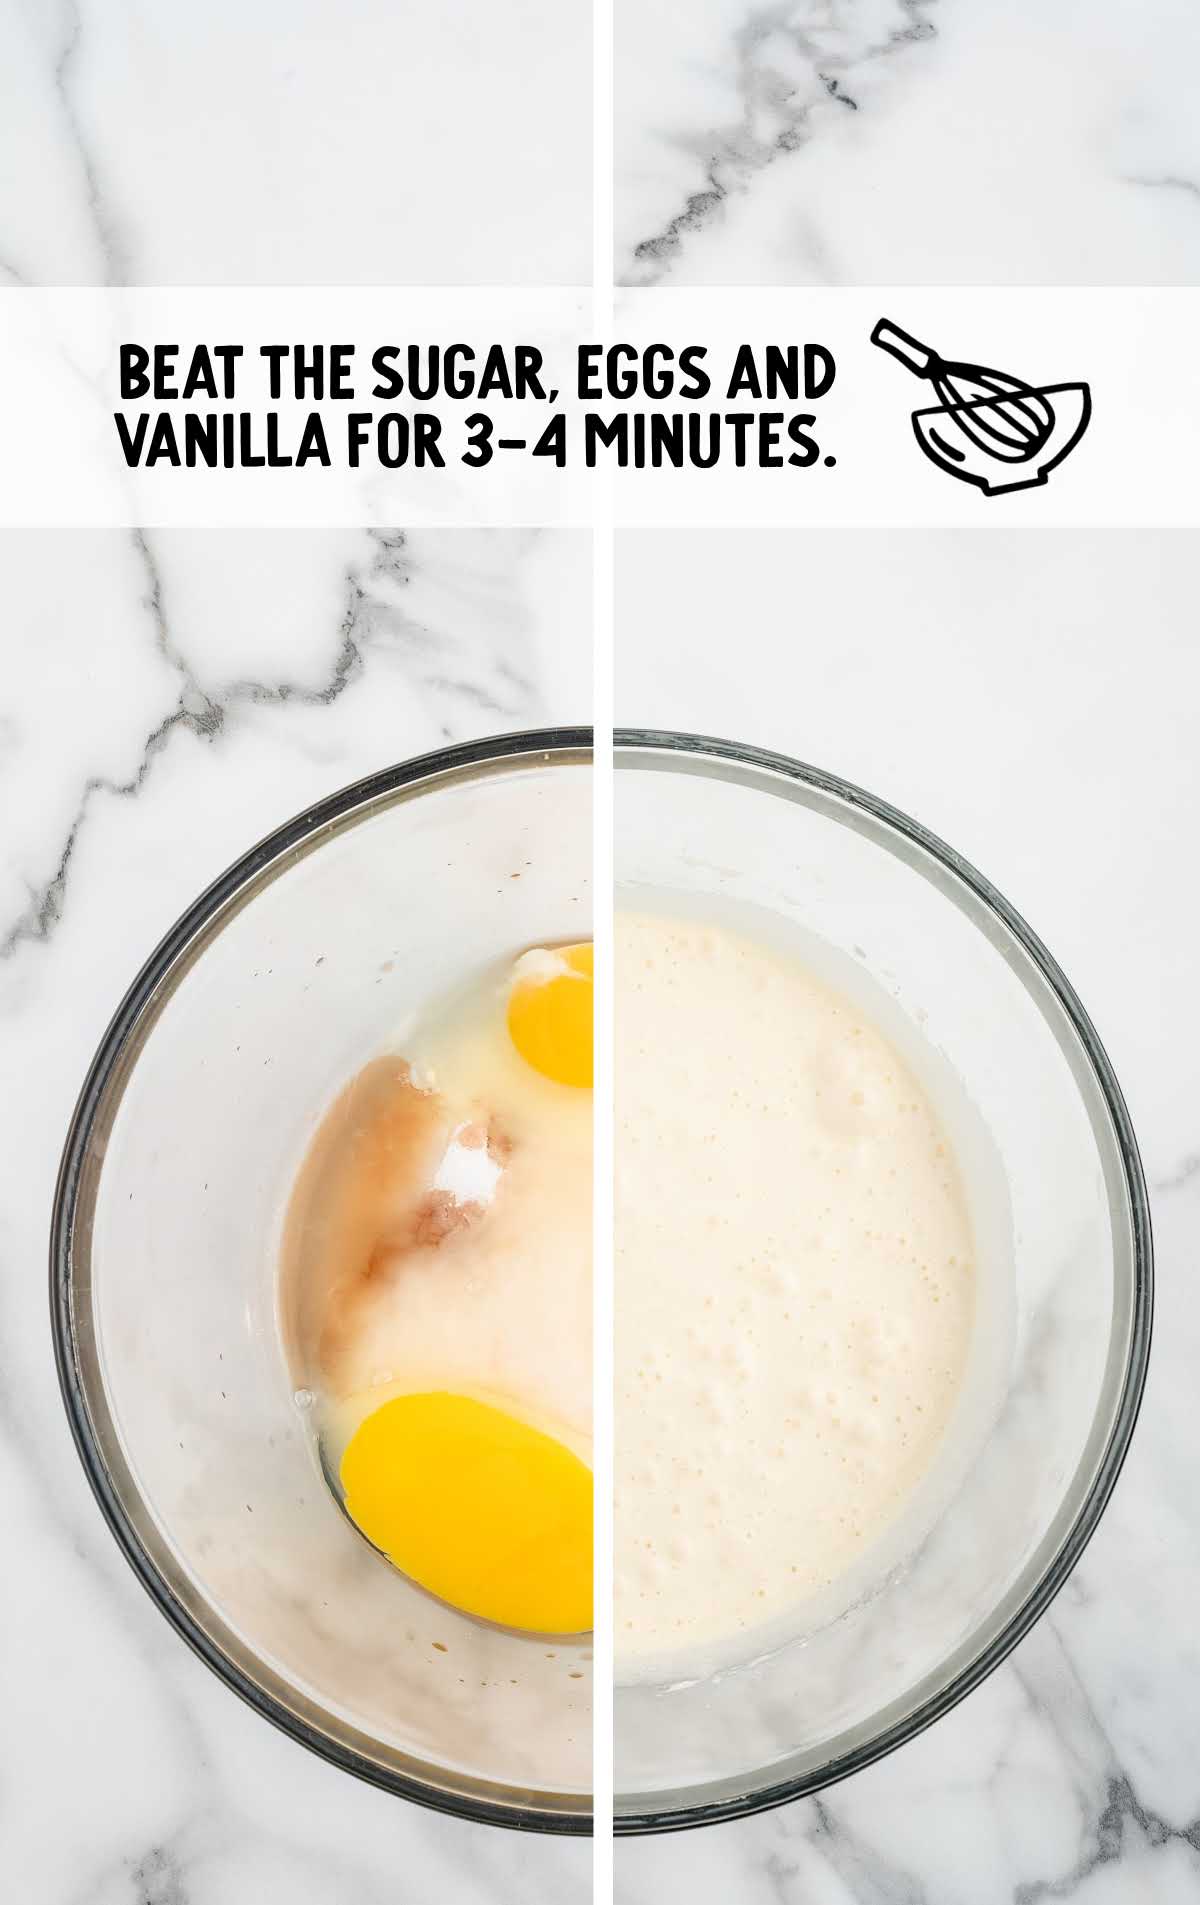
STEP FOUR: In a large mixing bowl, use a hand mixer on medium-high speed to beat together the sugar, eggs, and vanilla extract. Continue to beat until thick and fluffy.
STEP FIVE: In a small bowl with a pour spout (or a glass measuring cup), whisk together the warm milk and melted butter. Set a hand mixer on low and slowly drizzle the warm milk mixture into the large bowl of beaten eggs and sugar. Mix until fully incorporated.
STEP SIX: Continue mixing on low while you add the flour mixture to the bowl. Add it in small amounts and mix just until the flour has been fully incorporated. Your batter should resemble pancake batter with lots of bubbles, but it shouldn’t have any lumps.
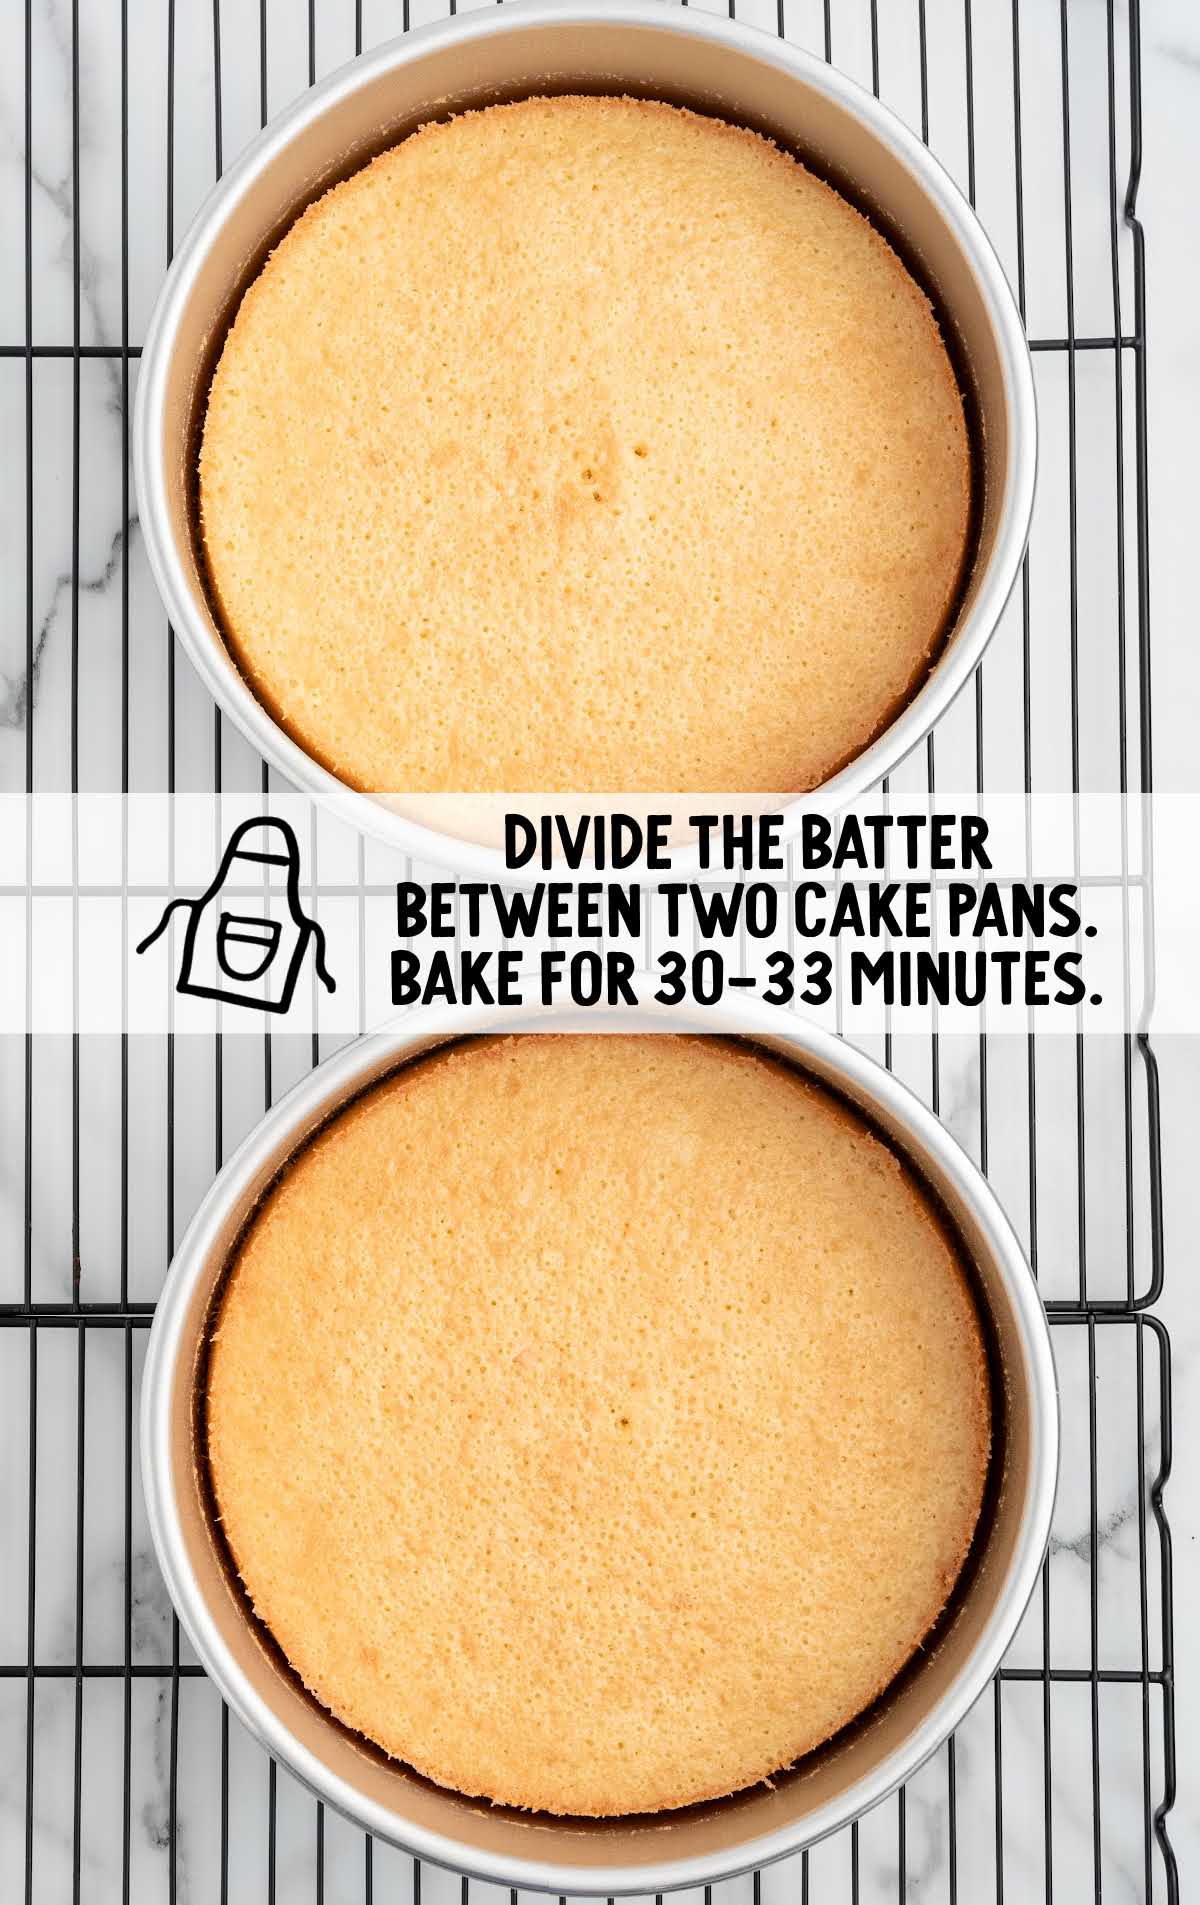
STEP SEVEN: Divide the cake batter evenly between the two prepared pans and bake until lightly golden around the edges. The centers should be set, and a toothpick inserted into the middle of the cakes should come out clean.
STEP EIGHT: Allow the cakes to cool in the pan for 10-15 minutes. Then, turn them out onto a wire cooling rack. Remove the parchment paper from the bottom and allow them to finish cooling completely.
TO MAKE THE BOSTON CREAM PIE GANACHE:
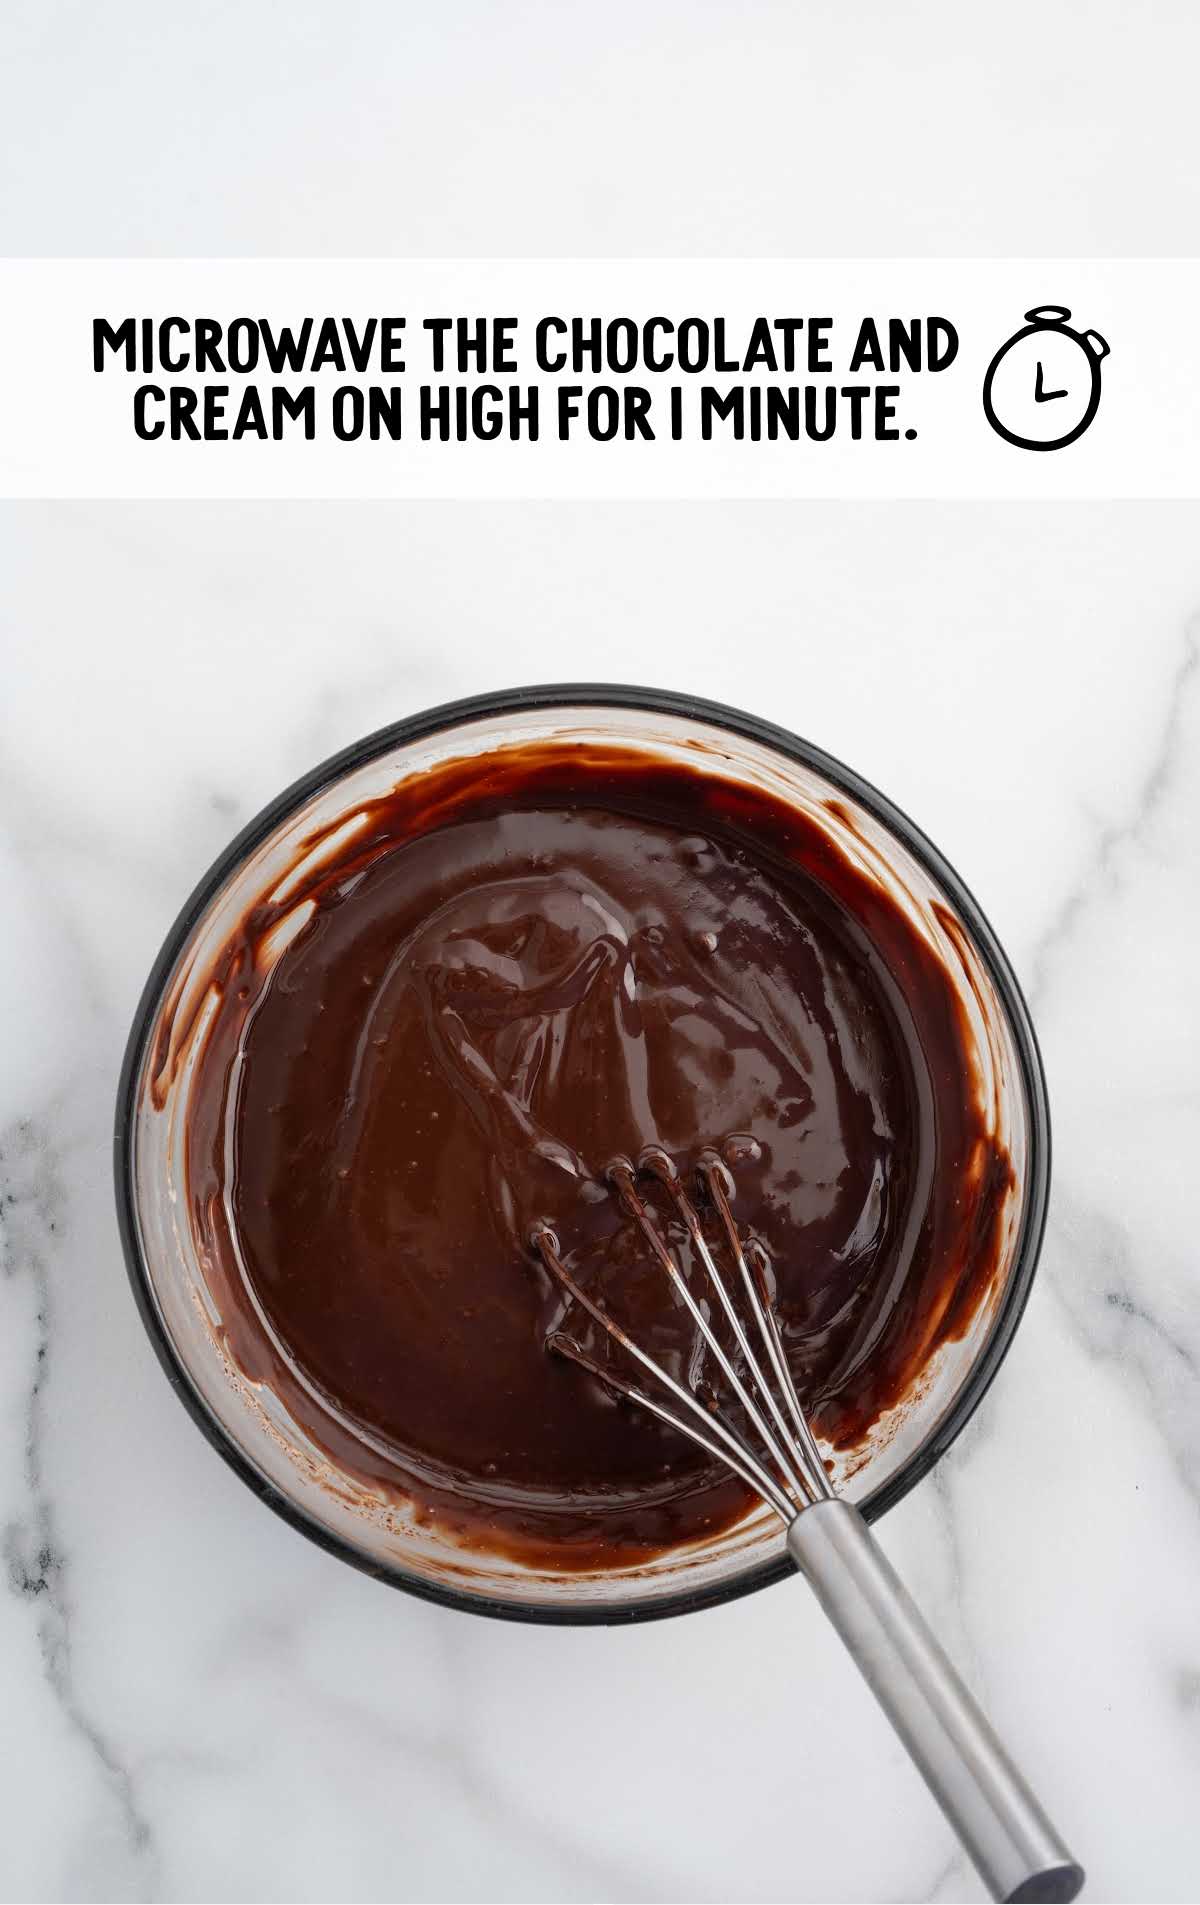
STEP ONE: Measure the chopped bittersweet chocolate and heavy cream into a microwave safe bowl. Be sure the chocolate is submerged in the heavy cream. Microwave on high for 1 minute. Remove from the microwave and let it sit for 1 minute.
STEP TWO: Add the clear corn syrup and vanilla extract to the melted chocolate. Whisk the mixture until smooth.
STEP THREE: Allow the chocolate glaze mixture to cool for 15-20 minutes before you pour it over the top of the cake.
Pro Tip: We recommend serving this pie soon after you apply the ganache. If needed, assemble the rest of the cake up to a day ahead, but make the ganache just before serving.
TO ASSEMBLE THE CAKE:
STEP ONE: Place one of the cake layers onto a large cake plate.
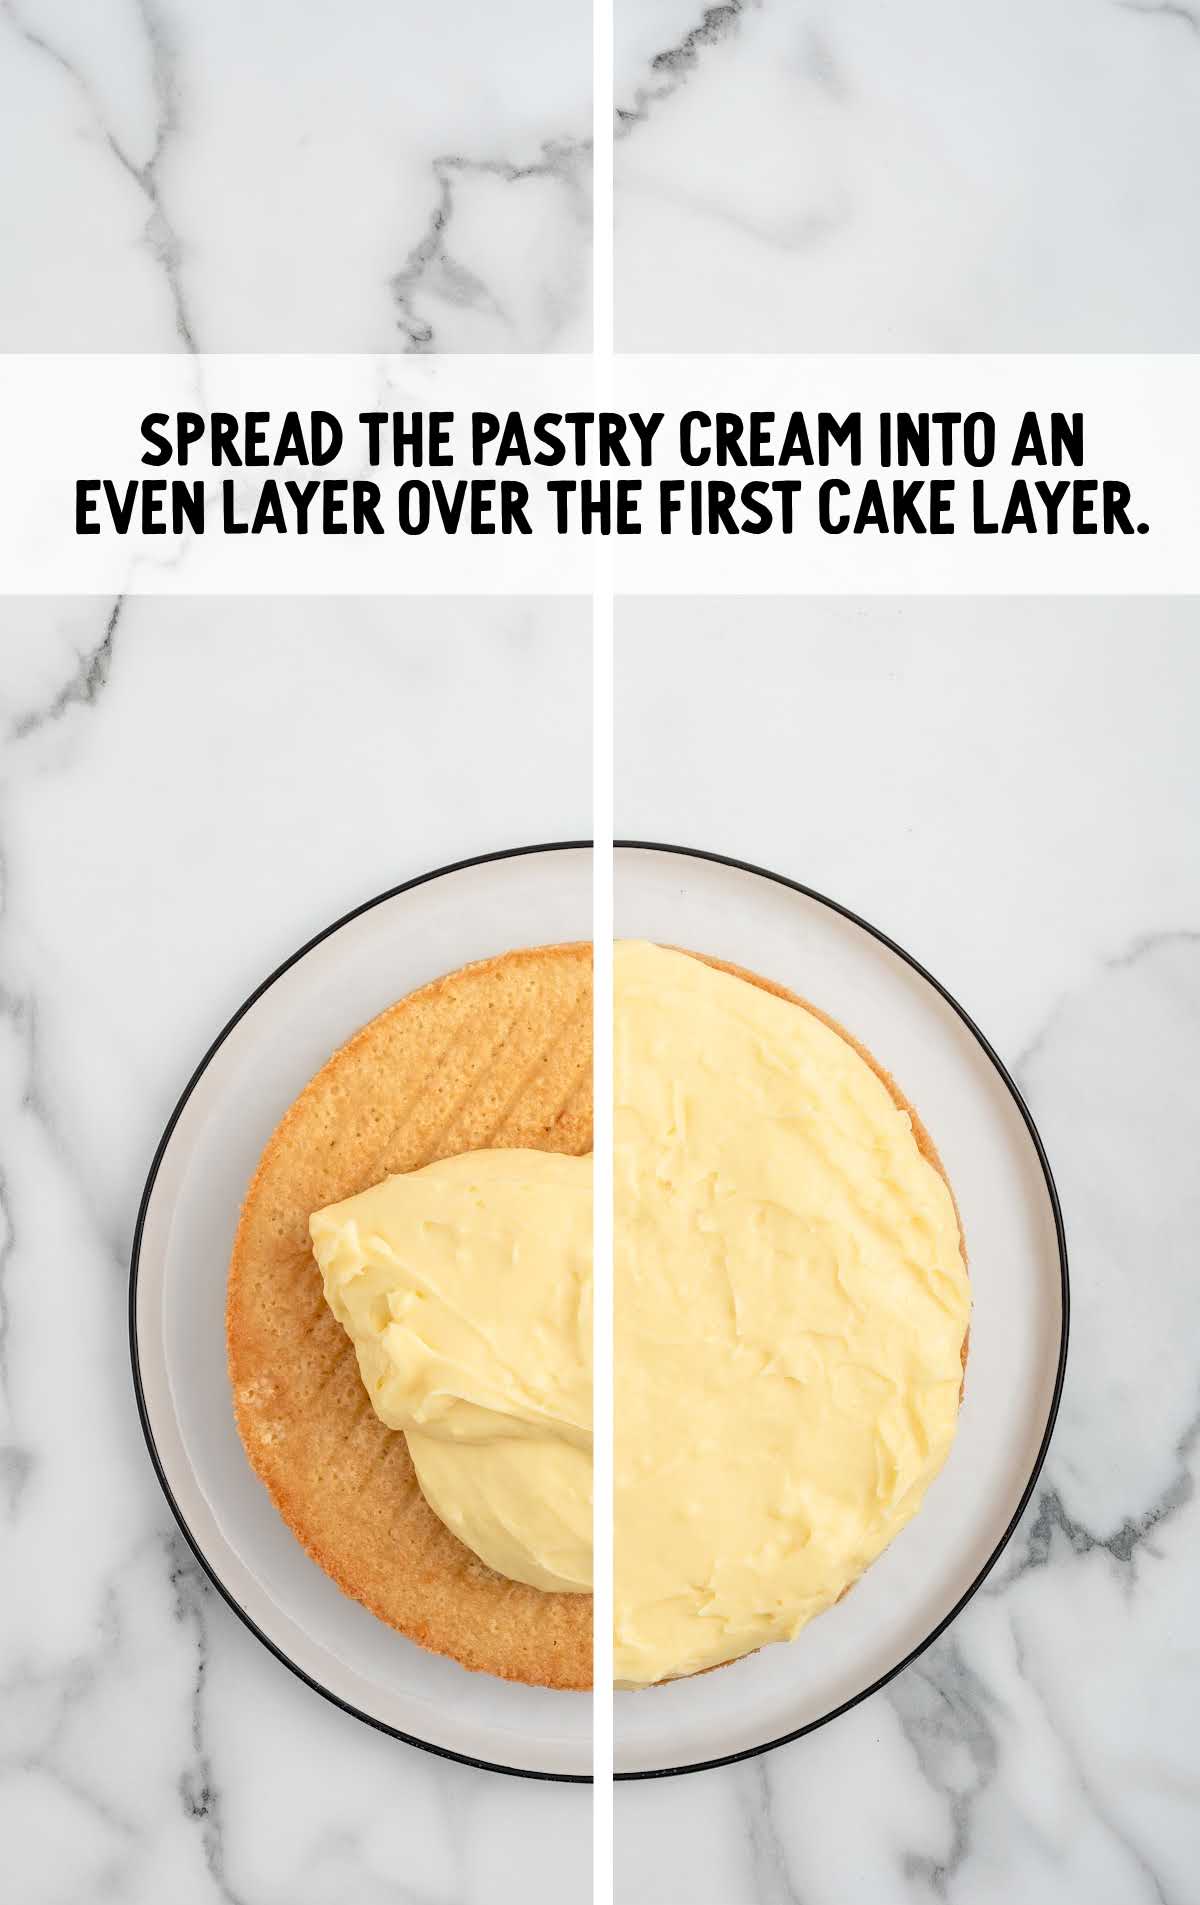
STEP TWO: Spread the chilled cream pie filling over the first layer of cake.
Pro Tip: If your pastry cream is really thick from being in the fridge for a long time, whisk it for a minute or two to loosen it up to a spreadable consistency.
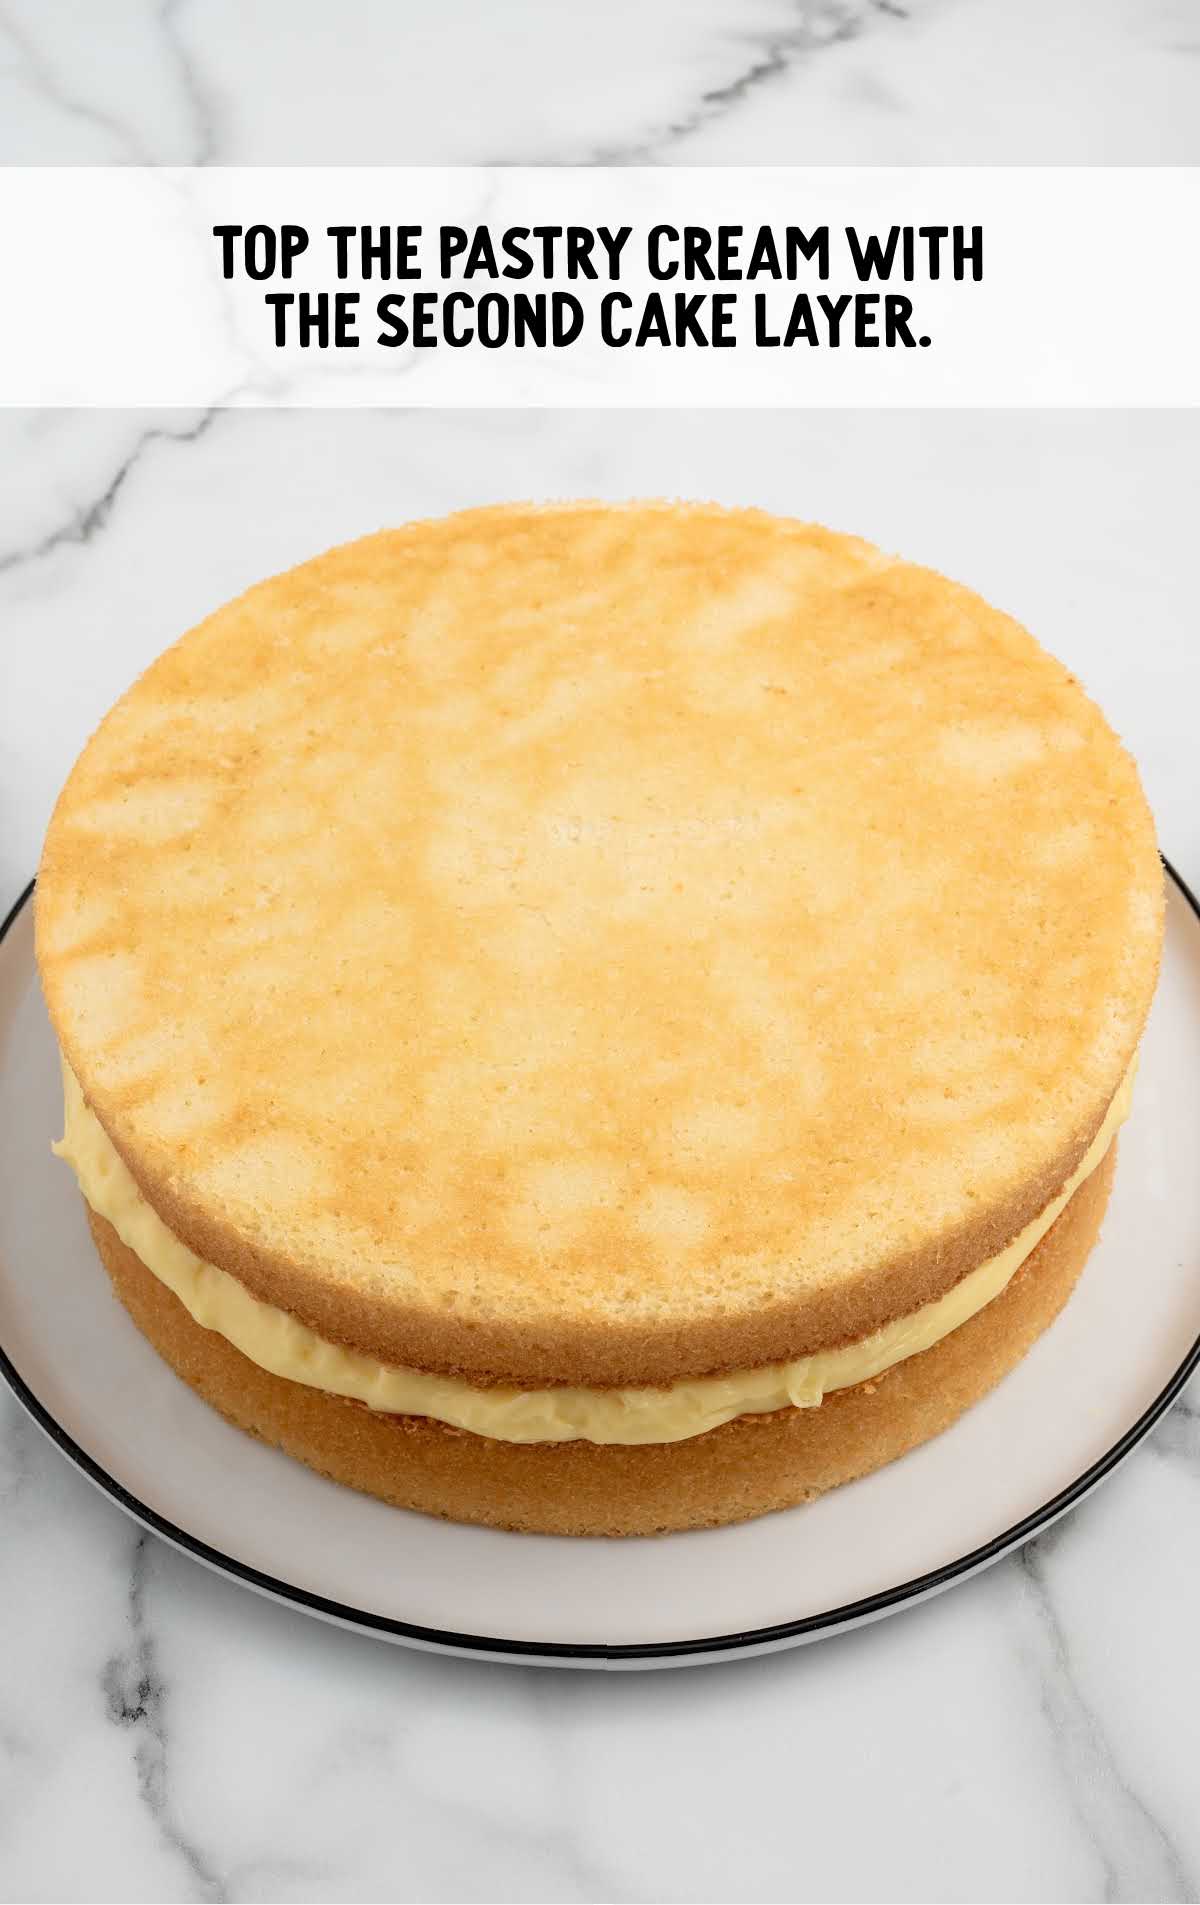
STEP THREE: Set the second cake layer on top of the custard filling. Set it gently on top but don’t press too hard!
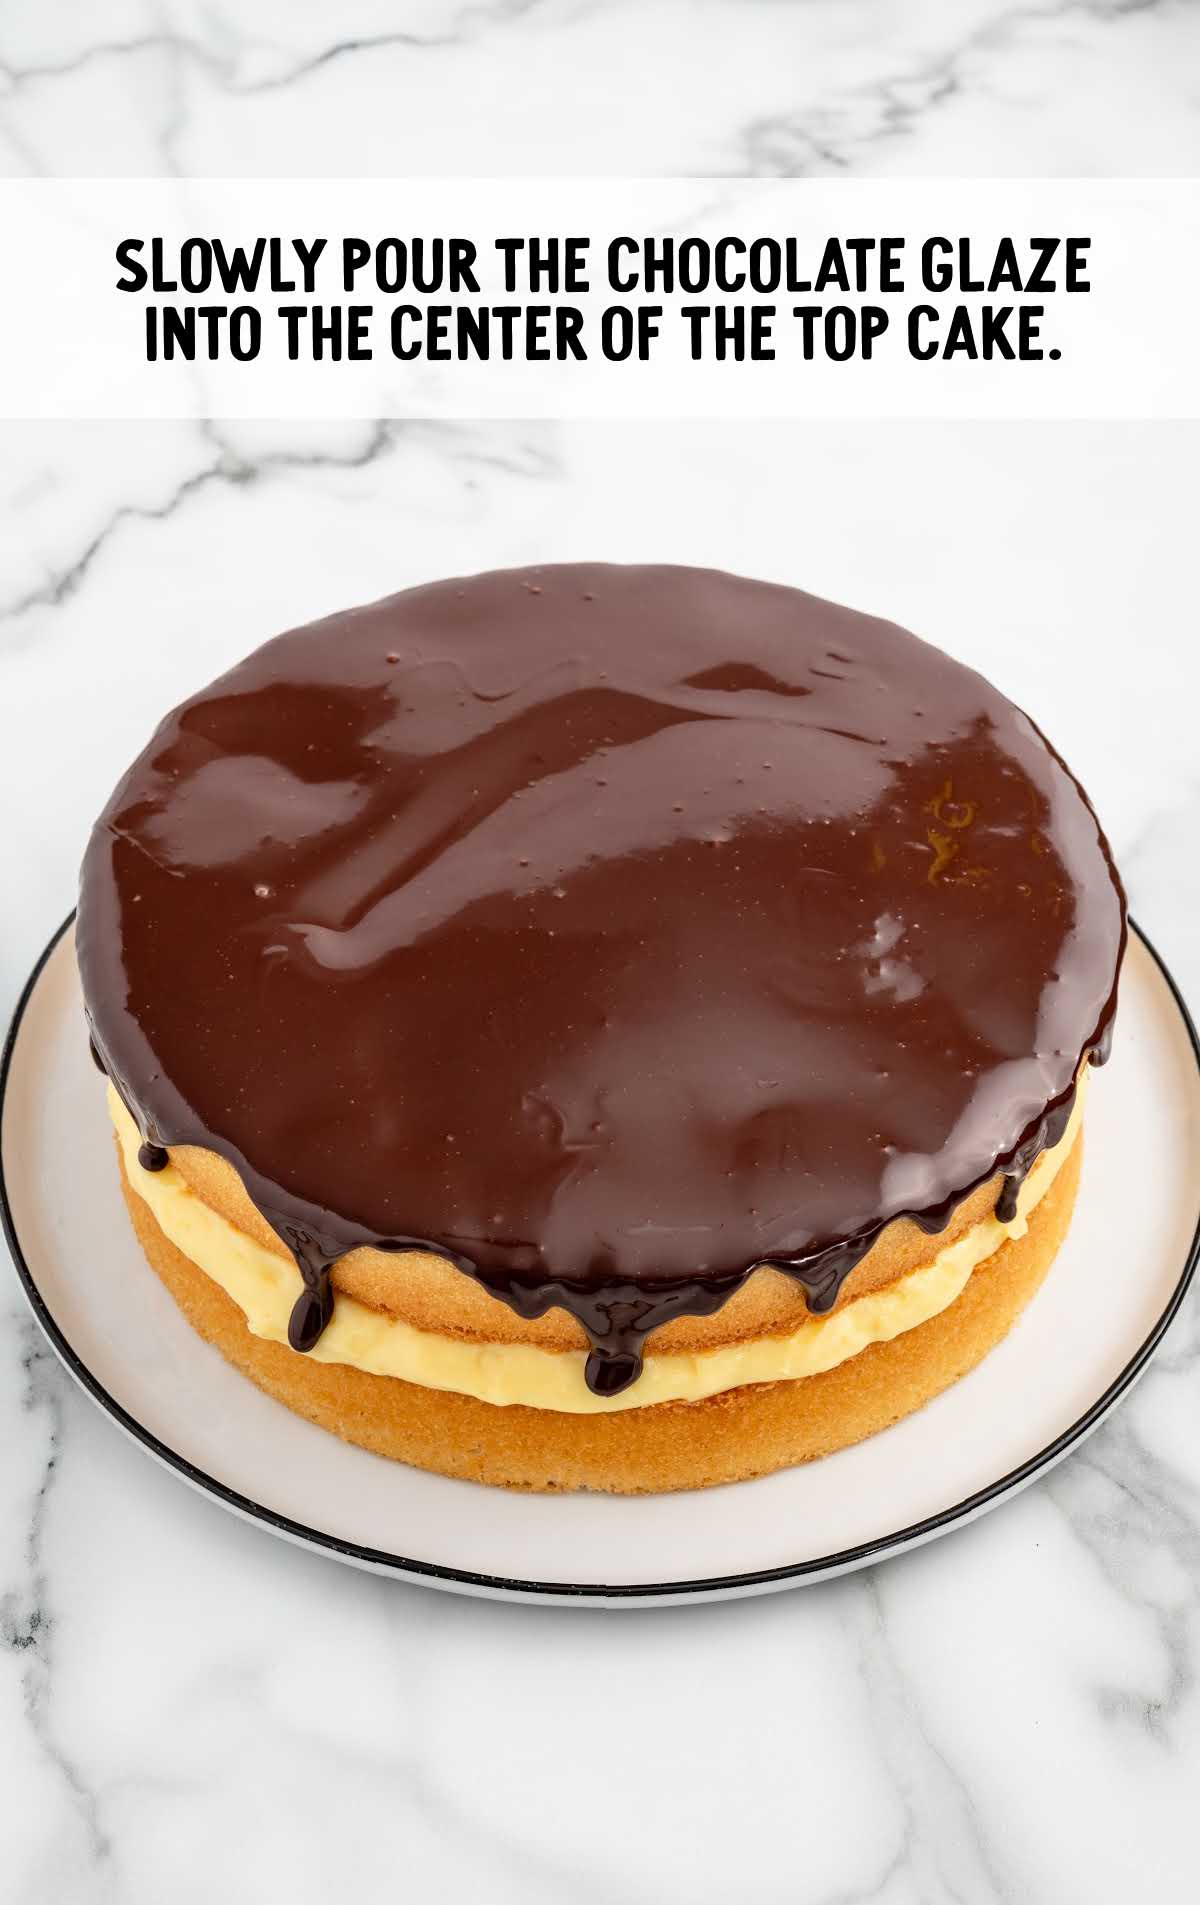
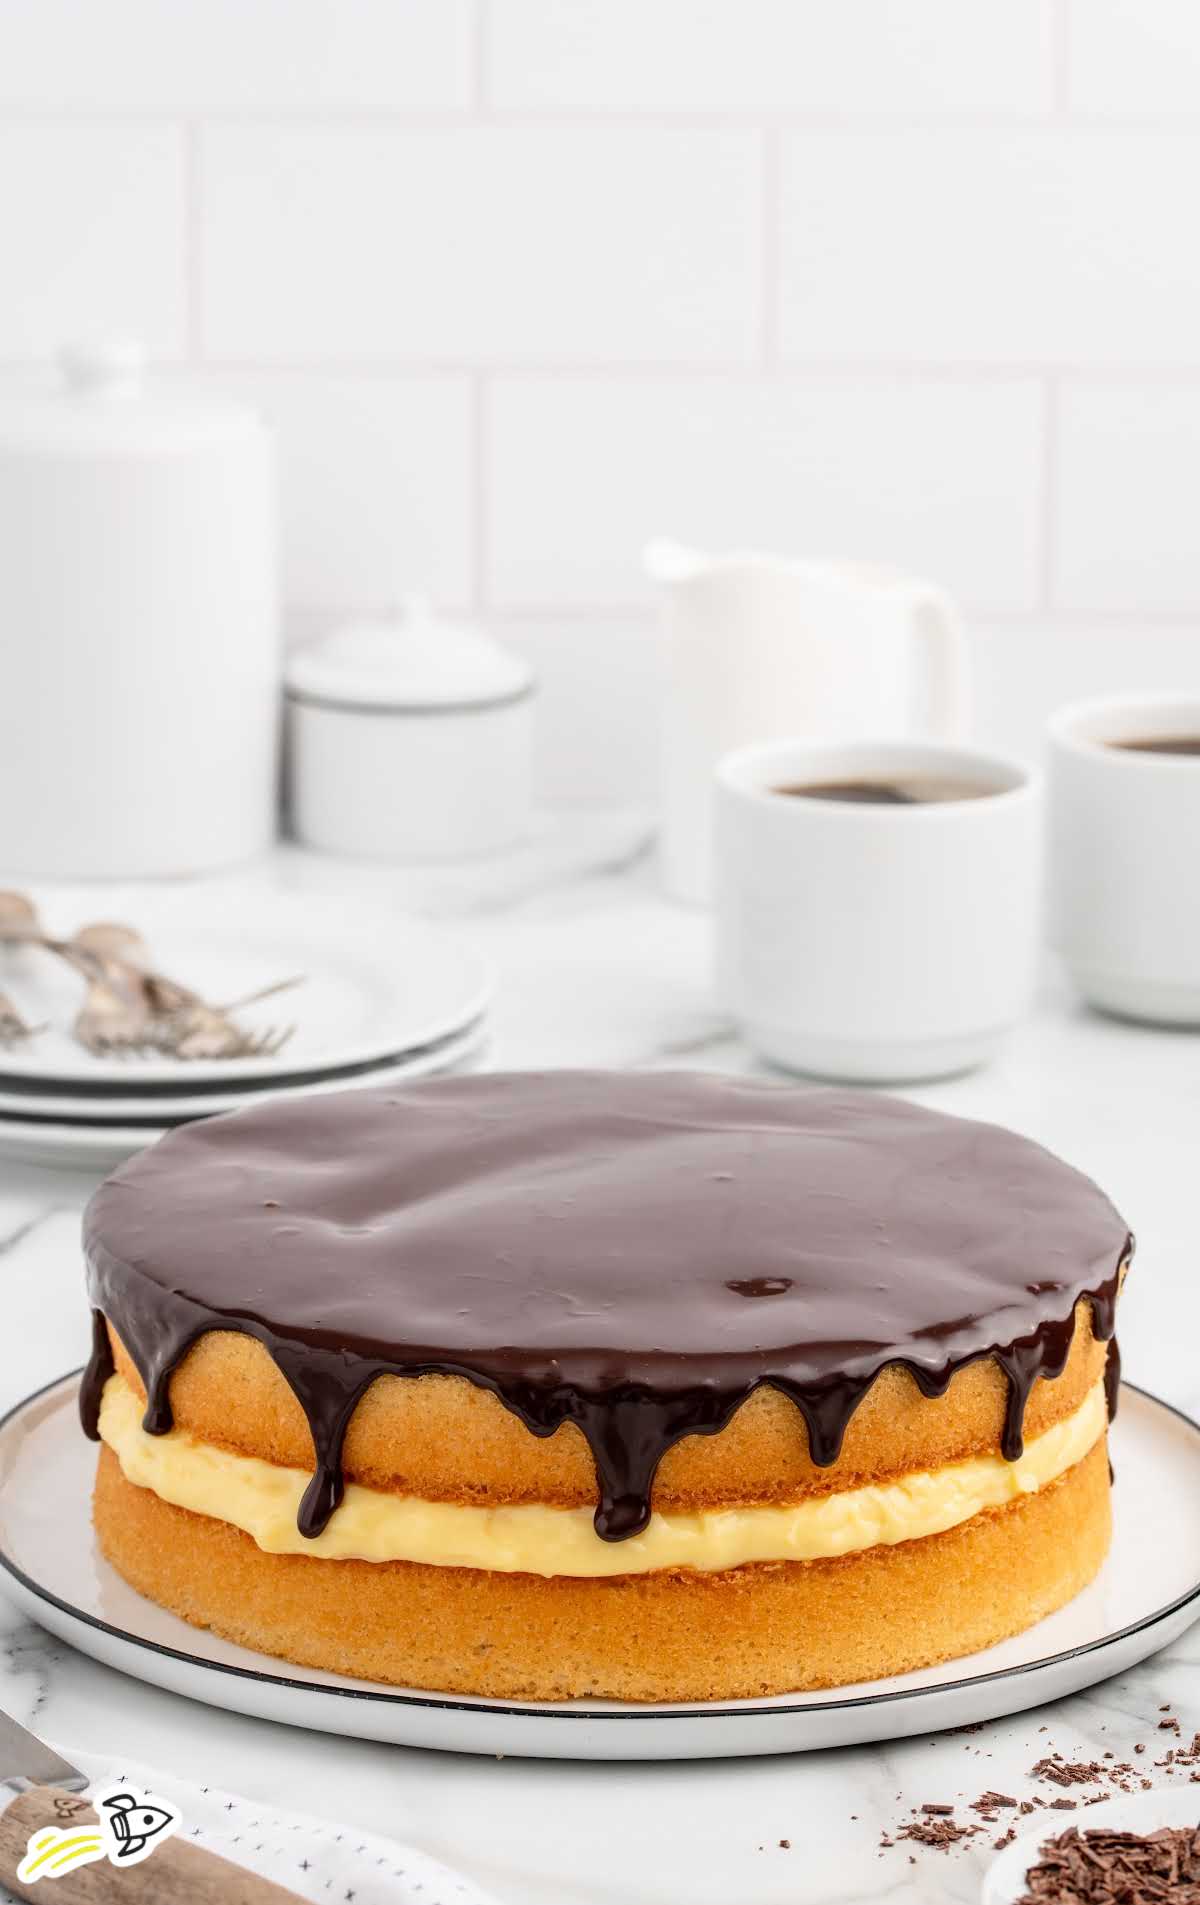
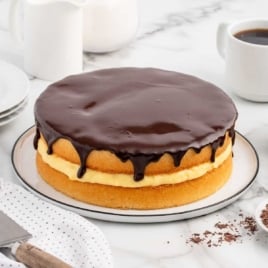
STEP FOUR: Very slowly, pour the chocolate ganache directly onto the center of the cake. Some of the glaze will drip over the sides, and that’s ok! But you don’t want to completely cover the outside, as you’ll want the yummy layers to be seen. If you need to, use an offset spatula to gently spread the ganache outward nearer to the edges of the cake.
STEP FIVE: Slice and serve the cake while the pastry cream is still chilled, and before the ganache sets completely.
Pro Tip: This cake is best served within 20-60 minutes after assembling. See below how to make ahead and assemble quickly before serving.
How To Serve This Recipe For Boston Cream Pie Cake
Once you’ve made your drool-worthy Boston Cream Pie Cake, you’ll be proud and excited to serve it to your guests. This recipe is so easy to serve and is a superb addition to all kinds of events and celebrations.
Classically served, this Boston Cream Pie looks impressive on a pretty dessert plate garnished with a dusting of powdered sugar and a drizzle of chocolate sauce.
Of course, you can never go wrong adding a dollop of whipped cream or a scoop of ice cream! For an extra special treat, make your own homemade vanilla ice cream (no churning required)!
This cake is perfect for hosting an afternoon coffee chat with your friends. It’s such an indulgent treat! Serve generous portions alongside a selection of teas and freshly brewed coffee for a delightful mid-day treat.
Were you asked to bring a dessert to your next family gathering? This is the best recipe to bring! It’s beautifully served, fully homemade, and utterly delicious. Plus, it looks lovely on a tiered cake stand surrounded by fruit-filled cookies, cheesecake bites, and chocolate truffles.
Freshly cut fruit is a wonderful addition to a Boston cream pie. I recommend choosing seasonal fruits, such as fresh berries in the summer or apple slices in the fall. Strawberries are always a pleasant addition.
A glass of milk is our preferred beverage alongside this creamy cake, but for a more grown-up drink, Bailey’s Irish Cream and coffee is a complementary choice.
From casual gatherings to formal celebrations, this vintage dessert is sure to be a hit with its decadent layers and irresistible flavors. Whether it’s an office party, birthday celebration, holiday dinner party, or even a date night, this dessert is ready to impress!
MORE PIE RECIPES

How To Store Boston Pie
This creamy dessert is so delicious, you’ll want to make sure to store the leftovers, so you don’t waste even a single bite.
MAKE AHEAD: This recipe is best served within an hour of assembling it, so we suggest you make the components of the cake ahead of time, then assemble just before serving.
To do this, bake the cakes and allow them to cool completely. Wrap the cake layers in plastic wrap, then refrigerate for up to 3 days before using. You can also freeze the cake layers for up to a month. Wrap them in a few layers of plastic wrap, then place them in freezer-safe Ziploc bags for longer storage.
Next, refrigerate the Boston cream filling with plastic wrap pressed tightly onto the top of the cream. It should stay fresh for up to 24 hours. To freeze instead, scoop the cream into a freezer-safe airtight container and press plastic wrap tightly onto the top of the cream. Set the lid on tightly on top and freeze for up to a month.
Make the ganache fresh just before assembling the cake.
If you assemble the cake, it can be refrigerated in a cake keeper for up to 3 days before serving, but the cakes will likely end up a bit wet from the cream, and the ganache will be quite hard and difficult to serve. We don’t recommend this option.
IN THE FRIDGE: Leftover or pre-assembled cake must be kept in the fridge. It can be refrigerated in a cake keeper for up to 3 days, but the cakes will likely end up a bit wet from the cream, and the ganache will be quite hard and difficult to serve. We don’t recommend this as a make-ahead option, and we recommend you eat up your leftovers within a day or two.
IN THE FREEZER: We don’t recommend freezing this cake once it’s assembled. To freeze the components, see the Make Ahead section above.
Why This Is The Best Boston Cream Pie
There’s something undeniably special about Boston Cream Pie Cake. From its cozy nostalgia to its irresistible flavor profile, this classic dessert has earned a permanent place in our recipe box.
Reasons We Love This Recipe:
Timeless Appeal: Boston Cream Pie Cake is a classic, vintage dessert that has stood the test of time. With its combination of moist cake, creamy custard filling, and decadent chocolate ganache, it’s a dessert that appeals to all generations and never goes out of style.
Homemade Goodness: A boxed cake is fine, but there’s something incredibly satisfying about making Boston Cream Pie Cake from scratch. From baking the cake layers to preparing the pastry cream filling and chocolate ganache, each step of the process is satisfying (and easy!). Plus, the aroma of freshly baked cake wafting through the kitchen is simply irresistible.
Crowd-Pleasing Dessert: No matter the occasion, Boston Cream Pie is guaranteed to be a crowd-pleaser. Its mouth-watering layers and indulgent flavors never fail to impress, making it the perfect dessert to serve at parties, gatherings, or family dinners.
Frequently Asked Questions
Yes, you can certainly experiment with different cake mixes or recipes to customize the flavor of your Boston Cream Pie. Chocolate, vanilla, or even lemon cake can be substituted for the yellow cake recipe for a more personalized dessert recipe. Make a from-scratch recipe, or use a boxed mix. Both will be delicious!
Absolutely! The pastry cream filling can be prepared ahead of time and stored in the refrigerator until you’re ready to assemble the cake. Just be sure to give it a good whisk before you use it so it spreads with a smooth consistency.
Once assembled, Boston Cream Pie Cake can be stored in the refrigerator for up to 2-3 days, although the cakes might begin to get wet from the filling. Be sure to cover it tightly with plastic wrap or store it in an airtight container to prevent it from drying out.
Yes, you can use milk chocolate (or any other kind of chocolate) for the ganache if you prefer a sweeter flavor. However, milk chocolate may result in a softer ganache than semisweet chocolate.
Absolutely! Feel free to experiment with different flavors such as almond extract, coconut extract, or even a splash of liqueur like rum or amaretto to customize the pastry cream filling to your liking.
Yes, you can make individual servings of Boston Cream Pie Cake by assembling the cake in small, individual-sized molds or ramekins. Simply chop up the cakes into cubes and layer them with the filling and ganache accordingly.
Boston Cream Pie is truly the perfect combination of flavors, making it a beloved dessert for any occasion. Whether you’re celebrating a special milestone or simply craving a delicious dessert, this Boston cream cake is sure to satisfy your sweet tooth and leave a lasting impression on all who taste it!
More Recipes You’ll Love
- Bumpy Cake
- Nutella Cupcakes
- Boston Cream Cupcakes
- Cookie Dough Cupcakes
- Copycat Hostess Cupcakes Recipe


Boston Cream Pie
Ingredients
For the Pastry Cream
- 2 cups whole milk
- ¾ cup granulated sugar
- ¼ cup cornstarch
- 5 large egg yolks, room temperature
- 3 tablespoons unsalted butter, cold and cubed
- 1 ½ teaspoons vanilla extract
For the Cake
- 1 ¾ cups all-purpose flour
- 1 ¾ teaspoons baking powder
- ½ teaspoon salt
- 1 ¾ cups granulated sugar
- 3 large eggs, room temperature
- 2 teaspoons vanilla extract
- 1 cup whole milk, heated to approximately 165* – 170* F
- ½ cup unsalted butter, melted
For the Chocolate Glaze
- ¾ cup finely chopped bittersweet chocolate baking bar, 60% cacao
- ½ cup heavy cream
- 1 tablespoon clear corn syrup
- ½ teaspoon vanilla extract
Instructions
To Make the Pastry Cream
- In a 3-4 quart saucepan, over medium-high heat, add the milk and bring to a temperature of 170*-180* F and you have tiny bubbles forming along the edges of the saucepan. You are scalding the milk, not bringing it to a boil. Remove from the heat.
- In a large mixing bowl whisk together the granulated sugar and cornstarch until fully combined and no lumps from the cornstarch remain. Whisk in the egg yolks by hand for 1-2 minutes or until smooth.
- Slowly drizzle in ½ cup of the warm milk while whisking vigorously. Add another ½ cup warm milk while whisking vigorously again. This is to temper the egg yolks so they do not scramble when added to the sauce pot and cooked.
- Place the saucepan with the remaining warm milk back to the stovetop, over medium-high heat, and slowly pour the egg mixture into the pot while whisking constantly.
- Cook the pastry cream mixture for 8-10 minutes, while whisking constantly to avoid burning, or until the mixture comes to a rolling boil and thickens quite a bit. The pastry cream will get very thick very quickly once it comes to a boil so do not walk away from the saucepan on the stove.
- Cook for an additional 30 seconds – 1 minute once it thickens then remove from the heat.
- Add the cubed unsalted butter and vanilla extract and whisk vigorously until the butter is fully incorporated and the pastry cream is thick and smooth.
- Transfer the pastry cream to a bowl and cover with plastic wrap, being sure to place the plastic wrap directly onto the entire surface of the pastry cream. This will prevent a skin from forming on the surface of the pastry cream while it cools.
- Refrigerate the pastry cream for 2-4 hours, or until fully chilled before adding to the cooled cake layers for assembly.
To Make the Cake
- Preheat oven to 325* F. Spray 2 – 9 inch round cake pans with baker’s spray and line each pan with a piece of parchment round. Set aside.
- In a small bowl combine together the all-purpose flour, baking powder and salt. Set aside.
- In a large mixing bowl, using a handheld mixer on medium-high speed, beat the granulated sugar, eggs and vanilla extract for 3-4 minutes or until thick and fluffy.
- In a small bowl, with a pour spout (a 2 cup glass measure cup works great for this) whisk together the warm milk and melted butter. With the mixer on low speed, slowly drizzle the warm milk mixture into the large bowl of beaten eggs until fully incorporated.
- With the mixer on low speed, add the flour mixture slowly to the bowl and mix just until all the flour has been fully incorporated. Your cake batter should resemble pancake batter without any lumps.
- Divide the batter evenly between the two prepared cake pans. Bake for 30-33 minutes or until lightly golden around the edges and the center is set. A toothpick inserted into the center of the cake should come out clean.
- Allow the cakes to cool in the pan for 10 – 15 minutes before turning them out onto a wire cooling rack to cool completely. Be sure to remove the parchment paper from the bottom of each cake layer while cooling.
To Make the Chocolate Glaze
- In a medium, microwave safe, bowl add the chopped bittersweet chocolate and heavy cream. Be sure that the chocolate is covered by the heavy cream, and microwave on high for 1 minute. Remove from the microwave and let sit for 1 minute.
- Add the clear corn syrup and vanilla extract to the melted chocolate and whisk until smooth.
- Allow the chocolate glaze mixture to cool for 15-20 minutes in the bowl before pouring over the top of the assembled cake.
To Assemble the Cake
- Place one of the cake layers onto a large cake plate.
- Spread the chilled pastry cream into an even layer over the first cake layer. If your pastry cream is very thick from a long chill, be sure to whisk it for 1-2 minutes to loosen it up to a spreadable consistency before adding to the cake.
- Top the pastry cream with the second cake layer. Be careful to not press too hard as you do not want the pastry cream to come out the sides of the cake.
- Slowly pour the chocolate glaze into the center of the top cake layer. It is ok if some of the chocolate glazes drips down the sides, but you do not want to cover the sides completely as you want to be able to see the layers.
- Slice and serve the cake while the pastry cream is still chilled.
Notes
- Measure and cut your butter into cubes, but keep it in the fridge until your ready to use it. Remove the eggs from the fridge before you start to bake so they come to room temperature.
- You can discard the egg whites from the custard or save them to make an omelette.
- Warm the milk for the cake layers in a microwave-safe bowl instead of the stovetop if you prefer. A 2-cup glass measure cup works great! Microwave for 1 minute and 30 seconds or until it starts to get little bubbles around the edges of the milk. Just be very careful not to boil the milk.
- Don’t walk away from the stove when making your custard filling! The mixture will very quickly thicken once the pot begins to boil.
- We recommend serving this pie soon after you apply the ganache, so make the ganache just before serving.
- If your pastry cream is really thick from setting up in the fridge for a long time, whisk it for a minute or two to loosen it up before you try to spread it over the cake.
- This cake is best served within 20-60 minutes of assembly.
Nutrition


Leave a Comment