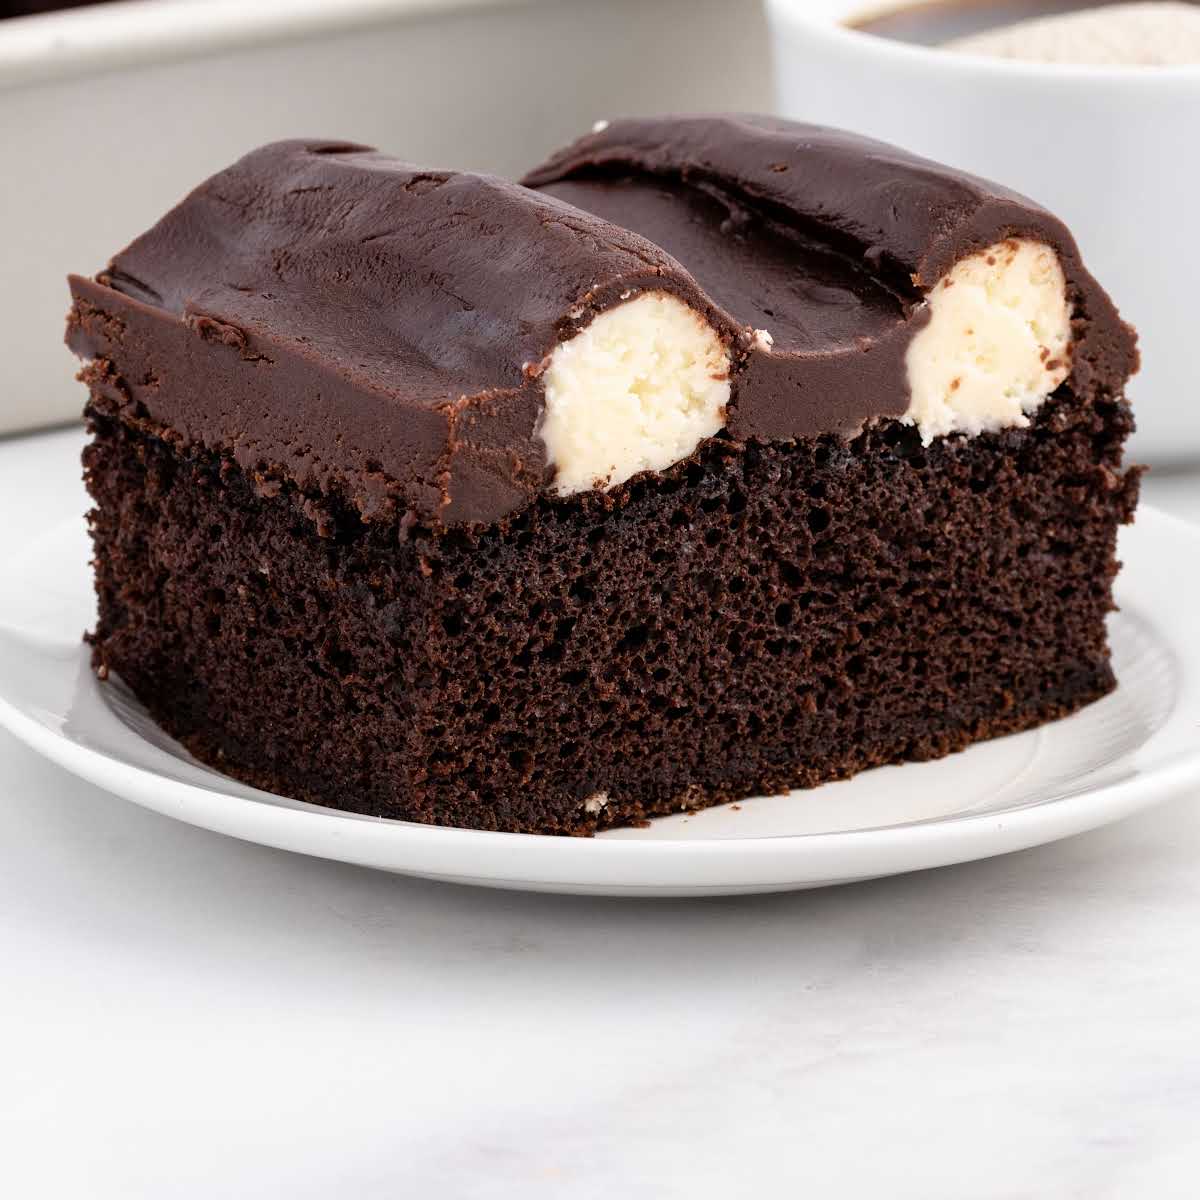

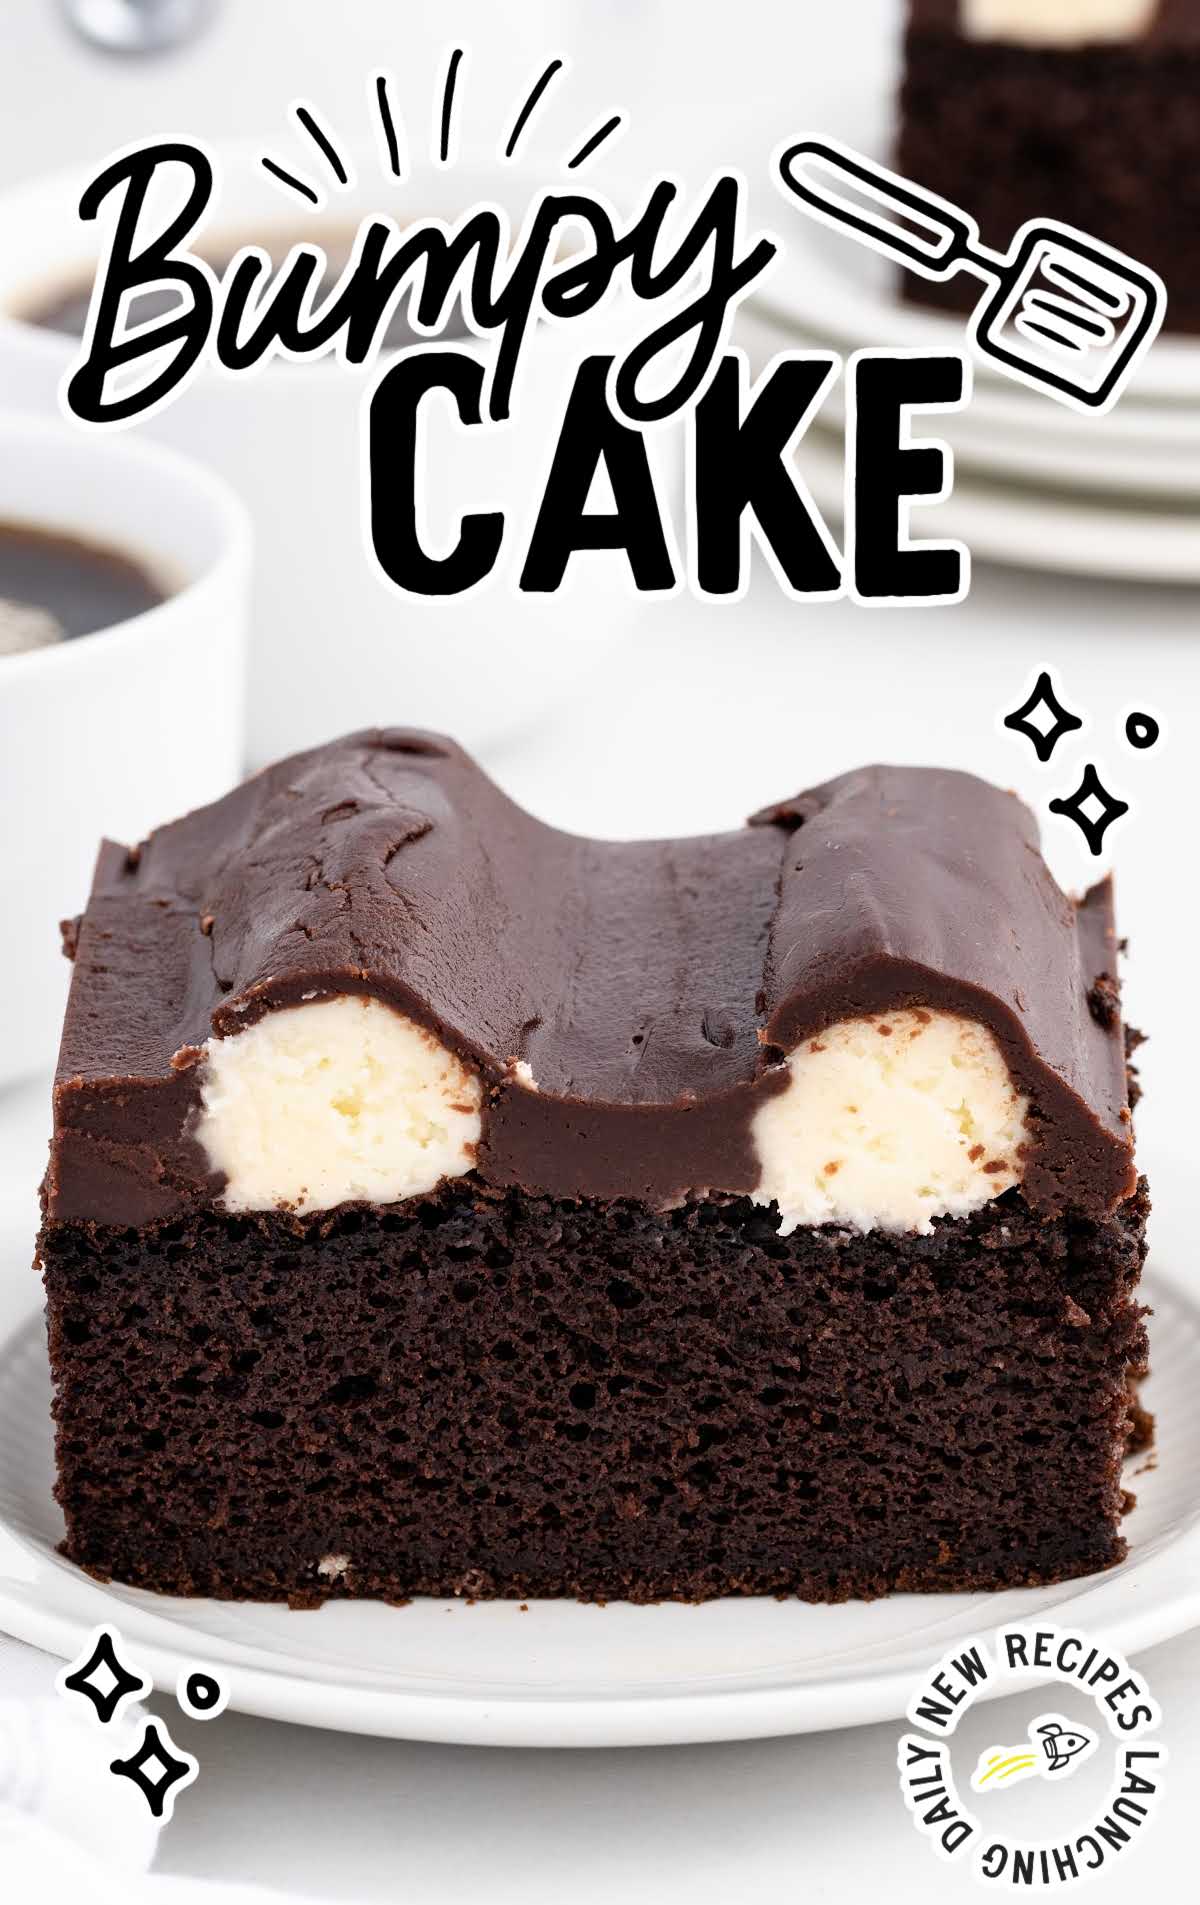
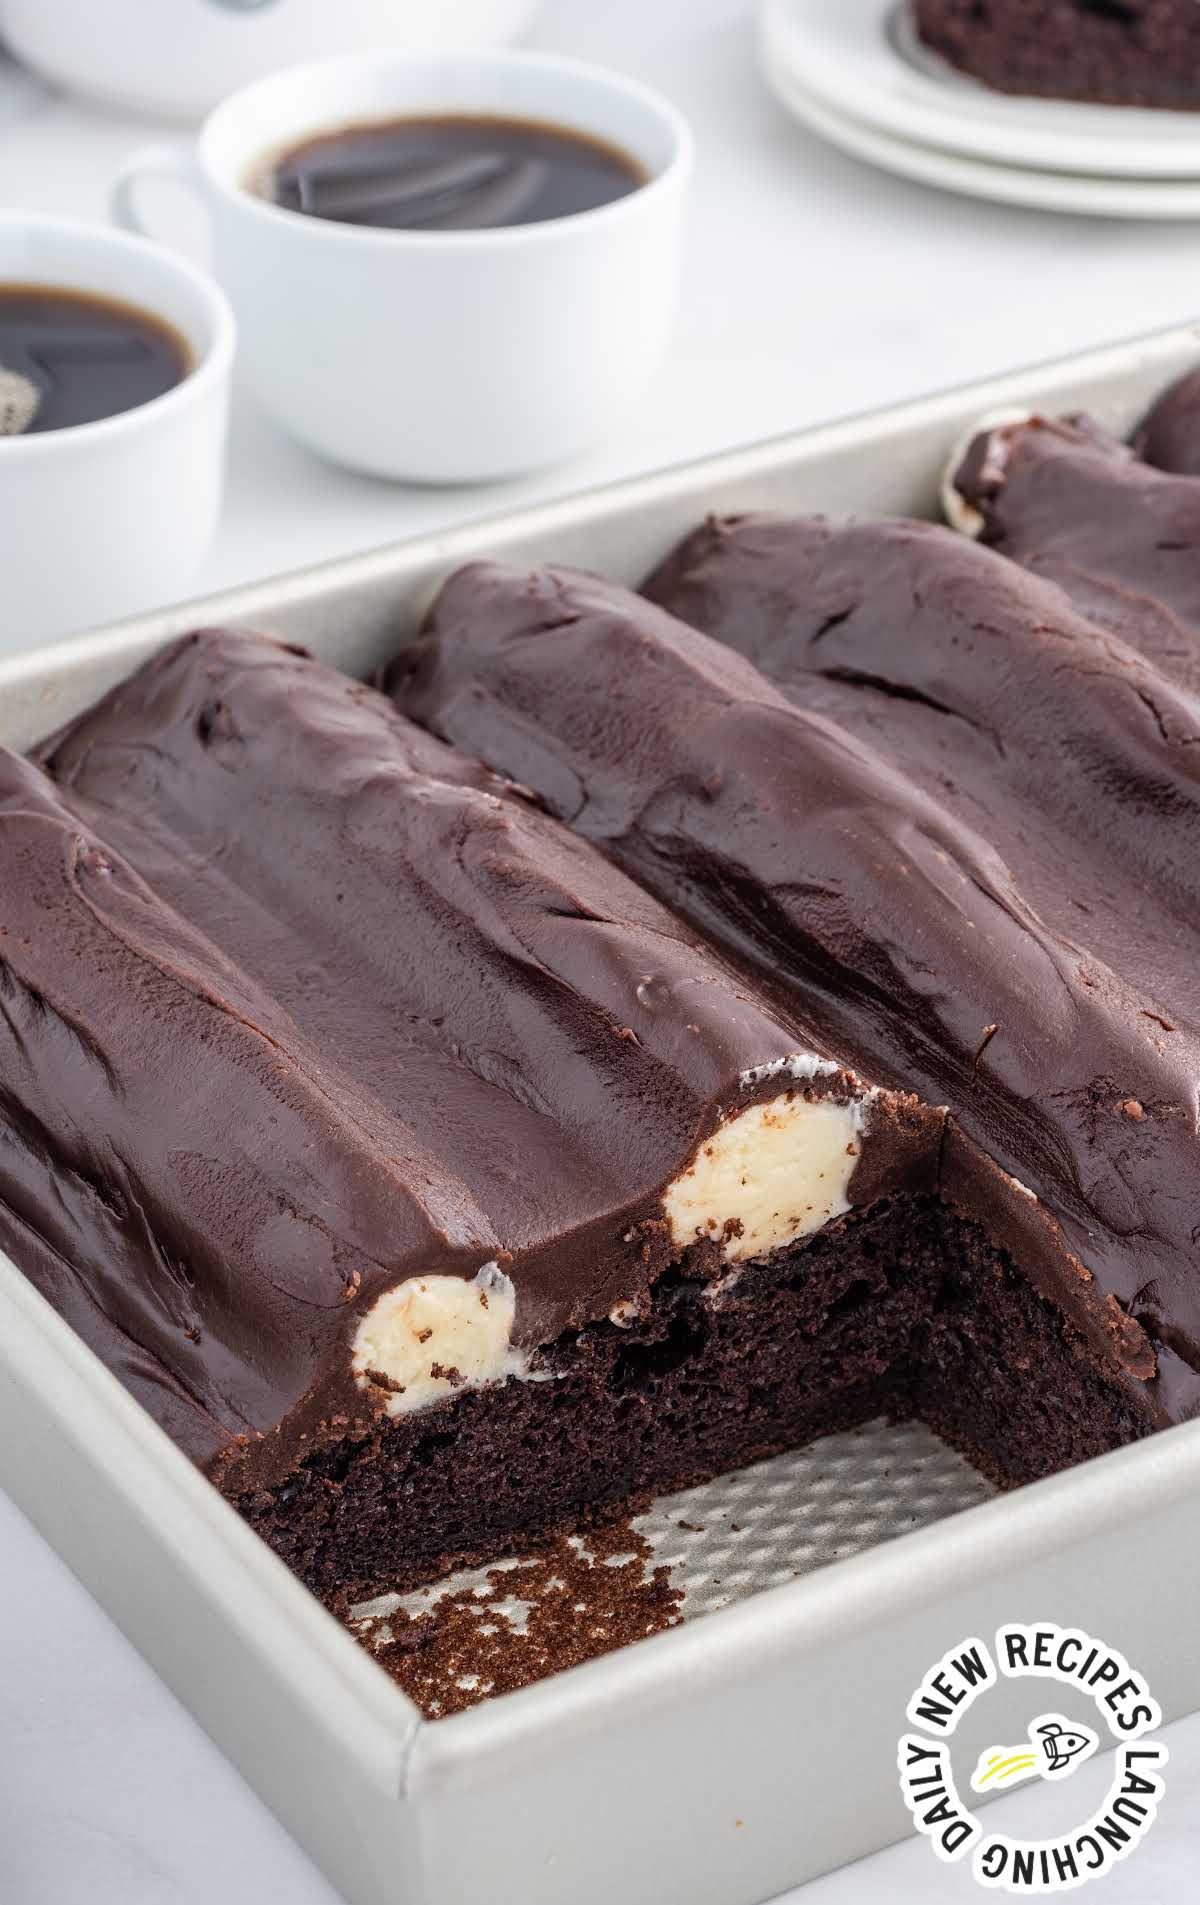
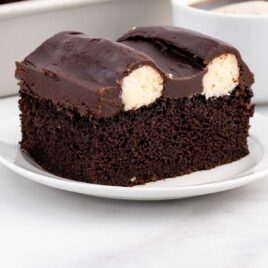
This vintage bumpy cake recipe features chocolate cake topped with rows of vanilla buttercream bumps and finished off with a thick layer of chocolate fudge frosting. This beloved midwestern treat, while having an unsual name, is as decadent as they come.
Bumpy Cake Ingredients
The bumpy cake is an irresistible dessert that boasts a dark chocolate cake infused with brewed coffee, creamy whole milk, and sour cream.
The buttercream filling is smooth and sweet, with a buttery richness and a touch of salt.
The chocolate frosting is a luscious blend of caramel undertones and deep chocolate richness.
You’ll need:
For The Chocolate Cake:
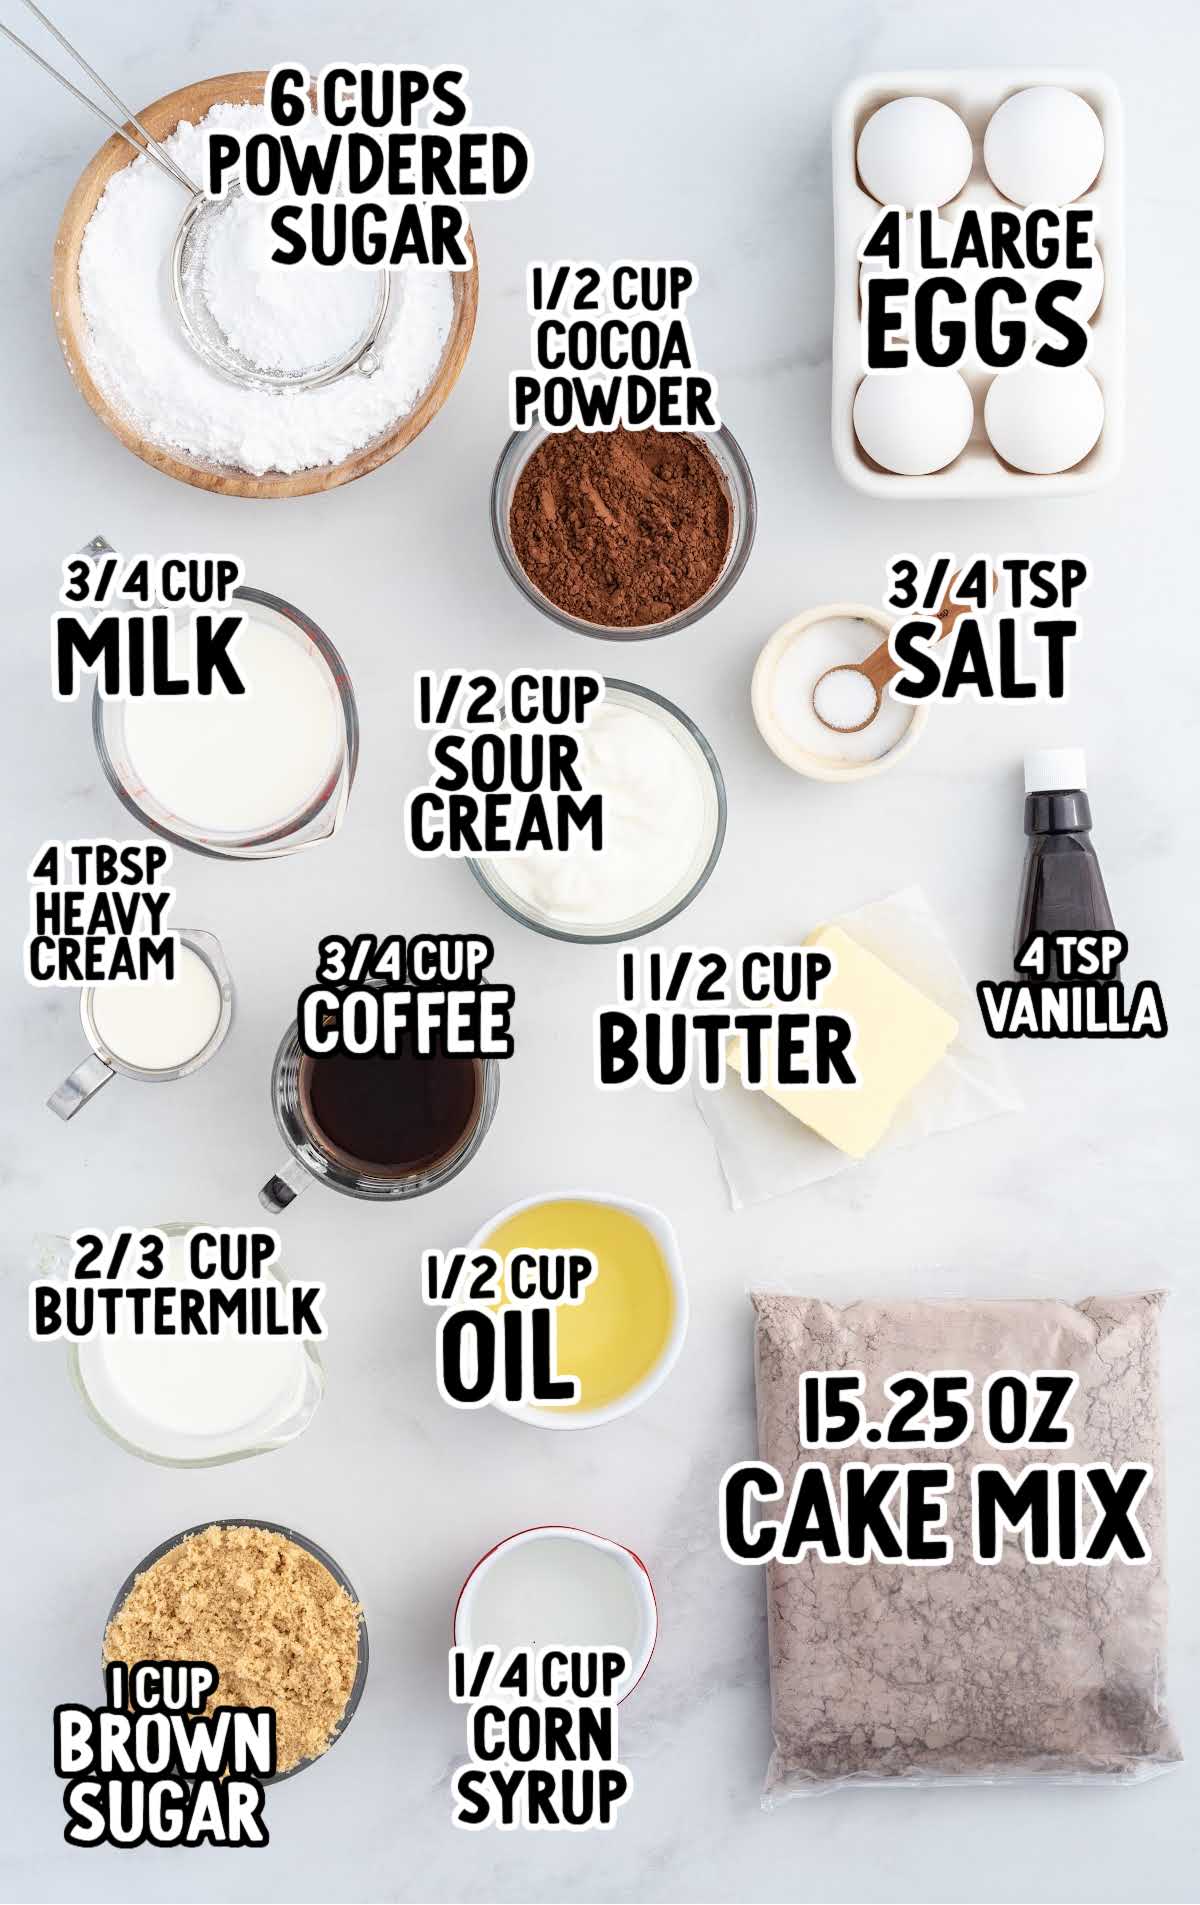
- 1 (15.25-ounce) box of dark chocolate fudge cake mix (I used Duncan Hines brand)
- ¾ cup of unflavored brewed coffee, cooled to room temperature
- ¾ cup of whole milk
- ½ cup of vegetable oil
- ½ cup of sour cream
- 1 teaspoon of vanilla extract
- 4 large eggs, room temperature
For The Buttercream Filling:
- ¾ cup of sweet cream butter, room temperature
- 1½ teaspoons of vanilla extract
- ¼ teaspoon of salt
- 3 cups of powdered sugar, sifted
- 4 tablespoons of heavy cream
For The Chocolate Frosting:
- 1 cup of light brown sugar, lightly packed
- ¾ cup of unsalted butter, room temperature
- ⅔ cup of buttermilk
- ½ cup of unsweetened cocoa powder
- ¼ cup of light Karo (corn) syrup
- ½ teaspoon of salt
- 3 cups of powdered sugar, sifted
- 1½ teaspoons of vanilla extract
Substitutions And Additions
CAKE: I like the richness that the dark chocolate cake mix provides. However, you can substitute a Devil’s Food, or your favorite chocolate cake mix, if desired.
BREWED COFFEE: Don’t have coffee or prefer to skip the caffeine? You can replace the coffee with an equal amount of hot water.
This swap won’t compromise the cake’s texture, and you’ll still get that moistness without the coffee flavor.
SOUR CREAM: Greek yogurt makes a fantastic substitute for sour cream. It’ll maintain the cake’s moisture while adding a slight tangy twist to the flavor.
VANILLA EXTRACT: Experiment with different extracts to infuse unique flavors into your cake. Almond extract or hazelnut extract can provide delightful alternatives.
BUTTERMILK: If buttermilk isn’t available, mix one tablespoon of white vinegar or lemon juice with regular milk and let it sit for a few minutes until it curdles.
This homemade buttermilk substitute works perfectly in the frosting.
UNSWEETENED COCOA POWDER: Experiment with Dutch-processed cocoa powder for a deeper, smoother chocolate flavor.
You can also try a high-quality dark cocoa powder for an extra decadent touch.
How To Make This Bumpy Cake Recipe
Let’s walk through the step-by-step instructions for making this unique and delightful cake.
For The Chocolate Cake
STEP ONE: Preheat the oven to 350°F. Spray a 9×13-inch metal baking dish with baking spray. Use Baker’s Joy or a generic version.
Set it aside.
OUR RECIPE DEVELOPER SAYS
DO NOT use a glass baking dish for this recipe. Since you will be placing a warm cake into a freezer and then also pouring hot chocolate frosting over a frozen cake, you do not want to risk the glass pan being shocked by the extreme changes in temperatures as this can cause the glass dish to crack and break.
STEP TWO: Using a medium bowl and a handheld mixer on medium speed, beat together the cake mix, coffee, milk, vegetable oil, sour cream, and vanilla extract.
Beat just until combined.
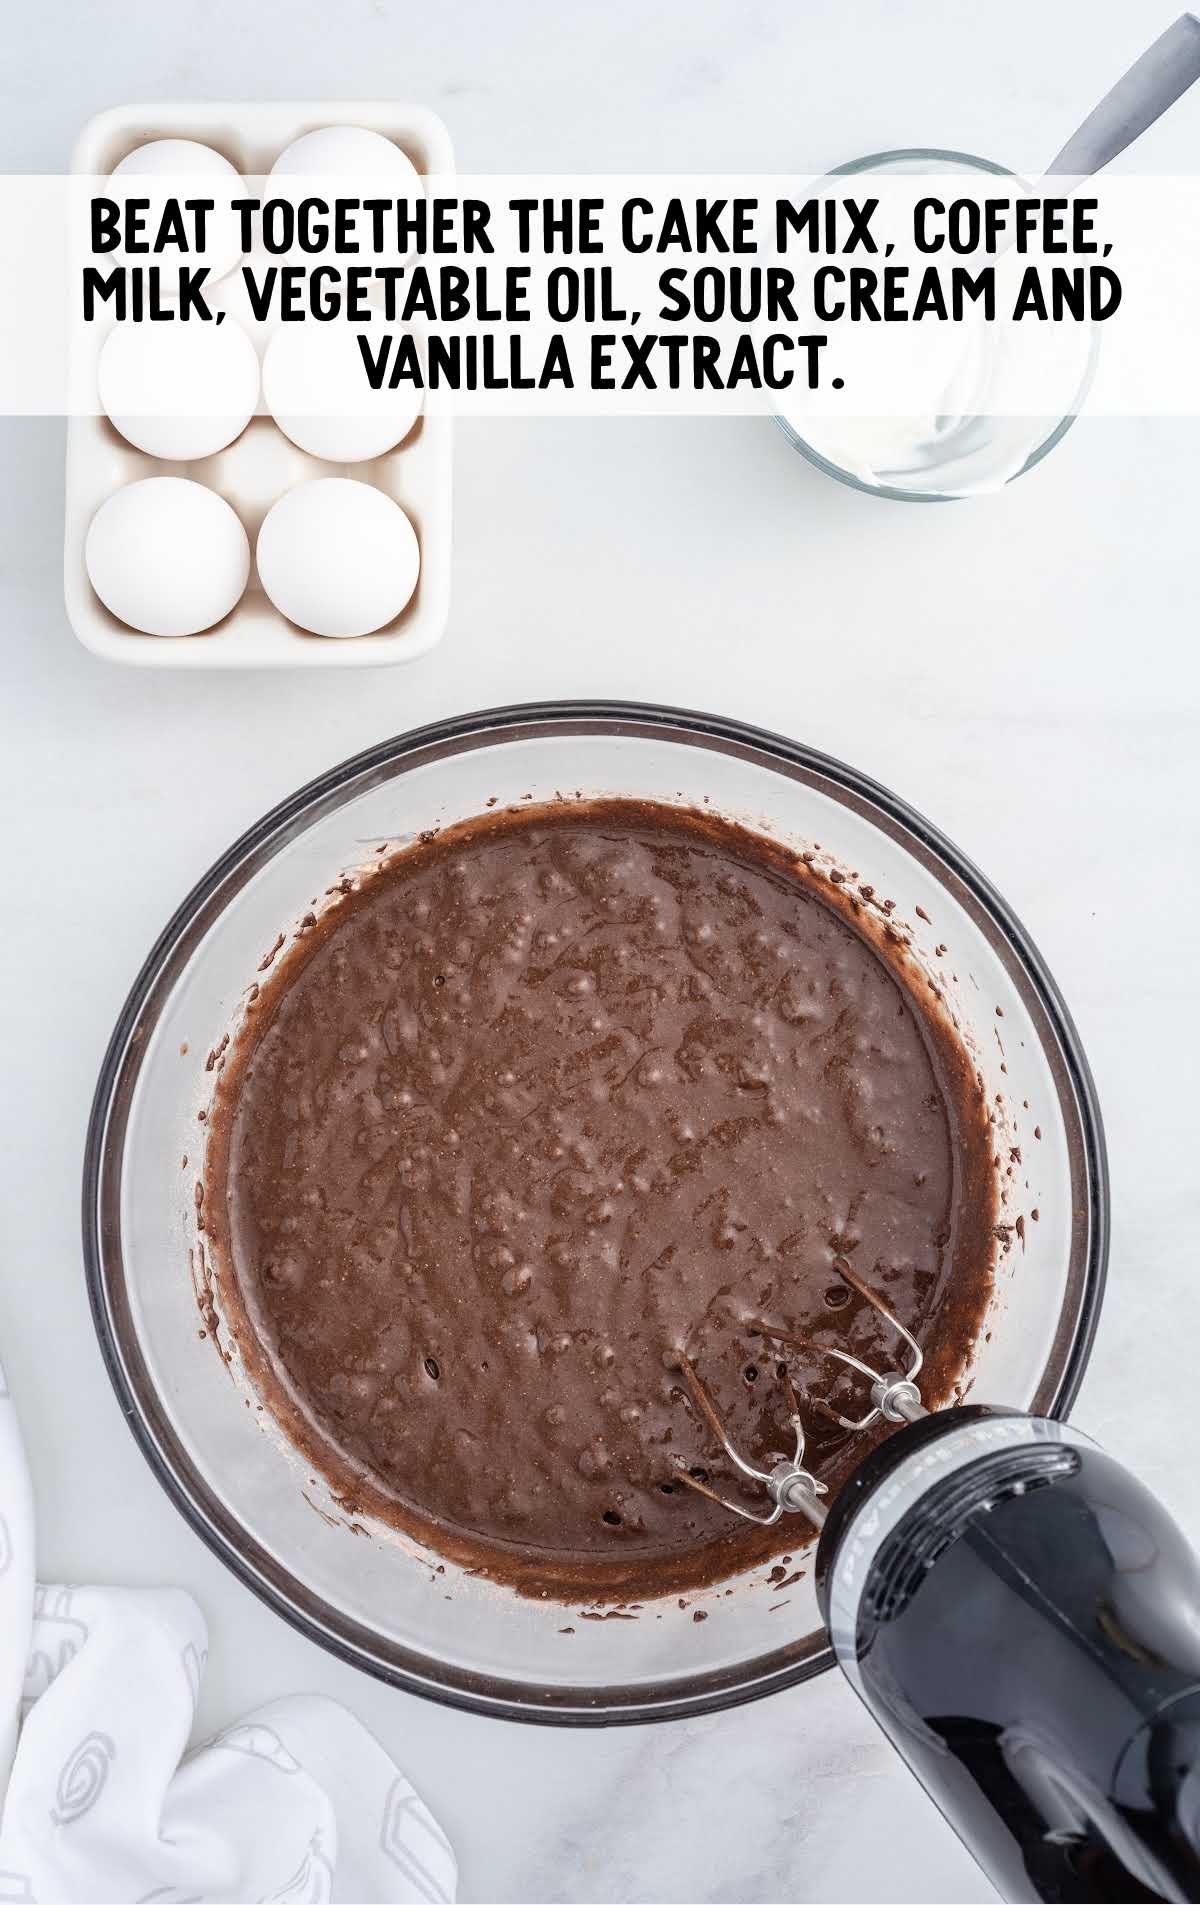
STEP THREE: Reduce the electric mixer speed to low speed. Add the eggs, one at a time, and beat just until all the eggs are incorporated.
Scrape down the sides and bottom of the bowl to ensure that the batter is smooth and well-mixed.

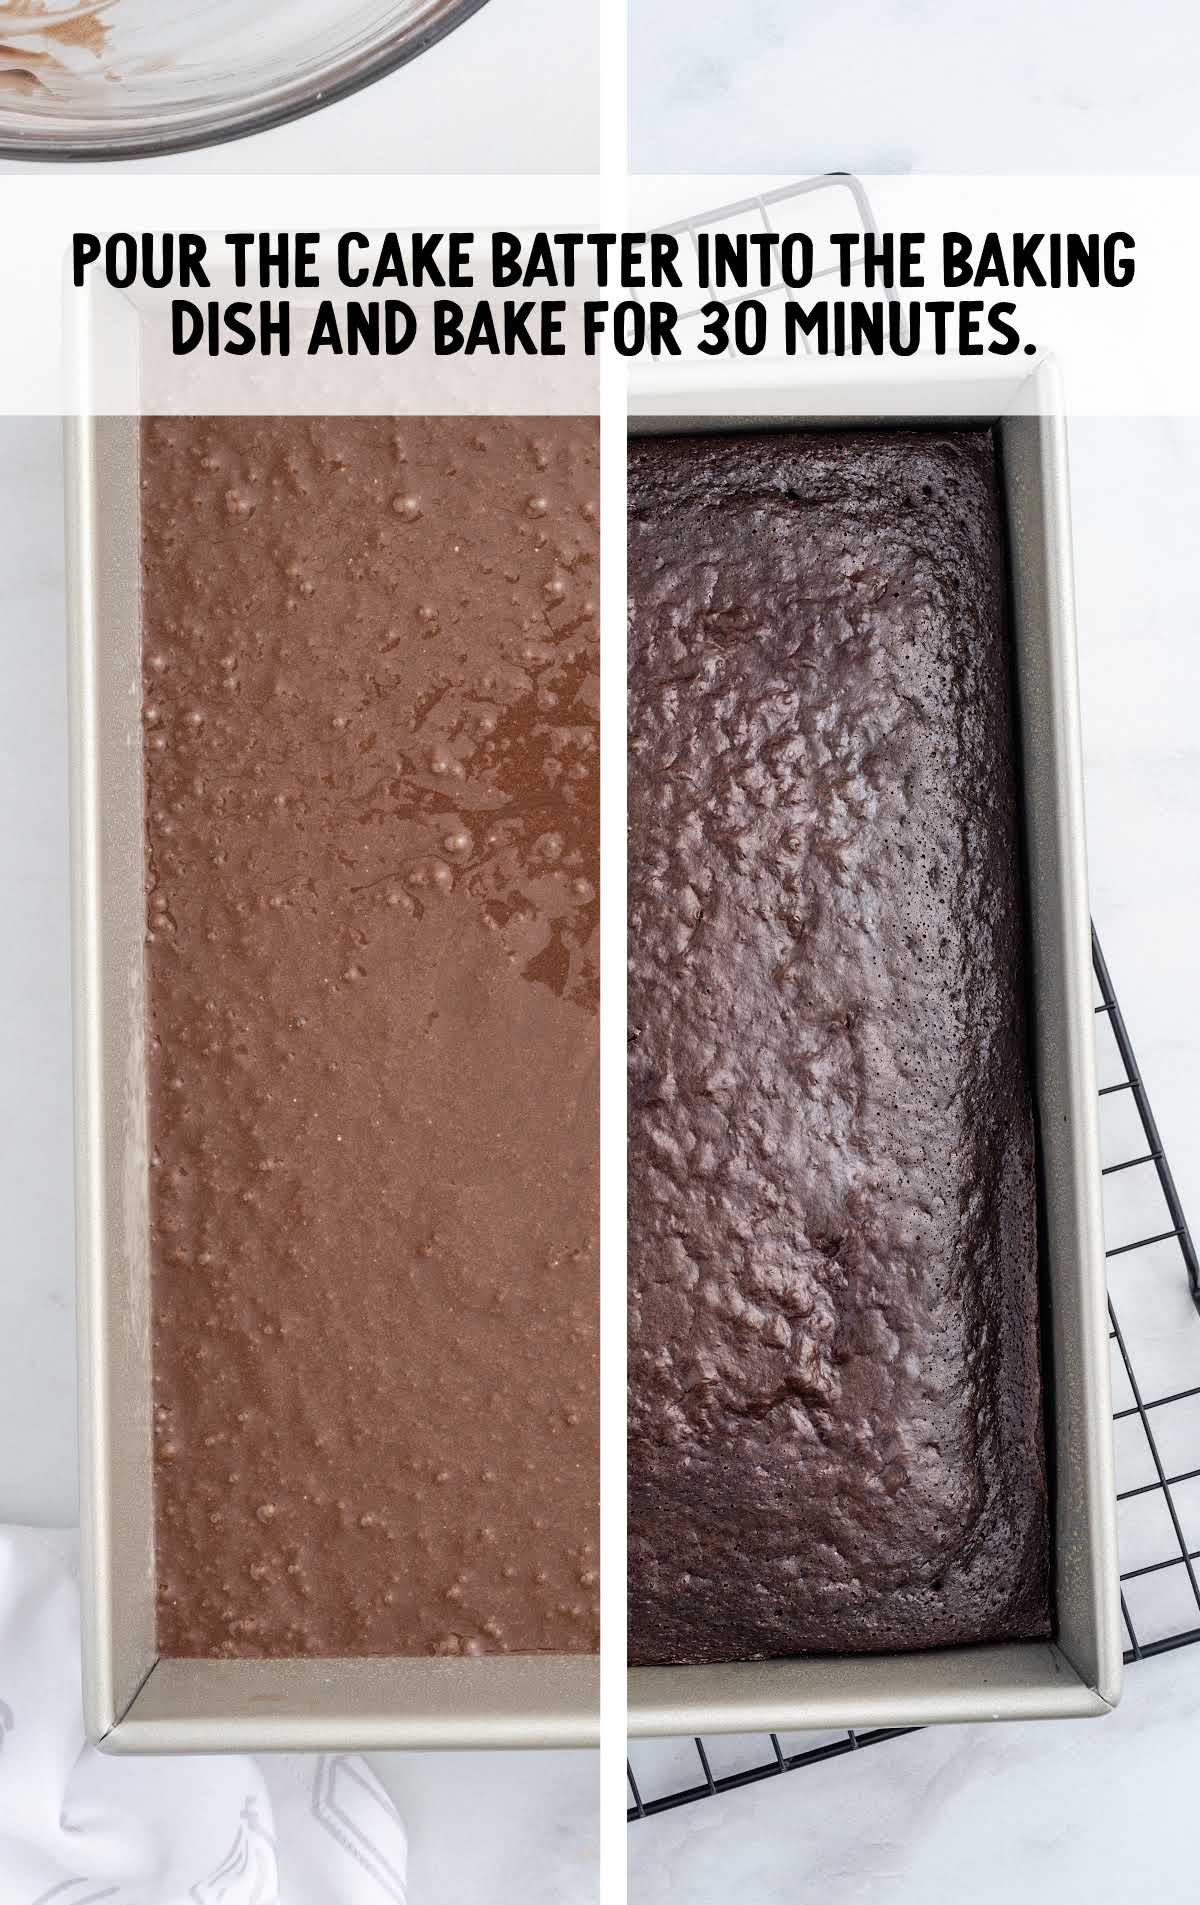
STEP FOUR: Pour the cake batter into the prepared pan and bake for 30 minutes, or until a toothpick inserted in the center of the cake comes away clean.
Let the cake cool for 30 minutes on the counter, then place the cake into the freezer while you make the buttercream filling.
PRO TIP:
Do not skip chilling the cake. This is important to ensure it is the right temperature for the next layers to set on top.
For The Buttercream Filling
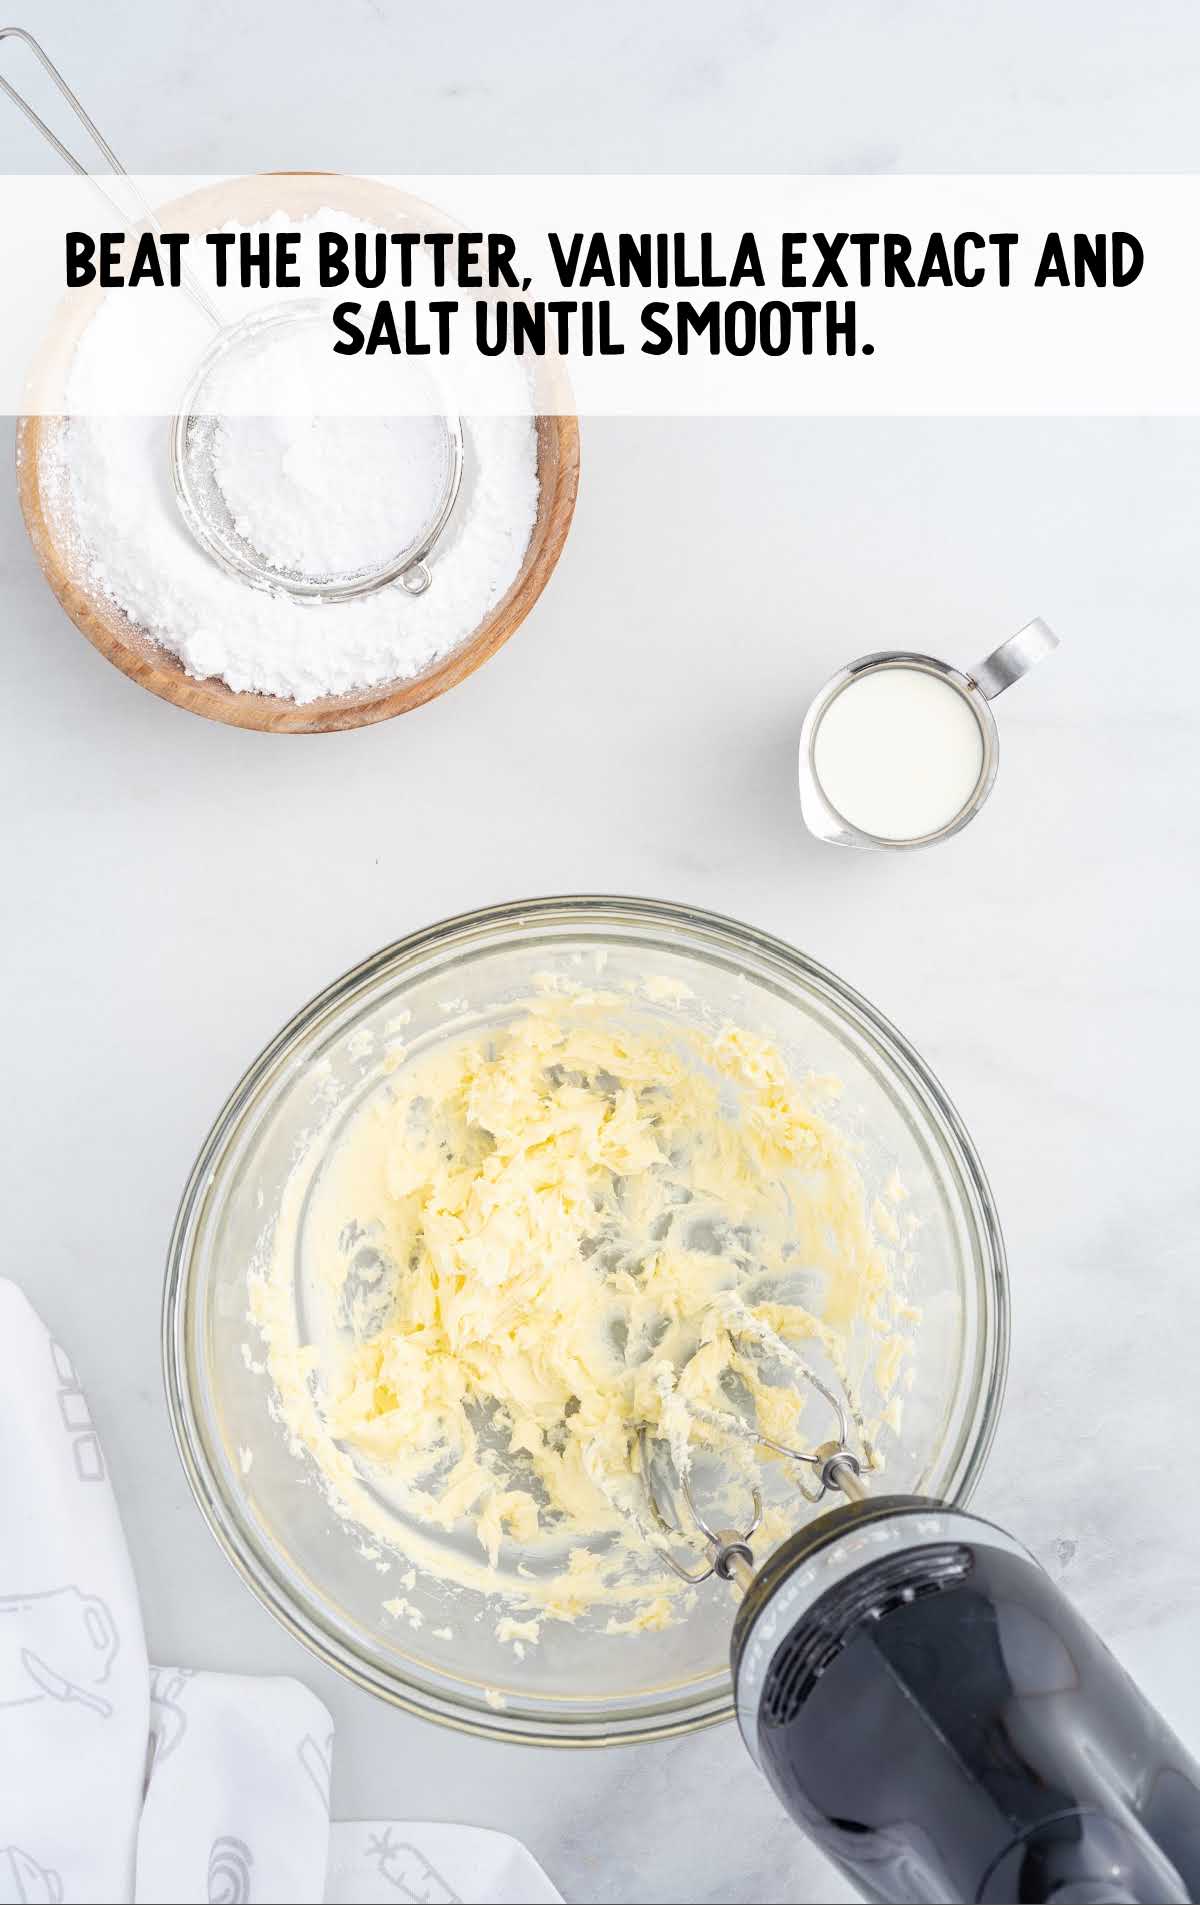
STEP ONE: Beat the softened butter, vanilla extract, and salt for 1 to 1½ minutes until smooth.
Use either a stand mixer or a medium-sized mixing bowl and a handheld mixer on medium-high speed.
STEP TWO: Lower the mixer speed to low and add half the powdered sugar and beat to incorporate.
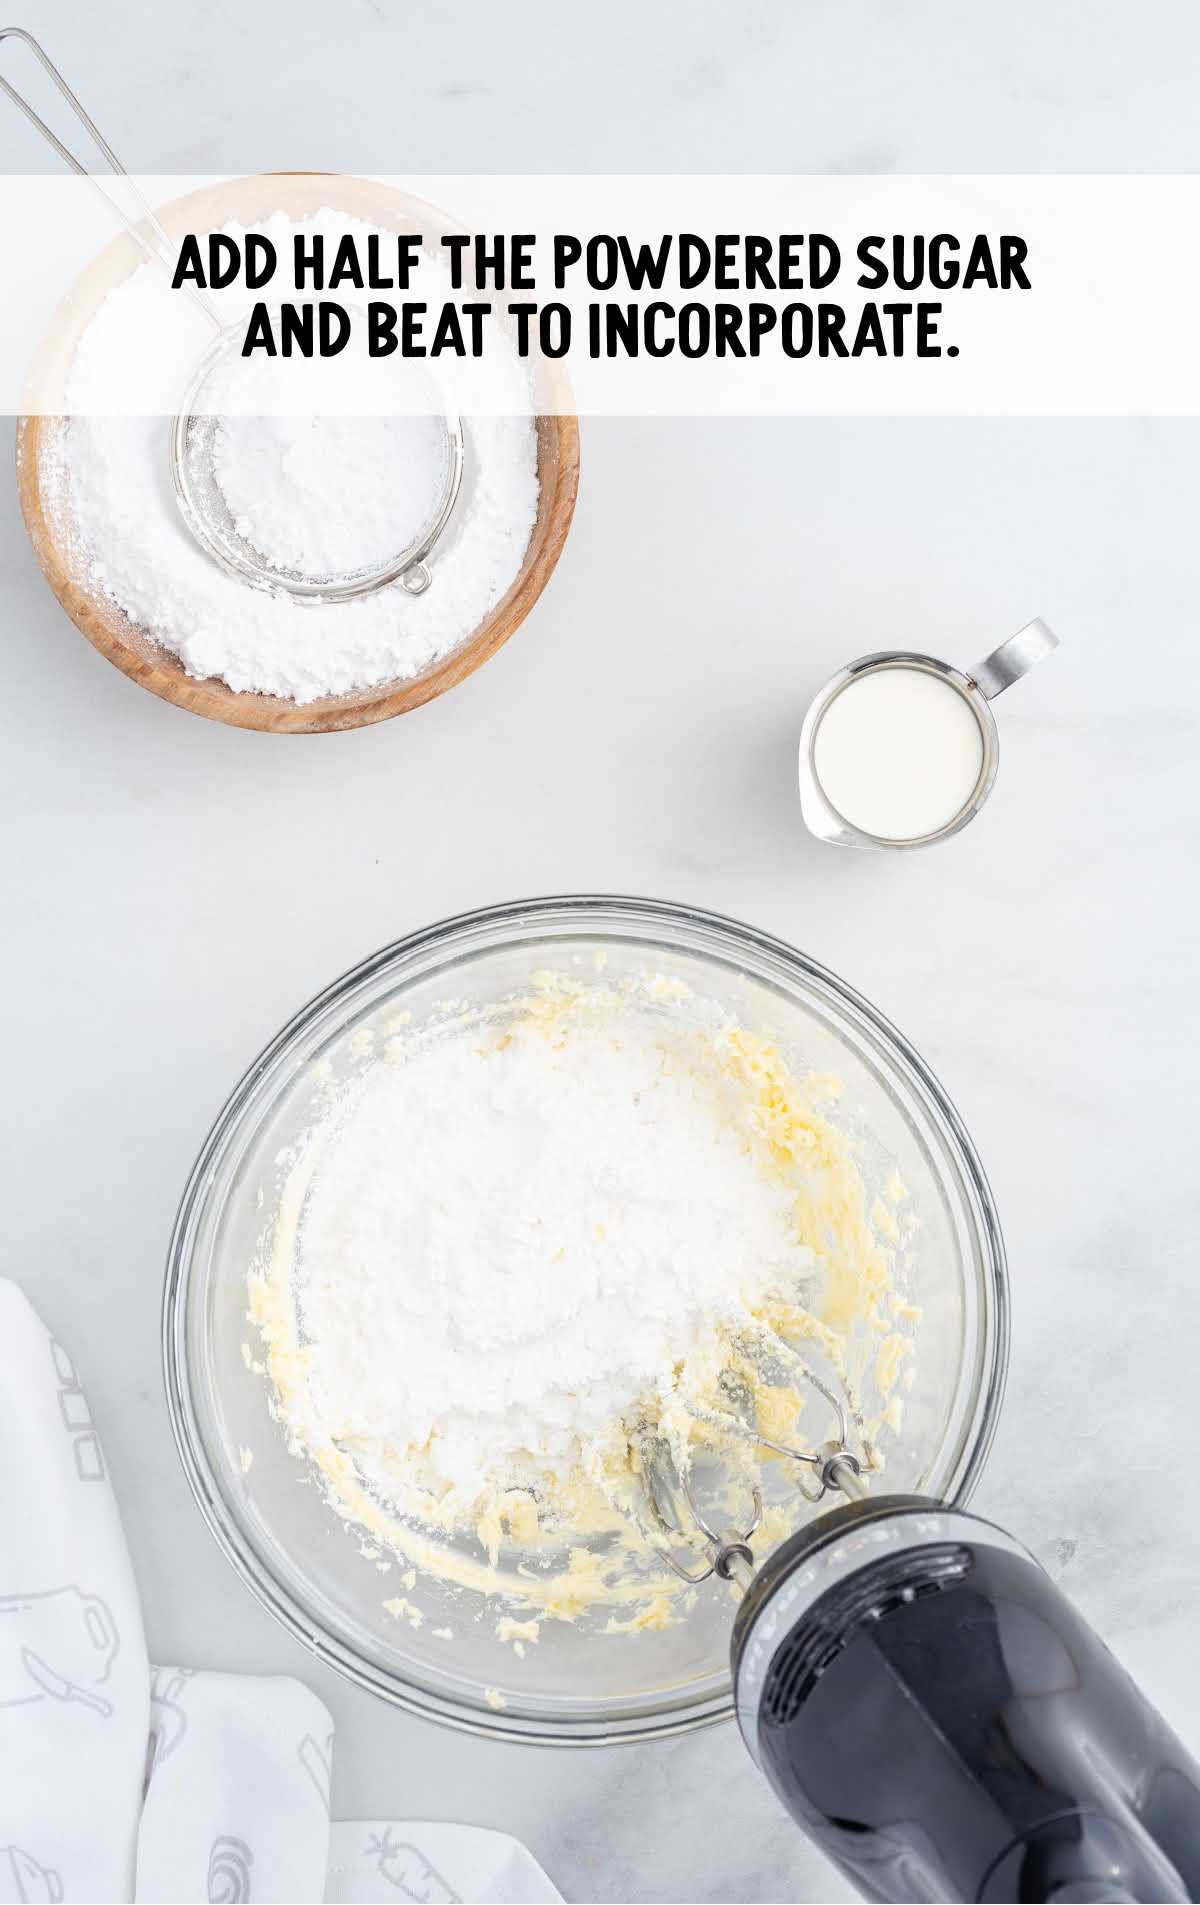
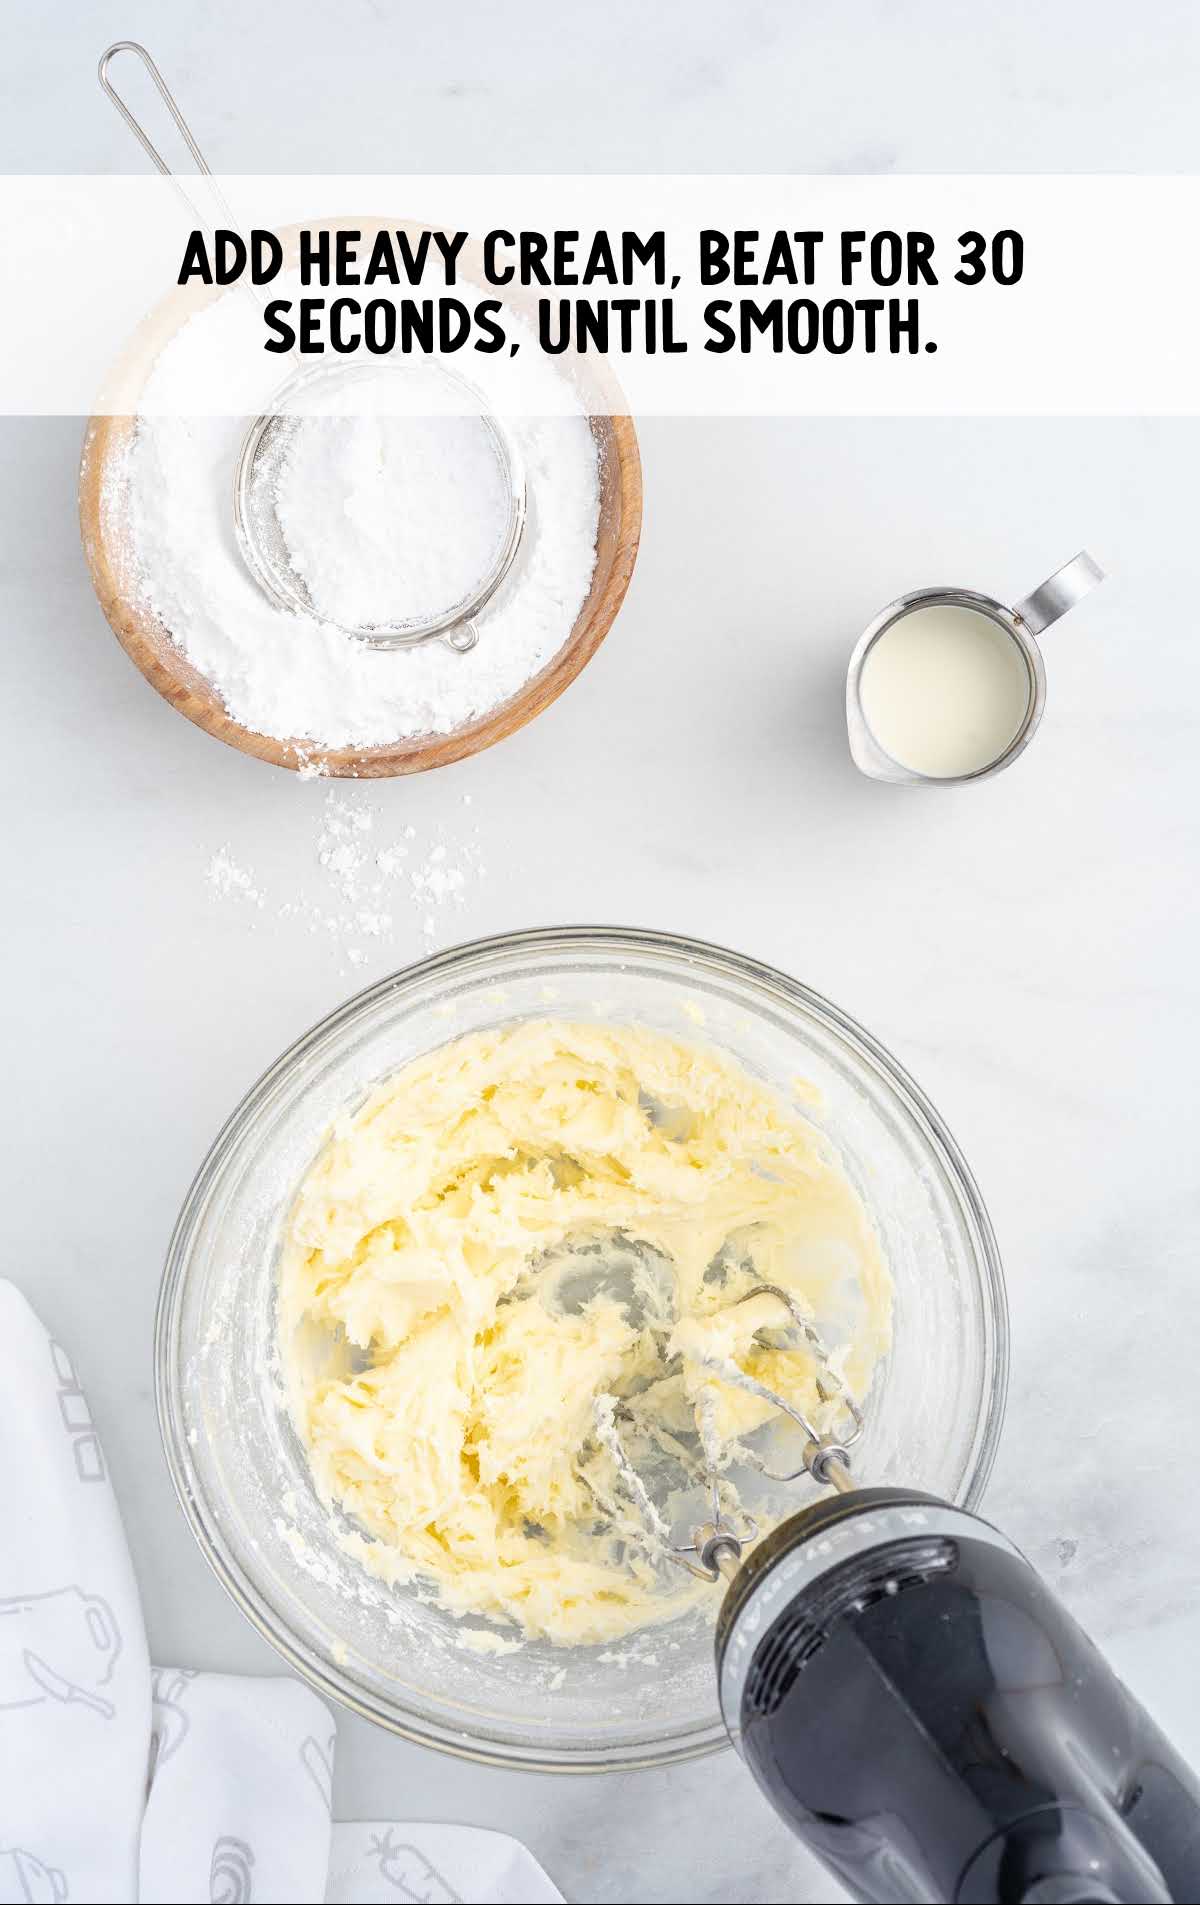
STEP THREE: Add half the heavy cream, beat for 30 seconds, then add the remaining half of the powdered sugar and heavy cream.
Beat for an additional two to three minutes until your buttercream is smooth.
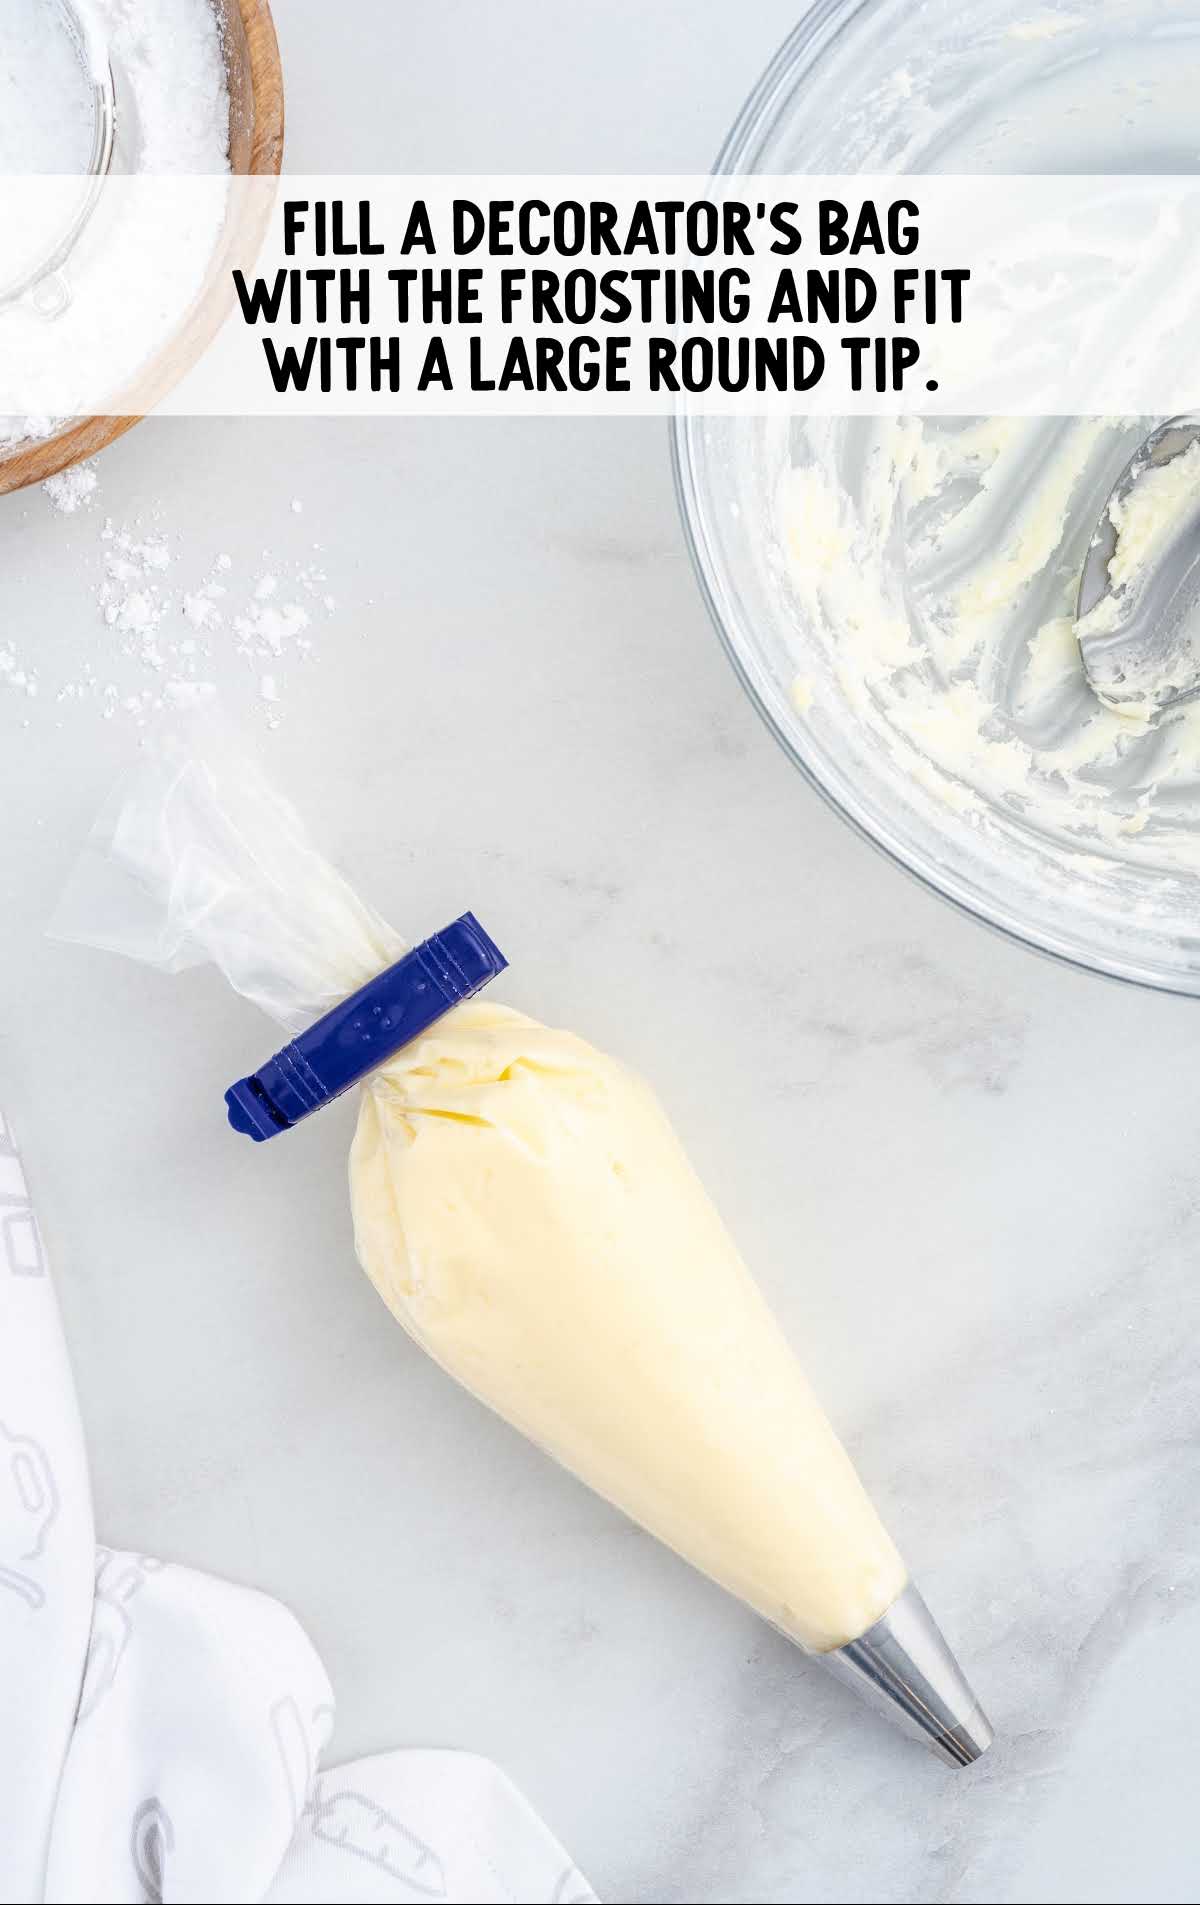
STEP FOUR: Using either a decorator’s bag with a large round tip or a gallon-size Ziploc bag with a large corner snipped off, fill the bag with the buttercream.
The opening of your piping tip, or the size of the hole snipped from the zip-top bag, should be about one inch in diameter to get a nice-sized line of buttercream when piped.
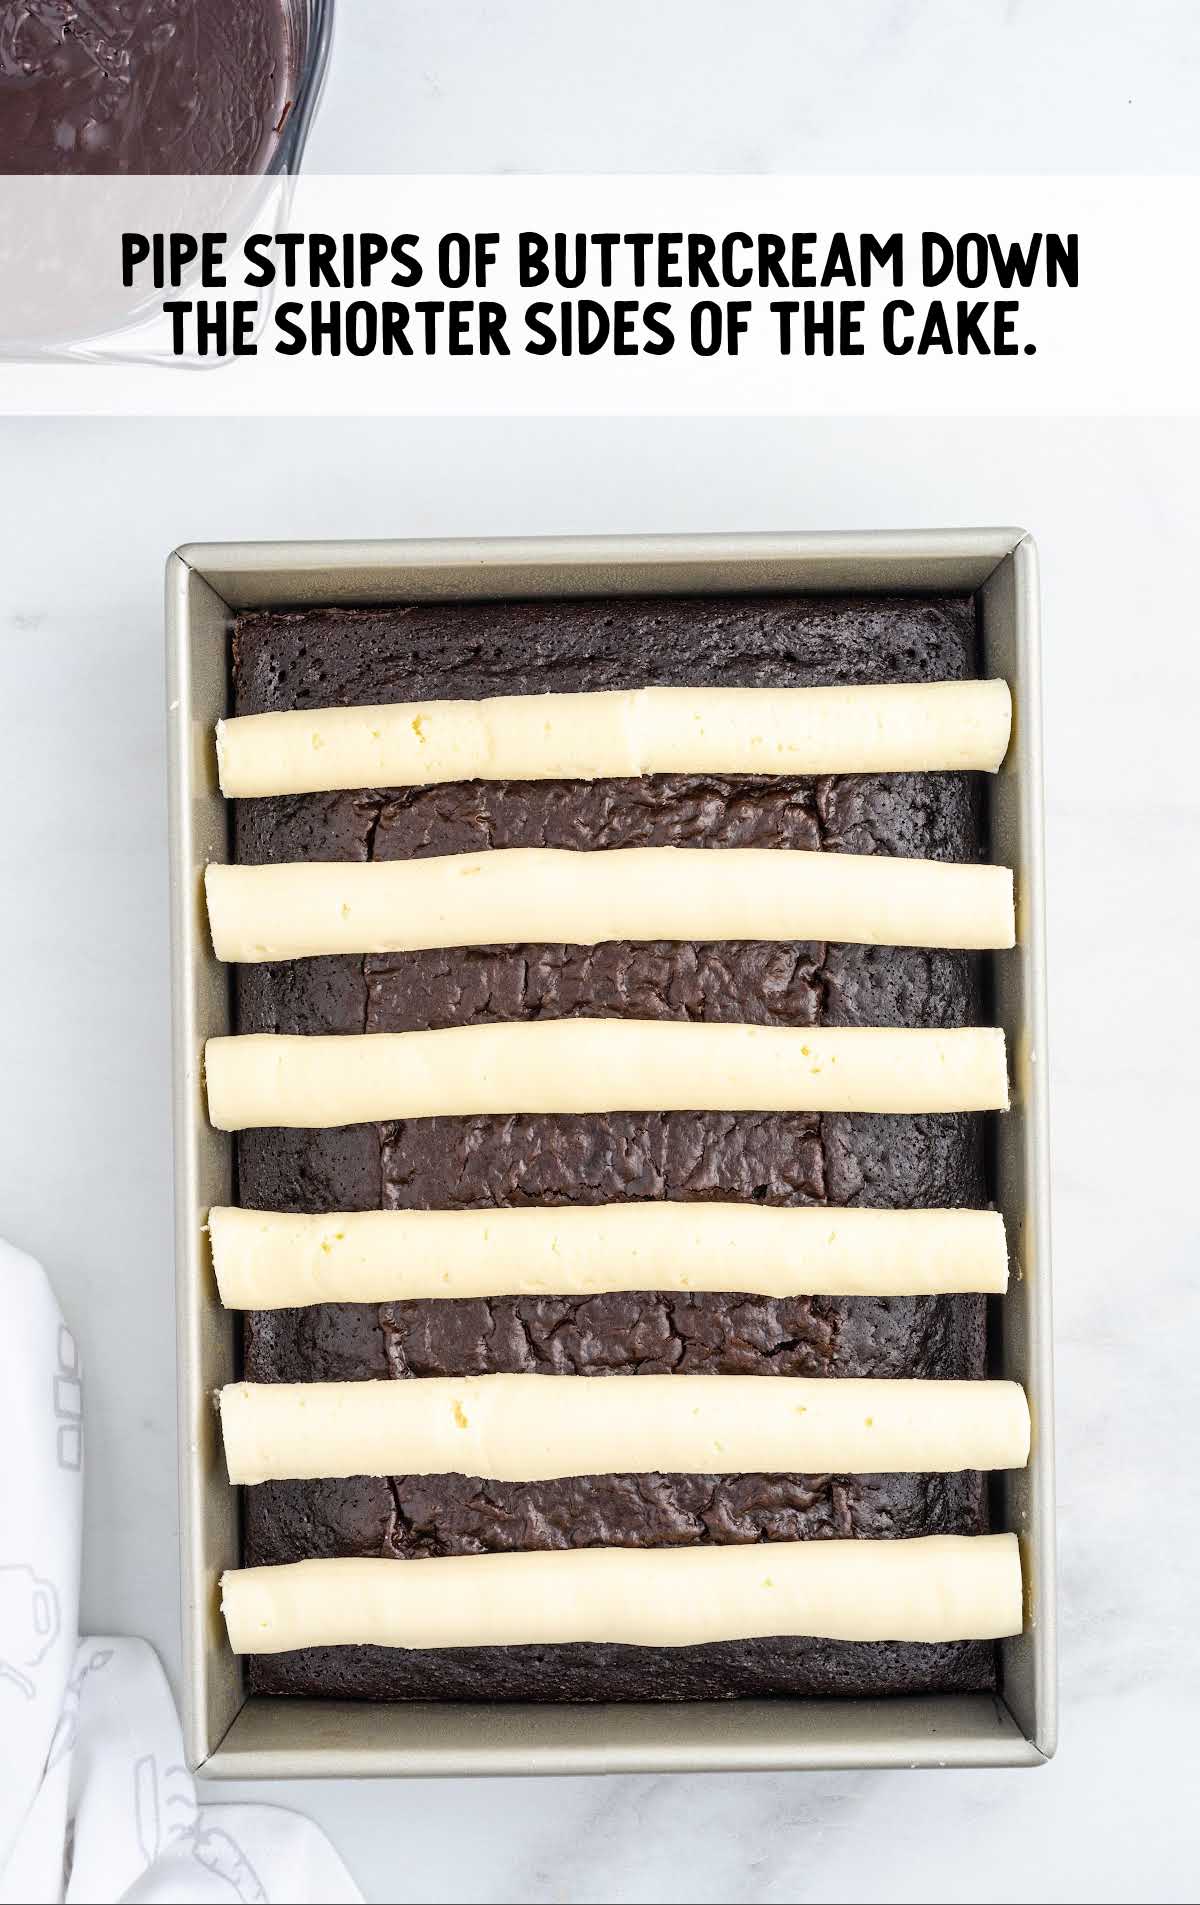
STEP FIVE: Remove the cake from the freezer. Pipe strips of buttercream down the shorter sides of the cake. Space one inch apart.
Depending on the thickness of the strips, you should be able to pipe six strips.
STEP SIX: Cover the cake and place it back in the freezer for 1½-2 hours to firm up the buttercream strips.
PRO TIP:
You do not want to skip the freezing of the buttercream step. This will ensure that when pouring the hot chocolate frosting over the buttercream strips that they do not melt. You do need to remember to work quickly though as the chocolate will start to set up quickly when it hits the cold cake and buttercream.
For The Chocolate Frosting
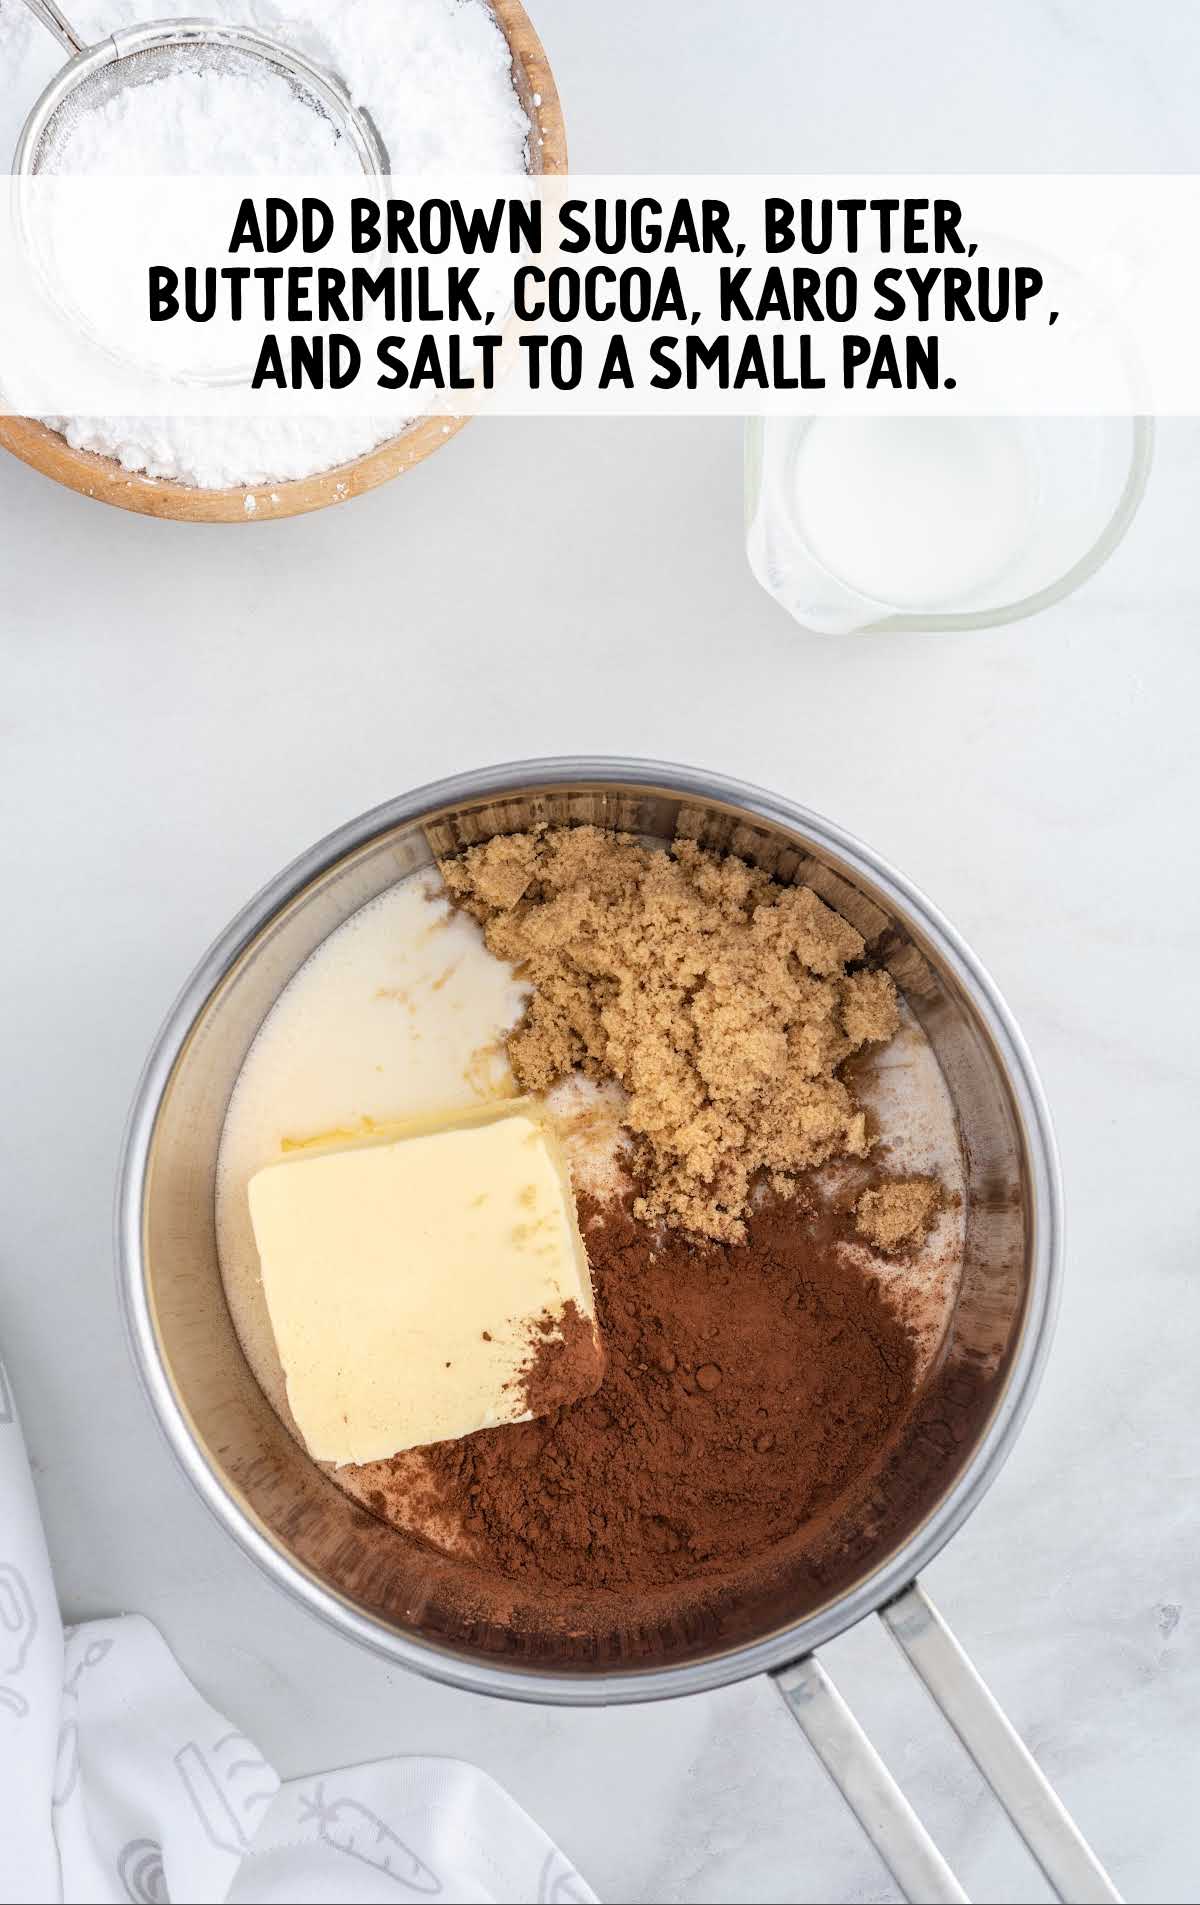
STEP ONE: In a medium saucepan, on medium-high heat, add the light brown sugar, unsalted butter, buttermilk, unsweetened cocoa powder, light Karo syrup, and salt.
STEP TWO: Bring the mixture to a boil, making sure to whisk it often so that your frosting doesn’t burn or clump. This will take about four to five minutes.
STEP THREE: Once your mixture reaches a rolling boil, continue to cook it for an additional three to four minutes or until your chocolate frosting reaches a temperature of 200 to 210°F on a candy thermometer.
Your frosting should start getting thick and should be very smooth.
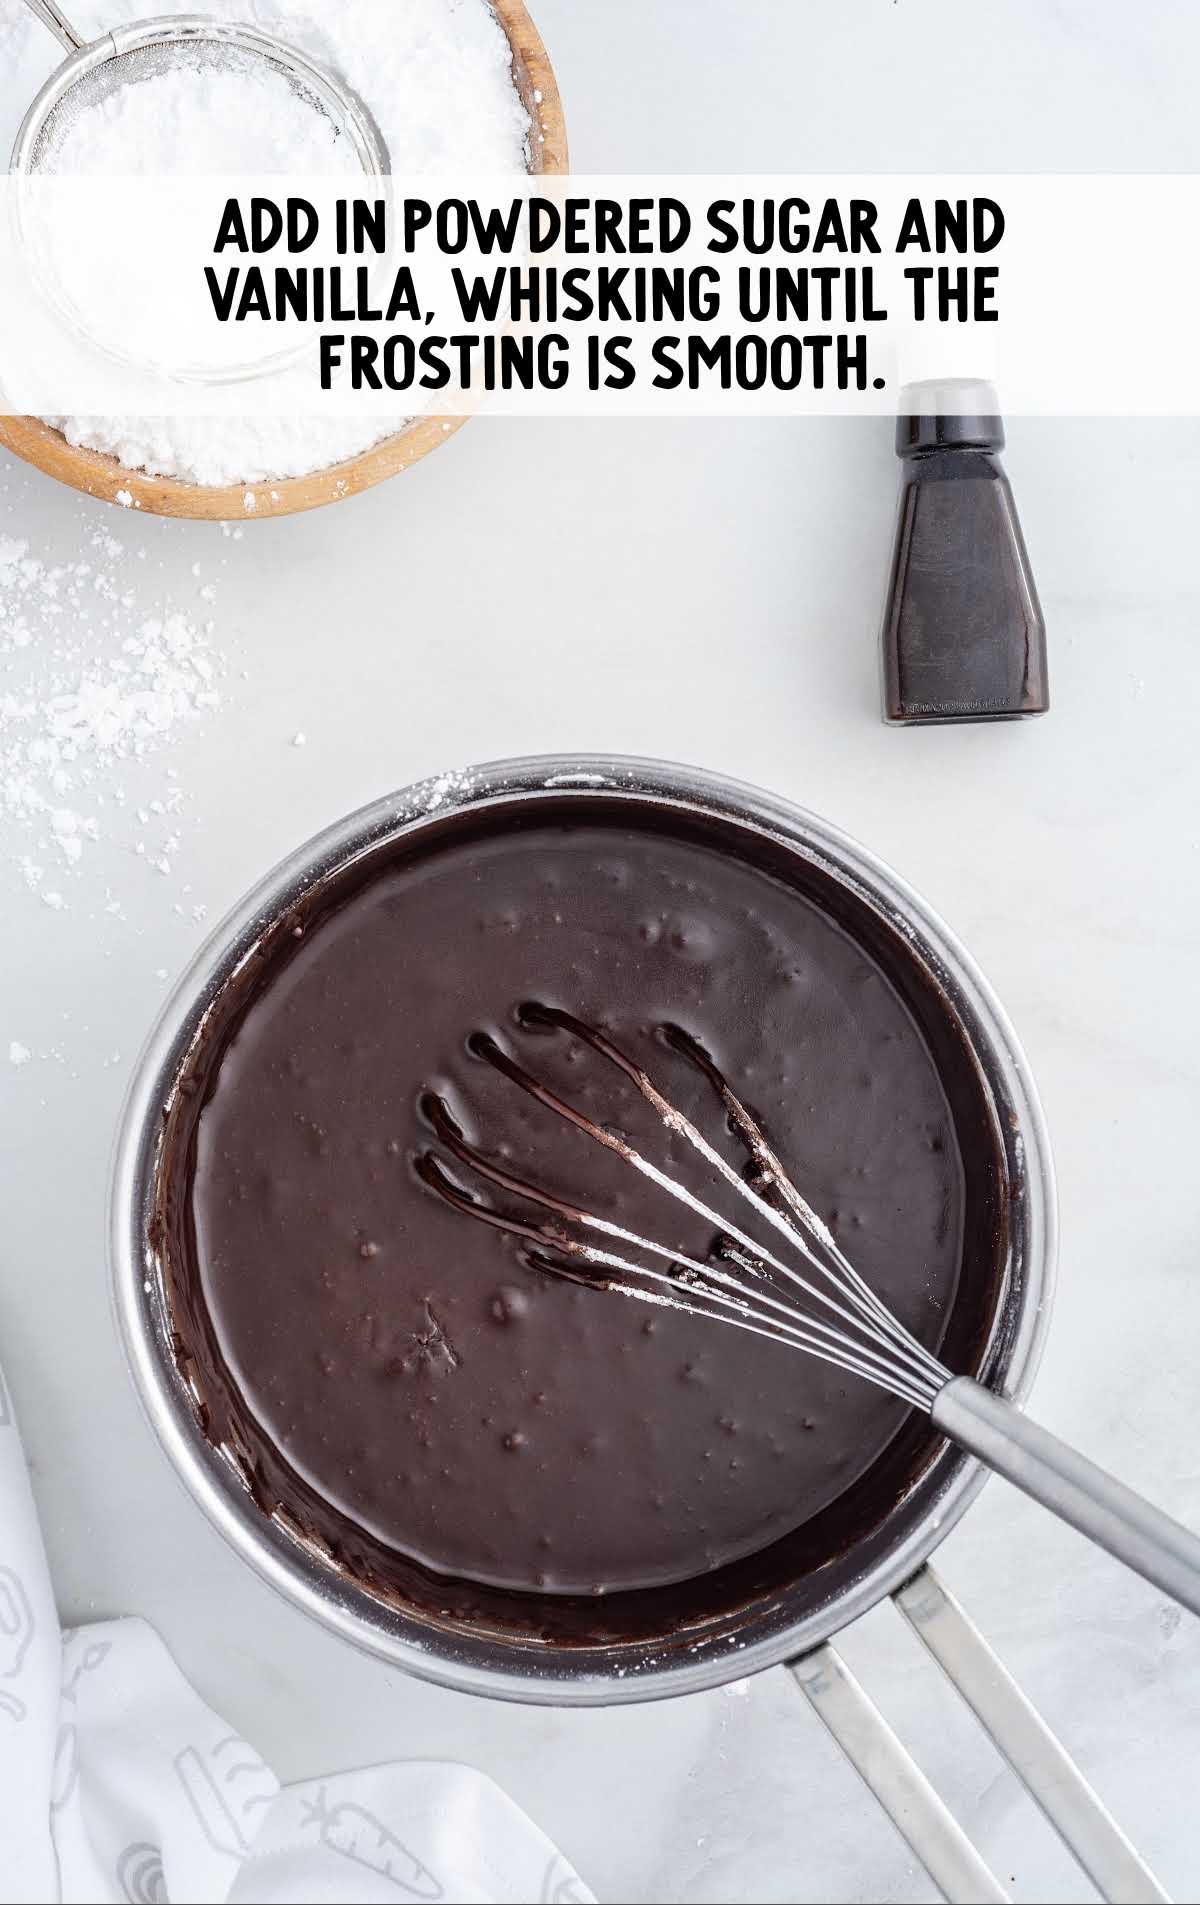
STEP FOUR: Turn the heat down to low and add your powdered sugar, one cup at a time, whisking until the frosting is smooth.
Once all the powdered sugar has been mixed in, add the vanilla extract and turn off the heat.
STEP FIVE: Transfer your chocolate frosting to a large bowl with a spout to cool slightly.
A 4-cup liquid measuring cup works great for this.
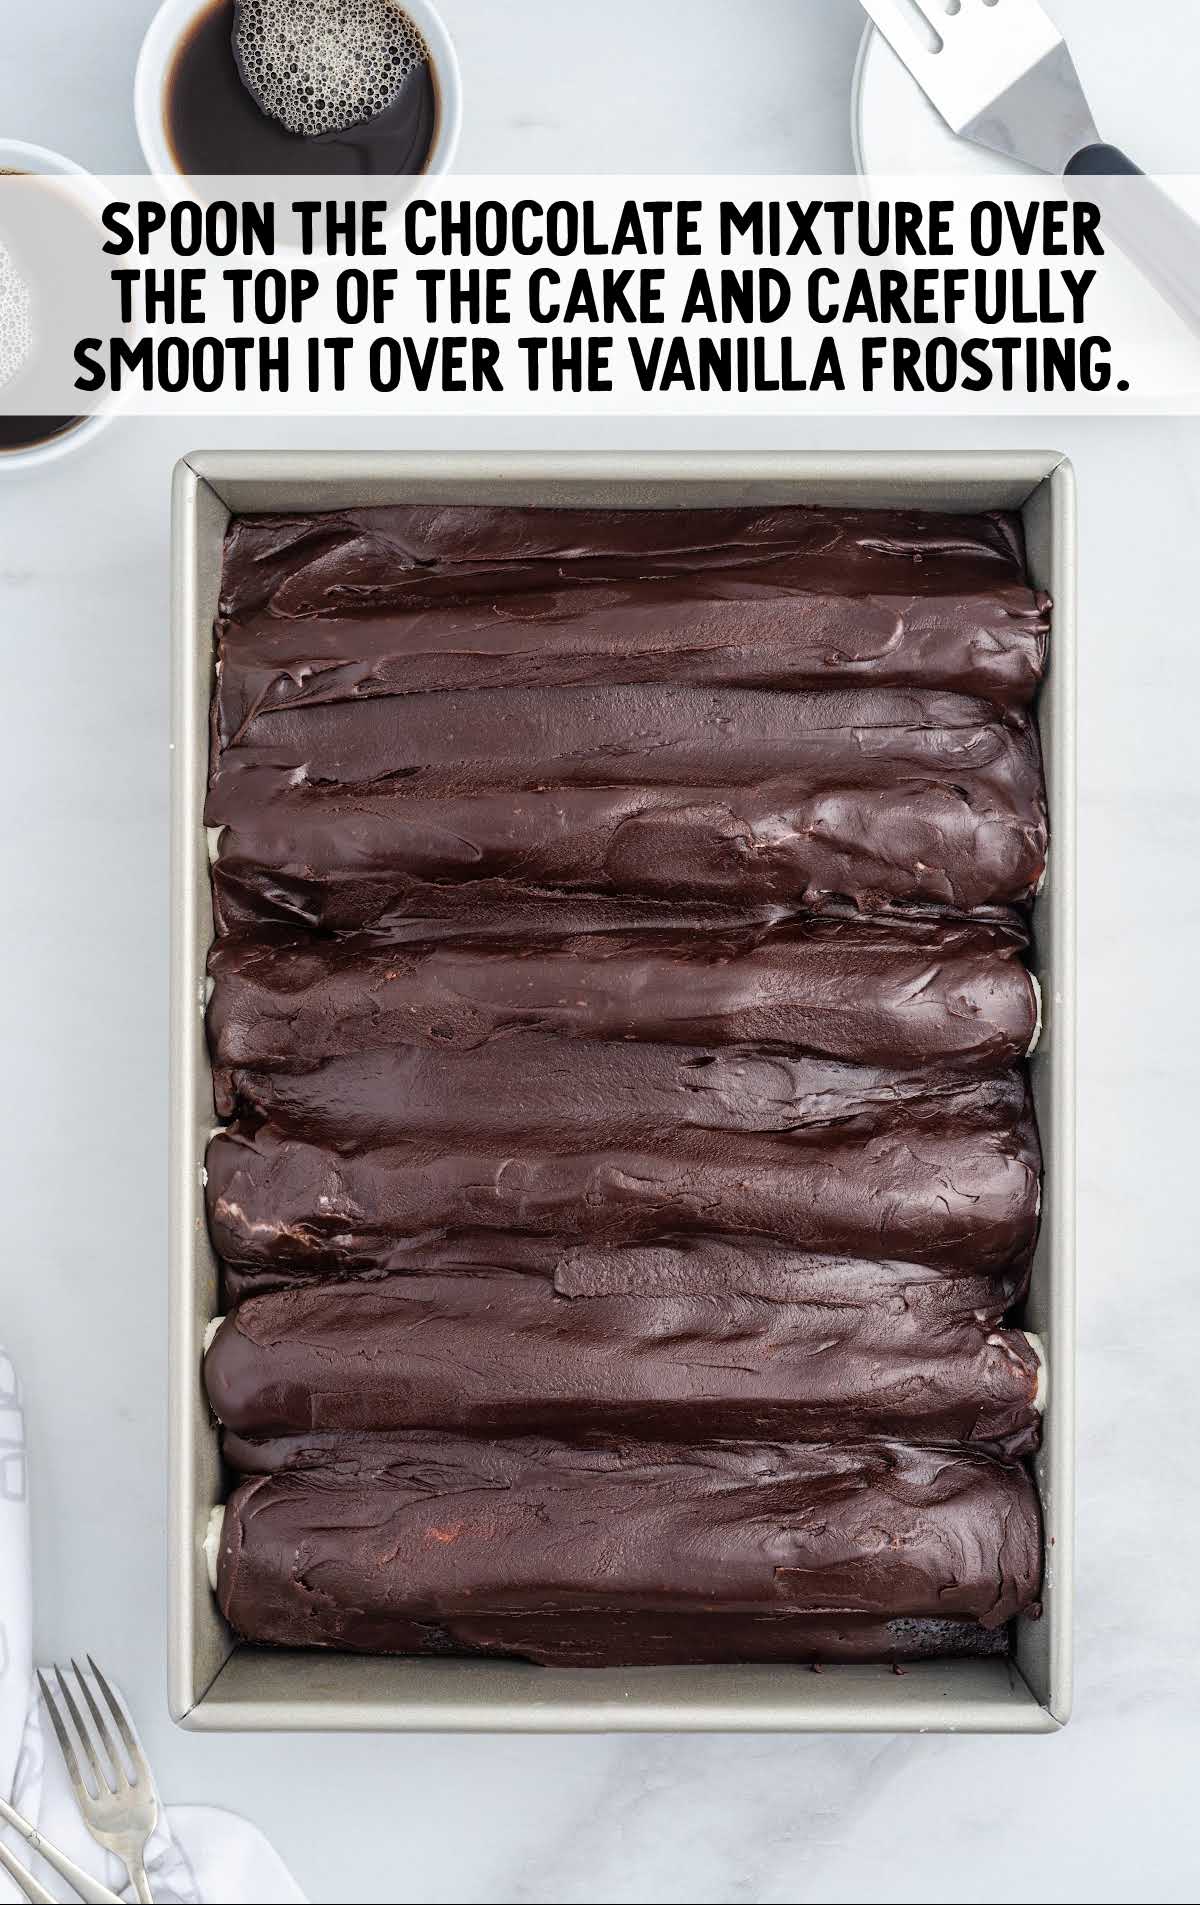
STEP SIX: Remove the cake from the freezer. Spoon the slightly cooled chocolate mixture over the top of the cake, paying close attention to covering the buttercream strips.
You can use a small spatula to carefully smooth the frosting to evenly cover the bumps and cake.
Place the cake into the refrigerator for 15 to 20 minutes to allow the chocolate to set up before slicing and serving.
How To Serve
This nostalgic cake is a fantastic treat to make for a birthday party or special occasion, especially for someone who grew up enjoying the original version from their local bakery.
Add a scoop of vanilla ice cream on the side for a delightfully indulgent dessert.
Add an extra layer of chocolatey goodness by drizzling hot fudge sauce over each slice. This indulgent touch enhances the cake’s richness.
Indulge in a mug of rich, homemade hot chocolate alongside your bumpy cake for a cozy treat.
For more vintage chocolate desserts, try our crazy cake and mayo cake
MORE CAKE RECIPES
Storage
Whether you want to make it ahead for a special occasion or save some for later, here’s a guide on how to store your bumpy cake.
MAKE AHEAD: Making bumpy cake ahead of time can be a real time-saver, especially if you have a busy schedule.
To do this, bake the cake as directed and let it cool completely. Once cooled, tightly wrap the whole cake or individual slices in plastic wrap or aluminum foil.
You can refrigerate it for up to two days or freeze it for longer storage.
IN THE FRIDGE: Store any leftovers of this sweet treat covered in the refrigerator for up to seven days.
IN THE FREEZER: You can freeze this rich and creamy cake for up to two months.
Why We Love This Recipe
This fun cake is a favorite for plenty of reasons, including:
DECADENT CHOCOLATE BLISS: This cake is a chocoholic’s dream come true. The rich and moist chocolate cake, combined with layers of creamy buttercream and a luscious chocolate frosting, delivers an indulgent chocolate experience that’s simply irresistible.
PERFECT FOR CELEBRATIONS: Bumpy cake is a showstopper dessert that’s sure to impress at birthdays, holidays, or any gathering. Its visually appealing layers and delectable taste make it the centerpiece of any celebration.
This moist chocolate cake is topped with ribbons of vanilla buttercream before fudge frosting is poured on top. It’s an old-fashioned treat that many midwesterners remember from childhood, and now you can recreate this bumpy cake at home.
Frequently Asked Questions
This delicious cake was originally created by Sanders Confectionary in Detroit, Michigan, in the early 1900s and has been a favorite of midwesterners ever since.
You can freeze this bumpy cake for up to two months.
In order for the vanilla buttercream “bumps” to set properly and hold their shape, you do need to make sure you are making time to freeze the cake at the appropriate times indicated.
More Recipes You’ll Love


Bumpy Cake
Ingredients
Chocolate Cake
- 15.25 ounces dark chocolate fudge cake mix (I used Duncan Hines brand)
- ¾ cup unflavored brewed coffee, cooled to room temperature
- ¾ cup whole milk
- ½ cup vegetable oil
- ½ cup sour cream
- 1 teaspoon vanilla extract
- 4 large eggs, room temperature
Buttercream Filling
- ¾ cup sweet cream butter, room temperature
- 1½ teaspoons vanilla extract
- ¼ teaspoon salt
- 3 cups powdered sugar, sifted
- 4 tablespoons heavy cream
Chocolate Frosting
- 1 cup light brown sugar, lightly packed
- ¾ cup unsalted butter, room temperature
- ⅔ cup buttermilk
- ½ cup unsweetened cocoa powder
- ¼ cup light karo, corn syrup
- ½ teaspoon salt
- 3 cups powdered sugar, sifted
- 1½ teaspoons vanilla extract
Instructions
Chocolate Cake
- Preheat the oven to 350°F. Spray a 9×13 metal baking dish with baking spray (Baker’s Joy or a generic version). Set it aside.
- Using a medium-sized mixing bowl and a handheld mixer on medium speed, beat together the cake mix, coffee, milk, vegetable oil, sour cream and vanilla extract. Beat just until combined.
- Reduce the mixer speed to low. Add the eggs, one at a time, and beat just until all the eggs are incorporated. Scrape down the sides and bottom of the bowl to ensure that the batter is smooth and well mixed.
- Pour the cake batter into the prepared baking dish and bake for 30 minutes, or until a toothpick inserted comes away clean. Allow the cake to cool for 30 minutes on the counter then place the cake into the freezer while you make the buttercream filling.
Buttercream Filling
- Using either a stand mixer, or a medium size mixing bowl and a handheld mixer on medium-high speed, beat the softened butter, vanilla extract, and salt for 1 to 1½ minutes, until smooth.
- Lower the mixer speed to low and add half the powdered sugar and beat to incorporate.
- Add half the heavy cream, beat for 30 seconds, then add the remaining half of the powdered sugar and heavy cream and beat for an additional 2 to 3 minutes until your buttercream is smooth.
- Using either a decorator’s bag with a large round tip, or a gallon-size ziploc baggie with a large corner snipped off, fill the bag with the buttercream. The opening of your piping tip, or the size of the hole snipped from the zip-top bag, should be about 1-inch in diameter to get a nice sized line of buttercream when piped.
- Remove the cake from the freezer. Pipe strips of buttercream down the shorter sides of the cake. Space 1 inch apart. Depending on the thickness of the strips you should be able to pipe 6 strips.
- Cover the cake and place back in the freezer for 1½ to 2 hours to firm up the buttercream strips.
Chocolate Frosting
- In a medium-sized saucepan, on medium-high heat, add the light brown sugar, unsalted butter, buttermilk, unsweetened cocoa powder, light karo syrup and salt.
- Bring the mixture to a boil (this will take about 4 to 5 minutes), making sure to whisk it often so that your frosting doesn’t burn or clump.
- Once your mixture reaches a rolling boil, then you will want to continue to cook it for an additional 3 to 4 minutes or until your chocolate frosting reaches a temperature of 200 to 210°F on a candy thermometer. Your frosting should start getting thick and should be very smooth.
- Turn the heat down to low and add your powdered sugar, one cup at a time, whisking until the frosting is smooth. Once all the powdered sugar has been mixed in, add the vanilla extract and turn off the heat.
- Transfer your chocolate frosting to a large spouted bowl to slightly cool. A 4 cup liquid measuring cup works great for this.
- Remove the cake from the freezer. Spoon the slightly cooled chocolate mixture over the top of the cake, paying close attention to covering the buttercream strips. You can use a small spatula to carefully smooth the frosting to evenly cover the bumps and cake. Place the cake into the refrigerator for 15 to 20 minutes to allow the chocolate to set-up before slicing and serving.
Notes
- DO NOT use a glass baking dish for this recipe. Since you will be placing a warm cake into a freezer and then also pouring hot chocolate frosting over a frozen cake, you do not want to risk the glass pan being shocked by the extreme changes in temperatures as this can cause the glass dish to crack and break.
- Do not skip chilling the cake. This is important to ensure it is the right temperature for the next layers to set on top.
- You do not want to skip the freezing of the buttercream step. This will ensure that when pouring the hot chocolate frosting over the buttercream strips that they do not melt. You do need to remember to work quickly though as the chocolate will start to set up quickly when it hits the cold cake and buttercream.
Nutrition


Comments
Mila says
I can remember my grandmother making this – delicious!
Nancy says
Instead of buttercream strips, I would like to spread it, then follow with the chocolate. Is the buttercream recipe enough to frost the entire cake?
Layne Kangas says
Hi, Nancy – I think you would need to increase the amount of buttercream for it to be enough to do the entire cake. Enjoy!
Charlotte Moore says
I have never seen or heard of this cake. Interesting!!! I am sure it is delicious if the person loves chocolate.