


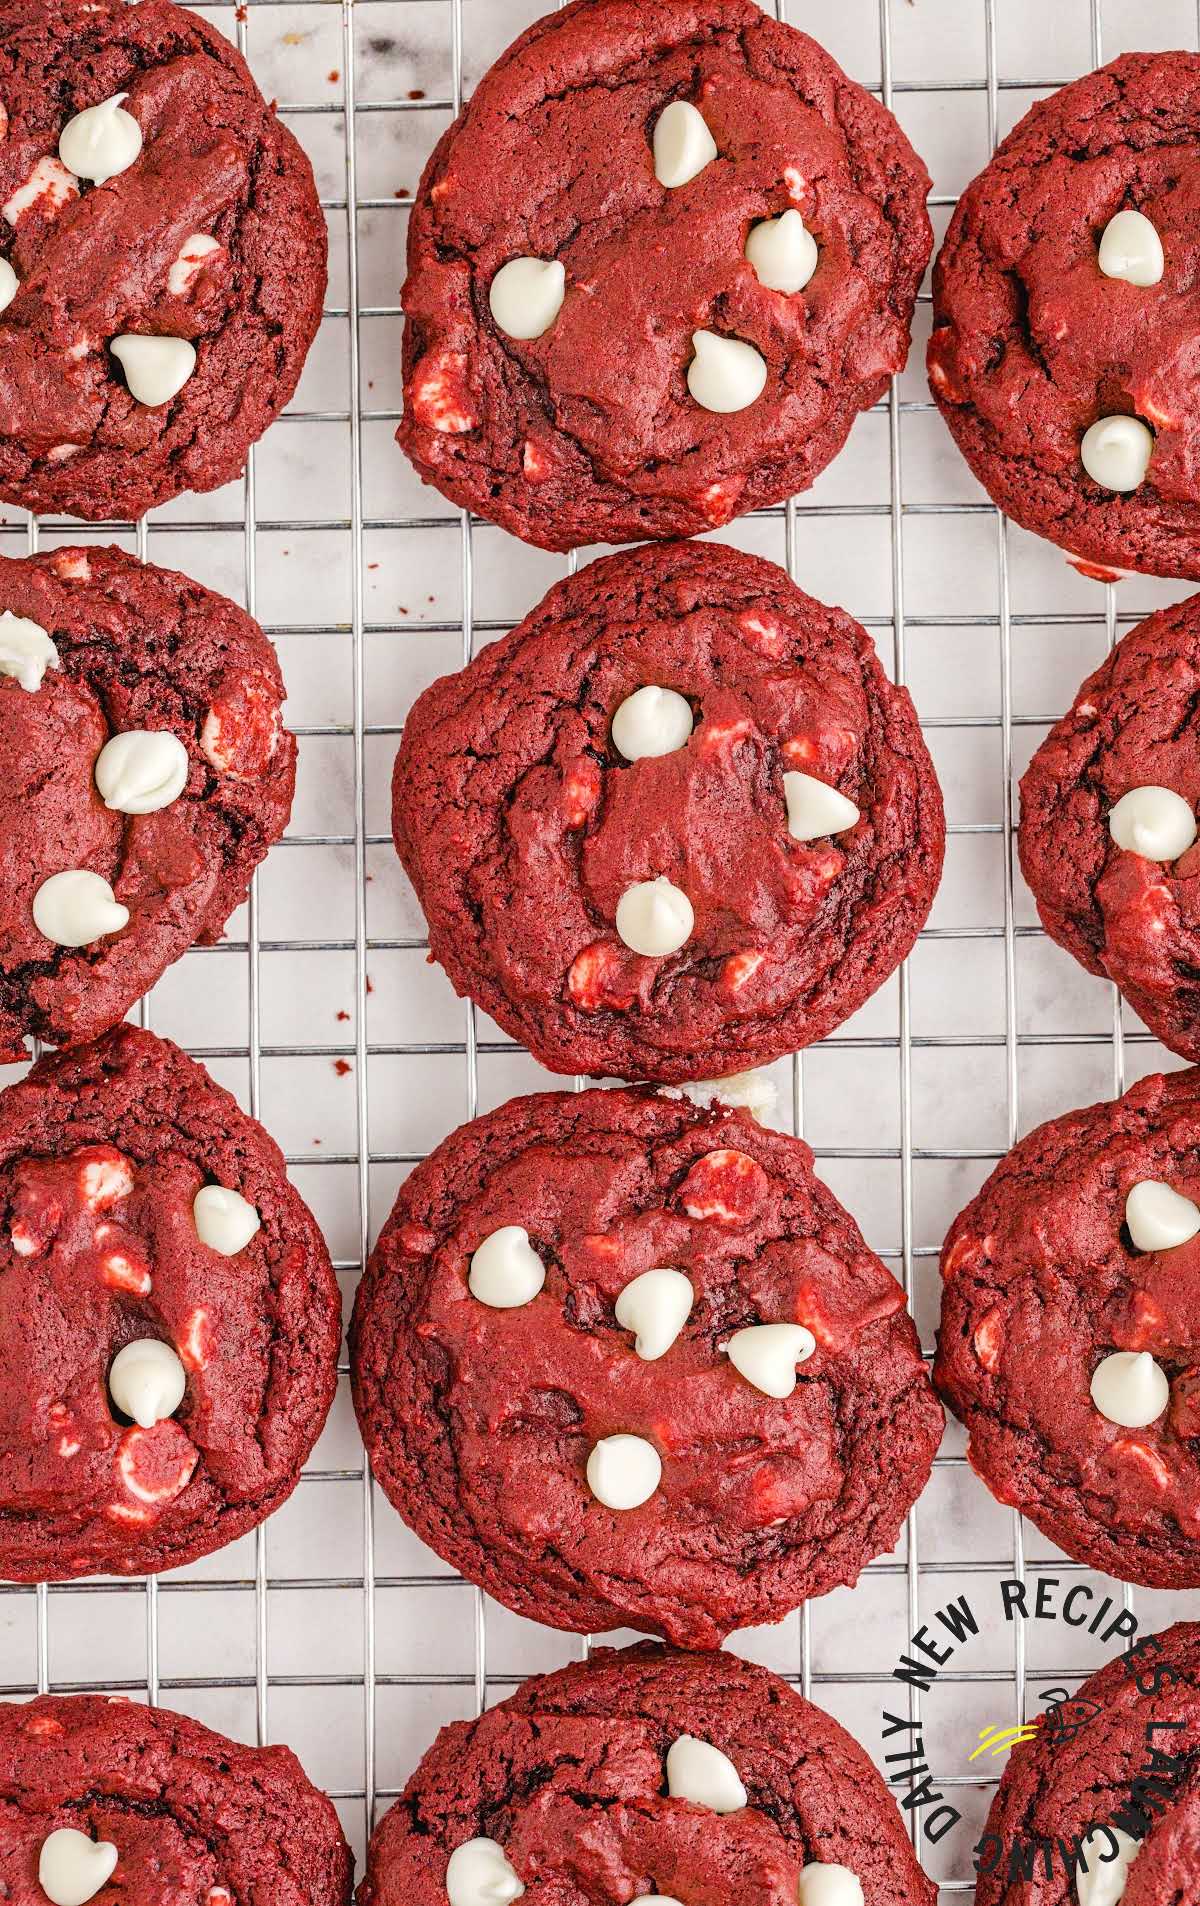
These pretty red velvet cookies are the ideal treats to make for a holiday season cookie exchange or a thoughtful Valentine’s Day gift for your loved one. Inspired by the classic red velvet cake, simple ingredients combine to create delicious, chewy cookies full of bursts of sweet white chocolate flavor and vibrant red color.

Red Velvet Cookie Ingredients
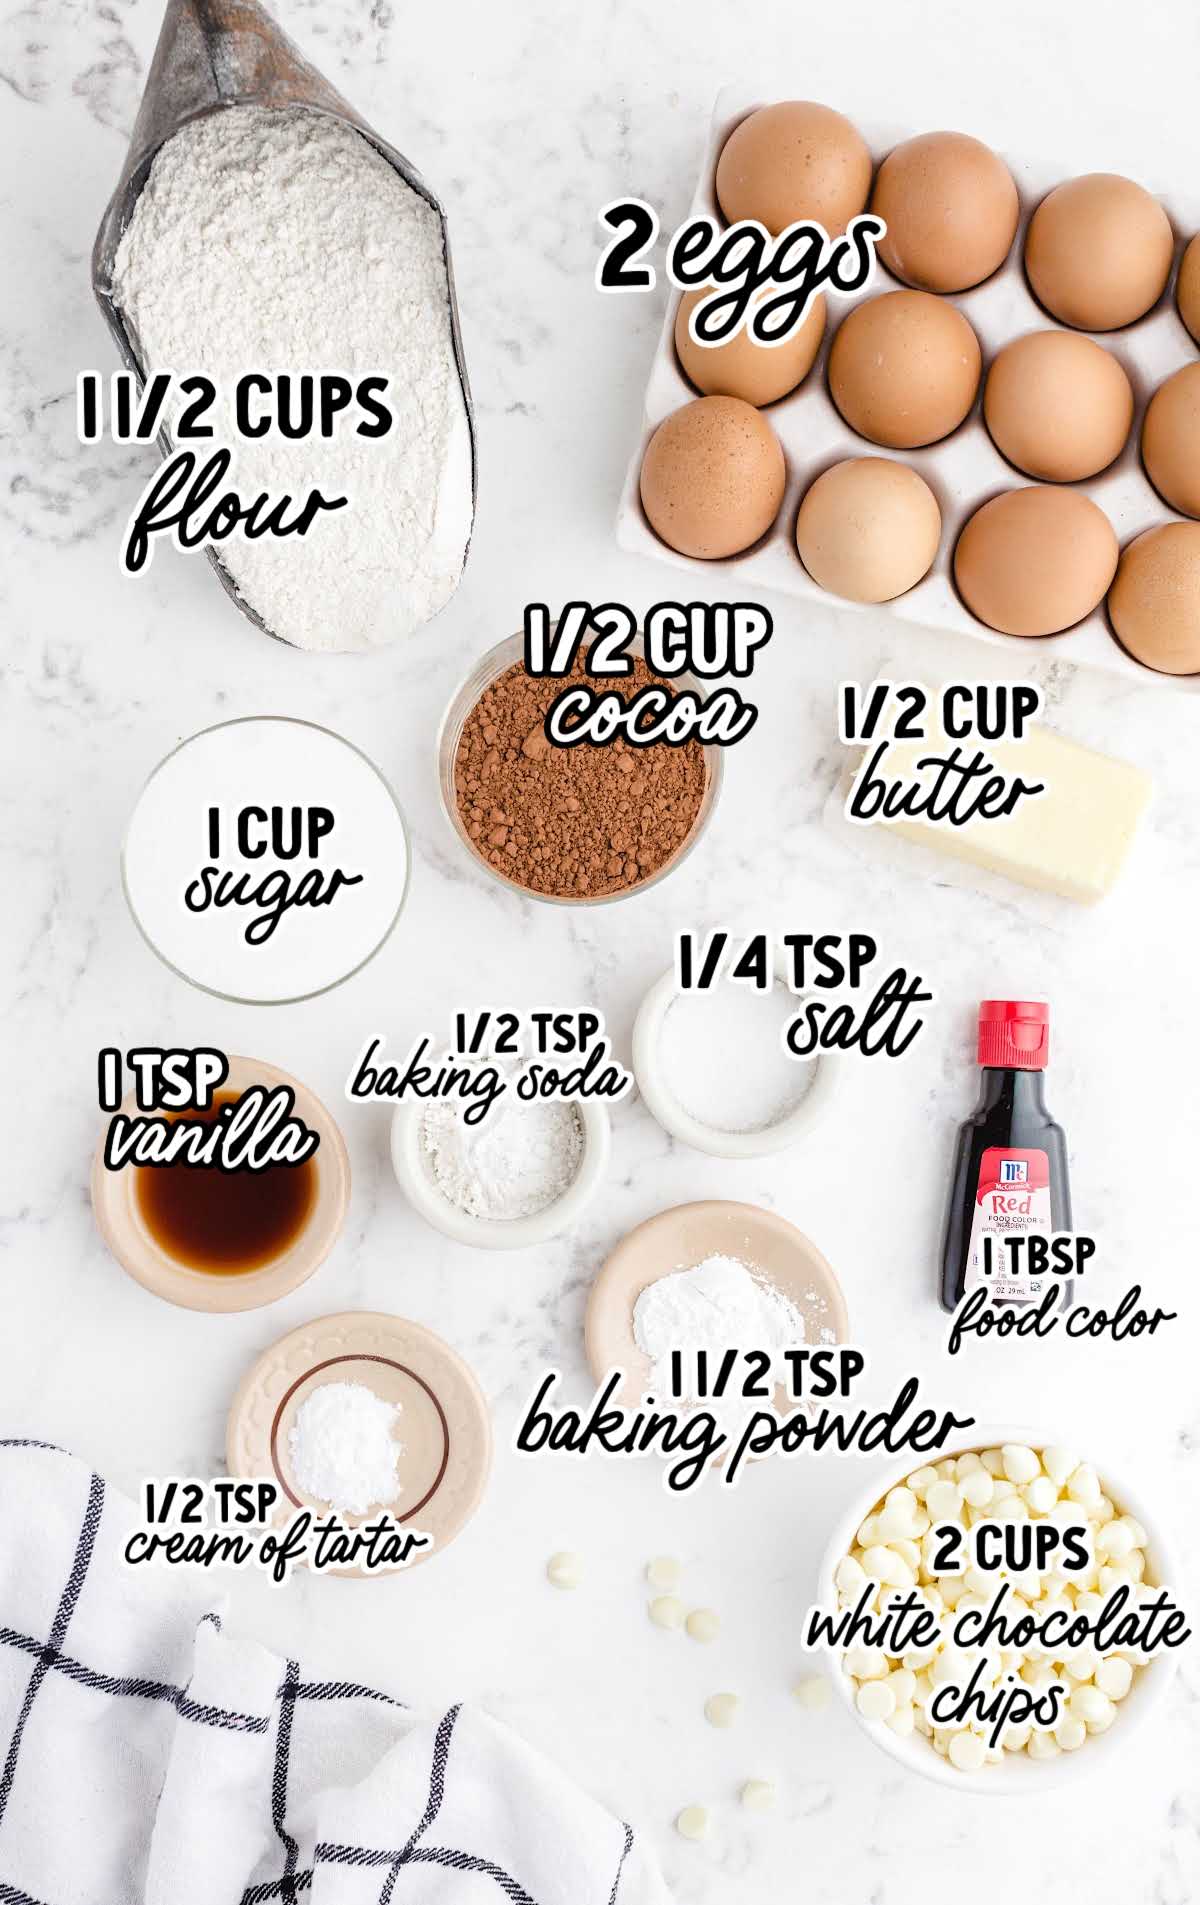
This red velvet cookie recipe features a rich cocoa undertone with a deep red hue, balanced sweetness from butter and sugar, and pockets of creamy white chocolate chips that provide a delightful crunch.
The result is a delicious combination of sweet, buttery, and cocoa flavors with a light, cake-like texture.
You will need:
- 1½ cups of all-purpose flour
- ½ cup of unsweetened cocoa powder
- ¼ teaspoon of salt
- ½ teaspoon of baking soda
- 1½ teaspoons of baking powder
- ½ teaspoon of cream of tartar
- ½ cup of salted butter, softened
- 1 cup of granulated sugar
- 2 eggs
- 1 teaspoon of vanilla extract
- 1 tablespoon of red food coloring, liquid or gel
- 2 cups of white chocolate chips, divided in half
Substitutions And Additions
CREAM OF TARTAR: If you don’t have this, you can add ¾ teaspoon of extra baking powder instead.
GRANULATED SUGAR: Light brown sugar would also work for this recipe without too much difference in taste.
RED FOOD COLORING: If you’d rather avoid artificial colors, you could opt to color your cookies with ¼ cup of beet juice.
WHITE CHOCOLATE CHIPS: You could use regular chocolate chips if you prefer, but we think the white ones look pretty and just like cream cheese frosting that you’d find on a red velvet cake.
VANILLA EXTRACT: While vanilla extract adds a lovely aroma, you can experiment with different extracts for unique flavor profiles.
Try almond extract for a nutty twist or peppermint extract for a refreshing minty flavor.
How To Make Red Velvet Cookies
Let’s get started making the easy cookie dough for these delectable cookies.
STEP ONE: Preheat the oven to 350°F. Line two baking sheets with parchment paper or grease lightly. Set aside.
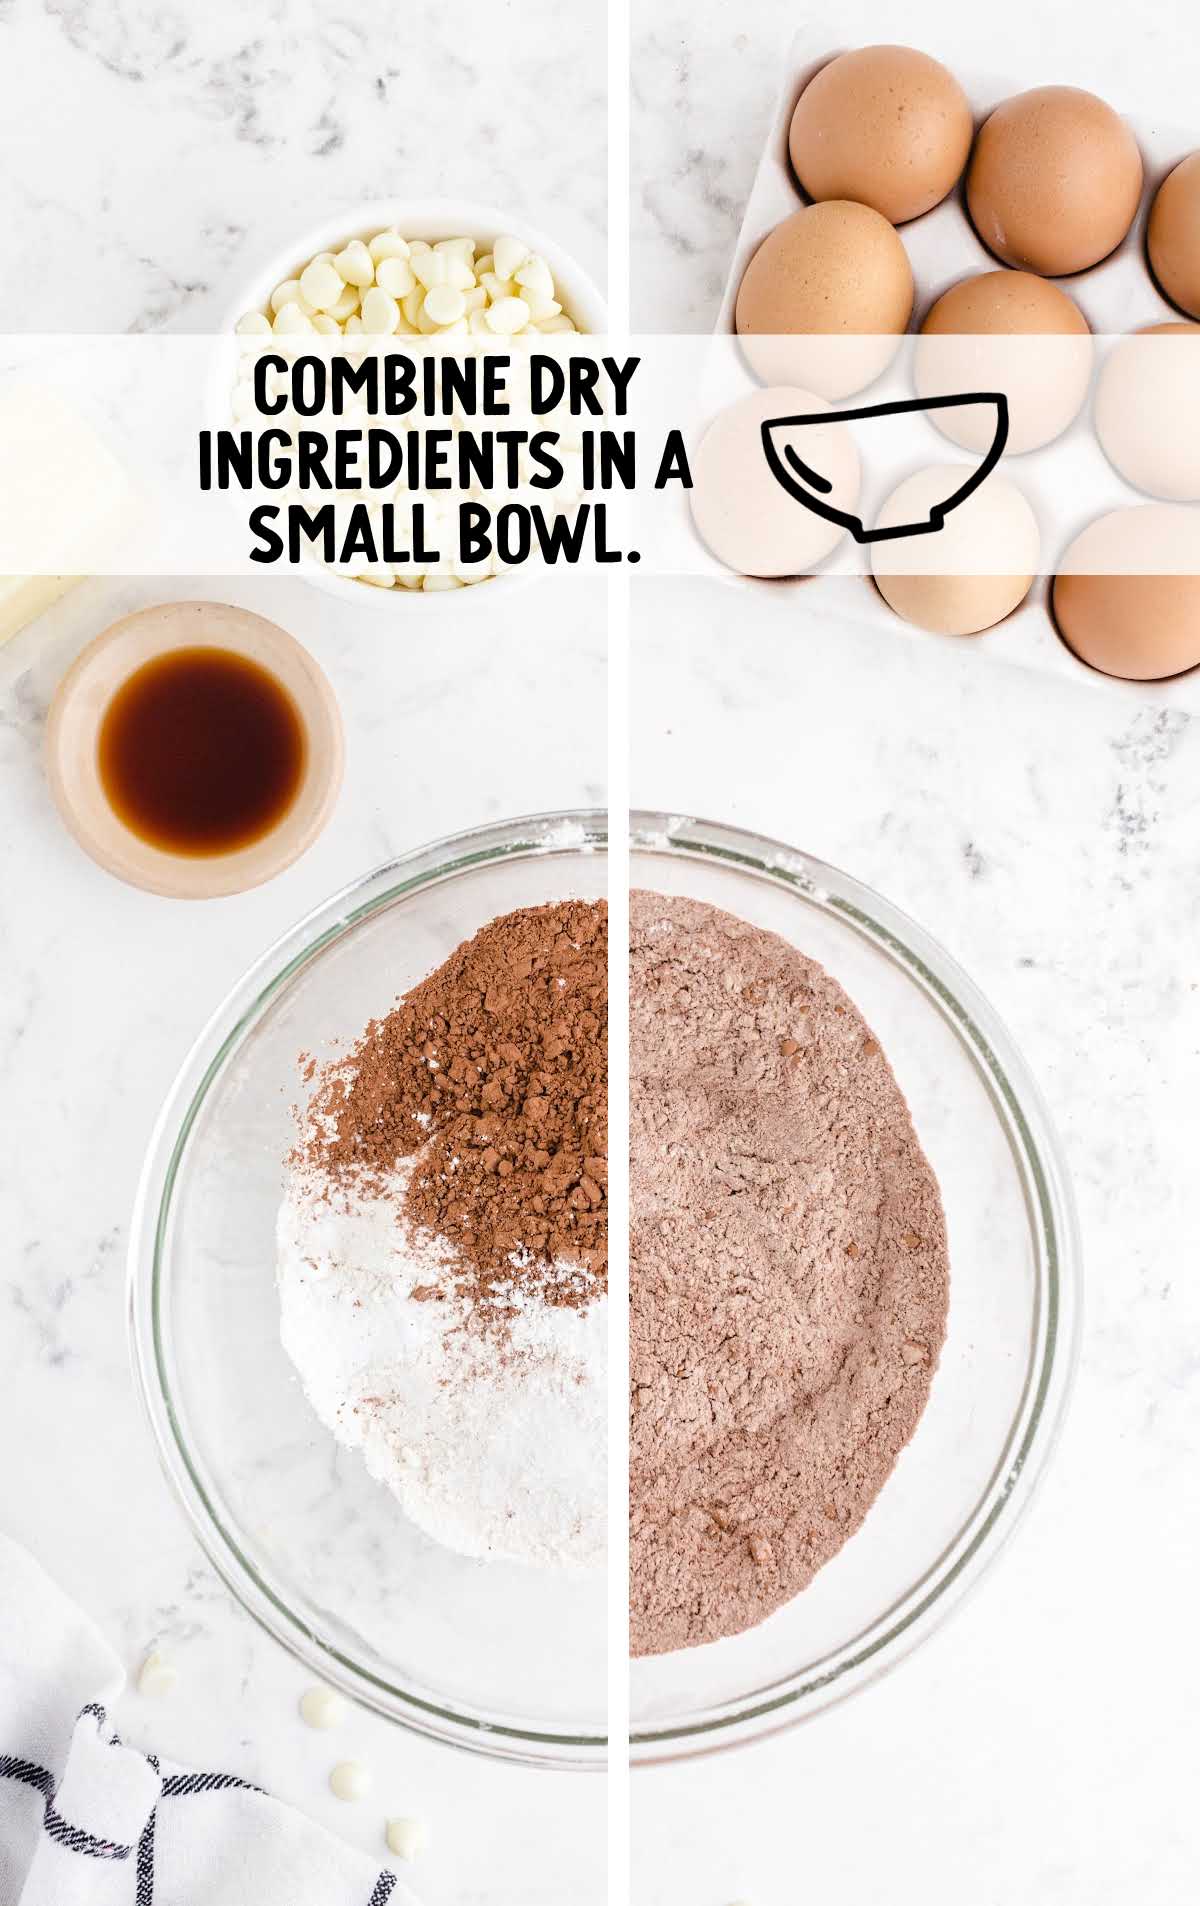
STEP TWO: In a small bowl, combine the flour, cocoa powder, salt, baking soda, baking powder, and cream of tartar.
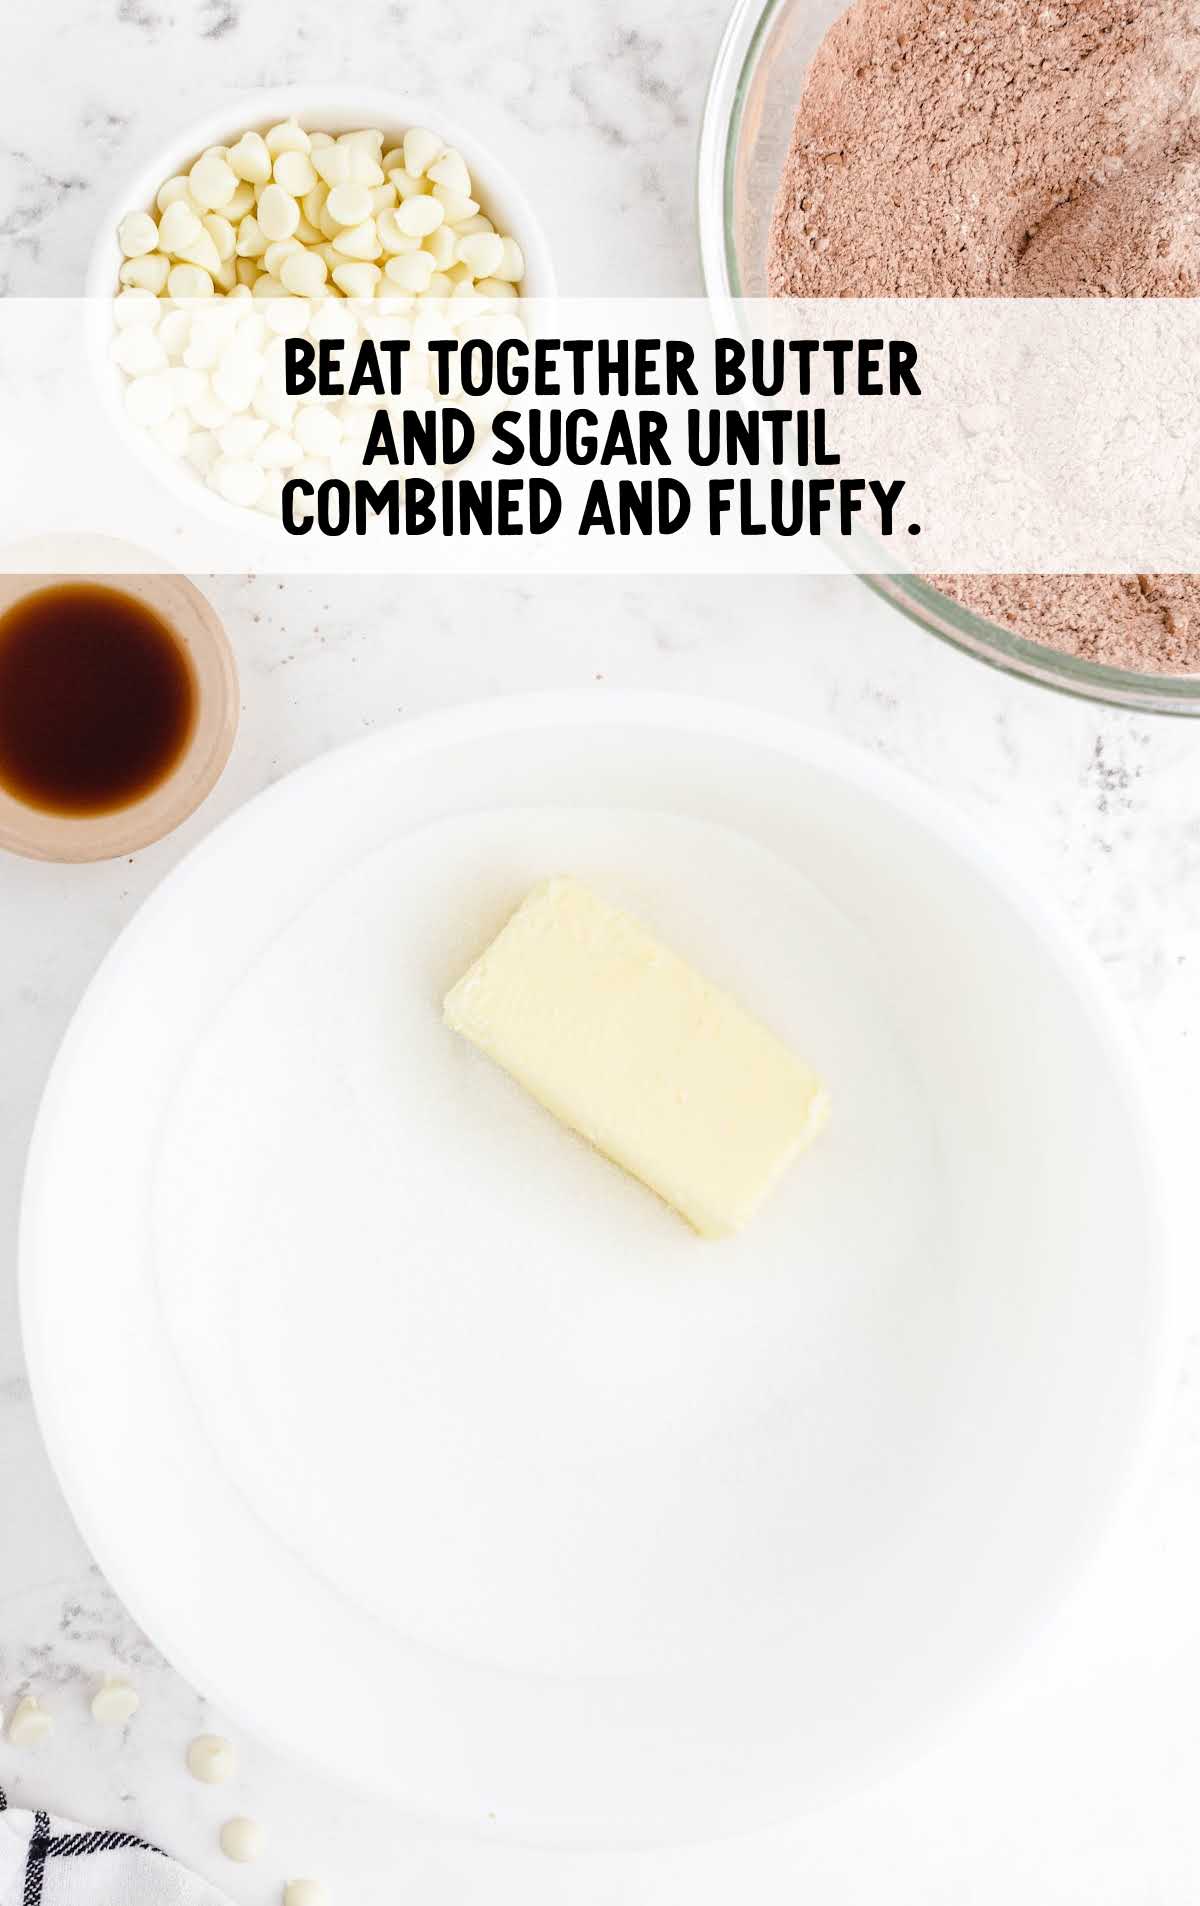
STEP THREE: In a large bowl, using a hand mixer, or in the bowl of a stand mixer, beat together the butter and white sugar until fluffy.
PRO TIP:
Make sure your ingredients are room temperature to keep your batter an even consistency.
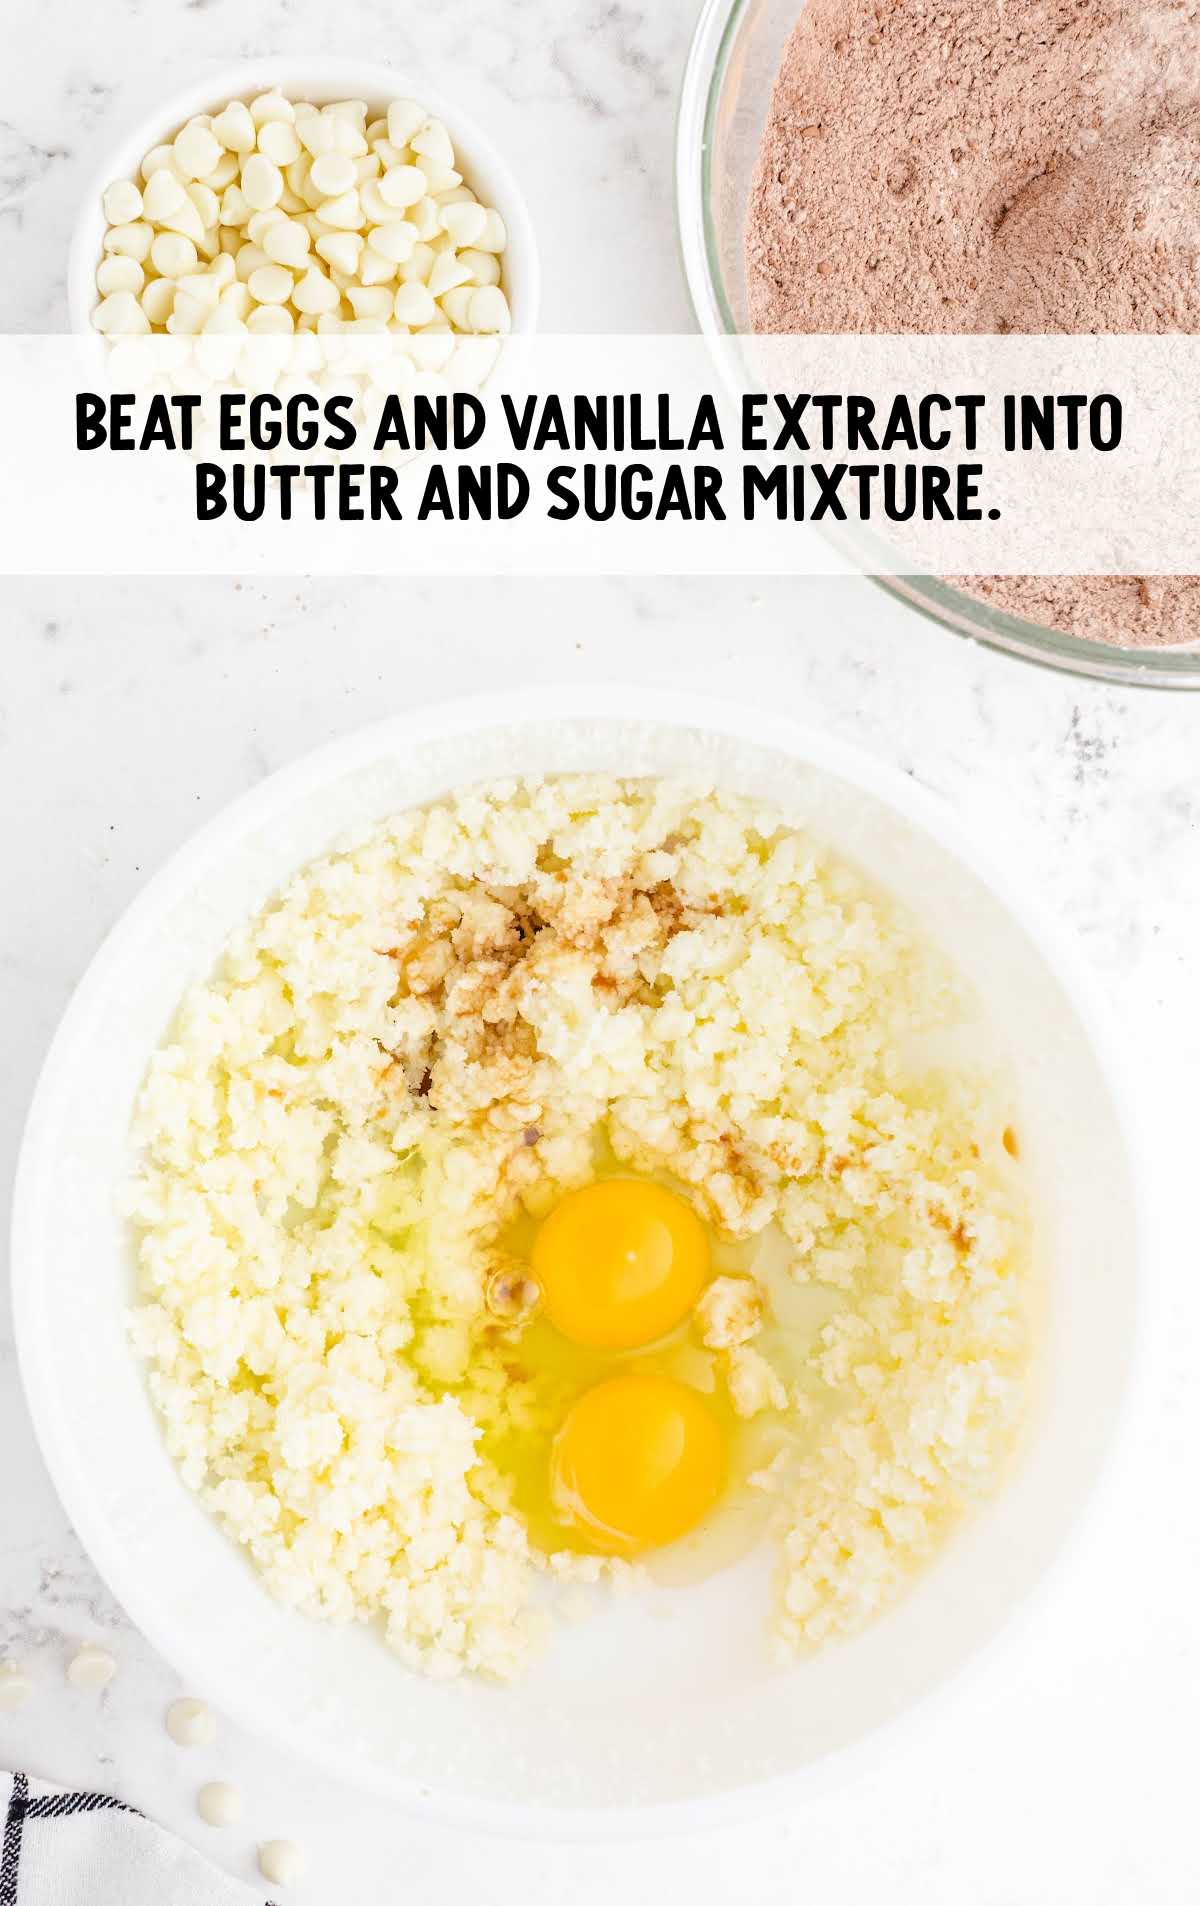
STEP FOUR: Add the eggs and vanilla extract into the butter mixture and beat until fluffy.
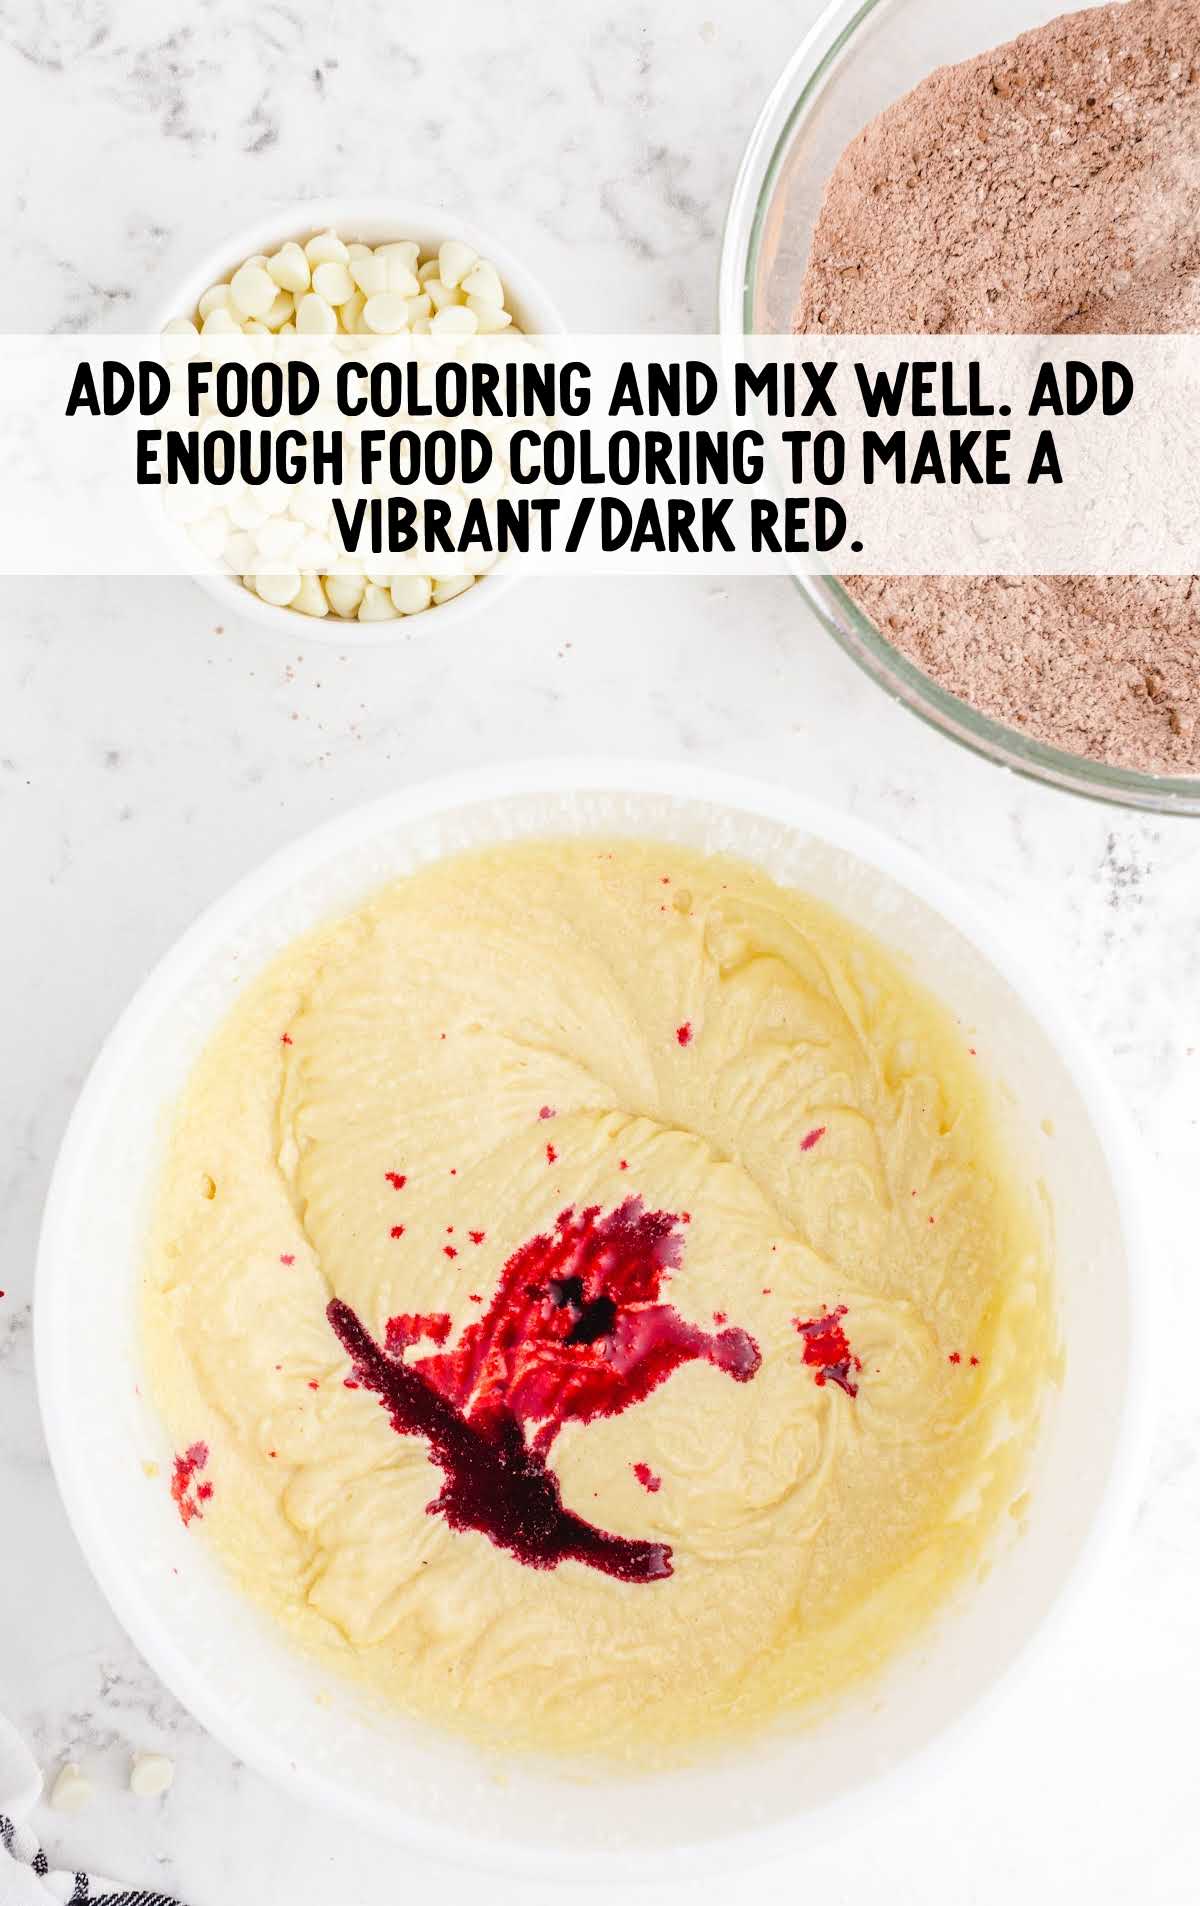
STEP FIVE: Add the liquid or gel food coloring and mix well, scraping down the sides of the bowl to ensure the color is evenly distributed.
PRO TIP:
Add more liquid food coloring, a little at a time, until the batter is a vibrant dark red.
STEP SIX: Mix the dry ingredients from the small bowl into the red batter.
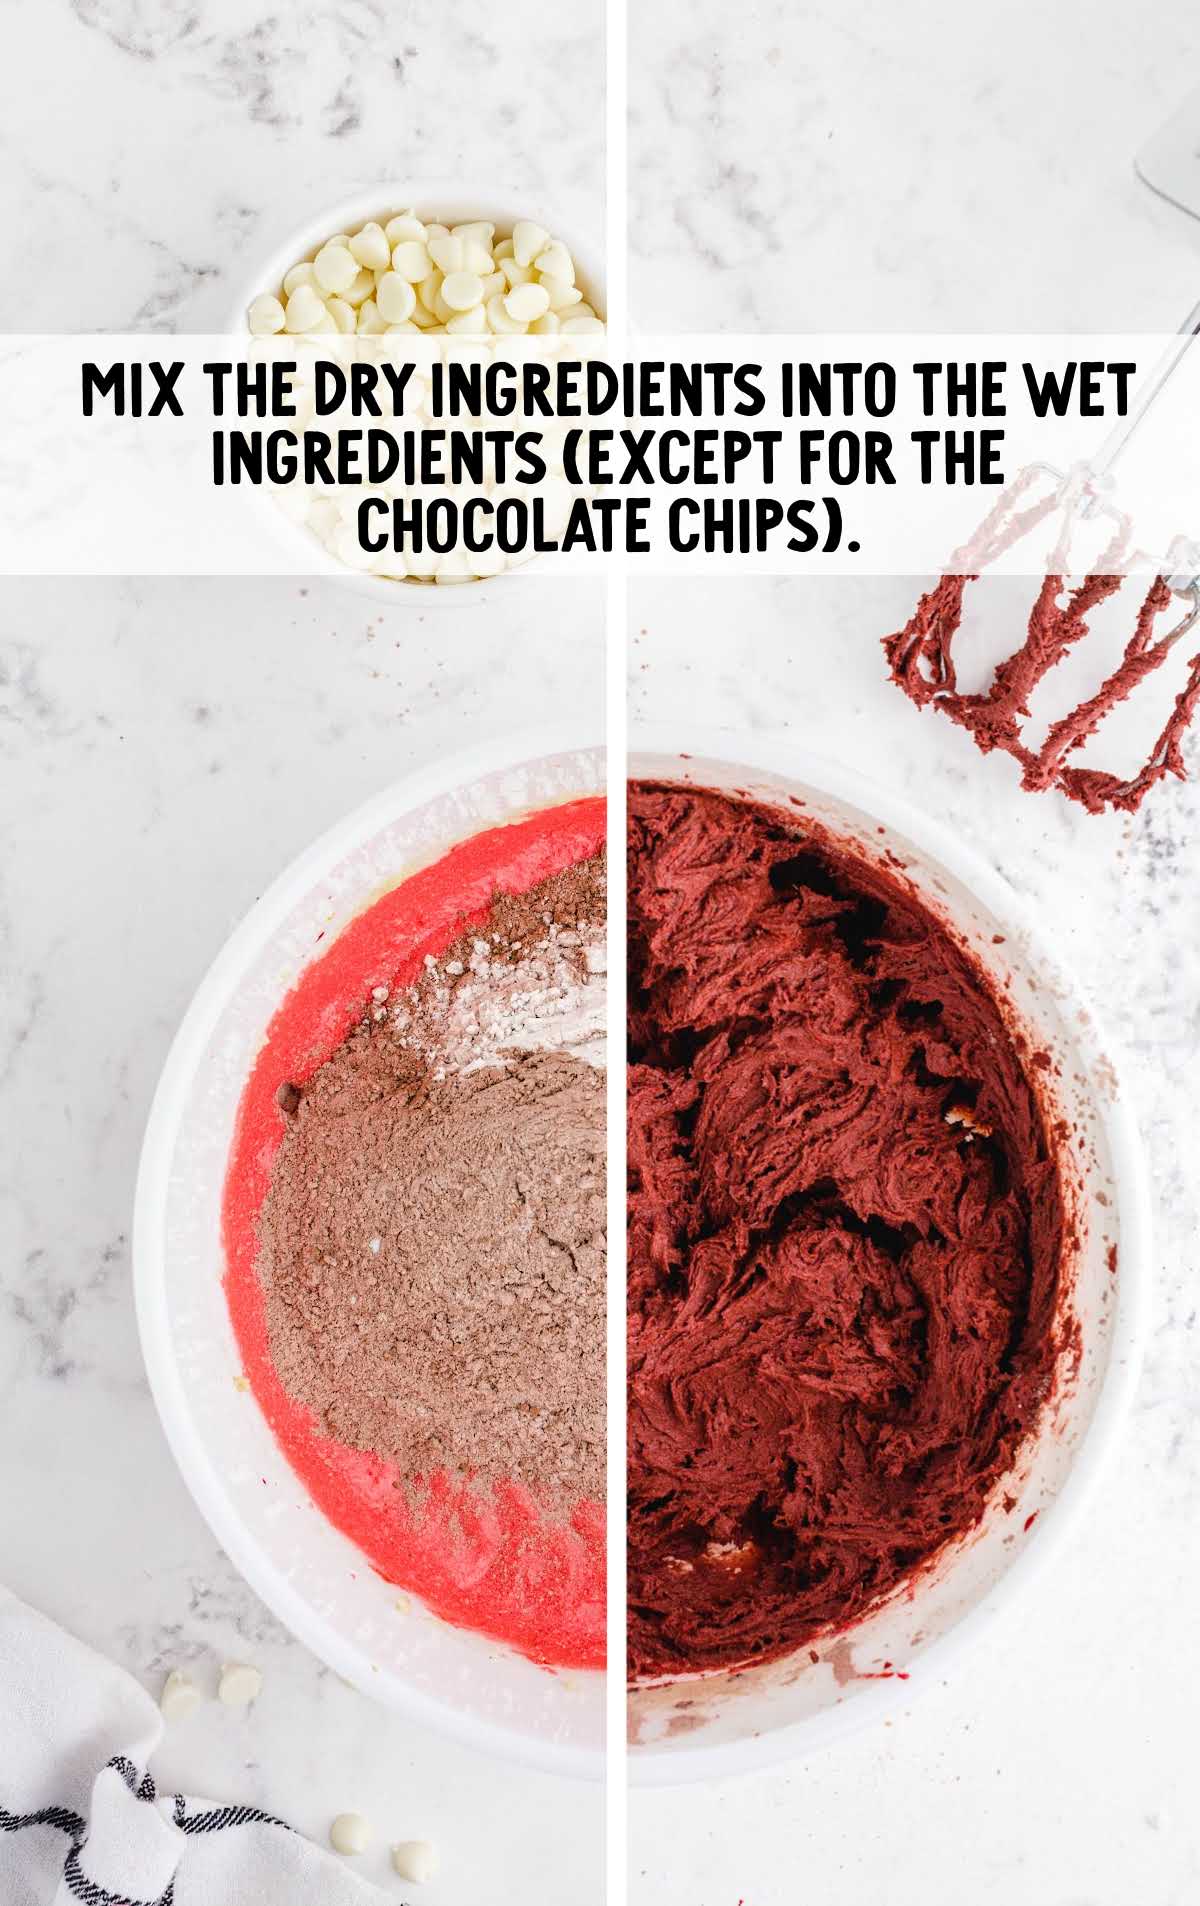
STEP SEVEN: Fold in half of the white chocolate chips.
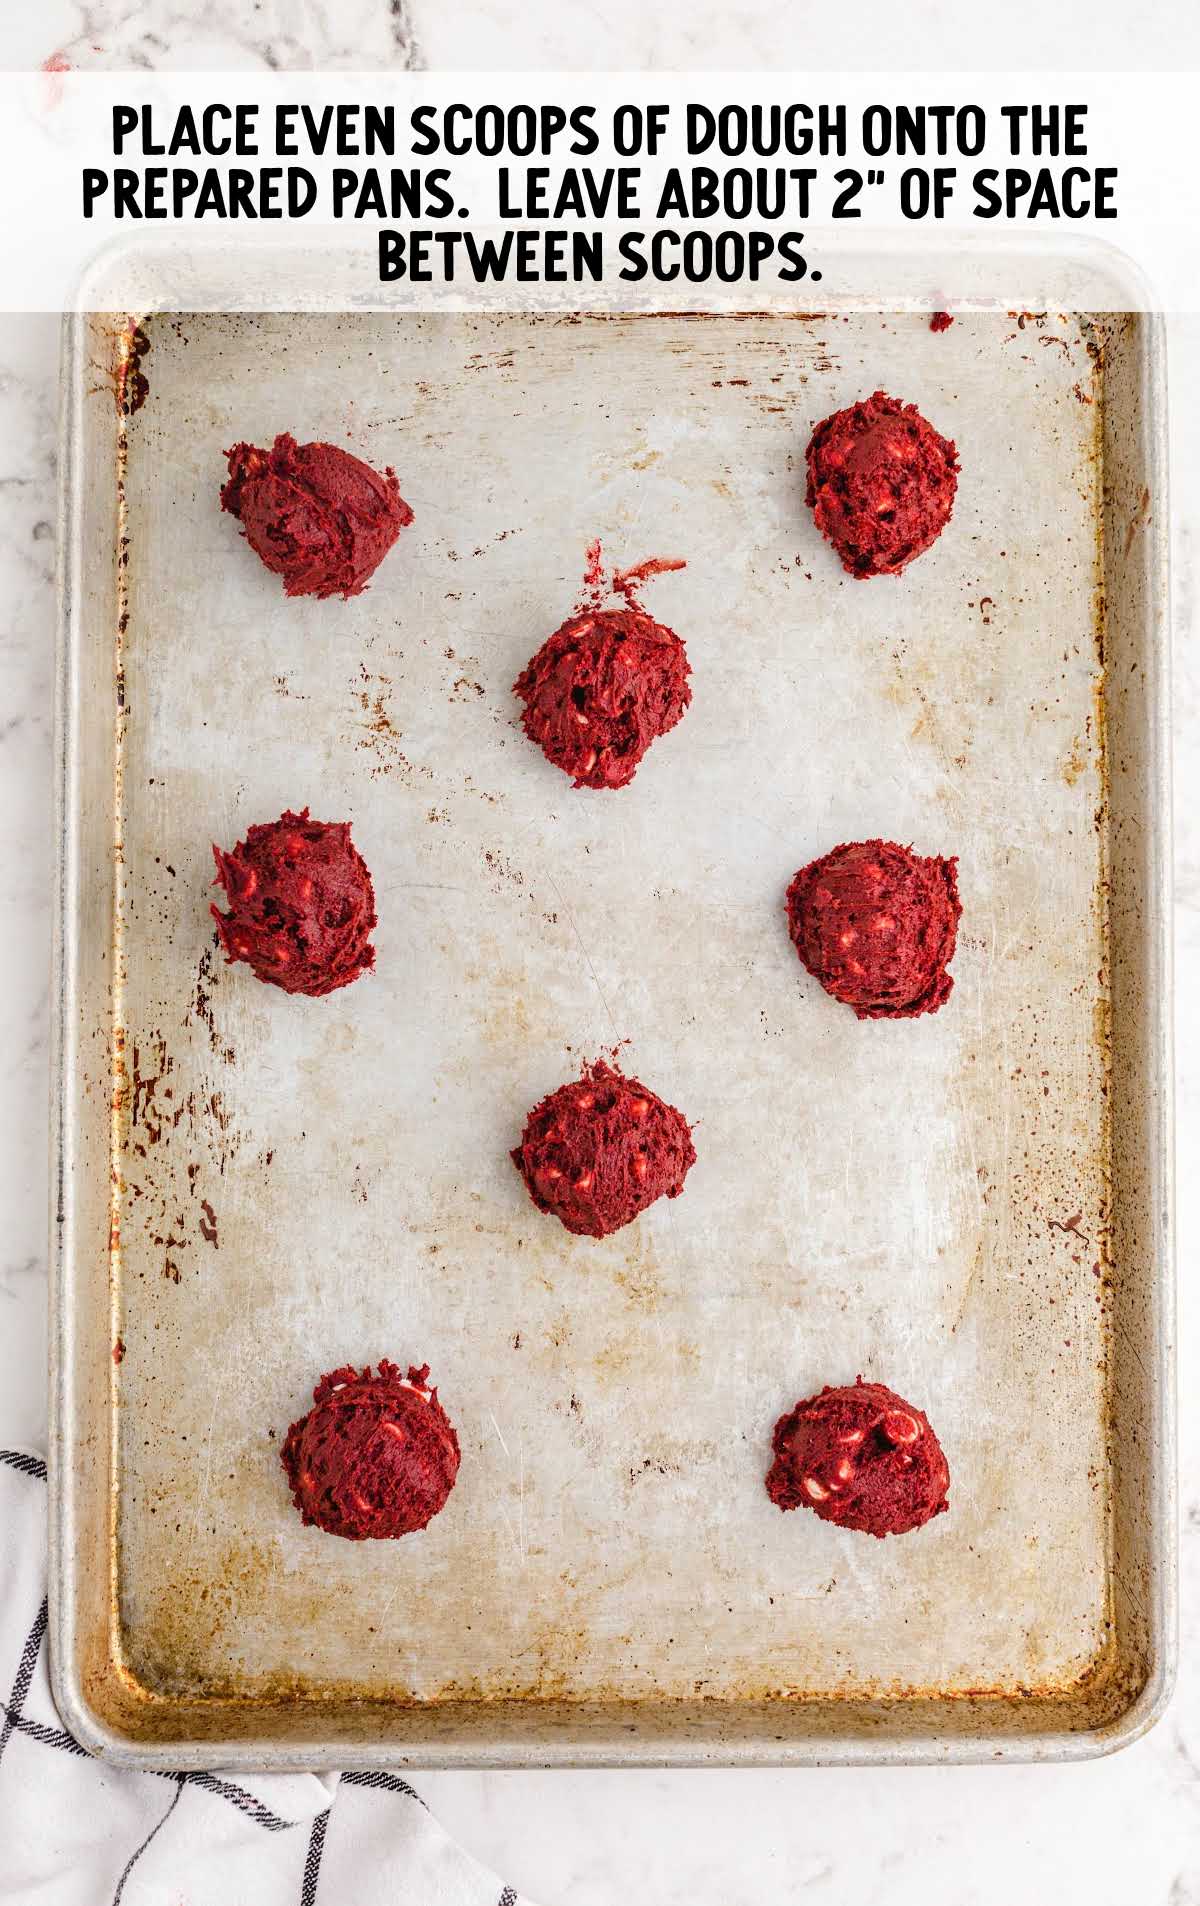
STEP EIGHT: Using a medium cookie scoop, place even cookie dough balls onto the prepared baking sheets.
PRO TIP:
Leave about 2 inches of space between scoops as the cookies will spread.
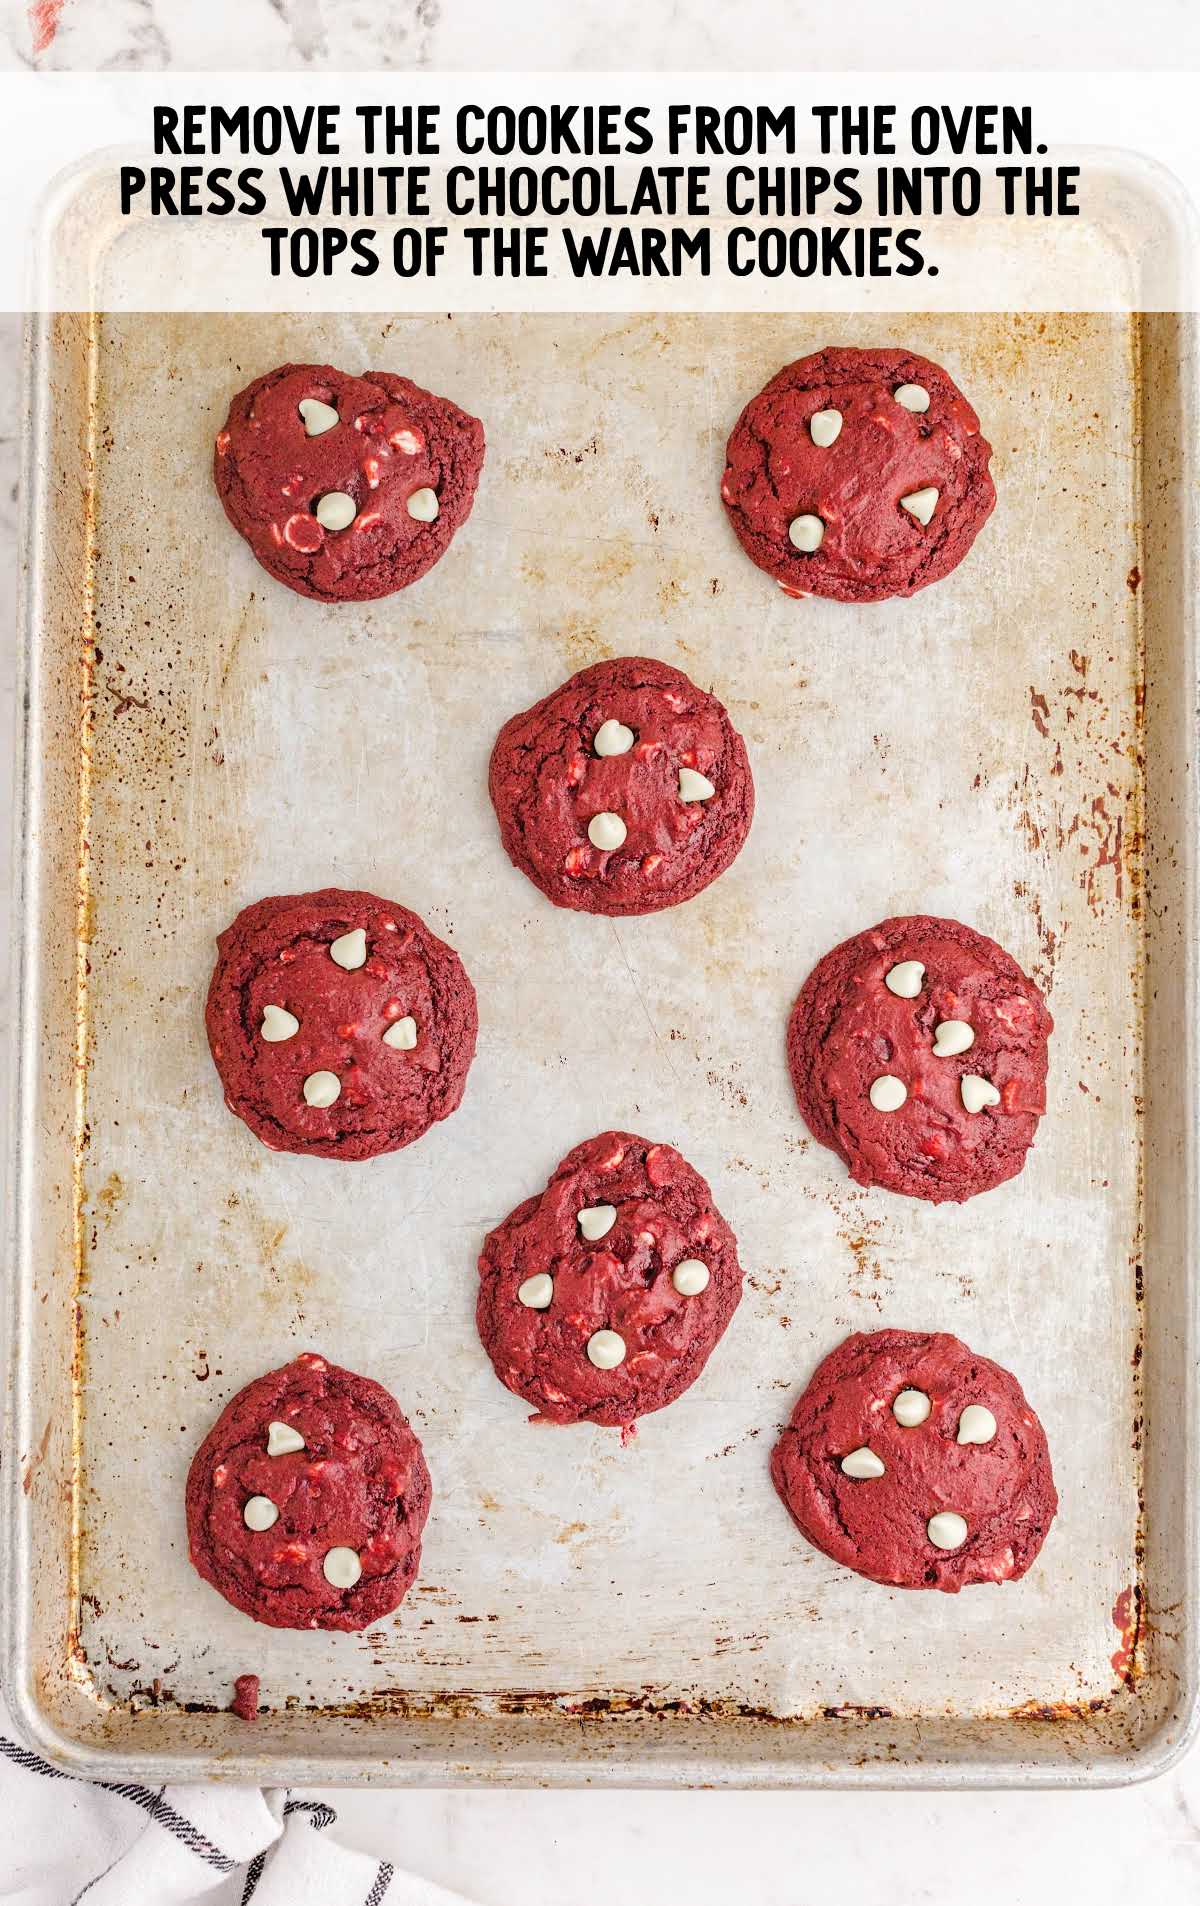
STEP NINE: Bake cookies for eight to nine minutes.
STEP TEN: Remove the cookie sheet from the oven. Immediately press the remaining white chocolate chips into the tops of the warm cookies.
STEP ELEVEN: Allow the cookies to cool on the pan for two to three minutes before transferring to a wire rack to cool fully.
STEP TWELVE: Serve once cooled.
Serving Red Velvet Chocolate Chip Cookies
Serve these easy red velvet cookies on a platter with other delicious cookies for a special dessert on Valentine’s Day or during the holiday season.
Add a glass of milk or one of our cold drinks such as our iced tea, raspberry iced tea, sweet peach iced tea, or our southern strawberry sweet tea on the side to wash them down.
Elevate your cookie experience by sandwiching a scoop of creamy vanilla ice cream between two red velvet cookies.
Create a dessert platter by arranging these cookies alongside a variety of other sweet treats, such as brownies, mini lemon meringue pies, and mini cheesecakes.
MORE COOKIES RECIPES

For more fun variations of the traditional red velvet cake, take a look at our other red velvet recipes, including our red velvet cheesecake recipe, or how about this tasty red velvet ice cream?
Storing Red Velvet White Chocolate Chip Cookies
Here are some tips on making the most of your red velvet cookies:
MAKE AHEAD: If you’re planning ahead for a special occasion or simply want to get a head start on your cookie cravings, you can make the cookie dough ahead of time.
After preparing the dough according to the recipe, shape it into cookie-sized portions and freeze them on a baking sheet.
Once frozen, transfer the dough portions to an airtight container or freezer bag, separating them with parchment paper to prevent sticking.
When you’re ready to bake, simply place the frozen cookie dough on a baking sheet and bake as directed, adding a few extra minutes to the baking time.
AT ROOM TEMPERATURE: Red velvet cake cookies can be stored in an airtight container on the counter for up to three days.
IN THE FREEZER: You can freeze red velvet chocolate chip cookies for up to three months in an airtight container.
Leave to thaw on the countertop until they reach room temperature.
Why We Love The Best Red Velvet Cookies Recipe
IRRESISTIBLE FLAVOR: These cookies boast a delightful blend of sweet and cocoa flavors with a hint of tanginess. The rich red hue adds an element of visual appeal, making them a treat for both the taste buds and the eyes.
PERFECT TEXTURE: The cookies have a soft and chewy texture that’s incredibly satisfying. The combination of ingredients, including cream of tartar and baking powder, ensures they turn out just right every time.
EASY TO MAKE: This recipe is beginner-friendly and includes step-by-step instructions, making it accessible for novice bakers. The straightforward process ensures you can enjoy homemade red velvet cookies without a fuss.
You can forget about boxed red velvet cake mix cookies – the best red velvet cookie recipes are made from scratch! This delicious cookie recipe is so simple that there’s no need for any shortcuts with store-bought packet mixes.
Red Velvet Cookie Recipe FAQ
You can freeze the unbaked dough for up to three months. Bake from frozen and add one to two minutes to the baking time.
Nowadays, the red color in red velvet desserts is mainly created using red food coloring, but when the recipe was first introduced, the red was created through a reaction between vinegar, buttermilk, and cocoa in the original recipe.
Red velvet tastes very similar to chocolate but also has a distinct tanginess from the addition of buttermilk or vinegar to the ingredients.
Using both room-temperature butter and baking soda will help ensure that your cookies are fluffy. If the butter is too cold, it will melt in the batter, causing flatter cookies, while the baking soda helps the dough rise slightly.
More Recipes You’ll Love
- Lemon Sugar Cookies
- No Spread Sugar Cookies
- Cookies and Cream Cookies
- Strawberry Cake Mix Cookies
- Cream Cheese Chocolate Chip Cookies
- Apple Pie Cookies


Red Velvet Cookies
Ingredients
- 1½ cups all-purpose flour
- ½ cup unsweetened cocoa powder
- ¼ teaspoon salt
- ½ teaspoon baking soda
- 1½ teaspoons baking powder
- ½ teaspoon cream of tartar
- ½ cup salted butter, softened
- 1 cup granulated sugar
- 2 eggs
- 1 teaspoon vanilla extract
- 1 tablespoon red food coloring, liquid or gel
- 2 cups white chocolate chips, divided
Instructions
- Preheat the oven to 350°F. Line two baking sheets with parchment paper or grease lightly and set aside.
- In a small bowl, combine flour, cocoa powder, salt, baking soda, baking powder, and cream of tartar.
- In a large mixing bowl, beat together butter and granulated sugar until combined and fluffy.
- Beat eggs and vanilla extract into the large bowl until batter is fluffy.
- Add food coloring and mix well, scraping down the sides of the bowl thoroughly to ensure the color is evenly distributed throughout the batter. Add enough food coloring to make a vibrant dark red.
- Mix the dry ingredients from the small bowl into the red batter.
- Fold in 1 cup of white chocolate chips.
- Use a cookie scoop and place even scoops of dough onto the prepared pans. Leave about 2 inches of space between scoops.
- Bake in oven for 8 to 9 minutes.
- Remove the cookies from the oven. Immediately press a few of the remaining white chocolate chips into the tops of the warm cookies. You will probably have leftover white chocolate chips.
- Allow them to cool on the pan for 2 to 3 minutes before transferring to a cooling rack to cool the rest of the way.
- Serve once cooled.
Video
Notes
- Make sure your ingredients are room temperature to keep your batter an even consistency.
- Add more liquid food coloring, a little at a time, until the batter is a vibrant dark red.
- Leave about 2 inches of space between scoops as the cookies will spread.
Nutrition


Comments
Janet says
These get rave reviews from everyone!! I’ve made them 3 times now. Definitely a keeper
Sheila says
This recipe makes very delicious yummy cookies. They were soft, cake-like texture. Maybe next time I will flatten the cookie before baking. I used gel food coloring and my cookies were very deep red.
Janet says
These are delious!! Thank you so much for the recipe. Besides tasting good, they will look so nice on my Christmas cookie platter! I will be making these Valentine’s Day, too!!
Courtney says
So easy to make and very tasty. I subbed white chocolate chips with cream cheese chips and wow, highly recommend!