
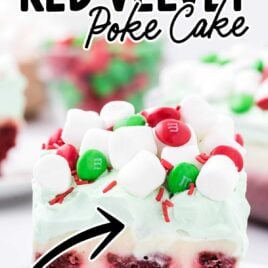

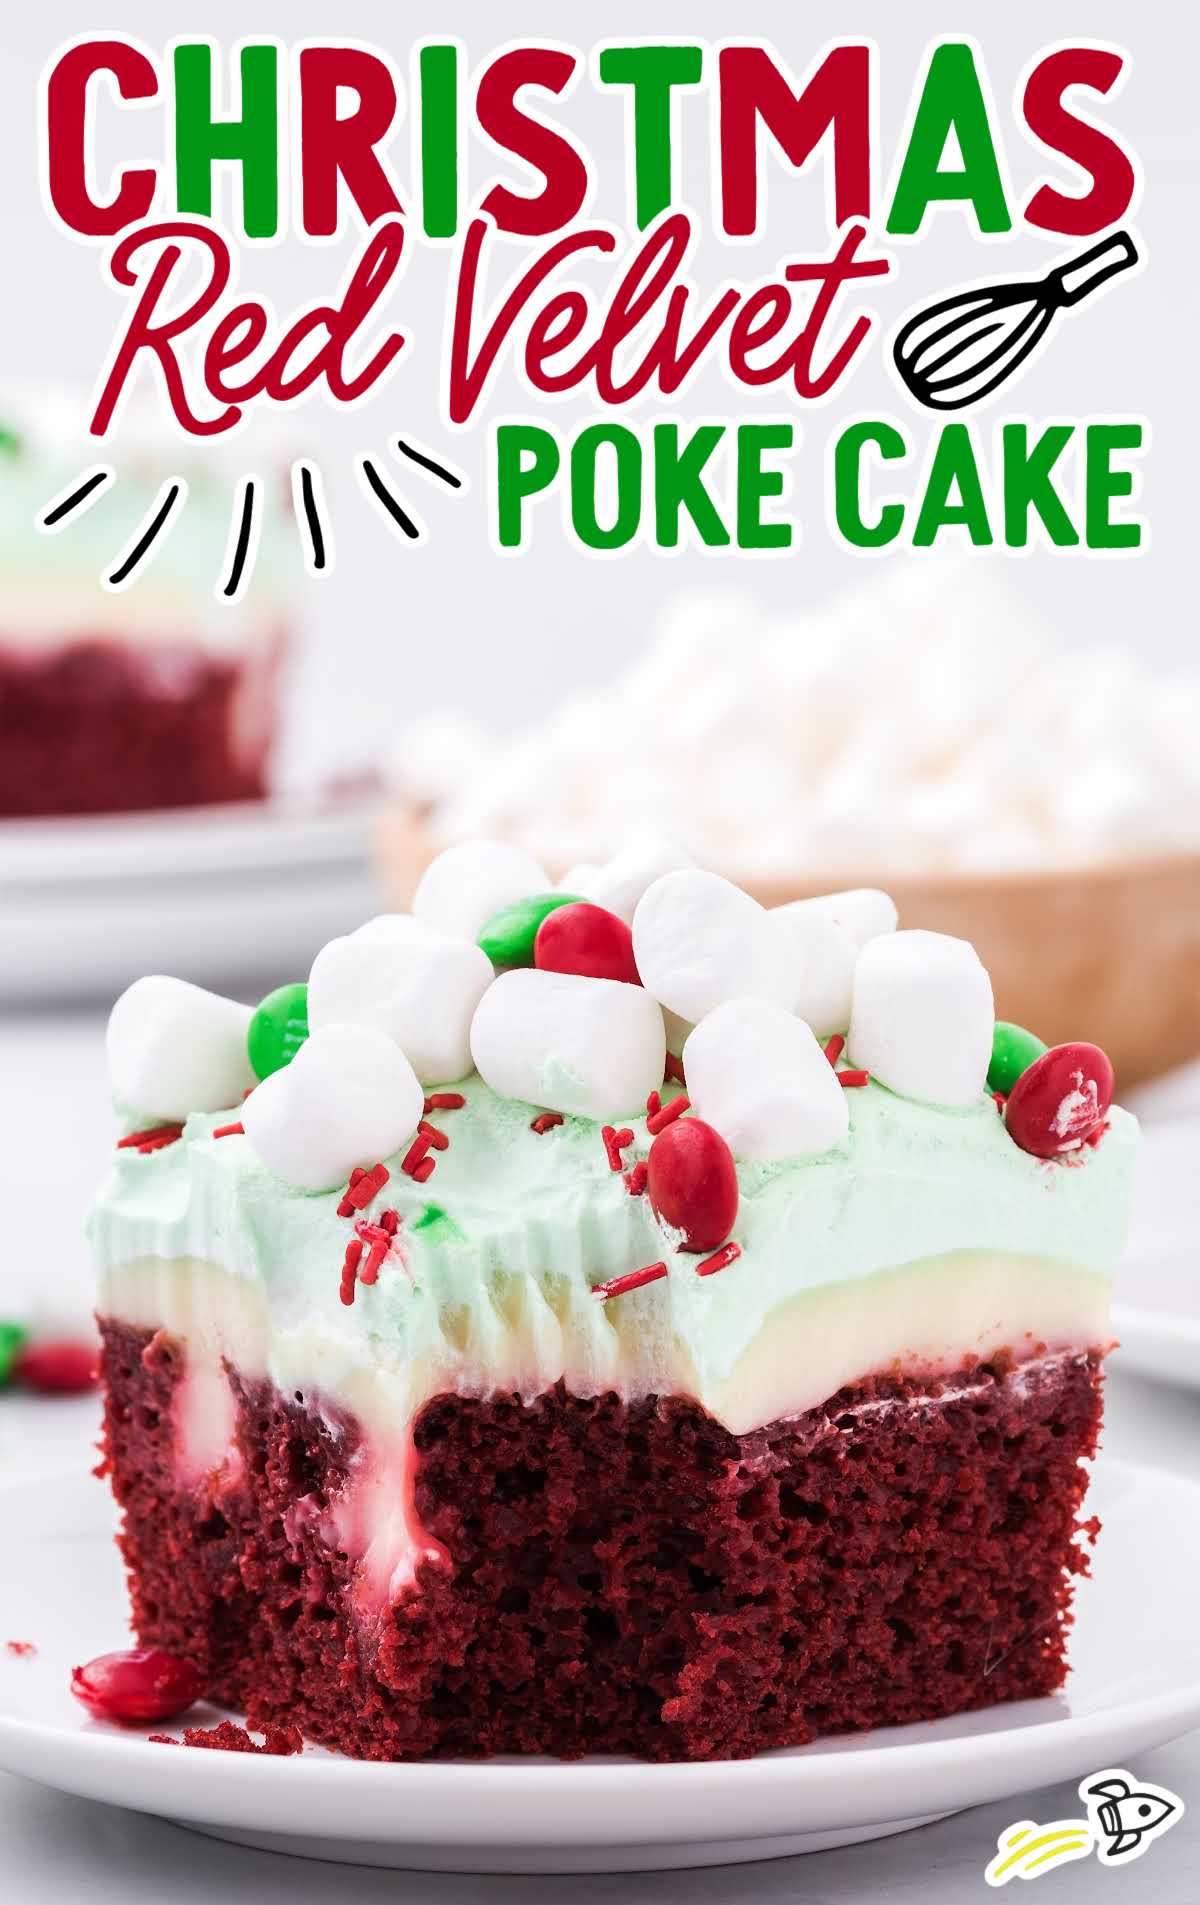
This delightfully festive Christmas red velvet poke cake will make all your holiday dreams come true. Moist red velvet cake filled with bursts of creamy pudding that is finished off with a fun green topping and red and green candies is decadence at its finest.
Christmas Red Velvet Poke Cake Ingredients

You’ll need:
For The Red Velvet Cake:
- 1 (15.25-ounce) box of red velvet cake mix
- 1¼ cup of water
- ½ cup of vegetable oil
- 3 large eggs
For The Pudding Filling:
- 3¾ cups of cold whole milk
- 2 (3.4-ounce) boxes of cheesecake-flavored instant pudding mix
For The Whipped Topping and Decoration:
- 10-12 drops of green food coloring
- 2 (8-ounce) tubs of Cool Whip whipped topping, thawed
- 3 cups of mini marshmallows
- ¼ cup of red M&M’s
- ¼ cup of green M&M’s
- red sprinkles
Substitutions And Additions
CAKE MIX: We used red velvet cake mix in this recipe, but you could use another flavor of boxed cake mix, such as chocolate or vanilla.
There are plenty of different options for the type of cake mixes you can get in the store.
WHIPPED TOPPING: If you would prefer to make your own whipped cream, check out our homemade stabilized whipped cream recipe.
PUDDING: If you can’t find cheesecake pudding at the grocery store, you can also use vanilla pudding, French vanilla pudding, or white chocolate pudding instead in this easy recipe.
How To Make This Christmas Red Velvet Poke Cake Recipe
For The Red Velvet Cake
STEP ONE: Preheat the oven to 350°F. Spray a 9×13-inch pan with baker’s spray (Baker’s Joy or generic version). Set it aside.
STEP TWO: Using a medium bowl and a handheld mixer on medium speed, prepare the cake mix according to the box directions.
STEP THREE: Pour cake batter into the prepared baking dish. Bake for 25 minutes until a toothpick inserted into the middle of the cake comes out clean.
STEP FOUR: Using a rounded handle of a wooden spoon, poke holes into the cake about ½-inch apart. Set it aside to cool.
PRO TIP:
It’s best to make the holes in the cake while it is still slightly warm because as it cools, the crust on top of the cake will crumble more easily.

For The Pudding Filling
STEP ONE: Using a medium-sized mixing bowl, whisk together the dry pudding mix and the cold milk for 1 to 1½ minutes, just until the pudding starts to thicken.
STEP TWO: Evenly pour the pudding mixture over the prepared cake. Use a spatula to smooth the pudding over the cake.
PRO TIP:
When you’re pouring the pudding into the holes, tap the pan on the counter a few times to get rid of any air bubbles and make sure the it fills the holes completely.

STEP THREE: Tightly cover the cake and chill in the refrigerator for four hours.
PRO TIP:
You can shorten the chill time to two hours, but to ensure the pudding properly sets, the longer you leave the cake in the fridge, the better.
For The Whipped Topping Layer
STEP ONE: Using a spoon, stir in the green coloring into the thawed whipped topping. Stir until the color is uniform.
PRO TIP:
Depending on how dark or light you want the tinted whipped topping layer, you can substitute green food coloring gel.

STEP TWO: Remove the cake from the refrigerator. Evenly spread the tinted whipped topping over the pudding layer.
STEP THREE: Evenly sprinkle the mini marshmallows over the tinted whipped topping layer.
STEP FOUR: Evenly sprinkle the red and green M&M’s and the red sprinkles.
PRO TIP:
Add white chocolate curls on top of your cake. To make the white chocolate curls, you can use a white chocolate candy bar or white almond bark and a vegetable peeler.
Carefully use gentle downward pressure against the side of the candy bar.

STEP FIVE: Cut twelve 3-inch x 3-inch squares.
How To Serve
Enjoy this festive dessert with a delicious scoop of no-churn vanilla ice cream on the side.
This would be a fun and indulgent treat to serve with our Grinch punch on Christmas Eve after enjoying a special meal before welcoming Santa.
All the red and green and sweet components are sure to get you in the holiday spirit.
Check out more of our poke cake recipes with our jello poke cake and coconut poke cake. They are some of our favorite desserts because the cake comes out so moist.
For more easy poke cake dessert ideas, browse my poke cake recipes page.
MORE CHRISTMAS RECIPES


Storing This Holiday Poke Cake Recipe
IN THE FRIDGE: Keep any leftovers of this moist holiday cake covered in the refrigerator for up to three days.
IN THE FREEZER: You can also freeze this red velvet Christmas poke cake recipe.
Tightly cover with plastic wrap and then cover with aluminum foil for up to three months. Allow the cake to thaw in the refrigerator before serving.

Once you take a bite of this delicious cake, you will have sugar plums dancing in your head. Moist decadent cake with creamy bursts of pudding in every bite is enough to make anyone smile. Adding sweet and colorful toppings will take this confection over the top.
Frequently Asked Questions
It’s an easy cake that you poke holes into the warm cake after baking. The holes are then filled with a liquid or filling — like condensed milk, pureed fruit, chocolate cream, or pudding. It makes a moist and delicious cake.
The end of a wooden spoon handle is the best size to poke large holes in the cake.
This great recipe will keep in the freezer in an airtight container for up to three months.
More Recipes You’ll Love
- Candy Cane Fudge
- Oreo Peppermint Bark
- Gingerbread Truffles
- Gingerbread Fudge
- Snickerdoodle Cheesecake Bars
- Christmas Sugar Cookie Recipe


Christmas Red Velvet Poke Cake
Ingredients
Red Velvet Cake
- 15.25 ounce box red velvet cake mix
- 1¼ cups water
- ½ cup vegetable oil
- 3 large eggs
Cheesecake Flavored Instant Pudding Mix
- 3¾ cups cold whole milk
- 6.8 ounces cheesecake flavored instant pudding mix (3.4-ounce packets)
Whipped Topping and decoration
- 10 to 12 drops green food coloring
- 16 ounces whipped topping thawed (8-ounce tubs)
- 3 cups mini marshmallows
- ¼ cup red M&M’s
- ¼ cup green M&M’s
- red sprinkles
Instructions
Red Velvet Cake
- Preheat the oven to 350°F. Spray a 9×13-inch pan with baker’s spray (Baker’s Joy or generic version). Set it aside.
- Using a medium-sized mixing bowl and a handheld mixer on medium speed, prepare the cake mix according to the box directions.
- Bake for 25 minutes.
- Using a rounded handle of a wooden spoon, poke holes into the cake about ½ inch apart. Set it aside to cool.
Cheesecake Flavored Instant Pudding
- Using a medium-sized mixing bowl, whisk together the pudding mixes and the cold milk for 1 to 1½ minutes, just until the pudding starts to thicken.
- Evenly pour the pudding over the prepared cake. Use a spatula to smooth the pudding over the prepared cake.
- Tightly cover the cake and chill in the refrigerator for 4 hours.
Whipped Topping Layer
- Using a spoon, stir in the green food color into the thawed whipped topping. Stir until the color is uniform.
- Remove the cake from the refrigerator. Evenly spread the tinted whipped topping over the pudding layer.
- Evenly sprinkle the mini marshmallows over the tinted whipped topping layer.
- Evenly sprinkle the red and green m and m’s and the red sprinkles.
- Cut twelve 3-inch x 3-inch squares.
Video
Notes
- It’s best to make the holes in the cake while it is still slightly warm because as it cools, the crust on top of the cake will crumble more easily.
- When you’re pouring the pudding into the holes, tap the pan on the counter a few times to get rid of any air bubbles and make sure it fills the holes completely.
- You can shorten the chill time to two hours, but to ensure the pudding properly sets, the longer you leave the cake in the fridge, the better.
- Depending on how dark or light you want the tinted whipped topping layer, you can substitute green food coloring gel.
- Add white chocolate curls on top of your cake. To make the white chocolate curls, you can use a white chocolate candy bar or white almond bark and a vegetable peeler. Carefully use gentle downward pressure against the side of the candy bar.
Nutrition


Comments
Gloria says
Delicious!!!!