


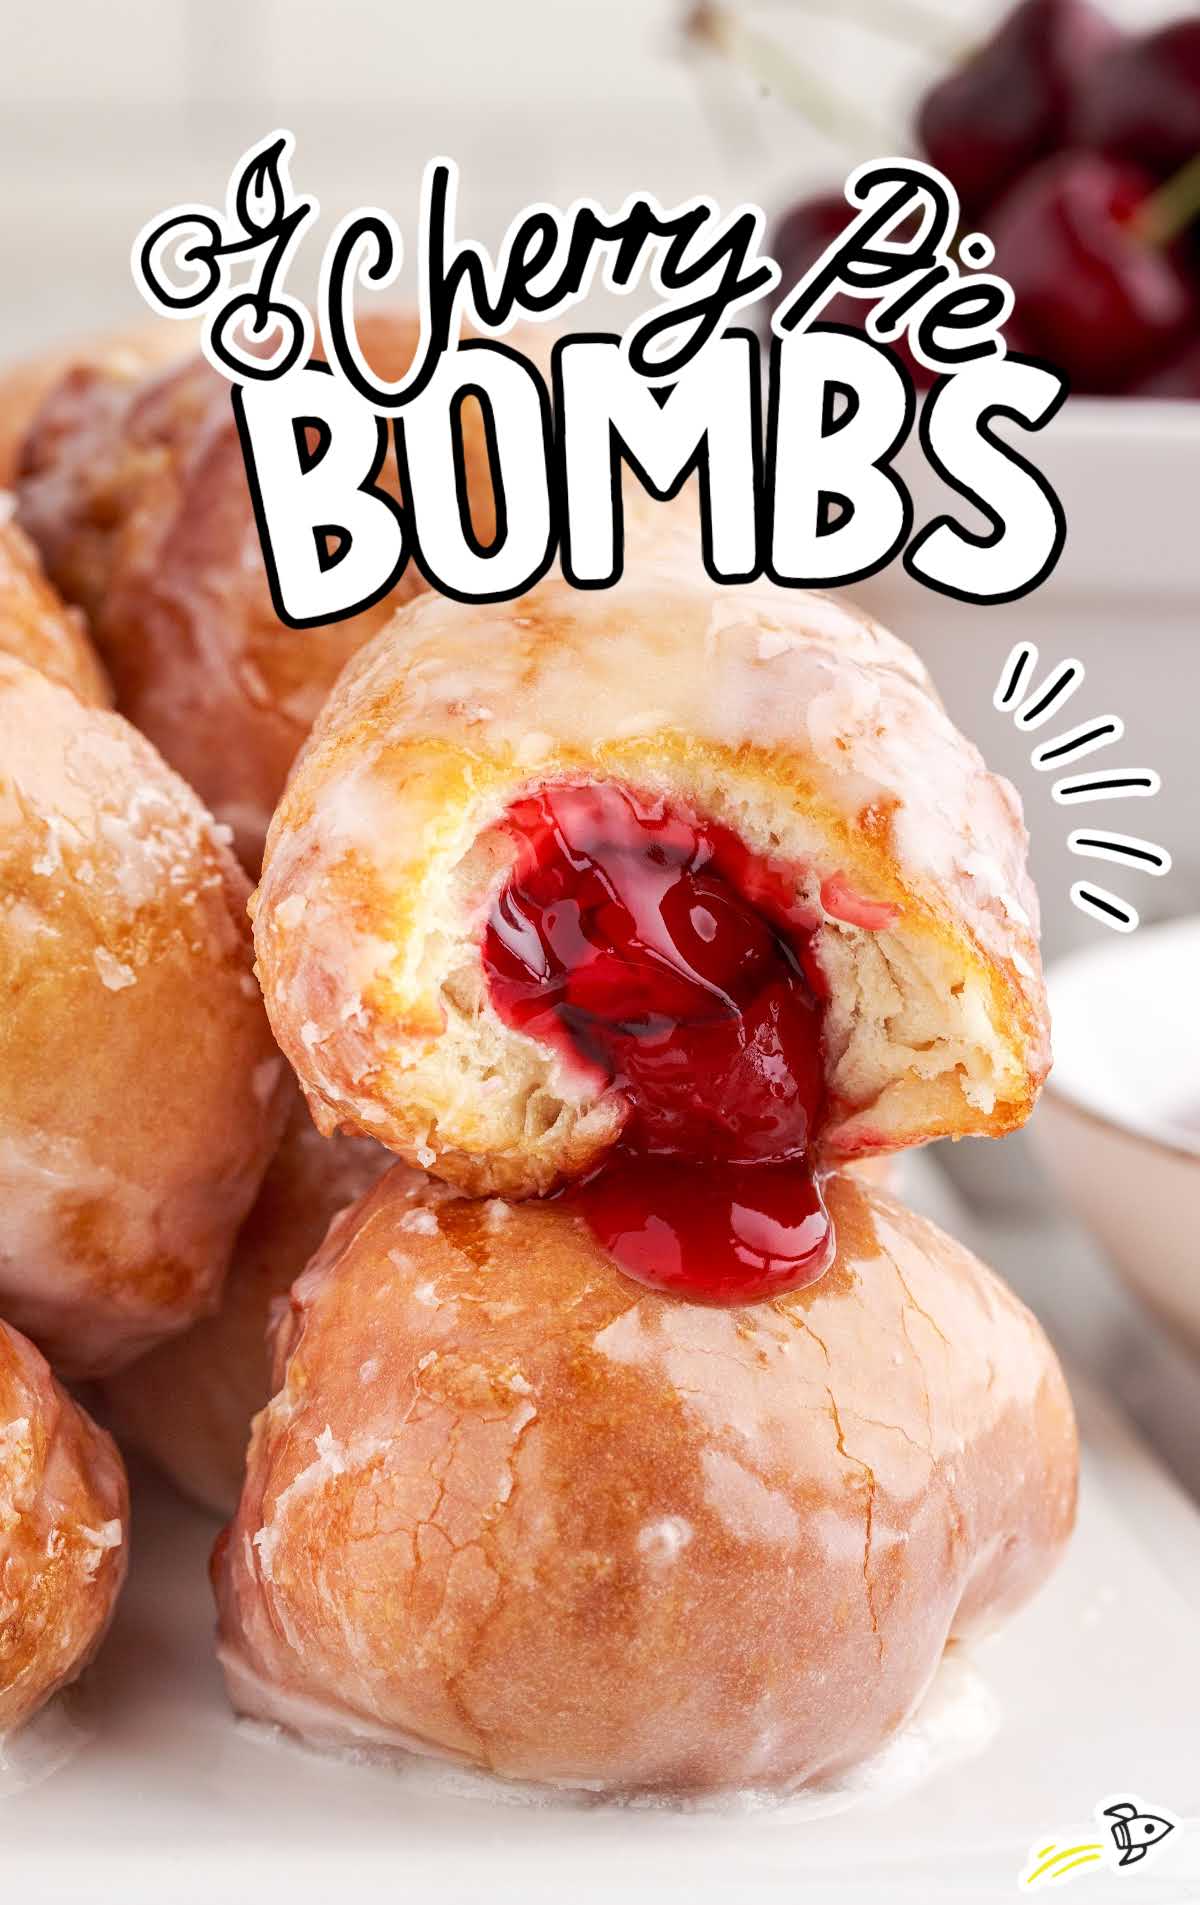
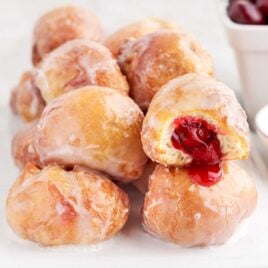
Cherry pie bombs are a dessert dream come true, and we will show you how to whip up these heavenly delights in no time. With their crispy exterior and gooey cherry filling, they’re a sweet indulgence that’s impossible to resist.
Cherry Pie Bombs Ingredients
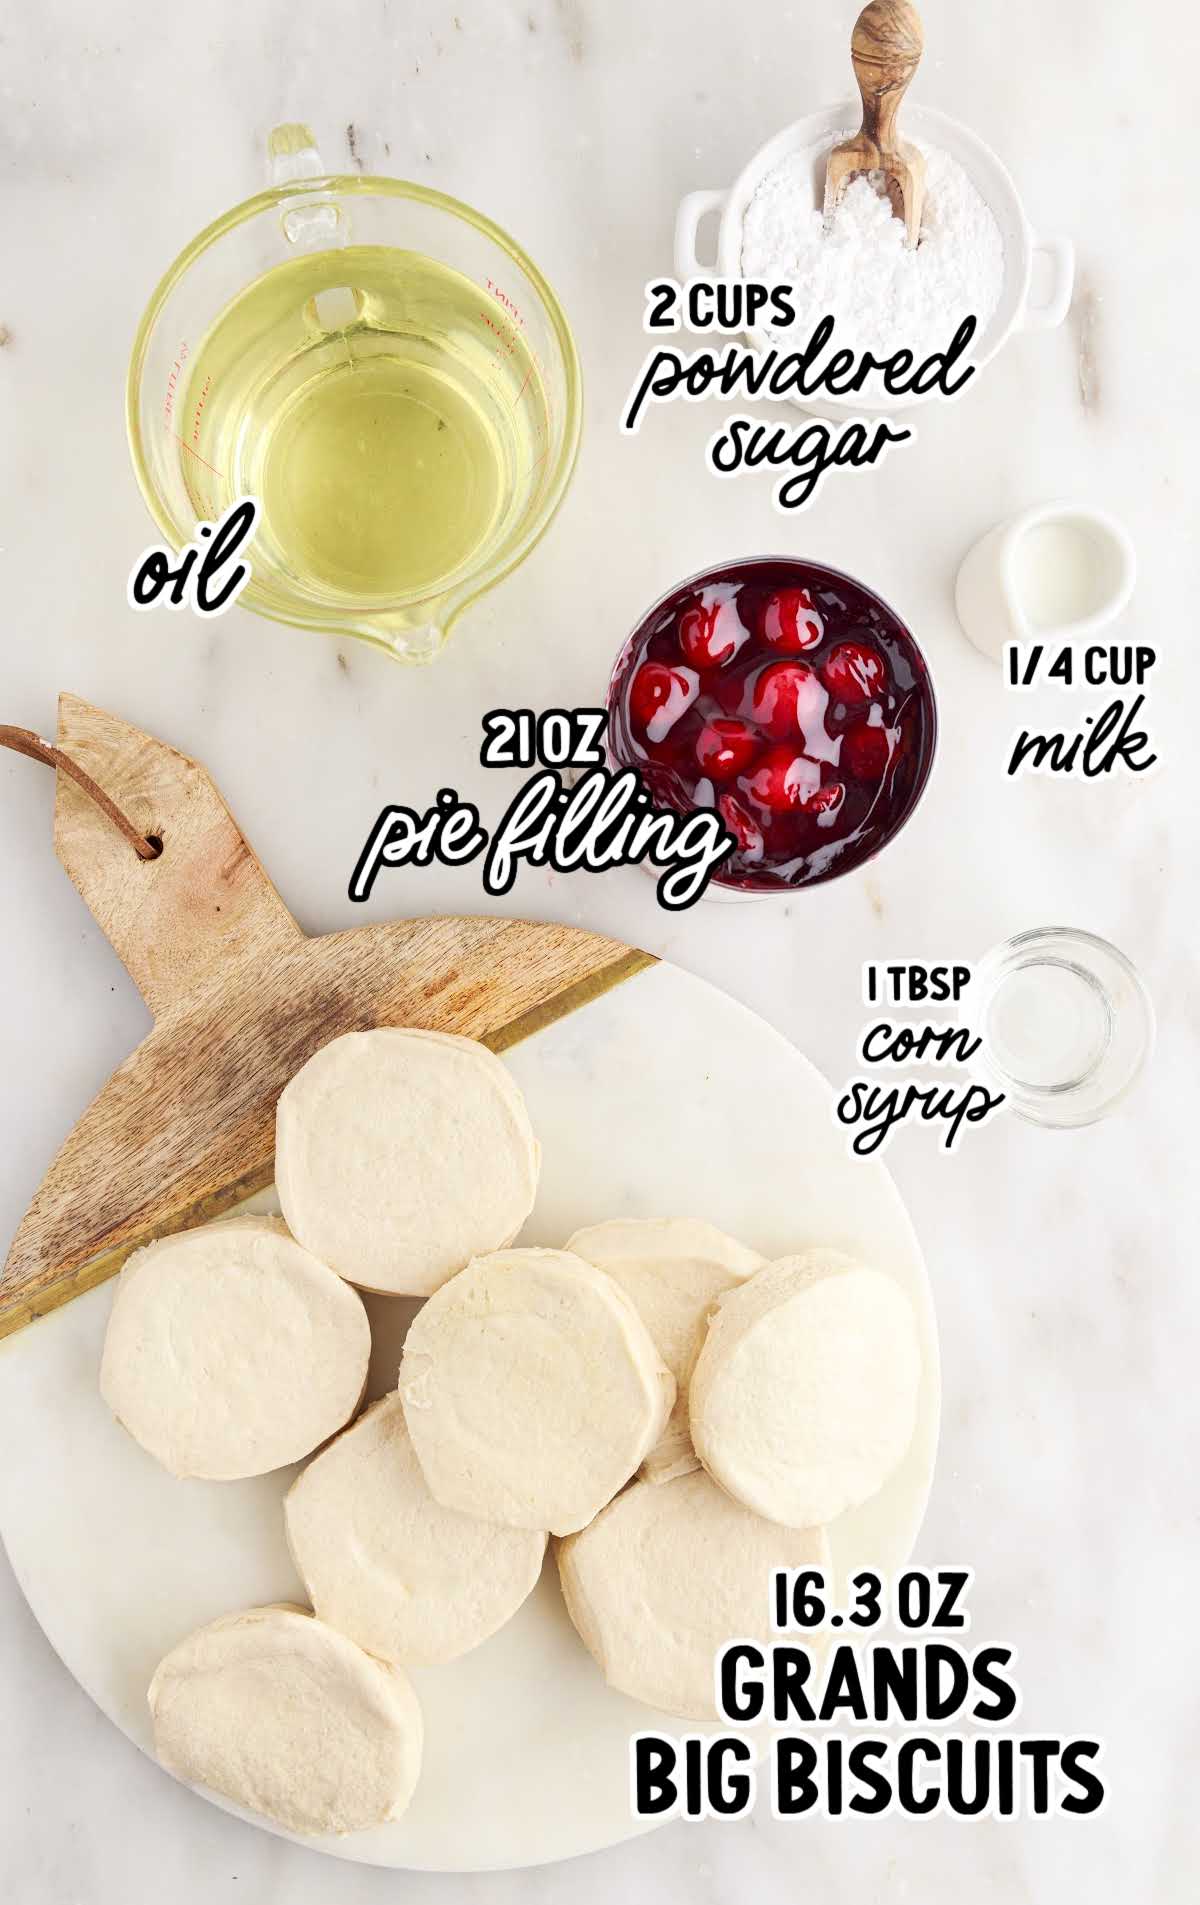
The Grands biscuits provide the flaky, buttery crust that encases the luscious cherry pie filling to create these delightful treats.
Speaking of filling, canned cherry pie filling is the star, delivering fruity sweetness. Powdered sugar and corn syrup are essential for our sweet glaze, and milk ensures its smooth consistency.
Cherry pie bombs are made with just a handful of simple ingredients:
- Vegetable oil for frying
- 1 (16.3-ounce) can of Grands “Big” biscuits, flaky
- 1 (21-ounce) can of cherry pie filling
- 2 cups of powdered sugar
- ¼ cup of milk
- 1 tablespoon of light corn syrup
Substitutions and Additions
CHERRY PIE FILLING: If you’re feeling adventurous, you can experiment with different fruit fillings like apple, peach, or blueberry pie filling for a unique twist on the classic recipe.
BISCUITS: While we recommend Grands “Big” biscuits for their size, you can use regular-sized biscuits if you prefer smaller cherry pie bombs. Adjust the amount of filling accordingly.
OIL: Don’t hesitate to use alternatives like canola or peanut oil if you prefer. Just ensure they have a high smoke point for safe frying.
SUGAR GLAZE: Feel free to add a splash of vanilla extract to the glaze for an extra layer of flavor. You can also experiment with different flavored glazes like lemon or almond to suit your taste.
How To Make This Cherry Pie Bombs Recipe
This recipe is as easy to make as wrapping the pie filling in the flaky dough and frying it to perfection.
STEP ONE: Fill a 2 to 3-quart heavy-bottomed saucepan a little over halfway with vegetable oil. You will want this deep enough to cover the dough balls completely. Set it aside.
STEP TWO: Open the can of biscuits and divide each biscuit in half by pulling apart the “flaky” layers at the center.
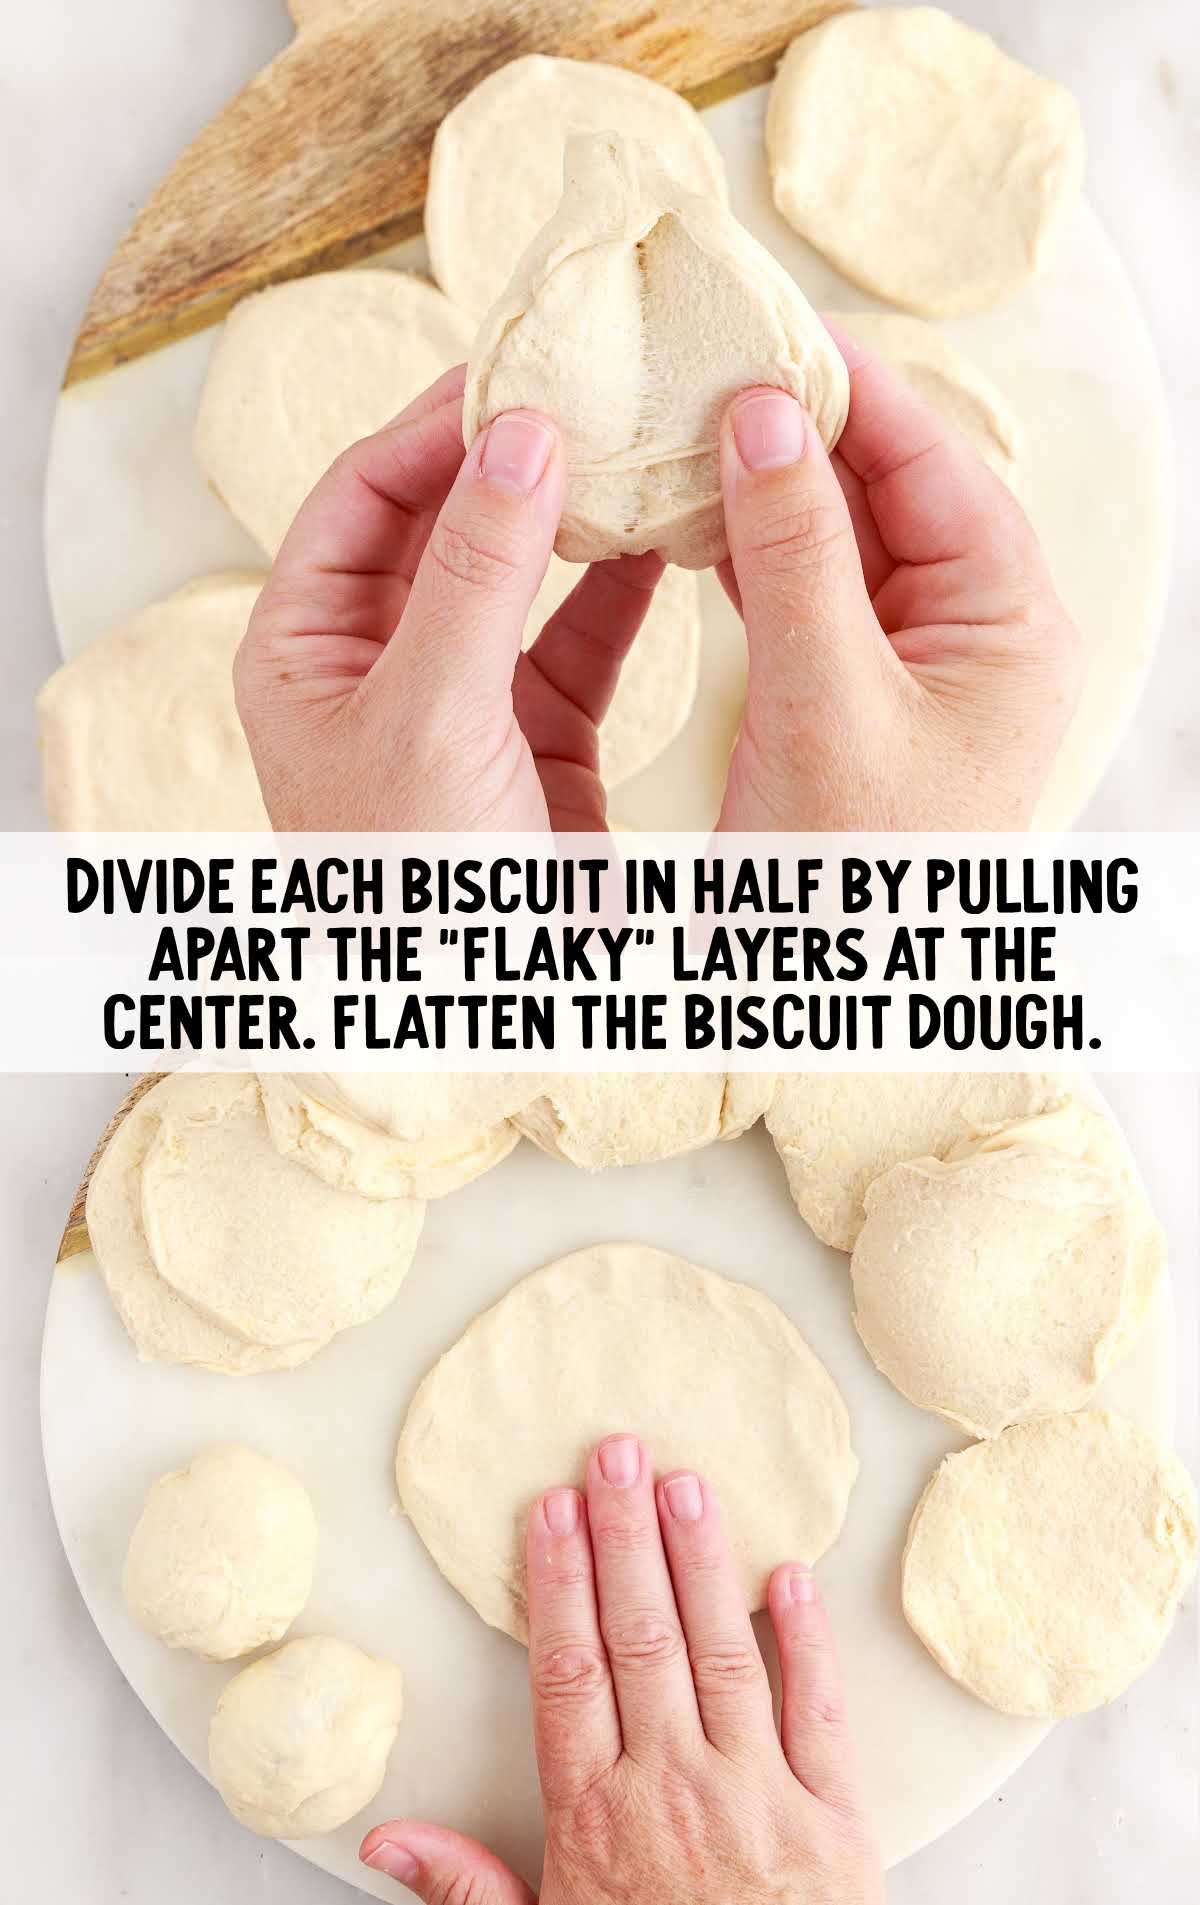
Use your fingers or a rolling pin to flatten the biscuit dough. Don’t roll the dough out thin – just flatten it.
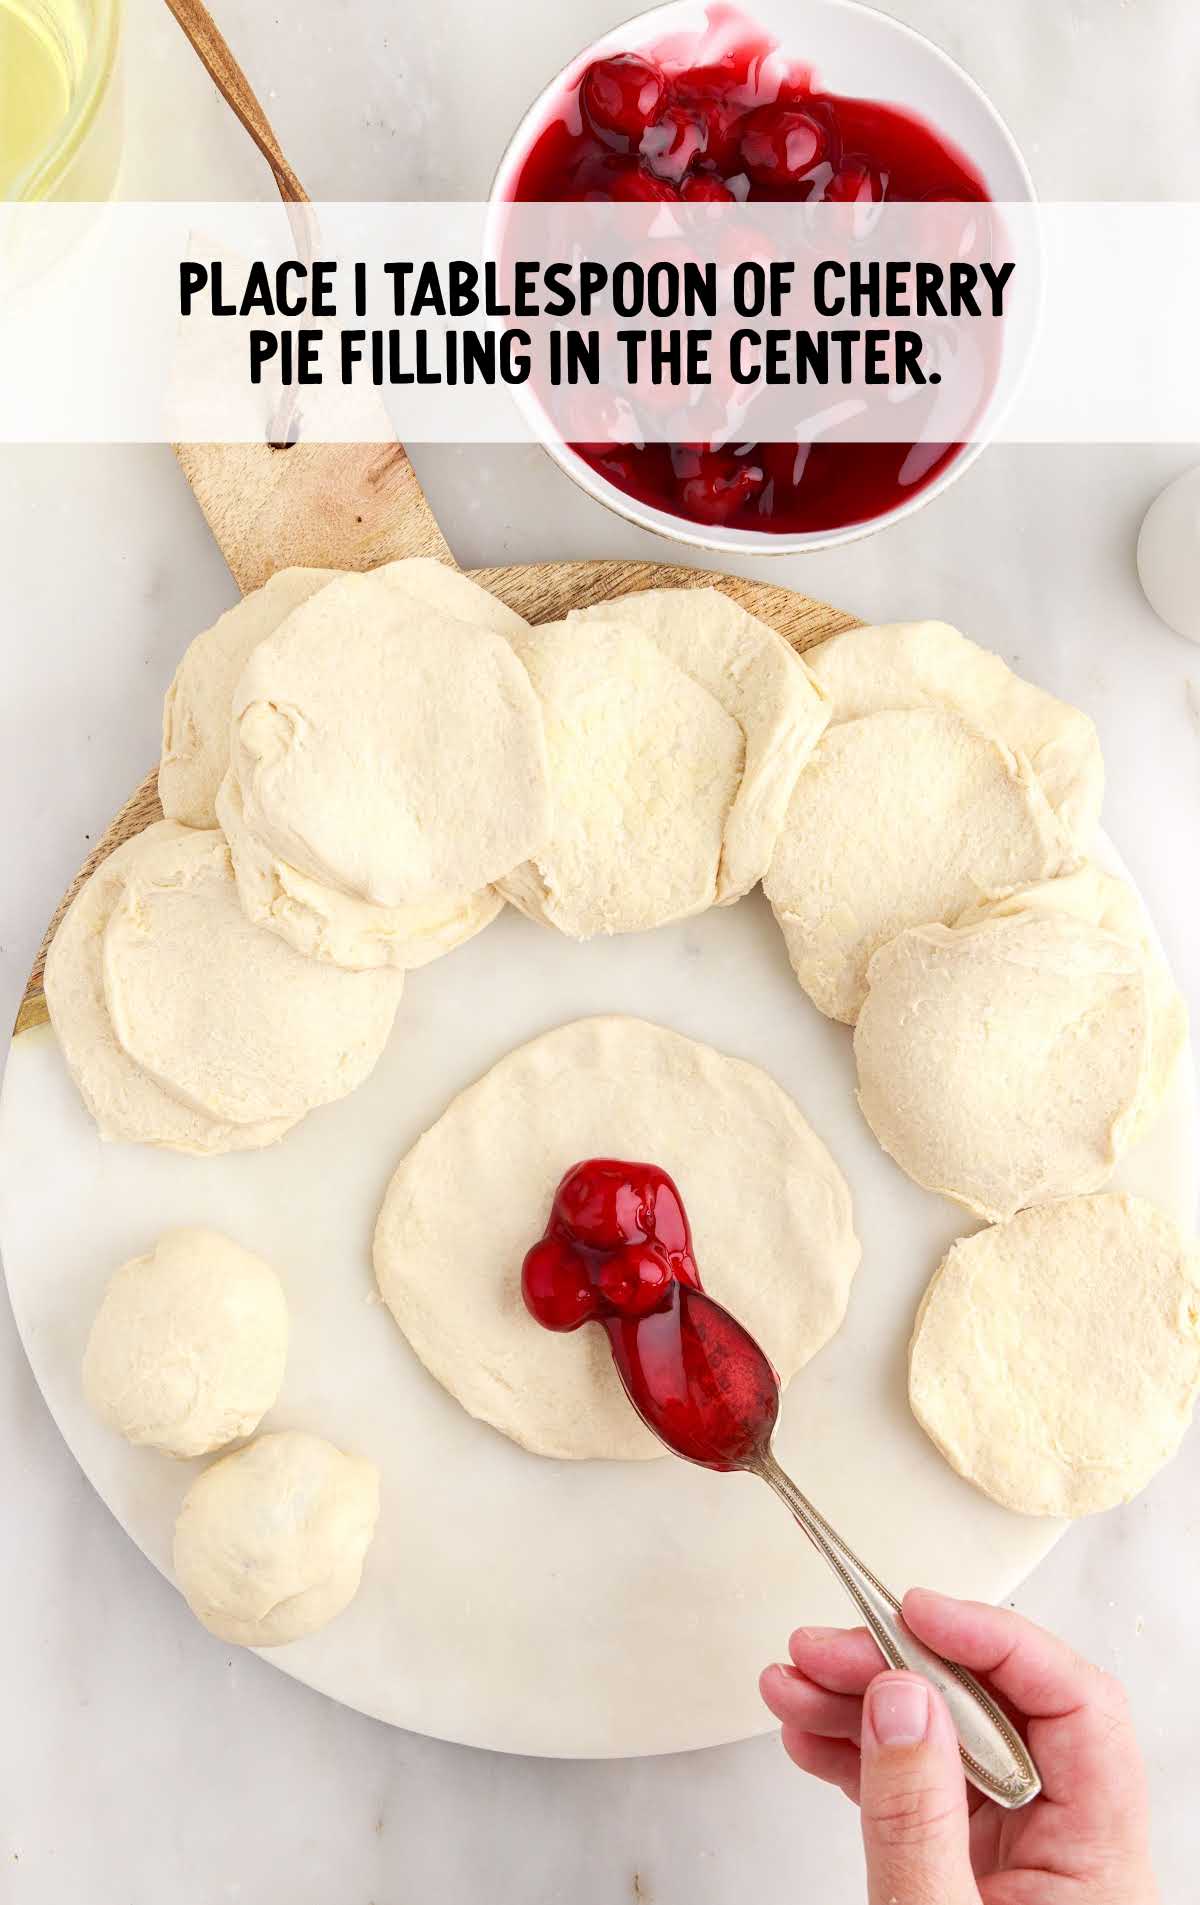
STEP THREE: Place one tablespoon of cherry pie filling in the center of the dough circle.
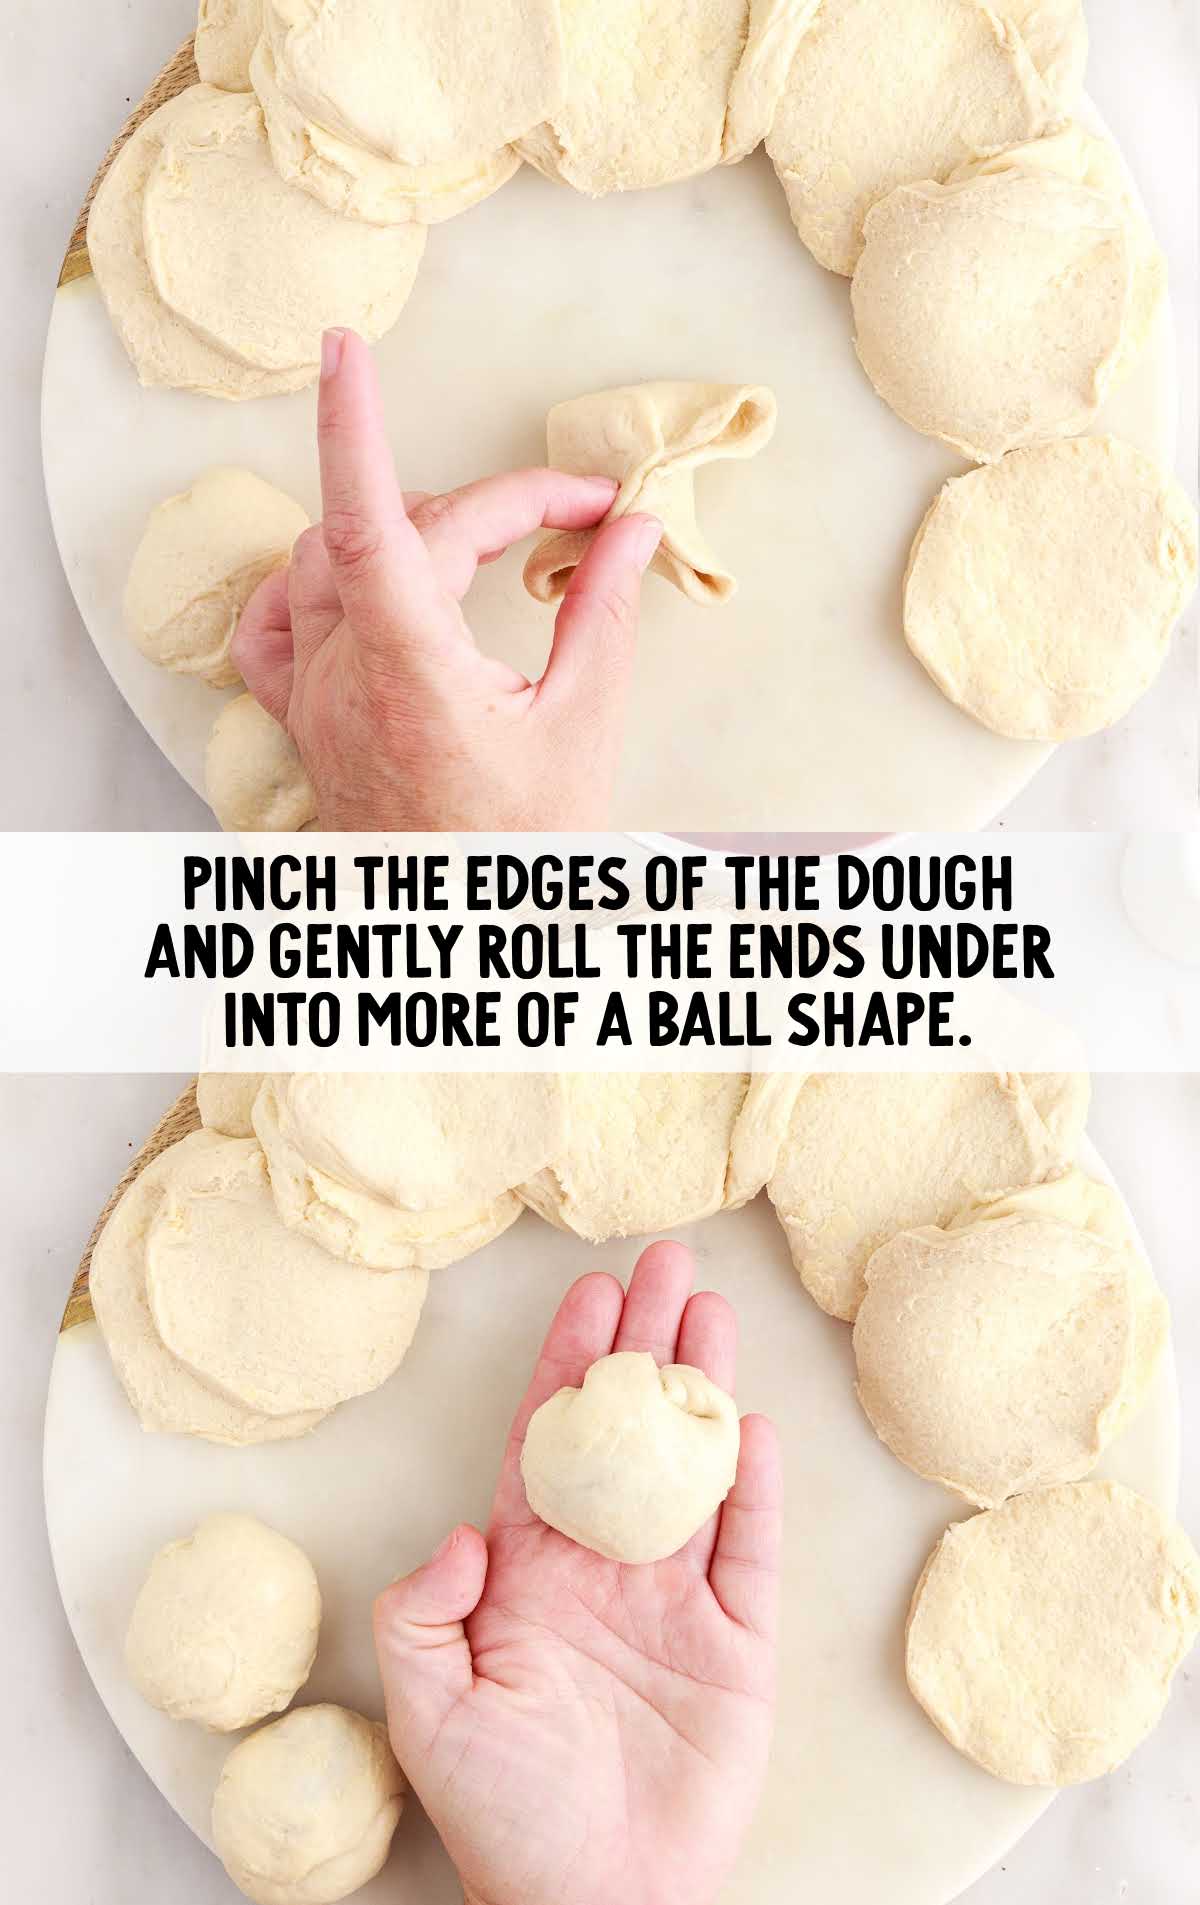
STEP FOUR: Pinch the edges of the dough together to ensure it does not come apart while frying. Once you have pinched the edges, gently roll the ends under into more of a ball shape.
STEP FIVE: Heat the oil to precisely 325°F and maintain this temperature throughout frying.
OUR RECIPE DEVELOPER SAYS
You can fry several pie bombs at a time; don’t overcrowd. You need the pie bombs to have enough room so that you can turn them to cook evenly and remove them when done.
STEP SIX: Carefully lower the dough balls into the oil using a slotted metal spoon, cooking two to three at a time.
Use the slotted spoon to roll the balls around in the oil to ensure they do not stick or burn. Fry the dough balls until all sides are a nice golden brown color, about five minutes.
PRO TIP:
The pie bombs will have more dough on the side where they were sealed up, which makes that side of the pie bomb heavier.
Use the slotted spoon to turn the pie bombs and hold them as needed in the frying oil to ensure all sides are cooked evenly.
STEP SEVEN: Be sure to constantly monitor the oil temperature and adjust accordingly. Too hot and you will burn the dough; too low and it will not cook evenly.
PRO TIP:
We cook these at 325°F (a little lower than typical) to give the thick dough time to cook all the way through without over-browning.
STEP EIGHT: Carefully lift the pie bombs out of the oil and transfer them to a plate with several sheets of paper towels to absorb excess oil. Continue frying the rest of the pie bombs.
STEP NINE: In a small bowl, whisk together the powdered sugar, milk, and corn syrup until smooth to make a sugar glaze.
PRO TIP:
The corn syrup in the glaze is optional, but it gives a nice sheen and also helps the glaze set dry to the touch.
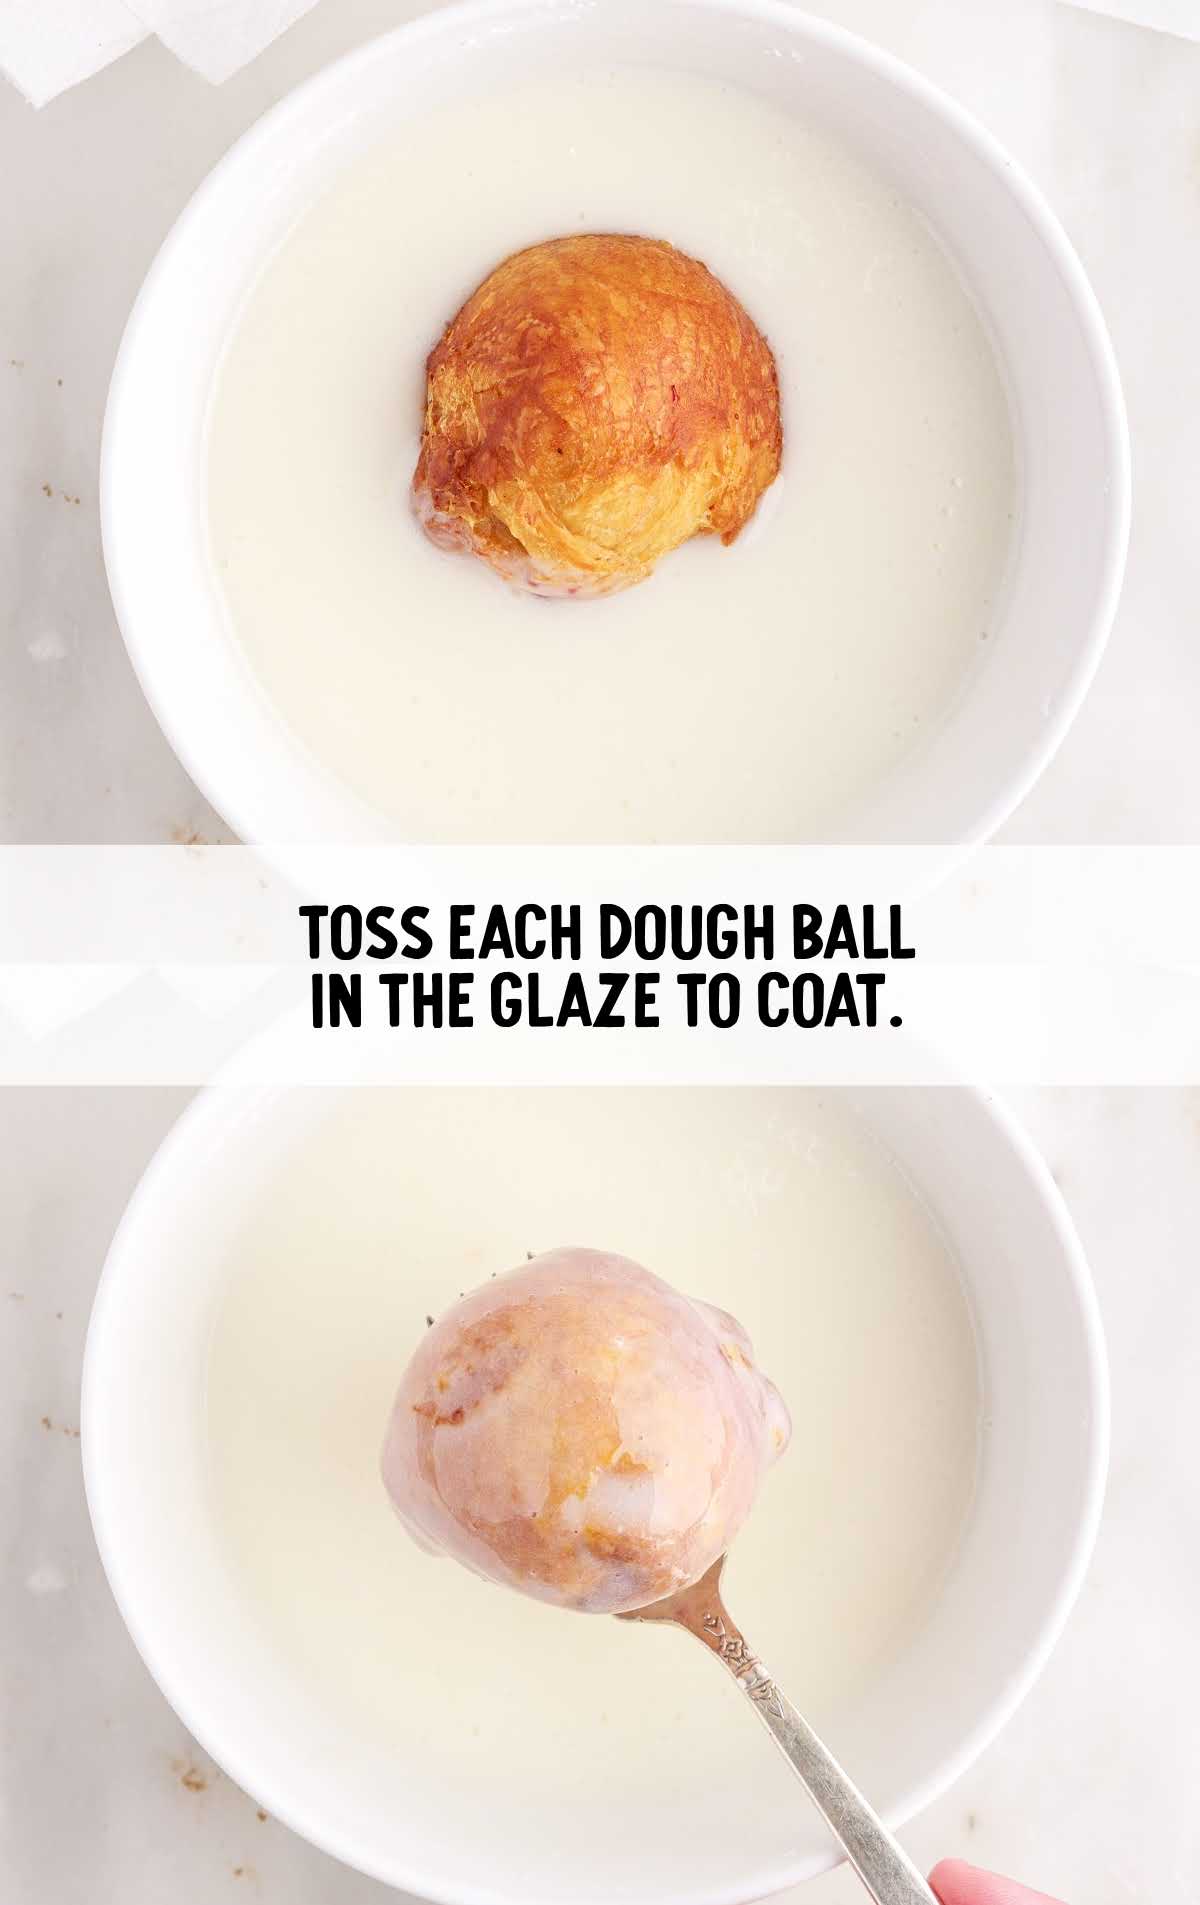
STEP TEN: Toss each dough ball in the glaze to coat, lift from the mixture, and allow the excess to drip off, then set aside on parchment paper or a cooling rack to set.
STEP ELEVEN: Serve immediately or allow the glaze to dry (about ten minutes), and then serve.
How To Serve
Serve this cherry bomb pie recipe warm as a delightful and easy dessert after a family dinner. Top with a scoop of vanilla ice cream for an extra treat.
Make a batch for brunch, along with our cherry Danish or cheese Danish, and watch them disappear. They pair perfectly with a cup of coffee, vanilla latte, or tea.
Our caramel apple pie bombs and chocolate covered cherry brownie bombs are two more easy recipes that are bursting with flavor inside.
MORE CHERRY RECIPES

Storage
To ensure you get the most out of your cherry pie bombs, we have a few tips to help you out:
MAKE AHEAD: You can assemble the pie bombs ahead of time and freeze them before frying. This way, you can enjoy them freshly fried whenever you desire.
IN THE FRIDGE: If you have leftovers, store them in an airtight container in the fridge. They’ll stay good for a day or so.
IN THE FREEZER: For longer storage, freeze the assembled but unfried bombs in an airtight container or freezer bag for up to three months.
When ready to enjoy, fry them directly from the freezer, adding a little extra time for cooking.
REHEATING: To reheat, you can use the oven, air fryer, or even the microwave if you’re in a hurry. Just be sure not to overheat them to maintain that delightful crispiness.
Why We Love This Recipe
There are countless reasons why we adore these cherry pie bombs:
EASY TO MAKE: These cherry pie bombs are incredibly easy to make, perfect for novice bakers.
COMFORT FOOD: The combination of flaky biscuit crust and sweet cherry filling is pure comfort.
SWEET TREAT: The sugar glaze adds a delightful sweetness and sheen to each bite of this tasty dessert.
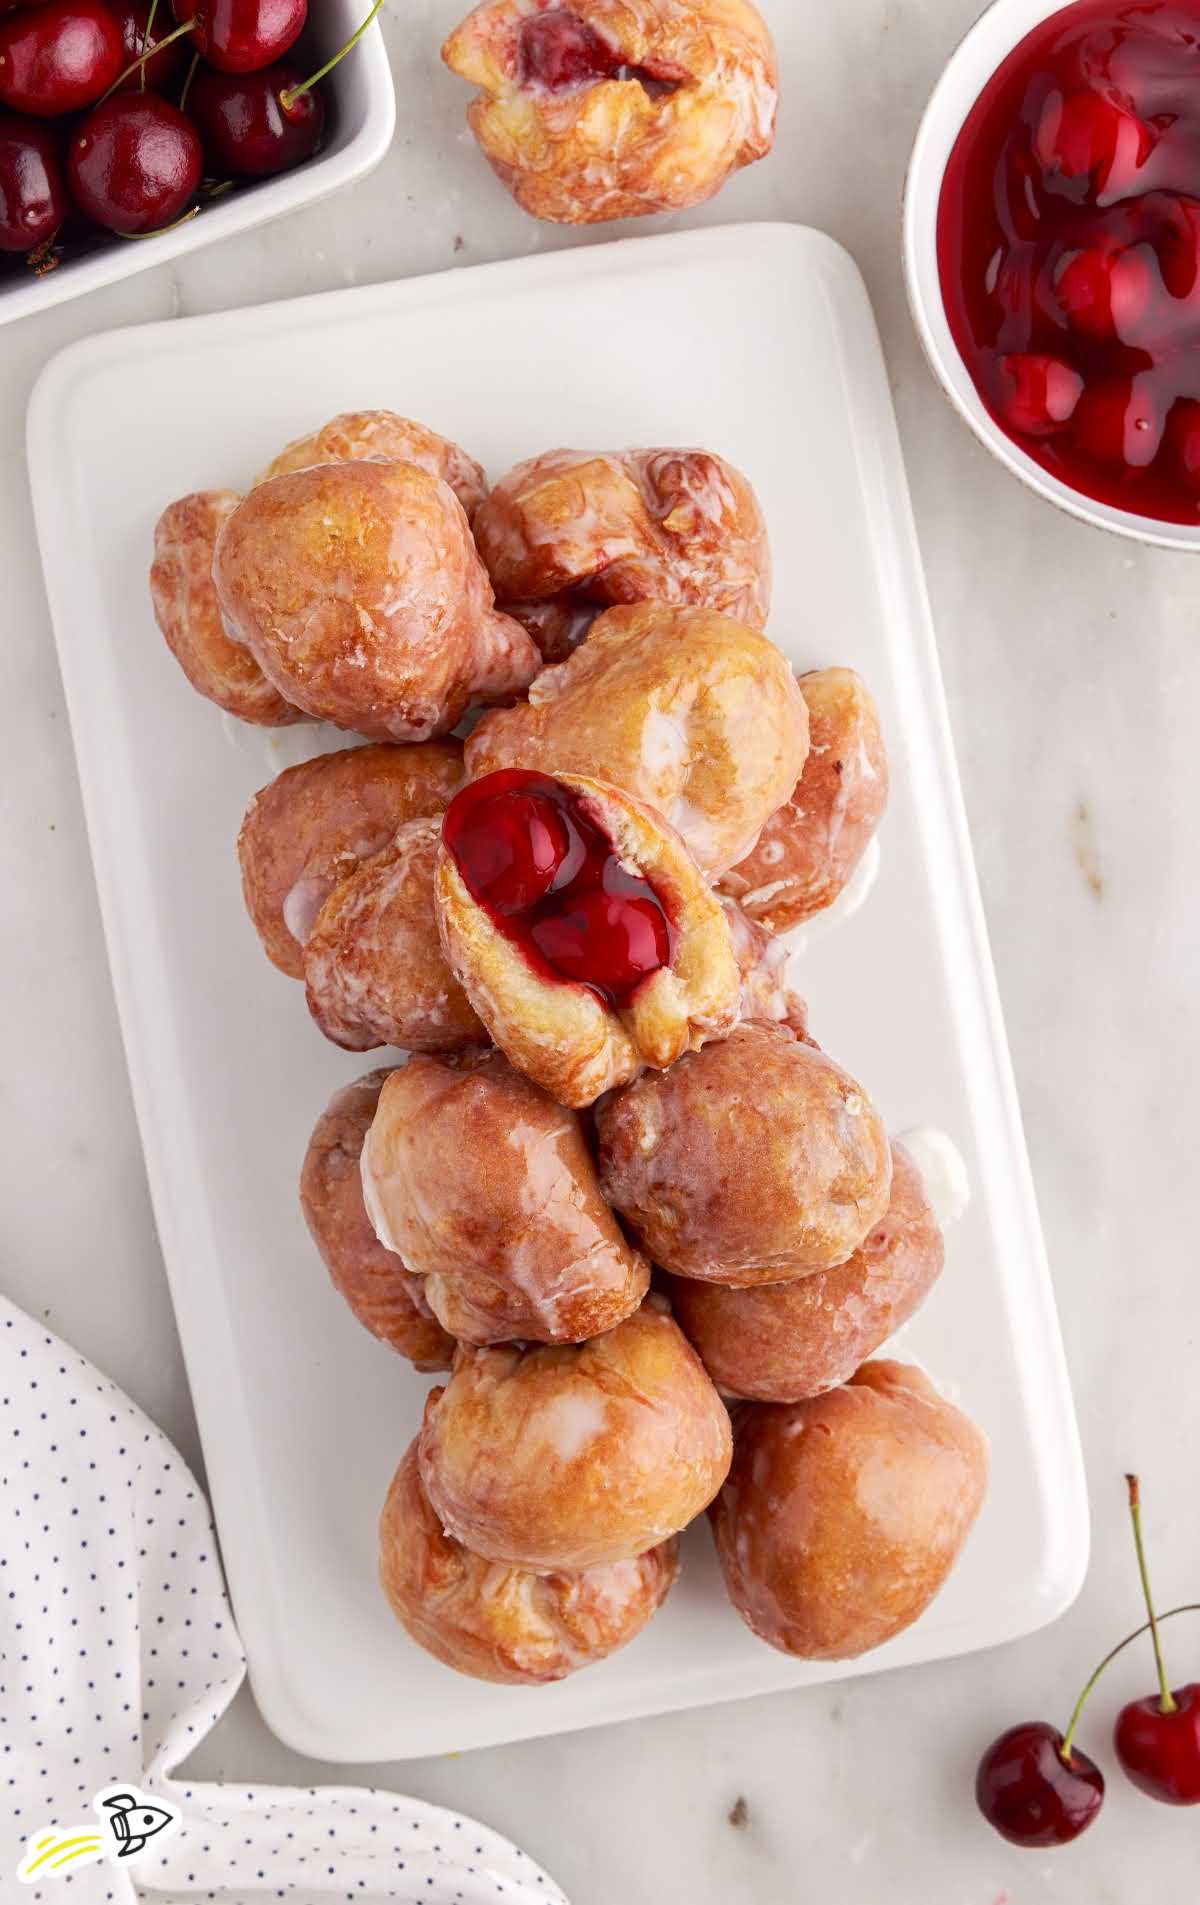
In the world of desserts, cherry pie bombs stand out as a delightful creation that combines simplicity with irresistible flavor. With their flaky biscuit exterior and the burst of sweet cherry pie filling inside, they are a crowd-pleaser on every occasion.
Golden on the outside with a warm cherry center, these stay soft inside with a crisp shell, and you can explore more dessert recipes here.
Frequently Asked Questions
Homemade filling can elevate the flavor of this sweet treat even more.
Frying is recommended for the best results, but you can try baking at 350°F until golden brown.
Yes, but be cautious not to overheat and lose their crispiness.
Ensure you pinch the edges tightly to seal them.
Certainly, regular-sized biscuits work well, too, in this simple recipe.
Opt for vegetable, canola, or peanut oil with a high smoke point.
More Cherry Dessert Recipes You’ll Love
If you’re planning a backyard cookout or bringing dessert to a summer party, take a look at my 4th of July desserts filled with easy cakes, chilled no-bake treats, fruity favorites, and fun desserts made for sharing.


Cherry Pie Bombs
Ingredients
- Vegetable oil, for frying
- 16.3 ounces Grands “Big” biscuits, flaky
- 21 ounces cherry pie filling
- 2 cups powdered sugar
- ¼ cup milk
- 1 tablespoon light corn syrup
Instructions
- Fill a 2 to 3-quart heavy-bottomed saucepan a little over ½ way with vegetable oil. You will want this deep enough to cover the dough balls completely. Set it aside.
- Open the can of biscuits and divide each biscuit in half by pulling apart the “flaky” layers at the center. Use your fingers or a rolling pin to flatten the biscuit dough. Don’t roll the dough out thin – just flatten it.
- Place 1 tablespoon of cherry pie filling in the center of the dough circle.
- Pinch the edges of the dough together to ensure it does not come apart while frying. Once you have pinched the edges, gently roll the ends under into more of a ball shape.
- Heat the oil to precisely 325°F and maintain this temperature throughout frying.
- Carefully lower the dough balls into the oil using a slotted metal spoon, cooking 2-3 at a time. Use the slotted spoon to roll the balls around in the oil to ensure they do not stick or burn. Fry the dough balls until all sides are golden brown, about 5 minutes.
- Be sure to constantly monitor the oil temperature and adjust accordingly. Too hot and you will burn the dough; too low and it will not cook evenly.
- Carefully lift the pie bombs out of the oil and transfer them to a plate with several sheets of paper towels to absorb excess oil. Continue frying the rest of the pie bombs.
- In a small bowl, whisk together the powdered sugar, milk, and corn syrup until smooth to make a sugar glaze.
- Toss each dough ball in the glaze to coat, lift from the mixture, and allow the excess to drip off, then set aside on parchment paper or a cooling rack to set.
- Serve immediately or allow the glaze to dry (about 10 minutes), and then serve.
Notes
- You can fry several pie bombs at a time; don’t overcrowd. You need the pie bombs to have enough room so that you can turn them to cook evenly and remove them when done.
- The pie bombs will have more dough on the side where they were sealed up, which makes that side of the pie bomb heavier. Use the slotted spoon to turn the pie bombs and hold them as needed in the frying oil to ensure all sides are cooked evenly.
- We cook these at 325°F (a little lower than typical) to give the thick dough time to cook all the way through without over-browning.
- The corn syrup in the glaze is optional, but it gives a nice sheen and also helps the glaze set dry to the touch.
Nutrition


Comments
Minnie09 says
I would have never tried these because they’re made with biscuits . I couldn’t imagine it. My husband insisted though. I’m so glad he did. I have made a ton of them in a short period of time. They are incredible . So delicious . Taste like jelly donuts from a bakery .