

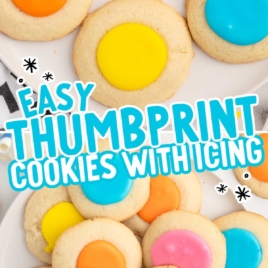
At Spaceships and Laser Beams, we’ve created hundreds of deliciously tender cookies for every holiday and celebration. Millions of readers have given our cookies five-star reviews because they bake up just like they hoped.
We pride ourselves on providing reliable, easy-to-follow cookie recipes that anyone can master, so anyone can feel confident you can create these delightful little icing-filled goodies.
Our team’s extensive hands-on experience ensures that every recipe we share is tested multiple times and perfected to deliver consistent, delicious results. With over ten years of expertise in the culinary field, our commitment to developing quality recipes and our attention to every detail sets us apart.
Trust Spaceships and Laser Beams to guide you through making perfect thumbprint cookies with icing with helpful instructions, advice, and photos along the way.

Ingredients For Thumbprint Cookies With Icing
Thumbprint Cookies with Icing are a colorful, fun, and delicious treat that can be whipped up in just over an hour.
The cookie dough we created for these treats bakes up like a cross between buttery shortbread cookies and sugar cookies, topped with a sweet, vibrant icing. And we’ve made sure you can easily customize the color for every occasion.
Our iced thumbprint cookies recipe provides a noticeably bright and fun pop of color to cookie trays and dessert tables, but needs only pantry staples. You probably have everything you need to whip up this recipe today.
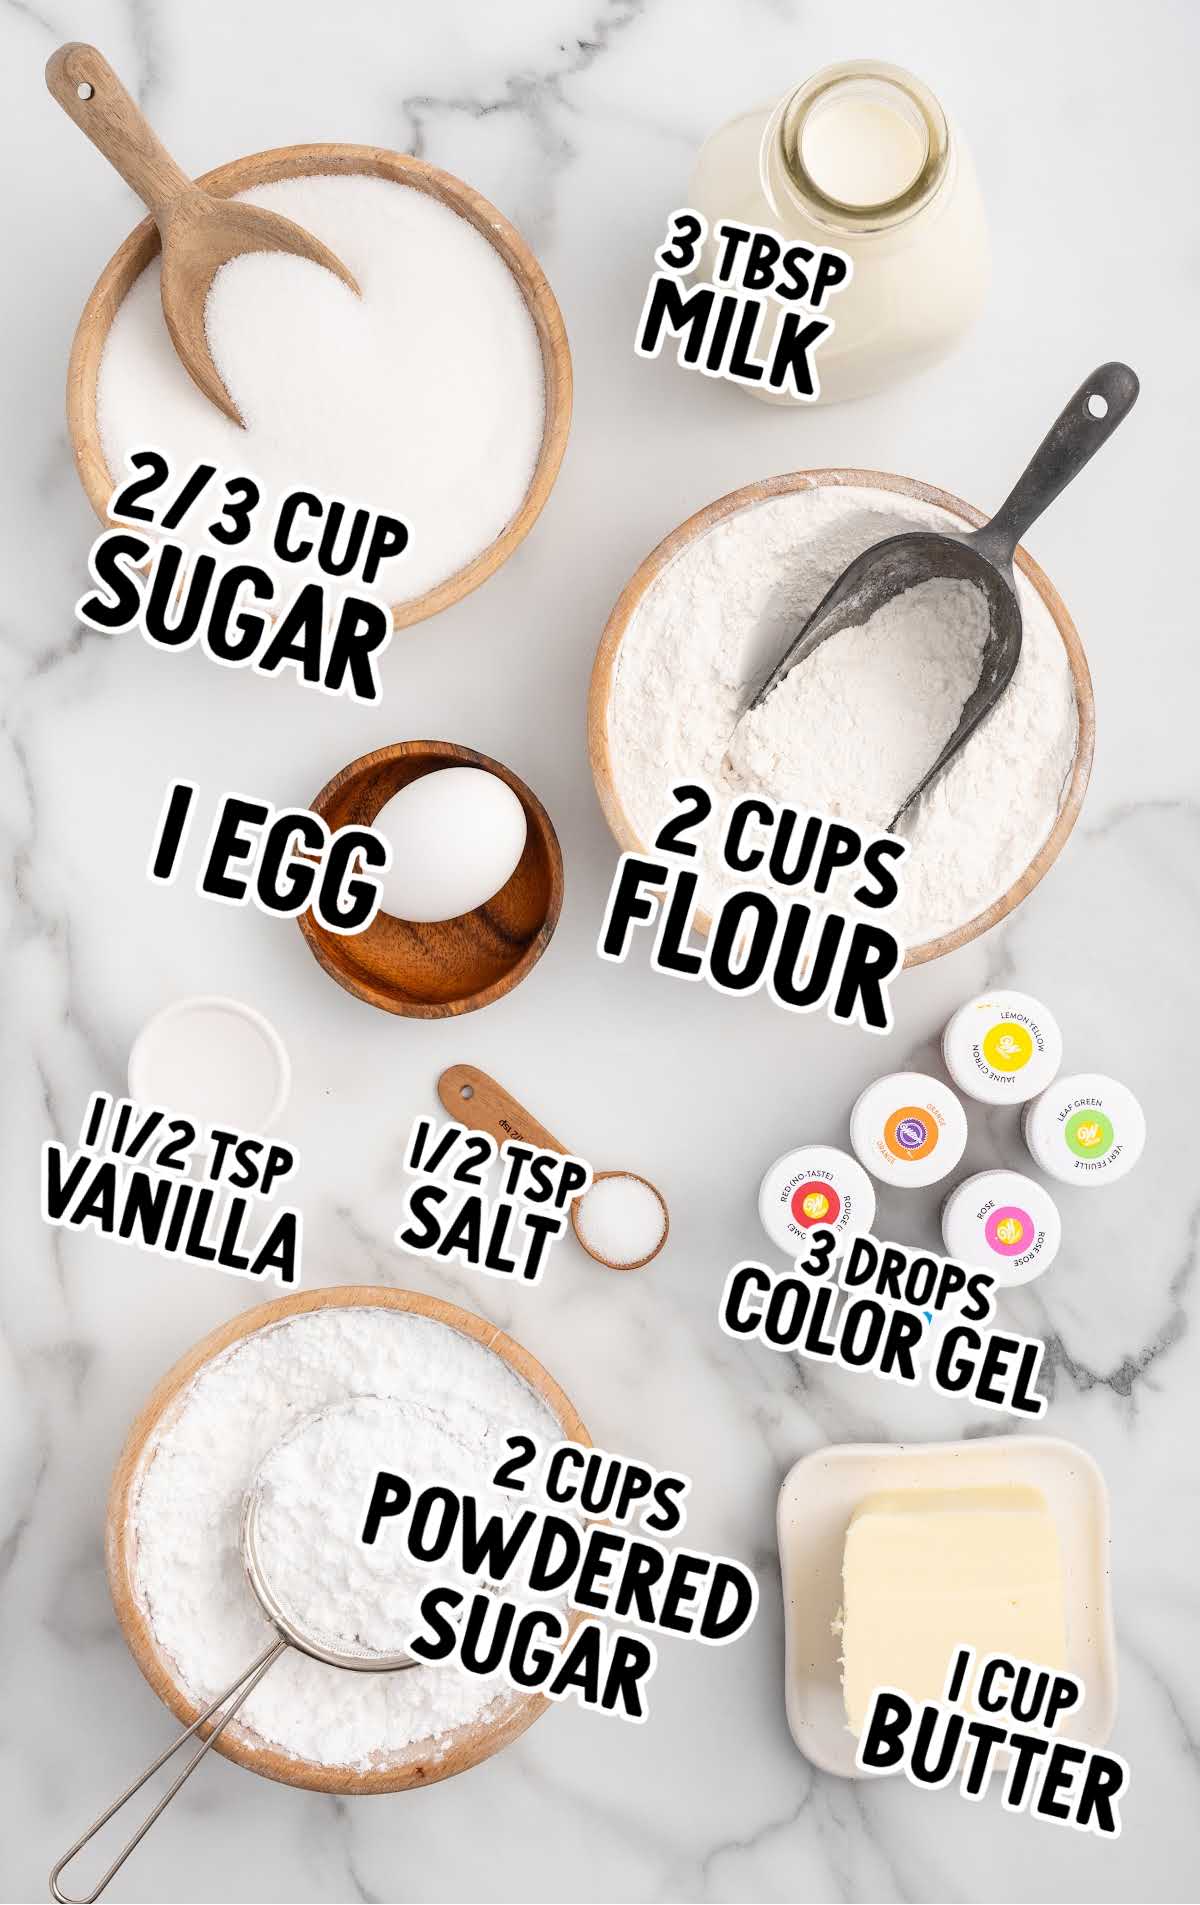
You’ll need these simple ingredients:
For the Cookies:
- 2 cups all-purpose flour
- ½ teaspoon salt
- 1 cup unsalted butter, softened to room temperature
- ⅔ cup granulated sugar
- 1 large egg, room temperature
- 1 teaspoon clear vanilla flavoring
For the Colored Icing:
- 2 cups powdered sugar, sifted
- 2-3 tablespoons whole milk
- ½ teaspoon clear vanilla flavoring
- 2-3 drops gel food coloring
Thumbprint Cookie Recipe With Icing – Substitutions and Additions
Making this Thumbprint Cookies with Icing recipe is easy and fun, but sometimes, you might want to customize it based on your preferences, dietary needs, or the ingredients you have on hand.
Here are some suggestions for substitutions and additions that can help you adapt this recipe.
Remember, any changes might alter the taste and texture, so use them at your own discretion.
Unsalted Butter: You can use salted butter if that’s what you have, just omit the added salt in the recipe.
For a dairy-free option, use vegan butter or margarine, but your cookies might end up more crispy.
Granulated Sugar: Swap with coconut sugar or a sugar substitute like Stevia for a lower-glycemic option. Note that these substitutes might change the texture slightly.
All-purpose Flour: Use gluten-free all-purpose flour for a gluten-free version. Ensure it’s a one to one substitute to maintain the dough’s consistency.
Whole Milk: You can substitute with 2% or skim milk for a lighter icing.
Almond milk or soy milk works well for a dairy-free version, though the flavor might be slightly different.
Clear Vanilla Flavoring: Vanilla flavoring gives both the cookies and the icing a sweet vanilla flavor, so the recipe will taste less sweet and intense without it. Regular vanilla extract can be used, but it may give a slight tint to the dough and icing. Almond extract or lemon extract can add a different flavor.
Gel Food Coloring: Liquid food coloring can be used if gel is unavailable, but you may need to adjust the amount of milk in the icing to get the right consistency.
Alternatively, you can make white icing by omitting the gel food coloring altogether.
Cocoa Powder: To make chocolate icing instead of colored icing, replace the gel food coloring with two to three tablespoons of cocoa powder.
How To Make Thumbprint Cookies With Icing
Ready to make sweet and delicious thumbprint cookies with frosting? We’ve developed the steps of this recipe to completely guide you through each phase, from making and baking the cookie dough to filling your thumbprints with icing.
Watch for Pro Tips along the way, and our recipe developers’ advice and troubleshooting section below to help avoid common issues.
STEP ONE: In a medium bowl, combine the all-purpose flour and salt. Set this mixture aside.
STEP TWO: In the bowl of a stand mixer or in a large mixing bowl, add the unsalted butter and granulated sugar. Use your stand mixer or an electric hand mixer on medium speed to cream together the butter and sugar for two to three minutes until the mixture is smooth and fluffy.
This step is crucial for creating a light and tender cookie base.
PRO TIP: Make sure the butter is fully softened to room temperature or your dough will be thick and tough.
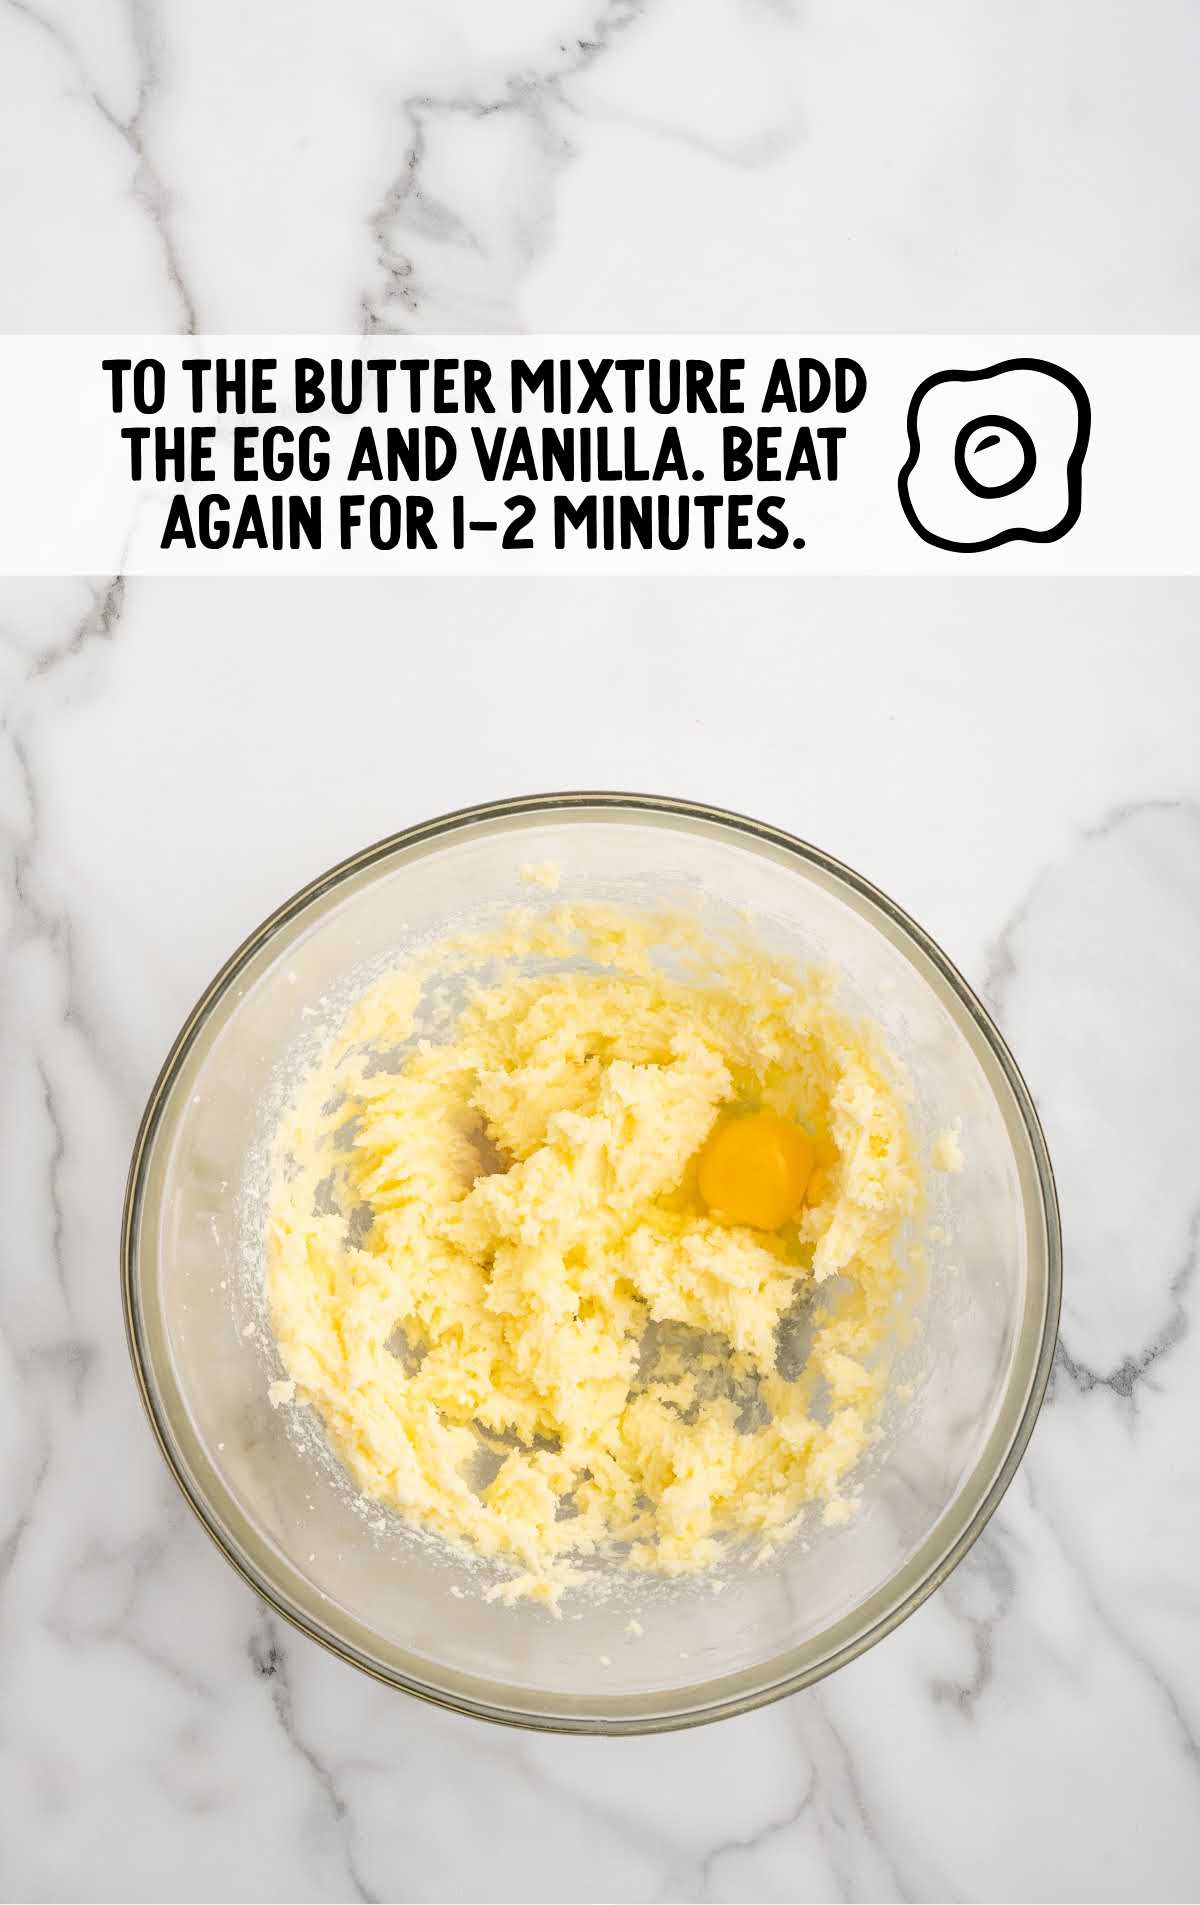
STEP THREE: Add a room-temperature egg and the clear vanilla flavoring to the butter mixture. Beat again for one to two minutes until fully incorporated.
Using room-temperature eggs helps the mixture blend more easily, creating a smoother dough.
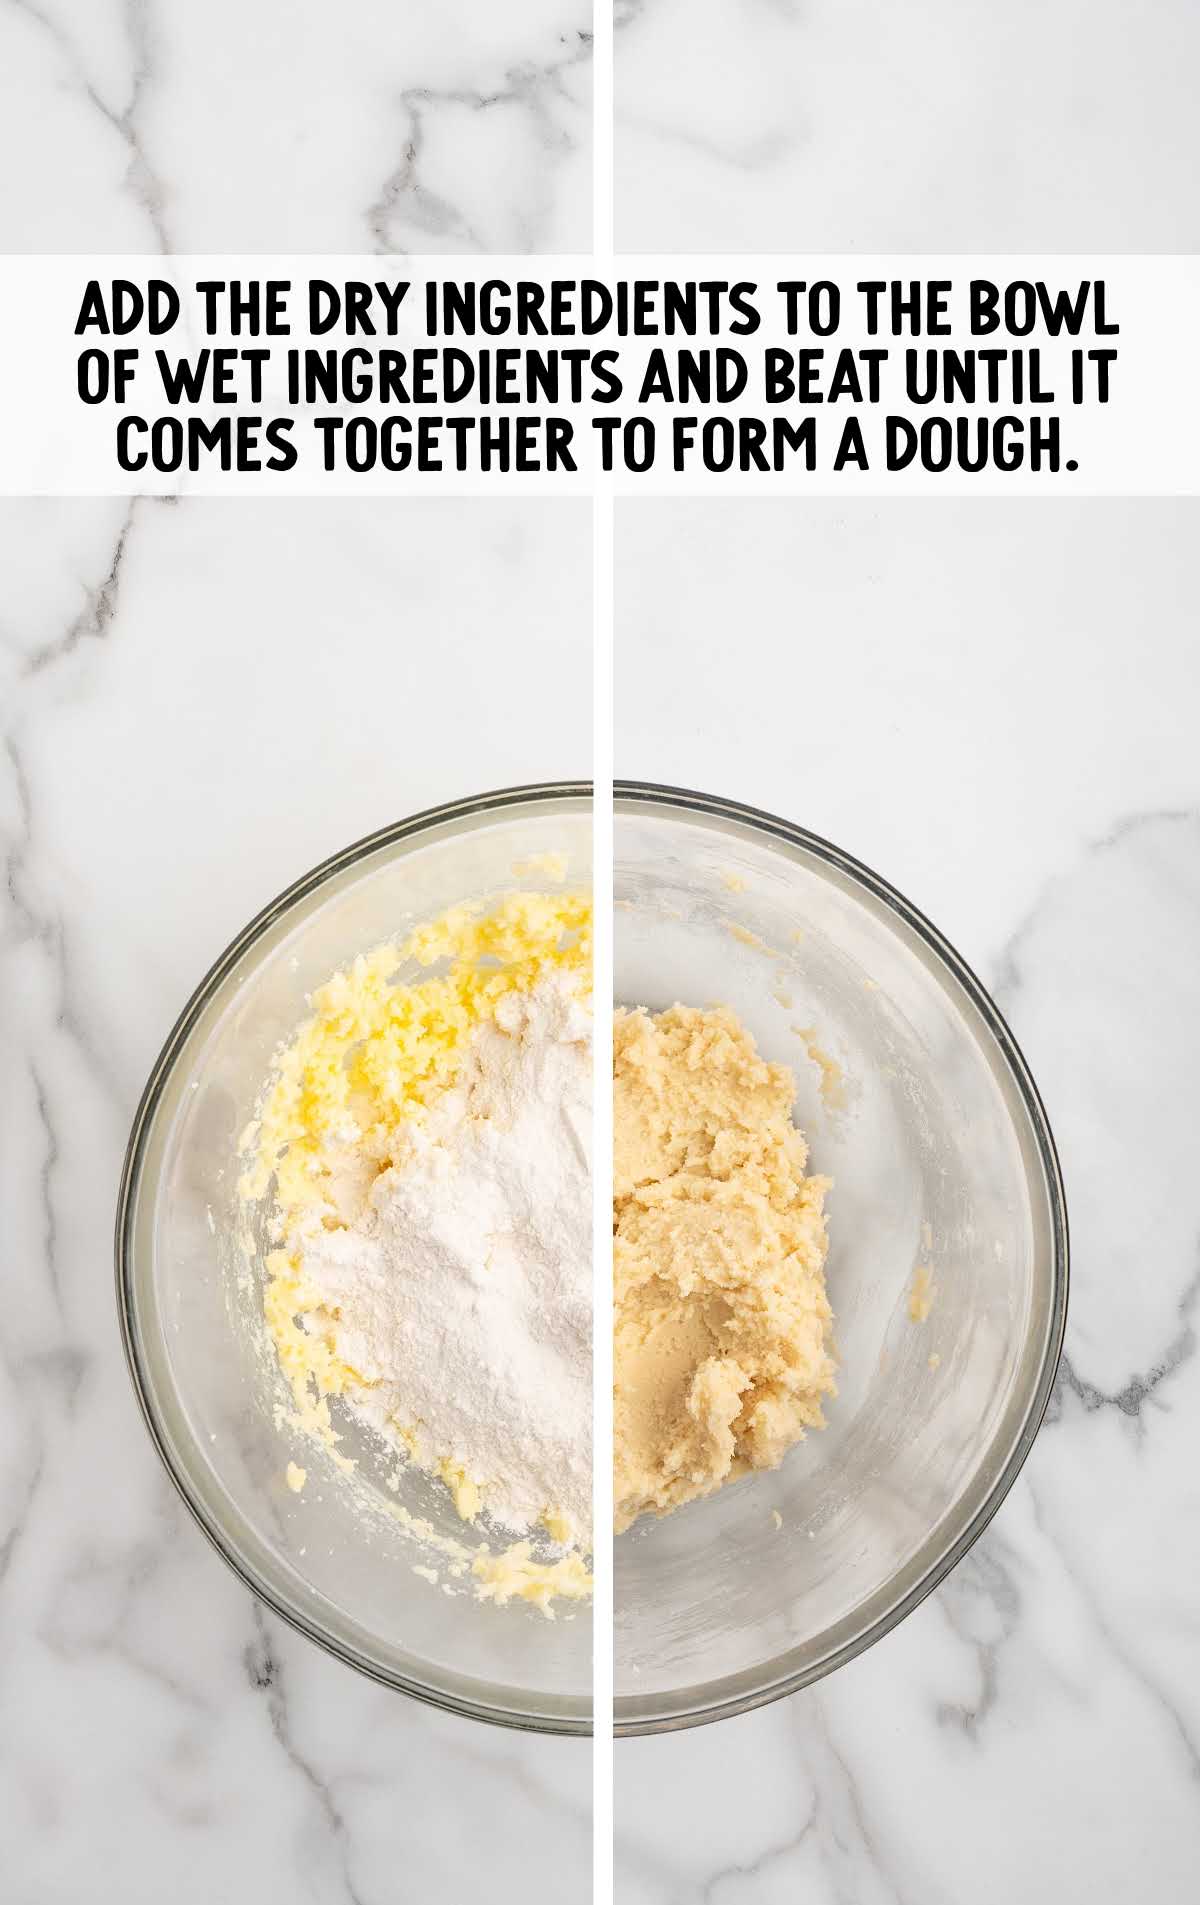
STEP FOUR: Gradually add the dry ingredients to the wet mixture. Beat on low speed until the dough comes together, forming a thick and smooth consistency.
Scrape the sides and bottom of the bowl with a rubber spatula to ensure all the dry ingredients are fully incorporated.
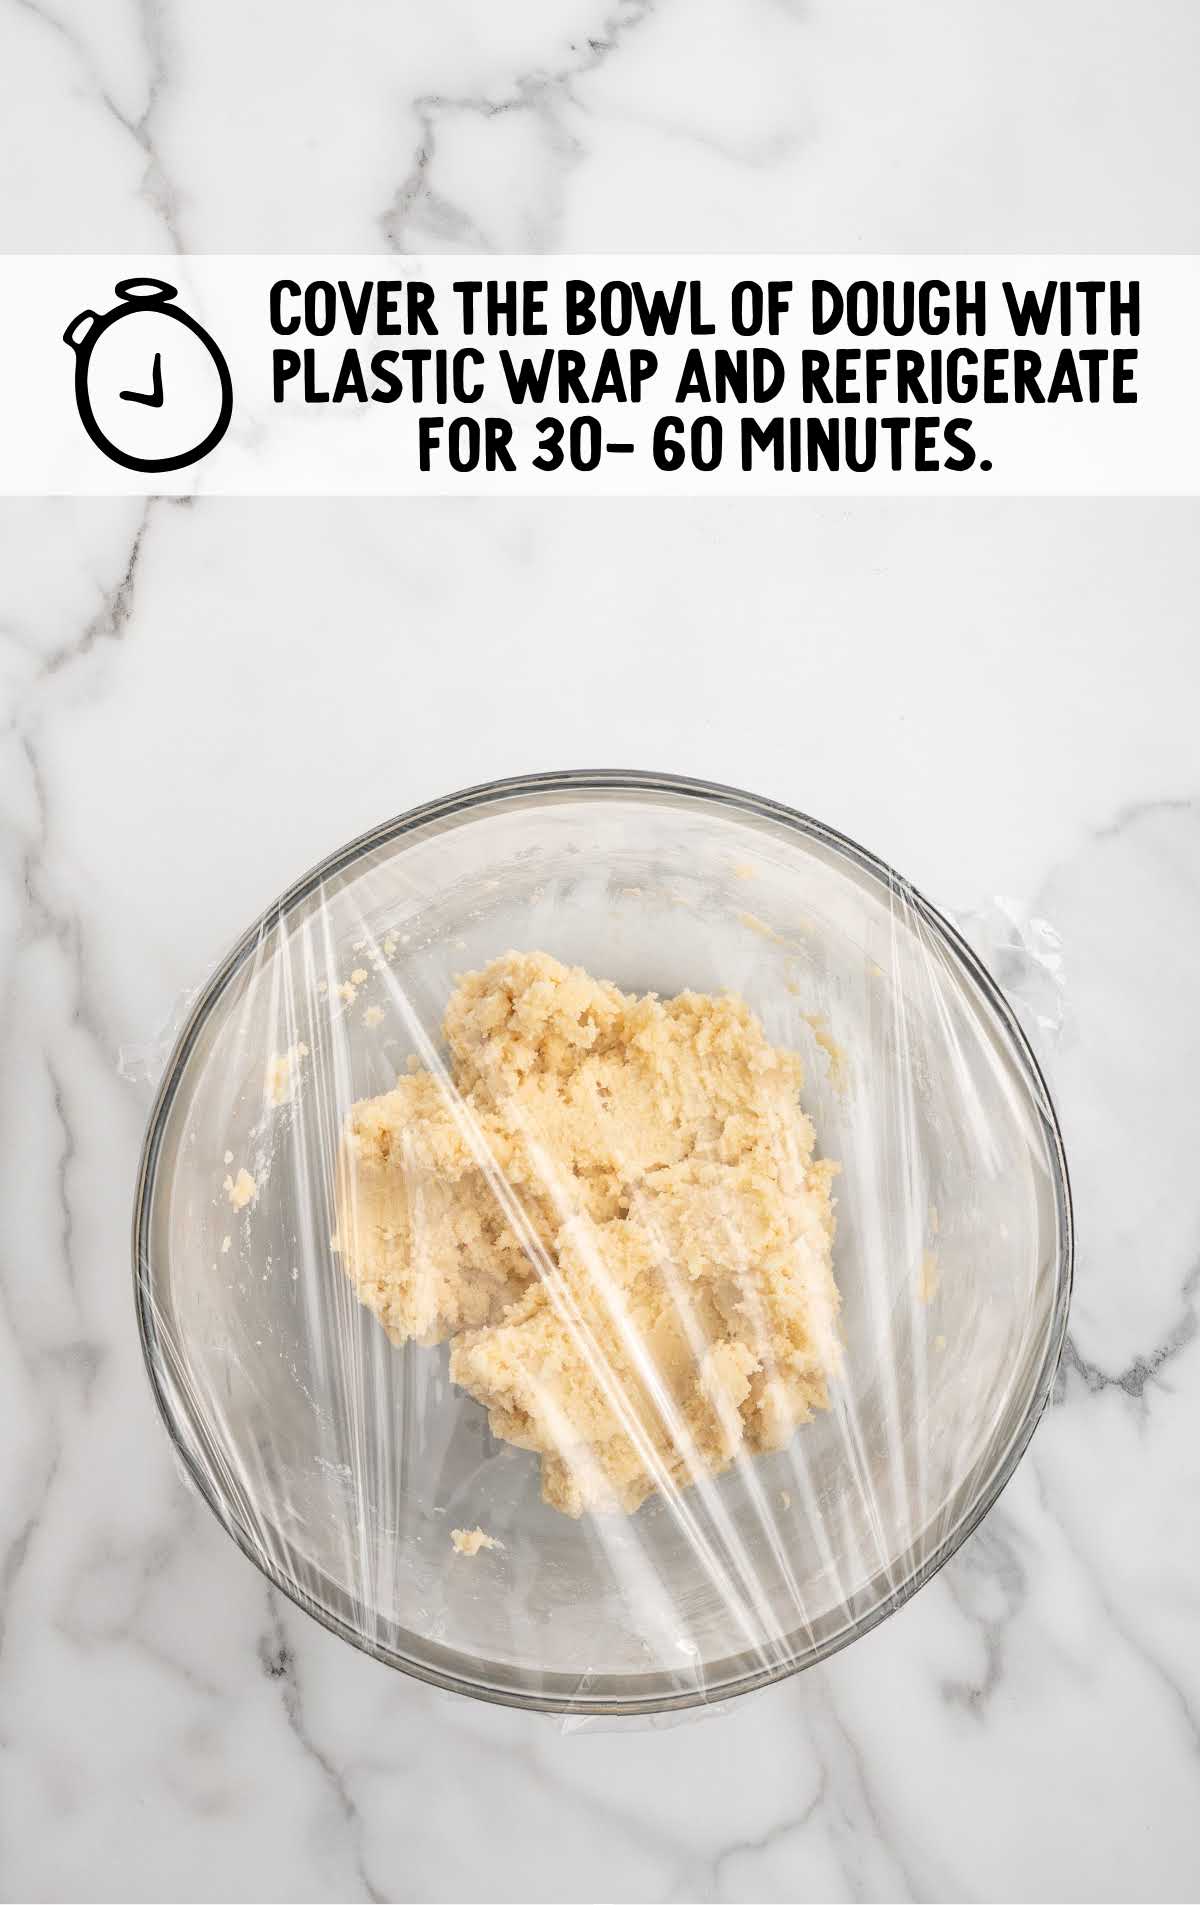
STEP FIVE: Cover the bowl of cookie dough with plastic wrap and refrigerate for 30-60 minutes.
Chilling the dough makes it easier to handle and helps the cookies maintain their shape during baking so they don’t spread out and lose their ‘thumbprint’ shapes.
STEP SIX: Preheat your oven to 350°F. Line two large baking sheets with parchment paper and set them aside.
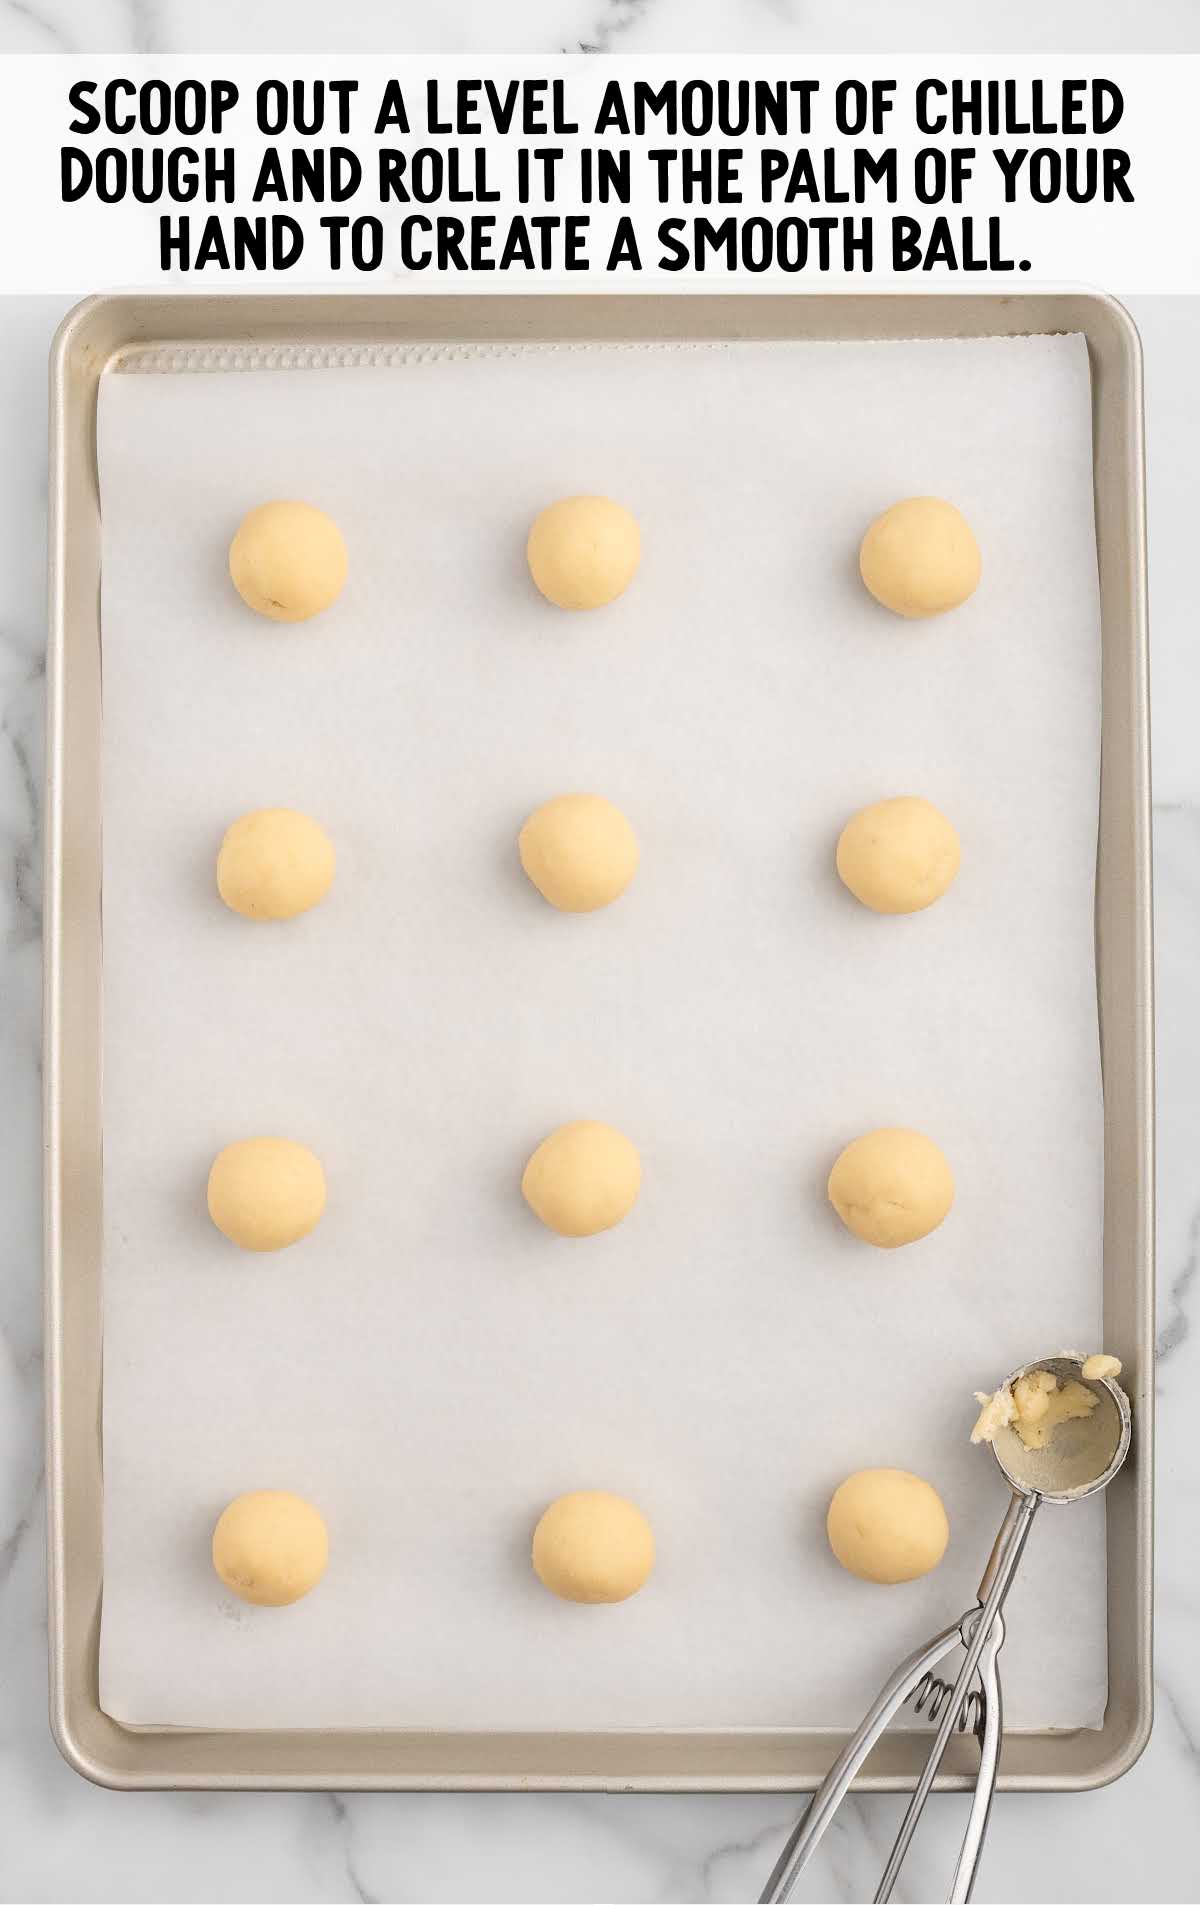
STEP SEVEN: Using a small one-tablespoon cookie scoop, take out a level amount of chilled dough and roll it into a smooth ball with your palms.
Place the dough balls onto the prepared baking sheets, spacing them about two inches apart.
STEP EIGHT: Using a small rounded measuring spoon or your thumb, press an indent into the center of each dough ball, about ¾ – 1 inch wide.
This step should slightly flatten the dough balls without piercing them completely.

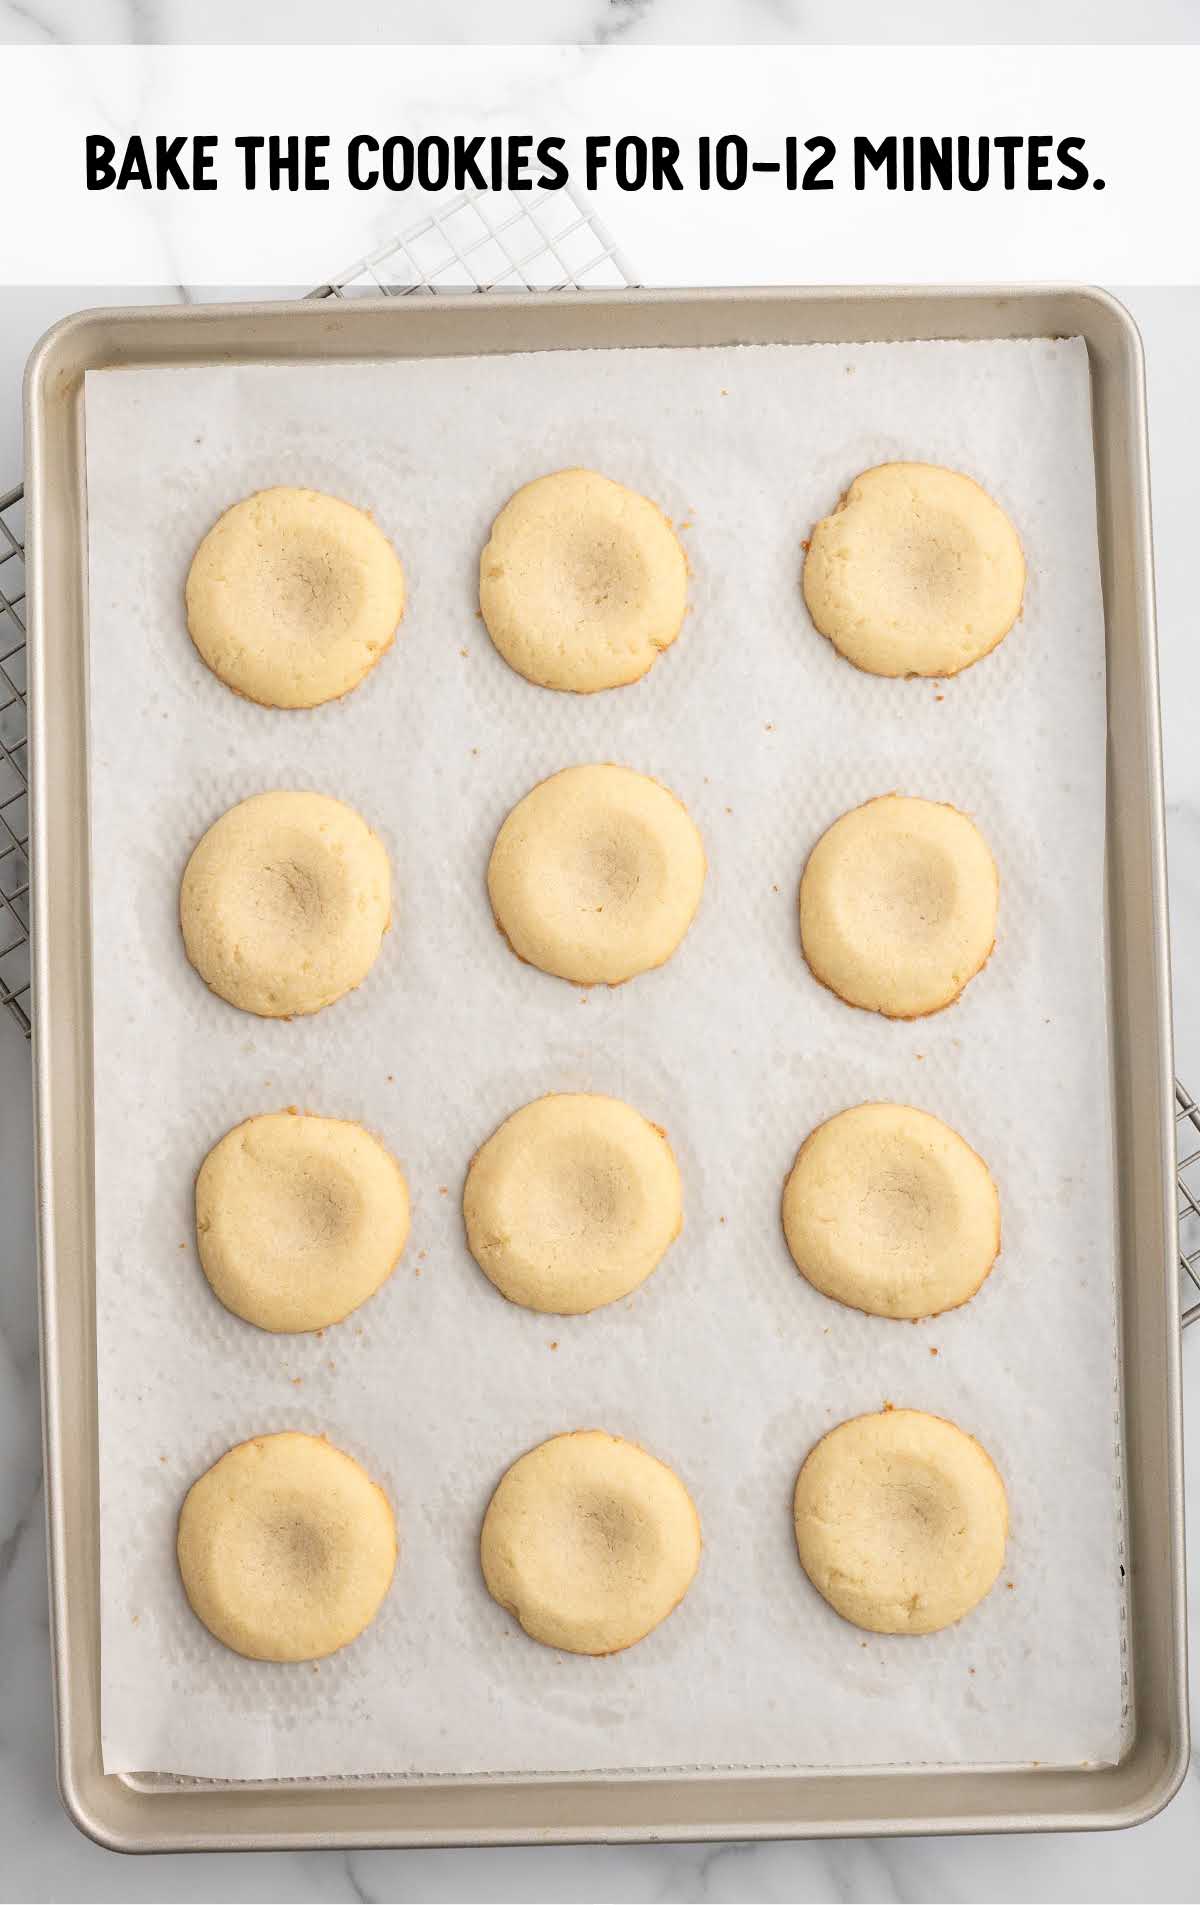
STEP NINE: Bake the cookies in the preheated oven just until the edges start to turn golden. Keep an eye on them to prevent over-baking.
Once done, remove the cookies from the oven and let them cool on the baking sheets for five minutes before transferring them to a wire rack to cool completely.
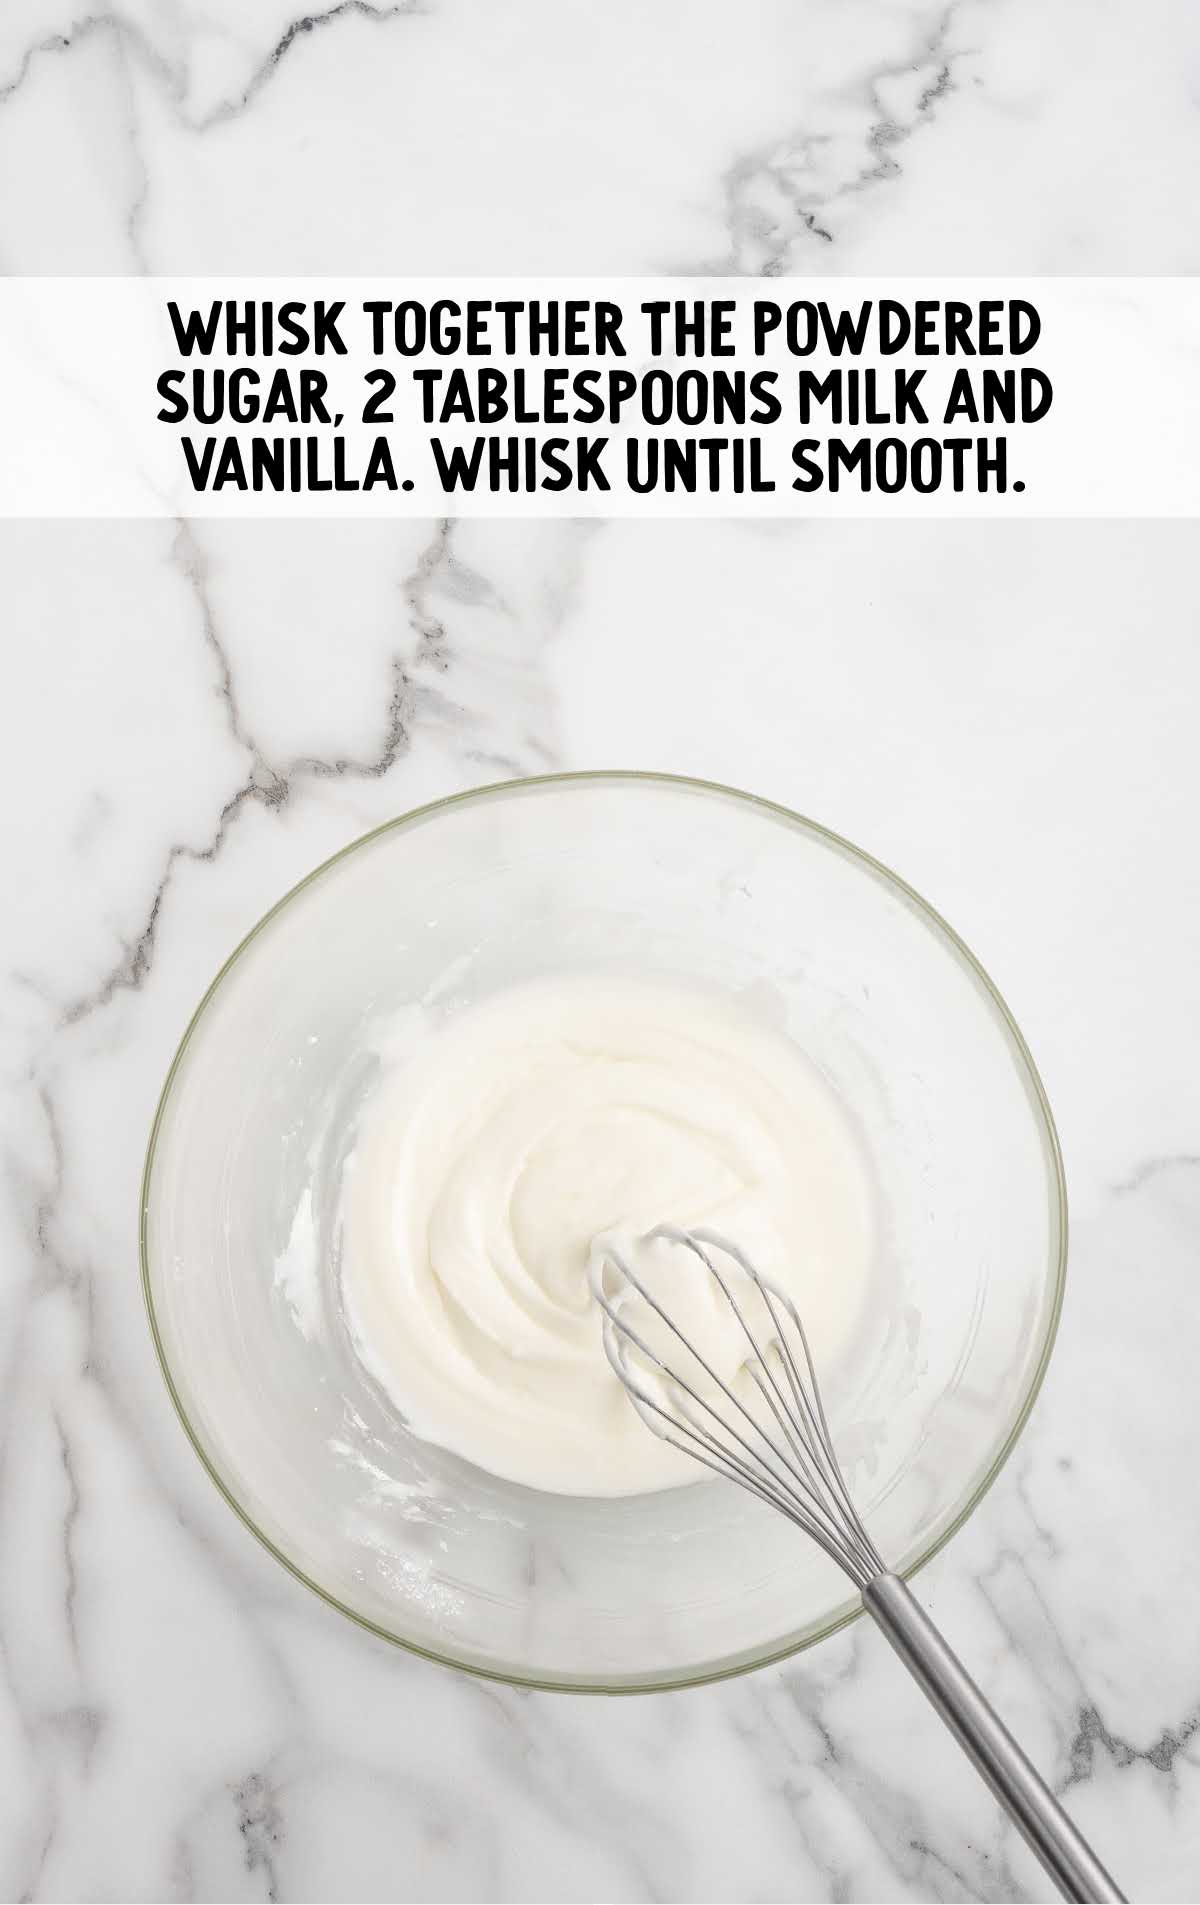
STEP TEN: In a large mixing bowl, whisk together the sifted powdered sugar, whole milk, and clear vanilla flavoring until smooth.
You want a thick consistency, so add milk gradually to avoid making it too runny.
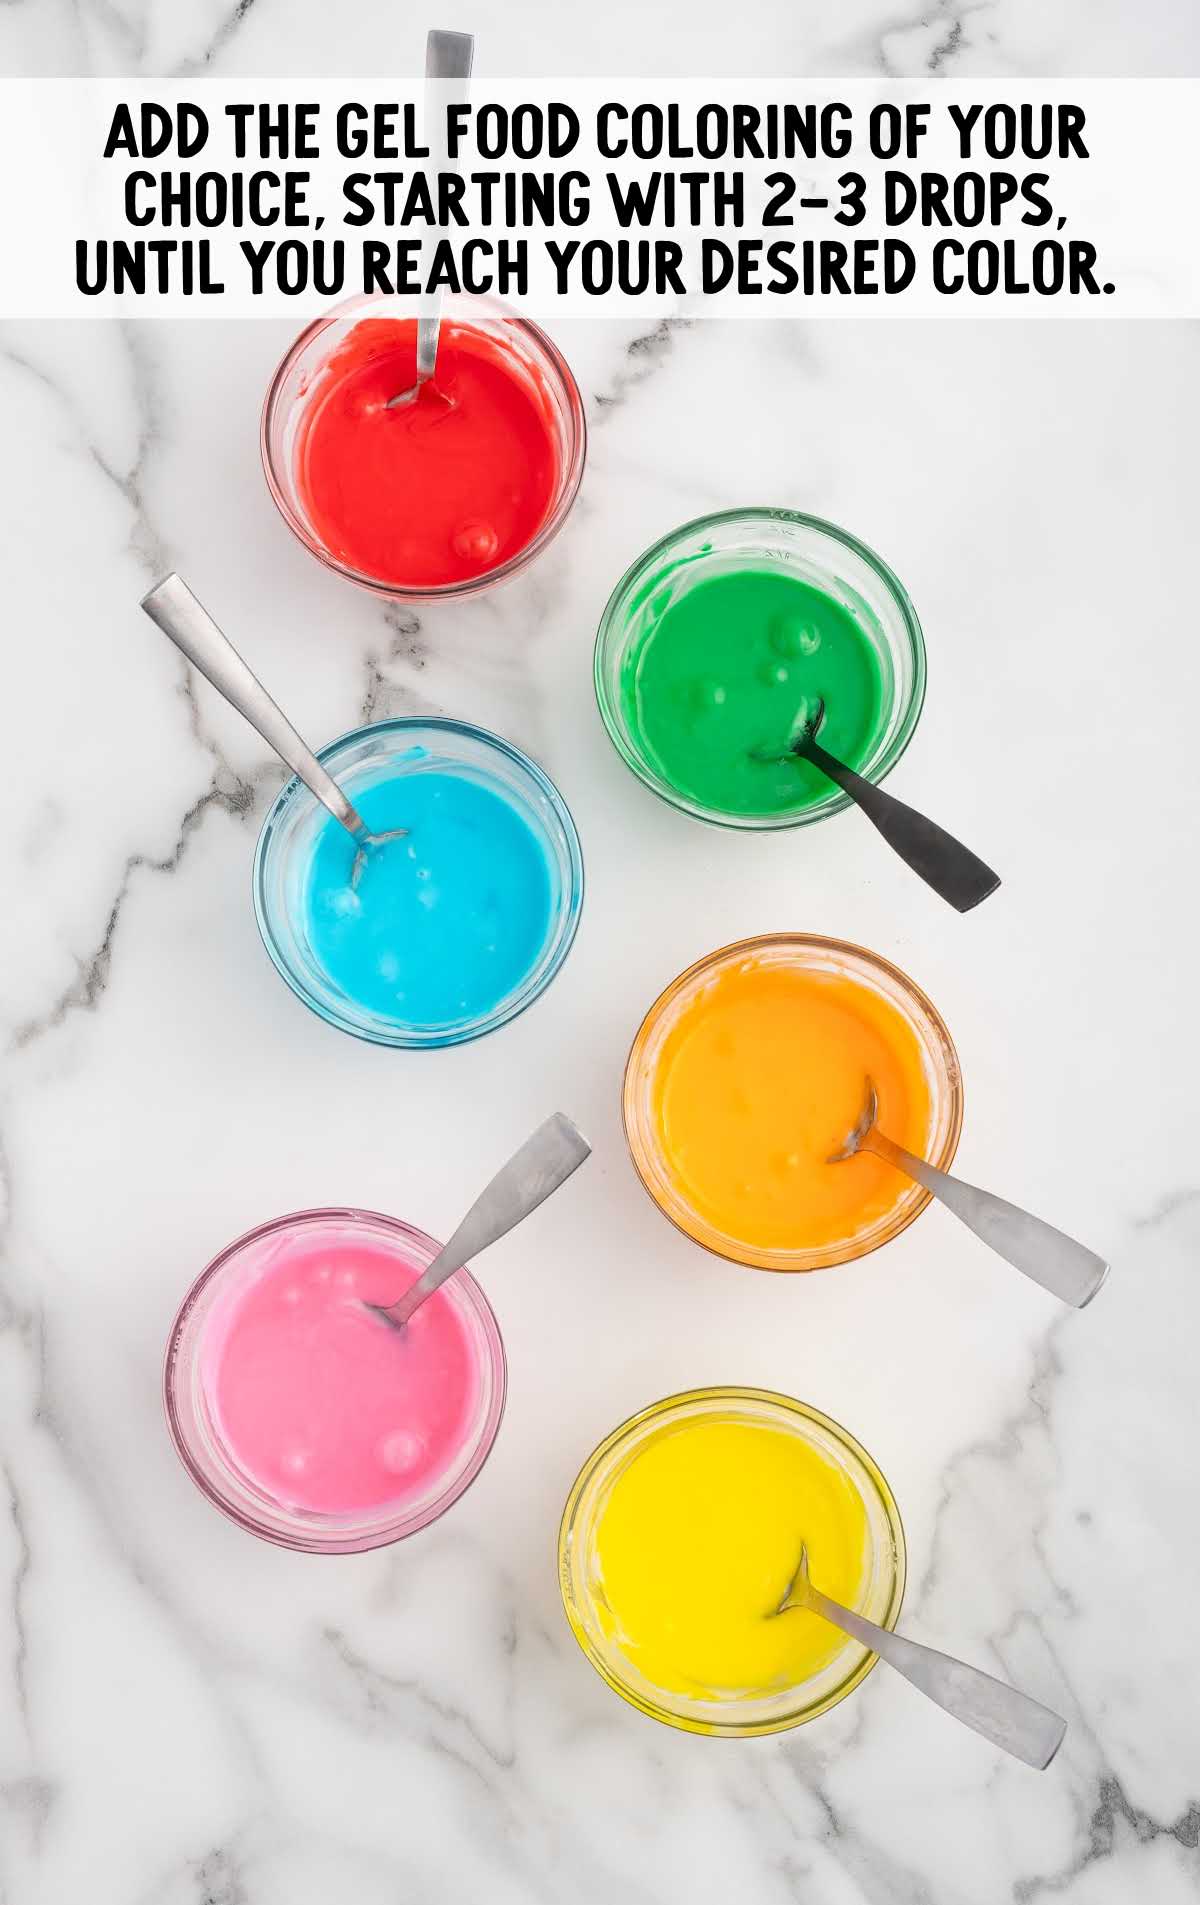
If you are making a single icing color, you will add the gel food coloring of your choice, starting with two to three drops, until you reach your desired color.
If making multiple colors see tips below. Stir the gel food coloring into the icing until no streaks remain and the color is uniform.
PRO TIP: If making multiple colors of icing for your thumbprint cookies, you will want to get your white icing to the proper consistency, then divide the icing equally (depending on the number of colors) before adding the gel food coloring.
Since you have divided this icing, you will want to start with a smaller amount of gel food coloring per batch.
If using Wilton brand food coloring (that comes in the little pots) you can use a toothpick to just dip into the gel food coloring and then swirl it into the smaller amounts of icing.
If using a brand such as Americolor, start with a very small drop as I find that their colors are more intense than other popular brands.
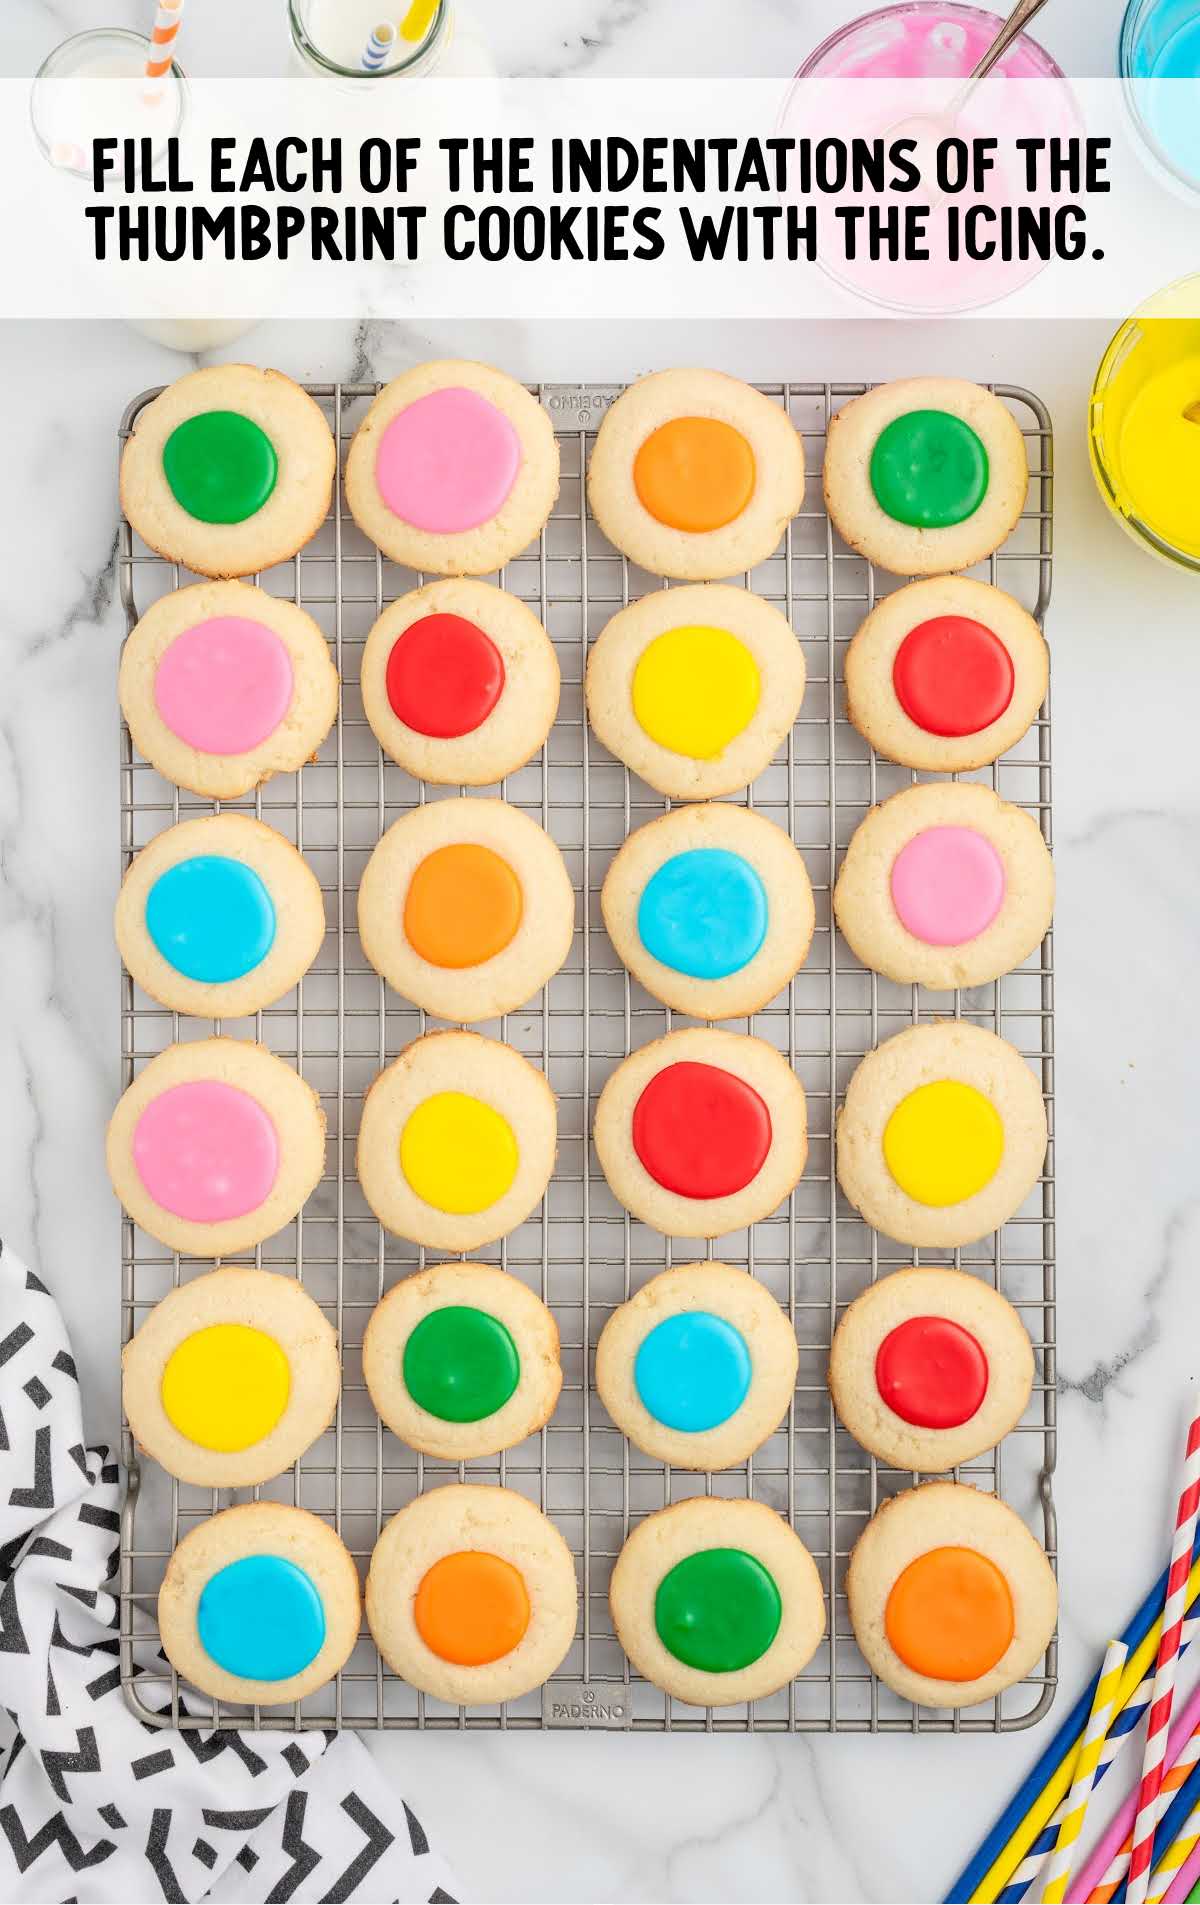
STEP ELEVEN: Using a small spoon or a piping bag, fill each cookie indent with icing. Be careful not to overfill.
Allow the icing to set at room temperature before serving or storing the cookies.
PRO TIP: If you don’t have a piping bag, you can use a large Ziploc bag instead. Just cut a very small hole in one corner after you’ve filled the bag.
Troubleshooting Tips for Traditional Thumbprints
We’re confident you’ll find our classic thumbprint cookies recipe easy to follow, but in case you run into any trouble, here are some wise words from our seasoned, professional recipe development team:
- We recommend making this cookie recipe at least 12 hours or a day ahead of when you plan to serve them so the icing has plenty of time to set.
- Chilling the dough is very important, or else you end up with flat cookies instead of little balls with indents.
- If your dough is really sticky, add a bit more flour, a tablespoon at a time, until the dough is easier to manage.
- If you’re using a small spoon or your finger to make your indents and find the dough is sticking, dip your spoon or finger into just a little bit of flour first.
- If your cookie indents rise too much during baking, gently press down on the center of the cookies while they’re still warm (but be careful not to burn yourself!).
- You can slowly add more powdered sugar to your icing to create the consistency you want it to have. It should be thick, but still pourable.
- If the cookies seem to be taking a long time to set, you can place them in the fridge for a few hours.
- Check on your cookies half way through the bake time, and if they seem to be baking unevenly, turn the cookie sheet half way around.
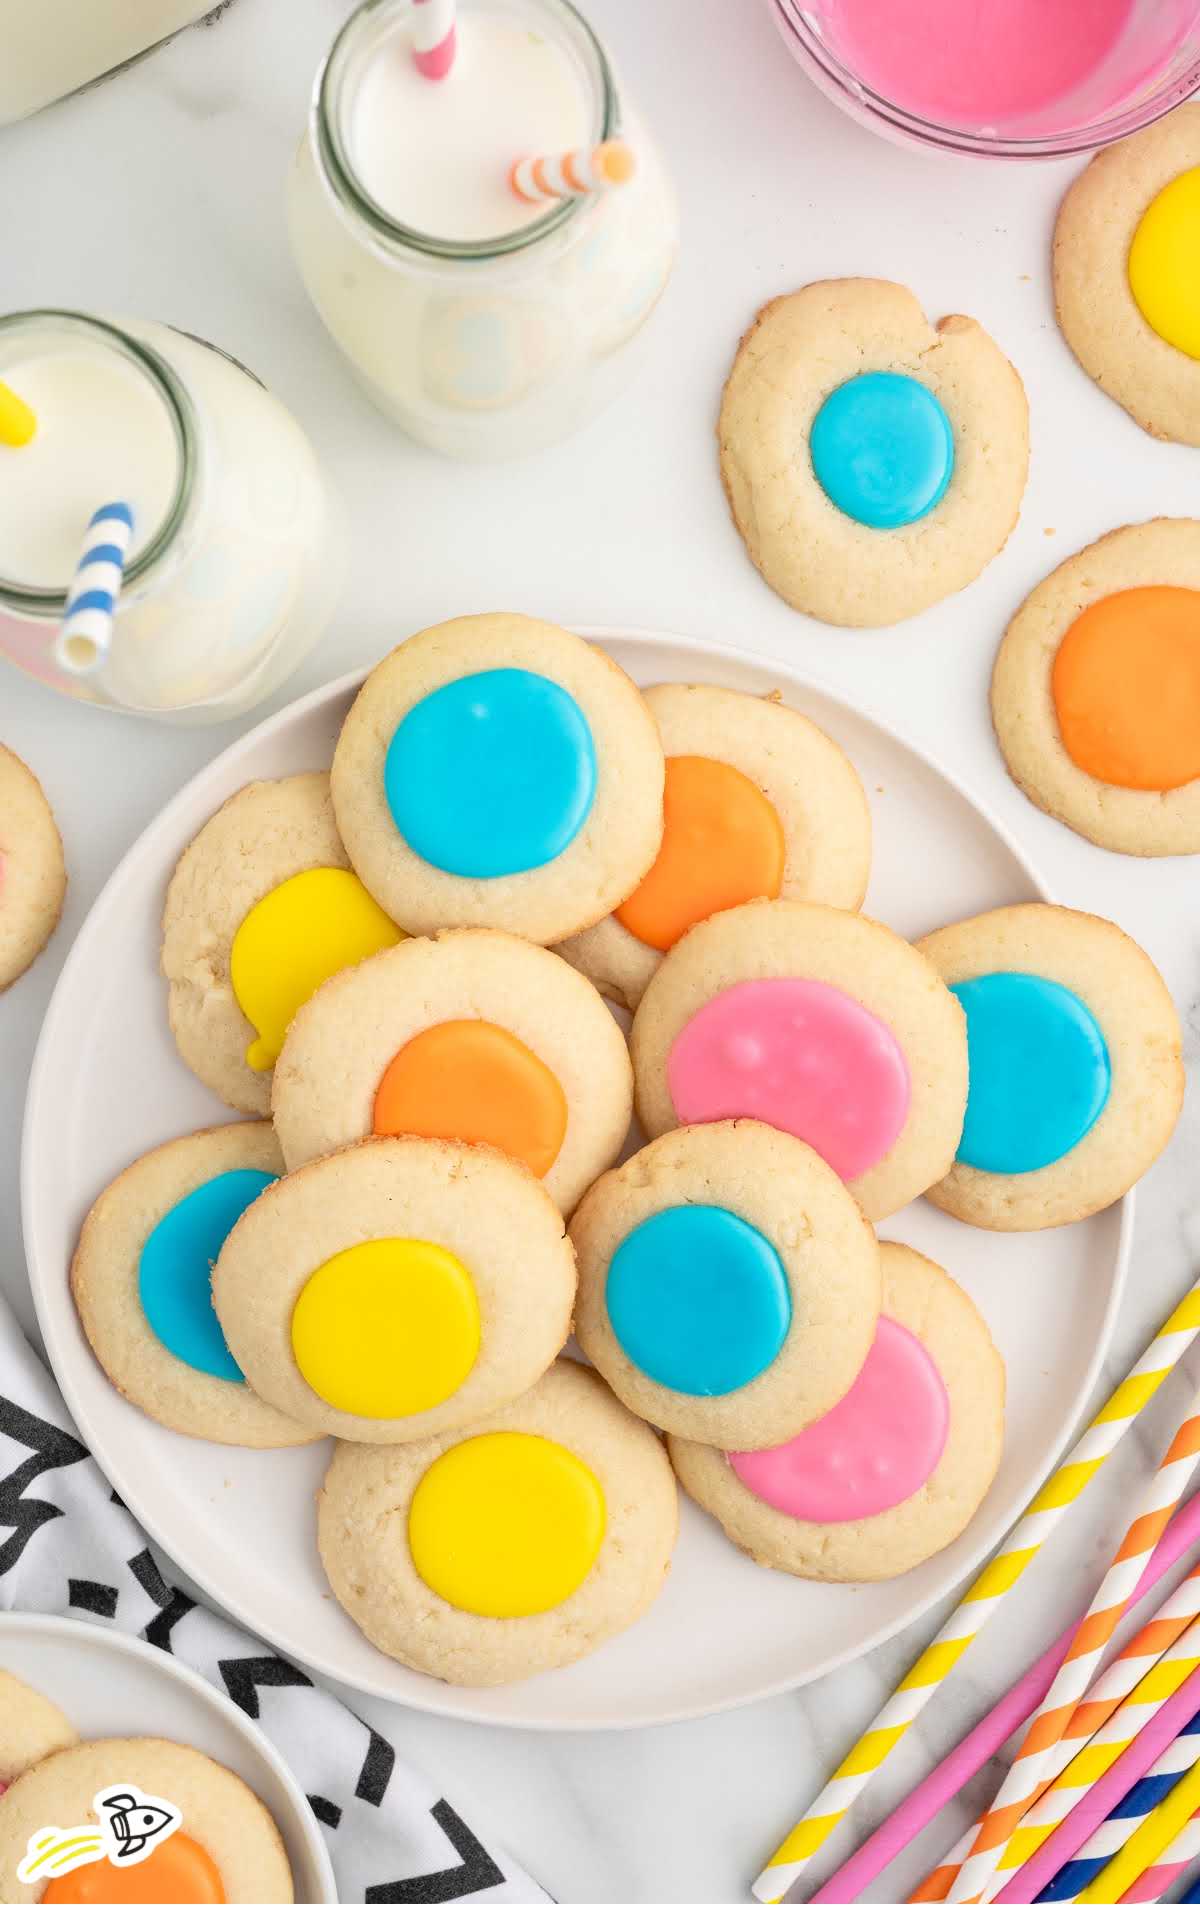
How To Serve Shortbread Thumbprint Cookies
After baking and icing your Thumbprint Cookies, you get to serve and eat them! These cookies are versatile and can be served in so many ways for just about any occasion.
Here are some suggestions:
Arrange the cookies on a bright cookie plate as a colorful addition to any party or dessert table. These cookies will be easy for guests to grab and enjoy.
With a Scoop of Ice Cream: For an indulgent treat, pair the cookies with a scoop of strawberry or vanilla ice cream. The cold, creamy ice cream contrasts nicely with the delicate cookies.
Afternoon Tea: Serve these cookies with a selection of teas at your book club meeting or a visit with friends. The light, buttery cookies will be a welcomed treat.
Family Dessert Spread: Incorporate these cookies into a larger dessert spread for family gatherings ad holidays. They pair well with other bite-sized cookies like brownies, cheesecake bites, and chocolate truffles, adding variety to your dessert table.
Holiday Gift: Pack these cookies in a decorative tin or box to give as a holiday gift. Their colorful icing and homemade touch make them a thoughtful and delicious present for friends and family.
Dessert for Special Occasions: You can easily adjust these treats for special occasions. Here are some ideas:
- Make a Valentine’s Day cookie tray with thumbprint cookies at the center. Make red and pink icing to celebrate the day. Surround the cookies with other Valentine’s treats like Peanut Butter Hearts, Cheesecake Stuffed Strawberries, and Heart-Shaped Sugar Cookies.
- Celebrate any holiday by adjusting the color of the icing, or adding a few drops of food coloring to your cookie dough. Red and green for Christmas cookies, pink and yellow for Easter dessert, or orange for Halloween.
- Make the frosting the colors of your kids’ school mascot for a bake sale or class party.
- Make the icing the colors of your favorite team for a Super Bowl party or game day gathering.
MORE THUMBPRINT COOKIES RECIPES


How To Store These Icing Thumbprint Cookies
Storing your traditional thumbprint cookies properly will keep them fresh and tasty for days to come. Here’s how:
MAKE AHEAD: You can prepare the cookie dough ahead of time and store it in the refrigerator for up to two days before baking.
This allows you to split the preparation time and bake fresh cookies as needed.
You can also bake the cookies in advance and store them without icing or freeze them for coming holidays.
IN THE FRIDGE: Store the baked and iced cookies in an airtight container at room temperature for up to four to five days.
If you prefer to keep them in the refrigerator, place them in a single layer in an airtight container. The cookies will last for about a week in the fridge.
IN THE FREEZER: To freeze the cookies, you can either freeze the dough balls or the baked cookies without icing.
Place the dough balls or cookies in a single layer on a baking sheet to freeze initially, then transfer them to an airtight container or freezer bag for up to two months.
Thaw the dough in the refrigerator before baking. For baked cookies, thaw them at room temperature and add icing after they have fully thawed.
Why This Is The Best Thumbprint Cookie Recipe With Icing
What’s not to love about these delicate cookies with a sugary sweet icing filling? Nothing! Especially how easy they are to bake!
Here’s why making these cookies is always a good idea:
Fun and Festive: These colorful cookies are perfect for holidays, parties, and special events, with customizable icing colors.
Easy to Make: Simple steps and quick baking time make this recipe great for novice bakers.
Great for Gifting: These cookies make thoughtful homemade gifts when packaged in a pretty tin or box.
Kid-Friendly: A fun recipe for kids to help with, from rolling dough to adding icing.
Frequently Asked Questions
Yes, you can. Your buttercream will fill the indentations in the cookies nicely, but it won’t set up the way the powdered sugar and milk mixture will.
These cookies are best enjoyed without reheating. If you prefer them warm, place them in a preheated oven at 300°F for about give minutes, but we don’t recommend reheating them if you’ve already added the icing.
Kids can help with rolling the dough, making thumbprints, and adding icing. It’s a fun and engaging activity for them.
Yes, you can prepare the dough and store it in the refrigerator for up to two days before baking.
Make sure to chill the dough for at least 30-60 minutes before baking. This helps the cookies keep their shape.
This Thumbprint Cookies with Icing recipe makes the perfect tender cookie that’s customizable for plenty of occasions. Sweet vanilla flavor in an easy recipe that uses pantry staples – it’ll will quickly become a family favorite.
Colorful Recipes You’ll Love


Thumbprint Cookies with Icing
Ingredients
For the Cookies
- 2 cups all-purpose flour
- ½ teaspoon salt
- 1 cup unsalted butter, softened to room temperature
- ⅔ cup granulated sugar
- 1 large egg, room temperature
- 1 teaspoon clear vanilla flavoring
For the Colored Icing
- 2 cups powdered sugar, sifted
- 2 to 3 tablespoons whole milk
- ½ teaspoon clear vanilla flavoring
- 2 to 3 drops gel food coloring
Instructions
Make the Cookies
- In a medium bowl add the all-purpose flour and salt. Set aside.
- In a large mixing bowl, add the softened unsalted butter and granulated sugar. Using a hand mixer, on medium speed, cream together the butter and sugar for 2-3 minutes or until smooth.
- To the butter mixture add the egg and clear vanilla flavoring. Beat again for 1-2 minutes or until fully incorporated.
- Add the dry ingredients to the bowl of wet ingredients and beat on low speed until it comes together to form a thick, and smooth, dough. Scrape the sides and bottom of the bowl with a rubber spatula to ensure that all the dry ingredients are fully incorporated and the dough is well combined.
- Cover the bowl of cookie dough with plastic wrap and refrigerate for 30- 60 minutes.
- Preheat the oven to 350* F. Line two large baking sheets with parchment paper and set aside.
- Using a 1 tablespoon cookie scoop, scoop out a level amount of chilled dough and roll it in the palm of your hand to create a smooth ball. Place the rolled ball onto a baking sheet and repeat until all the dough has been rolled and placed onto the two prepared baking sheets. Be sure to leave about 2 inches of space between each dough ball.
- Using a small rounded measuring spoon, or your thumb, press an indent into the center of each dough ball that is about ¾ – 1 inch wide. This should flatten your dough ball slightly and the indentation should not go all the way to the bottom of the dough ball. Repeat until all the cookie dough balls are indented.
- Bake the cookies for 10-12 minutes or just until lightly golden around the bottom edges.
- Remove the thumbprint cookies from the oven and allow them to cool on the pan for 5 minutes before transferring them to a wire rack to cool completely before icing them.
Make the Colored Icing
- To a large mixing bowl add the sifted powdered sugar, 2 tablespoons whole milk and clear vanilla flavoring. Whisk until smooth. You want a thicker consistency, not a pourable one. Start with the 2 tablespoons of whole milk then add 1 teaspoon at a time (up to 1 tablespoon) to get desired consistency.
- If you are making a single icing color, you will add the gel food coloring of your choice, starting with 2-3 drops, until you reach your desired color. If making multiple colors see tips below. Stir the gel food coloring into the icing until no streaks remain and the color is uniform.
Decorate the Cookies
- Using a small spoon, or transferring the colored icing to a small piping bag with the end cut off, fill each of the indentations of the cooled thumbprint cookies. Be careful not to overfill the indentations with the icing.
- Allow the iced thumbprint cookies to sit at room temperature to allow the icing to firm up before placing onto a serving plate or adding to a container for storage.
Notes
- We recommend making this cookie recipe at least 12 hours or a day ahead of when you plan to serve them so the icing has plenty of time to set.
- Chilling the dough is very important, or else you end up with flat cookies instead of little balls with indents.
- If your dough is really sticky, add a bit more flour, a tablespoon at a time, until the dough is easier to manage.
- If you’re using a small spoon or your finger to make your indents and find the dough is sticking, dip your spoon or finger into just a little bit of flour first.
- If your cookie indents rise too much during baking, gently press down on the center of the cookies while they’re still warm (but be careful not to burn yourself!).
- You can slowly add more powdered sugar to your icing to create the consistency you want it to have. It should be thick, but still pourable.
- If the cookies seem to be taking a long time to set, you can place them in the fridge for a few hours.
- Check on your cookies half way through the bake time, and if they seem to be baking unevenly, turn the cookie sheet half way around.
Nutrition


Leave a Comment