Blame it on Travis Kelce. On the April 1st episode of New Heights, Travis Kelce was talking through what he’d serve at a Masters Champions Dinner. Smash burgers, fried chicken, mac and cheese, Donna Kelce’s dinner rolls. Then he landed on the one detail no one expected to hear in that setting. Dairy Queen ice cream cake. “I’ve always liked the Dairy Queen ice cream cake too,” he said. “I haven’t had one in a long time.”

Hearing Travis Kelce talk about it sent me straight into recipe testing. Because if there’s one dessert that doesn’t need a reason to make a comeback, it’s a DQ ice cream cake.
What Is the Masters Champions Dinner?
The Masters Champions Dinner is held every Tuesday of Masters week at Augusta National. The previous year’s winner chooses the menu for all past champions. This year, Rory McIlroy went elevated. Peach ricotta flatbread, bacon-wrapped dates, elk sliders.
On New Heights, Travis Kelce had a different take. Comfort food, no pretension, and a Dairy Queen ice cream cake to finish. Honestly, I’d show up for that.
Read This Before You Start
- Start this cake the day before you need it. This is a layered ice cream cake, so timing matters more than anything else.
- There are 4 freeze times in this recipe and you cannot rush any of them without losing the clean, distinct layers that make a DQ ice cream cake what it is.
- The base needs about an hour before adding the fudge, and the full cake needs several hours or overnight to set before slicing.
- The total hands-on time to make this cake is under 45 minutes. The rest of the time is the freezer doing its job.
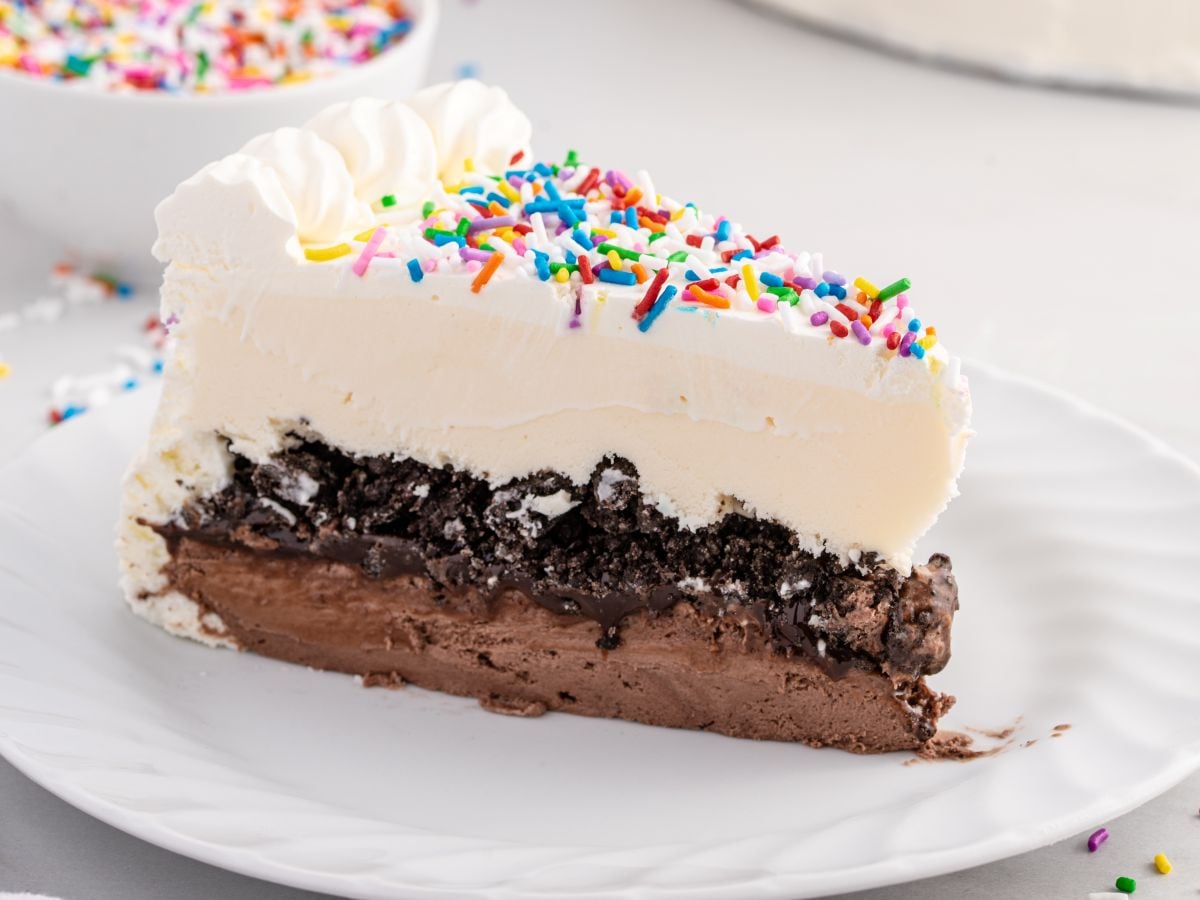
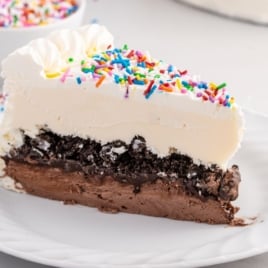
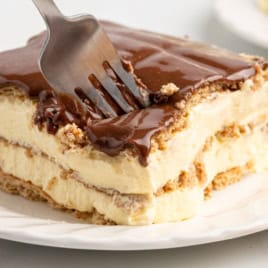
In my experience, most homemade versions of a Dairy Queen ice cream cake fall apart in three places. The fudge melts into the ice cream, the layers blend, or the cookie crunch separates when sliced. My method is built to control those exact points.
Making It Taste and Look Like The Real Thing
- I bake the cookie crumbs before adding them. When I left them raw, they softened and disappeared into the layers once frozen. An 8-minute bake dries them out just enough so the crunch stays distinct through the middle. It’s a step some recipes skip, but it changes how the layer holds, so I keep it in.
- When I sliced my first version of this cake, I noticed small gaps in the cookie crunch layer. Some of the crumbs even fell out of the slice. I’ve found the best way to fix this is to gently press the crumbs into the hot fudge with your hand or the back of a spoon right after sprinkling them on.
- I microwave the fudge it in a short burst just until it’s spreadable. If it’s too hot, it melts into the ice cream instead of sitting on top as its own layer. The whole middle section of the cake depends on getting this right. I have similar issues with my DQ-inspired recipe for a Buster Bar cake.
- When I sliced my first version of this cake, I noticed small gaps in the cookie crunch layer. Some of the crumbs even fell out of the slice. I’ve found the best way to fix this is to gently press the crumbs into the hot fudge with your hand or the back of a spoon right after sprinkling them on.
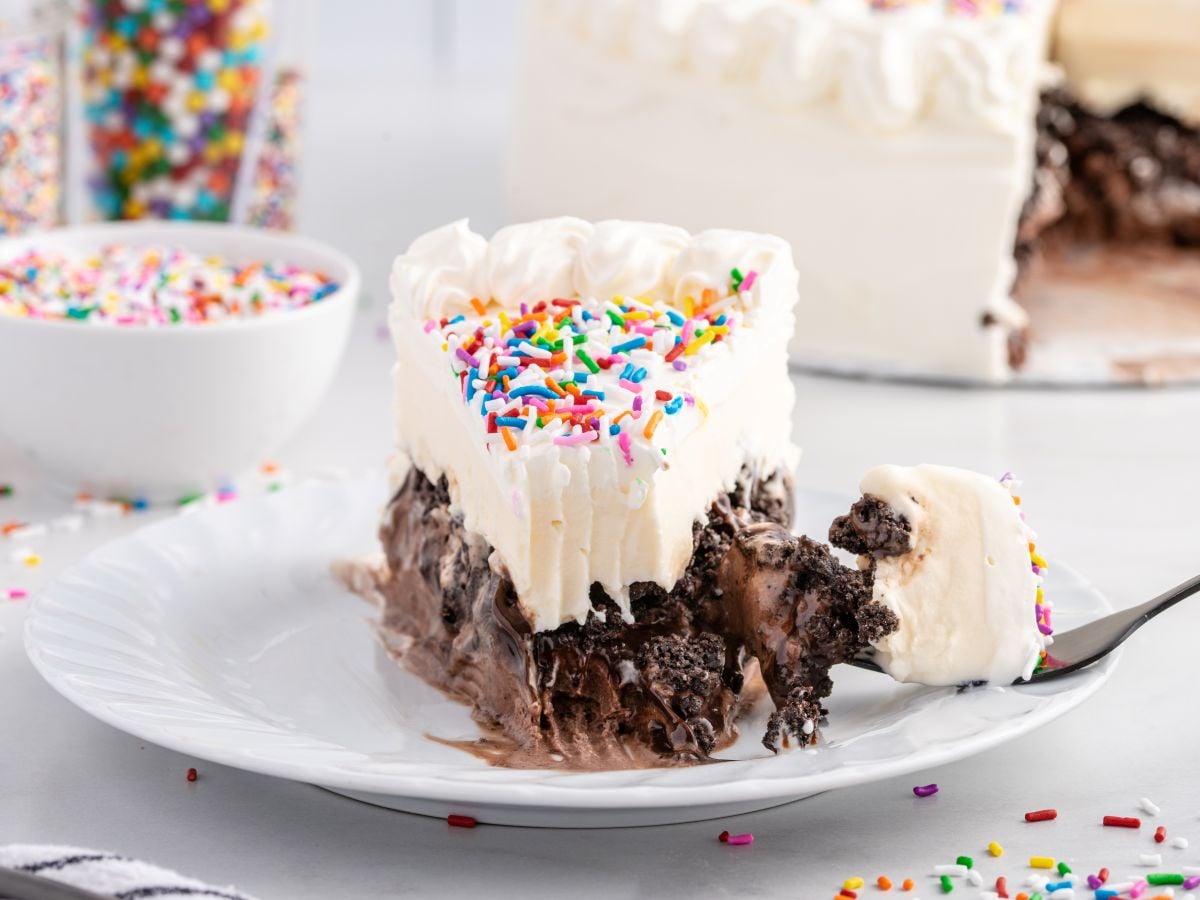
- The whipped cream for the frosting needs to be cold to whip properly and hold stiff peaks. I highly recommend that 30 minutes before you’re ready to frost, you put your mixing bowl in the freezer. This is the single best thing you can do to make sure your frosting goes on clean and stays put.

- I have found that the piped whipped cream border can slide if the cake has warmed even slightly before you pipe it.
The solution is to the cake back in the freezer within 10 minutes of starting to frost and it will set perfectly. Have your whipped cream made, your piping bag loaded, and your sprinkles within reach before you ever take the cake out of the freezer.
Ingredient Notes
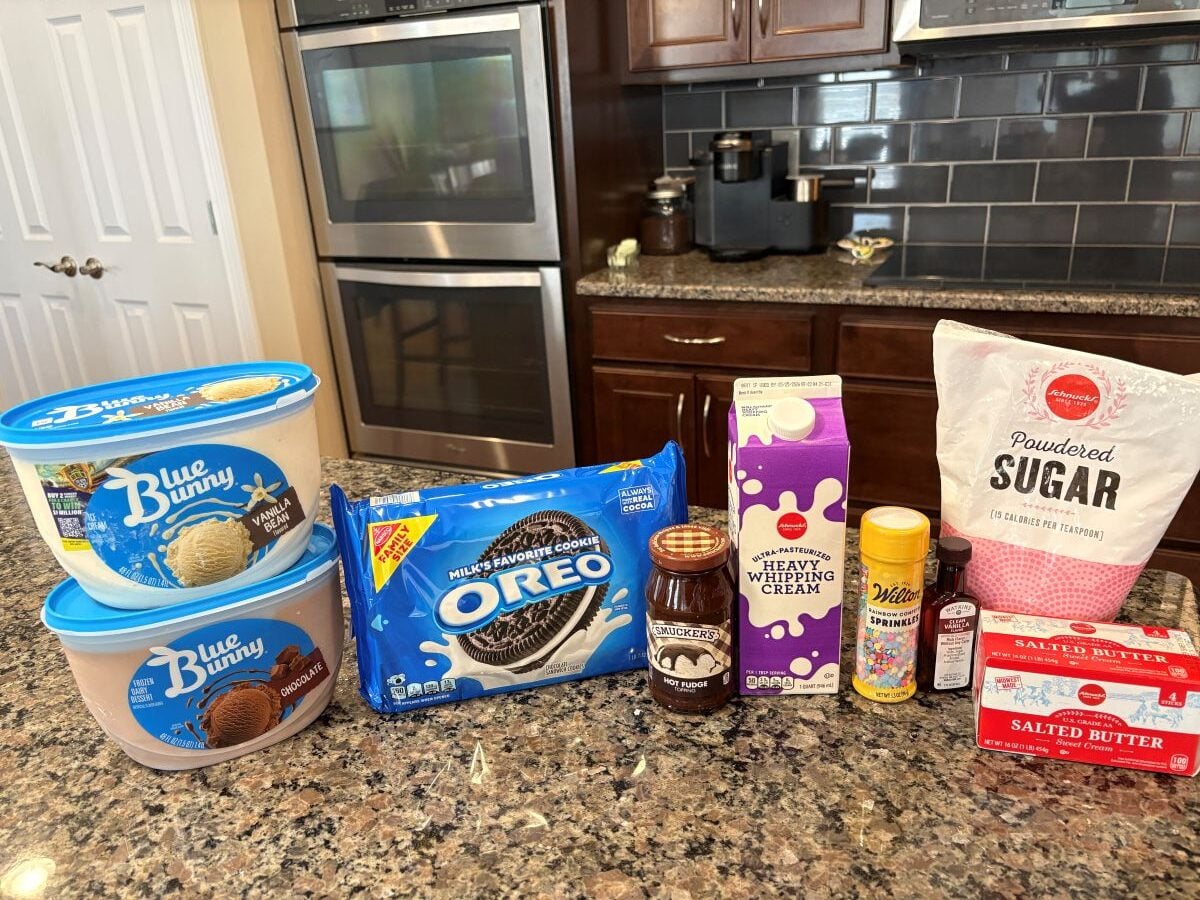
OREOS: I don’t remove the Oreo filling before I crush them. It contributes to the binding when the crumbs are baked with butter.
HOT FUDGE: Make sure you pick up hot fudge topping from a jar, not chocolate syrup. This is the mistake I see most from readers. Chocolate syrup is too thin and too wet — it runs, it bleeds into the ice cream, and it doesn’t set up.
VANILLA: I recommend using clear vanilla flavoring for the whipped cream, not regular vanilla extract. Regular extract will turn your frosting a pale tan color. Clear vanilla keeps it bright white, which is what gives it that classic DQ look. I get it in the baking aisle next to the regular vanilla.
WHIPPED FROSTING: I sometimes use my homemade Cool Whip recipe as an alternative to the whipped cream frosting. It stays more stable than store-bought and keeps a clean finish.
If you love frozen desserts, our Dr Pepper ice cream is another fun homemade treat with a classic soda shop flavor.
Recipe Test Notes (Last Updated April 2026)

This recipe was originally developed and photographed in 2019 To ensure it still meets our strict restaurant-quality standards, our independent recipe tester, Karen, re-tested it from scratch in April 2026.
The verdict: The cake worked great and looked exactly like the real thing. Karen’s family called it one of their favorites.
Tester Correction: In the original instructions from 2019, I said to let the ice cream based freeze for 30 minutes to 1 hour. Karen tested both. At 30 minutes, the hot fudge melted into the ice cream on contact and the distinct layer was lost. At 1 hour, the ice cream was firm enough to hold the fudge cleanly on top. We’ve updated the recipe below to 1 hour minimum.
Tester Tip: Warming the fudge makes it more spreadable — but Karen confirmed it needs stirred as well. A 20-second microwave burst and a good stir is all it needs.

Copycat Dairy Queen Ice Cream Cake
Ingredients
Cookie Layer
- 20 chocolate sandwich cookies (crushed but don't remove the center)
- 4 tablespoons salted sweet cream butter, melted
Ice Cream Layer
- 1 quart chocolate ice cream
- 1 quart vanilla ice cream
Hot Fudge Layer
- 11.75 ounces hot fudge topping
Whipped Cream Frosting Layer
- 2 cups cold heavy cream
- 1¼ cups powdered sugar
- 1½ teaspoons clear vanilla flavoring (not vanilla extract)
- Colorful sprinkles
Instructions
- Line a 9-inch springform pan with plastic wrap. Set it aside.
- Heat the oven to 350°F. Line a 10×15-inch baking sheet with parchment paper. Set it aside.
- Add the crushed chocolate sandwich cookies to a small mixing bowl.
- Stir in the melted butter until completely combined.
- Evenly spread the coated cookie crumbs on the lined baking sheet.
- Bake for 7 to 8 minutes.
- Remove from the oven and allow the cookie crumbs to cool completely.
- While the cookie crumbs are baking, remove the chocolate ice cream from the freezer and allow it to thaw for 15 to 20 minutes
- Spread the layer of softened chocolate ice cream into the bottom of the springform pan in an even layer.
- Place it back in the freezer for 30 minutes to 1 hour.
- Just before you are ready for the hot fudge layer, remove the lid and place it in the microwave for 20 seconds. This will soften the hot fudge, making it easier to spread on top of the chocolate ice cream layer.
- Stir the softened hot fudge.
- Using a spatula (silicone or offset), evenly spread the hot fudge over the top of the chocolate ice cream layer.
- Evenly sprinkle the baked cookie crumbs over the top of the fudge layer.
- Return to the freezer for 1 hour.
- About 15 to 20 minutes before you are ready to spread the vanilla ice cream layer, remove the vanilla ice cream from the freezer to soften
- Remove the springform pan from the freezer, and evenly spread the vanilla ice cream on top of the cookie layer.
- Return the springform pan to the freezer for 4 to 6 hours, or overnight.
- Around 30 minutes before you are ready to “frost” the ice cream cake, if you are using a stand mixer, place the metal bowl in the freezer. If you are using a handheld mixer, place your mixing bowl, preferably a metal mixing bowl, in the freezer for 30 minutes.
- Remove the bowl from the freezer, add the heavy cream, powdered sugar, and clear vanilla flavoring.
- Beat on medium, just until the powdered sugar is incorporated, then beat on high until stiff peaks form, about 3 to 4 minutes.
- Separate out 1 cup of whipped cream frosting and place in a decorator’s piping bag fitted with a large star tip.
- Remove the ice cream cake from the freezer.
- You will need to work quickly, especially if the weather is warm. Remove the outer edges of the springform pan.
- Using either a cake lifter or a large sturdy spatula, remove the plastic wrap and place the ice cream cake on either a serving platter or a round decorator's board.
- Using either a spatula (silicone or offset), quickly frost the sides and top of the ice cream cake.
- Using even pressure, holding the decorator's piping bag a ½ inch above the edge of the top of the cake, pipe either a shell pattern or swirl pattern around the edge of the ice cream cake.
- Evenly sprinkle the colorful sprinkles on the top of the ice cream cake.
- Place the cake back into the freezer until you are ready to serve.
Video
Notes
Nutrition
What Is the Masters Champions Dinner?
For readers who aren’t golf fans: the Masters Champions Dinner is a private dinner held every Tuesday of Masters week at Augusta National Golf Club. Every past Masters champion is invited, and the previous year’s winner gets to choose the entire menu. It’s one of the most talked-about traditions in golf.
This year, 2025 Masters winner Rory McIlroy went elevated — peach ricotta flatbread with hot honey and balsamic, bacon-wrapped dates, grilled elk sliders. Travis and Jason Kelce reviewed the menu on their podcast and had thoughts.
Travis approved of the flatbread and the dates, but drew the line at elk. When asked what he would serve, he went a completely different direction: comfort food for everyone, no pretension, and a Dairy Queen ice cream cake to finish.
Honestly? I’d show up to that dinner.


Comments
Toni Thomason says
This is seriously so easy to make and so delicious! It’s the absolute perfect summer treat everyone will love.
Treena says
Great idea! I made a much larger one for my daughter’s 7th birthday and the kids were ecstatic!
Gloria says
So much fun and very good!
Chelle Turner says
This is a Carvel copycat not dairy queen.
trish says
could you use regular vanilla that isn’t white
Layne Kangas says
Yes, enjoy!
Kimberly Westbrook says
I have made this cake at least 5 times. With 9 grandkids it has become the number 1 requested cake in my family! Perfection!
Khrissy says
Turned out really good. I used chocolate and Oreo ice cream and also put some crushed Oreos in the whip cream. Kids enjoyed it and so did the adults!
Sue says
This is delish and makes a lot. I’ve made twice now, I make my own hot fudge sauce.
Thanks for the recipe!