


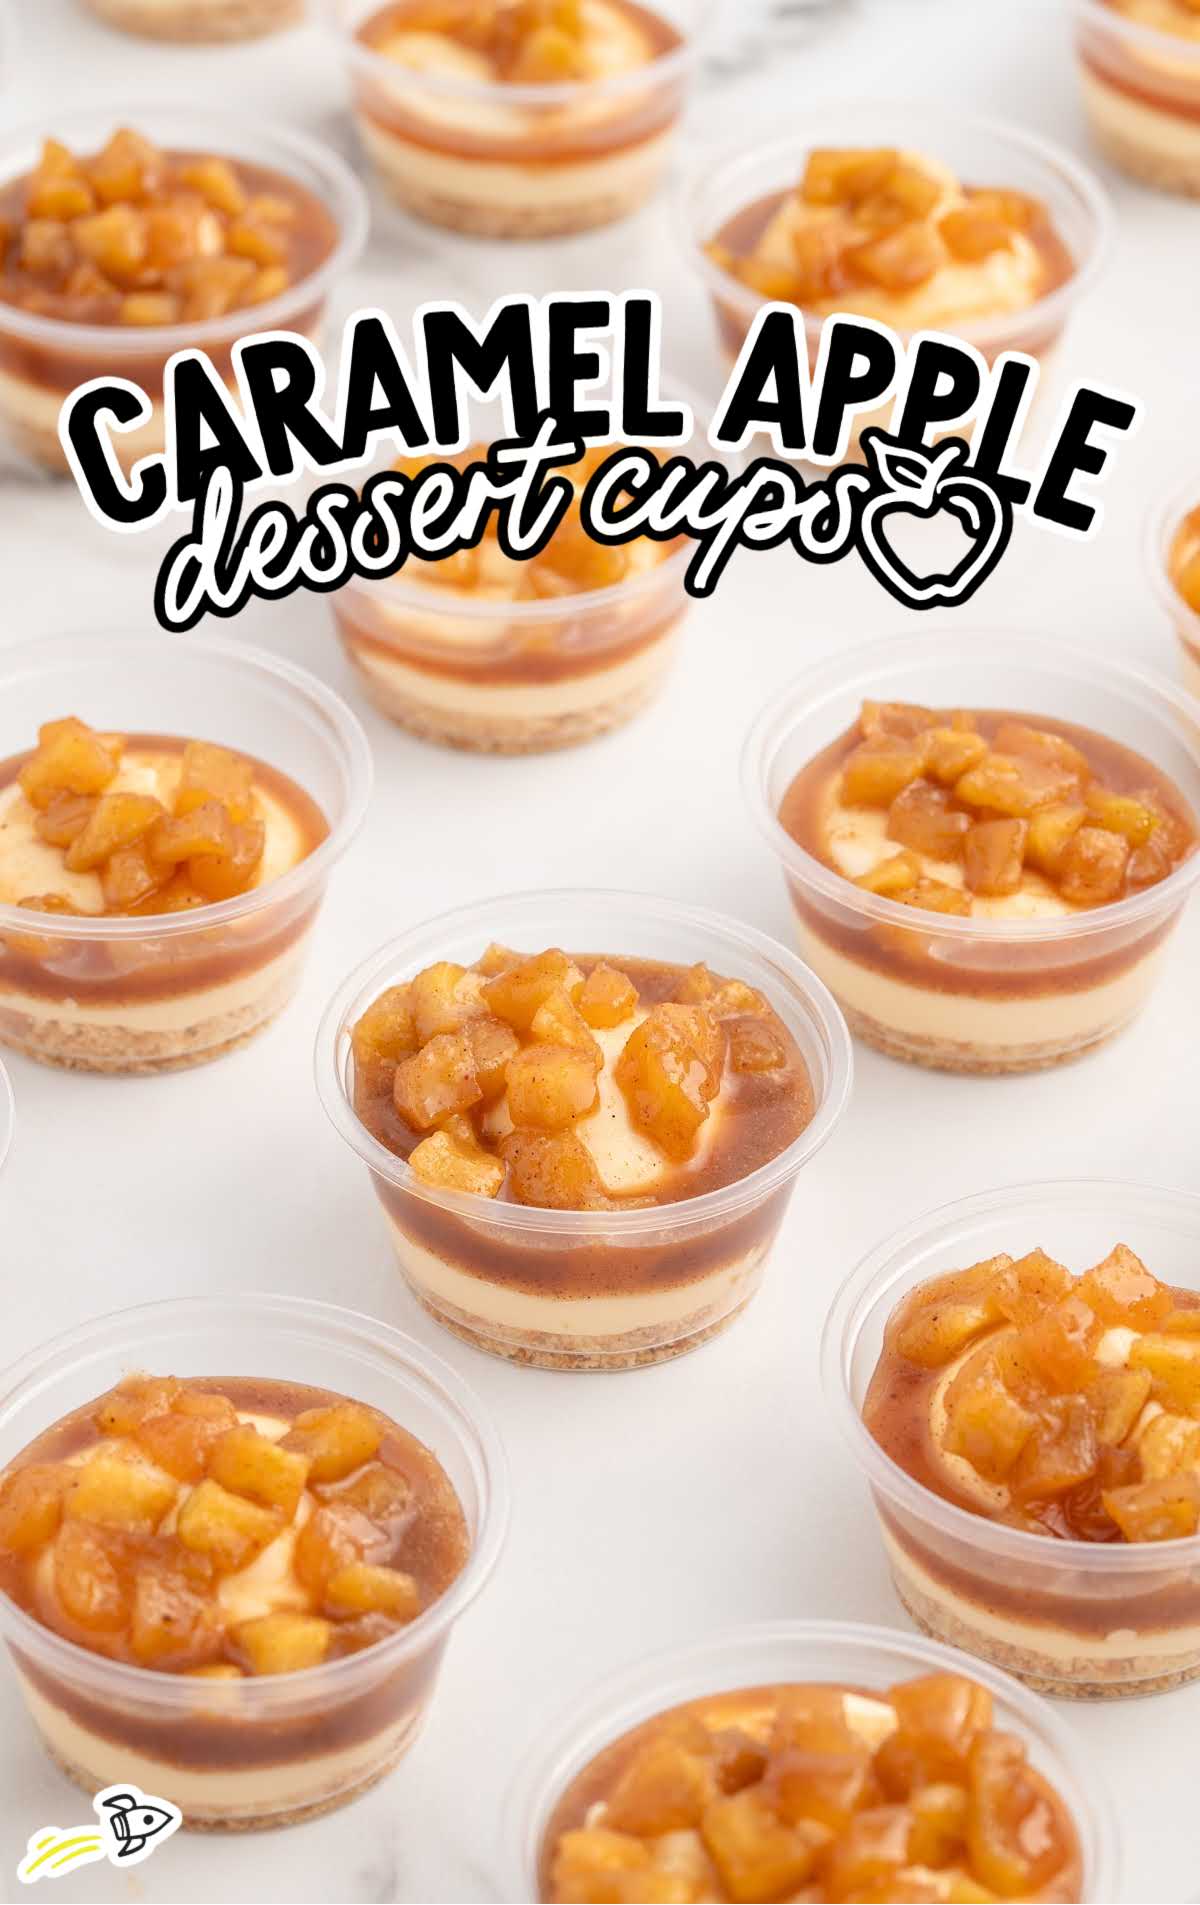
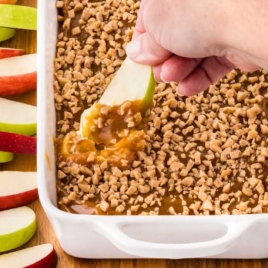
Combine the goodness of homebaked apple crisp and the portability of a snack cup with these cute and oh-so-delicious Caramel Apple Dessert Cups.
These sweet apple dessert cups might be the most fun way to eat a treat! Instead of baking an entire apple crisp, you can make these single-serve snacks in minutes, perfect for a game-day treat, birthday party, or class snack. And, they’re no-bake!
Caramel Apple Dessert Cups Ingredients
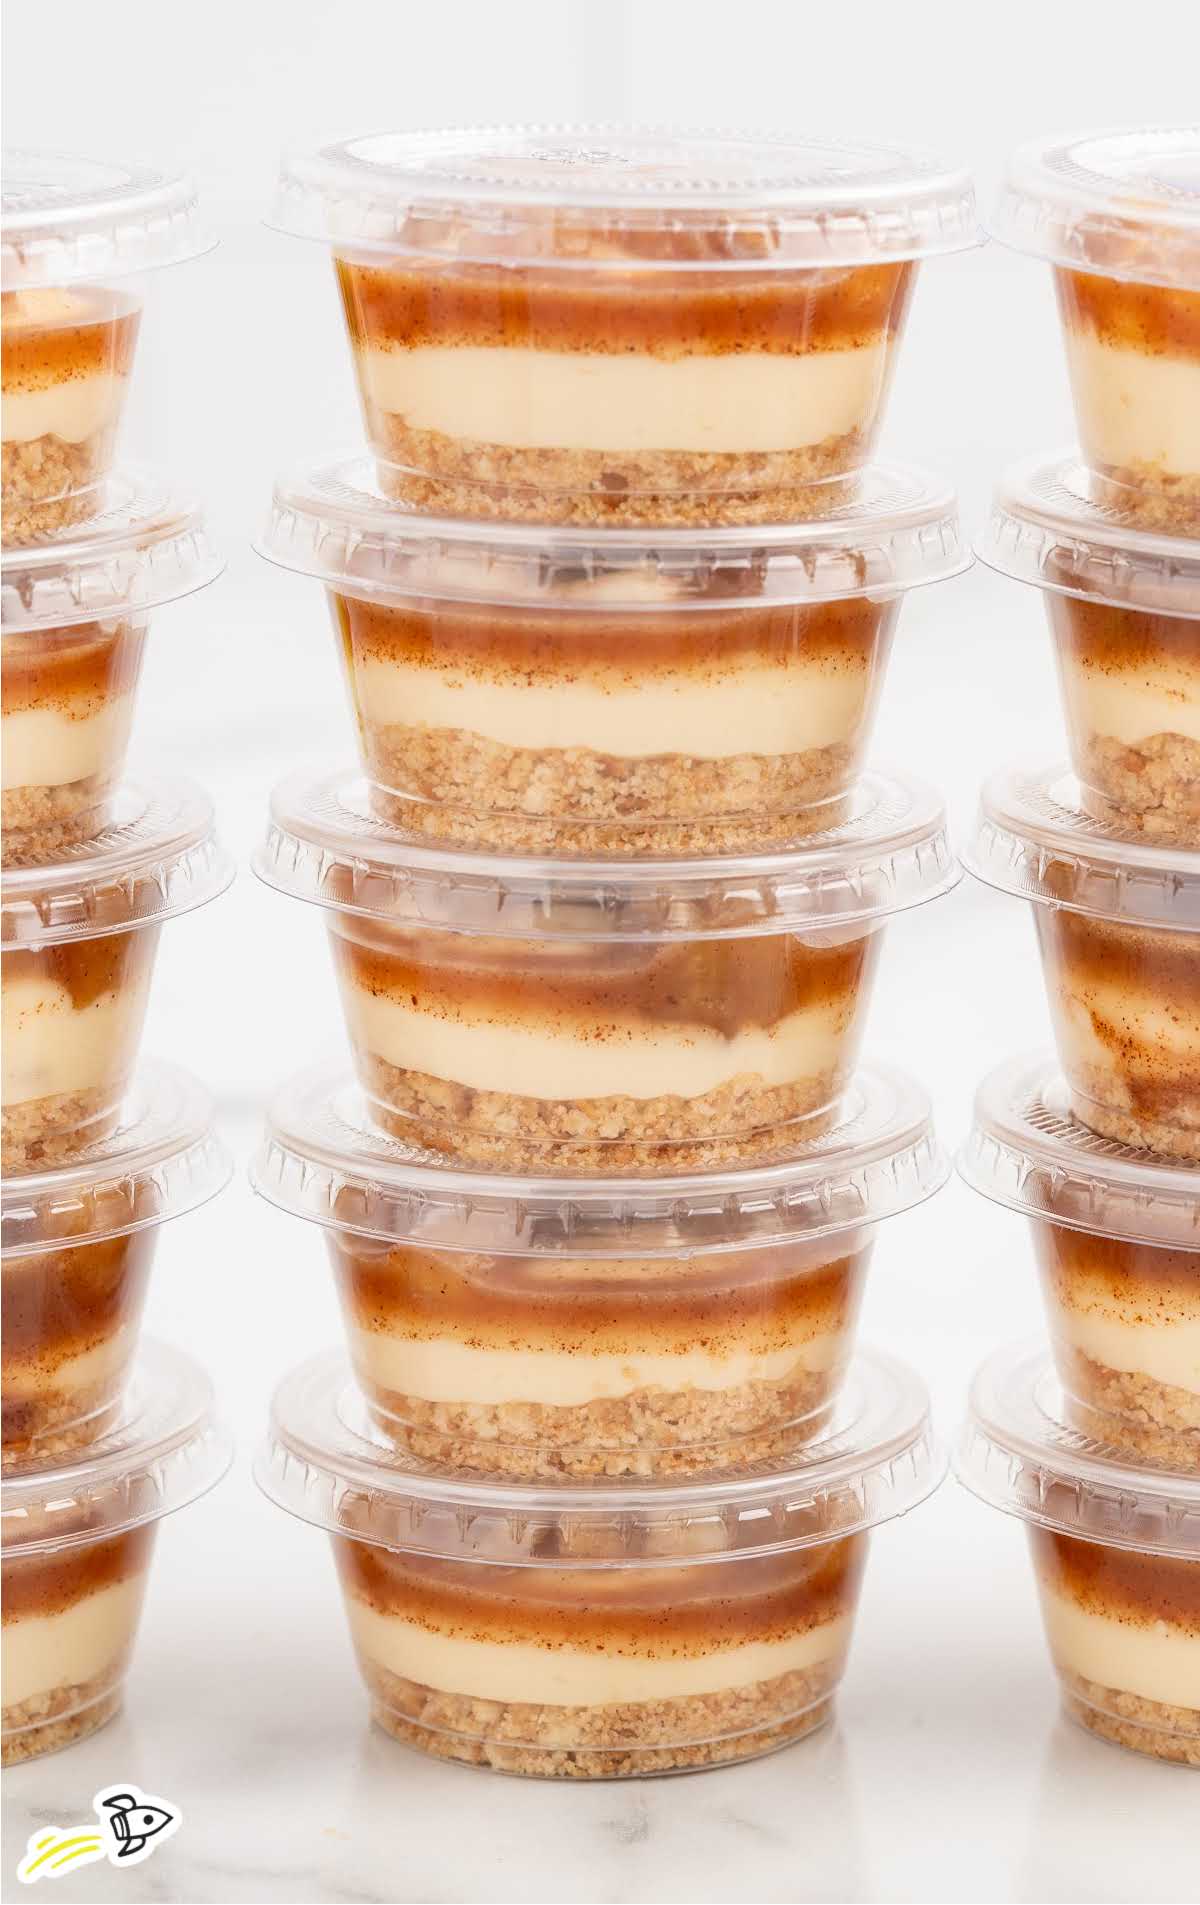
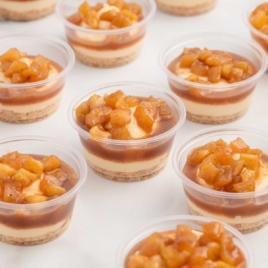
These caramel apple cups are full of the comforting warmth of cinnamon apples from a quickly cooked homemade apple pie filling. Full of flavor and ready in minutes on your stovetop, the apple reduction is absolutely perfect atop the creamy pudding filling, caramel sauce, and buttery pie crust.
You’ll need:
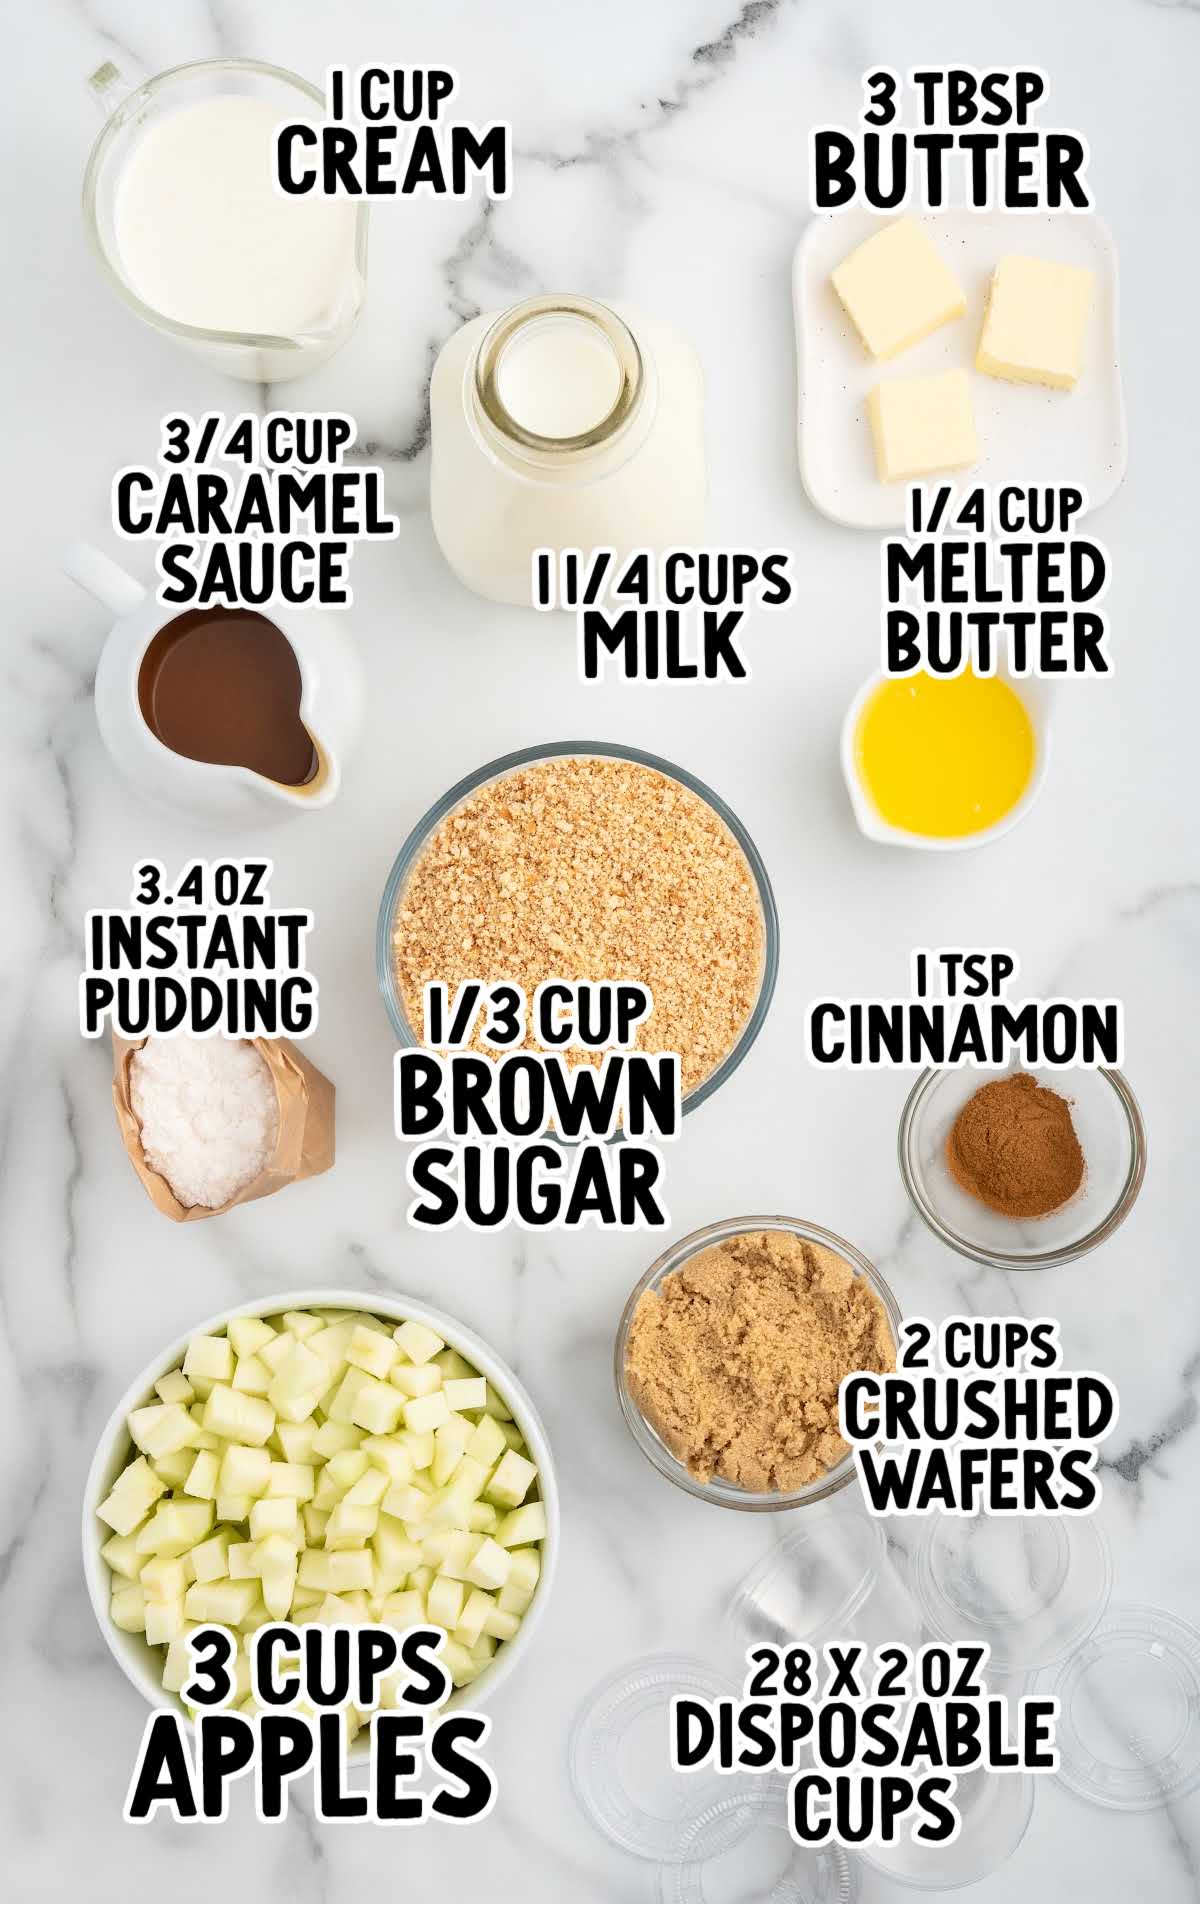
- 3 cups Granny Smith apples, peeled, cored and finely diced. (Just remember these are small desserts and the apple pieces need to fit on top, so chop them up quite small!)
- ⅓ cup light brown sugar, packed
- 3 tablespoons salted butter
- 1 teaspoon ground cinnamon
- 2 cups crushed vanilla wafers
- ¼ cup salted butter, melted and cooled
- 3.4 ounce instant vanilla pudding mix
- 1 ¼ cup cold whole milk
- ¾ cup salted caramel sauce, divided into ¼ cup and ½ cup (try our 5-star recipe instead of store-bought!)
- 1 cup cold heavy whipping cream
For serving:
- 28 x 2 ounce disposable condiment (or portion) cups with lids
Substitutions and Additions
Granny Smith Apples: For a sweeter flavor, swap Granny Smith apples with honey crisp, gala, fuji, or pink lady apples. These apples offer a different level of sweetness and texture. This recipe is a great way to use up fresh apples, so feel free to use what you have on hand.
Light Brown Sugar: Experiment with different types of sugar like dark brown sugar or coconut sugar for alternative sweetness levels and flavors. Dark brown sugar will provide a deeper caramel flavor, while coconut sugar offers a subtle hint of caramel.
Salted Butter: You’re welcome to use unsalted butter, but the flavors may be slightly less intense. You can also use vegan butter for a dairy-free option if needed.
Ground Cinnamon: Adjust the flavor of the dessert cups by incorporating spices like nutmeg, allspice, or ginger in place of cinnamon. These spices will provide a different flavor while still complementing the apples and caramel sauce.
Vanilla Wafers: Get creative with the crust by using other types of cookies or biscuits, such as graham crackers, gingersnaps, or shortbread cookies. Each option will provide a unique flavor and texture to the dessert cups, allowing for plenty of customization possibilities.
Instant Vanilla Pudding Mix: Customize the pudding filling by using alternative flavors of instant pudding mix such as cheesecake, butterscotch, or chocolate. If you’re making a double batch, you can use more than one flavor of pudding for a variety of apple dessert cups.
Salted Caramel Sauce: Explore different varieties of caramel sauce, including traditional caramel, dulce de leche, or our homemade easy caramel sauce for a personalized touch.
Heavy Whipping Cream: For a lighter option, substitute heavy whipping cream with whipped coconut cream. You can also substitute half and half for a much lighter but thinner pudding mixture.
How To Make This Recipe For Caramel Apple Dessert Cups
This easy snack cup recipe just takes a few quick steps. In no time, you’ll be savoring the sweet flavors of these delectable apple and pudding dessert treats.
STEP ONE: Peel, core, and finely dice the Granny Smith apples, ensuring they are cut into small pieces to fit neatly into the dessert cups. Crush the wafers (or pulse them in a food processor) and measure out the remaining ingredients so they’re ready for your use. This will make it much easier to follow along with the recipe.
OUR RECIPE DEVELOPER SAYS
You can use a vegetable peeler (like a carrot peeler) to peel the apples. This may be easier for some people than using a knife.
STEP TWO: Set a 2-3 quart saucepan on the stovetop over medium heat. Add the pie filling ingredients to the pan: diced apples, brown sugar, butter, and cinnamon.
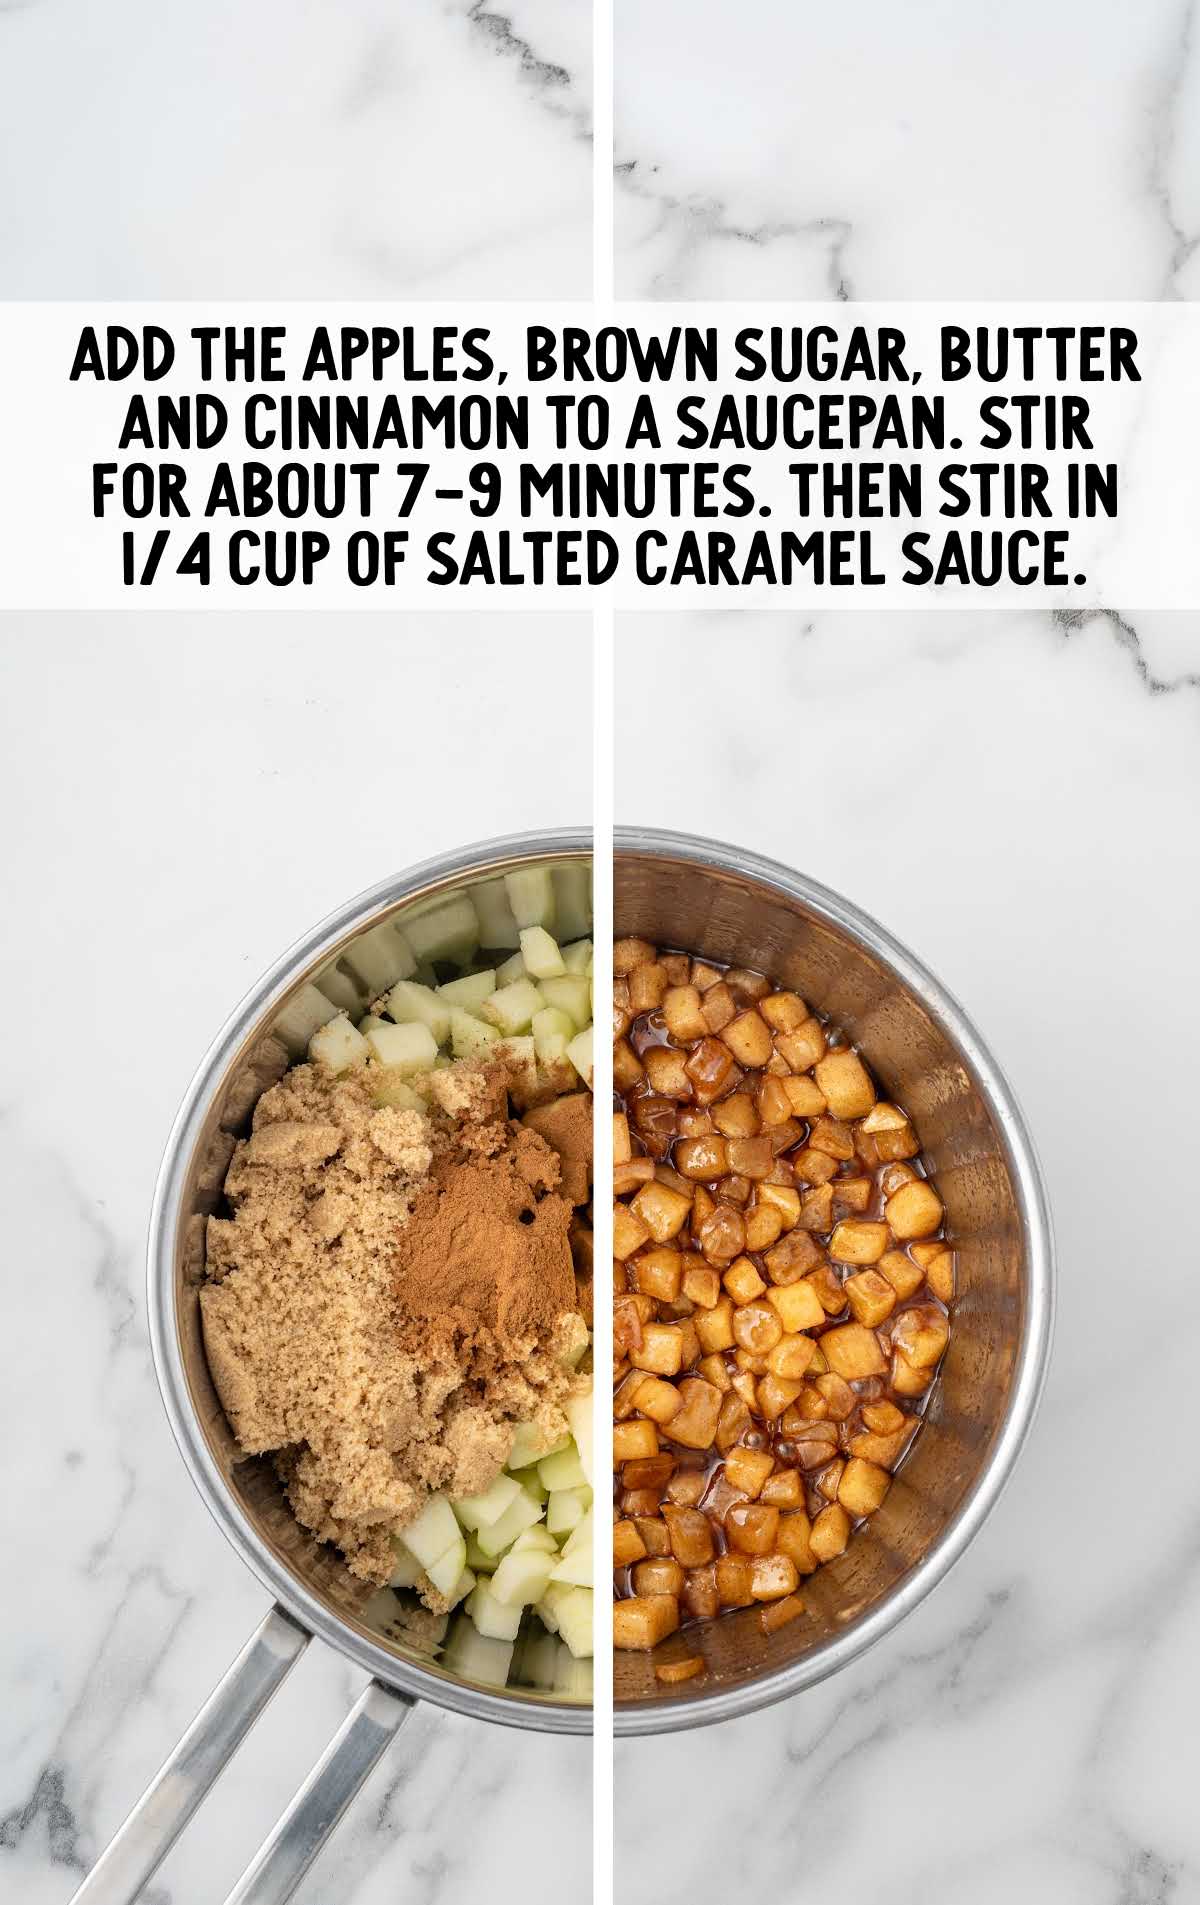
STEP THREE: Stir the apple mixture frequently while it cooks. The apples will soften and the sauce will thicken until it has a consistency similar to apple pie filling.
STEP FOUR: Turn off the heat and stir in ¼ cup of salted caramel sauce. Allow the sauce to cool completely.
PRO TIP:
If you’re short on time, set the apples in the fridge to cool instead. You may want to put a lid on the apples in the fridge so they don’t dry out, however, condensation may form resulting in a slightly different consistency.
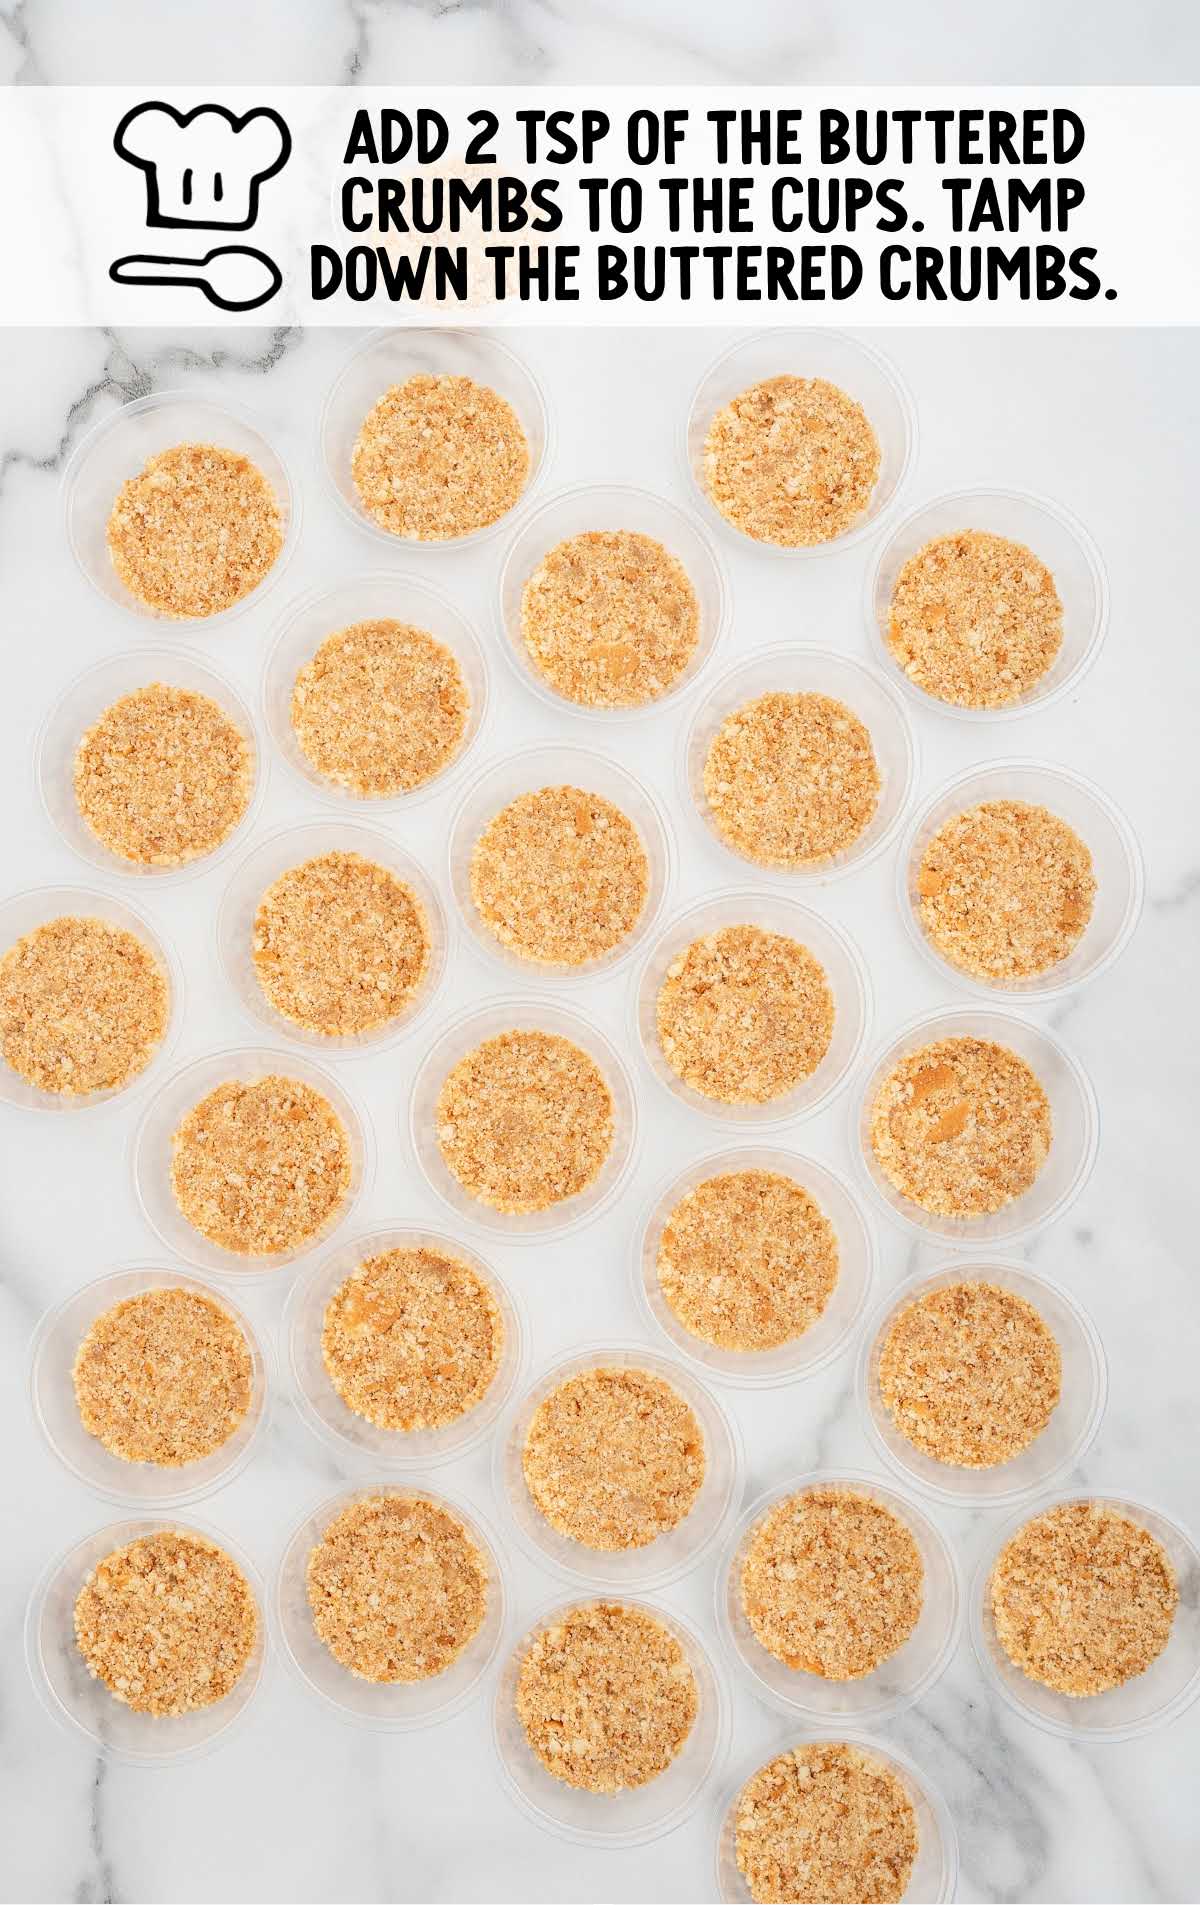
STEP FIVE: Grab a small mixing bowl and measure in the crushed vanilla wafers. Add the melted butter and stir completely, until all the crumbs are coated and damp.
STEP SIX: Set your plastic cups on the counter. Add 2 teaspoons of the buttered crumbs to each cup. Use a spoon or a small flat-bottomed cup to tamp them down into the bottom of the cups.
PRO TIP:
To make it easy to move the cups around later, you can set the portion cups out on a large baking tray.
STEP SEVEN: In a separate bowl, add the cold milk and instant vanilla pudding mix. Use a hand whisk or an electric mixer on low to mix until the pudding starts to thicken.
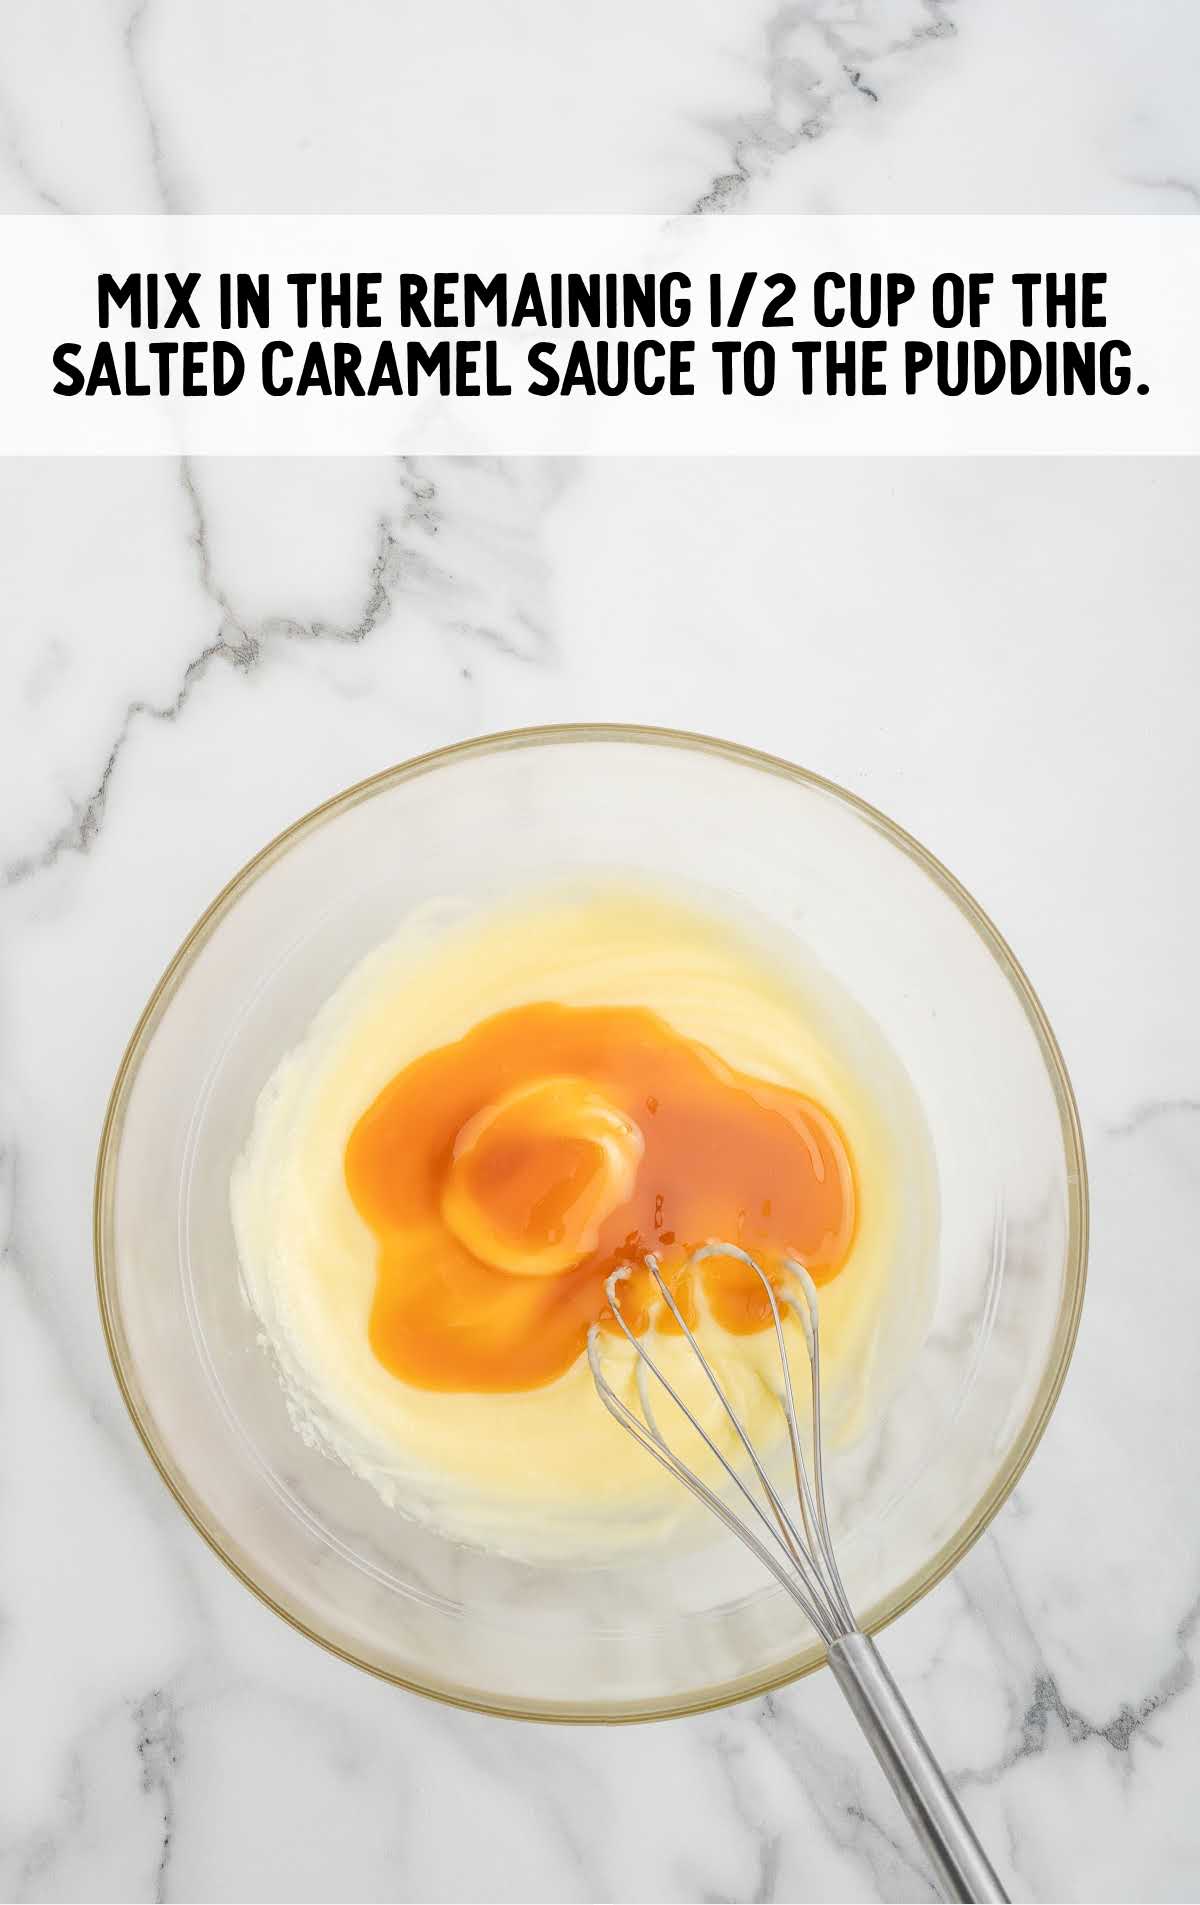
STEP EIGHT: Add in the remaining ½ cup of salted caramel sauce and mix again until combined.
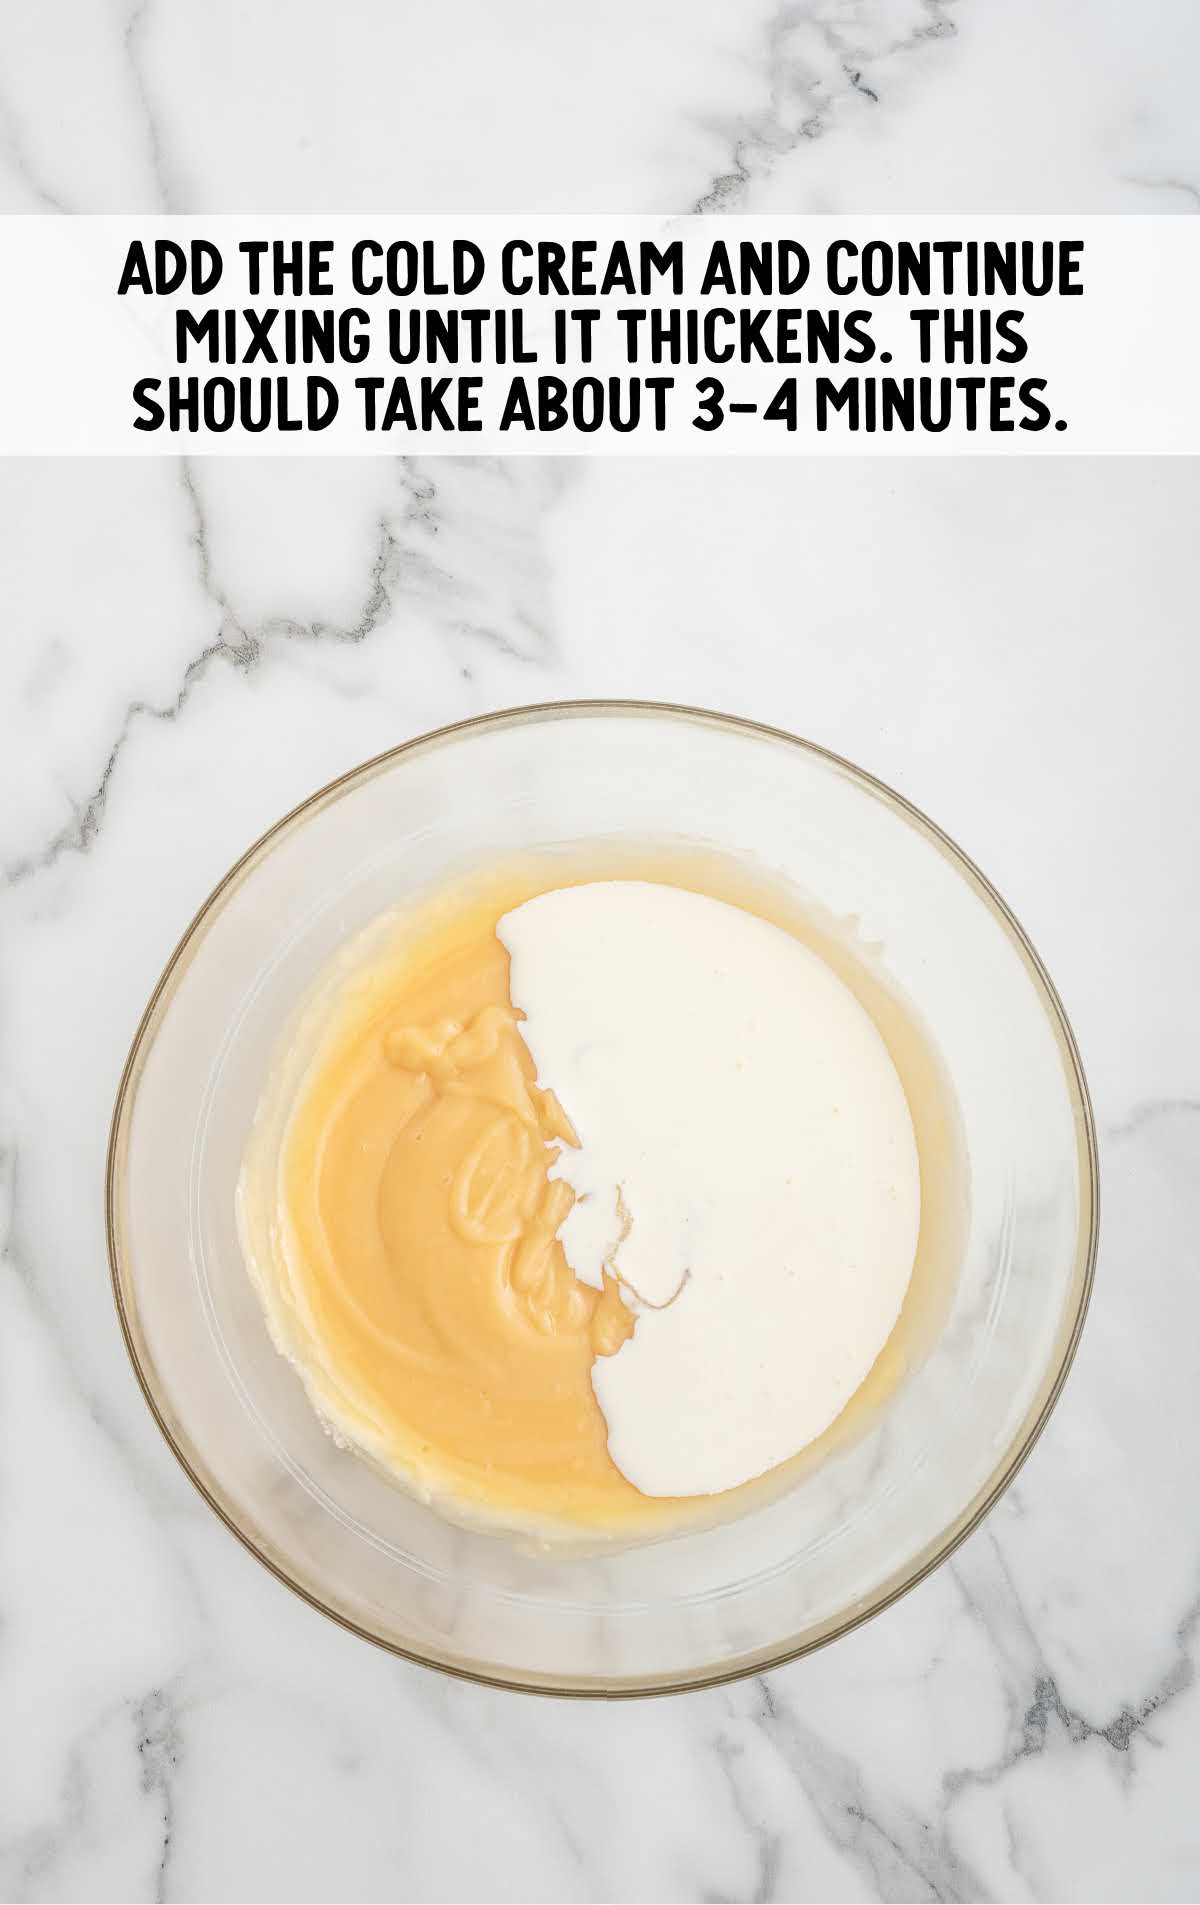
STEP NINE: Finally, add in the cold, heavy cream, and continue mixing until the pudding is fully thickened. The mixture should be able to hold it’s shape.
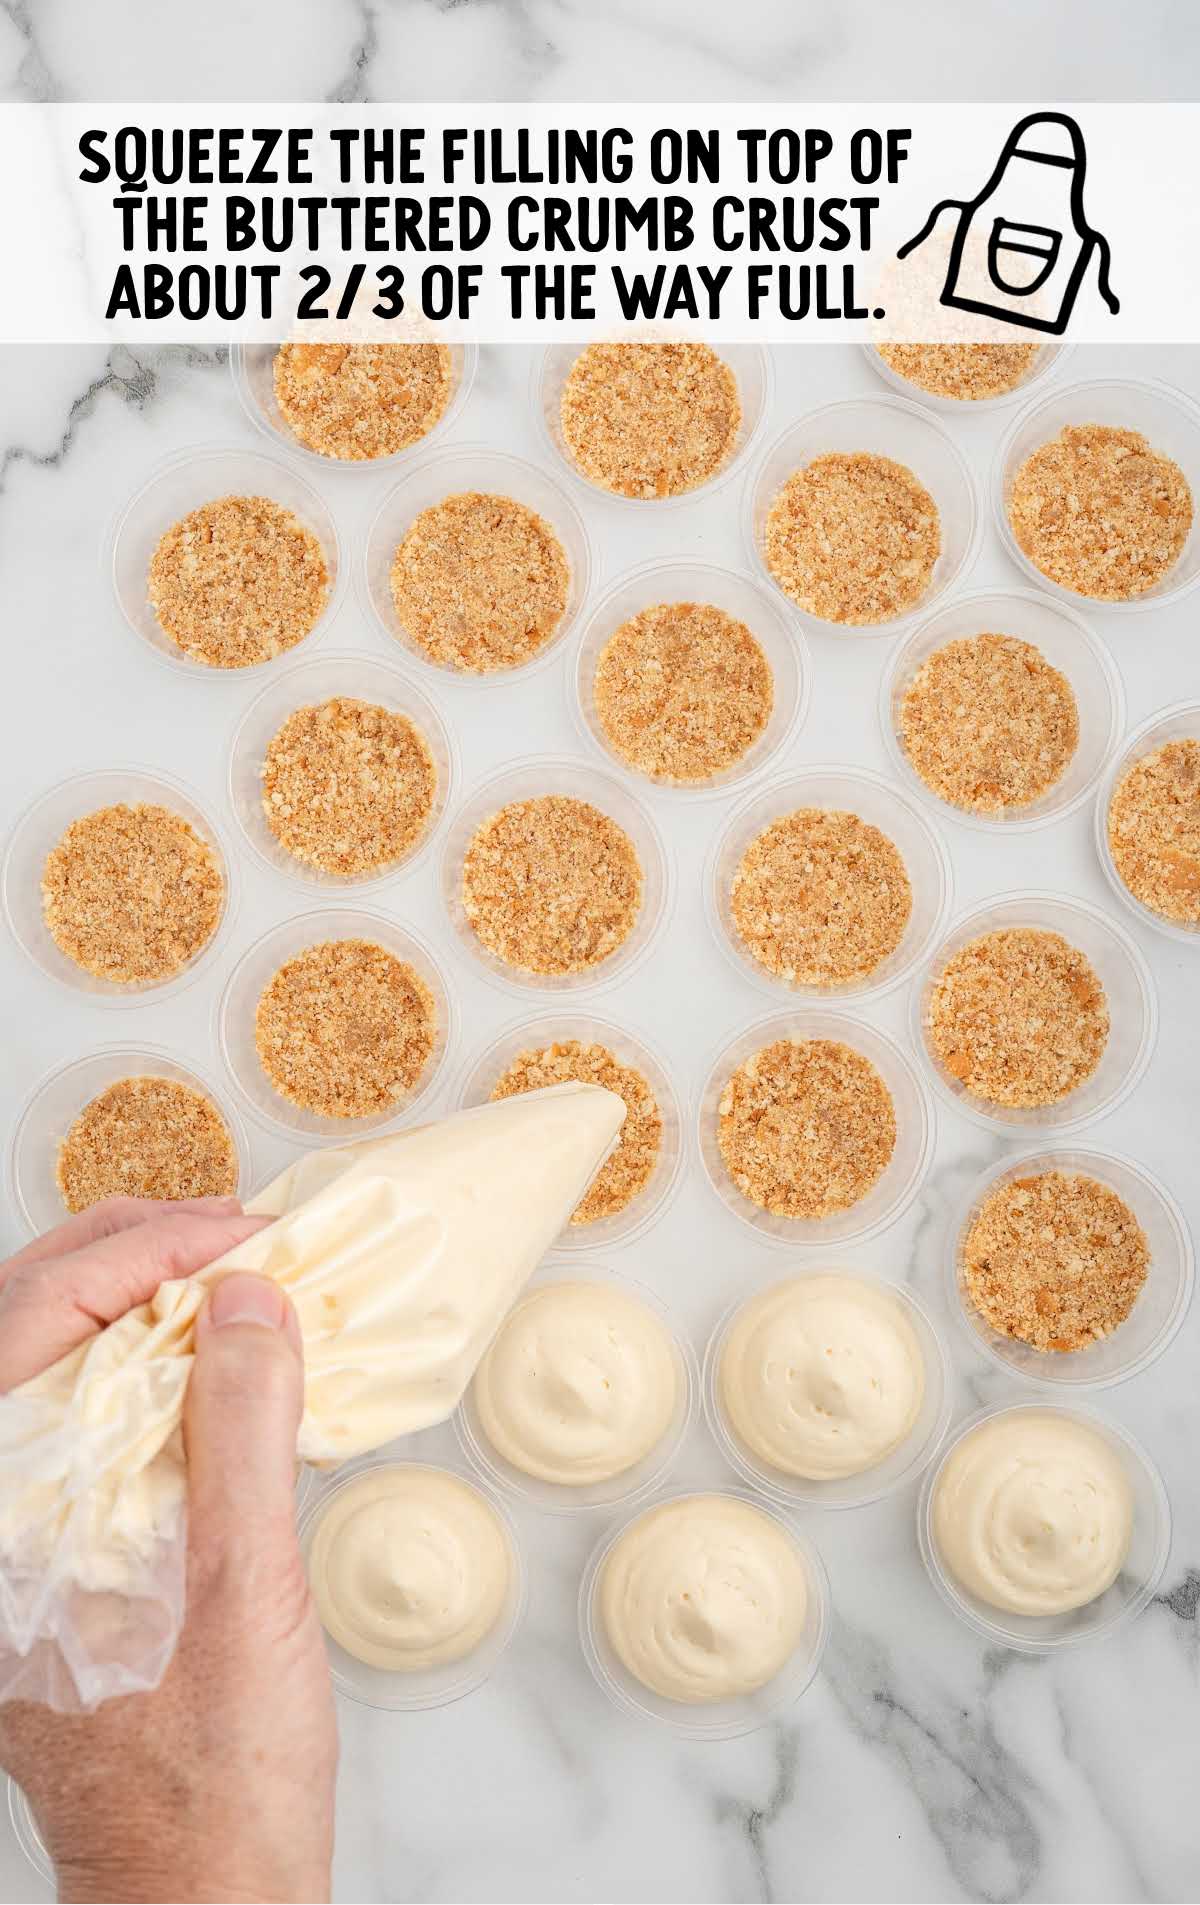
STEP TEN: Add the thickened pudding to a piping bag. You can also use a gallon-sized Ziploc bag with one corner snipped off.
PRO TIP:
If you’re using a Ziploc bag, don’t cut off too much of the bag. Begin with a small hole and make it bigger if needed.
STEP ELEVEN: Use even pressure to squeeze the filling onto the top of the buttered crumb crust. The portion cups should be about ⅔ of the way full.
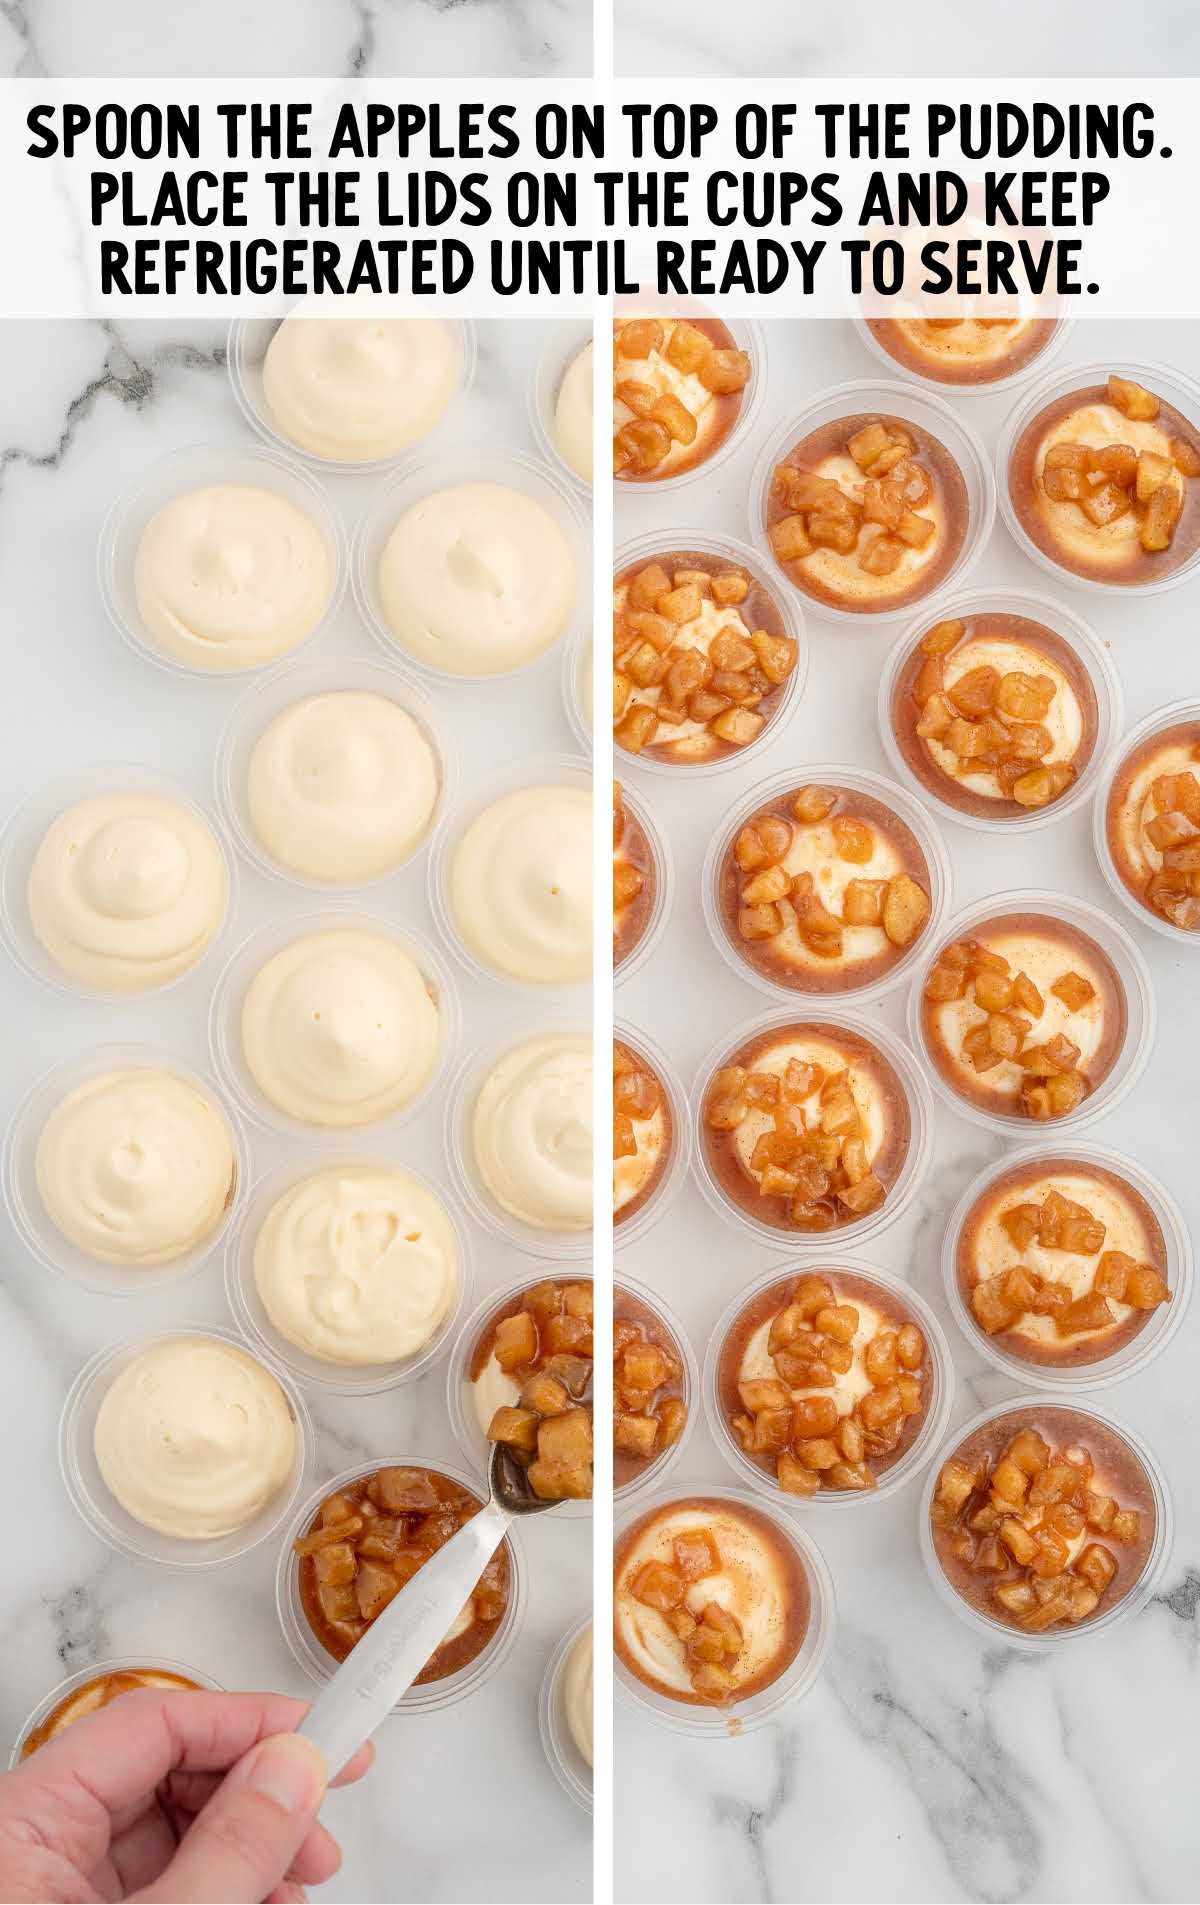
STEP TWELVE: Spoon about 2 teaspoons of the cooled, cooked apples and sauce on top of the pudding. Place the lids on the cups and store in the fridge until you’re ready to serve.
How To Serve Apple Desserts With Caramel Sauce
Now that your caramel apple pudding cups are ready to be enjoyed, it’s time to explore the endless possibilities for serving this easy layered treat. Whether you’re hosting a holiday party or indulging in a cozy night in, these fun dessert cups will be a hit with adults and kids alike!
Serve these little delights with mini spoons, or for an extra fun twist, use lady finger cookies for scooping. A bit of extra caramel drizzle on top will make everyone smile.
Top your apple caramel cups with a small dollop of whipped cream. Of course, a scoop of vanilla ice cream and a drizzle of caramel is always a good idea!
You can also transform the layers into a mini caramel apple trifle instead. Instead of making 28 mini dessert cups, you can make 4-6 larger ones. Layer the crust, pudding mixture, and cooked caramel apples 2 to 3 times in small glasses or bowls and serve as individual caramel apple trifles.
Make an extra special breakfast treat by pairing dessert cups with crunchy granola and a scoop of Greek yogurt.
Use the dessert cups as a filling for stuffed French toast by sandwiching the caramel apple mixture between two slices of bread dipped in egg batter. Cook until golden brown and crispy on the outside, then serve with a dusting of powdered sugar and maple syrup for a decadent breakfast or brunch. For a simpler option, cut homemade French toast into sticks. Dip the sticks in the apple dessert cups for an ultra-yummy breakfast.
Turn these single-serve desserts into dessert tacos, but instead of pie filling, layer the pudding and apple mixture inside. Perfect for Cinco de Mayo or Taco Tuesday!
These mini layered desserts pair perfectly with hot apple cider, iced caramel macchiato, or a grown-up hot chocolate.
MORE CARAMEL DESSERT RECIPES

When to Serve
Our Caramel Apple Dessert Cups are a wonderful treat for any occasion and versatile enough to elevate any gathering into a memorable experience.
- Family Fall Picnic in the Park: These caramel apple treats are the best sweet to complement the apple season. They’re a portable and mess-free dessert option that everyone can enjoy.
- Office Potluck or Holiday Party: Our Caramel Apple Dessert Cups offer a fun twist on classic fall flavors, earning rave reviews from coworkers eager to indulge in these single-serve treats.
- Kids’ Birthday Party: Surprise the little ones with a special treat at their birthday party that’s both delicious and fun to eat. These caramel apple desserts are perfectly portioned for little hands and offer a combination of flavors and textures that will have kids and adults alike reaching for seconds.
How To Store These Caramel Apple Dessert Cups
Whether you’re planning ahead for a special occasion or simply looking to enjoy leftovers, proper storage is critical so you can savor these no bake salted caramel cups for days to come.
MAKE AHEAD: To save time on busy days or prepare for upcoming events, you can make these cups up to 1 day ahead of time. You can also make the individual layers and store them separately for quick assembly on the day of your event.
IN THE FRIDGE: For leftover dessert cups, be sure the condiment cup lids are sealed tight, or cover the cups with plastic wrap. Store them in the refrigerator for up to 3 days for the best freshness and flavor. Before serving, allow the dessert cups to come to room temperature for about 10-15 minutes to soften slightly.
IN THE FREEZER: If you want to extend the shelf life of your Caramel Apple Dessert Cups, you can freeze them instead. Place the assembled dessert cups in a single layer on a baking sheet and freeze until firm. Once frozen, transfer them to airtight freezer-safe containers or resealable plastic bags, removing as much air as possible to prevent freezer burn. Stored properly, the dessert cups will last in the freezer for up to 1 month.
Why These Caramel Apple Cookie Cups Are The Best
Our Caramel Apple Dessert Cups are a delightful fusion of seasonal flavors and comforting sweetness that never fails to impress. From their irresistible aroma to their indulgent taste and versatile serving options, there are countless reasons why we can’t get enough of this delectable dessert.
Why We Love This Recipe:
Perfect Balance of Flavors: One of the reasons we adore this recipe is its impeccable flavor combination. The tartness of Granny Smith apples perfectly complements the sweet caramel sauce, while the hint of cinnamon adds warmth and depth to each bite.
Comforting and Nostalgic: There’s something undeniably comforting and nostalgic about the combination of caramel and apples. Just like biting into a delicious caramel apple, this mini apple crisp recipe offers a taste of nostalgia that warms the soul.
Make-Ahead Convenience: Another reason to love this recipe is its make-ahead convenience. With yummy layers that can be prepared in advance and assembled just before serving, our dessert cups are the perfect solution for busy hosts or last-minute entertainers.
Frequently Asked Questions
Yes, you can freeze the assembled dessert cups for up to 1 month. Thaw them overnight in the refrigerator before serving.
Absolutely! Store-bought caramel sauce works perfectly fine for this recipe.
While cinnamon adds warmth and depth to the apple filling, you can omit it if you prefer. You can replace it with your favorite complementary spice.
You can prepare the dessert cups 1 day in advance or prepare the components of the dessert cups up to 3 days in advance and assemble them just before serving.
Absolutely! Granny Smith apples are recommended for their tartness, but you can use honey crisp, gala, fuji, or pink lady apples for a different flavor profile.
Our Caramel Apple Dessert Cups combine tart apples, rich caramel sauce, and creamy pudding. With unlimited serving options and make-ahead convenience, they are perfect for any occasion.
More Recipes You’ll Love
- Caramel Apple Bars
- Apple Delight Recipe
- Caramel Apple Cobbler
- Caramel Apple Cookies
- Mini Apple Cheesecakes


Caramel Apple Dessert Cups
Ingredients
- 3 cups Granny Smith apples (peeled, cored, and finely diced)
- ⅓ cup light brown sugar, packed
- 3 tablespoons salted butter
- 1 teaspoon ground cinnamon
- 2 cups crushed vanilla wafers
- ¼ cup salted butter, melted and cooled
- 3.4 ounce instant vanilla pudding mix
- 1 ¼ cup cold whole milk
- ¾ cup salted caramel sauce, divided ¼ cup and ½ cup
- 1 cup cold heavy whipping cream
Instructions
- Add the diced apples, brown sugar, butter and cinnamon to a 2-3 quart saucepan over medium heat. Stir the apples frequently, for about 7-9 minutes, until the apples have softened and the brown sugar sauce has thickened to canned apple pie filling consistency. Stir in ¼ cup of salted caramel sauce. Allow the apples to cool completely. (If you are pressed for time, you can chill the apples in the refrigerator. Be aware that condensation may occur on the lid or covering over the apples which may affect the consistency)
- Add the crushed vanilla wafers and melted butter to a small mixing bowl. Stir to completely coat the crumbs.
- Add 2 teaspoons of the buttered crumbs to the cups. Use either a spoon or an extra cup to tamp down the buttered crumbs.
- Add the cold whole milk and instant pudding to a medium size mixing bowl. Use a handheld mixer on low, or a hand whisk, to mix until the pudding begins to thicken. This will take about 2-3 minutes
- Mix in the remaining ½ cup of the salted caramel sauce to the pudding.
- Add in the cold heavy cream and continue mixing until the pudding has thickened. This should take about 3-4 minutes (The mixture should be thick enough to hold its shape when piped into the cups)
- Add the thickened pudding to a piping bag, or a gallon size ziplock bag with a corner snipped off.
- Snip the end of the piping bag off. Use steady even pressure to squeeze the filling on top of the buttered crumb crust about ⅔ of the way full.
- Spoon the cooled, cooked apples on top of the pudding. (About 2 teaspoons) Place the lids on the cups and keep refrigerated until ready to serve.
Notes
- You can use a vegetable peeler (like a carrot peeler) to peel the apples. This may be easier for some people than using a knife.
- If you’re short on time, set the cooked apples in the fridge to cool instead of waiting for them to come to room temperature. You may want to put a lid on the apples in the fridge so they don’t dry out, however, condensation may form resulting in a slightly different consistency.
- To make it easy to move the filled cups around later, you can set the portion cups out on a large baking tray while you build the layers.
- If you’re using a Ziploc bag instead of a piping. bag, don’t cut off too much of the bag. Begin with a small hole and make it bigger if needed.
Nutrition


Leave a Comment