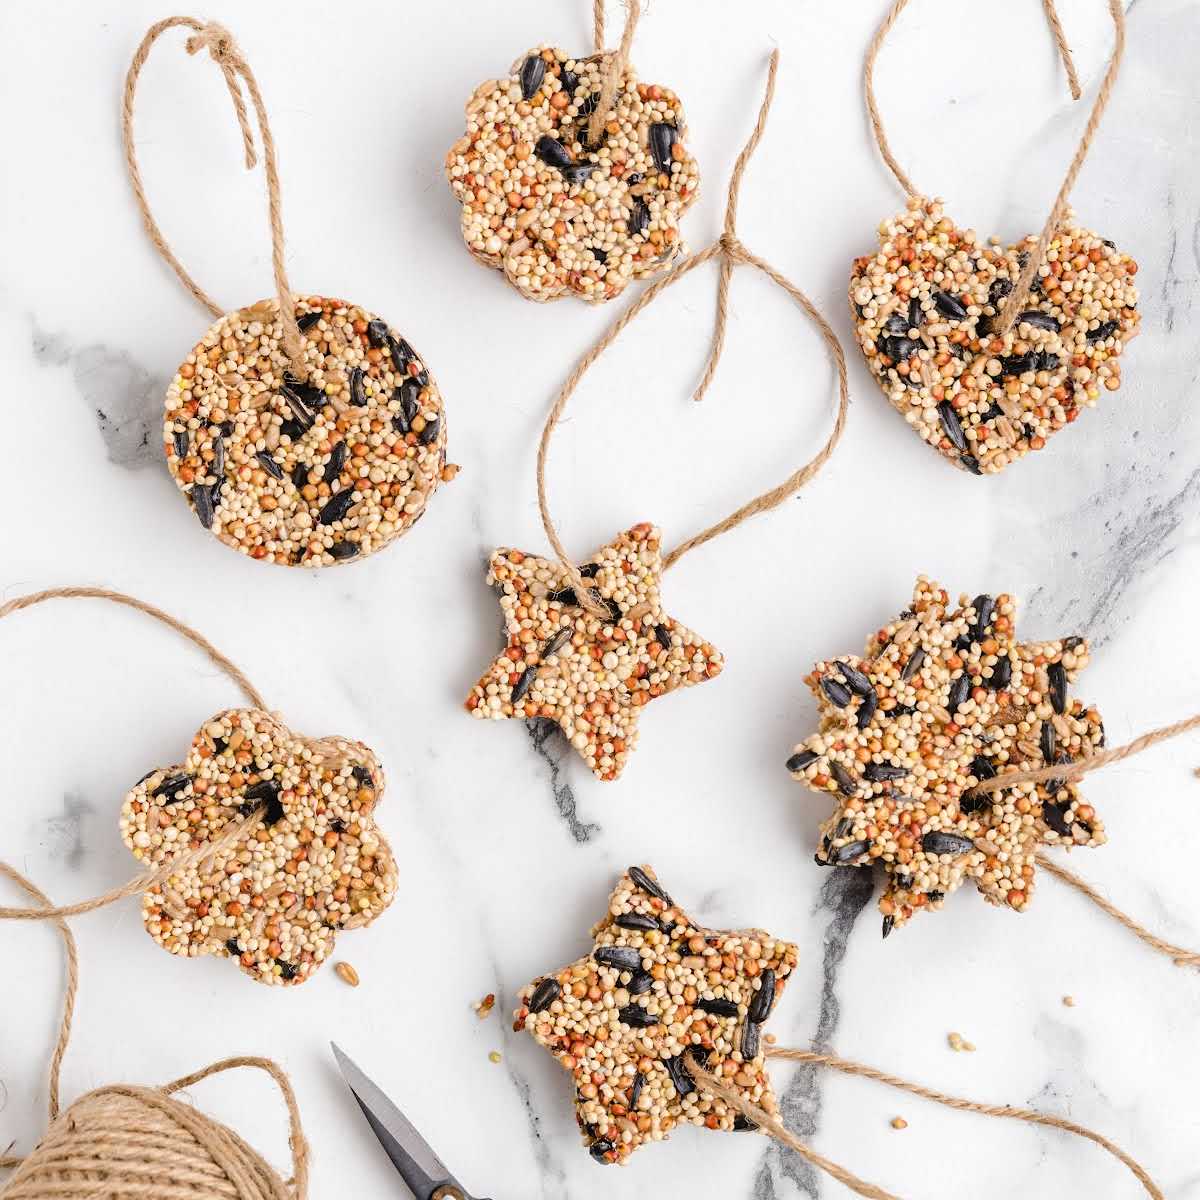
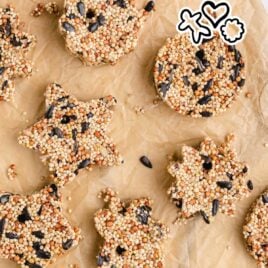
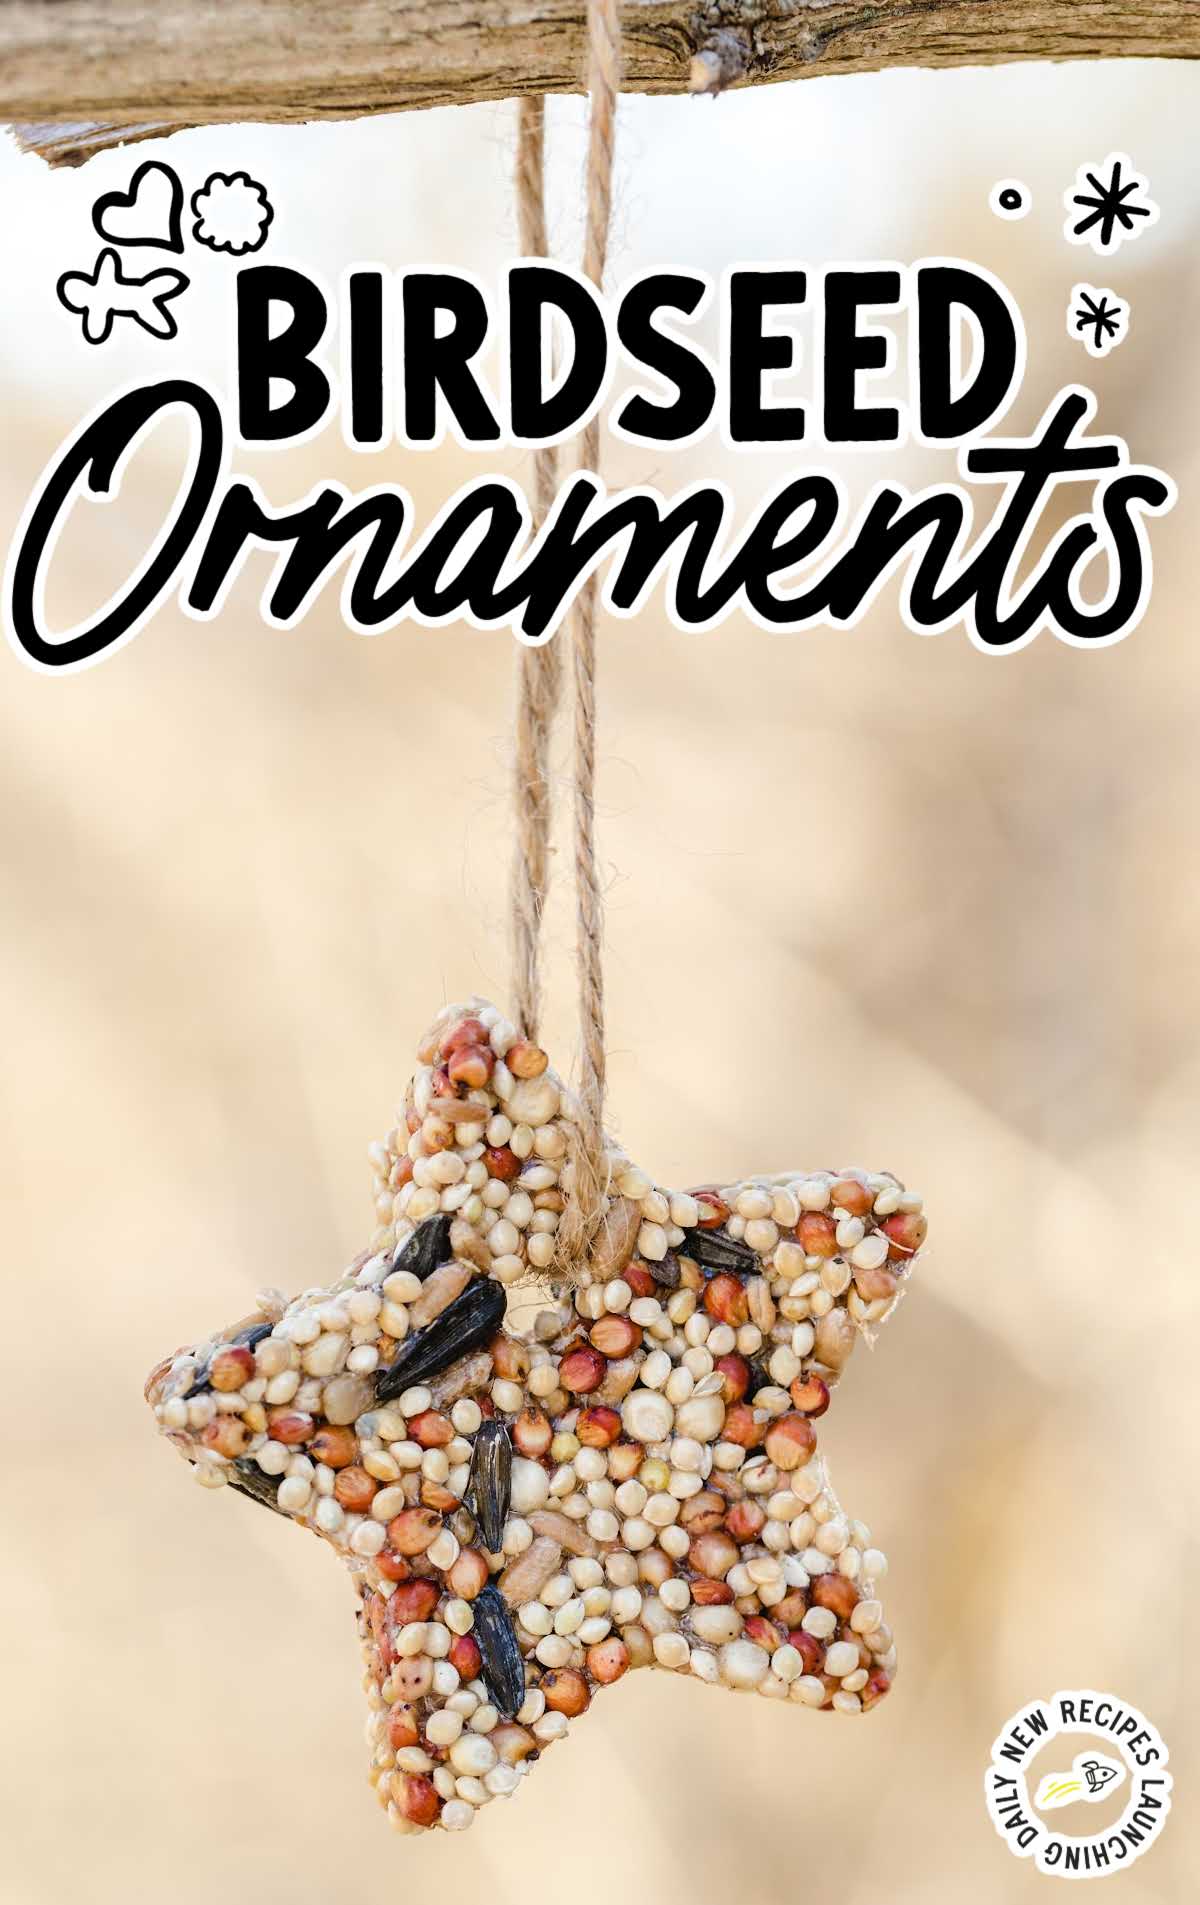
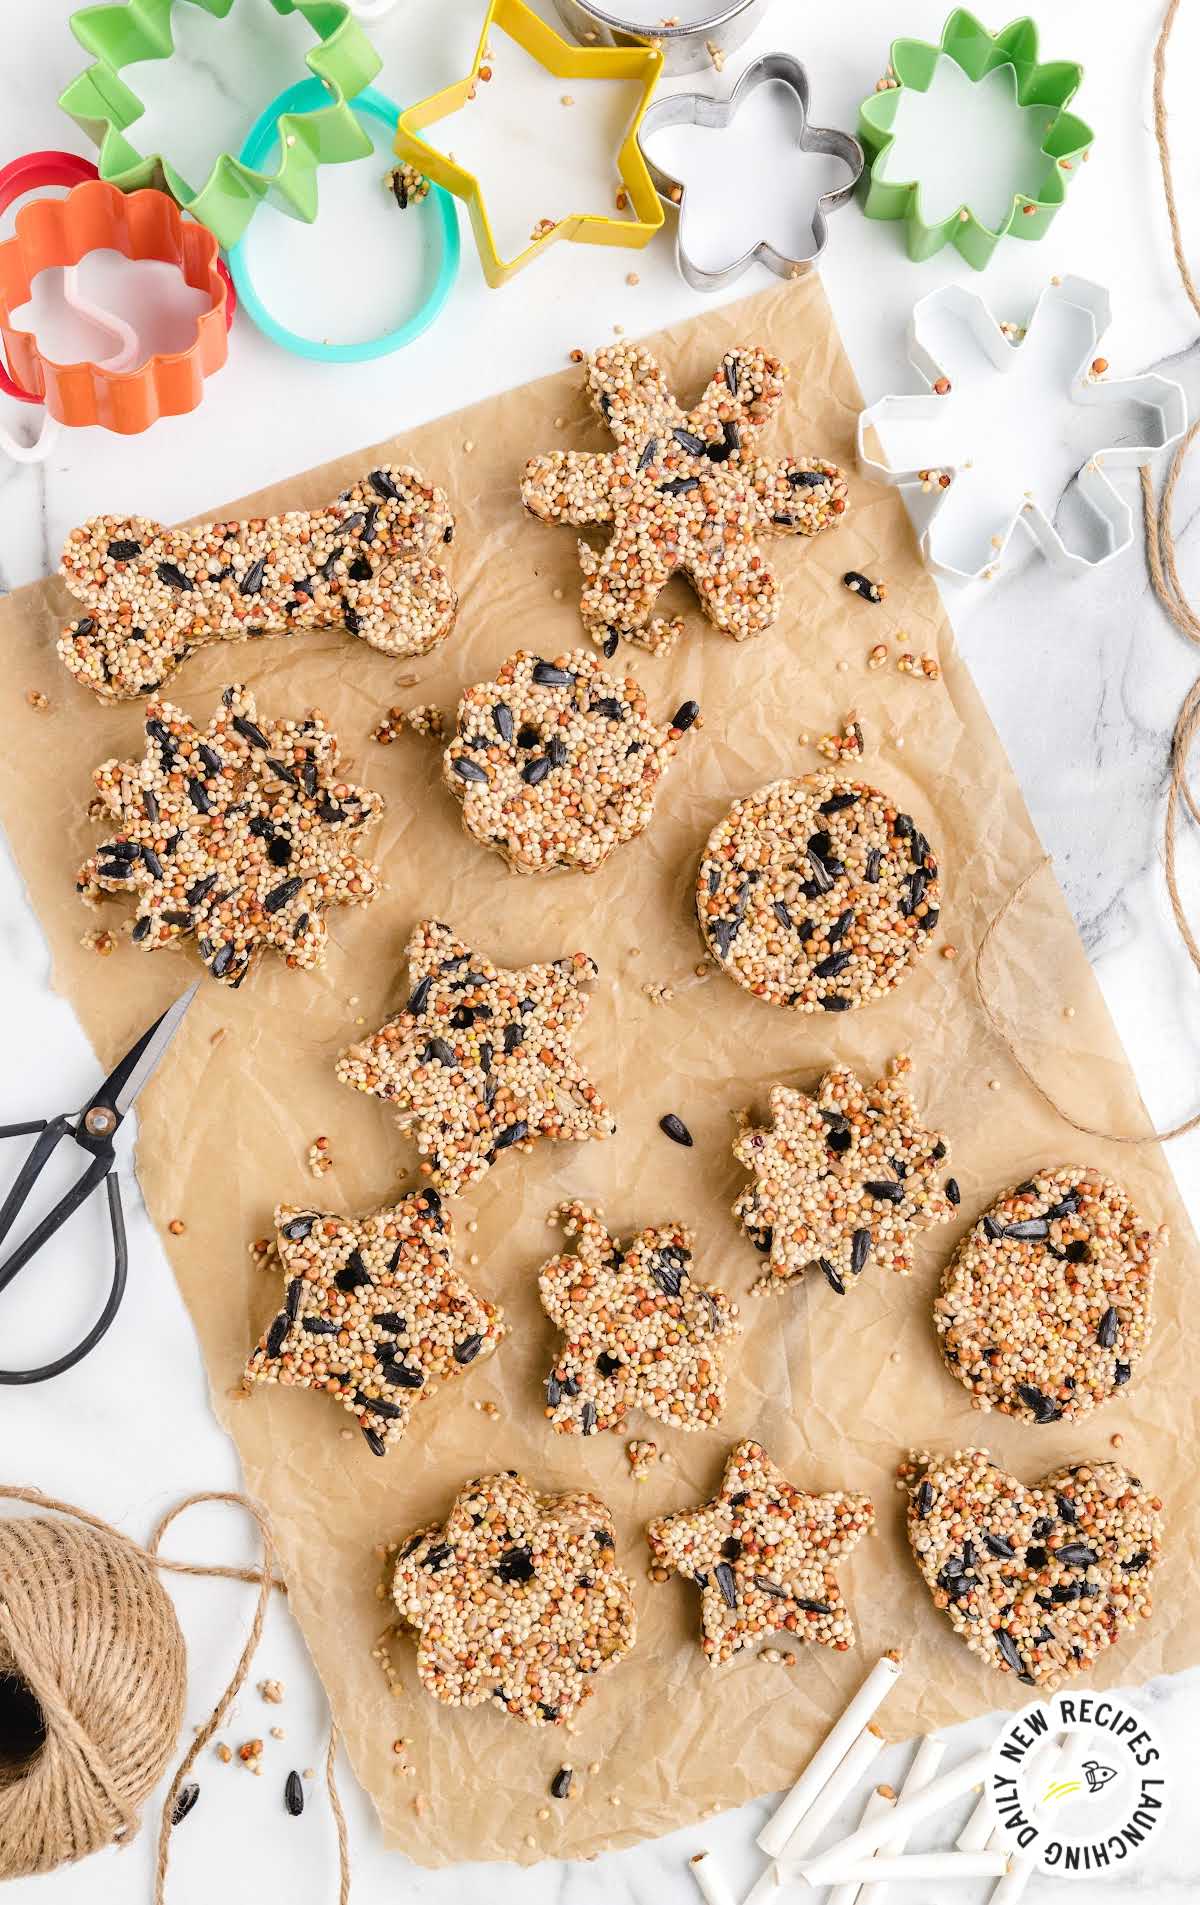
These birdseed ornaments are adorable and will be a hit with the birds in your neighborhood this spring. These cute and crunchy treats are a fun craft to do with the kids, especially since no baking is required, and a great way to attract lots of feathered friends to your trees.
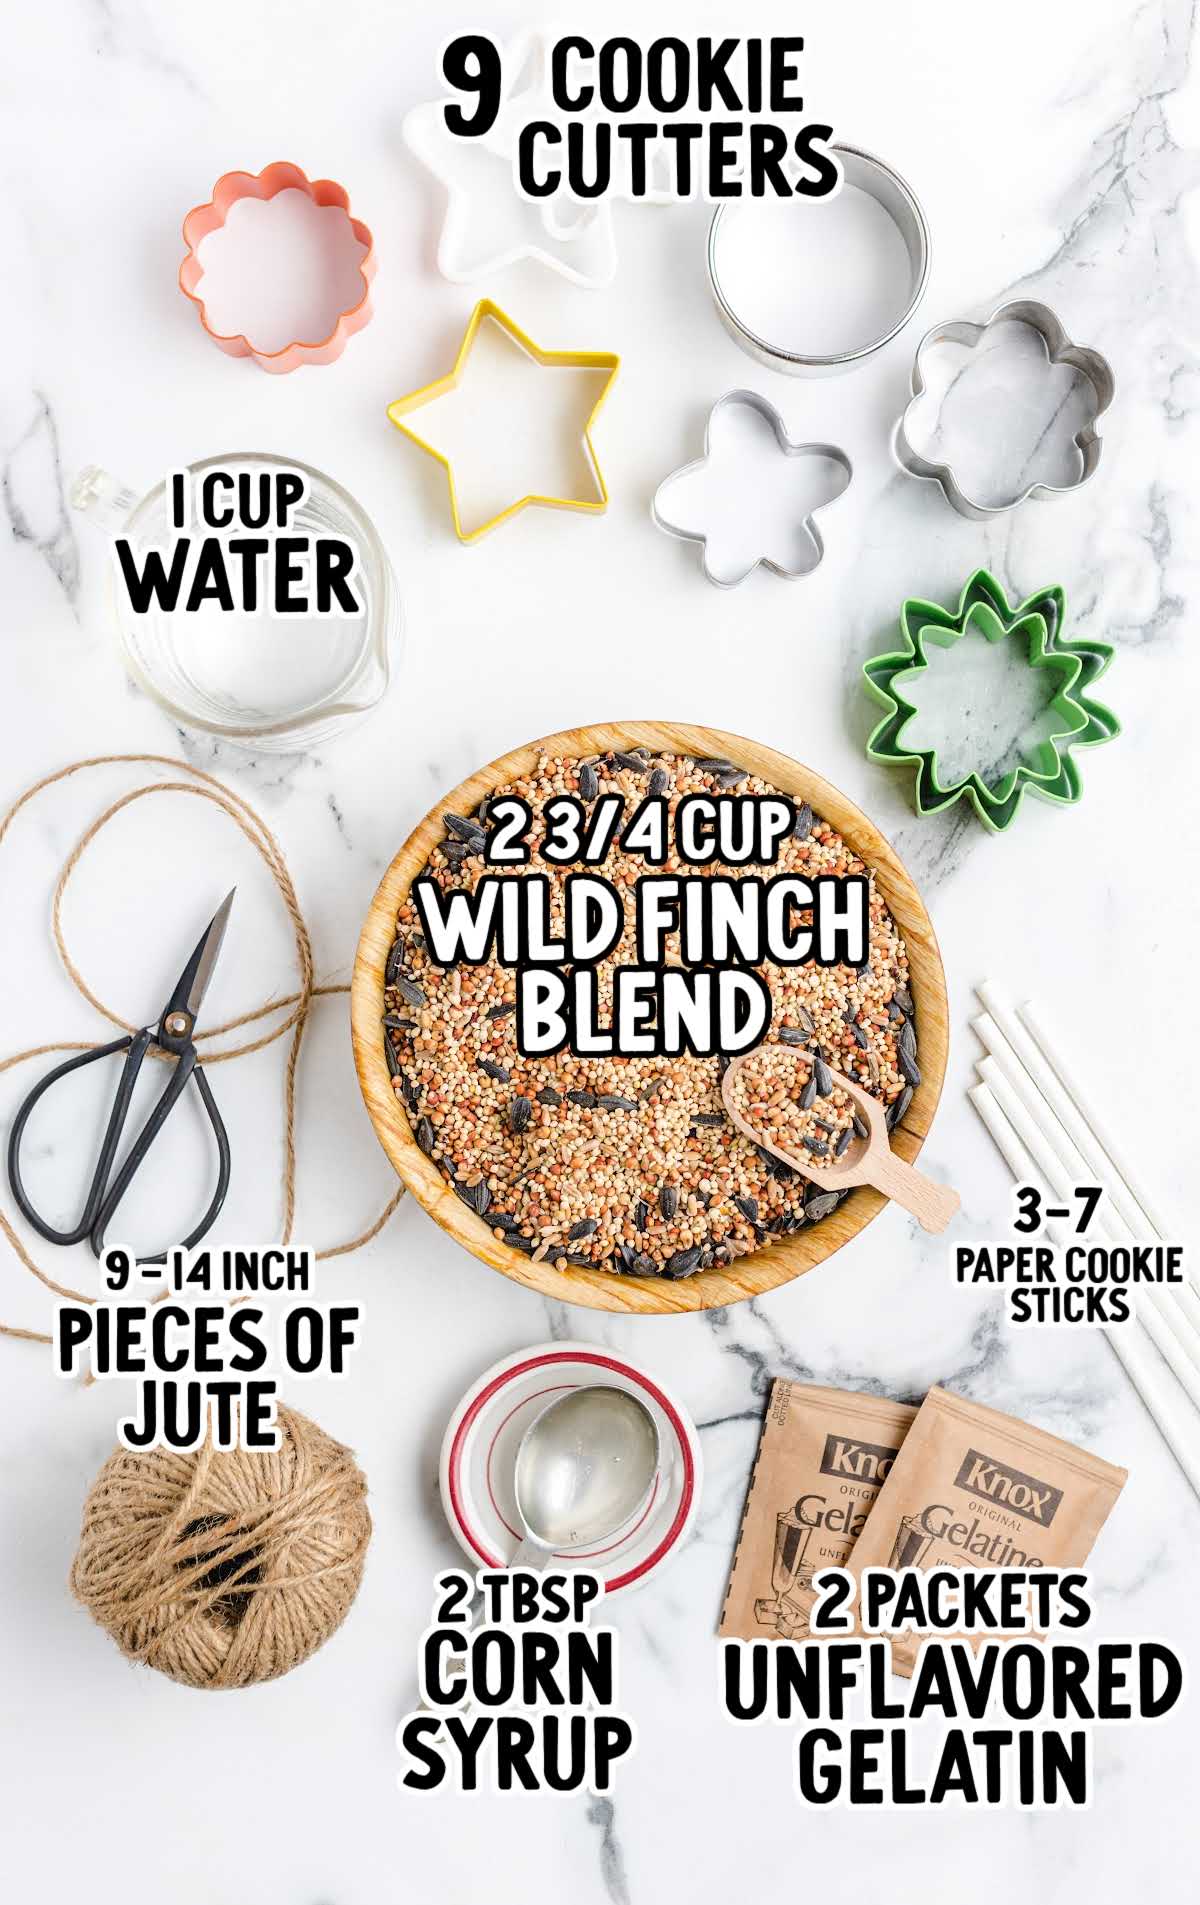
Bird Seed Ornaments Ingredients
This birdseed ornament recipe is crafted to attract birds by offering a tasty blend of wild finch seeds, including sunflower, nyjer, and millet.
Gelatin and corn syrup are used to bind the seeds together, providing a stable and long-lasting structure that birds can comfortably perch on while enjoying their meal.
You’ll need:
- 1 cup of water, divided into half
- 2 packets of unflavored gelatin
- 2 tablespoons of light corn syrup
- 2¾ cups of wild finch blend
- 9 plastic or metal cookie cutters, any shape
- 3 (7-inch) paper cookie sticks, cut into 2¼-inch pieces or 3 plastic drink straws, cut into 2¼-inch pieces
- 9 (14-inch) long cut pieces of jute, twine, hemp, or yarn for hanging the ornaments
Substitutions And Additions
CORN SYRUP: Honey is not a good substitute for light corn syrup. If you don’t have any light corn syrup, you can skip the sweetener altogether.
LEMON OR ORANGE ZEST: If the weather is below 45-50°F, you can add a teaspoon of orange or lemon zest.
ORANGES: You can also use hollowed-out orange halves instead of cookie cutters.
Make two holes on opposite sides of the orange, about ½ inch down, and fill the halves with the birdseed mixture.
GELATIN: If you are making this birdseed ornament recipe in above-50°F weather, you can substitute 1½ tablespoons agar powder for the gelatin.
It is completely vegetable-based and should not mold as quickly.
How To Make This Bird Seed Ornaments Recipe
Let’s dive into making these fun ornaments so that you can treat your feathered friends.
STEP ONE: Line a baking sheet with either wax paper or parchment paper.
Lay out your favorite cookie cutters, spacing them at least two inches apart. Set the tray aside.
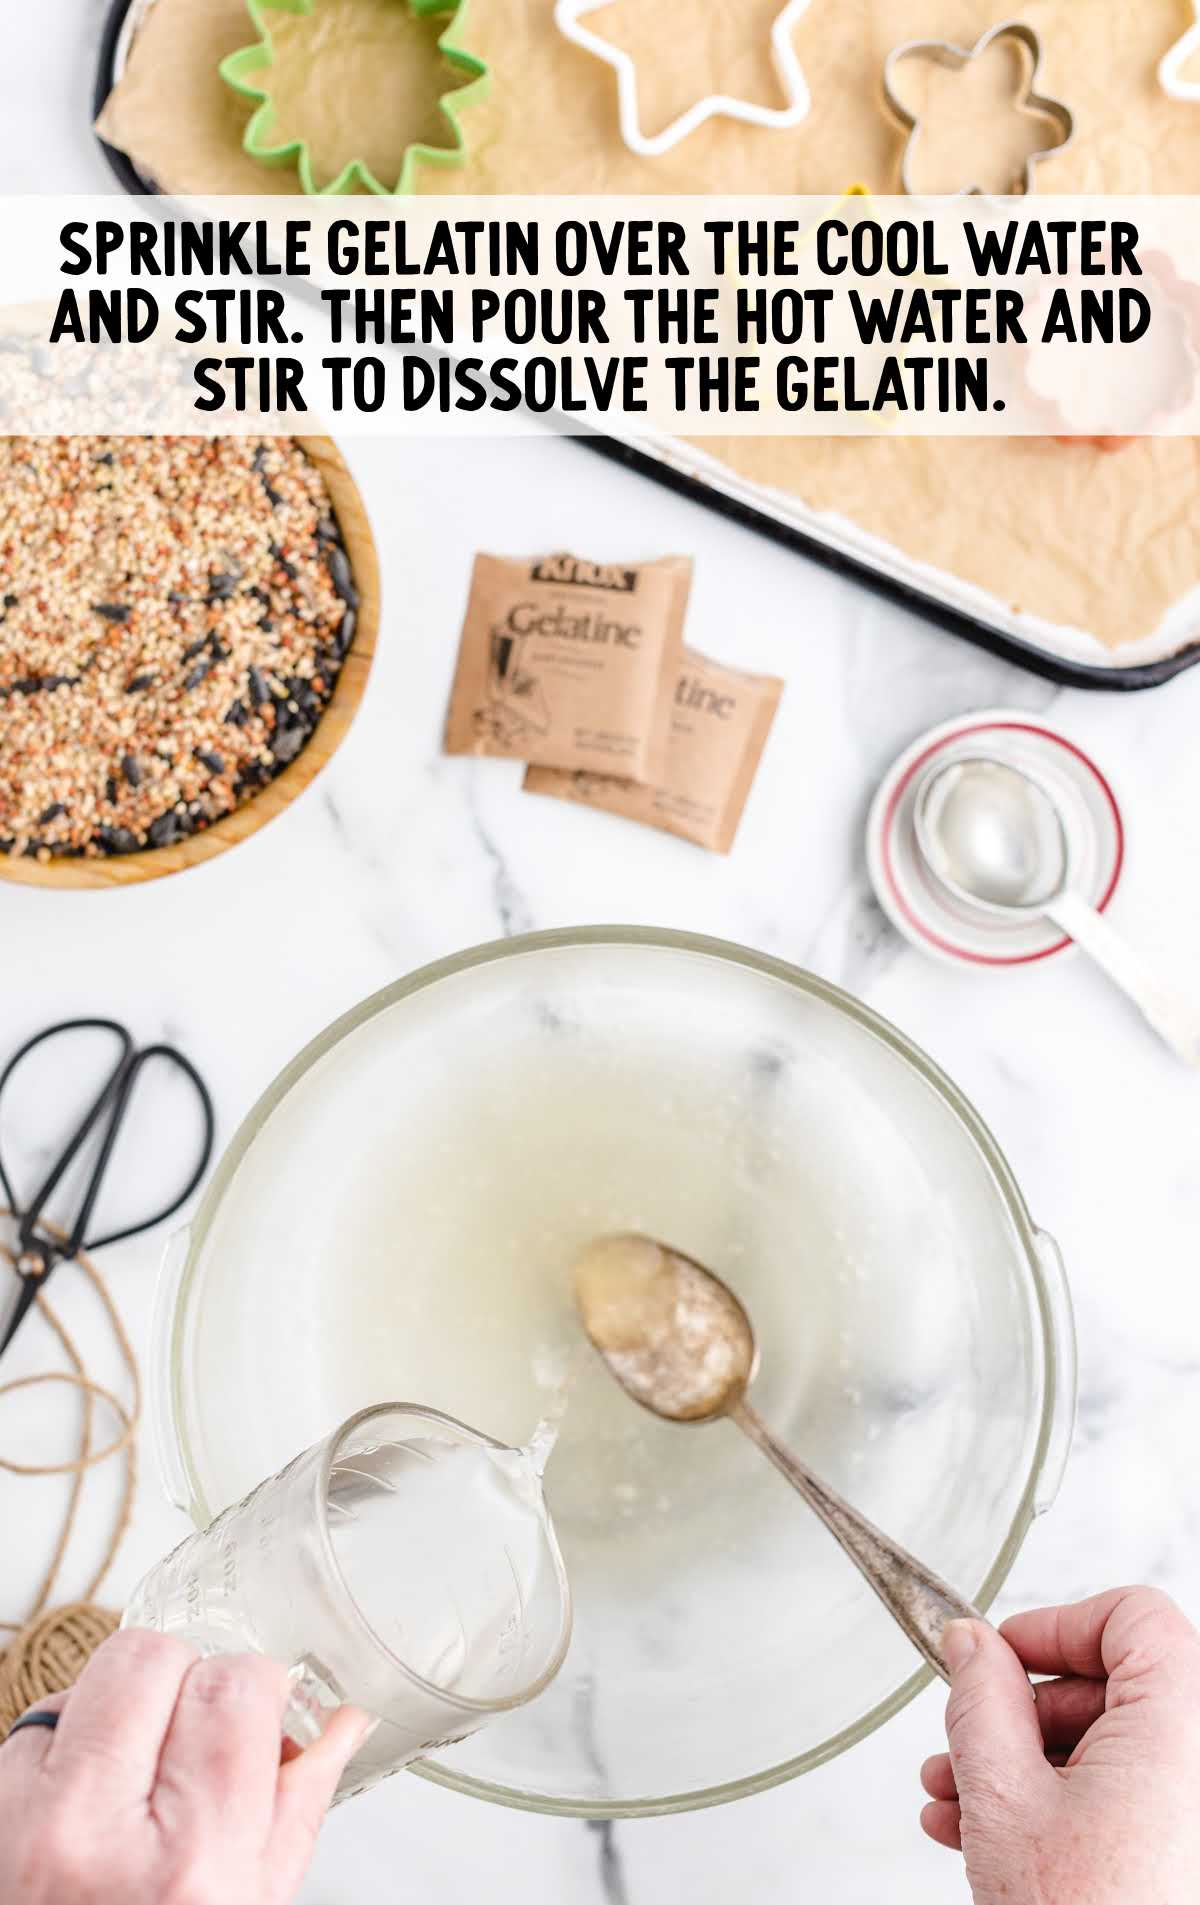
STEP TWO: In a large heat-safe mixing bowl, add a half cup of cool water.
STEP THREE: In a small heat-safe bowl, add the other half cup of cold water and microwave for one minute.
Carefully remove the hot water and set it aside.
STEP FOUR: Sprinkle the packets of gelatin over the cool water and stir to dissolve.
While stirring, carefully pour the hot water over the gelatin mixture. Stir to continue dissolving the gelatin.
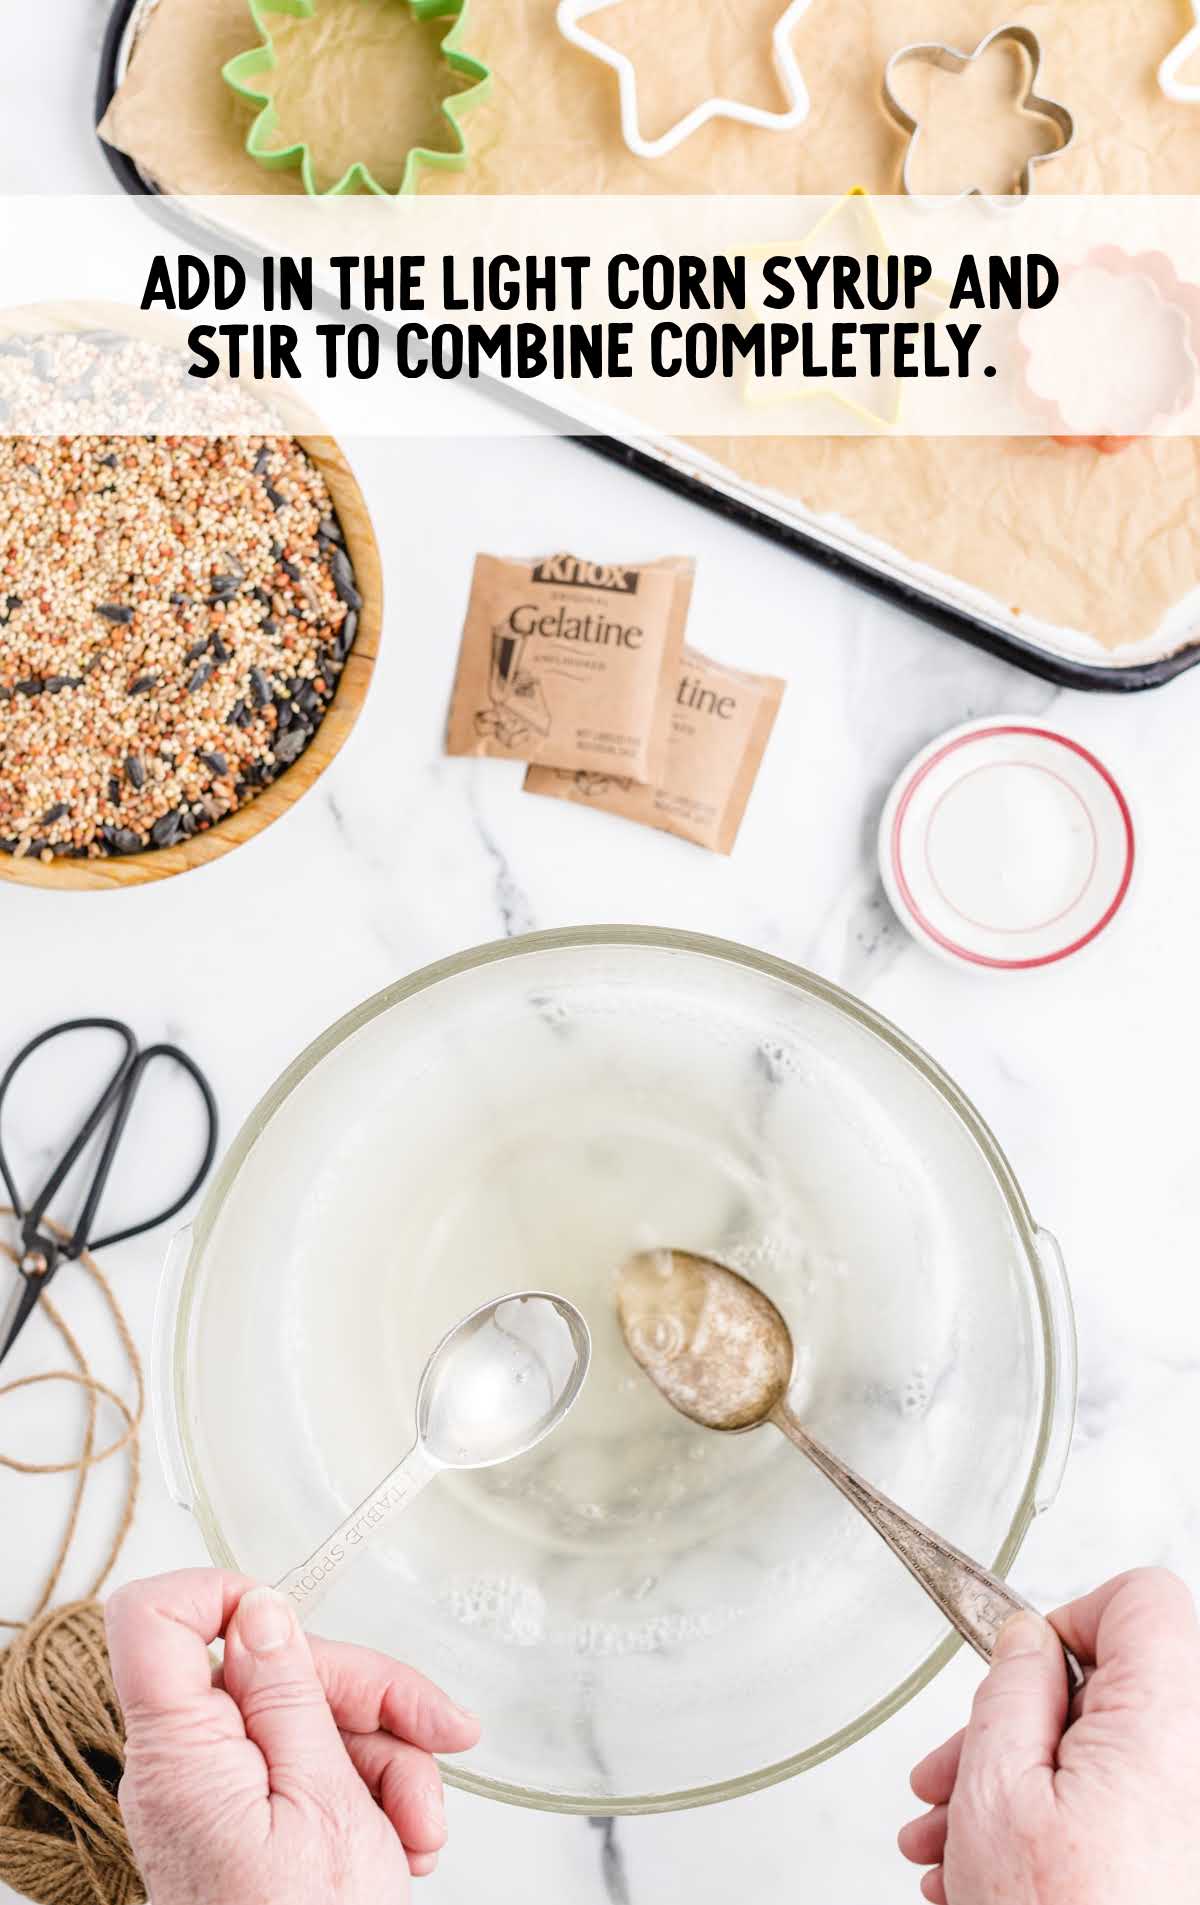
STEP FIVE: Continue stirring. Add the light corn syrup and stir to combine completely.
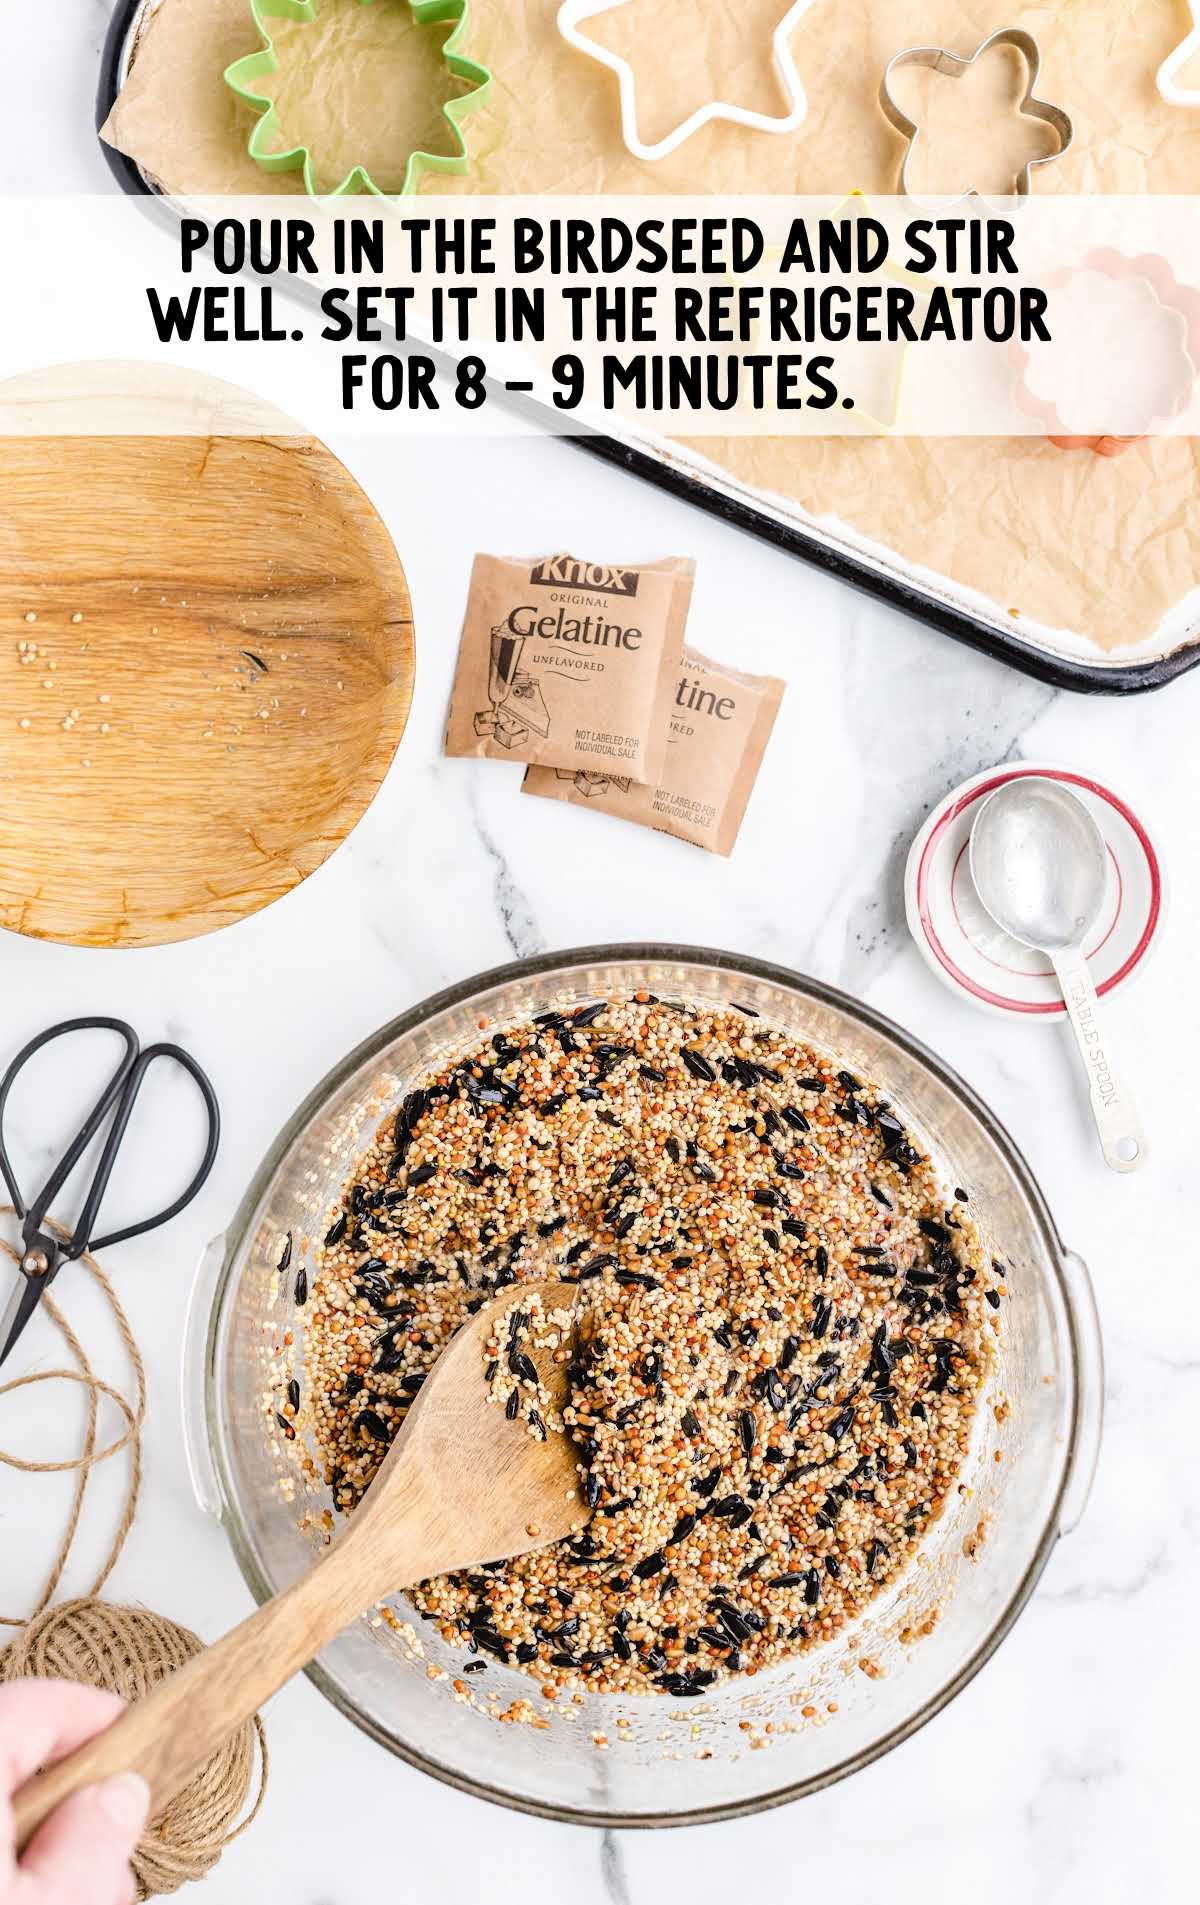
STEP SIX: Immediately pour the birdseed into the corn syrup mixture and stir with a large wooden spoon.
Set the bowl in the refrigerator for eight to nine minutes to allow the gelatin mixture to be slightly absorbed by the seed.
OUR RECIPE DEVELOPER SAYS
Don’t leave the bowl in the fridge for any longer than ten minutes, as it will harden too much, and the ornaments will end up crumbly. It only needs to be set enough that it doesn’t seep out from under the sides of the cookie cutters.
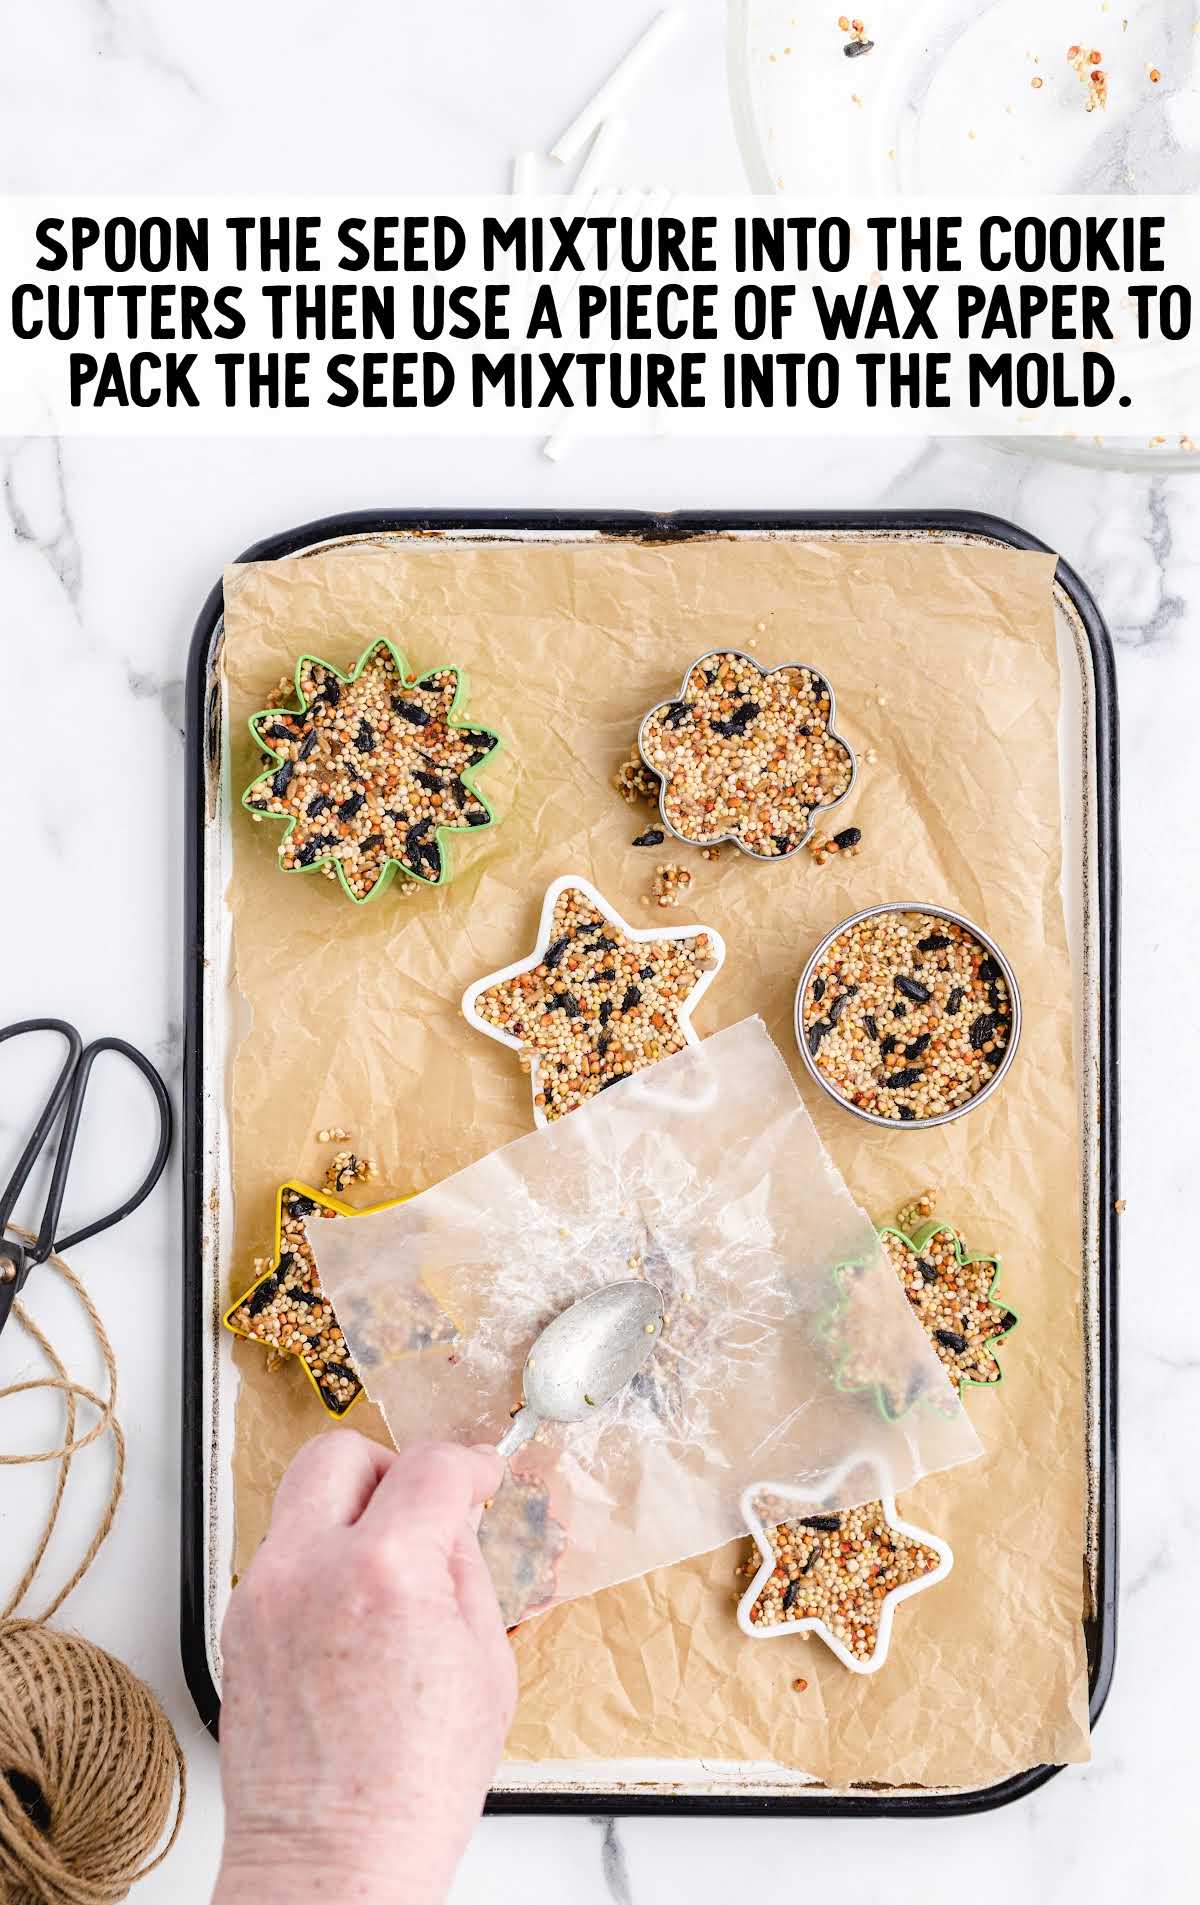
STEP SEVEN: Spoon the seed mixture into the cookie cutters until full.
Once you have your cookie cutters filled, use a small piece of parchment paper or wax paper to gently pack the seed mixture into the mold.
PRO TIP:
Spray your cookie cutters with nonstick spray so that the ornaments don’t stick when you remove them.
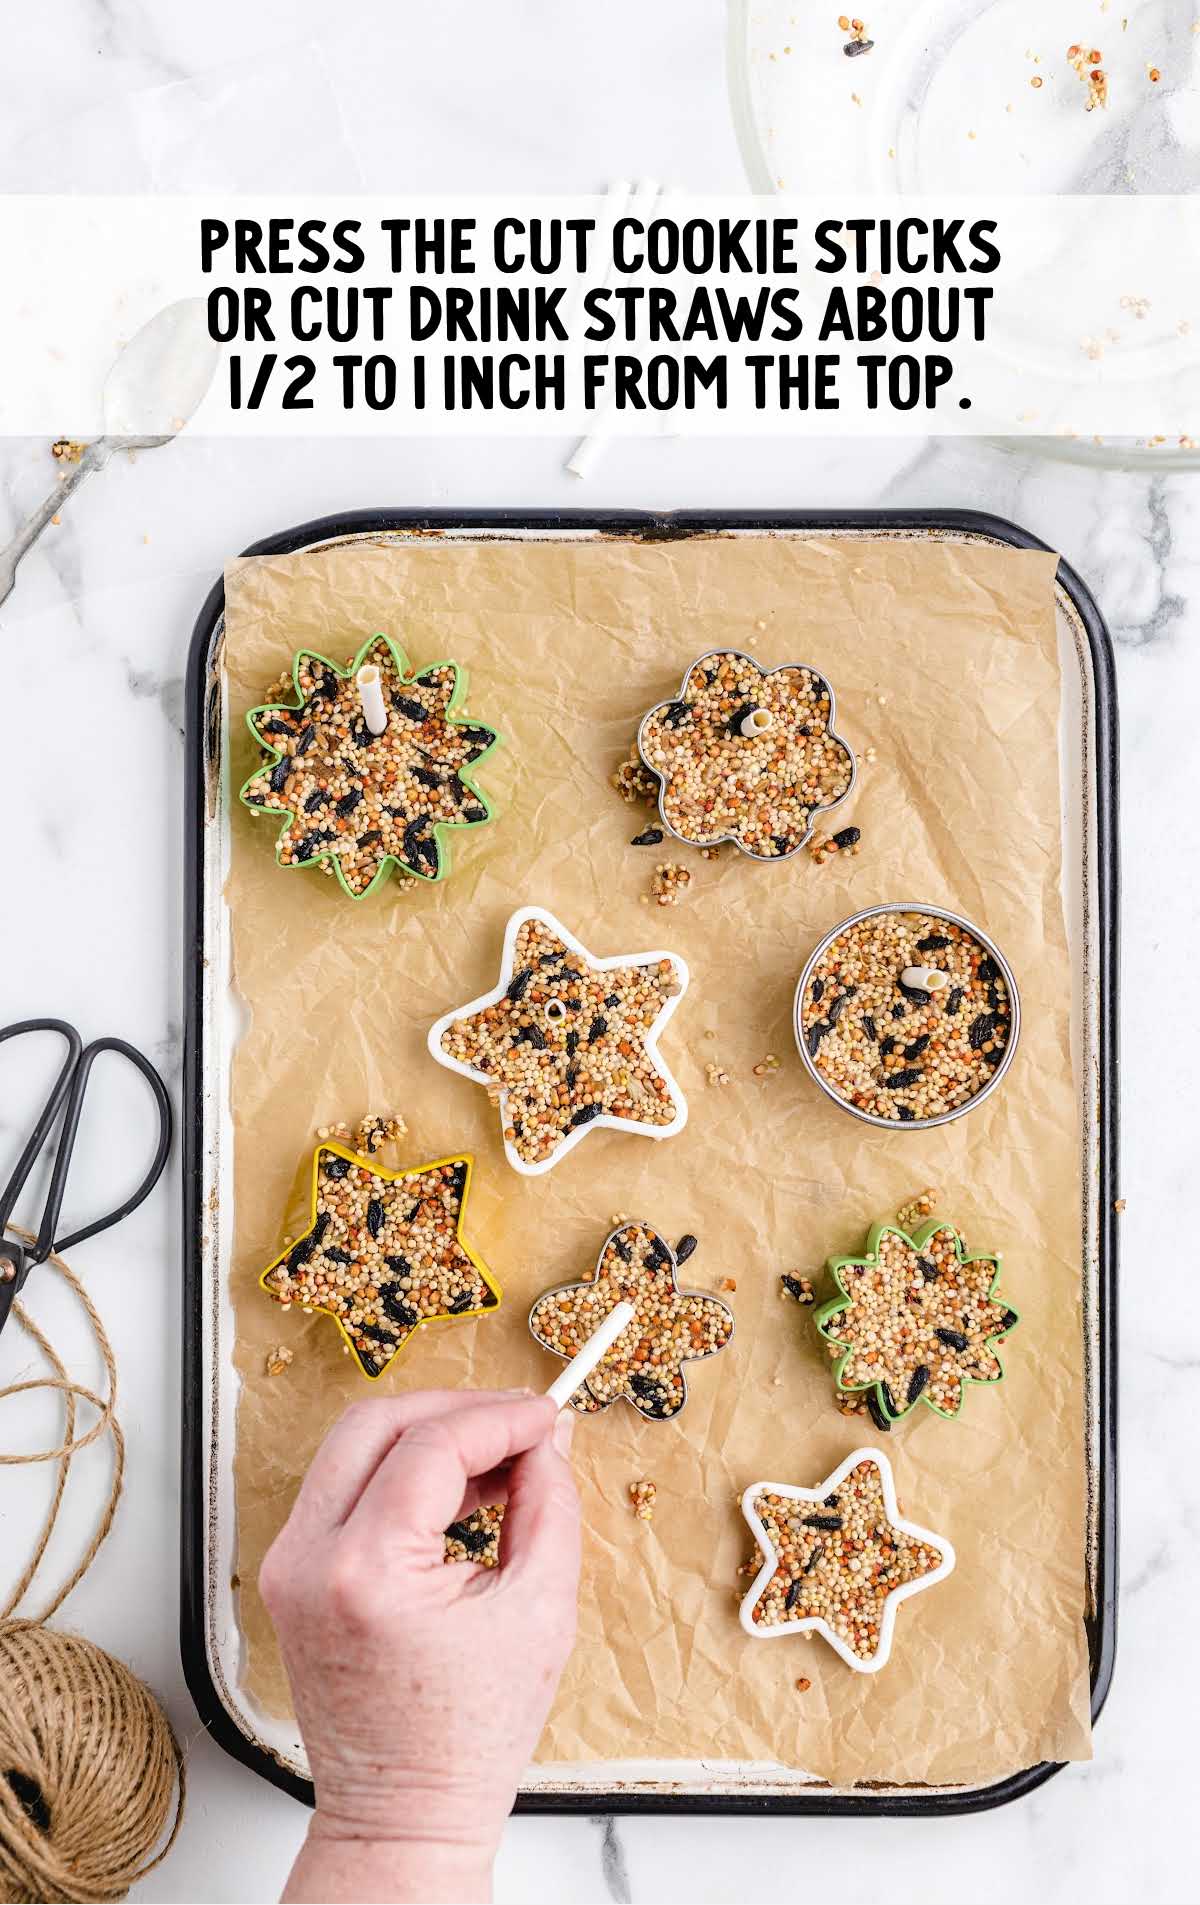
STEP EIGHT: Press the cut cookie sticks or cut drink straws about a half to one inch from the top.
Be sure to gently press down around the plastic straw with the wax/parchment paper as well.
PRO TIP:
Make sure the hole is not set much closer to the edge of the shape than a half inch, or the edge may not be thick enough to hold the ornament’s weight.
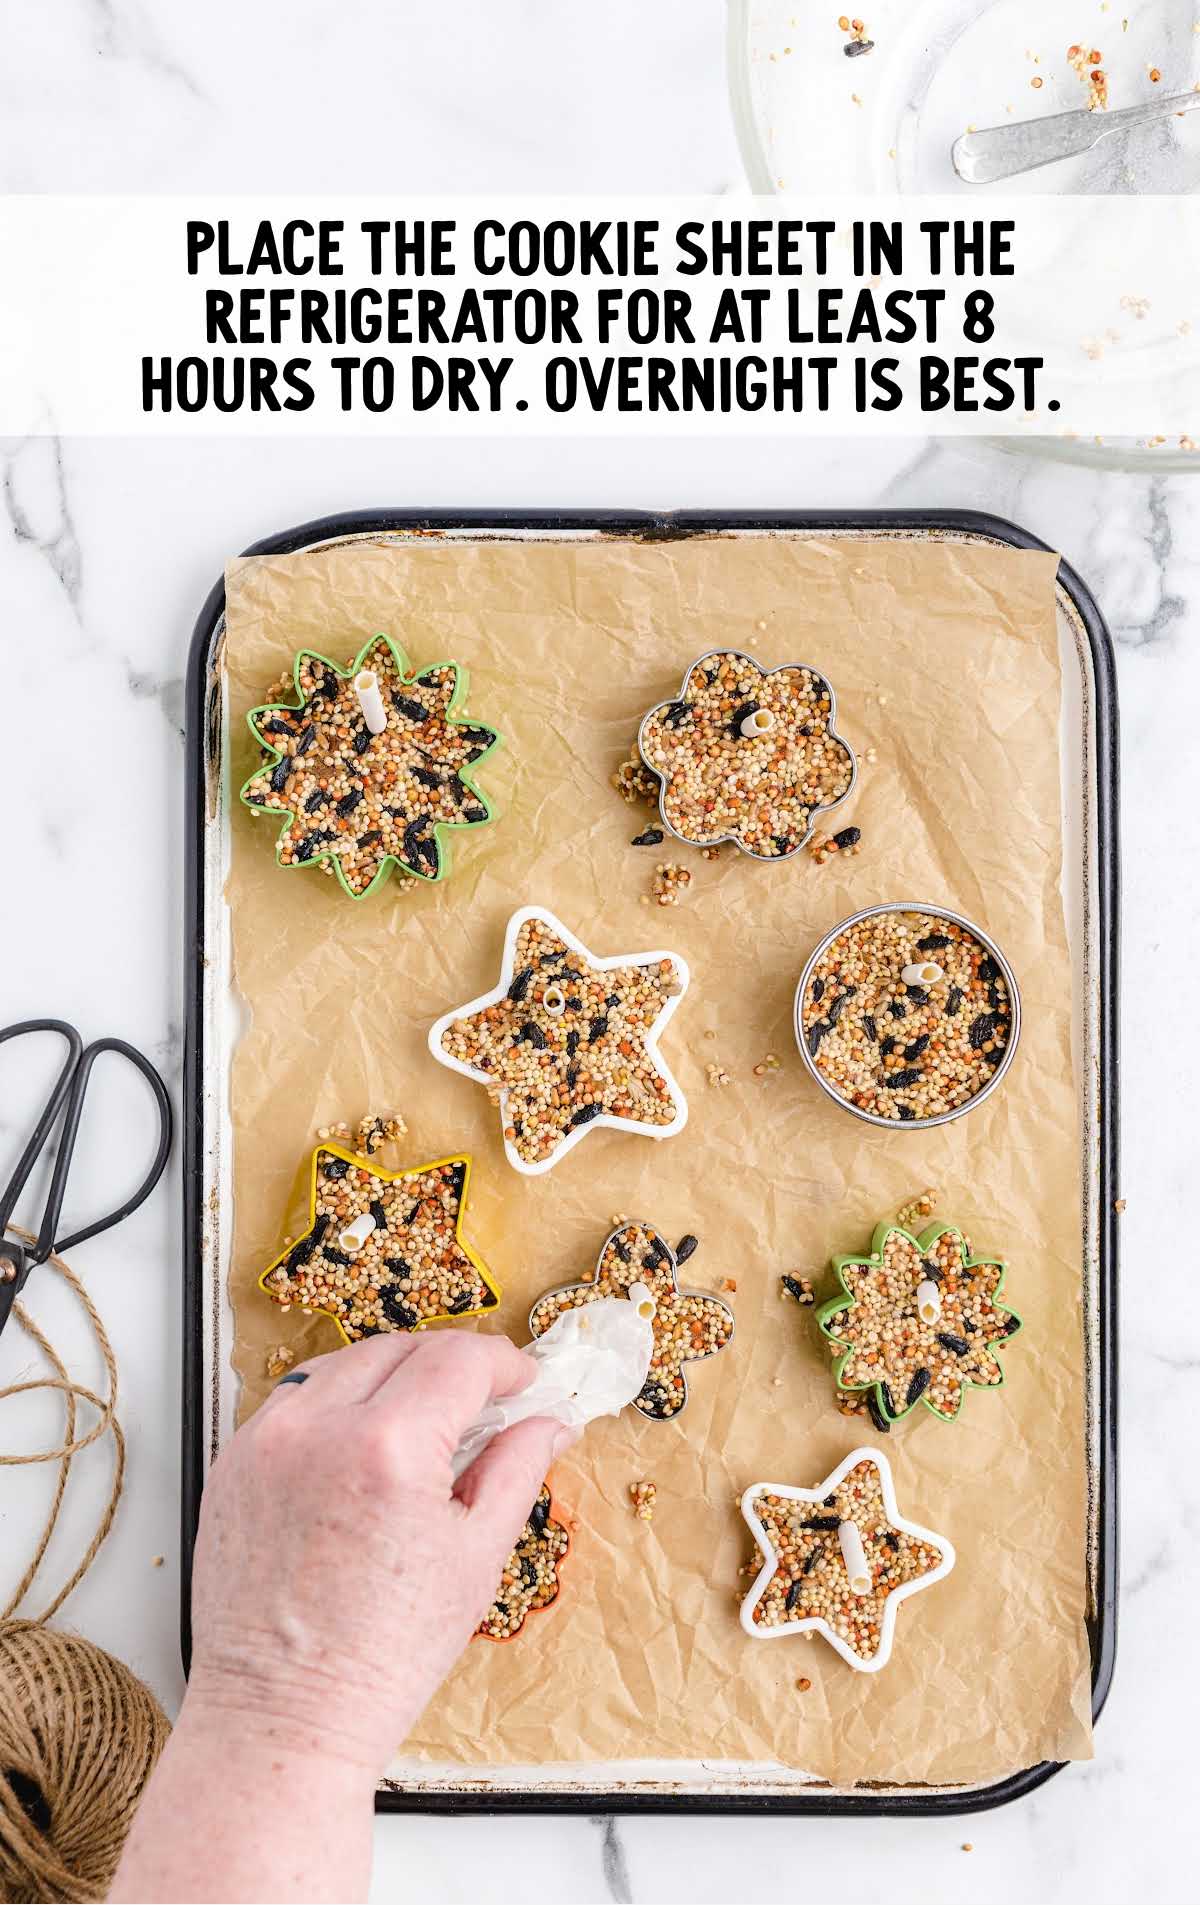
STEP NINE: Place the cookie sheet in the refrigerator for at least eight hours to dry. Overnight is best.
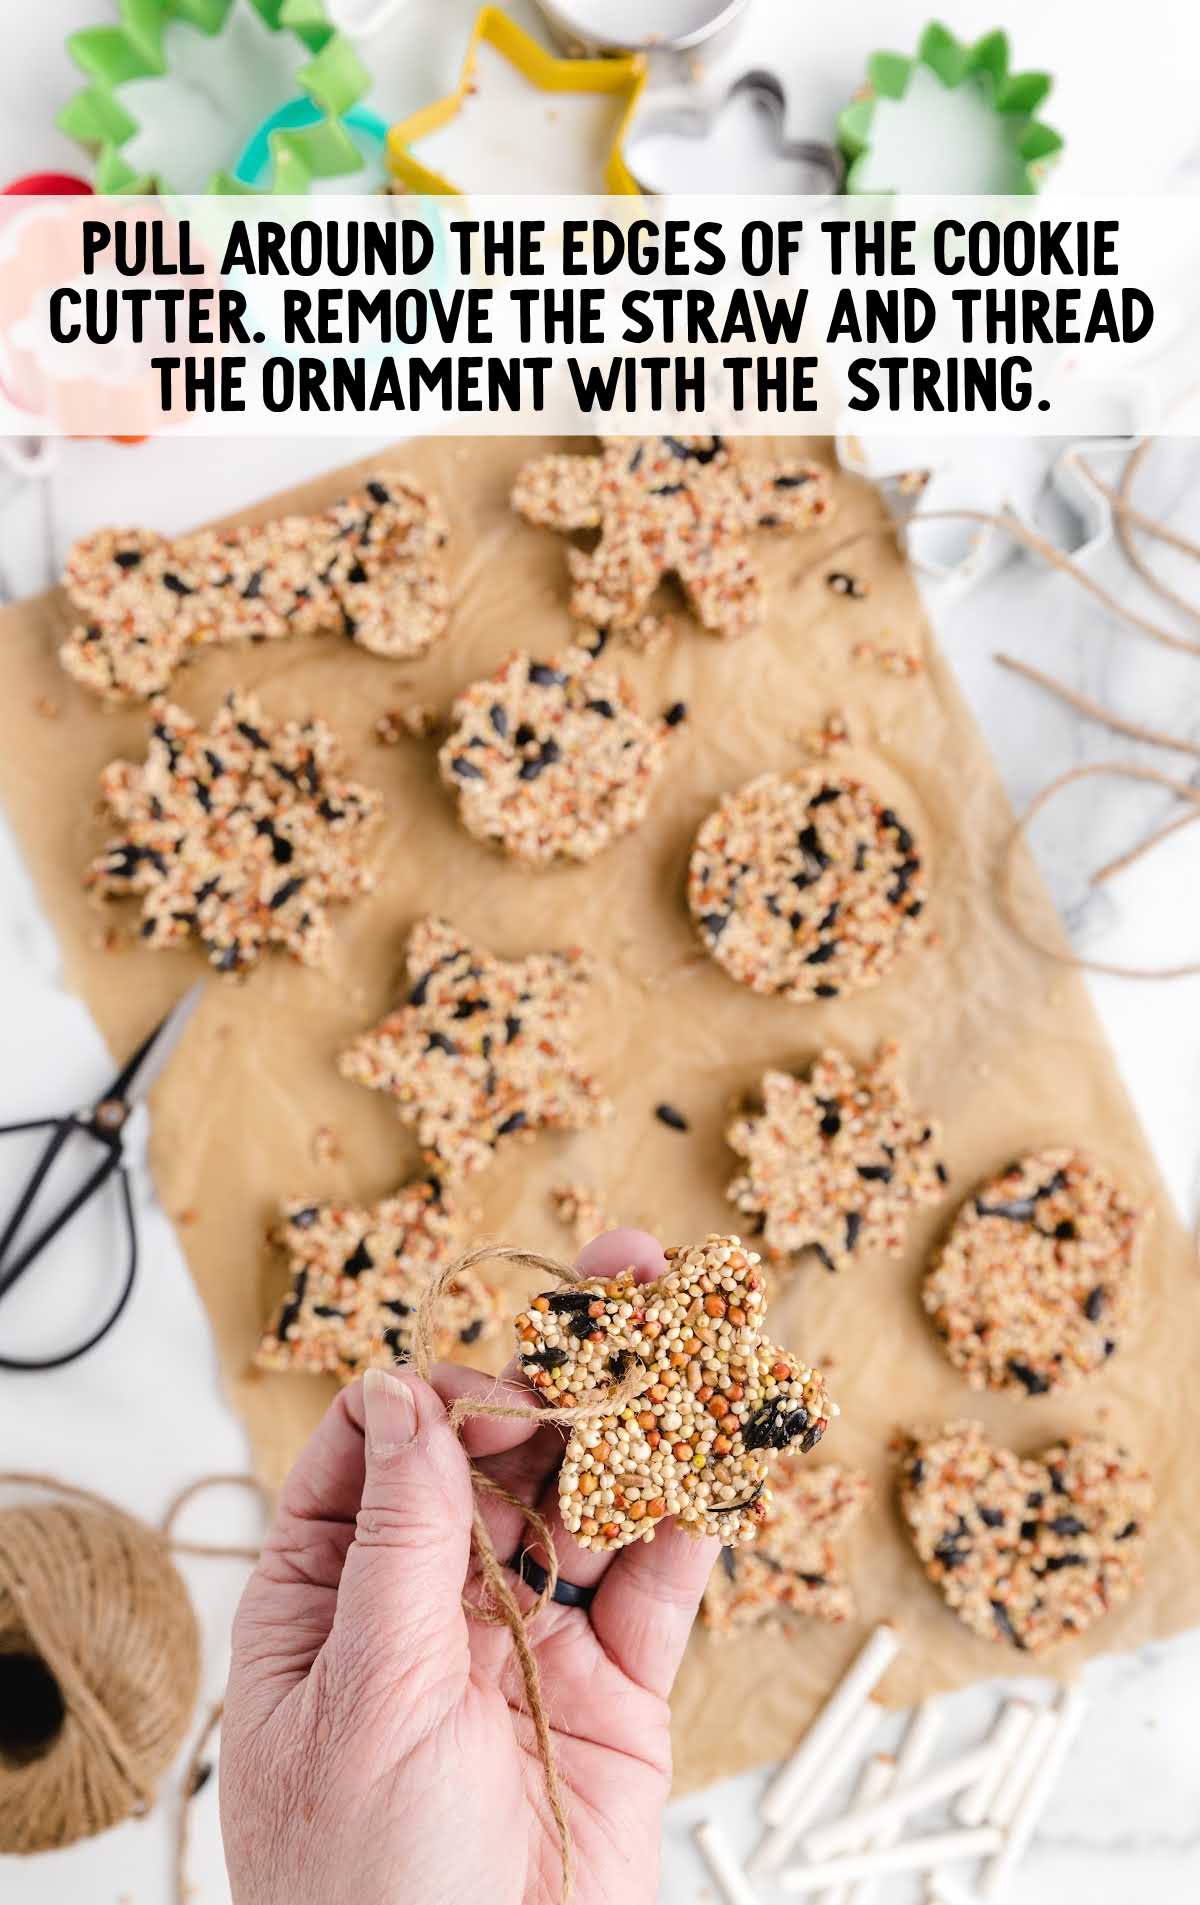
STEP TEN: Once the ornament is dried, carefully pull/push around the edges of the cookie cutter.
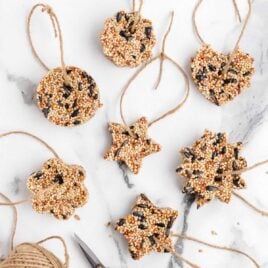
Gently remove the stick/straw and thread the ornament with the pre-cut piece of twine.
Tie a small knot in the string. Hang the ornaments outside any time of year.
How To Serve
Hang these DIY cookie-cutter birdseed ornaments on your trees and shrubs and wait for a wide variety of birds to arrive.
Try to hang them so that they are close to other tree branches so the birds have somewhere to perch.
These homemade birdseed ornaments would also make great gifts for all of the bird lovers in your life during the holiday season.
For another DIY project, check out our recipe for Christmas potpourri.
Storage
Here are some tips to ensure these treats stay in great shape:
AT ROOM TEMPERATURE: In temperatures 50°F and higher, these no-bake wild birdseed ornaments will keep for seven days.
In weather below 50°F, the ornaments should keep for 10 to 14 days.
IN THE FREEZER: You can also freeze these cookie-cutter birdseed ornaments for up to two months.
Why We Love This Recipe
EASY AND FUN DIY: Crafting these birdseed ornaments is a delightful and easy DIY project that can be enjoyed by both adults and children.
ATTRACTS BEAUTIFUL BIRDS: The carefully selected wild finch blend and high-quality ingredients in this recipe are irresistible to finches and other birds. Watching a variety of colorful birds flock to your garden is a rewarding and captivating experience.
LONG-LASTING DECOR: These ornaments not only serve as bird food but also as charming outdoor decorations. They add a touch of natural beauty to your outdoor space.
These look like bird cookies or birdseed cakes, and I bet they will gobble them up. It’s exciting to see all the wild birds visiting your own backyard to eat the homemade birdseed ornaments you left for them, and they will thank you with a display of their stunning colors.
FREQUENTLY ASKED QUESTIONS
Gelatin is a natural product, and therefore it is safe for birds to consume.
If you are storing birdseed ornaments inside, keep them in an airtight container or Ziploc bag in a dry, cool place, and they should last for 10-14 days or in the freezer for up to two months.
To get your birdseed treats to stick together, add gelatin to your mixture, as it acts as an adhesive.
More Recipes You’ll Love


Birdseed Ornaments
Ingredients
- 1 cup water, divided in half
- 2 gelatin, unflavored
- 2 tablespoons light corn syrup
- 2¾ cups wild finch blend
- 9 cookie cutters, any shape
- 21 inch paper cookie sticks, cut into 2¼-inch pieces or 3 plastic drink straws, cut into 2¼-inch pieces
- 126 inches long cut pieces of jute, twine, hemp, or yarn for hanging the ornaments
Instructions
- Line a baking sheet with either wax paper or parchment paper. Lay out the cookie cutters, spacing them at least 2 inches apart. Set it aside.
- In a large heat-safe mixing bowl, add ½ cup cool water.
- In a small heat-safe bowl, add the other ½ cup water and microwave for 1 minute. Carefully remove the hot water and set it aside.
- Sprinkle the gelatin over the cool water and stir to dissolve it. While you are still stirring, carefully pour the hot water over the gelatin mixture. Stir to continue dissolving the gelatin.
- Continue stirring, and add in the light corn syrup and stir to combine completely.
- Immediately pour in the birdseed and stir with a large wooden spoon. Set the bowl in the refrigerator for 8-9 minutes to allow the gelatin mixture to be slightly absorbed by the seed.
- Spoon the seed mixture into the cookie cutters until they are full. Once you have your cookie cutters filled, use a small piece of wax paper or parchment paper to gently pack the seed mixture into the mold.
- Press the cut cookie sticks or cut drink straws about ½ to 1 inch from the top. Be sure to gently press down around the straw with the wax/parchment paper as well.
- Place the cookie sheet in the refrigerator for at least 8 hours to dry. Overnight is best.
- Once the ornament is dried, carefully pull/push around the edges of the cookie cutter. Gently remove the stick/straw and thread the ornament with the pre-cut string. Tie a small knot in the string. Hang the ornaments outside.
Notes
- Don’t leave the bowl in the fridge for any longer than 10 minutes, as it will harden too much, and the ornaments will end up crumbly. It only needs to be set enough that it doesn’t seep out from under the sides of the cookie cutters.
- Spray your cookie cutters with nonstick spray so that the ornaments don’t stick when you remove them.
- Make sure the hole is not set much closer to the edge of the shape than ½ inch, or the edge may not be thick enough to hold the ornament’s weight.
Nutrition


Comments
Gloria says
Such a super cute project to do with your kids!
Carrie Gartzke says
Easy and fun for all ages. Thanks for the suggestion of adding in grated orange peel! So clever.
This is a great activity and economical too. In addition these make great gifts.
I appreciate you for publishing this recipe/activity/diy holiday present.
Carrie Gartzke says
Easy and fun for all ages.it is also very economical.
I made these with a girl scout troop and a group of older adults, 65 and better and another group which consisted with individuals with disabilities. This activity worked wonderfully for all.
Thanks for the suggestion of adding in grated orange peel! So clever. I made those for little gifts. .
I appreciate you for publishing this recipe/activity/DIY holiday present.