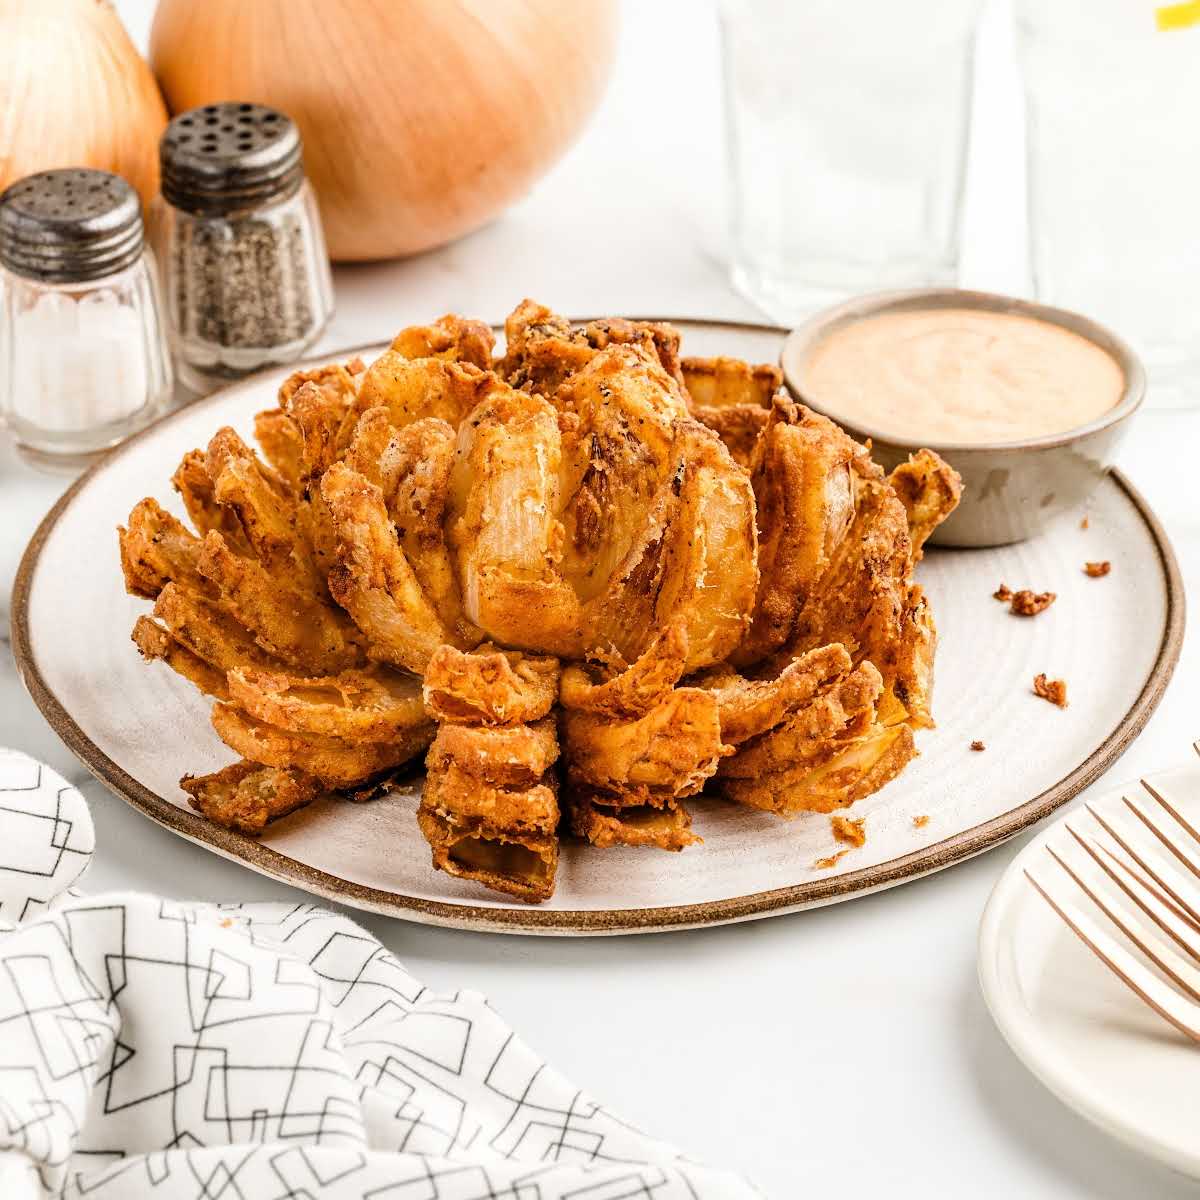


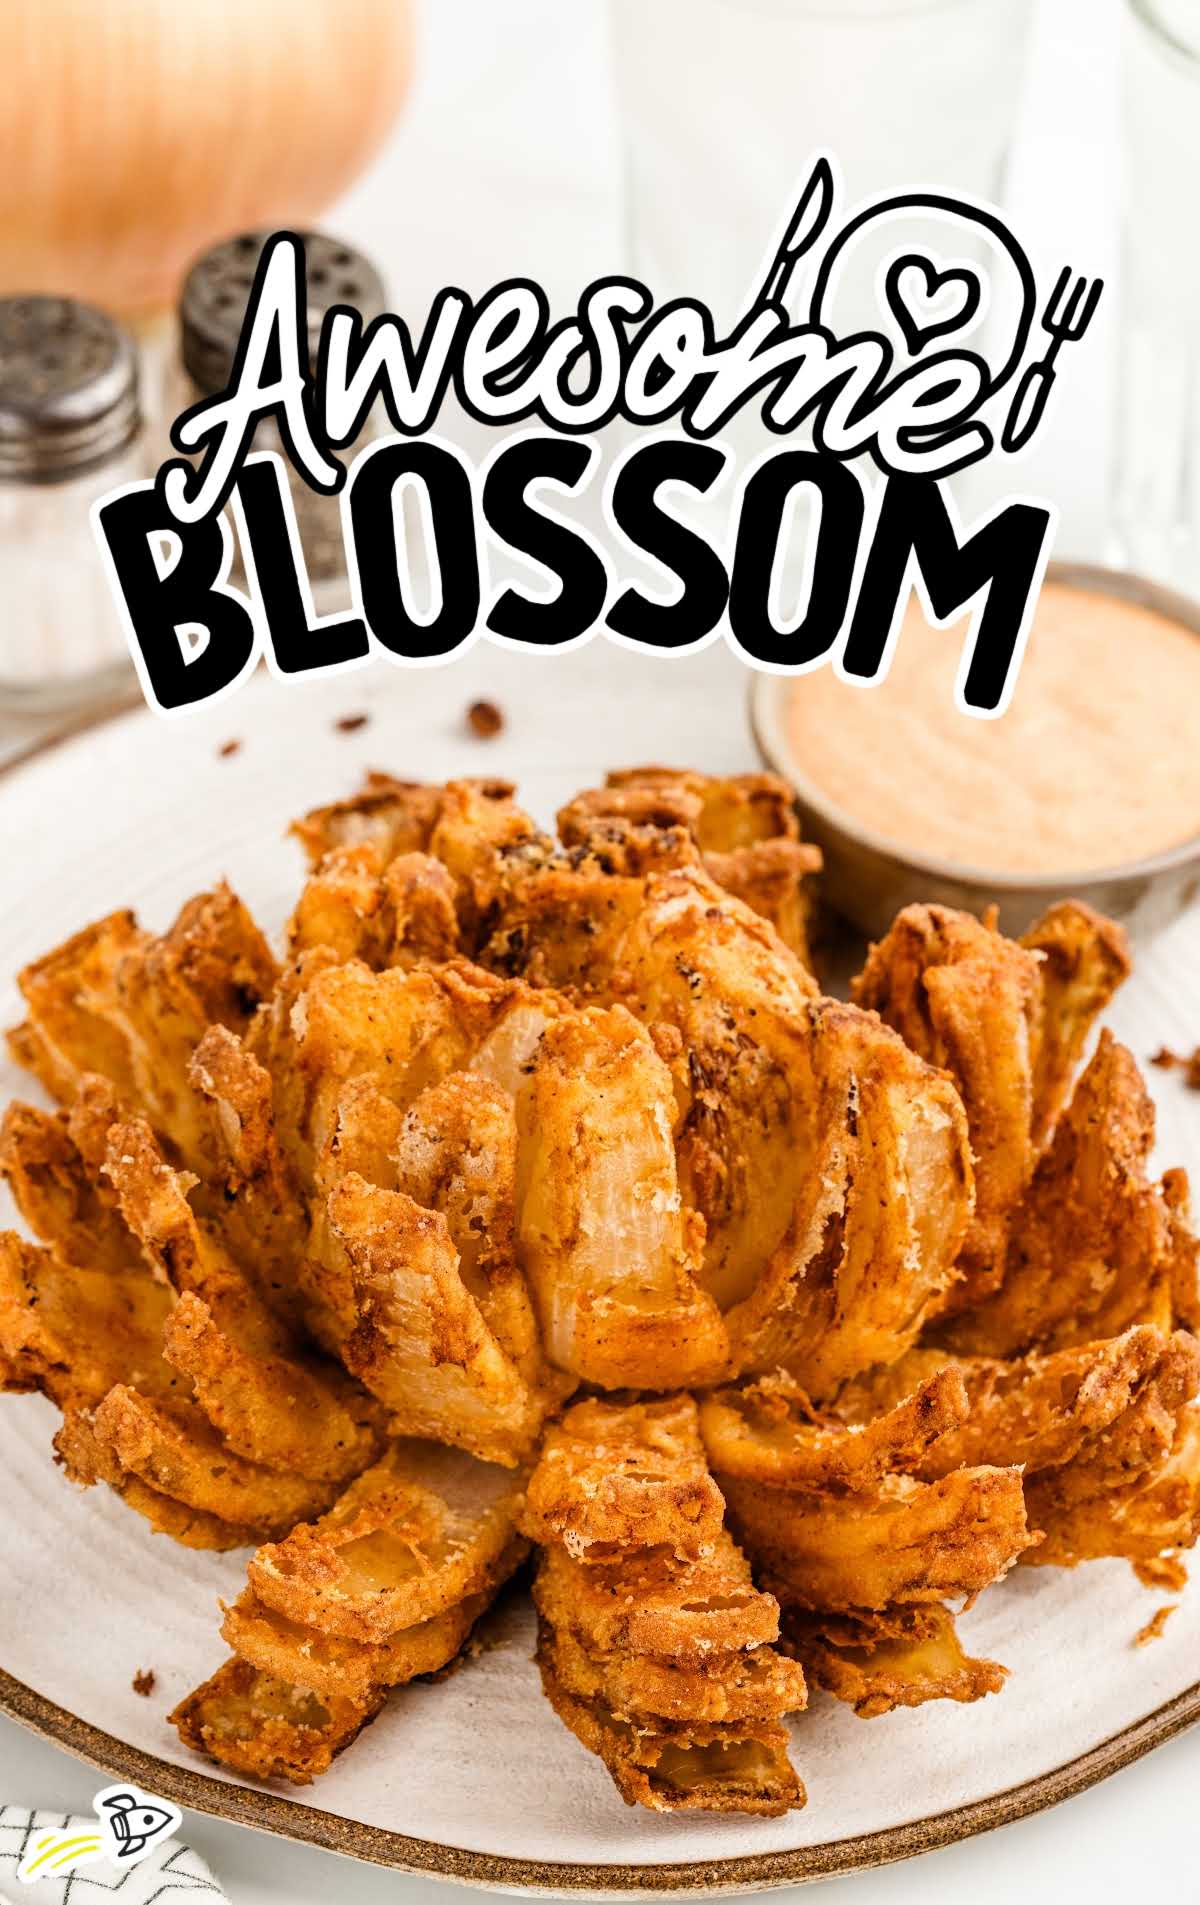
If you’ve ever ordered the Awesome Blossom at Chili’s, you already know why this appetizer has such a devoted following. This copycat recipe recreates that same crispy, golden fried onion with a tangy horseradish dipping sauce – and you can have it on the table in just 14 minutes.
The Secret to a Perfect Awesome Blossom
The key to nailing this recipe at home comes down to one rule: keep everything cold and dry until it hits the oil.
After cutting your onion, pat it completely dry and let it rest open in the fridge for 20 to 30 minutes. This extra step helps the batter adhere to every petal instead of sliding off.
When you coat the onion, work the flour deep into every layer. Thin spots become soggy spots. Then make sure your oil is at a full 375°F before the onion goes in, and serve it the moment it comes out.
One more thing worth doing ahead of time: make the dipping sauce the day before. As it rests overnight, the horseradish mellows into a deeper, more savory flavor.
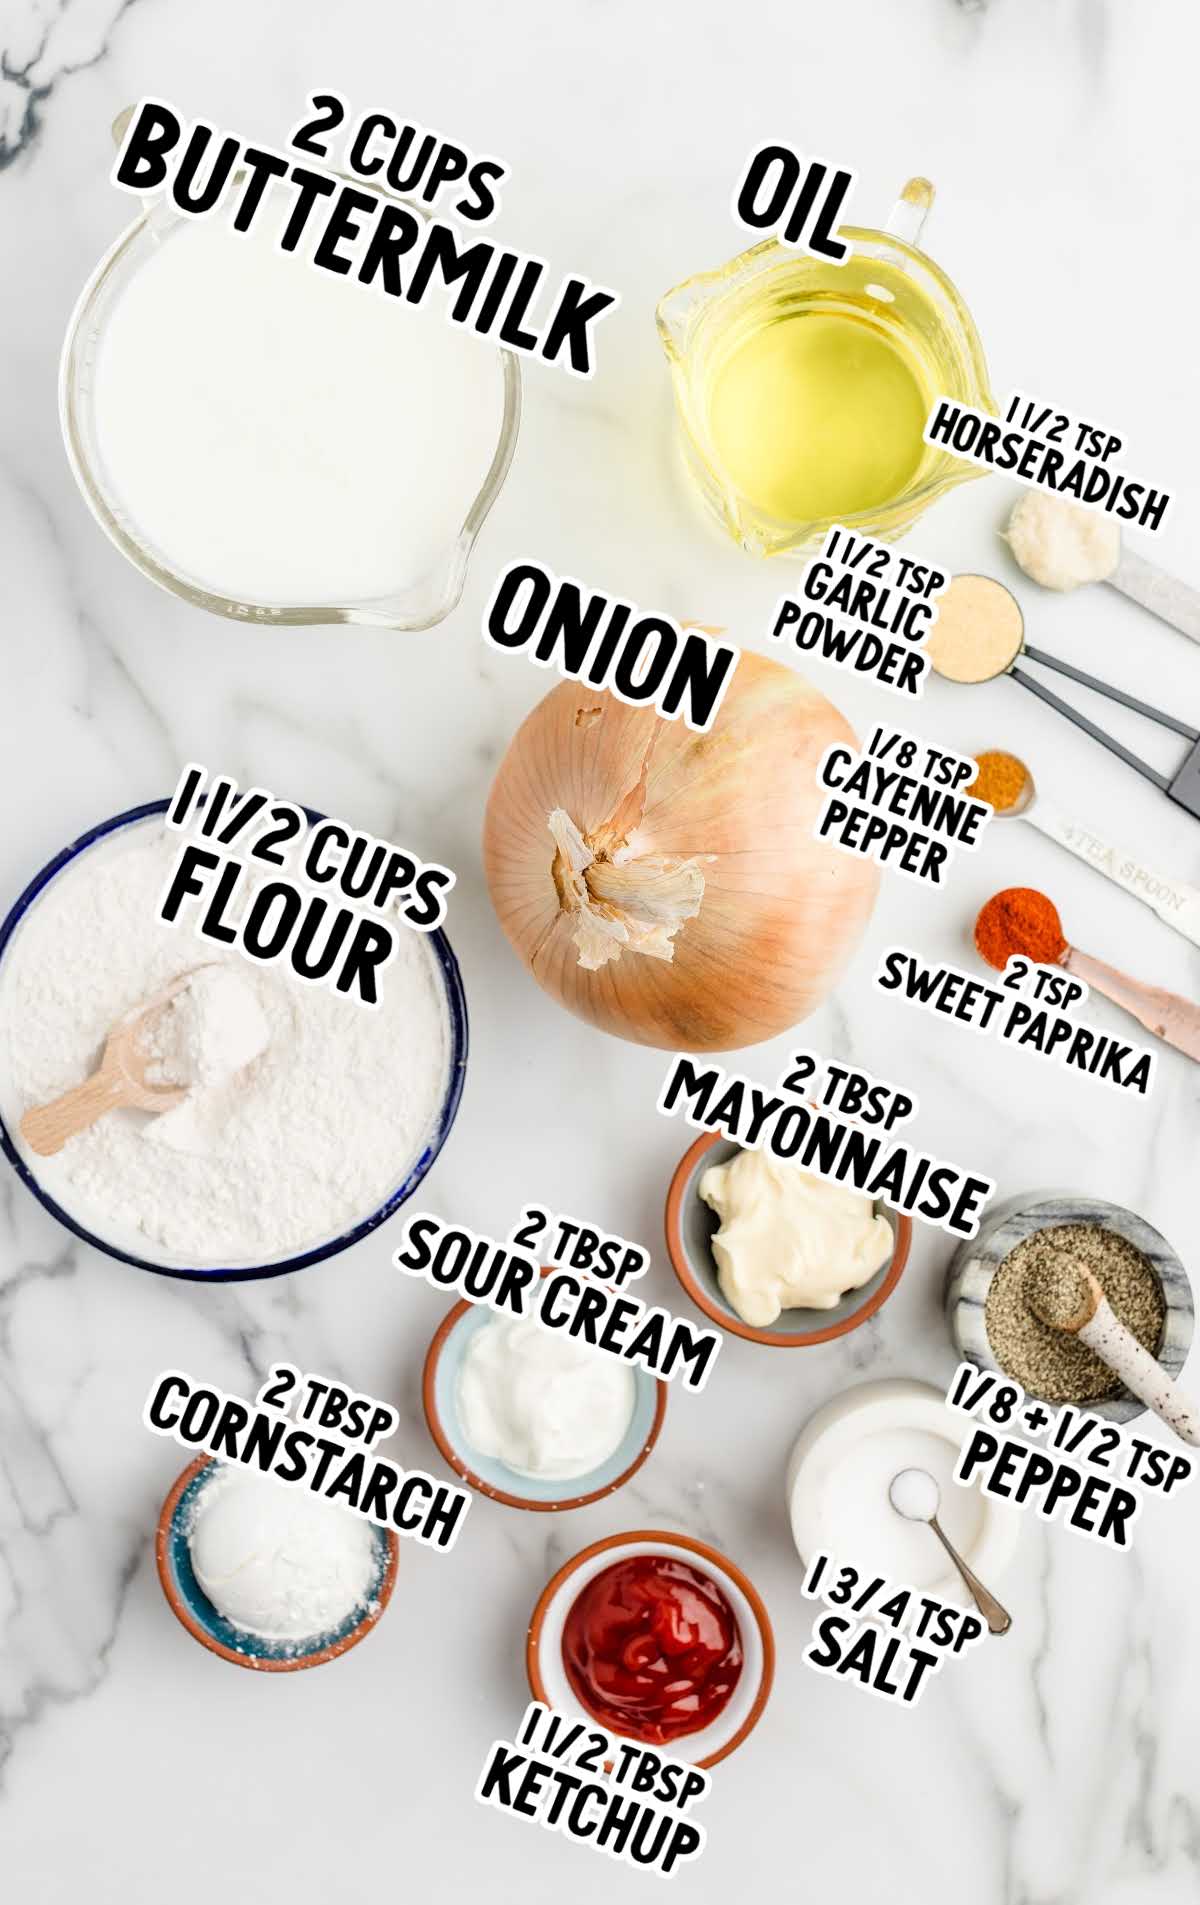
Awesome Blossom Ingredients
You’ll love the savory, crispy goodness of our Awesome Blossom. This fried onion appetizer is a real treat, combining a perfectly seasoned onion with a tasty dipping sauce.
You’ll need:
For the Dipping Sauce
- 2 tablespoons mayonnaise
- 2 tablespoons sour cream
- 1½ tablespoons ketchup
- 1½ teaspoons prepared horseradish
- ½ teaspoon sweet paprika
- ¼ teaspoon salt
- ⅛ teaspoon black pepper
- ⅛ teaspoon cayenne pepper
For the Fried Onion
- Vegetable oil for frying (amount will vary depending on the size of your pot or electric fryer)
- 1 large Vidalia onion (approximately 1 pound in weight)
- 1½ cups all-purpose flour
- 2 tablespoons cornstarch
- 1½ teaspoons sweet paprika
- 1½ teaspoons garlic powder
- 1½ teaspoons salt
- ½ teaspoon black pepper
- 1½-2 cups buttermilk
Awesome Blossom Substitutions and Additions
If you’re looking to customize the Awesome Blossom recipe to fit your preferences or dietary needs, here are some easy substitutions and additions.
Remember, any changes might affect the taste and texture, so use them at your own discretion.
FOR THE SAUCE:
Mayonnaise or Sour Cream: Substitute one or the other with Greek yogurt.
Sweet Paprika: Substitute with smoked paprika to add a smoky flavor to both the sauce and the batter.
FOR THE ONION BATTER:
Vegetable Oil: Peanut oil or canola oil can be used as alternatives for deep frying. We don’t suggest using olive oil for deep frying.
Vidalia Onion: If you can’t find Vidalia onions, you can use another large sweet onion like a Walla Walla or Maui. Avoid regular yellow, red, or white onions, if possible.
Buttermilk: If you don’t have buttermilk, make a substitute by adding a tablespoon of lemon juice or vinegar to a cup of milk and let it sit for a few minutes.
How To Make This Awesome Blossom Recipe
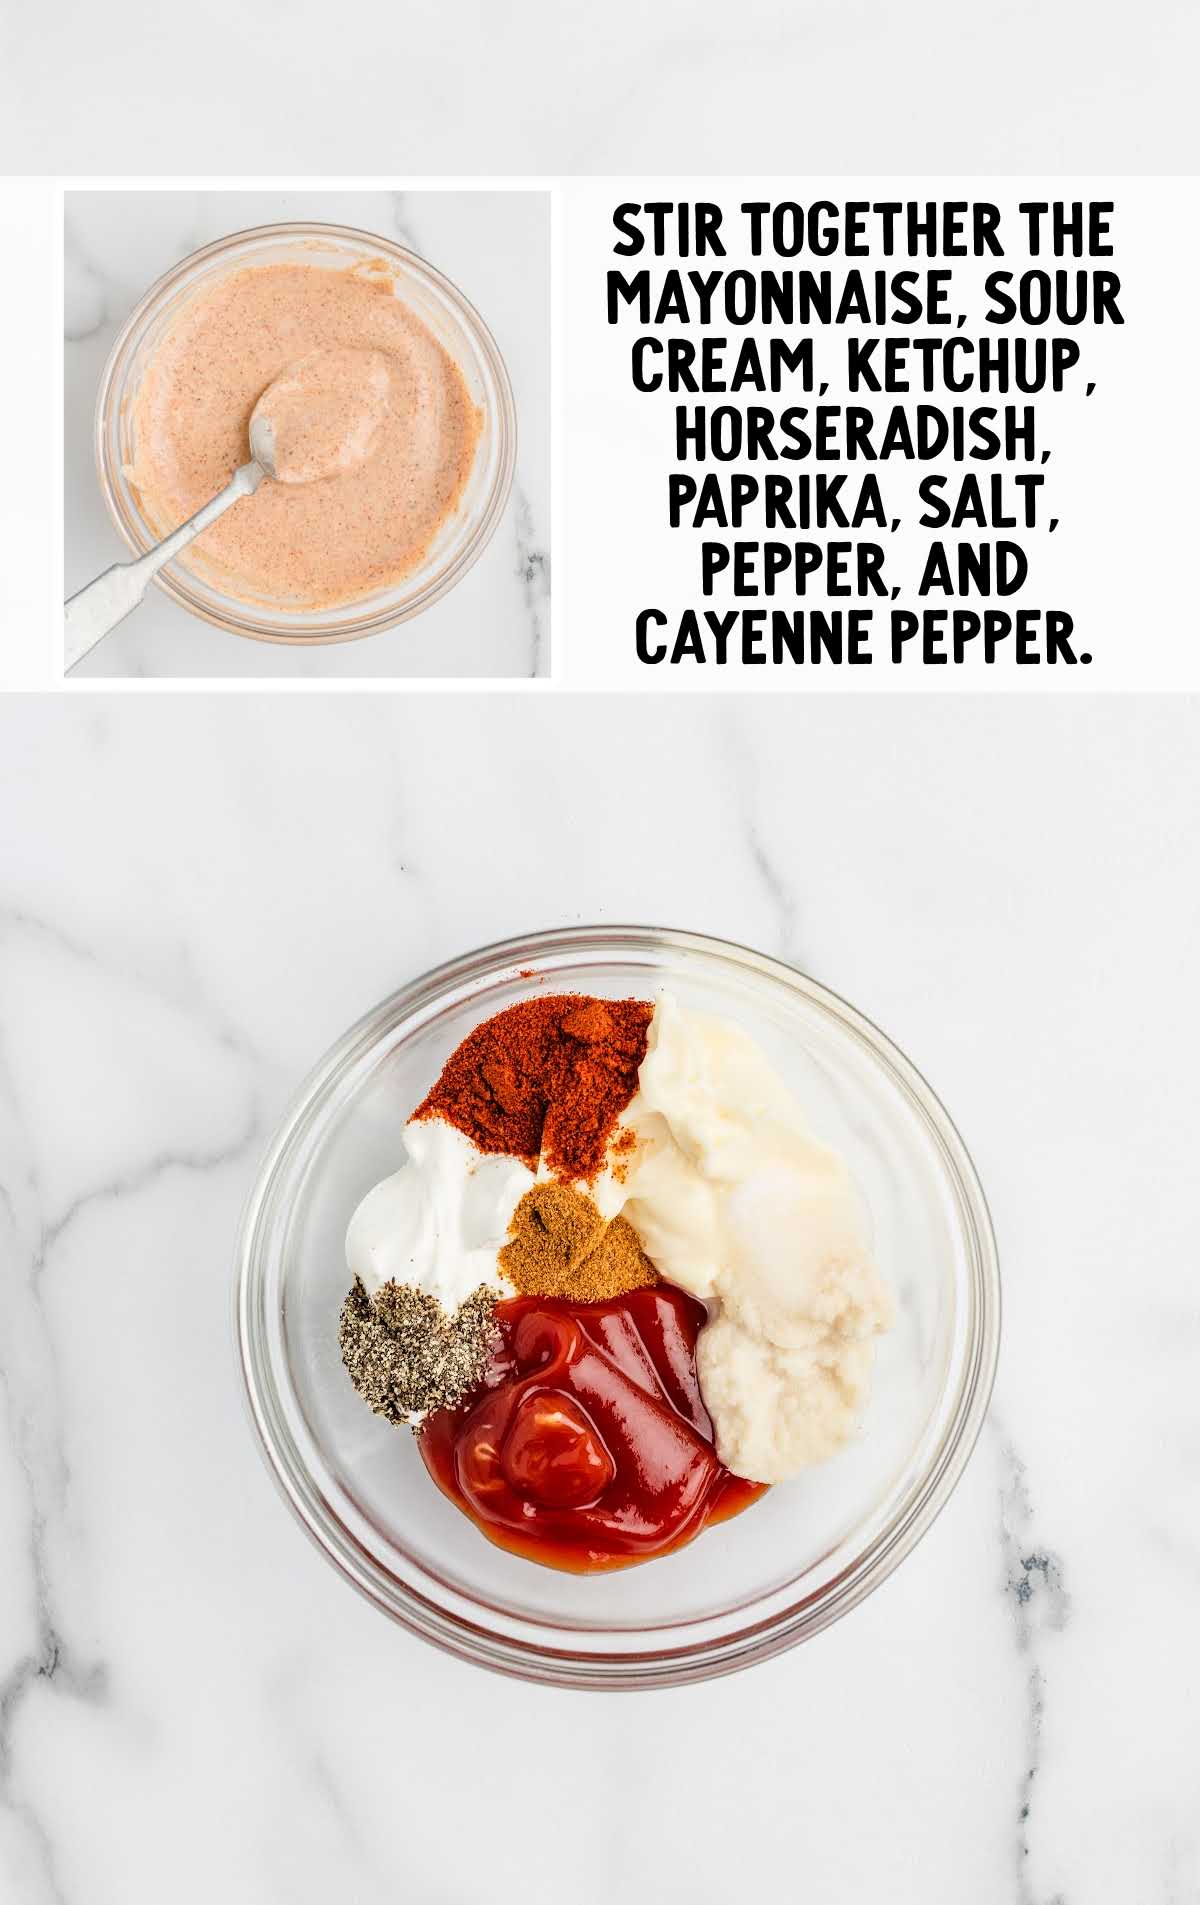
STEP ONE: Before you start making your onion bloom, mix together the dipping sauce ingredients. In a small bowl, combine the mayonnaise, sour cream, ketchup, prepared horseradish, sweet paprika, salt, black pepper, and cayenne pepper.
Stir until smooth and well-blended. Cover the onion sauce and set it aside in the fridge to let the flavors meld together.
PRO TIP:
Make the dipping sauce a day ahead to deepen the flavors, giving you an even more delicious dip when it’s time to serve.
STEP TWO: Pour enough vegetable oil into your electric fryer or a large pot to fully submerge the onion later. Heat the oil to 375°F.
Use a cooking thermometer to check the temperature, ensuring it reaches the correct heat for frying without becoming too hot, which could burn the onion.
STEP THREE: Take your large Vidalia onion and trim about ½ inch off the top to create a flat, stable surface.
Carefully cut the root end just enough to remove the dried bits without detaching it completely, as the root end will keep the onion layers together during frying.
Peel the outer skin off.
PRO TIP:
Use a sharp knife for cleaner cuts, which helps the onion petals separate more easily without tearing.
STEP FOUR: Place the onion cut side down, and starting about ½ inch from the root, make four evenly spaced downward cuts. Make sure not to cut through the center of the onion (the root).
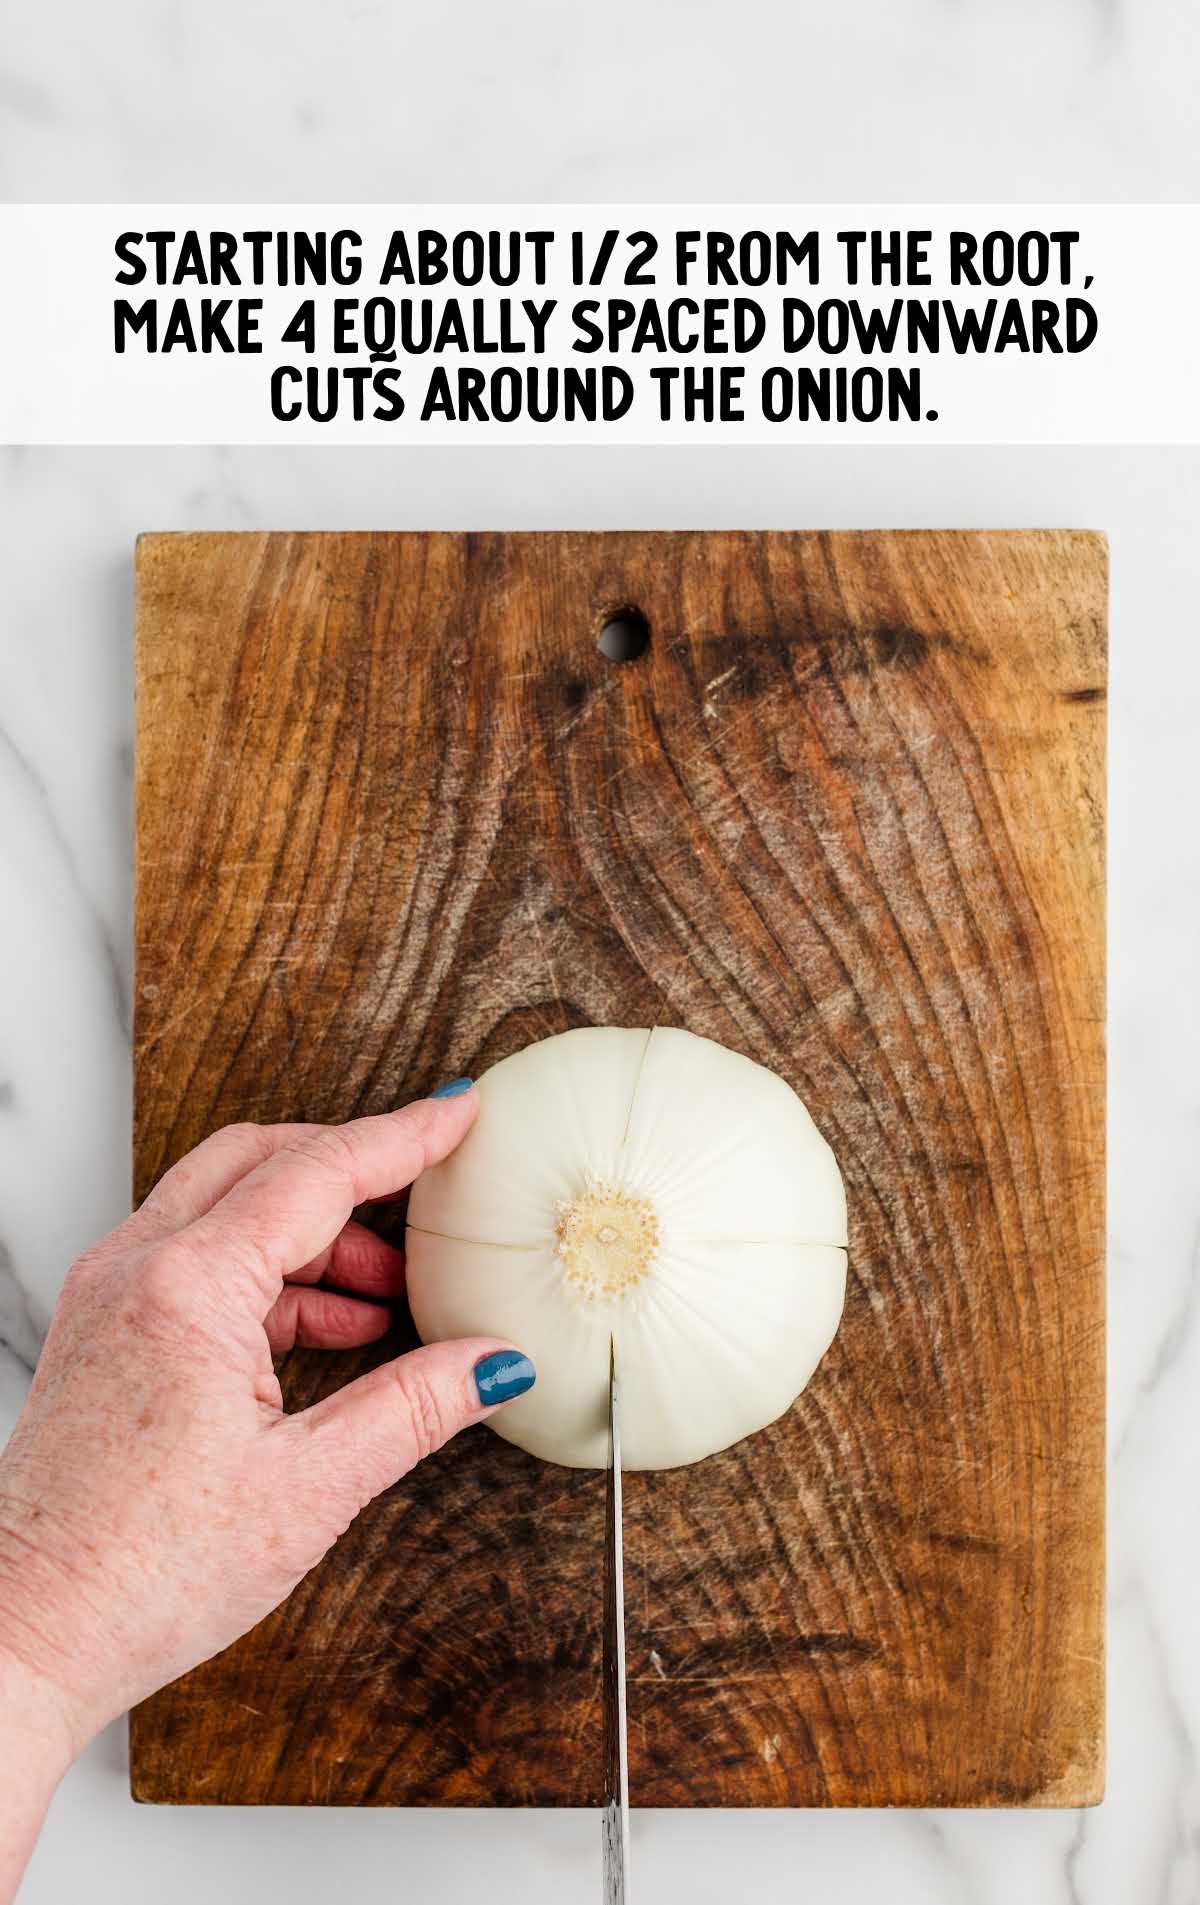
This technique helps create the bloom effect, allowing the onion to spread like a flower once fried.
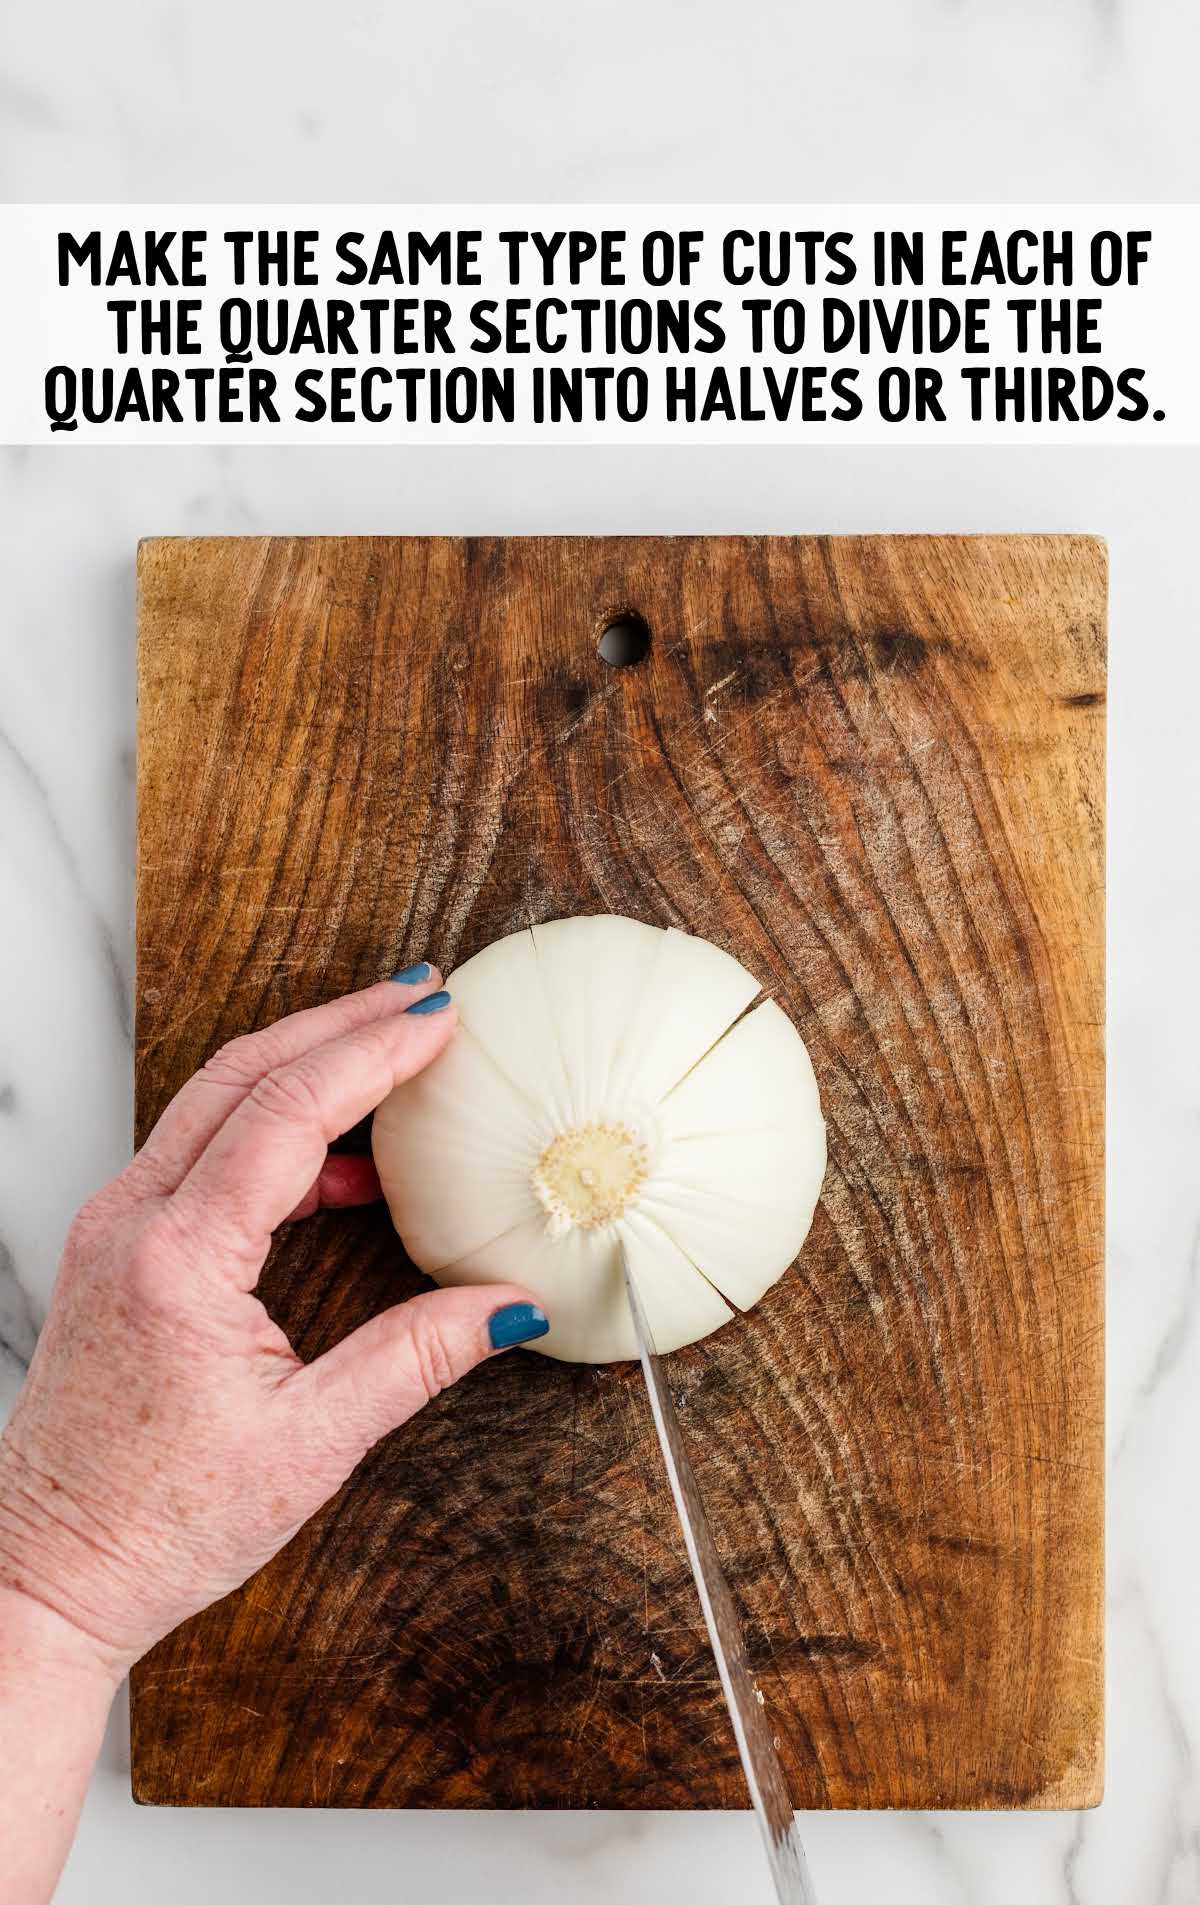
STEP FIVE: Carefully flip the onion to make additional cuts between the initial ones, slicing each quarter into thin segments while still keeping them attached at the root.
Once all cuts are made, turn the onion over and gently separate the petals to bloom the onion fully.
STEP SIX: In a mixing bowl, whisk together the flour, cornstarch, sweet paprika, garlic powder, salt, and black pepper.
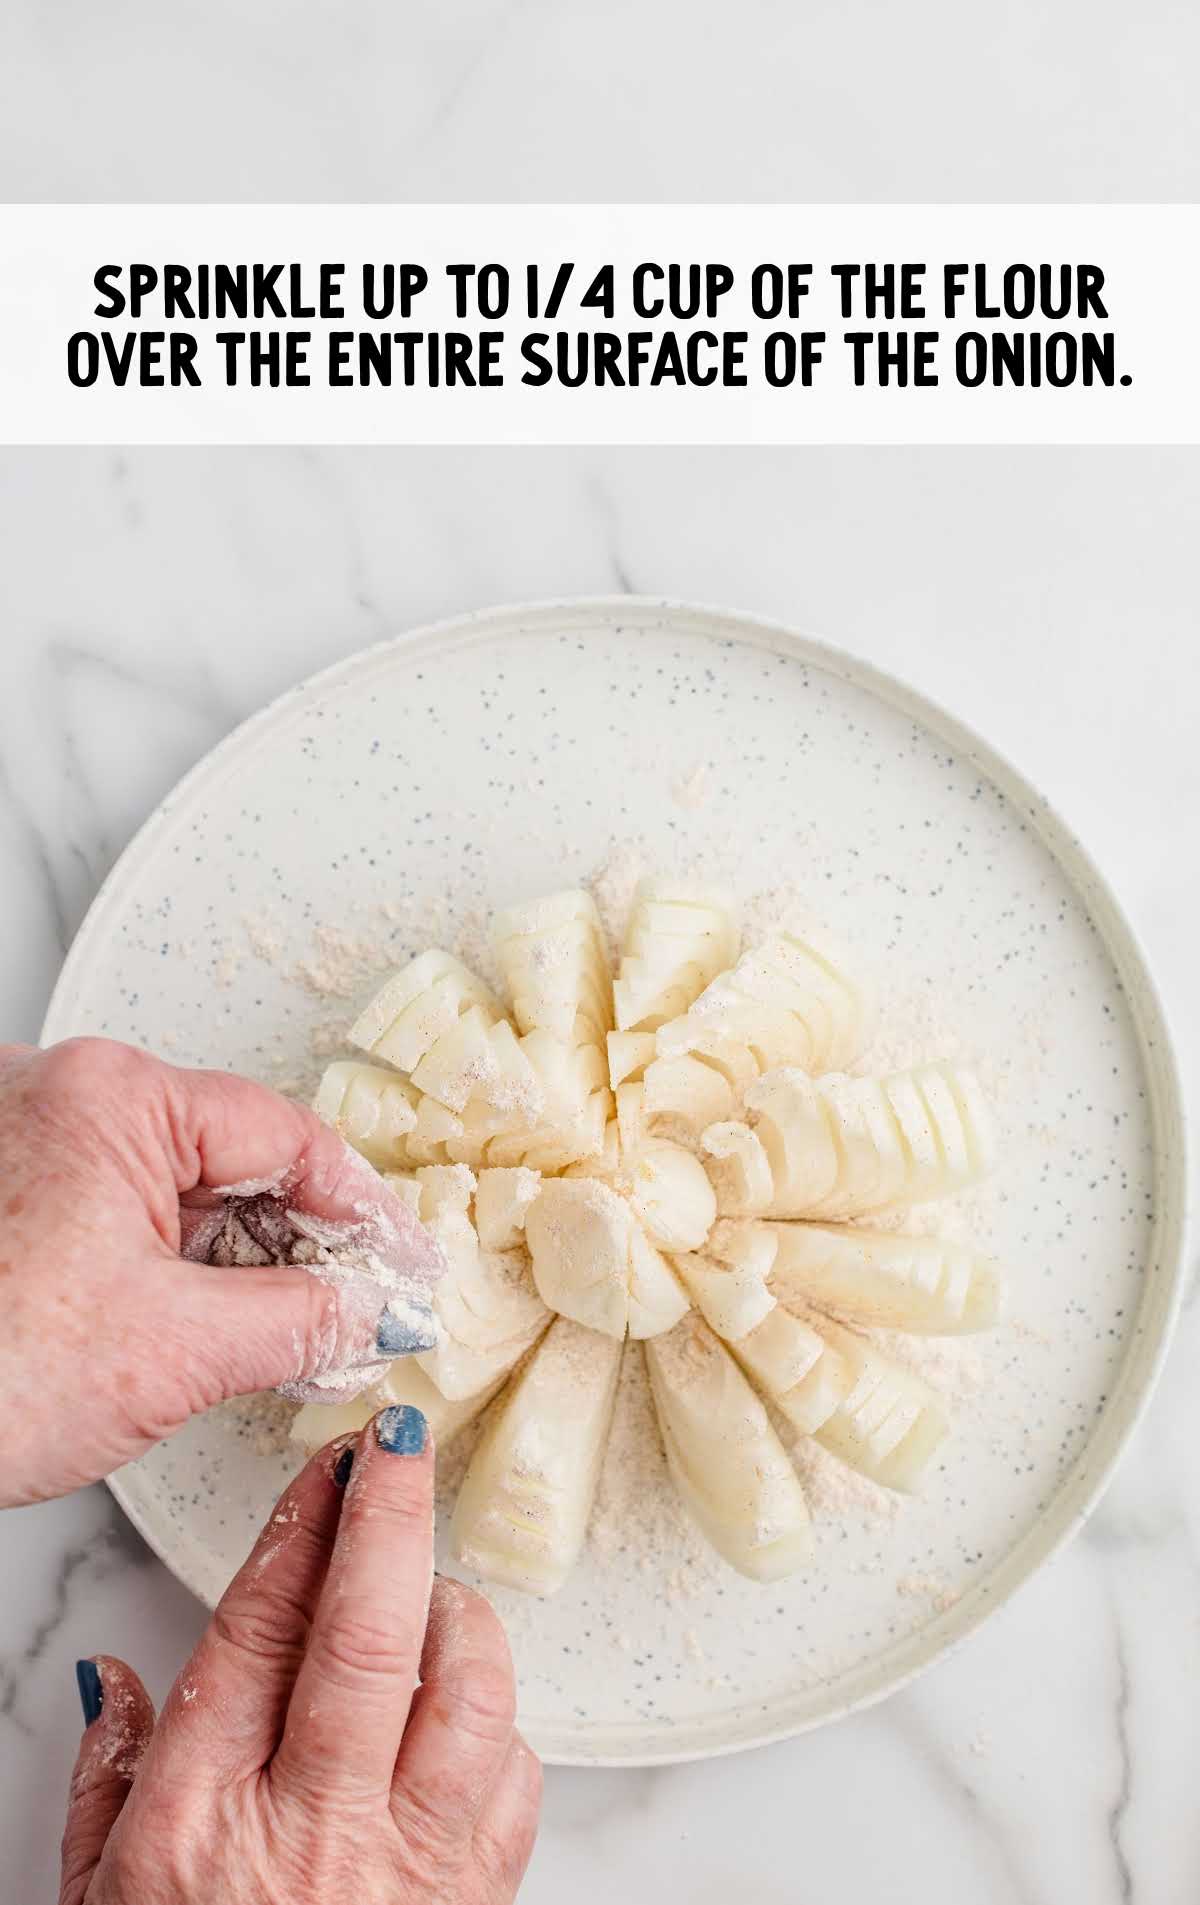
Transfer the onion to a large plate, and carefully dust the flour mixture between each of the Awesome Blossom petals, ensuring all parts are lightly coated.
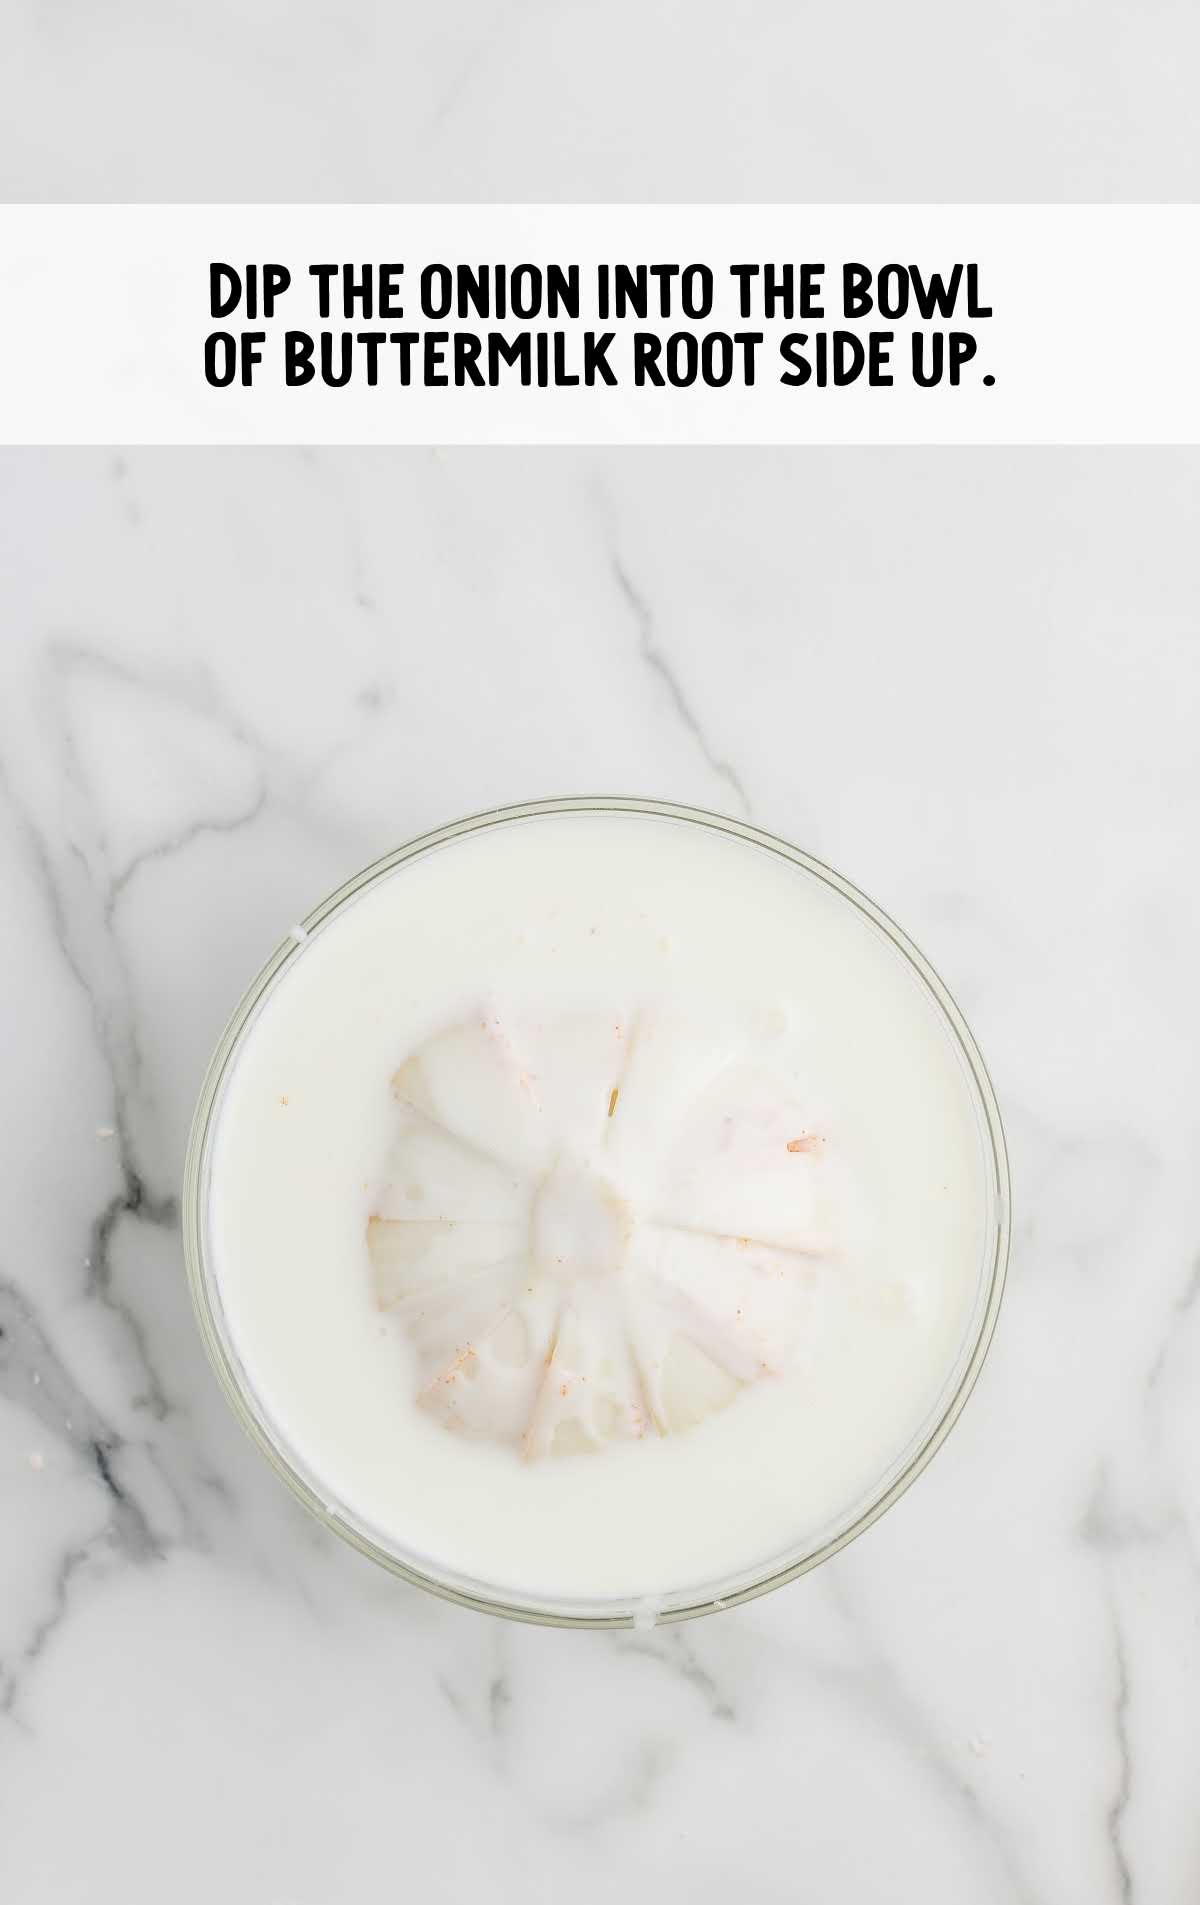
STEP SEVEN: Place the whole onion, coated in flour, into a bowl of buttermilk. Ensure it’s fully submerged so the buttermilk can seep into every layer, helping the additional coating of flour to adhere in the next step.
STEP EIGHT: Lift the onion from the buttermilk, letting the excess drip off. Place it back onto the plate and generously apply the remaining flour mixture, working it gently into every layer of the onion petals.
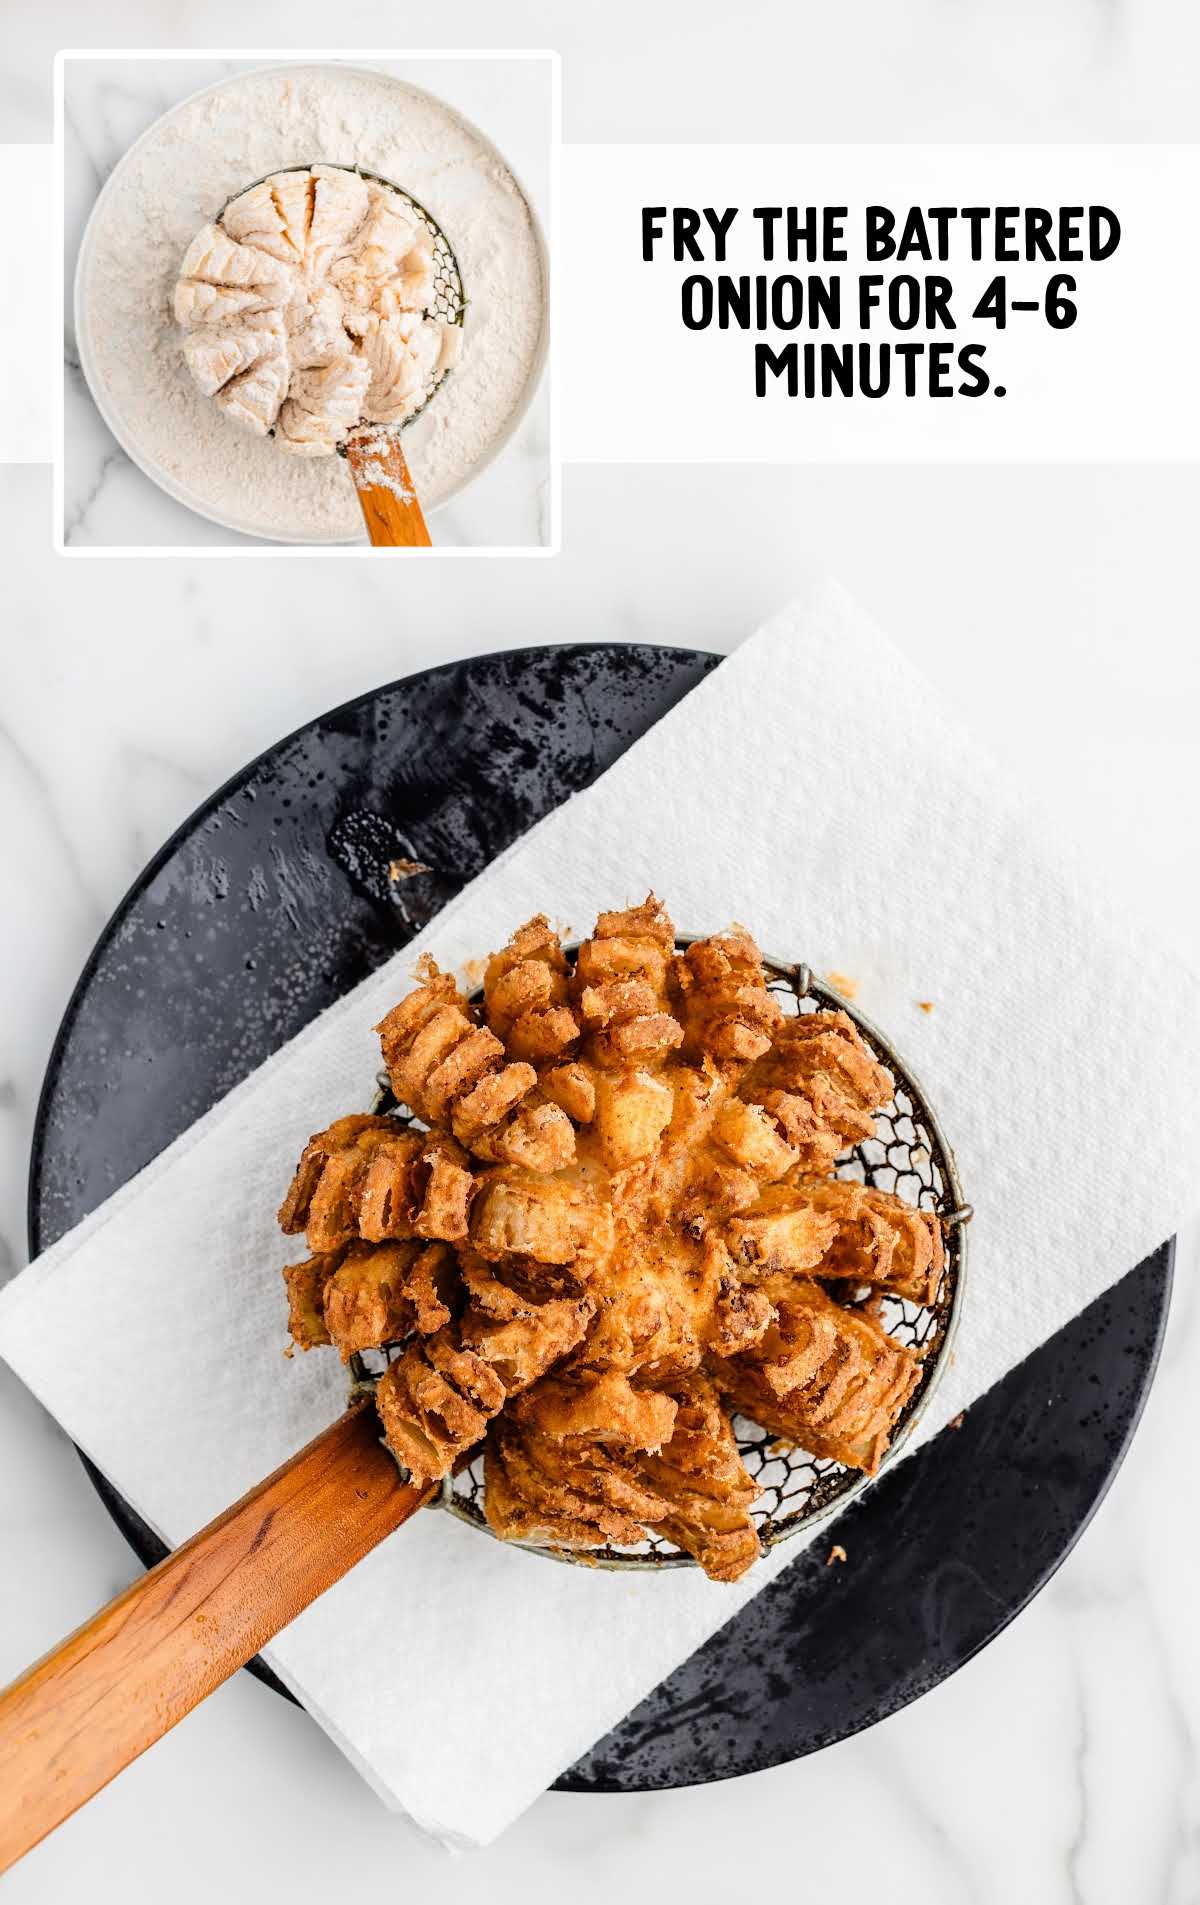
STEP NINE: Carefully place the prepared onion into the preheated oil. Fry for four to six minutes or until it’s golden and crispy.
Monitor the frying process to avoid over-browning, and adjust the heat if necessary.
PRO TIP:
Use a candy thermometer to maintain the oil temperature at 375°F. This helps make sure your Bloomin’ Onion cooks golden brown with the perfect crispiness.
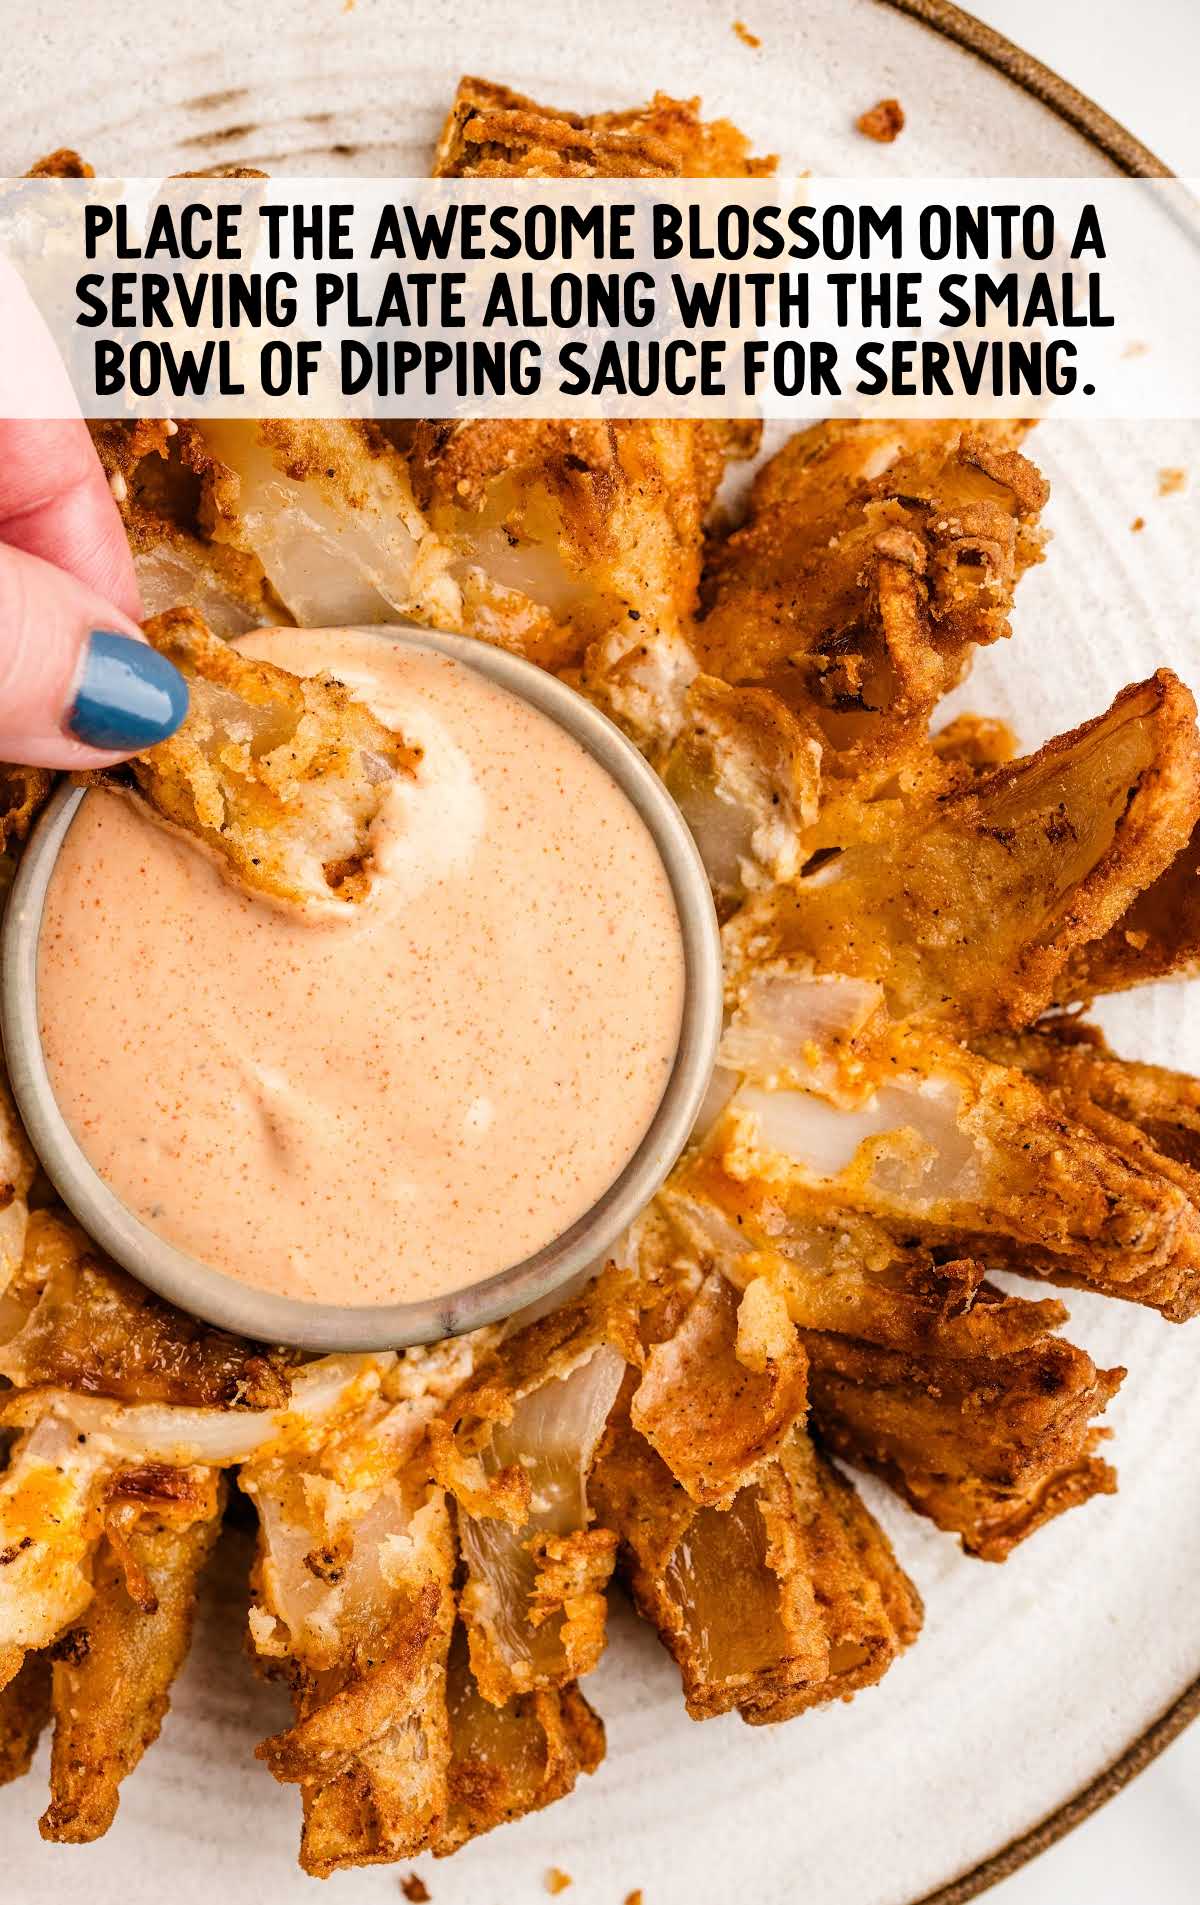
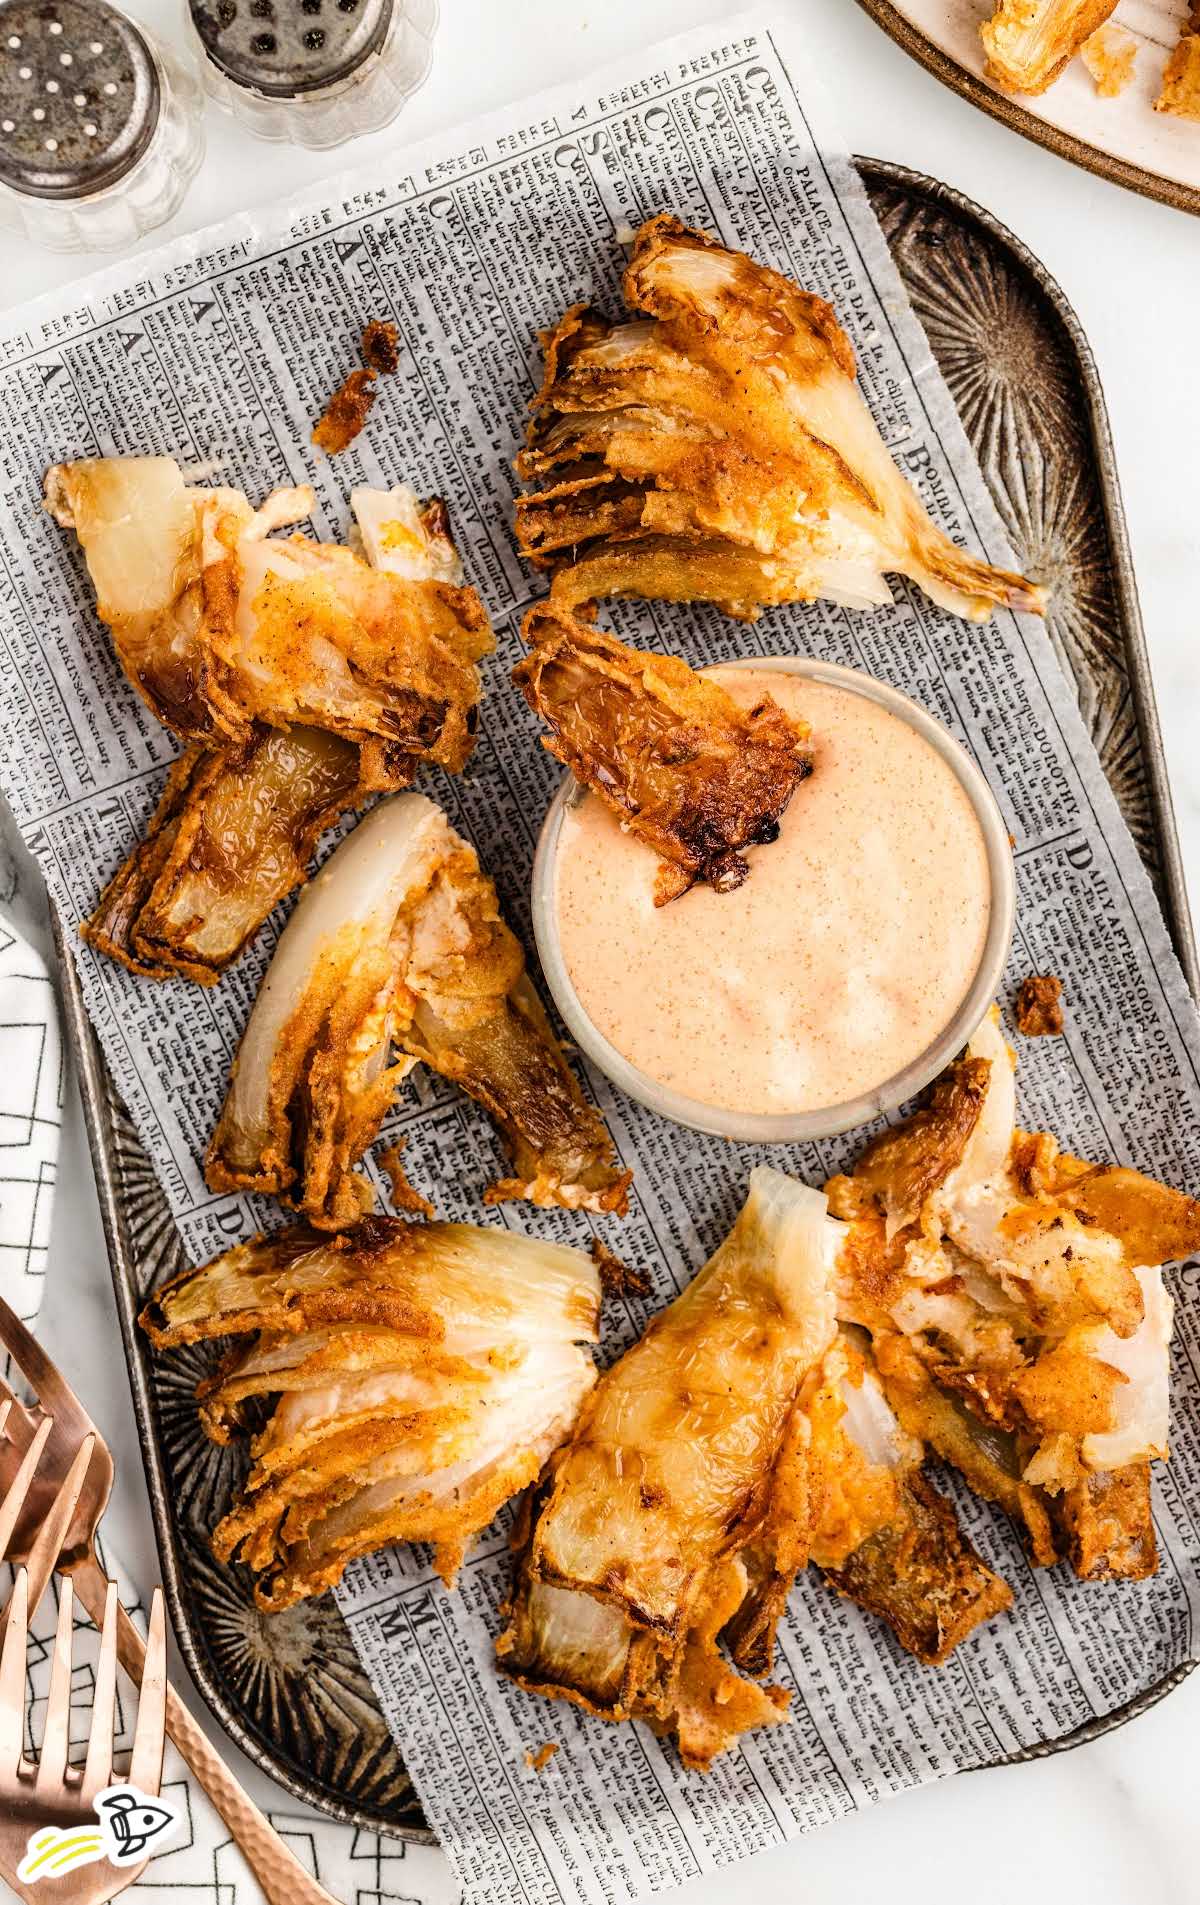
STEP TEN: Once fried, use a slotted spoon or a spider to carefully lift the Awesome Blossom from the oil. Let it drain on a paper towel-lined plate to remove excess oil.
Transfer to a serving dish and surround it with the chilled dipping sauce prepared earlier.
Tips for Making This Recipe
Our recipe developers created a list of their best advice for making this crispy appetizer! Use these tips to ensure your blooming onion recipe fries perfectly:
- Dry the Onion: After peeling and cutting the onion, pat it dry with paper towels. This helps the flour mixture adhere better.
- Make Consistent Cuts: Make sure the cuts around the onion are consistent in width to ensure even cooking and a uniform bloom.
- Prevent Floating: Use a wire skimmer or spider to gently press the onion blossom down if it starts to float while frying. Try to make sure it stays fully submerged.
- Careful Handling: When turning the onion over or handling it after cutting, do so gently to keep the petals intact.
- Give It a Gentle Shake: After coating the onion in flour, give it a gentle shake to remove any excess, preventing clumps from forming during frying.
How To Serve An Awesome Blossom
The Awesome Blossom is a standout appetizer that sets the stage for any gathering. Whether you’re serving it at a casual get-together or incorporating it into a more elaborate meal, the versatility of this dish gives you plenty of ideas for how to present and serve it.
Classic Presentation: Serve the Awesome Blossom on a large platter, accompanied by the prepared dipping sauce in a small bowl in the center. This presentation is perfect for sharing!
Burger Topping: For a unique twist, use the Awesome Blossom as a topping for burgers. The crispy onion petals add a delightful crunch and a burst of flavor!
Salad Enhancer: Chop the fried onion petals and sprinkle them over a Caesar salad. The crunchy texture and savory flavor make a great addition to mixed greens.
Side Dish Accompaniment: Serve the Awesome Blossom alongside a grilled steak or barbecue ribs. The crispiness of the onion complements the rich, smoky flavors of grilled meats.
Party Platter: Create a party platter by pairing the Awesome Blossom with other finger foods like mozzarella sticks, chicken wings, and potato skins. This assortment provides a variety of flavors and textures, making it a hit at any gathering.
Beverage Pairings:
- Beer: A cold, crisp lager or pale ale pairs wonderfully with the Awesome Blossom.
- Iced Tea: For a non-alcoholic option, serve with a glass of raspberry iced tea or a glass of homemade strawberry lemonade.
Make a this famous Chili’s appetizer for your next Super Bowl party or game night. It’s the perfect party finger food! It’s a fun dish to serve at a family dinner or a holiday party, too!
How To Store An Awesome Blossom
Proper storage is essential to maintain the quality and taste of your Awesome Blossom. Here’s how you can make the most of your preparation time and keep your dish fresh.
MAKE AHEAD: You can prepare the dipping sauce up to 48 hours in advance. Store it in an airtight container in the fridge to allow the flavors to meld. The onion can be prepped and sliced a few hours ahead of time, but wait to coat and fry it until just before serving to keep it crispy.
IN THE FRIDGE: If you have leftovers, place the fried onion in an airtight container and store it in the fridge. It will stay fresh for up to two days. Keep the dipping sauce in a separate container.
IN THE FREEZER: We don’t recommend freezing your Awesome Blossom, as the texture will not hold up well. The batter will become soggy, and the onion may lose its crispiness upon reheating.
HOW TO REHEAT: To reheat the Awesome Blossom, use an oven or toaster oven to maintain its crispiness.
Preheat your oven to 350°F, place the onion on a baking sheet, and heat for about 10-15 minutes until warmed through. If you’re in a hurry, you can use the microwave, but note that it may make the onion less crispy. Microwave on high for one to two minutes, checking at intervals to avoid overcooking.
Why This Awesome Blossom Recipe Is The Best
The Awesome Blossom is a new favorite out of our test kitchens, offering a crispy, savory treat that’s perfect for any occasion.
Here are the reasons why we love this recipe:
Crowd-Pleaser: This appetizer always impresses guests with its restaurant-quality look and taste.
Simple Ingredients: Made with items you likely already have in your pantry.
Fun to Make: Preparing the onion to bloom is an engaging and rewarding process.
Perfect for Sharing: The Awesome Blossom is designed to be pulled apart and enjoyed with others, making it ideal for gatherings.
Awesome Blossom Frequently Asked Questions
Chili’s awesome blossom (sometimes mistaken for a Chili’s Blooming Onion or Chili’s Onion Petals) is a famous recipe on the Chili’s appetizer menu. An entire onion is battered then deep fried. As the onion fries, it opens to look similar to a flower blossom.
Applebee’s made a version of this recipe (sometimes mistaken for an ‘Applebees Bloomin Onion), but instead of frying a whole onion, their appetizer is made from slices of deep fried onions, called Onion Peels. Other restaurants that serve onion blossom appetizers include Outback Steakhouse, which made the original Bloomin’ Onion.
Make sure to leave the root intact when cutting the onion, as it helps hold the petals together.
Yes, you can add more cayenne pepper or even a dash of hot sauce to increase the heat.
Make the slices about ½ inch thick to ensure even cooking and a good bloom.
Sift the flour and cornstarch mixture before coating the onion to avoid clumps.
Buttermilk helps the flour mixture adhere better and creates a nice, crispy coating.
Serve it immediately after frying for the best taste and texture, along with the dipping sauce on the side.
The Awesome Blossom is a perfect way to bring a restaurant-quality appetizer to your home. Enjoy its crispy texture and savory taste, making any occasion special.
When you want another restaurant-quality recipe like this, you can find more of my copycat favorites on my dedicated recipes page.
Crowd-Pleasing Appetizers You’ll Love


Awesome Blossom
Ingredients
For the Dipping Sauce
- 2 tablespoons mayonnaise
- 2 tablespoons sour cream
- 1½ tablespoons ketchup
- 1½ teaspoons prepared horseradish
- ½ teaspoon sweet paprika
- ¼ teaspoon salt
- ⅛ teaspoon black pepper
- ⅛ teaspoon cayenne pepper
For the Fried Onion
- Vegetable oil, for frying (amount will vary depending on the size of your pot or electric fryer)
- 1 large Vidalia onion, approximately 1 pound in weight
- 1½ cups all-purpose flour
- 2 tablespoons cornstarch
- 1½ teaspoons sweet paprika
- 1½ teaspoons garlic powder
- 1½ teaspoons salt
- ½ teaspoon black pepper
- 1½ to 2 cups buttermilk
Instructions
- To make the dipping sauce, add the mayonnaise, sour cream, ketchup, prepared horseradish, sweet paprika, salt, black pepper, and cayenne pepper to a small mixing bowl. Stir to fully combine all ingredients. Transfer the dipping sauce to a small serving bowl and cover with plastic wrap until ready to serve.
- Add the vegetable oil to an electric fryer or large 6 to 8-quart pot, and heat the oil to 375°F. The oil should be deep enough in your electric fryer or large pot that the onion is fully submerged while frying. While the oil is heating, you will prepare the onion for frying.
- Trim about ½ inch from the top of the onion straight across so that you have a flat, even top. Flip the onion over to the root side and just barely trim off the roots from the onion. Be sure that you leave the root intact. Peel the outer skin from the onion and discard.
- Place the onion cut side down (root side up) on a stable cutting surface. Starting about ½-inch from the root, make a downward cut all the way through the onion until you hit the cutting board. Repeat to create 4 equally spaced cuts around the onion. The onion will be quartered but still held together at the root.
- Next, make the same type of cuts in each of the quarter sections to divide the quarter section into halves or thirds. Remember that you do not want to get too close to the root. Repeat until you have made all the additional cuts in the remaining 3 quarters of the onion.
- Very carefully flip the onion over, place it onto a large plate, and use your fingers to gently open the sections, creating the “bloomed” onion. The onion should resemble a flower that has “blossomed” or opened up all its petals.
- In a medium mixing bowl, combine the all-purpose flour, cornstarch, sweet paprika, garlic powder, salt, and black pepper. Be sure that all the spices are evenly distributed into the flour.
- In a separate bowl (big enough that your onion will fit but not too big), add the buttermilk. The amount of buttermilk you will need will depend on the size of the bowl, as the cut onion will need to be dipped or submerged into the buttermilk.
- Using your hands, sprinkle up to ¼ cup of the flour over the entire surface of the onion, being sure to separate the onion slices so that the flour gets in between the individual “petals” of the onion.
- Carefully pick up the sliced onion, being sure to keep it intact, and dip it into the bowl of buttermilk root side up. You want your onion to be fully submerged in the buttermilk so that the buttermilk can get in between all the individual slices of onion “petals”.
- Using a large slotted spoon, lift the onion out of the buttermilk and allow any excess buttermilk to drip back into the bowl. Place the buttermilk-coated onion back onto the plate that you used to add the first batch of flour to the onion. Using your hands, separate the pieces of onion and sprinkle as much of the remaining flour mixture all over the top, sides, and between each of the onion “petals”. You want to get as much of the flour mixture as possible into all the openings so that as the onion fries, the “petals” will all be coated in the batter.
- Very carefully, place the battered onion into the basket of an electric fryer or onto a spider. Gently lower the onion into the hot oil and fry for 4-6 minutes or until golden and crispy.
- Once the awesome blossom is fully fried, carefully remove it from the hot oil, allowing as much of the excess oil to drip back into the hot pot or electric fryer, then place it onto a paper towel-lined plate to absorb the remaining excess oil.
- Place the oil-drained fried awesome blossom onto a serving plate along with the small bowl of dipping sauce for serving.
- This awesome blossom is best served while it is still warm and freshly made. I do not suggest trying to refrigerate or freeze this appetizer. You can make the dipping sauce up to 48 hours ahead of time and store it in the refrigerator in an airtight container until ready to serve.
Notes
- Dry the Onion: After peeling and cutting the onion, pat it dry with paper towels. This helps the flour mixture adhere better.
- Make Consistent Cuts: Make sure the cuts around the onion are consistent in width to ensure even cooking and a uniform bloom.
- Prevent Floating: Use a wire skimmer or spider to gently press the onion blossom down if it starts to float while frying. Try to make sure it stays fully submerged.
- Careful Handling: When turning the onion over or handling it after cutting, do so gently to keep the petals intact.
- Give It a Gentle Shake: After coating the onion in flour, give it a gentle shake to remove any excess, preventing clumps from forming during frying.
Nutrition


Leave a Comment