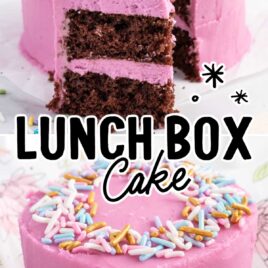
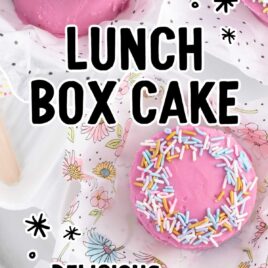
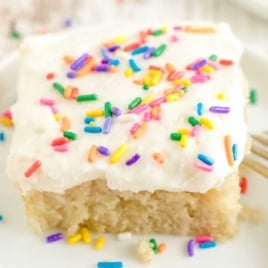
This lunch box cake recipe creates super cute mini cakes made in individual portions that are the perfect size to be transported in your lunch box. The adorable little cakes are made with moist cake and topped with decadent buttercream frosting and can be customized for a special surprise.
Why This Recipe
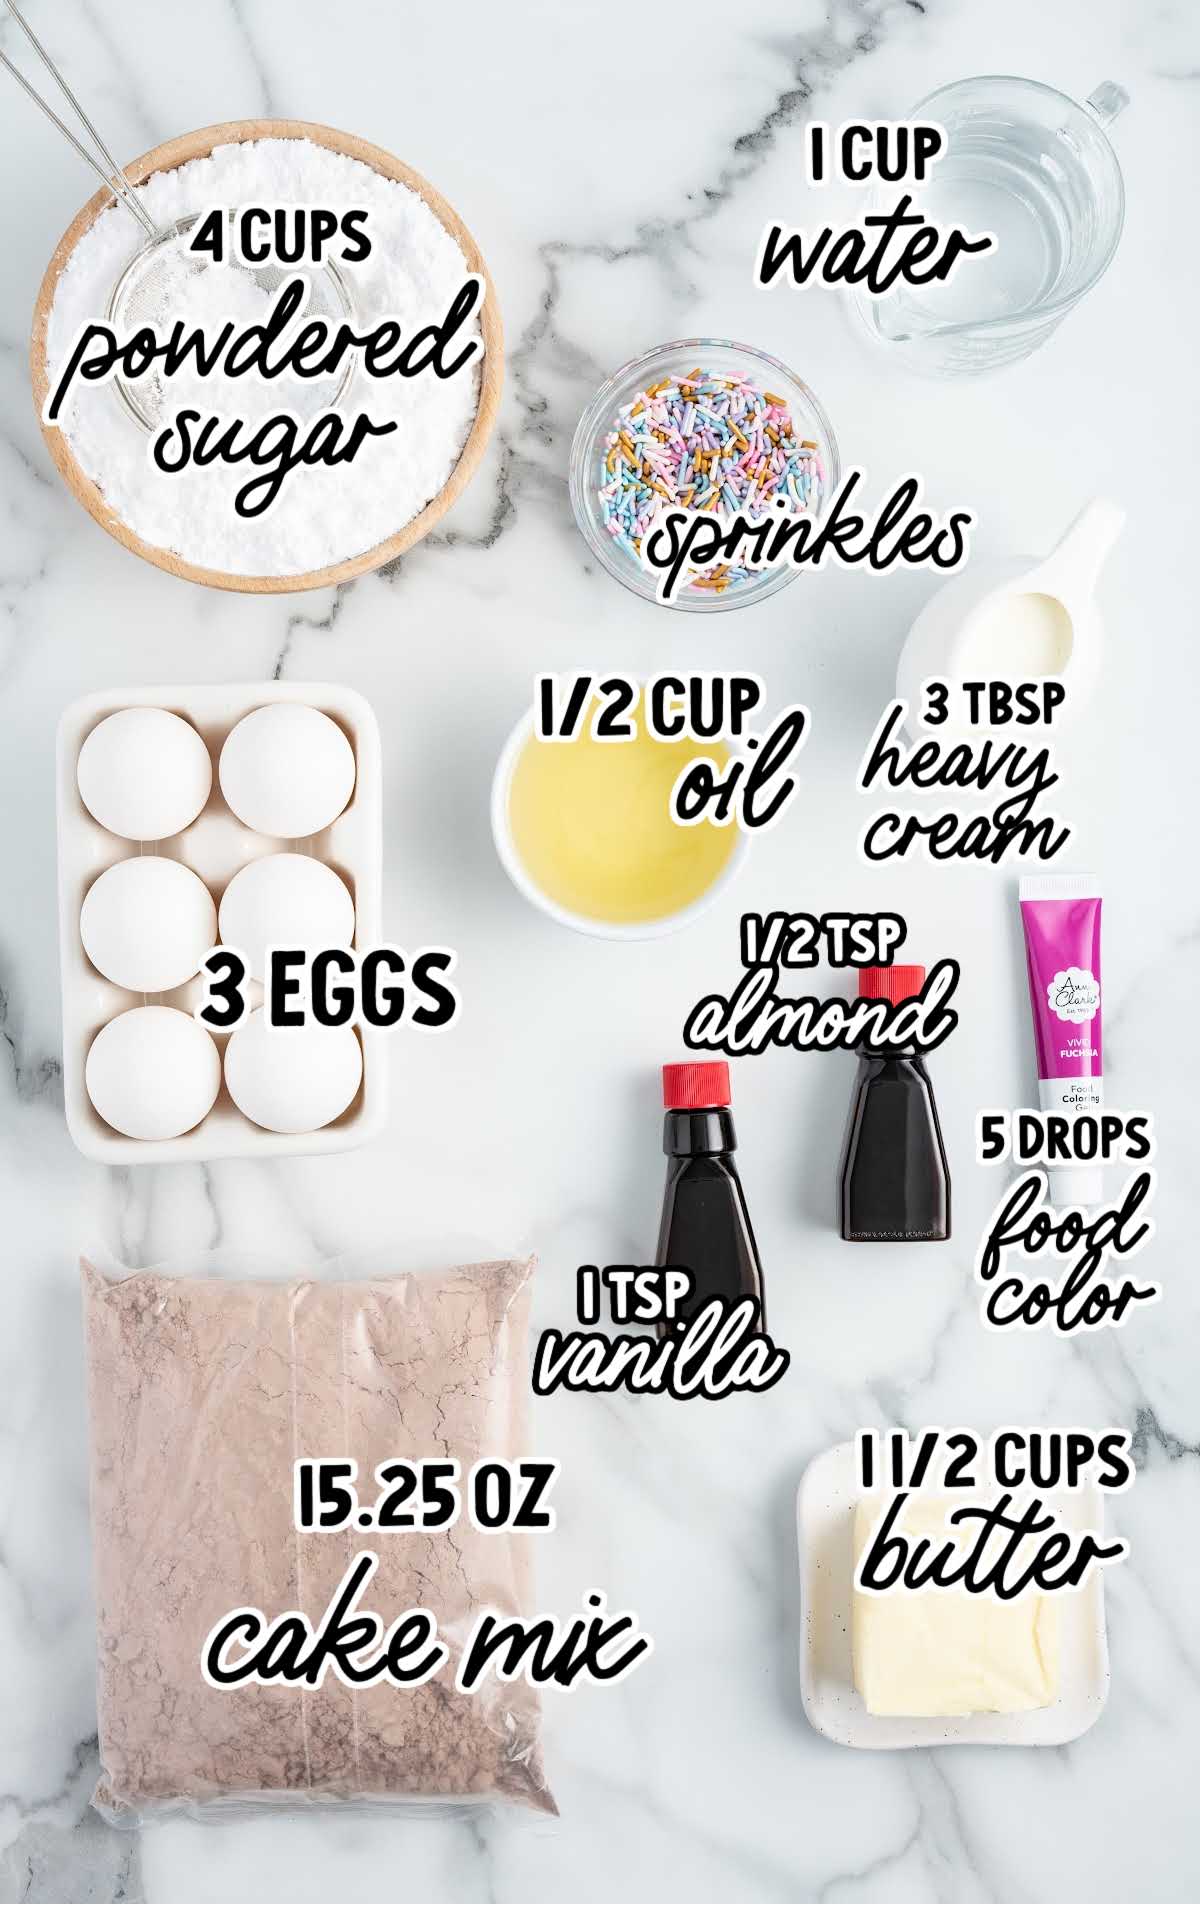
- Main Ingredients: Devil’s Food cake mix, eggs, vegetable oil, water, butter, powdered sugar, food coloring, sprinkles.
- Quick Steps: Mix cake ingredients, bake, cut into circles, prepare buttercream, frost layers, chill, and add sprinkles.
- Total Time & Yield: 2 hours 18 minutes, makes 6 servings/small cakes.1
- Pro Tip: To prevent cake layers from shifting when assembling, freeze them for 20 minutes. This keeps the layers firm and easy to frost.
- Why This Recipe: What sets this recipe apart from the competition is its balance of simplicity and customization. While many lunch box cakes feature elaborate cake designs, this recipe offers the perfect middle ground—approachable enough for beginners but versatile enough to allow creativity.
Additionally, the buttercream has just the right balance of almond and vanilla extracts, giving it a depth of flavor that elevates it above overly sweet frostings.
Lunchbox Cake Ingredients
To make these mini cakes, you’ll need:
For The Cake:
- 1 (15.25-ounce) box of Devil’s Food cake mix
- 1 cup of water
- ½ cup of vegetable oil
- 3 large eggs, room temperature
For The Buttercream Frosting:
- 1½ cups of salted sweet cream butter, softened
- 1 teaspoon of clear vanilla flavoring
- ½ teaspoon of almond extract
- 4 cups of powdered sugar
- 2 to 3 tablespoons of heavy cream
- 3 to 5 drops of food coloring gel (I used fuchsia)
- Colorful sprinkles (Optional garnish)
Mini Lunch Box Cake Substitutions & Additions
CAKE: You can substitute any boxed cake flavor for the Devil’s Food cake mix in this easy recipe.
Try red velvet lunch box cake, vanilla lunch box cake, or even lunch box carrot cake.
BUTTERCREAM: If you are pressed for time, you can substitute canned whipped frosting for homemade buttercream for these delicious cakes.
TOPPING: Add fresh fruit, sprinkles, or other fun toppings to these sweet Korean bento cakes.
EXTRACTS: While vanilla and almond extract is a classic choice, you can infuse your cake with different flavors by using hazelnut extract or even a hint of coconut extract.
FRUIT PRESERVES: If you’re feeling adventurous, you can spread a layer of fruit preserves between the cake layers before baking.
Apricot, raspberry, or strawberry preserves work well. This addition will infuse your cake with a fruity burst of flavor, making it even more delightful.
How To Make Lunchbox Cakes
STEP ONE: Preheat the oven to 350°F. Line a ½ sheet cake pan with parchment. Spray the pan and parchment paper with nonstick cooking spray. Set it aside.
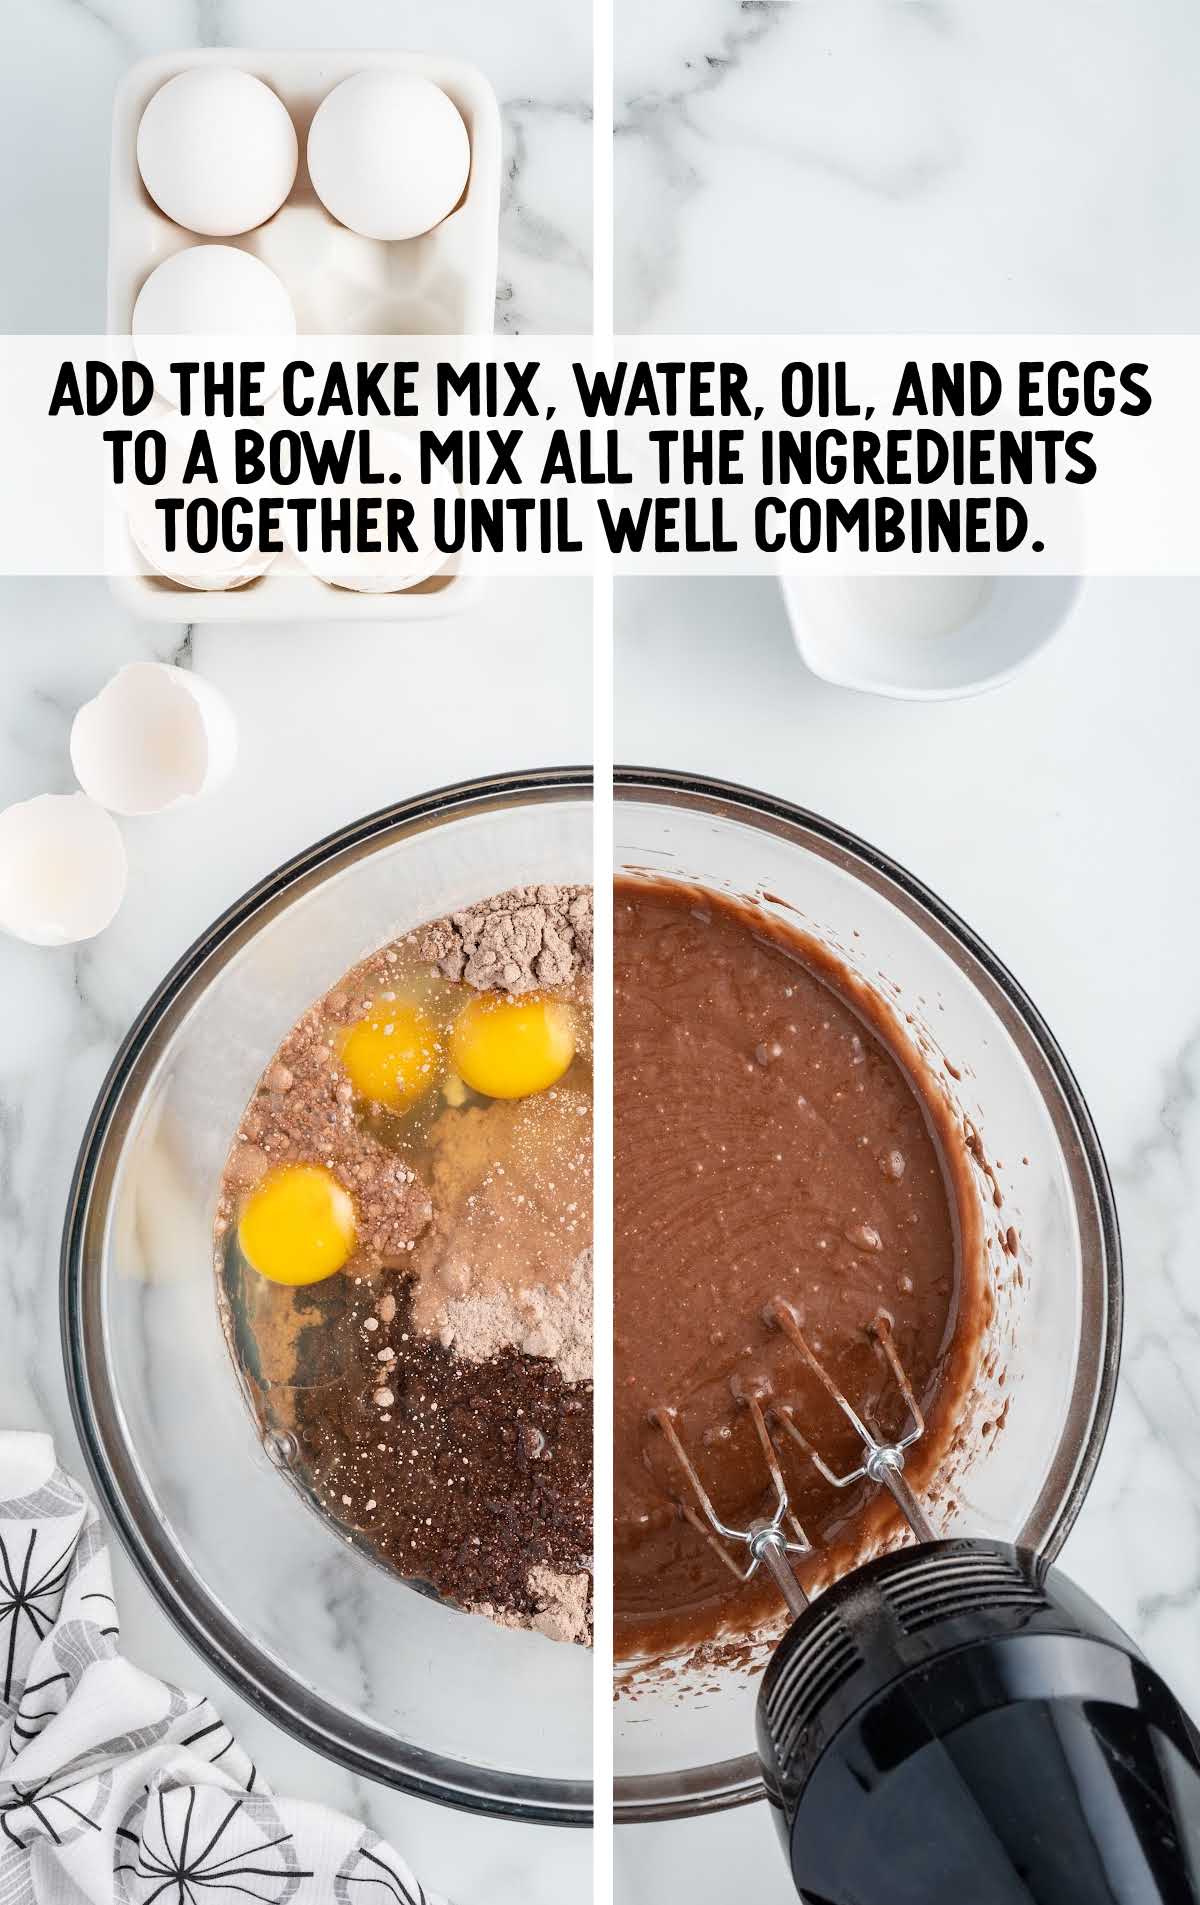
STEP TWO: Add the cake mix, water, vegetable oil, and eggs to a medium-sized mixing bowl.
Use a handheld mixer on medium speed to mix all the ingredients together until well combined.
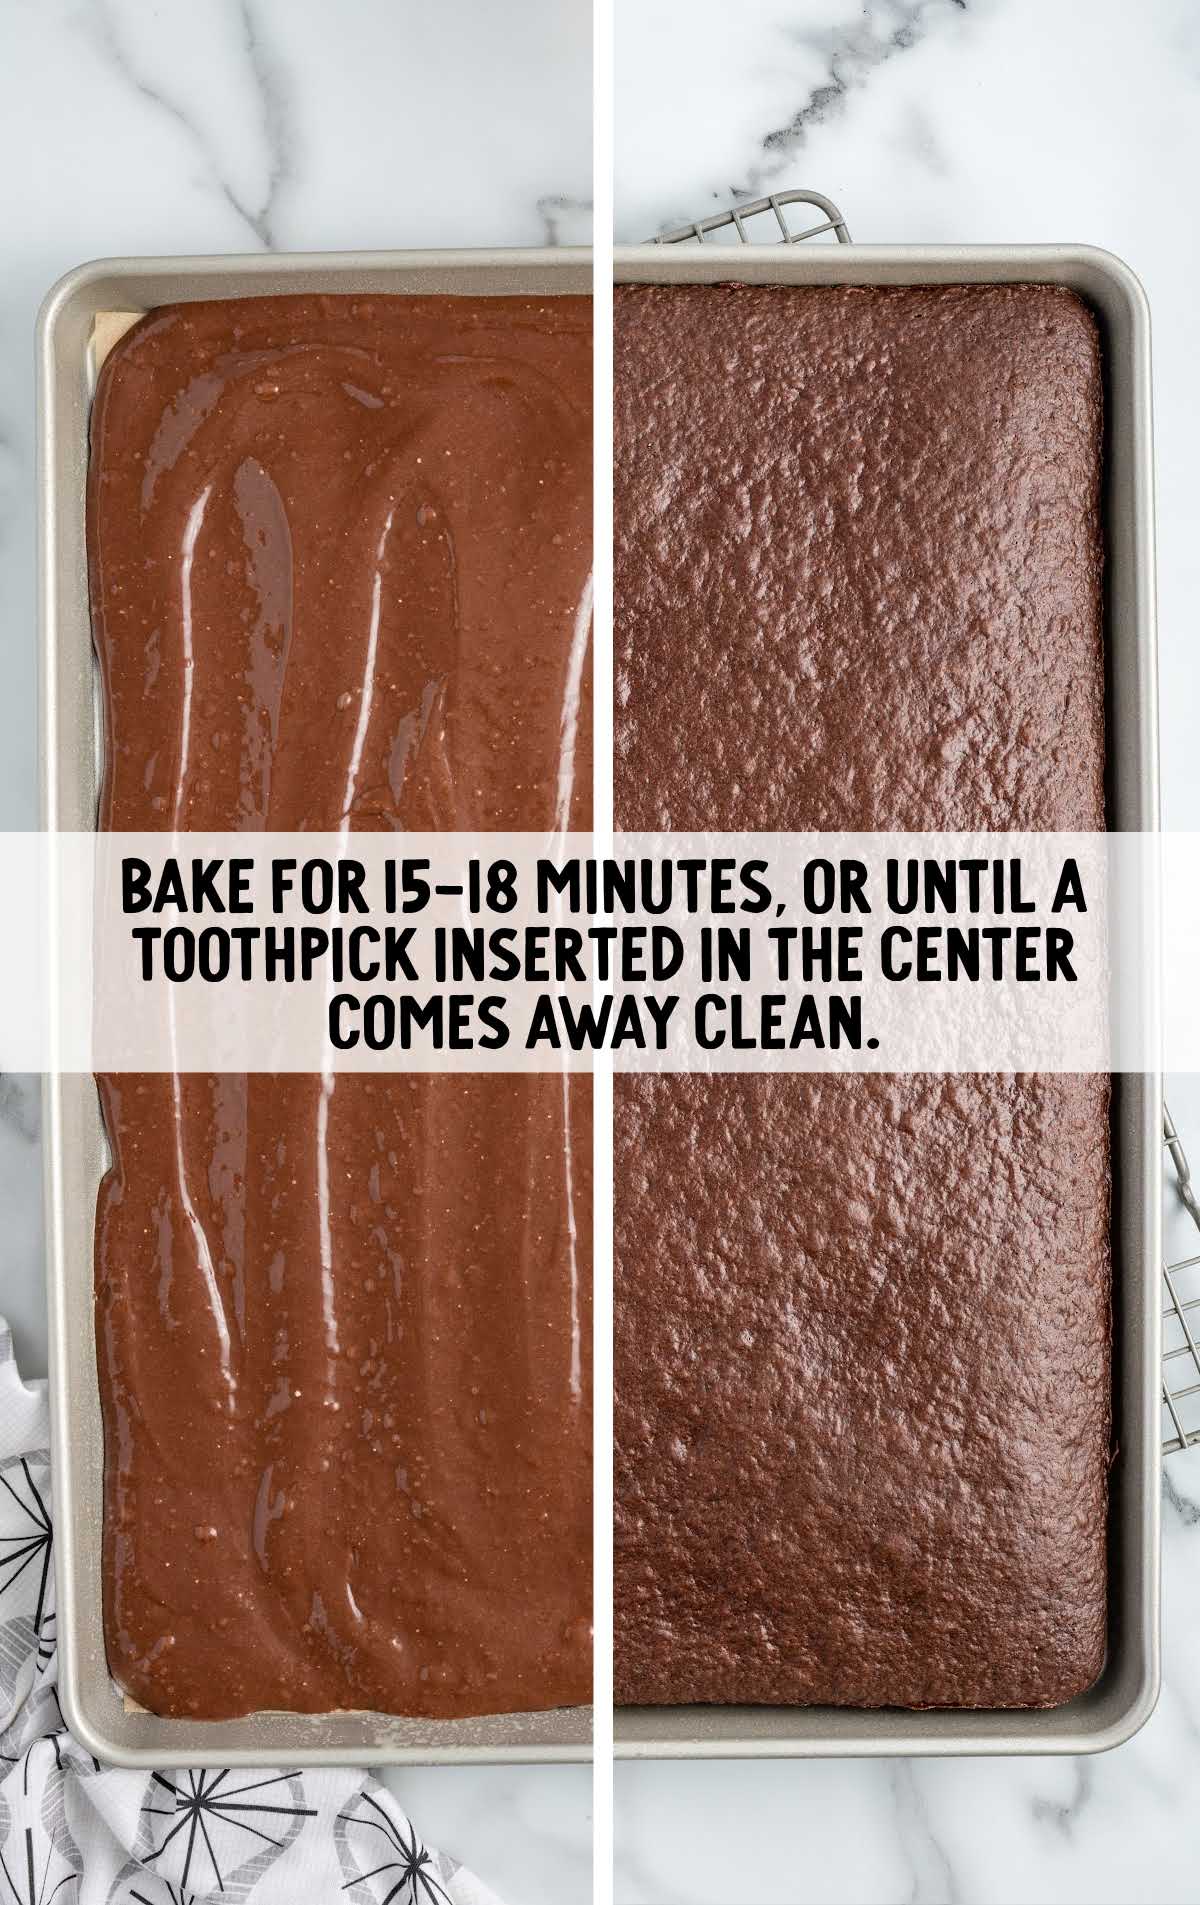
STEP THREE: Evenly spread the cake batter over the prepared cake pan. Bake for 15 to 18 minutes or until a toothpick inserted in the center comes away clean.
OUR RECIPE DEVELOPER SAYS
Oven temperatures vary and may need to be recalibrated periodically to ensure they are accurate. Make sure to check your cake at the lower end of the recommended baking time.
STEP FOUR: Gently run the tip of a knife around the edge of the pan to ensure the cake does not stick to the pan.
STEP FIVE: Spray a piece of parchment paper with nonstick cooking spray and place (sprayed side on top of the cake) on top of the cake.
STEP SIX: Place a cooling rack over the top of the cake. Carefully flip the cake over on top of the cooling rack. Allow the cake to cool completely.
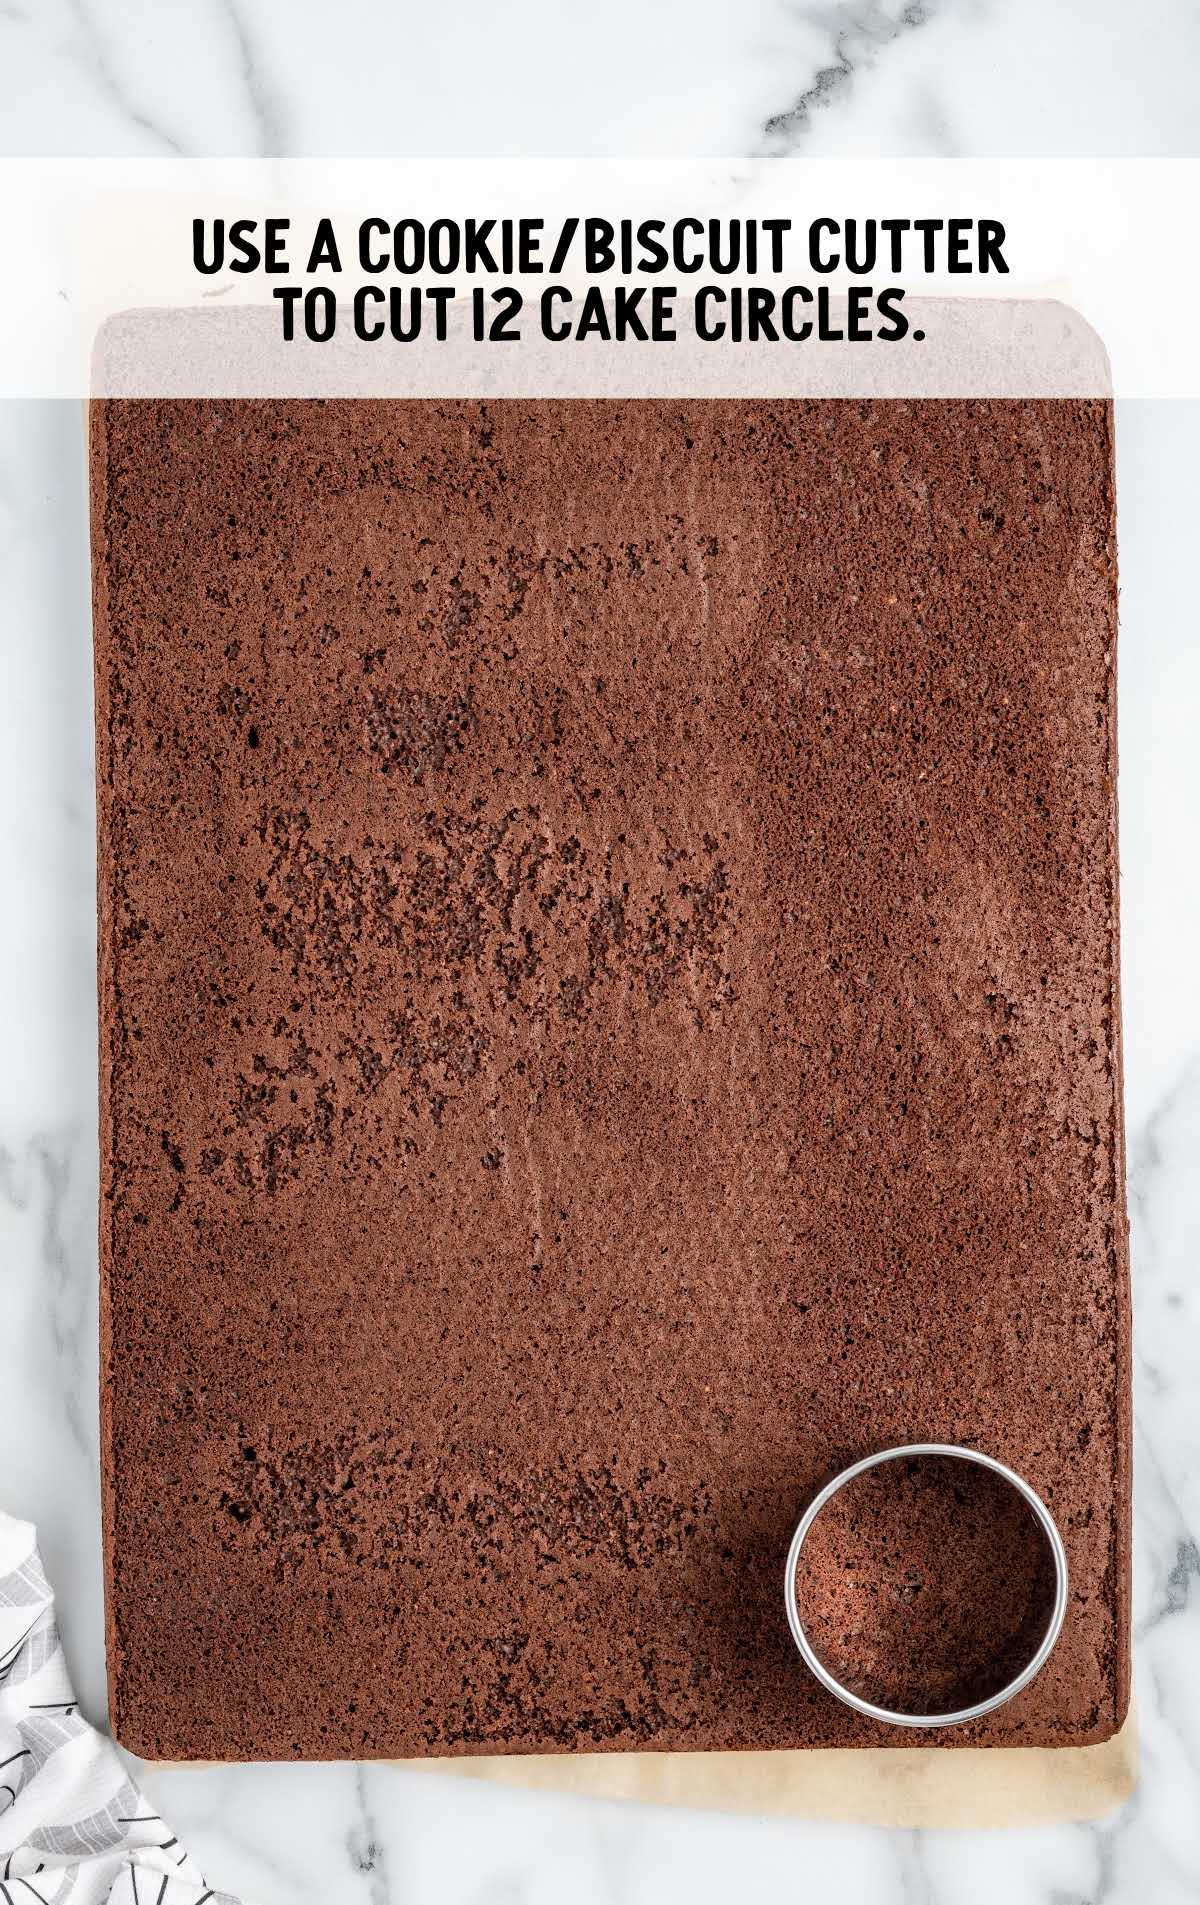
STEP SEVEN: Use a 3½-inch round cookie/biscuit cutter to cut 12 cake circles. Once all the circles are cut out, make the buttercream.
PRO TIP:
Any cake scraps left over can be used to make cake pops.
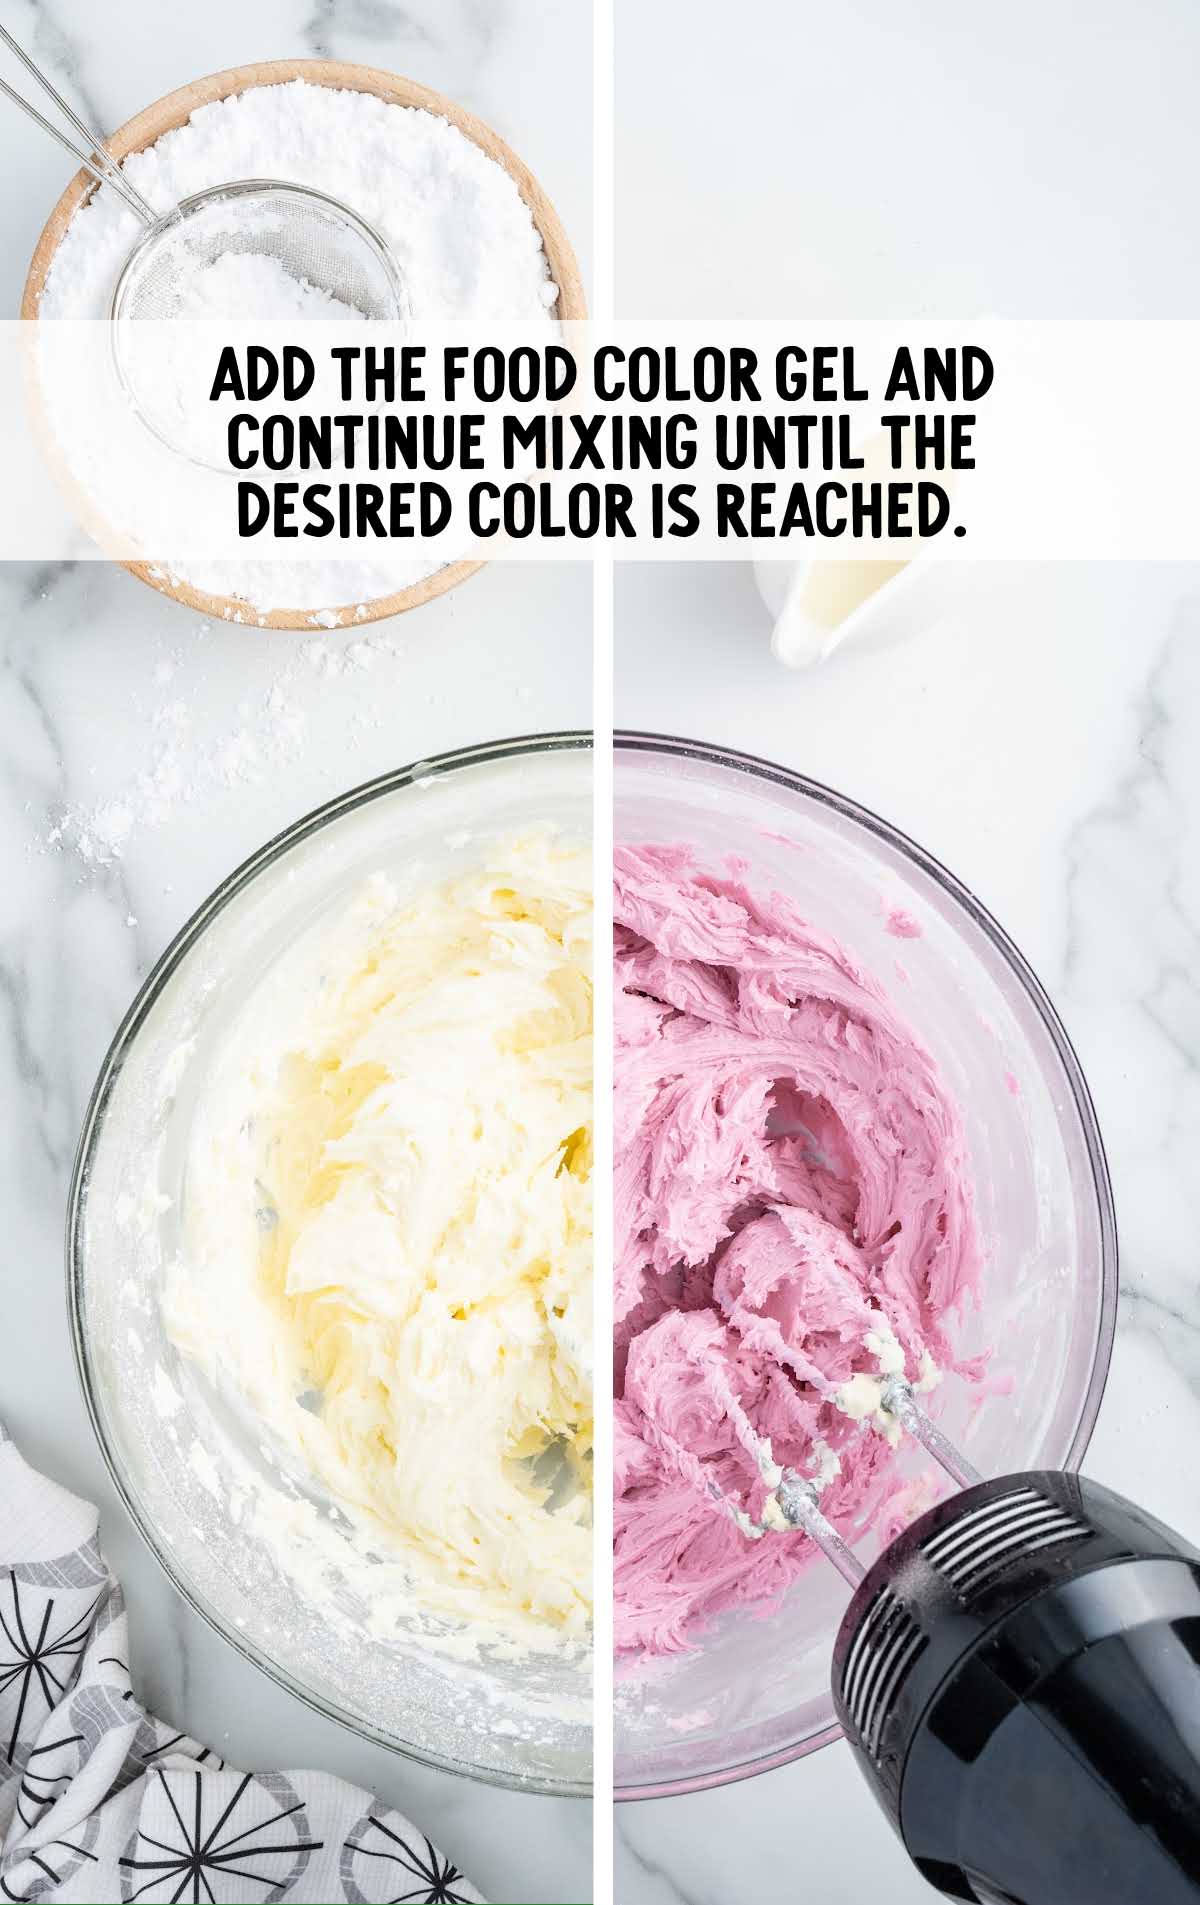
STEP EIGHT: Using a stand mixer or a large mixing bowl and a handheld mixer on medium-high speed, beat the butter, clear vanilla, and almond extract for 1 to 1½ minutes until smooth.
STEP NINE: Lower the mixer speed to low and slowly add the powdered sugar one cup at a time.
Be sure to mix well after each additional cup of powdered sugar.
STEP TEN: Add the heavy cream if the frosting is too stiff.
STEP ELEVEN: Once the powdered sugar has all been added, increase the speed to medium-high and continue mixing until the frosting is completely smooth.
STEP TWELVE: Add the food color gel and continue mixing until the desired color is reached and no streaks appear.
For The Assembly
PRO TIP:
If you are decorating a bunch of these little cakes on the same day, freeze the layers for two hours. Remove them from the freezer, two layers at a time. The frozen cakes will be a bit firmer and more forgiving when you frost them.
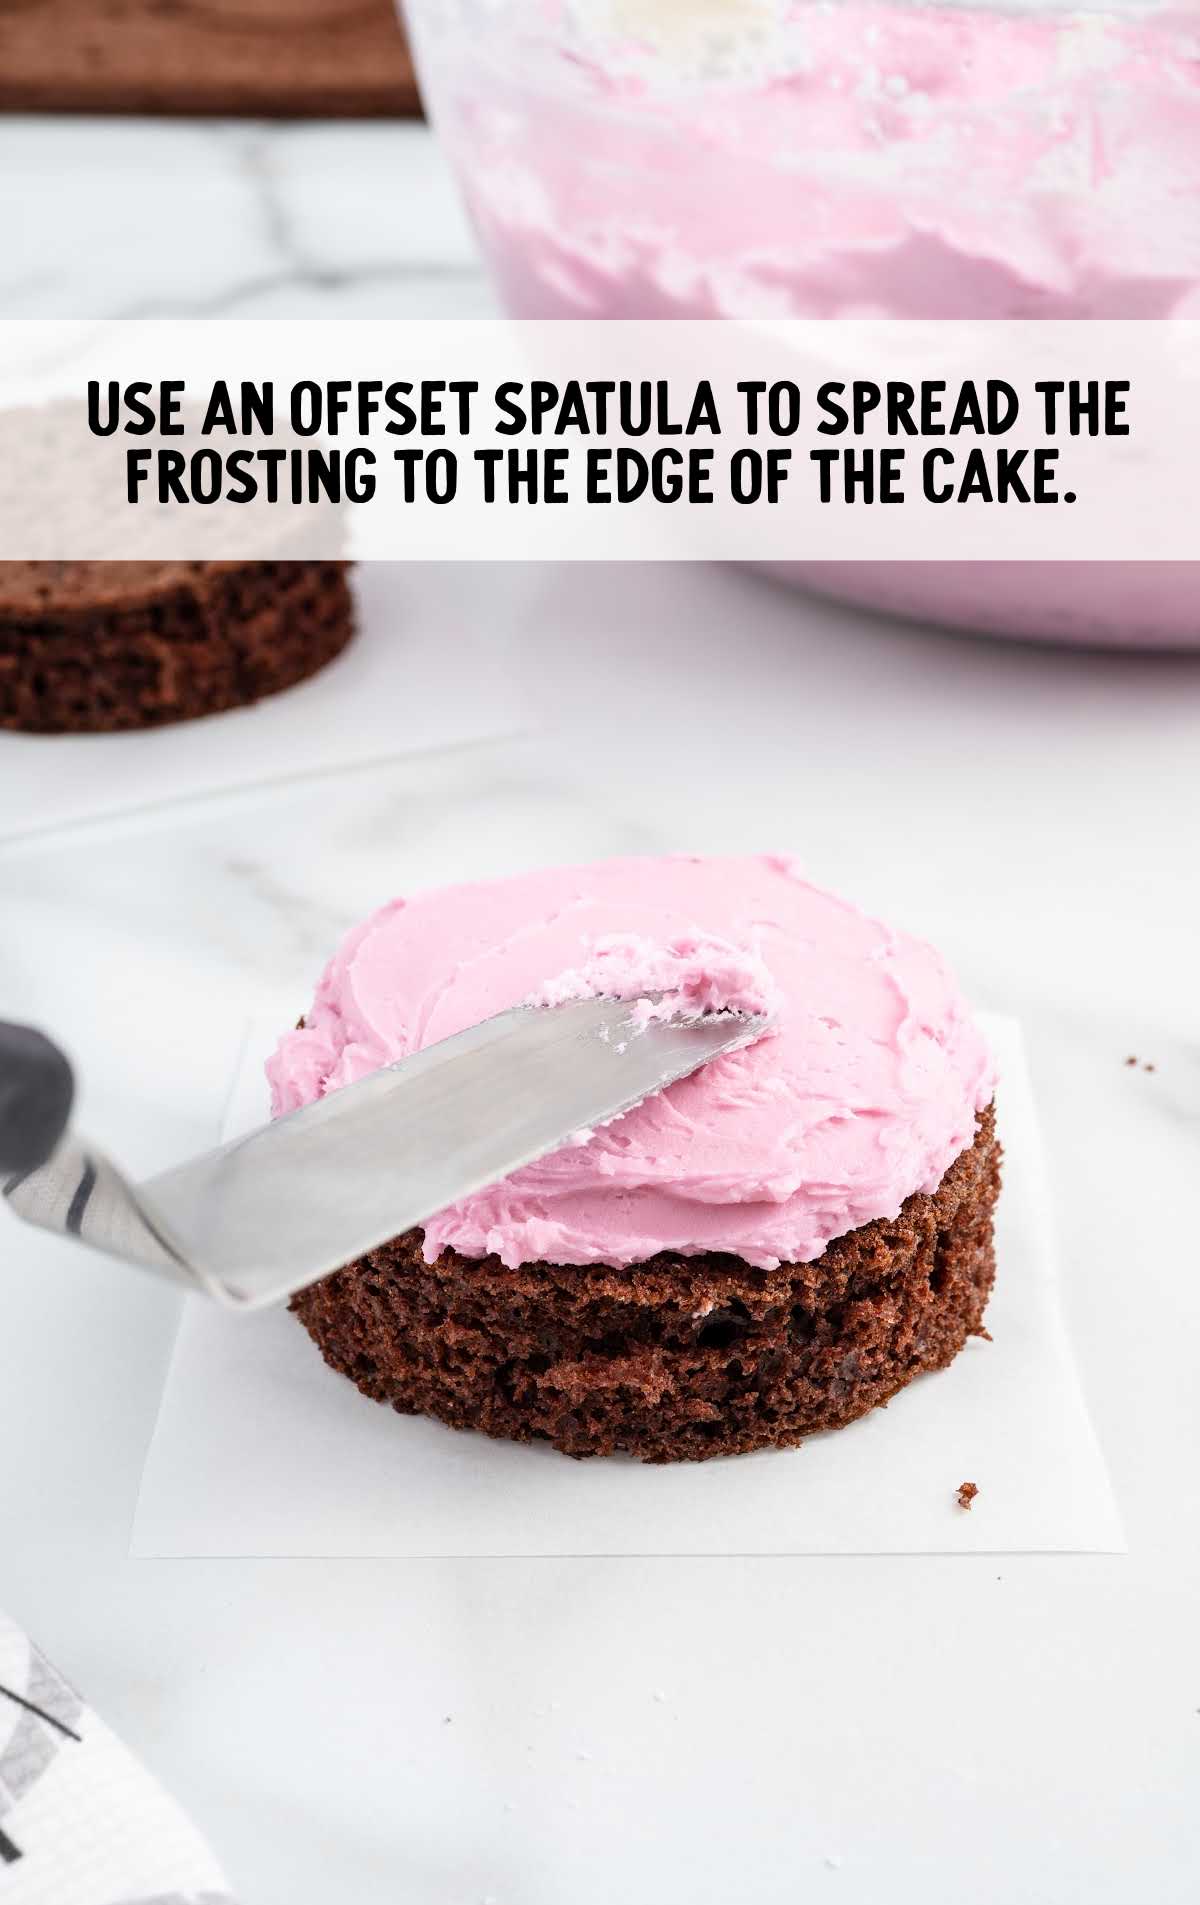
STEP ONE: Cut a 4-inch x 4-inch square of parchment paper. Add one teaspoon of buttercream to the center of the parchment square.
Center one of the cake circles over the buttercream. Spoon 1½ to 2 tablespoons of buttercream.
Use an offset spatula to spread the frosting to the edge of the cake. Center the top cake layer over the bottom layer.
Spread 2 to 2½ tablespoons of buttercream over the top layer.
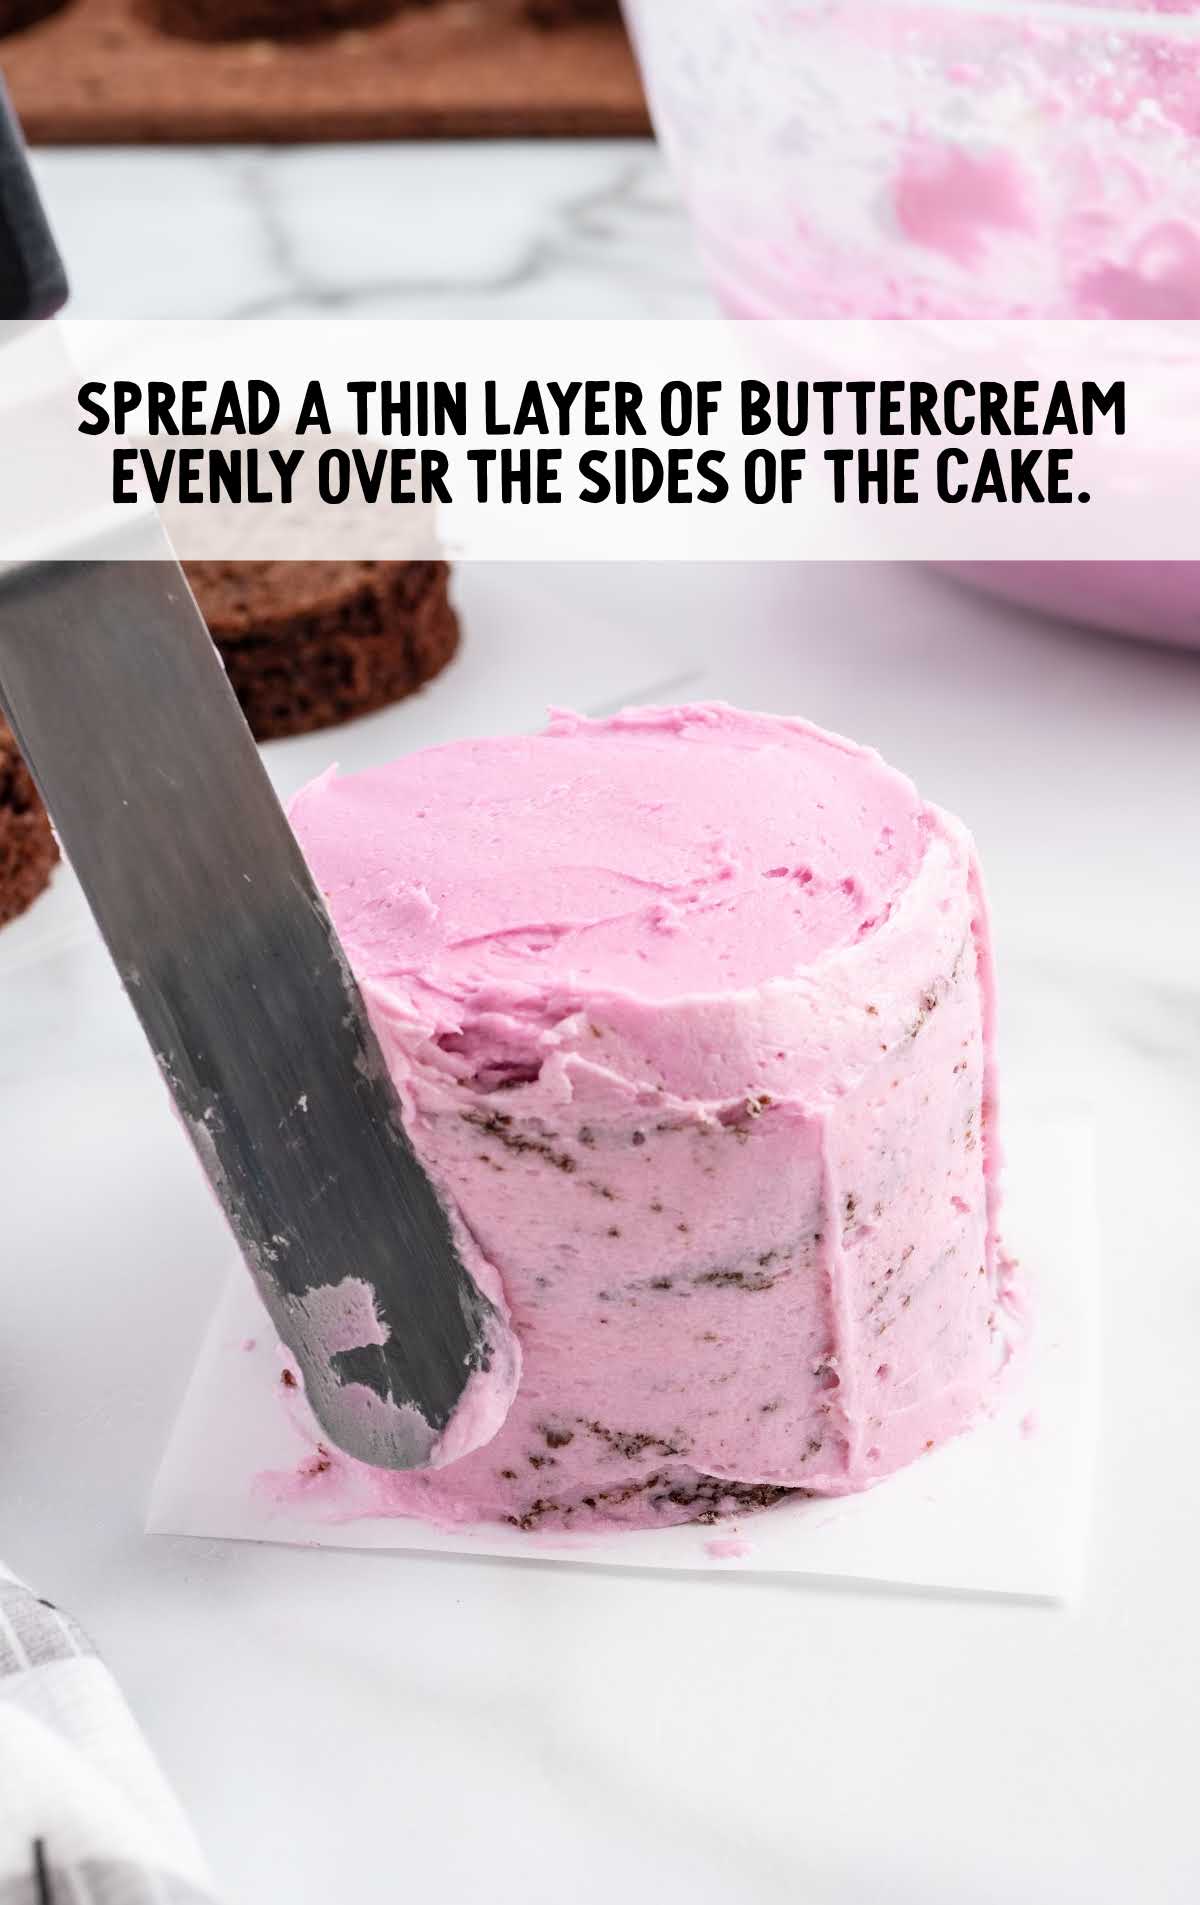
STEP TWO: Spread a thin layer of buttercream evenly over the sides of the cake.
Don’t worry about this layer of frosting not completely covering the whole cake; this is known as the crumb coat.
The final layer of frosting will be added after the cake chills in the refrigerator for about an hour.
Repeat for the remaining small cakes. Place the cakes in the fridge to chill and firm up for one hour.
STEP THREE: Remove the cakes from the refrigerator.
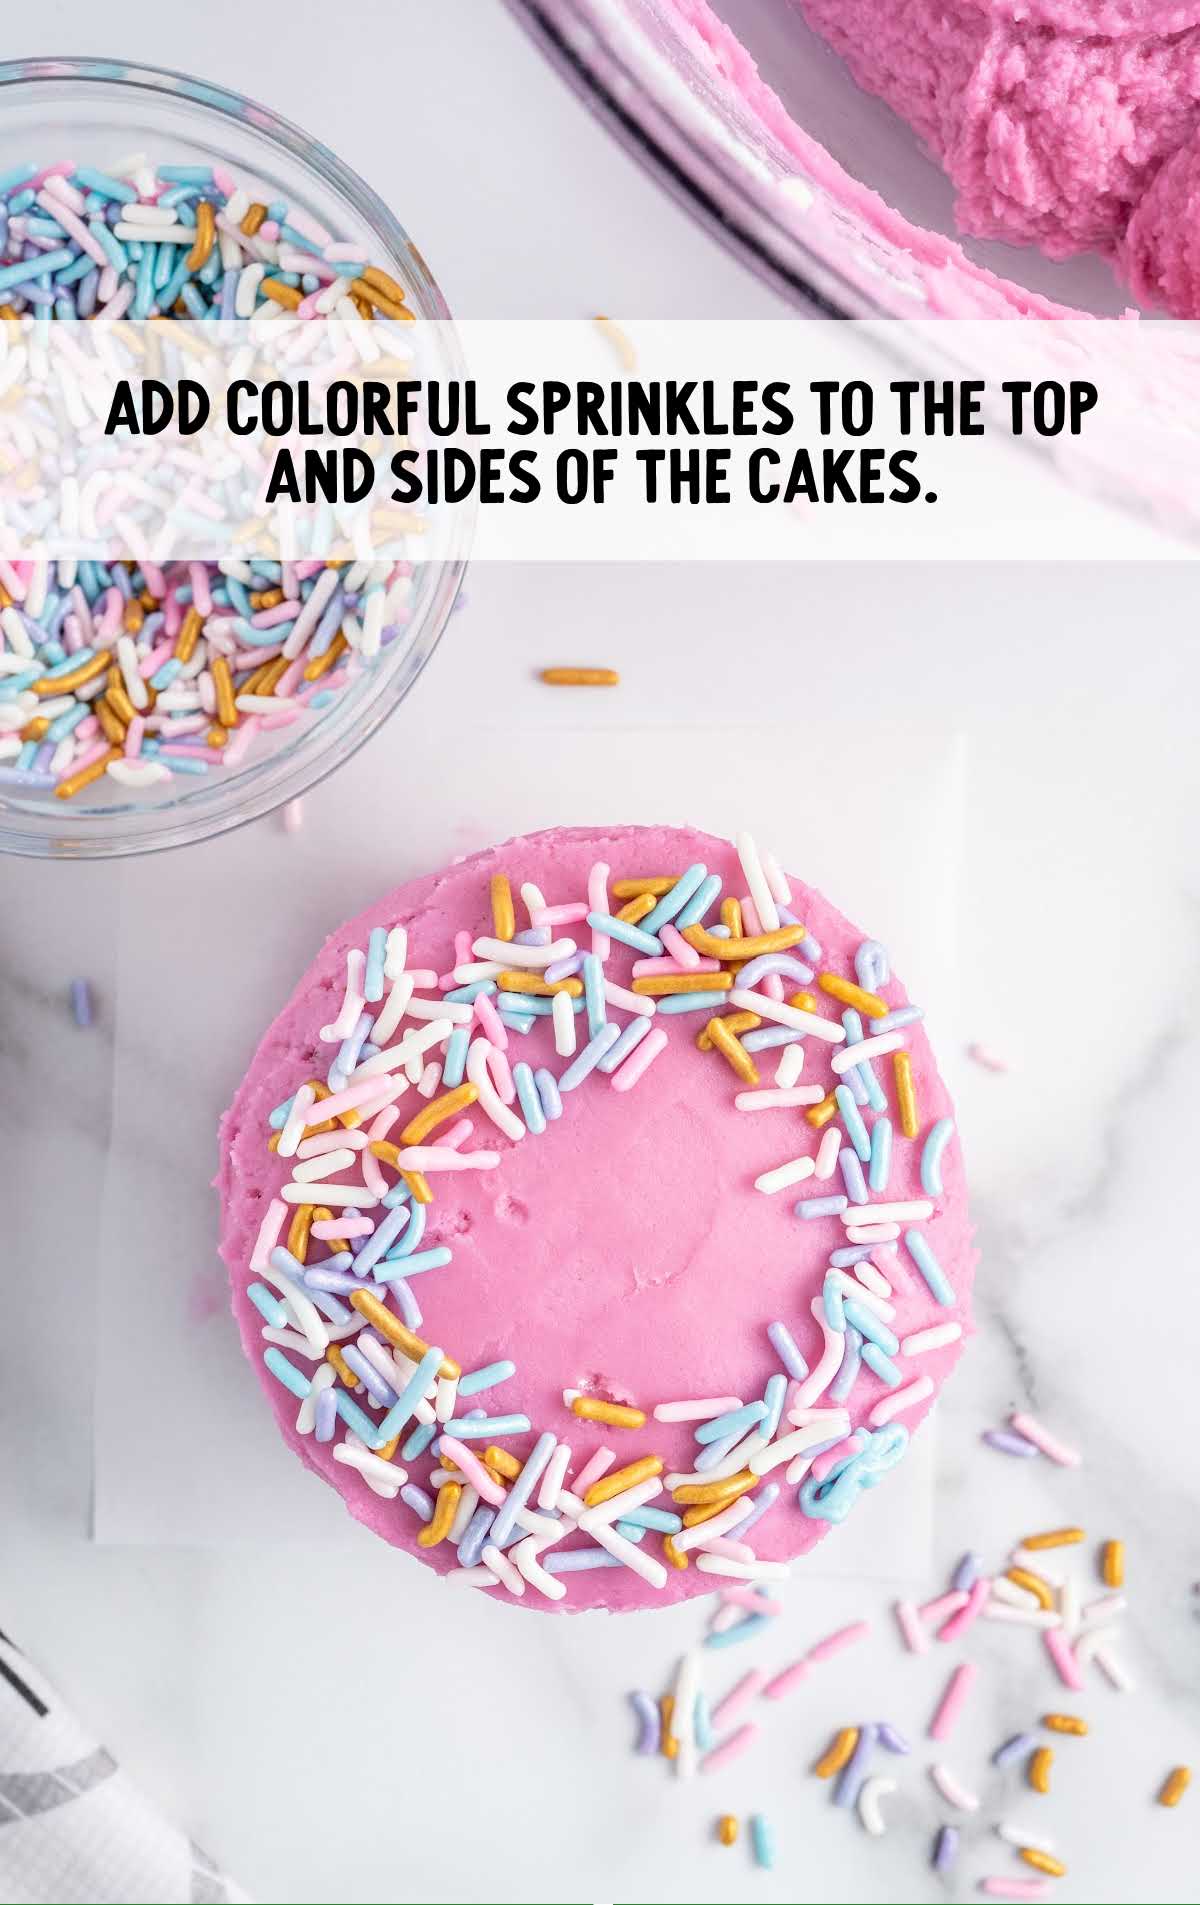
Use an offset spatula to spread a thicker layer over the top and sides of the cakes, be sure to smooth as you go.
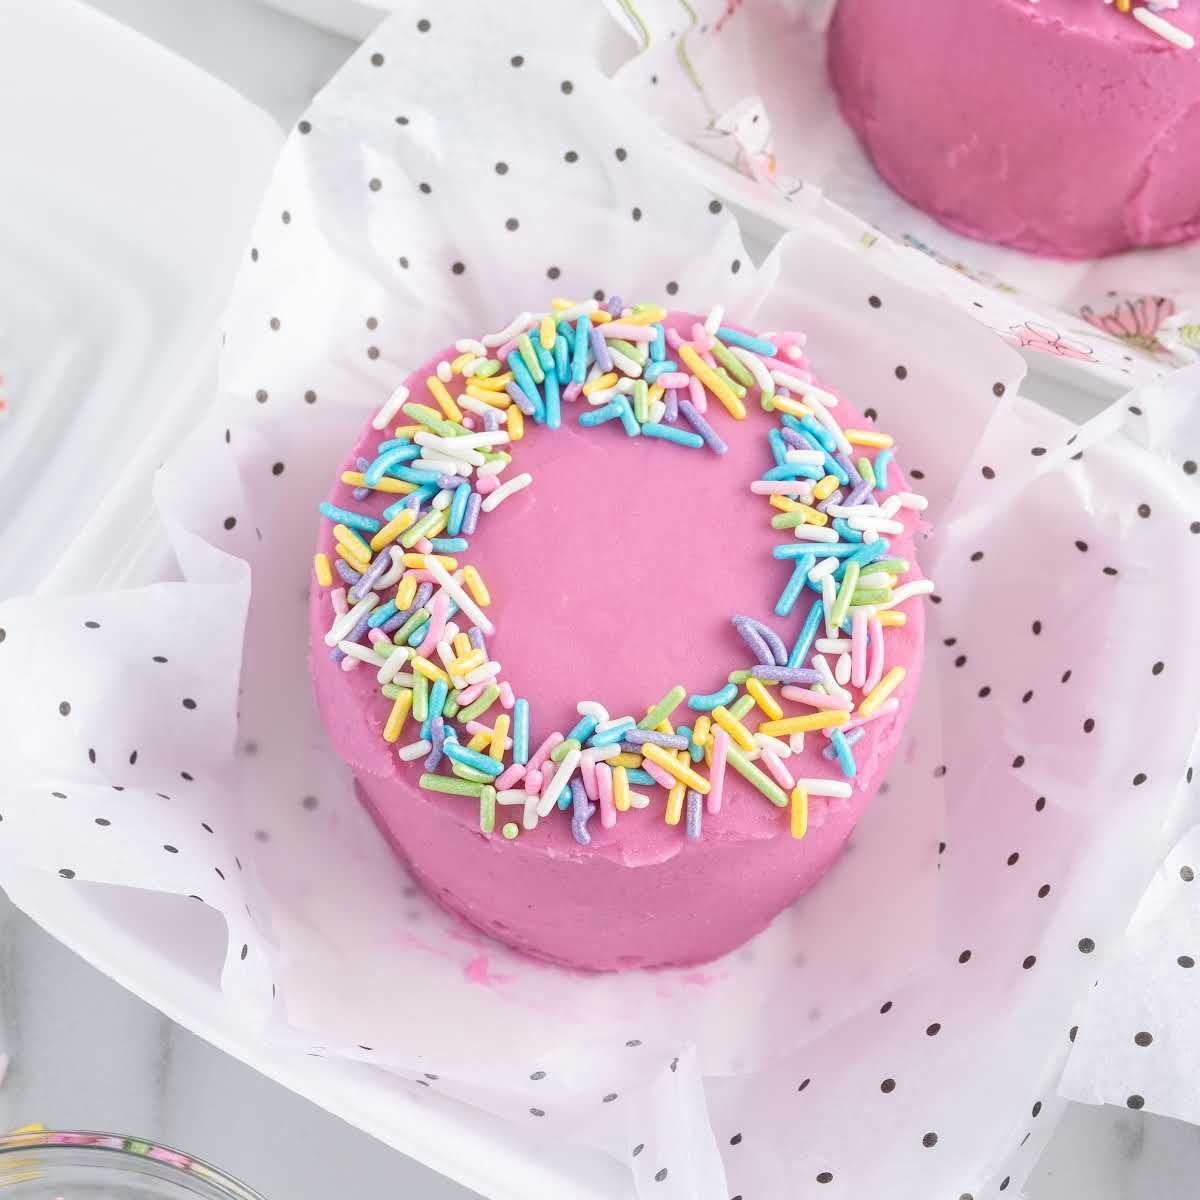
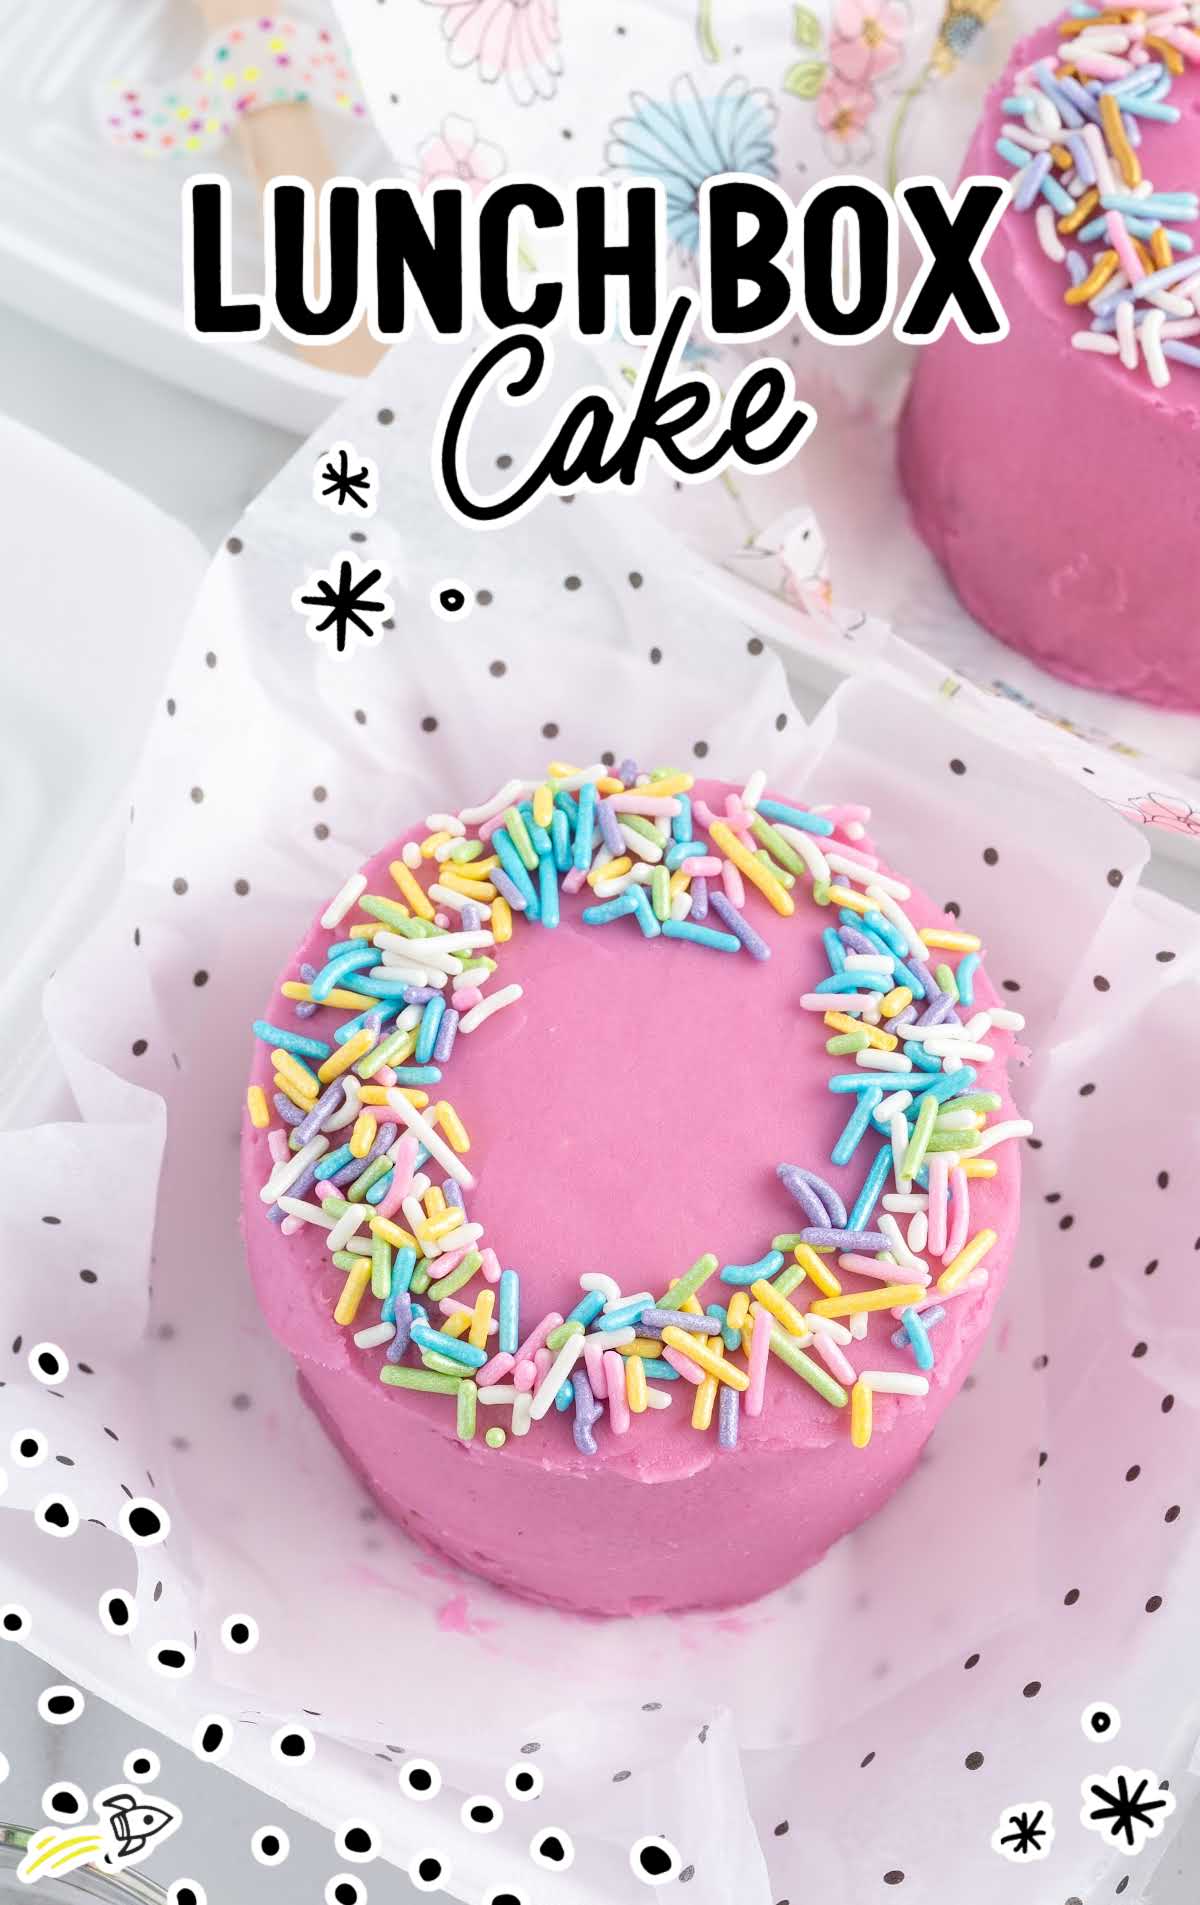
Add colorful sprinkles to the top and sides of the cakes. Chill in the refrigerator until ready to serve these adorable cakes.
PRO TIP:
You can dip the offset spatula in warm water when you are smoothing out the frosting. This should help the spatula to glide along the surface of the frosting rather than drag the frosting.
STEP FOUR: Add colorful sprinkles to the top and sides of the cakes. Chill in the refrigerator until ready to serve these adorable cakes.
How To Serve Mini Lunch Box Cakes
Send a tiny cake in your family’s lunch boxes or bento box with a cute message attached.
They also make a great gift to cheer someone up or even a fun alternative to a larger cake at special events. Add a scoop of vanilla ice cream to make it extra fancy.
For a classic combination, why not pair your cake with a hot cup of tea, latte, or coffee on the side?
MORE CAKE RECIPES

If you are looking for a full-sized cake recipe instead, our Neapolitan cake and strawberry cake are two choices that are sure to impress.
Lunchbox Cakes Storage
Make a batch of these and pop them in the freezer so that you can sneak them into your kids’ lunch boxes for a surprise treat.
MAKE AHEAD: If you’re thinking of preparing this cake ahead of time, you’re in luck!
Once the cake has completely cooled after baking, you can cover it securely with plastic wrap or aluminum foil to keep it fresh.
Store it at room temperature for up to two days before serving, or you can refrigerate it for up to five days.
ON THE COUNTER: Store the frosted mini lunchbox cakes in clamshell containers or covered with plastic wrap for up to one week.
IN THE FREEZER: You can freeze the unfrosted layers in an airtight container for up to three months. Just make sure to allow the cake layers to thaw overnight before frosting. In addition, you can freeze the frosted cakes for up to one month.

Why We Love This Recipe
SIMPLICITY: This recipe is wonderfully straightforward and approachable, making it ideal for both novice and experienced bakers. The step-by-step instructions ensure that you’ll achieve a scrumptious cake without any fuss.
MAKE-AHEAD CONVENIENCE: The ability to make this cake ahead of time and store it without compromising its taste and texture is a huge plus. It’s a fantastic recipe for those busy days when you need a homemade dessert without the last-minute rush.
PORTABLE AND PERFECT FOR SHARING: As the name suggests, this cake is great for packing in lunch boxes or sharing with friends and family. It’s a crowd-pleaser that can be enjoyed at home, at picnics, or as a sweet surprise in a loved one’s lunch.
Lunchbox Cakes FAQs
These cute cakes vary in size but are typically small enough to fit into a lunch box or small container.
These easy mini lunch box cakes can be decorated any way you desire. From tinting the frosting to adding sprinkles and sweet messages, tap into your imagination to create something special.
This easy dessert cake can be frozen unfrosted for up to three months or up to one month once frosted. Thaw and decorate when you are ready to enjoy them.
Lunchbox cakes are typically small, portable, and individually portioned cakes that are designed to fit easily into a lunchbox or be carried as a snack.
The number of people a lunchbox cake can serve depends on the size of the individual cakes and the portion size you desire. Lunchbox cakes are typically small, individually portioned cakes, so they are meant to serve one person per cake.
These are often called bento cakes as they are the perfect size to fit into a bento box-style lunch box.
A bento cake is an individual-sized cake that is much smaller than a regular cake.
There is no difference between cake and bento cake other than the size of the cake and how many people it will serve.
Pack your bento cake into a small individual-sized container.
If you looking for a sweet and satisfying treat that’s conveniently portable for your lunch break, look no further than this lunch box cake. This mini dessert packs a punch of flavor in every bite, from its moist chocolate cake to its creamy and colorful frosting.
Don’t let its small size fool you – it’s big on taste and will leave you feeling completely satisfied.
Sometimes known as Korean lunch box cake or bento cakes since they are the perfect size to fit into a lunch box, this cake recipe is the ideal treat to make to add a smile to the faces of the ones you love.
More Recipes You’ll Love
- Busy Day Chocolate Cake
- Caramel Apple Dump Cake
- Carrot Cake Cupcakes
- Pumpkin Sheet Cake
- Campfire Chocolate Cake


Lunch Box Cake Recipe
Ingredients
Cake Batter
- 15 to 25 ounces Devil’s Food cake mix
- 1 cup water
- ½ cup vegetable oil
- 3 large eggs, room temperature
Buttercream Frosting
- 1½ cups salted sweet cream butter, softened
- 1 teaspoon clear vanilla flavoring
- ½ teaspoon almond extract
- 4 cups powdered sugar
- 2 to 3 tablespoons heavy cream
- 3 to 5 drops food color gel, I used fuchsia
- Colorful sprinkles, Optional garnish
Instructions
- Preheat the oven to 350°F. Line a ½ sheet cake pan with parchment. Spray the pan and parchment paper with nonstick cooking spray. Set it aside.
- Add the cake mix, water, vegetable oil, and eggs to a medium-sized mixing bowl. Use a handheld mixer on medium speed to mix all the ingredients together until well combined.
- Evenly spread the cake batter over the prepared cake pan. Bake for 15-18 minutes, or until a toothpick inserted in the center comes away clean.
- Gently run the tip of a knife around the edge of the pan to ensure the cake does not stick to the pan.
- Spray a piece of parchment paper with nonstick cooking spray and place (sprayed side on top of the cake) on top of the cake.
- Place a cooling rack over the top of the cake. Carefully flip the cake over on top of the cooling rack. Allow the cake to cool completely.
- Use a 3½-inch round cookie/biscuit cutter to cut 12 cake circles. Once all circles are cut out, make the buttercream.
- Using a stand mixer or a large mixing bowl and a handheld mixer on medium-high speed, beat the butter, clear vanilla, and almond extract for 1 to 1½ minutes until smooth.
- Lower the mixer speed to low and slowly add the powdered sugar 1 cup at a time. Be sure to mix well after each additional cup of powdered sugar.
- Add the heavy cream if the frosting is too stiff.
- Once the powdered sugar has all been added, increase the speed to medium-high and continue mixing until the frosting is completely smooth.
- Add the food color gel and continue mixing until the desired color is reached and no streaks appear.
Assembly
- Cut a 4-inch x 4-inch square of parchment paper. Add 1 teaspoon of buttercream to the center of the parchment square. Center 1 of the cake circles over the buttercream. Spoon 1½ to 2 tablespoons of buttercream. Use an offset spatula to spread the frosting to the edge of the cake. Center the top cake layer over the bottom layer. Spread 2 to 2½ tablespoons of buttercream over the top layer.
- Spread a thin layer of buttercream evenly over the sides of the cake. Don’t worry about this layer of frosting not completely covering the whole cake; this is known as the crumb coat. The final layer of frosting will be added after the cake chills in the refrigerator for about an hour. Repeat for the remaining cakes. Place the cakes in the refrigerator to chill and firm up for 1 hour.
- Remove the cakes from the refrigerator. Use an offset spatula to spread a thicker layer over the top and sides of the cakes, be sure to smooth as you go. Add colorful sprinkles to the top and sides of the cakes. Chill in the refrigerator until ready to serve these adorable cakes.
Notes
- Oven temperatures vary and may need to be recalibrated periodically to ensure they are accurate. Make sure to check your cake at the lower end of the recommended baking time.
- Any cake scraps left over can be used to make cake pops.
- If you are decorating a bunch of these little cakes on the same day, freeze the layers for 2 hours. Remove them from the freezer, 2 layers at a time. The frozen cakes will be a bit firmer and more forgiving when you frost them.
- You can dip the offset spatula in warm water when you are smoothing out the frosting. This should help the spatula to glide along the surface of the frosting rather than drag the frosting.
Nutrition


Comments
Jeannette says
Such a great idea! I have kids, nieces and nephews all over the country. Would I be able to ship (mail) these with or without frosting? Thank you! This is great!
Laura says
What a fun treat idea, so cute and also very tasty!