February 18, 2023
Review RecipeLEGO Cake Pops
Table of Contents
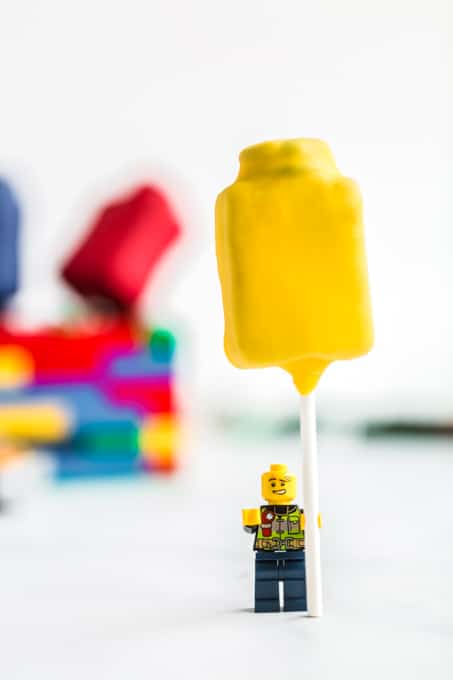
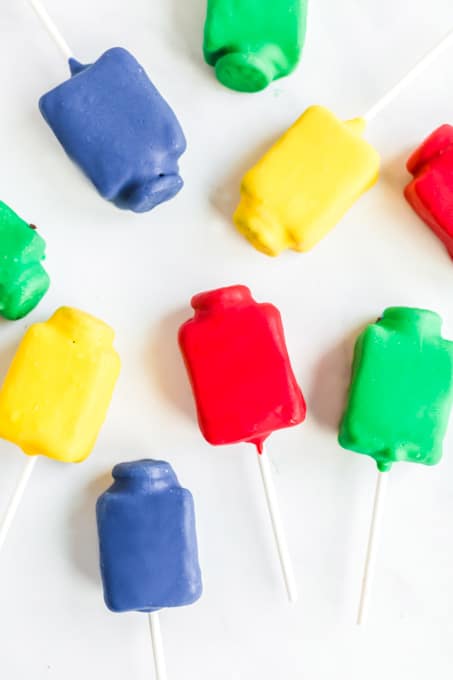
Attention all you Lego fans, these Lego cake pops are so charming and adorable. They are such a fun spin on the ever-popular cake pops. If you are planning a Lego party, these are a must-make treat that will be a hit with all your party guests. Moist cake and frosting are mixed together and then dipped in a candy coating to make these yummy treats.
Of course, no party is complete without cake. If you are making this for a birthday, check out our easy ice cream cake and birthday cake delight. No cake is complete without ice cream and our no-churn birthday cake ice cream would be perfect.

LEGO CAKE POPS INGREDIENTS
- 1 box chocolate cake, baked according to package directions
- ¼ cup canned vanilla frosting
- 16 cake pop sticks
- red, blue, green, and yellow candy melts
- mini chocolate sandwich cookies
- parchment paper
- twine
- candy wrappers
- LEGO printable tags (optional)
SUBSTITUTIONS AND ADDITIONS
CAKE MIX: If you prefer a different flavor of the cake pop, any boxed cake mix will work fine for this recipe. The same goes for the frosting.
COLORS: There are so many colors of candy melts available. We went with the primary colors since they are classic Lego colors. If you want to customize the color of your Lego pops, feel free to mix and match whichever colors you’d like.
HOW TO MAKE THIS LEGO CAKE POPS RECIPE
STEP ONE: Start by preparing the cake according to the box directions.
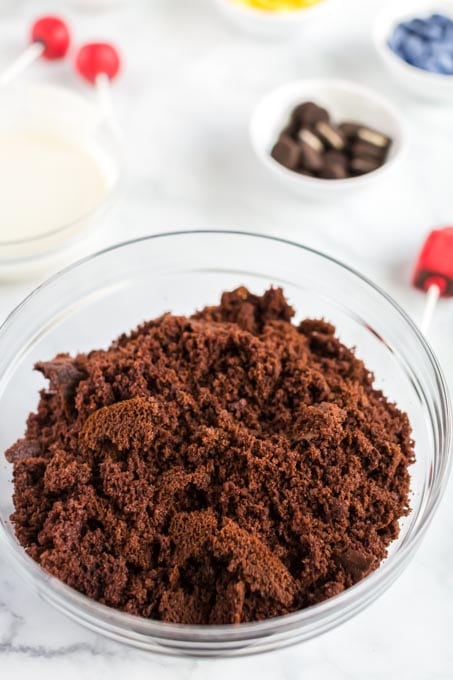
STEP TWO: Once the cake has cooled, break up the cake and place it in a large bowl.
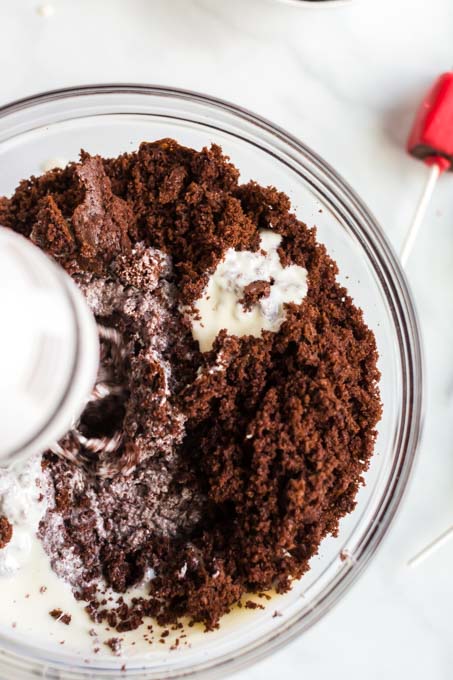
STEP THREE: Add ¼ cup frosting to the cake crumbs and mix with a hand mixer (or in a stand mixer) until the cake starts to come together.
PRO TIP: You’re going to think that ¼ cup of frosting isn’t enough, but believe me it is. Especially for these. If you add more frosting, they will get really heavy, especially after dipping in the candy melts, and fall off the sticks when kept at room temperature.
STEP FOUR: Line an 8×8 baking pan with parchment paper or wax paper and press the mix into the pan.
PRO TIP: I use clothespins to hold down the sides of the parchment paper. You could also use chip clips.
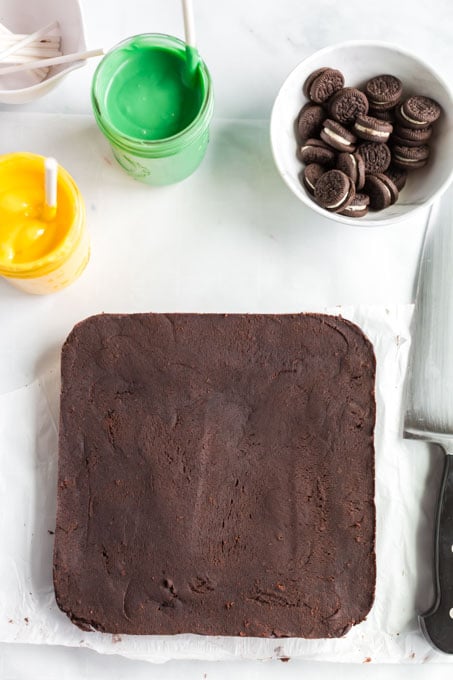
STEP FIVE: Use a pastry cutter (or something with a large flat edge) and press down into the pan. Then use an offset spatula to smooth the top of the cake pop mixture.
STEP SIX: Place in the freezer for 1-2 hours until set.
STEP SEVEN: Lift the sides of the parchment paper up to remove the cake pop mixture onto a clean surface.
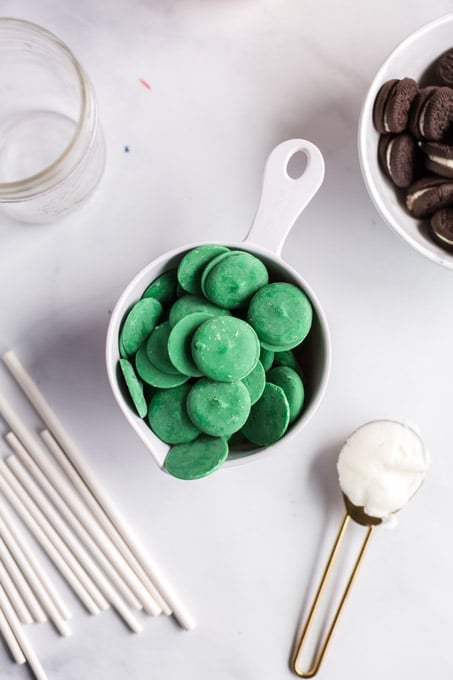
STEP EIGHT: In separate microwave-safe jars, melt the candy melts in your desired colors (we used red, green, blue, and yellow). Microwave about 1 minute at 50% power. Remove to stir and return for 30-second intervals until melted. DO NOT OVERHEAT.
PRO TIP: Mason Jars work great for this step.
PRO TIP: Be really gentle with the candy melts. They are finicky little things. If overheated, they will clump up, thicken and you’ll have a really lumpy outcome.
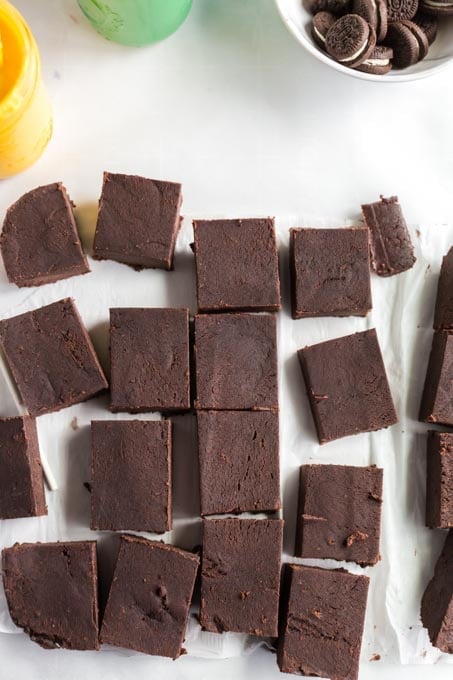
STEP NINE: Cut into 20 pieces. Gently reshape the pieces to be slightly smaller, fatter rectangle. To do this, press the tops down and the sides in and work until you get your desired shape.
PRO TIP: You want to make sure it is thicker than the sandwich cookie you’re going to stick on top.

STEP TEN: Stick a candy stick or lollipop stick in the melted candy melts and then press into the bottom of the cake pop.
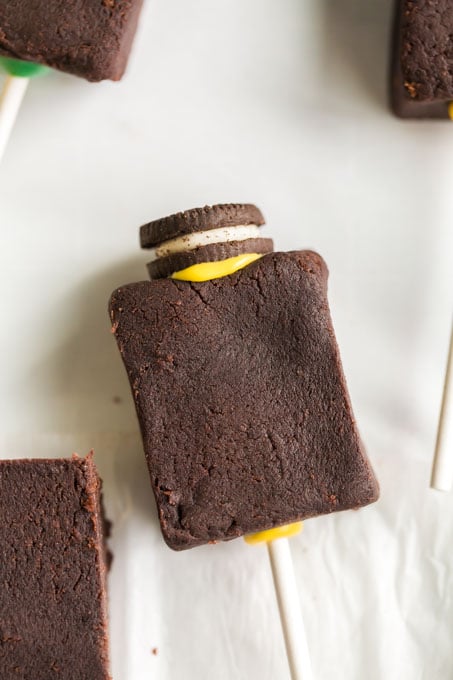
STEP ELEVEN: Take a mini sandwich cookie and add a drop of candy melts to one side of the cookie and press onto the top.
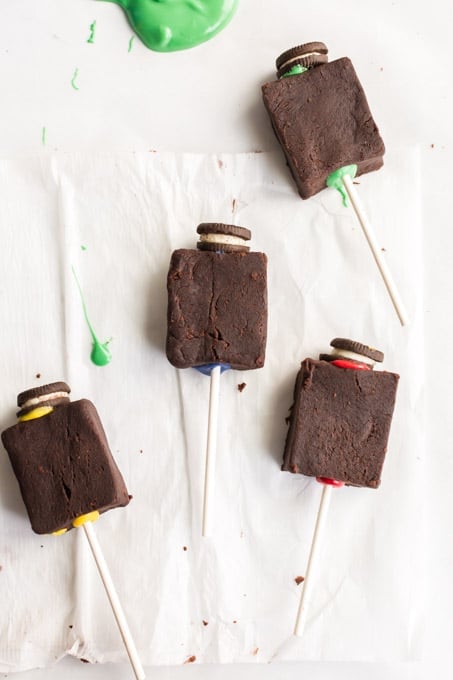
STEP TWELVE: Set aside a pan lined with parchment paper. Let the candy melts set. Once they are all assembled, place them in the refrigerator or freezer for another hour.
STEP THIRTEEN: Remove from freezer. If necessary, re-melt your candy melts, but do not overheat or the consistency will change and will ruin the cake pops.
STEP FOURTEEN: Gently dip each cake pop into the melted chocolate candy melts. Gently tap the side of the cup to let the excess candy drip from the sides, allowing the Lego to form. Place bake on parchment paper to dry. Repeat with every cake pop. Allow them to sit until candy hardens.
PRO TIP: If you put these in the freezer after you dipped them again, they will condensate as they thaw, creating water droplets on the outside of the cake pop. Leave at room temperature or place in the fridge once they are all assembled.
HOW TO SERVE
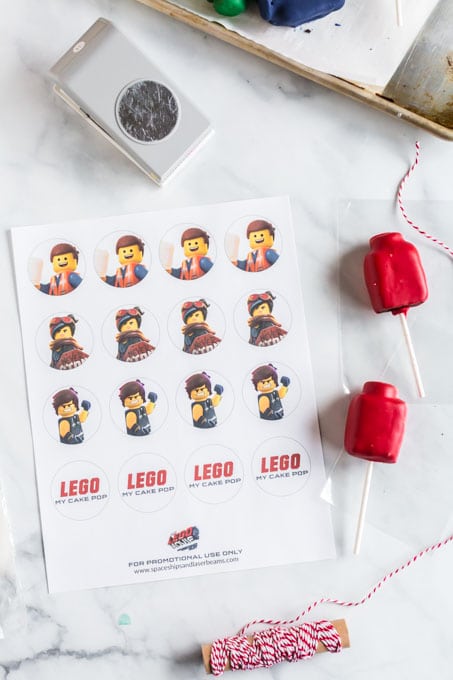
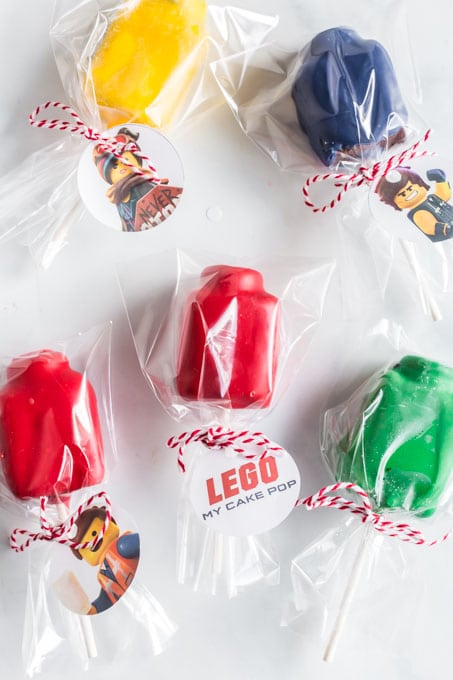
If you are making these for a Lego-themed birthday party, once they’ve set and are completely dry, you can place the entire pop into individual bags and tie them with string. We made these fun little LEGO Movie 2 character tags to place on each bag. Just cut them out, hole punch and tie them onto each Lego cake pop.
If you are planning to display these for a party, take a piece of styrofoam, a sphere cut in half works well, and stick the cake pops in it to keep them upright.
STORAGE
ON THE COUNTER: Store these adorable cake pops at room temperature until they are gobbled up. They will last for about a week at room temperature.
IN THE FREEZER: Cake pops will last in the freezer for up to 6 months. You can freeze them either before or after dipping in the candy melts.

I’m confident your gang will love these little cake pops as much as we did. Such a fun, Lego-themed treat — as darling as they are tasty.
FAQ
Where can I find candy sticks?
Most baking sections of the grocery store or bulk stores carry candy sticks for cake pops. Look for either candy sticks or lollipop sticks. These ones on Amazon are a great choice.
How long will cake pops last on the counter?
Cake pops will last about a week at room temperature and up to three weeks in the fridge.
Can cake pops be frozen?
Cake pops can be frozen either before or after dipping in the candy melts for up to 6 months.
Why did my cake pops crack?
The reason cake pops crack is that there is too great a difference between the temperature of the cake pop and the candy coating. Try to make sure that your pops are not in the freezer longer than an hour before dipping and don’t overheat your candy melts.

LEGO Cake Pops
This fun treat is the perfect dessert for any LEGO fanatic!
Prep Time 2 hours
Total Time 2 hours 3 minutes
Servings 16
Ingredients
- 1 box chocolate cake baked according to package directions
- ¼ cup canned vanilla frosting
- 16 cake pop sticks
- red yellow, blue and green candy melts
- mini chocolate sandwich cookies
- parchment paper
- twine
- candy wrappers
Instructions
- Once the cake has cooled, break up the cake and place in a large bowl.
- Add ¼ cup frosting and mix with a hand mixer (or in a stand mixer) until the cake starts to come together.
- Line an 8×8 baking pan with parchment paper (use clothespins to hold down the sides of parchment paper) and press the mix into the pan.
- Use a pastry cutter (or something with a large flat edge) and press down into the pan. Then use an offset spatula to smooth the top of the cake pop mixture.
- Place in the freezer for 1-2 hours until set.
- Lift the sides of the parchment paper up to remove the cake pop mixture onto a clean surface.
- In separate microwave safe jars, melt the candy melts. Microwave about 1 minute at 50% power. Remove to stir and return for 30 second intervals until melted. DO NOT OVER HEAT.
- Cut into 20 pieces. Gently reshape the pieces to be slightly smaller, fatter rectangle. To do this, press the tops down and the sides in and work until you get your desired shape. (You want to make sure it is thicker than the sandwich cookie you’re going to stick on top).
- Stick a candy stick in the melted candy and then press into the bottom of the cake pop. Take a mini sandwich cookie and add a drop of candy melts to one side of the cookie and press onto the top.
- Set aside a pan lined with parchment paper. Let the candy melts set. Once they are all assembled, place in the refrigerator or freezer for another hour.
- Remove from freezer. If necessary, re-melt your candy melts, but do not over heat or the consistency will change and will ruin the cake pops.
- Gently dip each cake pop into the candy melts. Gently tap the side of the cup to let the access candy drip from the sides, allowing the Lego to form. Place bake on parchment paper to dry. Repeat with every cake pop. Allow to sit until candy hardens.
Notes
TIP: You’re going to think that ¼ cup of frosting isn’t enough, but believe me it is. Especially for these. If you add more frosting, they will get really heavy, especially after dipping in the candy melts, and fall off the sticks when kept at room temperature.
TIP: I use clothespins to hold down the sides of the parchment paper. You could also use chip clips.
TIP: Be really gentle with the candy melts. They are finicky little things. If overheated, they will clump up, thicken and you’ll have a really lumpy outcome.
TIP: You want to make sure the cake pop is thicker than the sandwich cookie you’re going to stick on top.
TIP: If you put these in the freezer after you dipped them again, they will condensate as they thaw, creating water droplets on the outside of the cake pop. Leave at room temperature or place in the fridge once they are all assembled.
TIP: If you put these in the freezer after you dipped them again, they will condensate as they thaw, creating water droplets on the outside of the cake pop. Leave at room temperature or place in the fridge once they are all assembled.
Nutrition
Calories: 350kcal
Have You Tried This Recipe?Follow me on Pinterest @spaceshipslb


Comments
Toni Thomason says
These are perfect for a LEGO party! So easy to make as well.