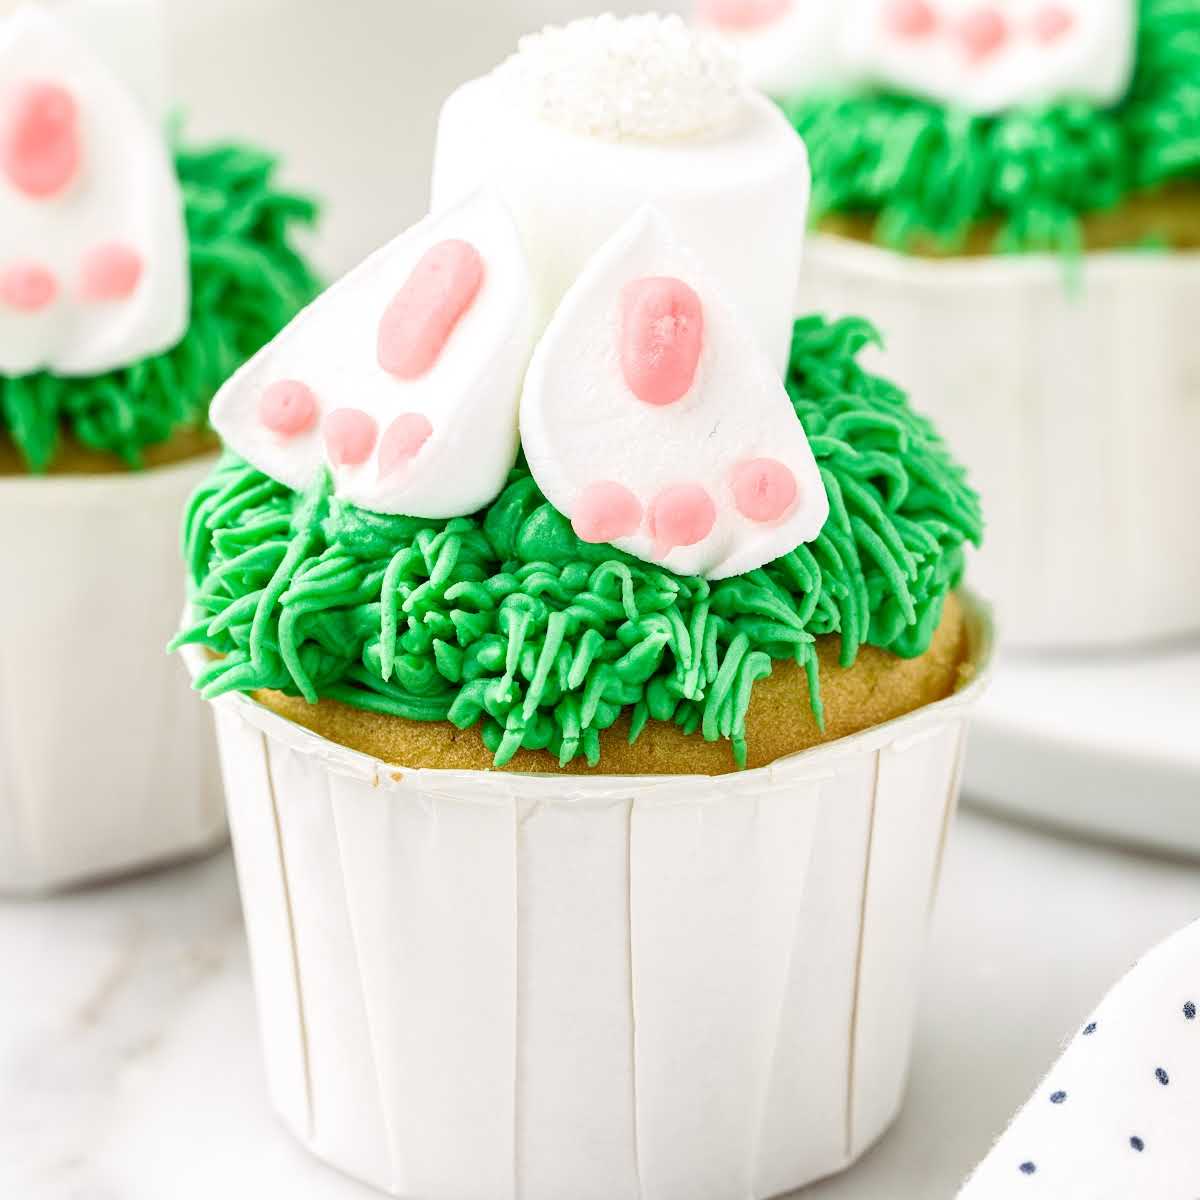
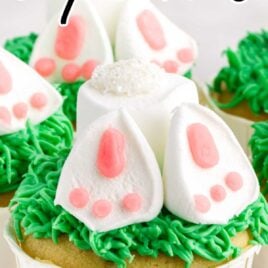
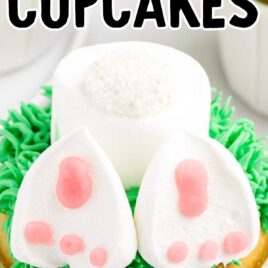
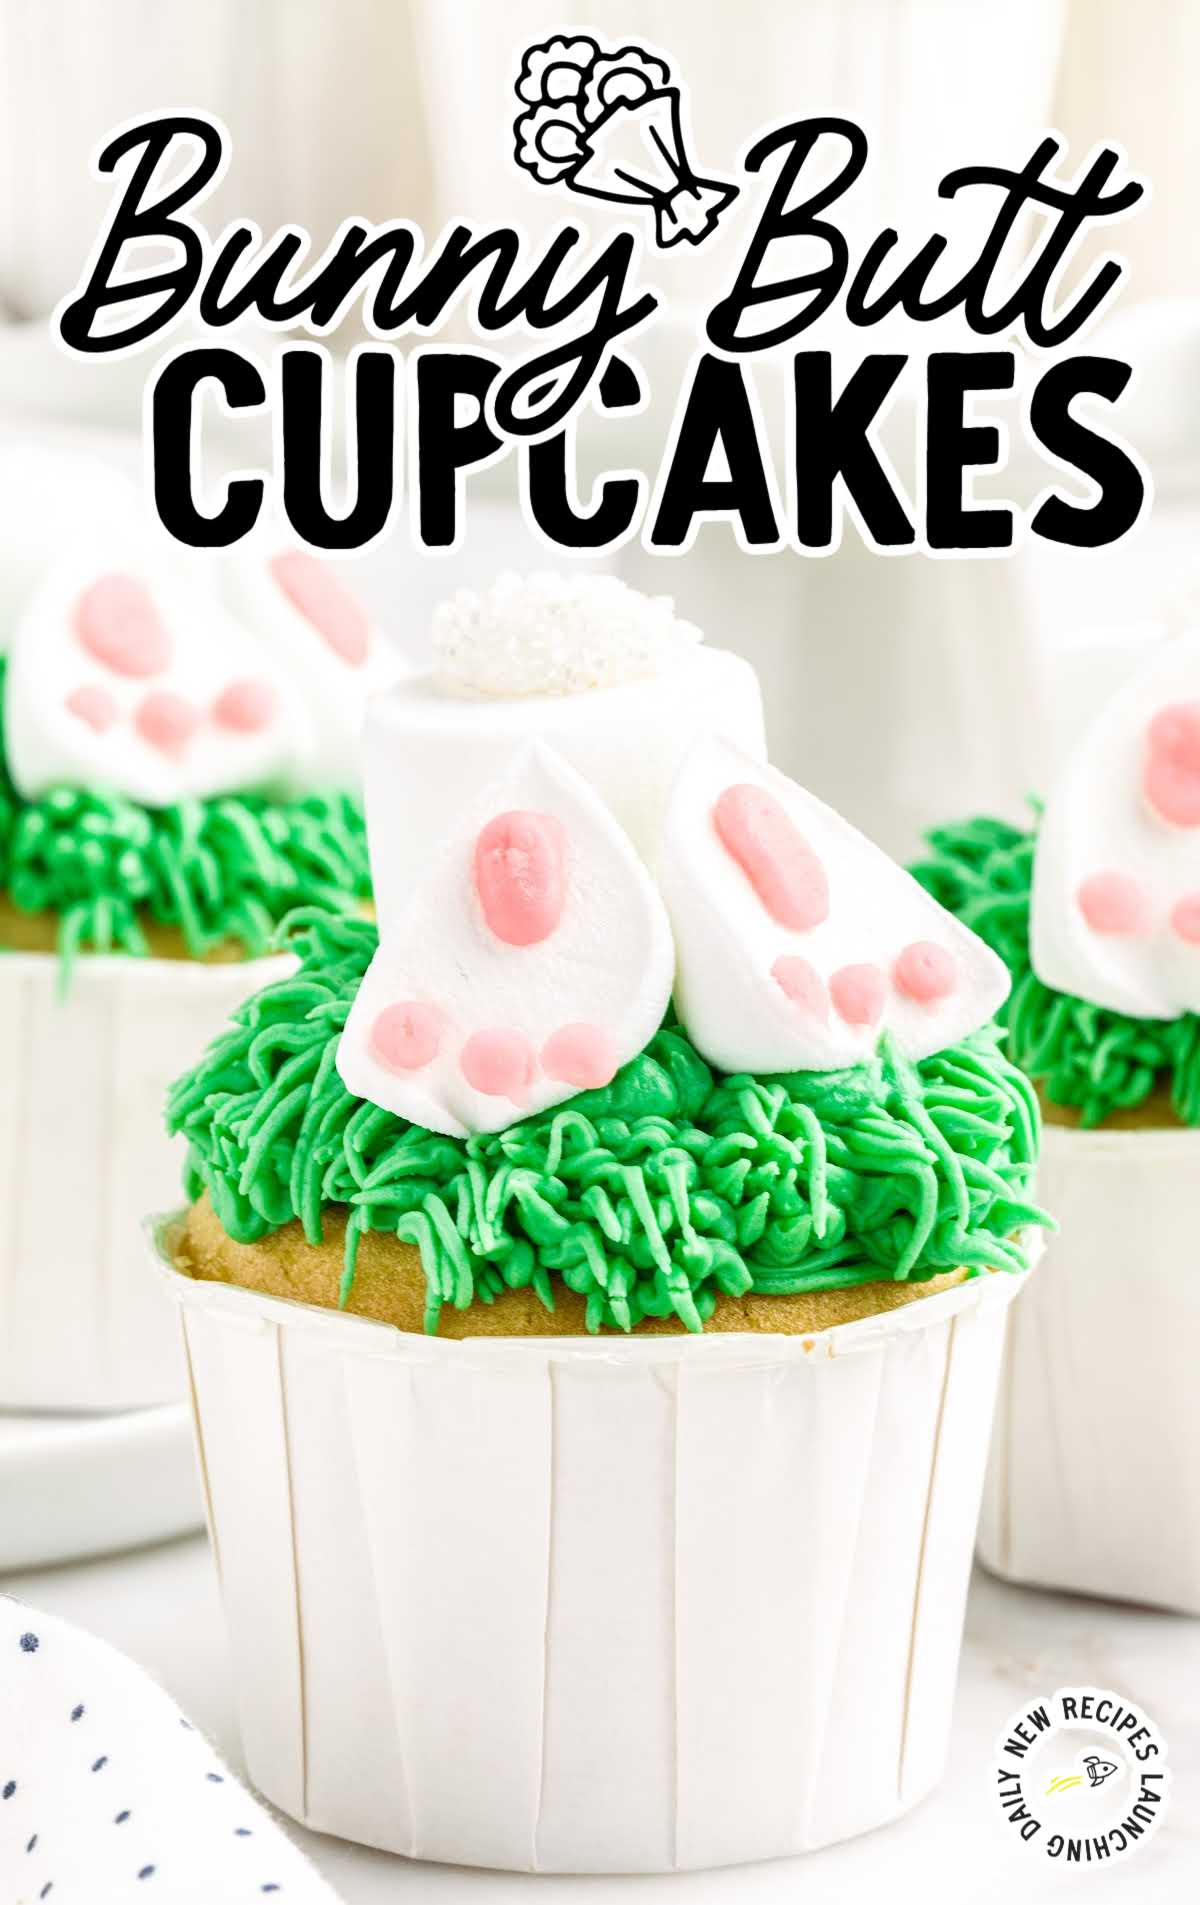
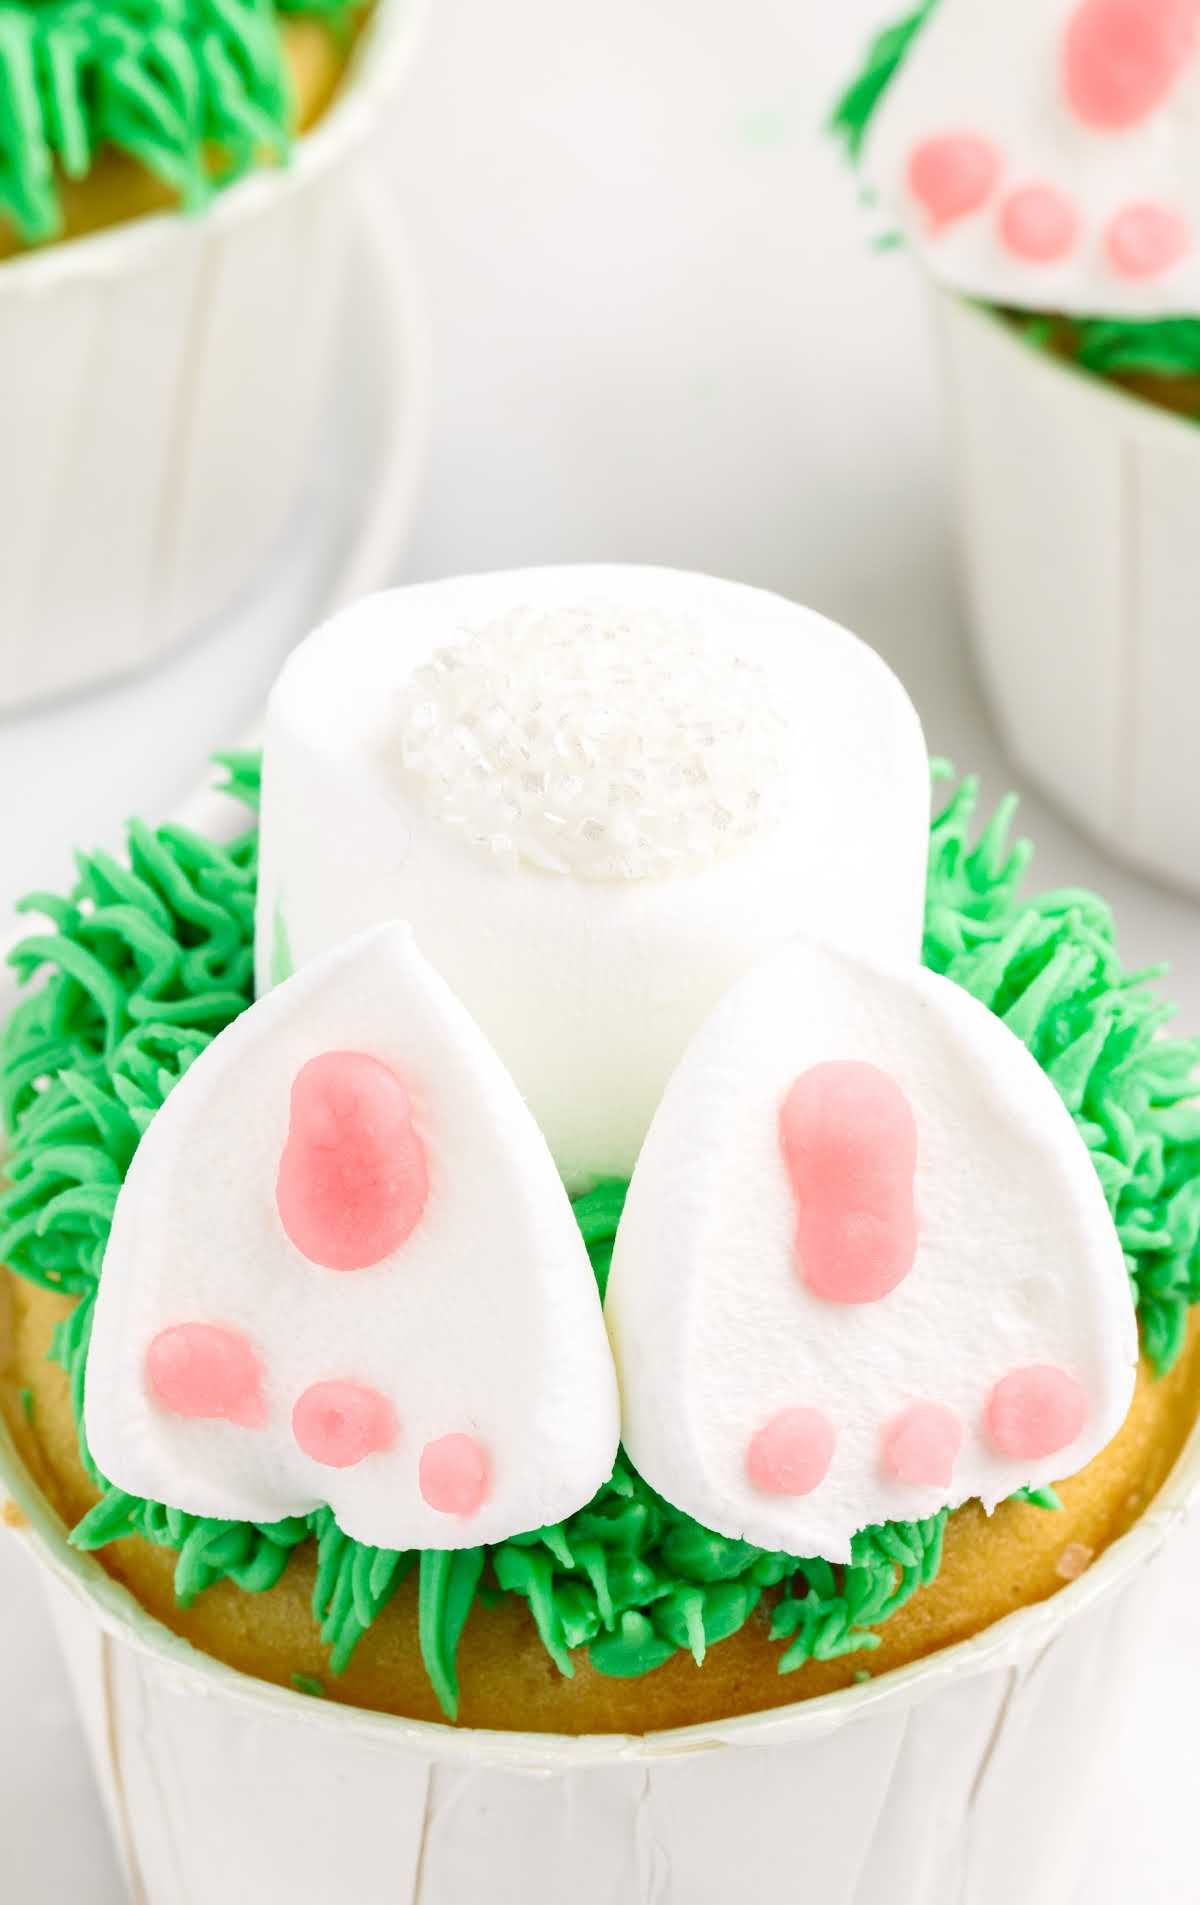
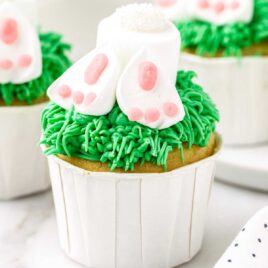
These adorable bunny butt cupcakes are sure to draw some smiles come Easter time! The moist cupcakes have a cute marshmallow bunny butt and feet burrowed into the green icing grass on top of the cupcake that will delight everyone that you serve them to.
For more Easter recipes, our easy Easter cake and easy Easter cookies are two more fun treats to add to the fun of the holiday.
Bunny Butt Cupcakes Ingredients
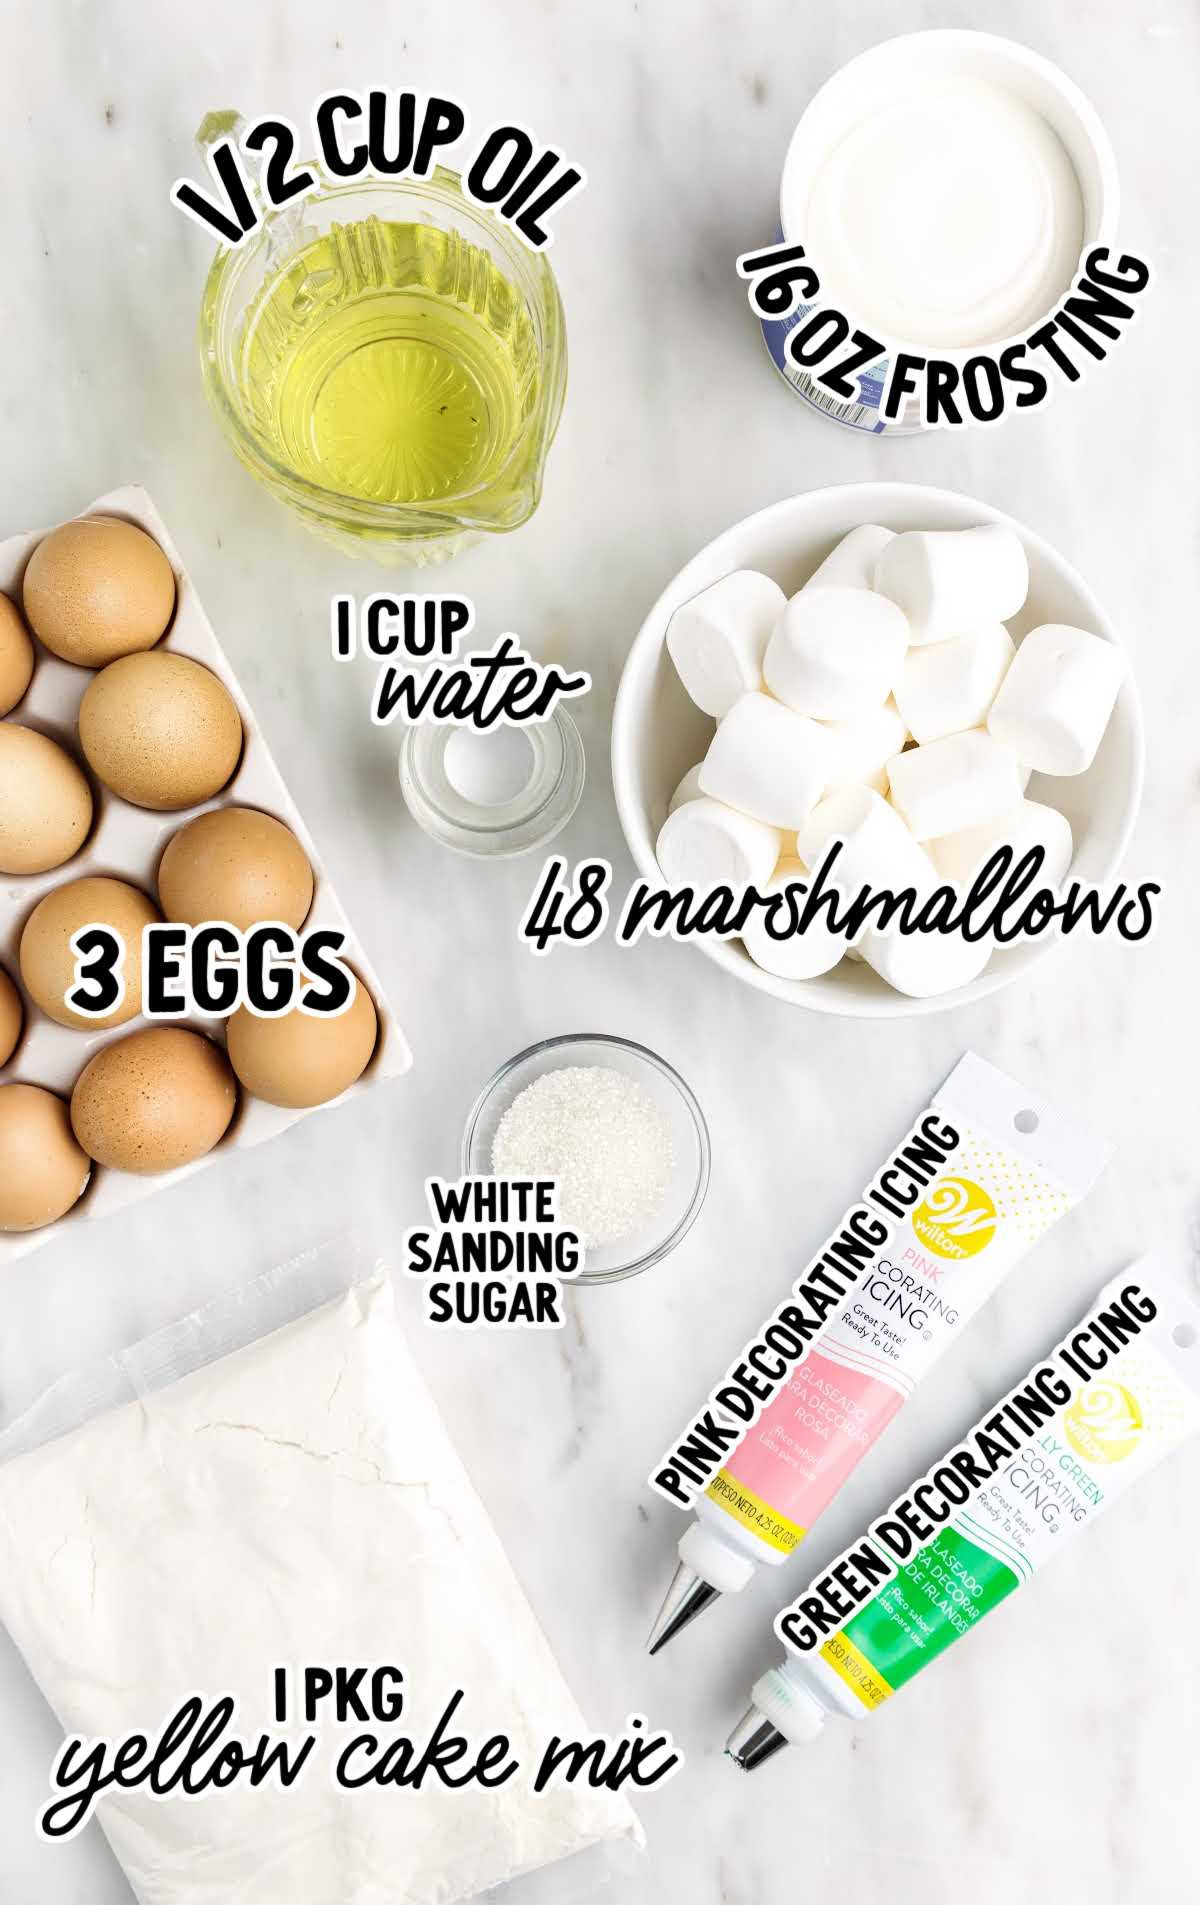
You’ll need:
For the Cupcakes
- 1 package yellow cake mix
- 3 large eggs
- 1 cup water
- ½ cup vegetable oil
For the Bunny Butt Decorations
- 1 tube green decorator’s icing
- 48 regular size marshmallows
- 1 (16-ounce) container of white frosting
- White sanding sugar or sugar crystal sprinkles
- 1 tube pink decorator’s icing
SUBSTITUTIONS AND ADDITIONS
CUPCAKES: You can use your favorite yellow or white cupcake recipe, any flavor of boxed cake mix, or premade cupcakes from the grocery store.
ICING: You can use homemade buttercream or any type of icing that holds its shape enough to pipe. The tubes of green icing are super easy to use as the piping tips screw right onto the tube. You can also use all white icing and tint portions of it to pink and green using gel food coloring. If your icing is too thin to hold its shape, add a bit more powdered sugar.
How To Make This Bunny Butt Cupcakes Recipe
STEP ONE: Preheat the oven according to cake mix instructions. In a large bowl, combine cake mix, eggs, water, and oil. Beat with an electric mixer or stand mixer on medium speed for 2 to 3 minutes until fluffy and well combined.
STEP TWO: Line a muffin tin with cupcake liners and fill each liner ⅔ of the way full with cake batter. Bake according to the cake mix package instructions for approximately 15 minutes in the preheated oven.
OUR RECIPE DEVELOPER SAYS
Use non-stick or parchment paper cupcake liners to make sure your cupcakes don’t stick to the paper.
STEP THREE: Allow cupcakes to cool completely.
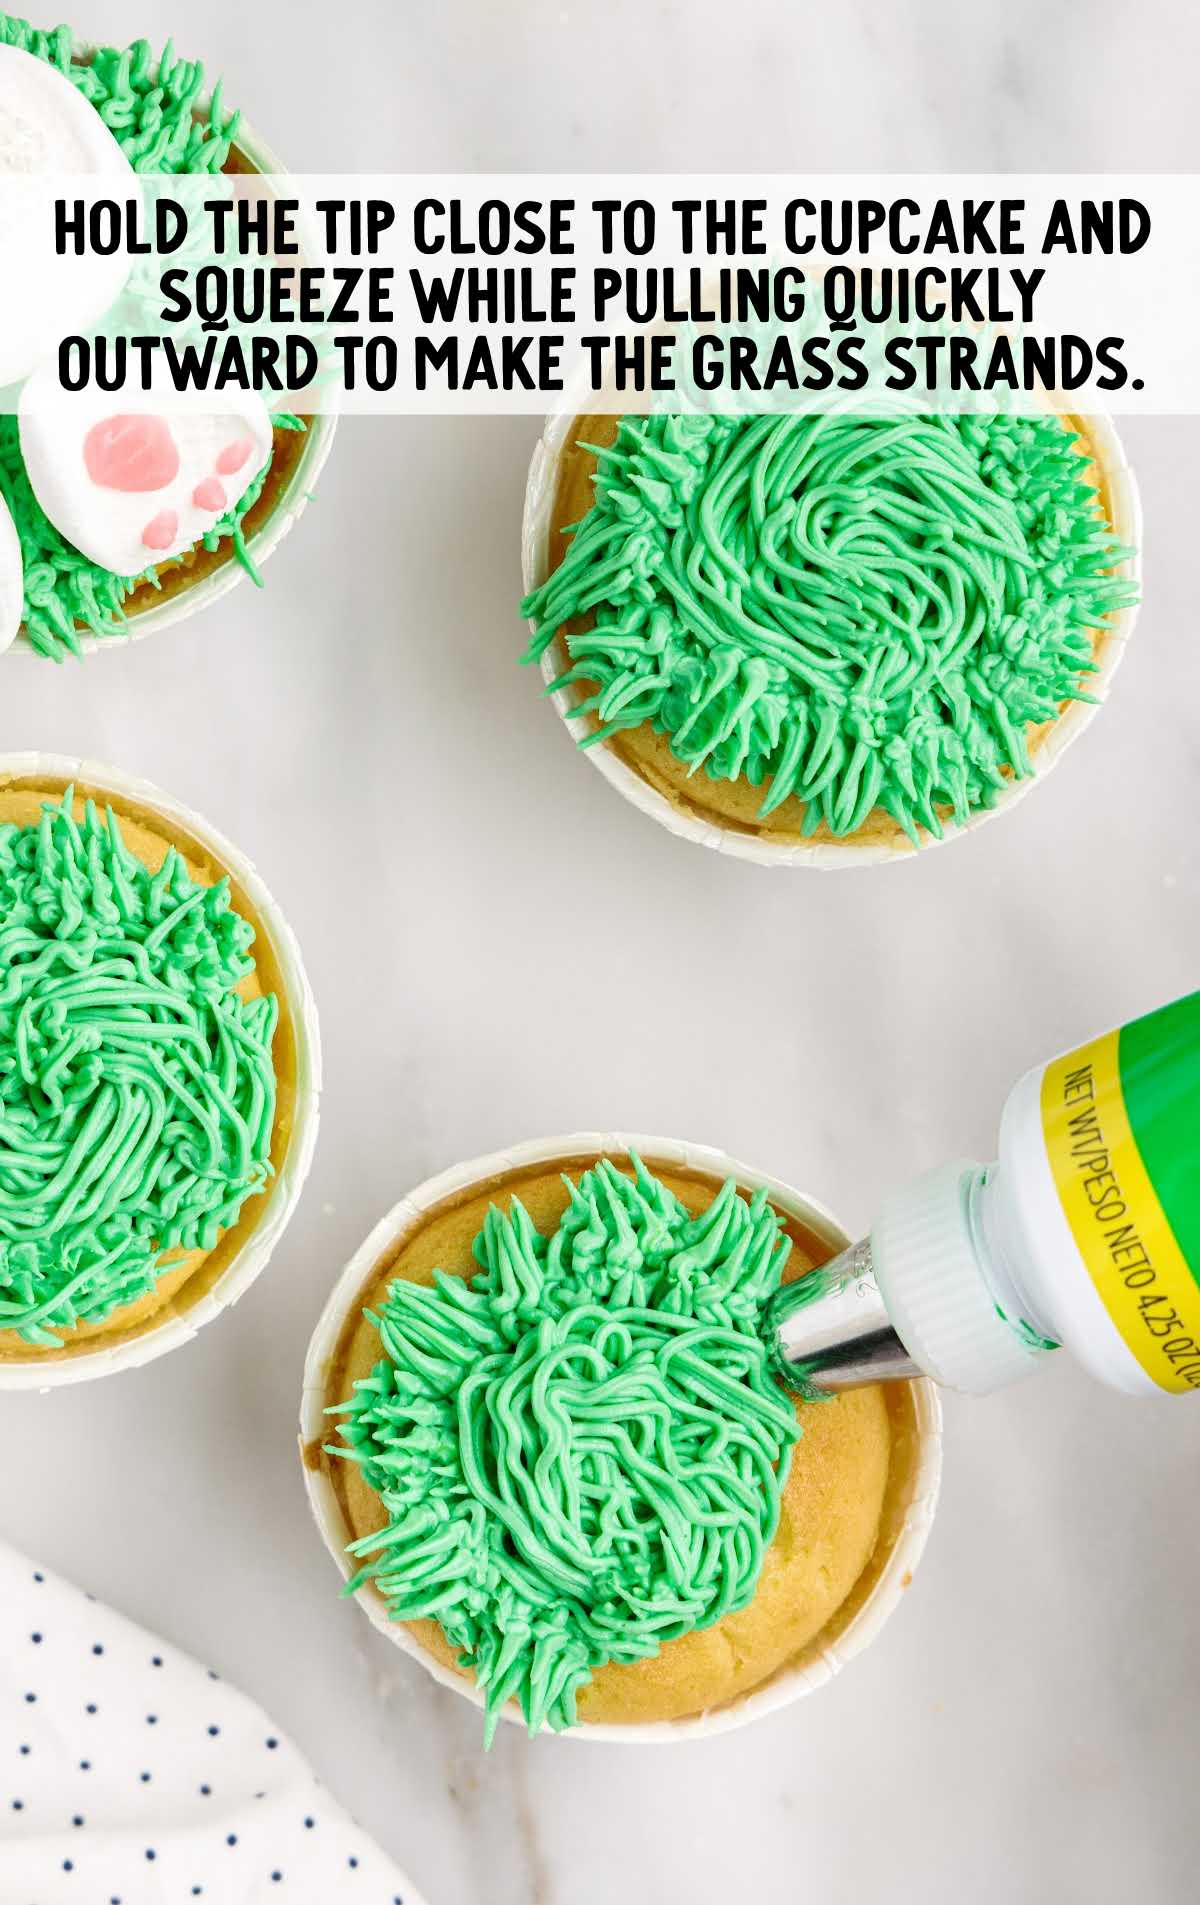
STEP FOUR: Use grass piping tip #233 attached to the green tube of icing or a piping bag fitted with the tip to pipe a mound of green grass on the top of each cupcake. Hold the tip close to the cupcake and squeeze the icing while pulling quickly outward and releasing pressure to make the grass strands.
STEP FIVE: Cut about ⅓ off of the end of one standard marshmallow to make the bunny butt. You can also just leave it whole if you prefer.
PRO TIP:
I liked the proportion of the bunny butt to feet by cutting the bunny butt marshmallow to about ⅔ its size. But it’s not necessary.
STEP SIX: On the intact end of the marshmallow, place a dollop of white icing and dip into the sanding sugar to make a sparkly bunny tail. Press the cut end of the marshmallow into the grass on the cupcake.
STEP SEVEN: Take a second marshmallow and snip on the diagonal to cut off two triangular-shaped marshmallow pieces – these will be the two feet – the cut side of each piece will be the bottoms of the feet.

STEP EIGHT: Place the feet into the grass up against the bunny butt.
STEP NINE: Use a small round piping tip attached to the pink tube of icing to pipe the pads of the feet.
STEP TEN: Repeat for the remaining cupcakes.
How To Serve
These Easter bunny butt cupcakes would be an adorable treat to add to your Easter table this year. Save them for dessert after dinner or even for a snack after the little ones finish their Easter egg hunt.
While you’re planning your Easter dessert table, don’t forget the drinks — this Drunk Bunny Easter Cocktail is just as adorable as everything on this list and takes about five minutes to pull together for the adults at the party.
MORE EASTER RECIPES
Storage
ON THE COUNTER: Store this Easter dessert on the countertop for up to a week.
IN THE FRIDGE: You can also store the cupcakes in the refrigerator in an airtight container for up to 1 week.
IN THE FREEZER: Easter bunny cupcakes can be frozen as well, but we would recommend freezing them undecorated. Thaw on the counter and then at the decorations once you are ready to serve them.
These are just the cutest Easter cupcakes. The cute little bunny butts and pairs of bunny feet are just perfect to serve to little ones and watch their eyes light up with delight.
Fluffy cupcakes topped with playful decorations and a smooth frosting finish. You can find more themed desserts like this in these easter recipes.
Frequently Asked Questions
These cupcakes freeze well but we would recommend waiting to add the bunny butt decorations until you are ready to serve them.
You can use homemade, boxed, or premade cupcakes for this recipe and they will make it a delicious treat.
If you prefer to make your own icing, you can, just make sure it is thick enough to hold up for the grass design. Tint it with gel food coloring for the most vibrant colors.
More Recipes You’ll Love


Bunny Butt Cupcakes
Ingredients
Cupcakes
- 1 package yellow cake mix
- 3 large eggs
- 1 cup water
- ½ cup vegetable oil
Bunny Butt Decorations
- 1 tube green decorator's icing
- 48 regular-size marshmallows
- 16 ounces white frosting
- 1 tube pink decorator's icing
- white sanding sugar or sugar crystal sprinkles
Instructions
- In a mixing bowl, combine cake mix, eggs, water, and oil. Beat with a hand mixer or stand mixer for 2 to 3 minutes until fluffy and well combined.
- Line a muffin tin with cupcake liners and fill each liner ⅔ of the way full. Bake according to the cake mix package instructions for approximately 15 minutes at 350°F.
- Allow cupcakes to cool completely.
- Use grass piping tip #233 attached to the green tube of icing or a piping bag fitted with the tip to pipe a mound of grass on the top of each cupcake. Hold the tip close to the cupcake and squeeze icing while pulling quickly outward and releasing pressure to make the grass strands.
- Cut about ⅓ off of the end of one standard marshmallow to make the bunny butt. You can also just leave it whole.
- On the intact end of the marshmallow, place a dollop of white icing and dip it into the sanding sugar to make a sparkly bunny tail. Press the cut end of the marshmallow into the grass on the cupcake.
- Take a second marshmallow and snip on the diagonal to cut off two triangular-shaped marshmallow pieces – these will be the two feet – the cut side of each piece will be the bottoms of the feet.
- Place the feet into the grass up against the bunny butt.
- Use a small round piping tip attached to the pink tube of icing to pipe the pads of the feet.
- Repeat for the remaining cupcakes.
Notes
- Use non-stick or parchment paper cupcake liners to make sure your cupcakes don’t stick to the paper.
- I liked the proportion of the bunny butt to feet by cutting the bunny butt marshmallow to about ⅔ its size. But it’s not necessary.
Nutrition


Comments
Gloria says
These are so cute, what a fun idea for Easter!