
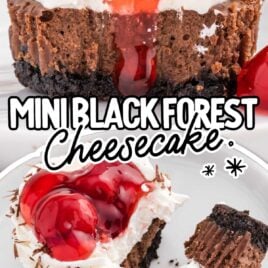

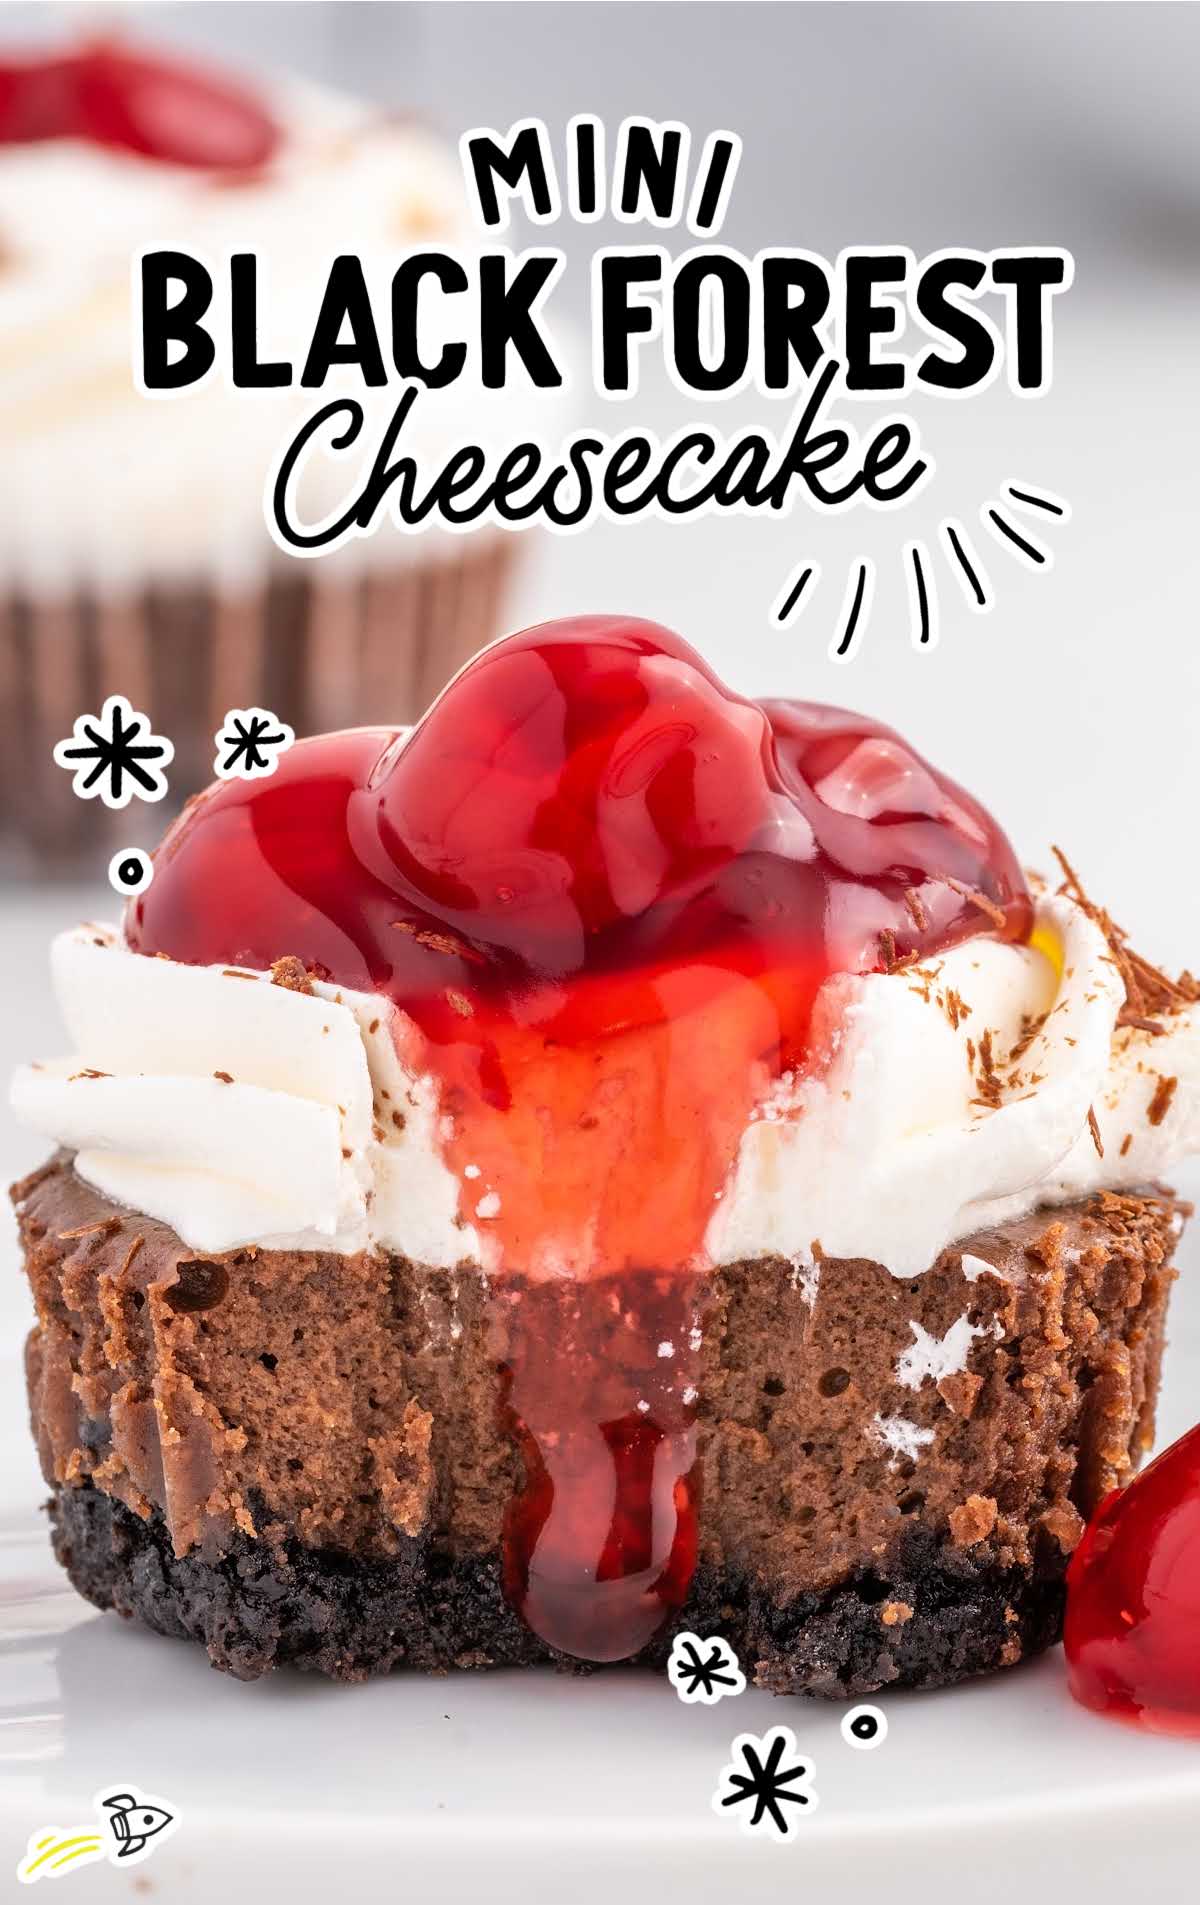
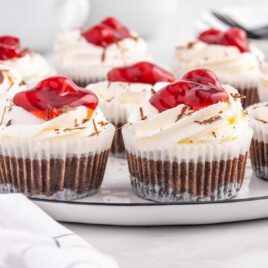
This mini black forest cheesecake looks like something you would order from a gourmet bakery and is one of the most delicious desserts you will ever eat. The chocolate and cherry flavors pair perfectly together, and the creamy cheesecake is the perfect finishing touch.
Mini Black Forest Cheesecake Ingredients
Mini black forest cheesecakes feature layers of chocolate-flavored cheesecake topped with decadent toppings like juicy cherries, dark chocolate shavings, and fluffy whipped cream.
Perfectly sized so you can indulge without feeling too guilty afterward, these mini treats offer the perfect balance between sweet and tart, creamy and crunchy.
To make these little decadent treats, you’ll need:
For The Crust:
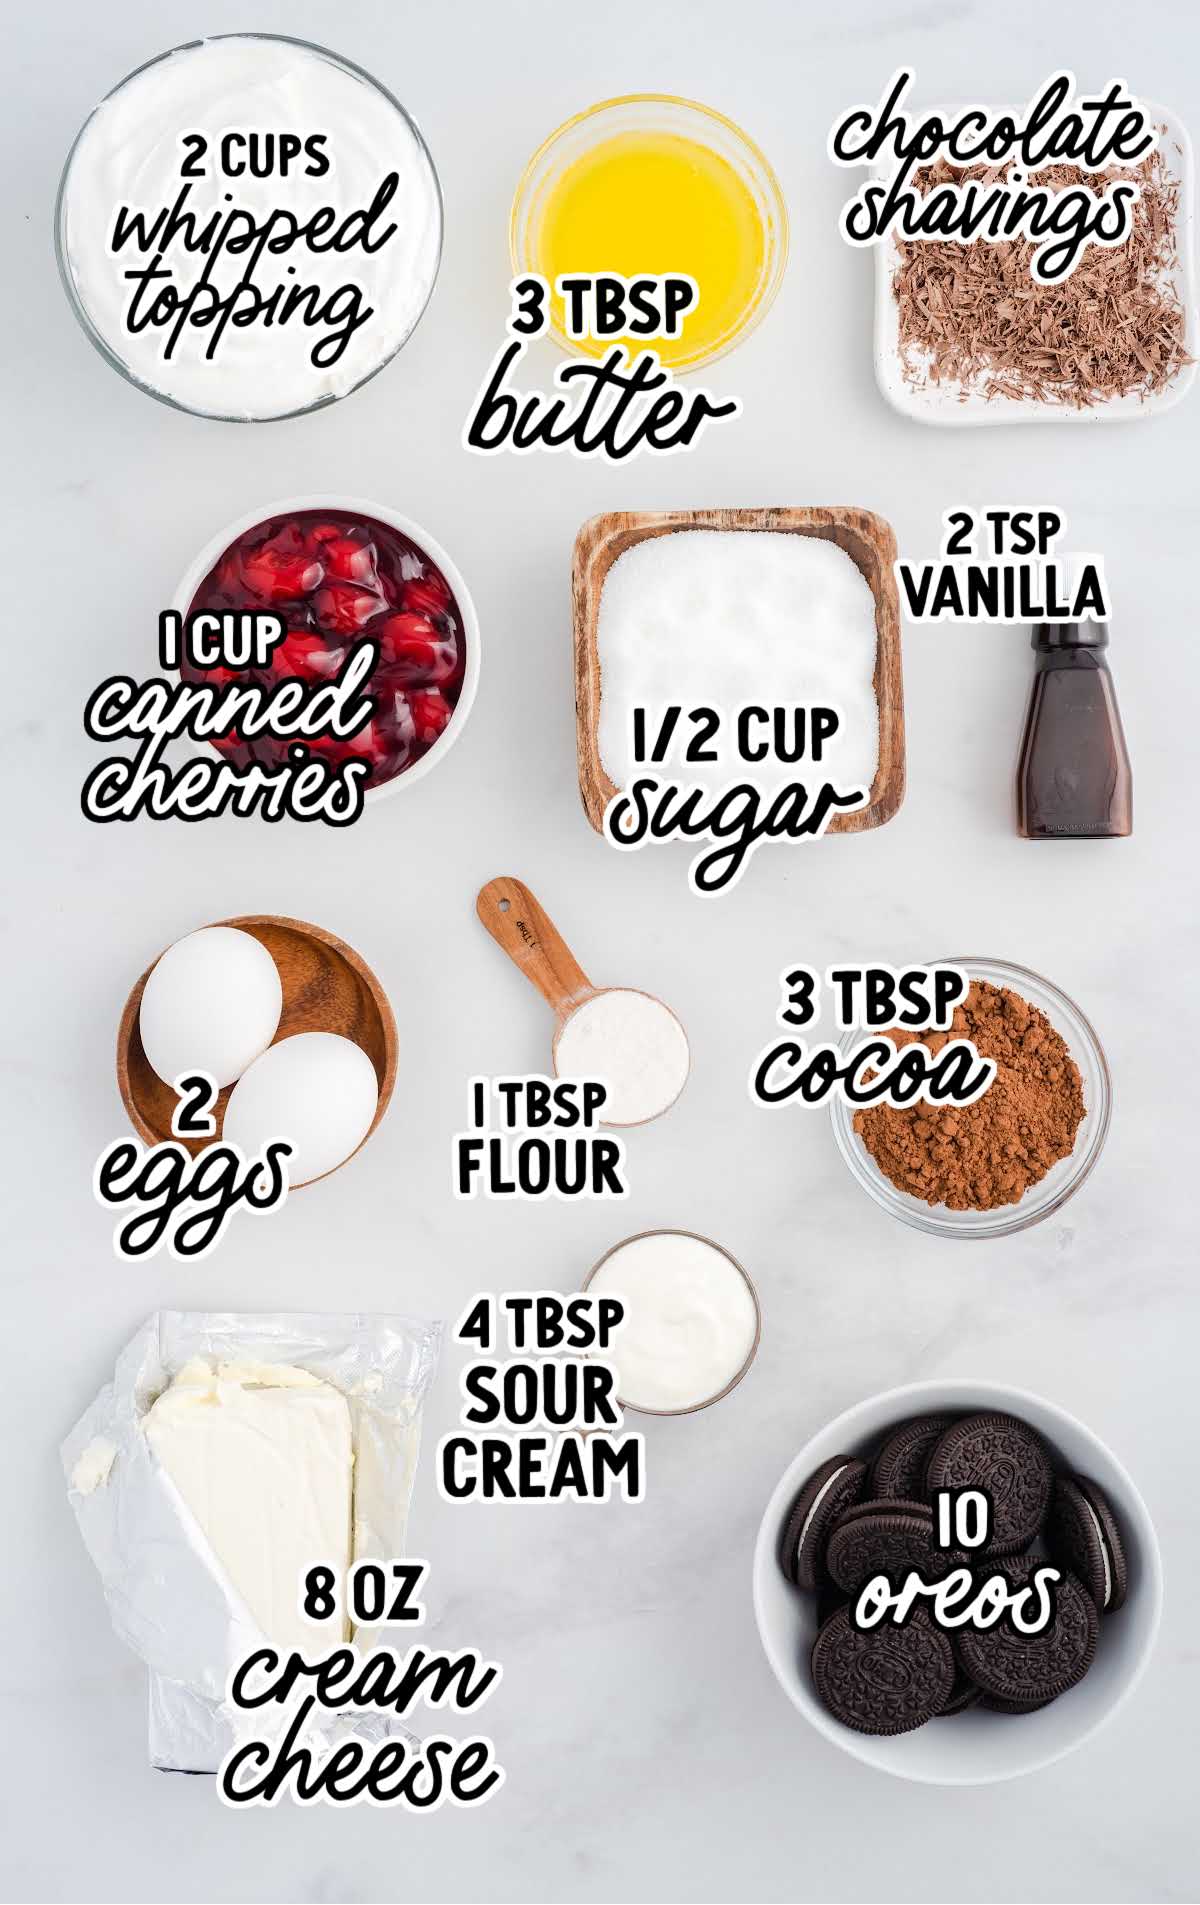
- 10 Oreos (or generic version) with the cream centers
- 3 tablespoons of salted sweet cream butter, melted and cooled
For The Chocolate Cheesecake Filling:
- ½ cup of granulated sugar
- 3 tablespoons of unsweetened cocoa powder
- 1 tablespoon of all-purpose flour
- 1 (8-ounce) package of cream cheese, softened
- 4 tablespoons of sour cream
- 2 teaspoons of pure vanilla extract
- 2 large eggs, room temperature
For The Topping:
- 2 cups of whipped topping, thawed
- 1 cup of canned cherry pie filling
- Chocolate shavings (optional garnish)
Substitutions And Additions
COCOA POWDER: You can substitute unsweetened Dutch cocoa powder or Hershey’s special dark unsweetened cocoa powder in this recipe.
FLOUR: You can use cornstarch in place of the all-purpose flour.
CHOCOLATE COOKIE CRUST: If you’re looking to switch up the crust, graham crackers or chocolate graham crackers can be used instead of chocolate cookies for a slightly different flavor profile.
You can also add a pinch of ground nuts (like almonds or hazelnuts) to the crust for some extra crunch and a nutty undertone.
VANILLA EXTRACT: Swap out the vanilla extract for almond extract to give your mini Black Forest cheesecakes a nuttier and more intense flavor.
Alternatively, try a touch of coffee extract for a delightful mocha twist.
CHERRY PIE FILLING: While the classic cherry pie filling is a must for Black Forest flavor, you can get creative with different fruit toppings.
Blueberry, raspberry, or mixed berry pie fillings can be used for a unique fruity twist that complements the cheesecake base.
How To Make This Mini Black Forest Cheesecake Recipe
This cheesecake recipe comes together in delicious layers.
First, the crunchy Oreo crust forms the bottom of this dessert. Next, you will create the creamy chocolate cheesecake filling.
Once baked, the cheesecakes are topped with fluffy whipped cream, juicy cherry pie filling, and rich chocolate shavings.
Our step-by-step instructions below will walk you through making these treats.
STEP ONE: Preheat the oven to 325°F. Line a regular muffin tin with cupcake liners. Lightly spray the liners with nonstick cooking spray. Set it aside.
OUR RECIPE DEVELOPER SAYS
Parchment paper liners or foil-lined wrappers are the easiest to peel from the cheesecake filling.
STEP TWO: Add the Oreos to either a food processor or a gallon ziplock bag. If you are using a food processor, pulse until the cookies are crumbs.
If using the ziplock bag, you can pound the cookies with either a mallet or a rolling pin.
STEP THREE: Add the crushed Oreo cookie crumbs and the melted and cooled butter to a small mixing bowl. Stir to combine completely.
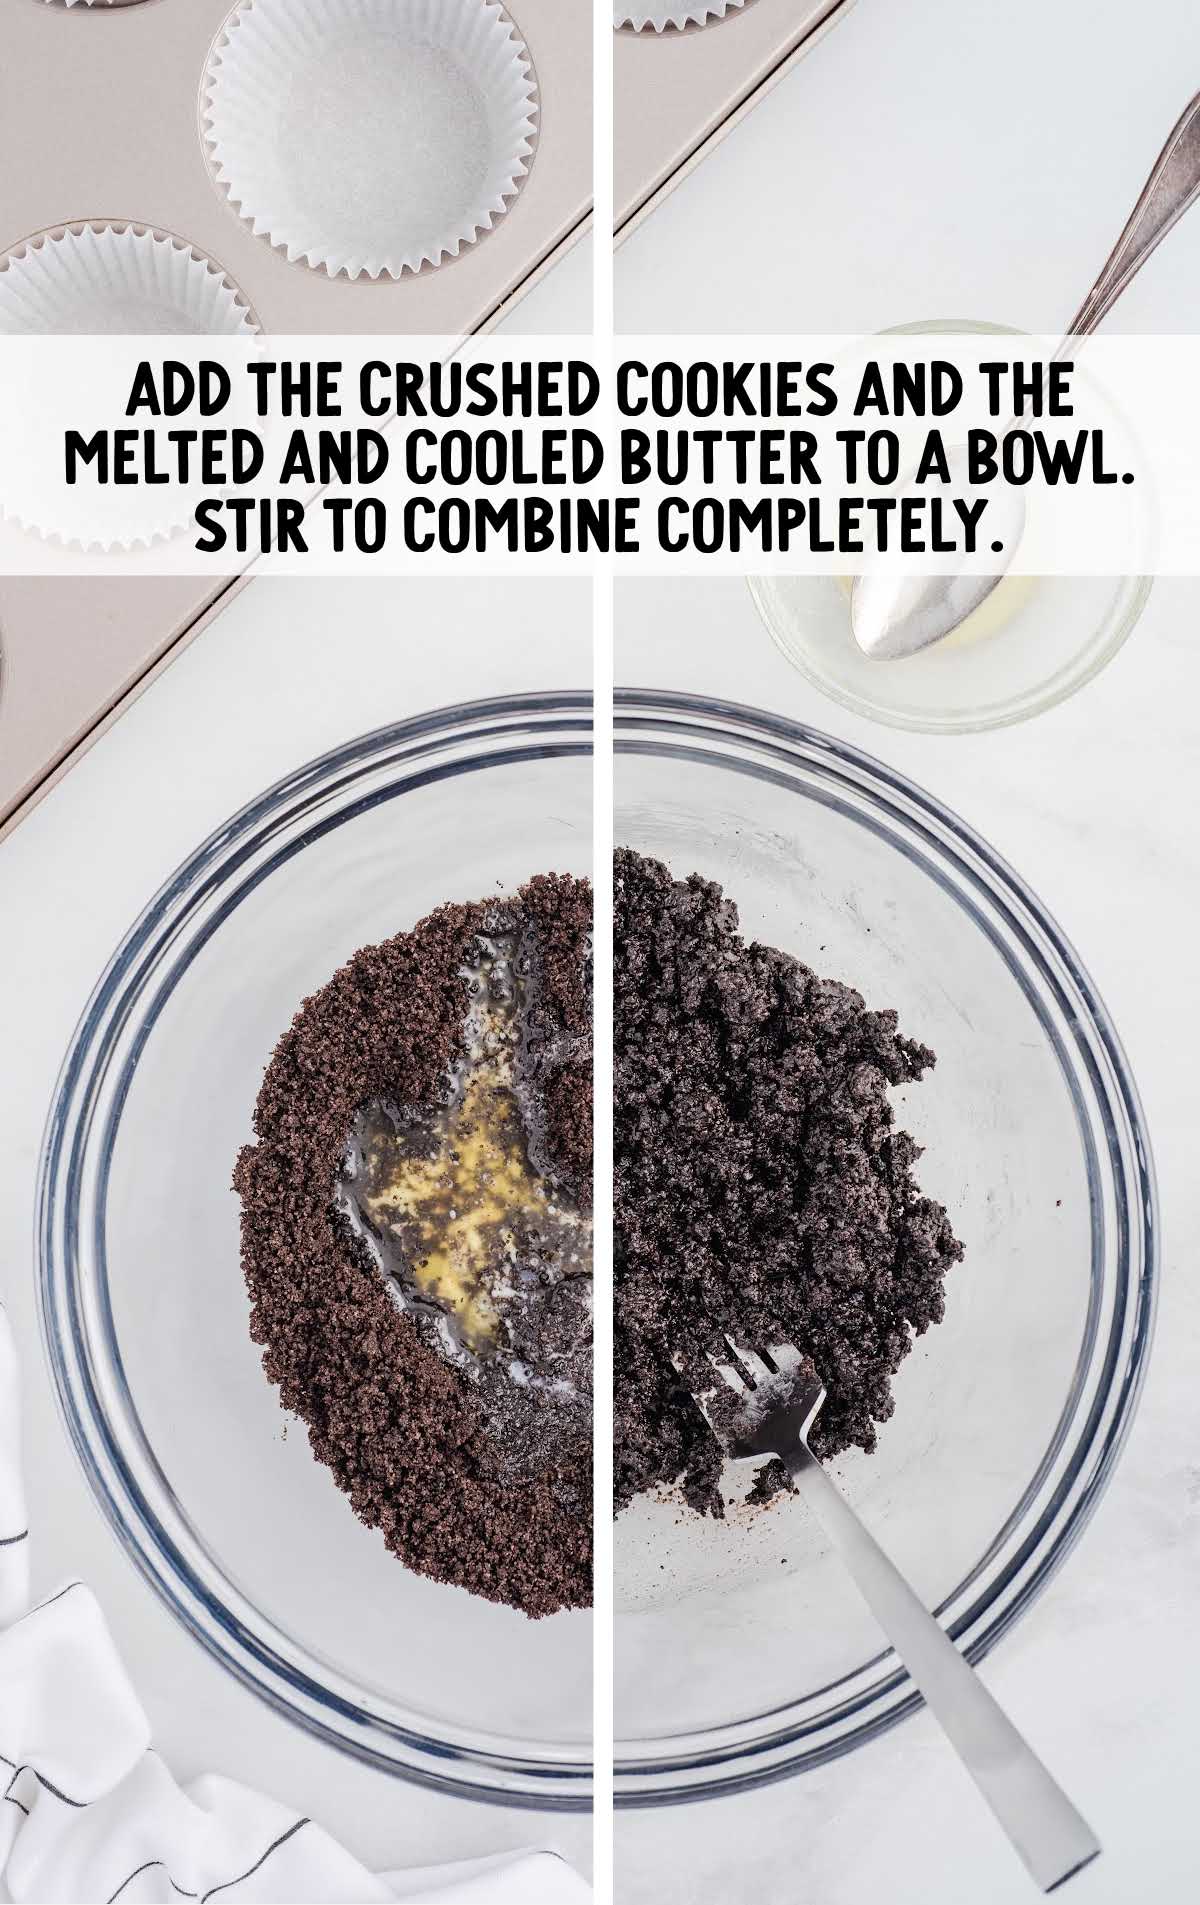
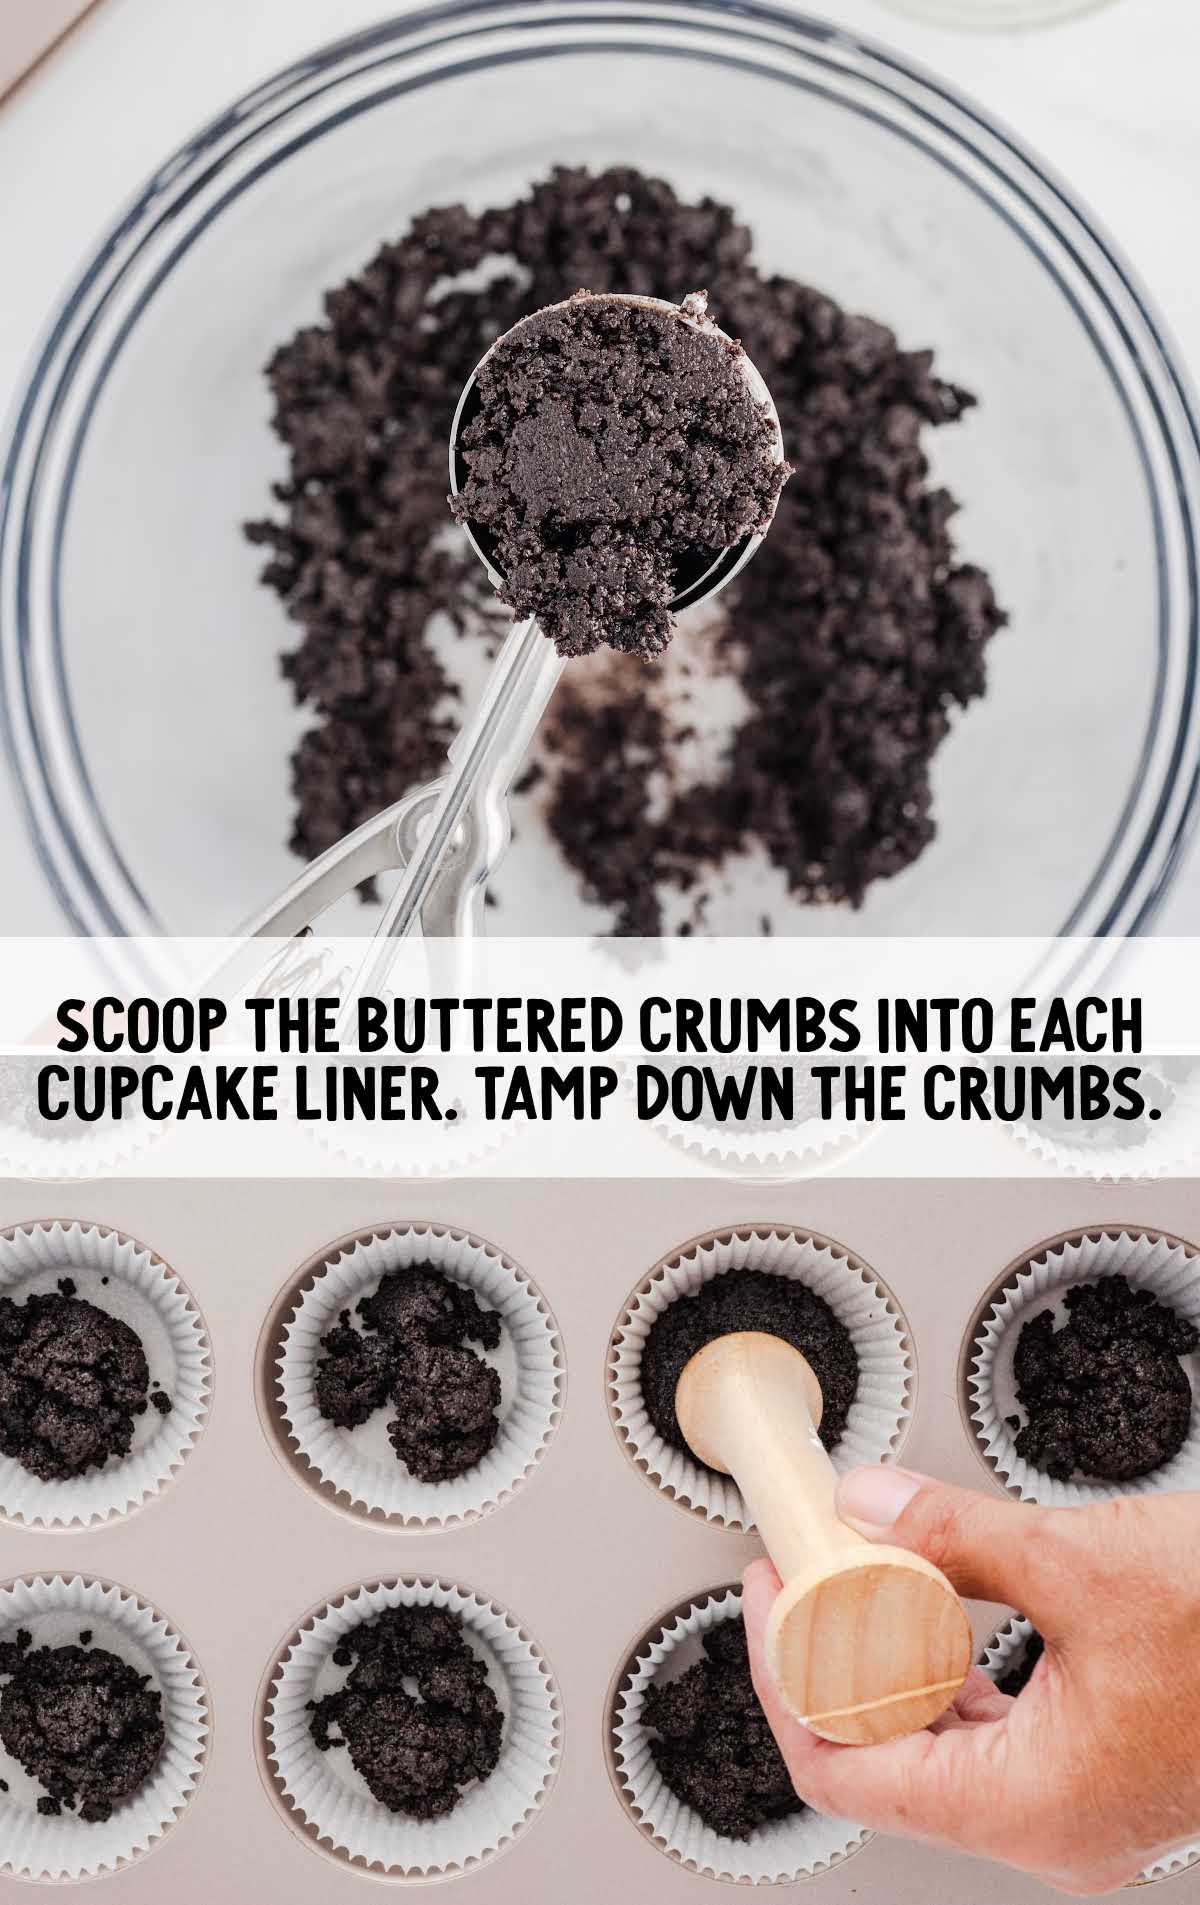
STEP FOUR: Use a one tablespoon cookie scoop and scoop the buttered crumbs into each cupcake liner. Tamp down the crumbs with the back of a spoon.
STEP FIVE: Add the sugar, cocoa powder, and flour to a small bowl. Whisk to combine. Set it aside.
STEP SIX: Beat together the softened cream cheese, sour cream, and vanilla for 1½ to 2 minutes until completely smooth.
Use a stand mixer or a medium-sized mixing bowl and an electric hand mixer on medium-high speed.
PRO TIP:
Always make sure that your cream cheese is at room temperature. This will help ensure that there are no lumps in your cream cheese mixture.
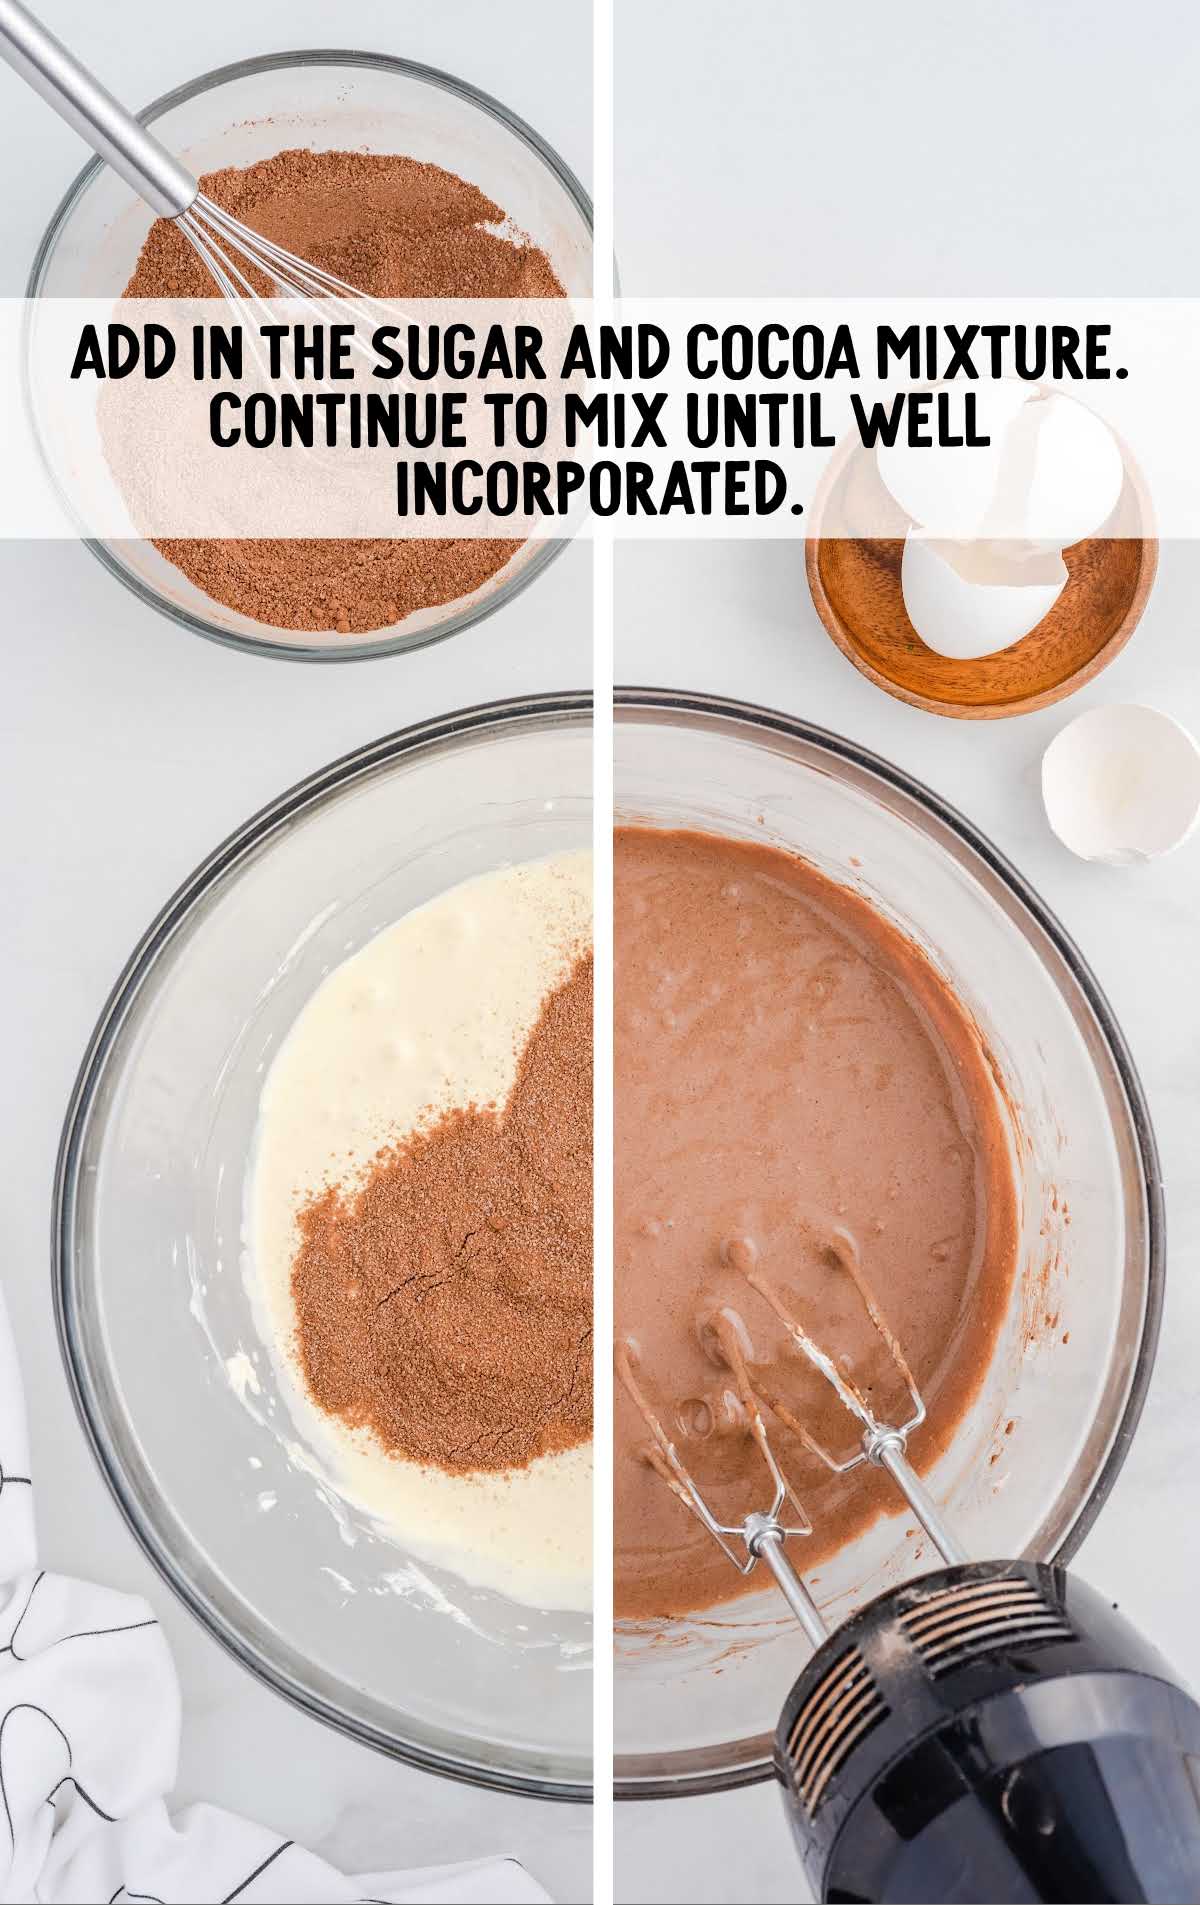
STEP SEVEN: Add in the sugar and cocoa mixture. Continue to mix for another 1 to 1½ minutes until well incorporated.
STEP EIGHT: Lower the electric mixer speed to low speed and add the eggs, one at a time, beating well after each egg.
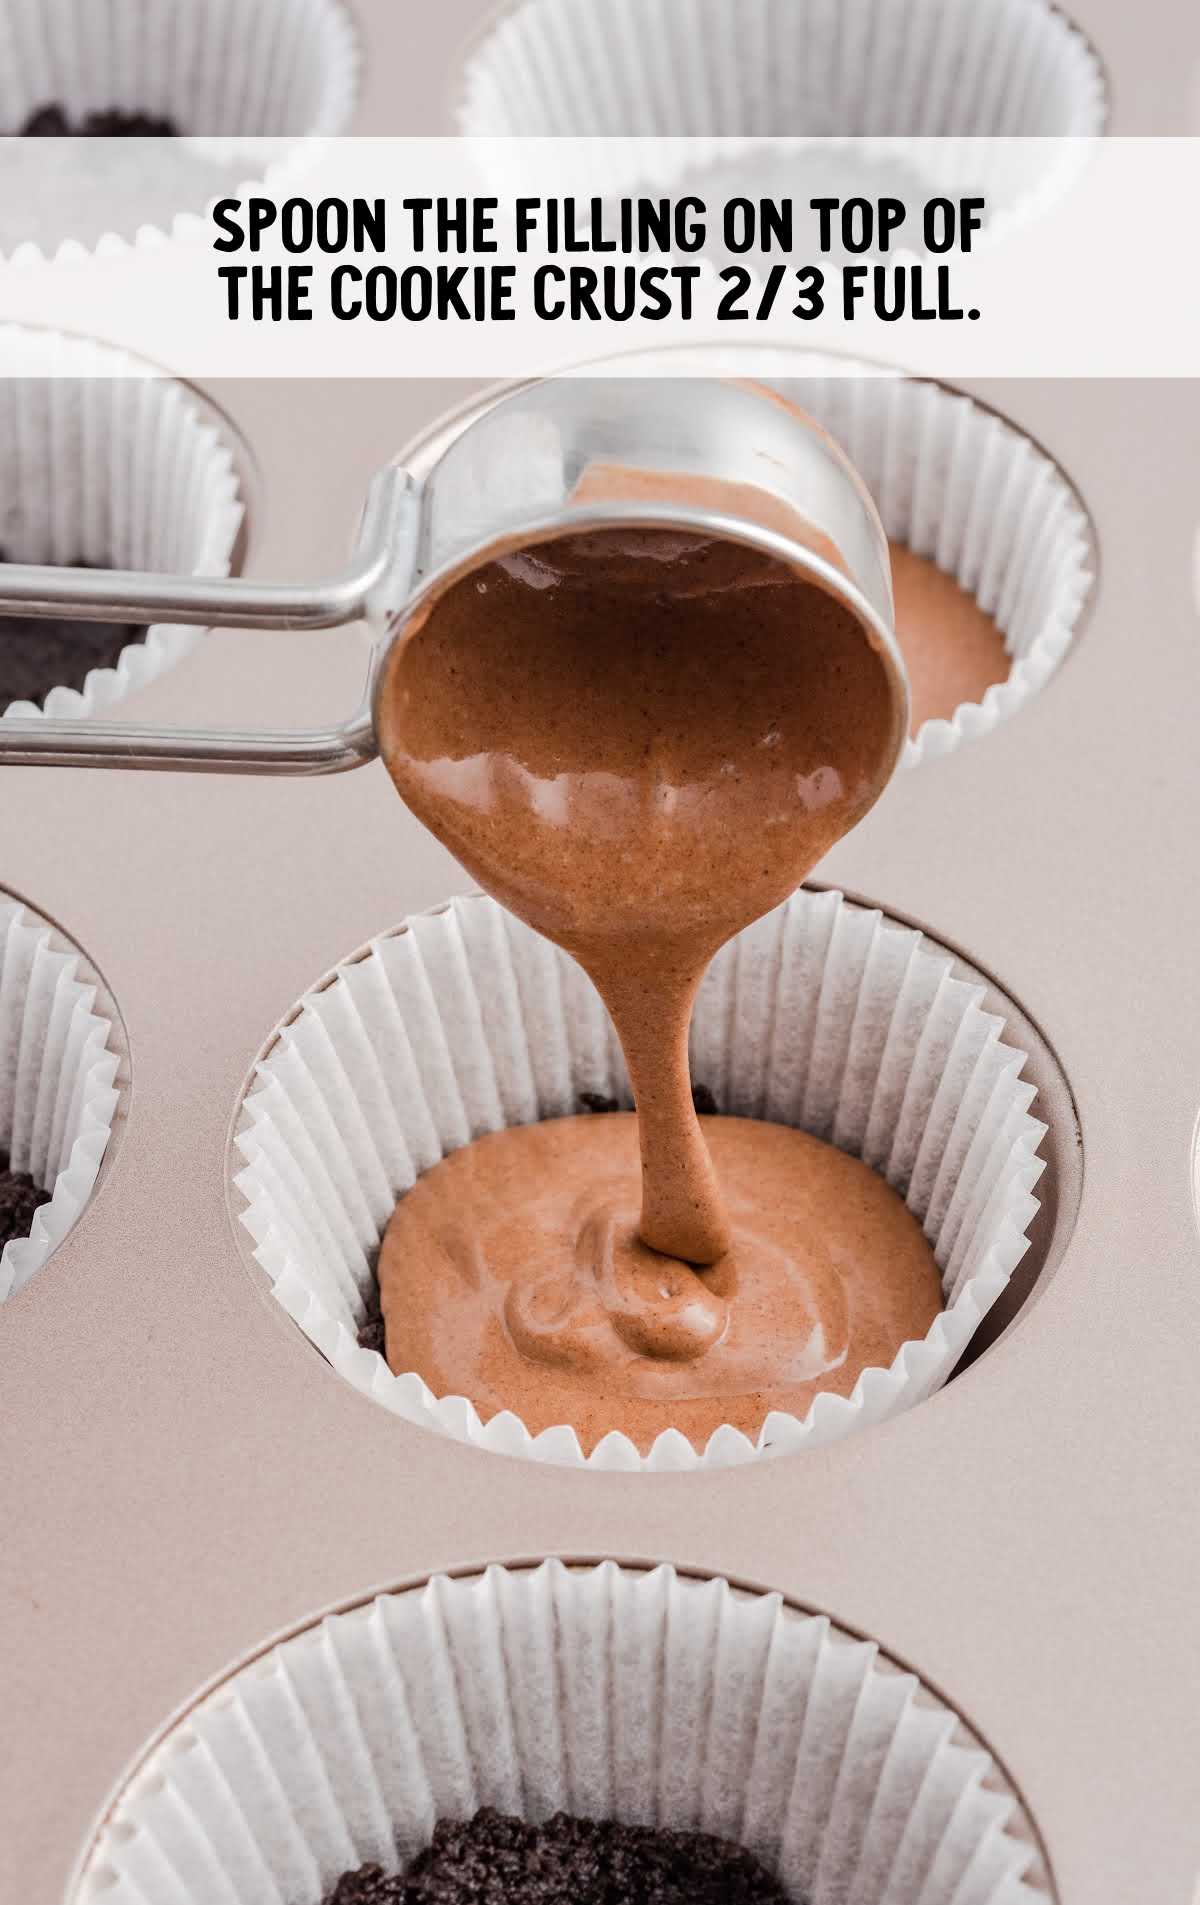
STEP NINE: Divide the batter on top of the cookie crust two-thirds full (2 tablespoons).
STEP TEN: Bake for 20 minutes. Turn the oven off and leave the pan in the oven, with the oven door slightly ajar for a further five minutes.
Remove the pan from the oven and allow the cheesecakes to rest for 30 minutes. Place the muffin pan in the fridge and let the cheesecakes chill for two hours.
PRO TIP:
Oven temperatures vary and may need to be recalibrated periodically to ensure they are accurate. Make sure to keep a close eye on your cheesecake as the suggested baking time approaches.
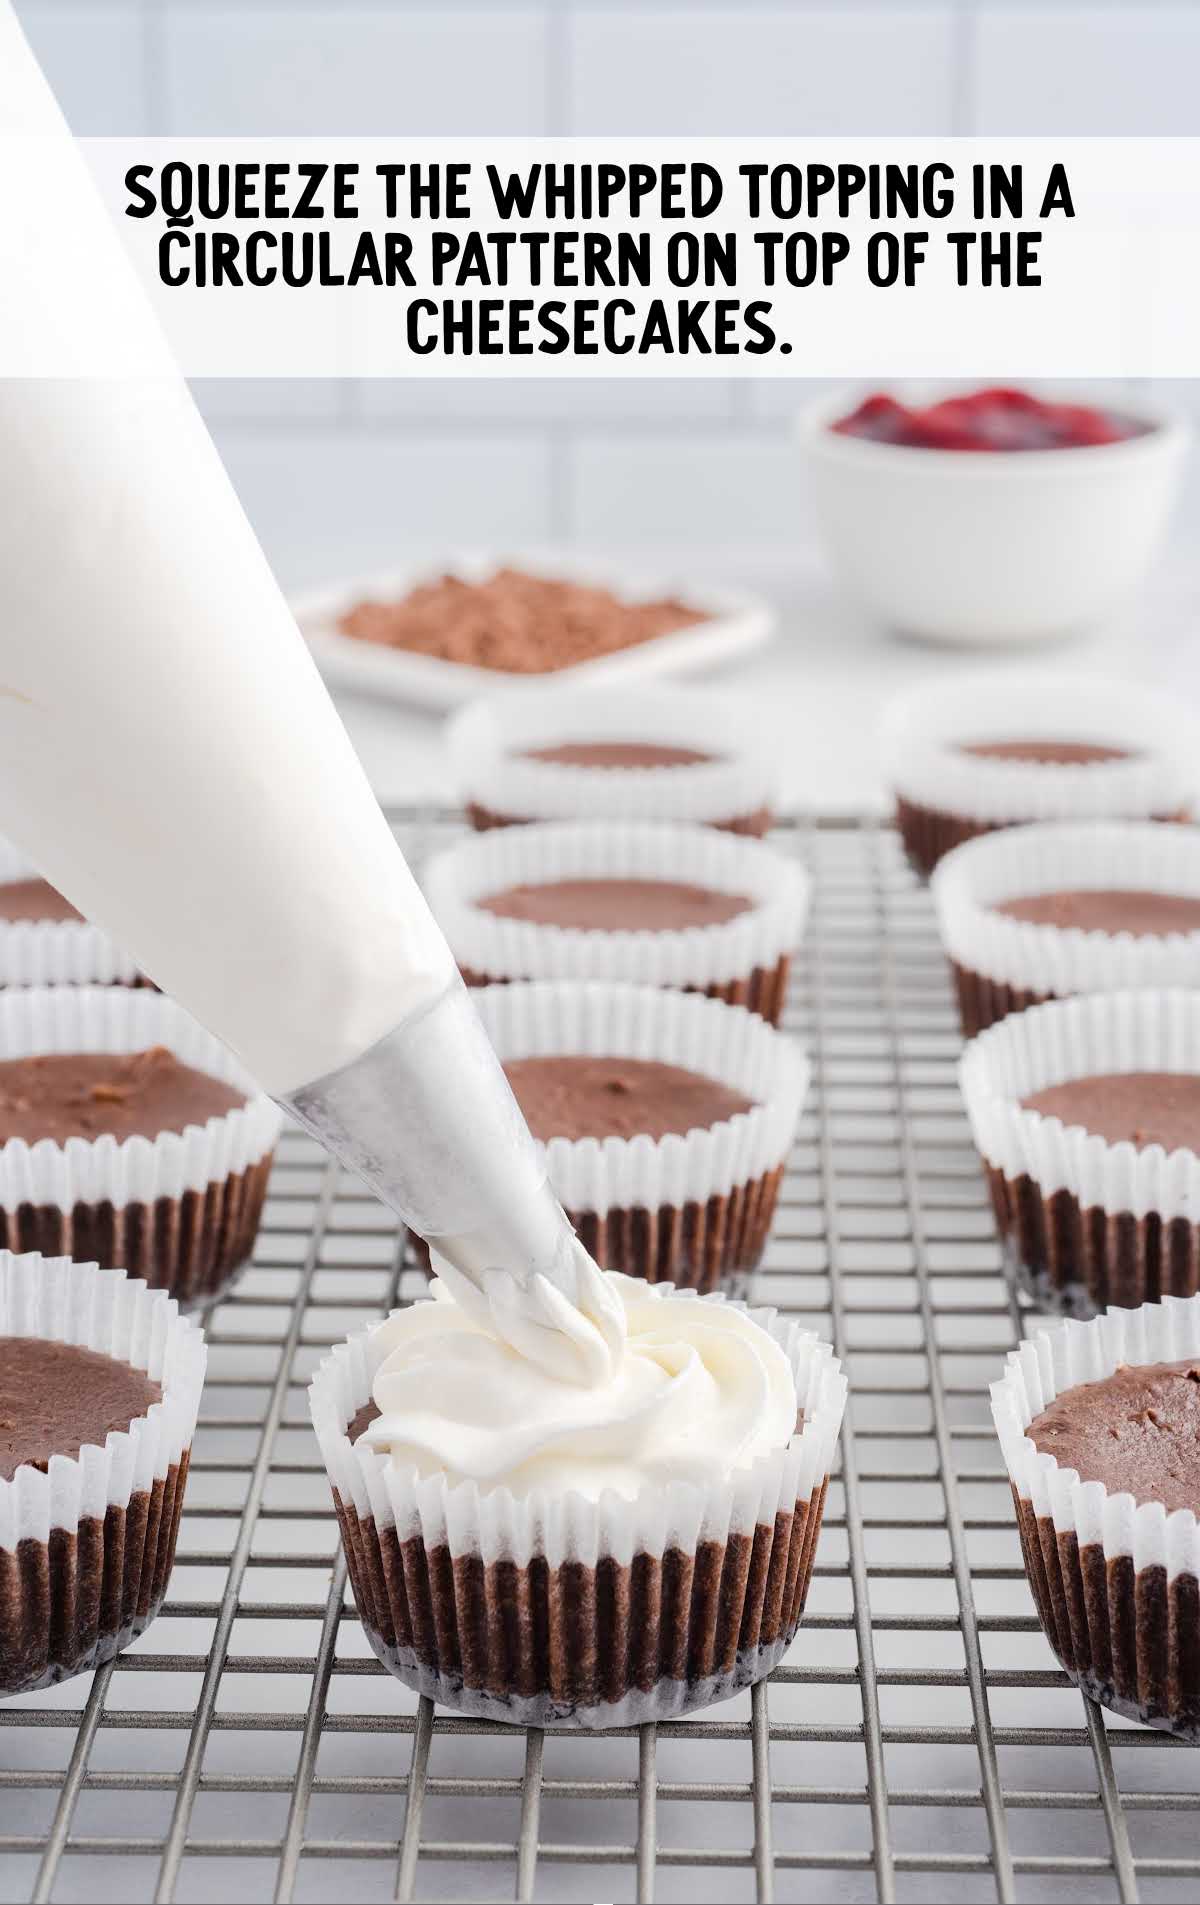
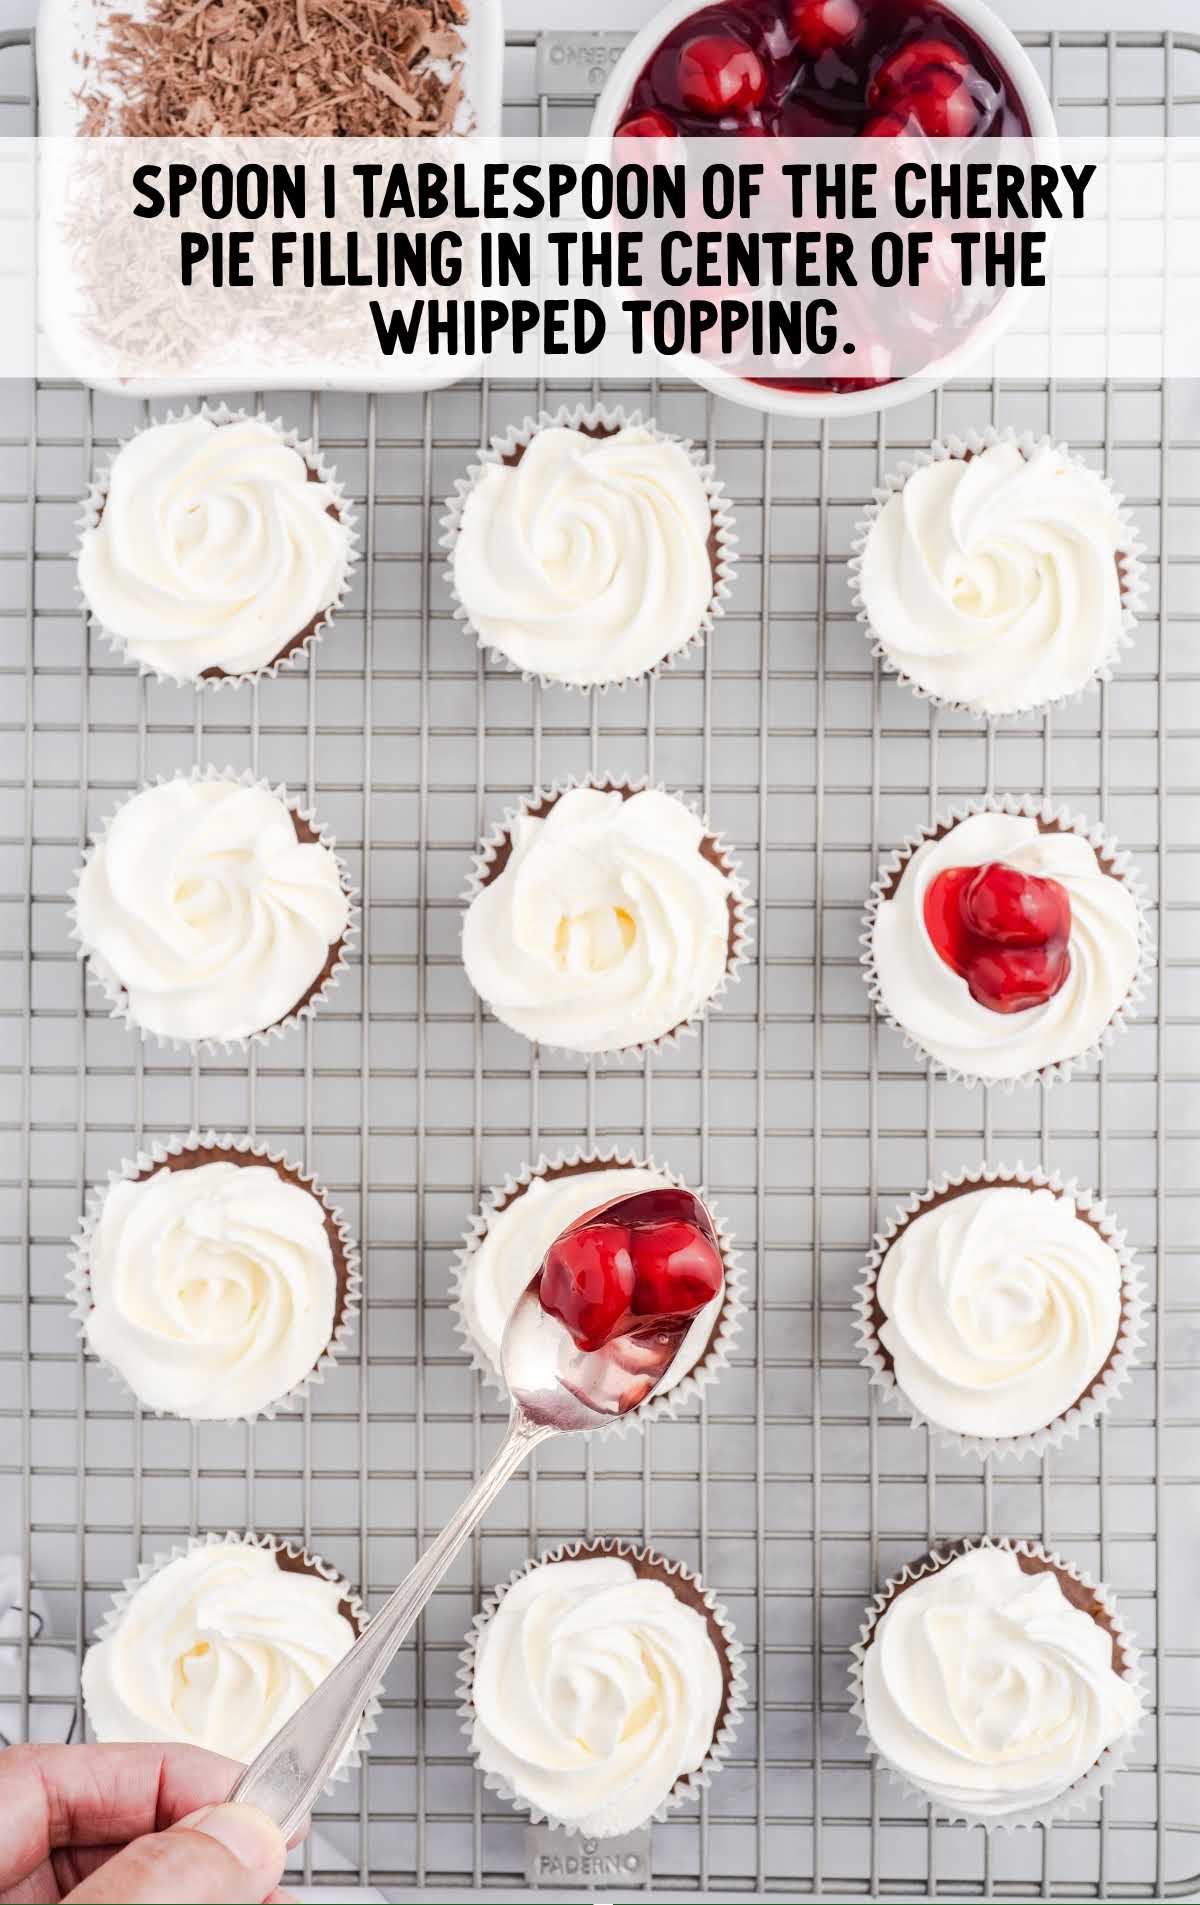
STEP ELEVEN: Just before serving, add the whipped topping to a disposable decorator’s bag fitted with a star-shaped decorator’s tip or a quart-size ziplock bag with a corner snipped off.
Using even and steady pressure, squeeze the whipped topping in a circular pattern on top of the cheesecakes.
STEP TWELVE: Spoon one tablespoon of the cherry filling in the center of the whipped topping.
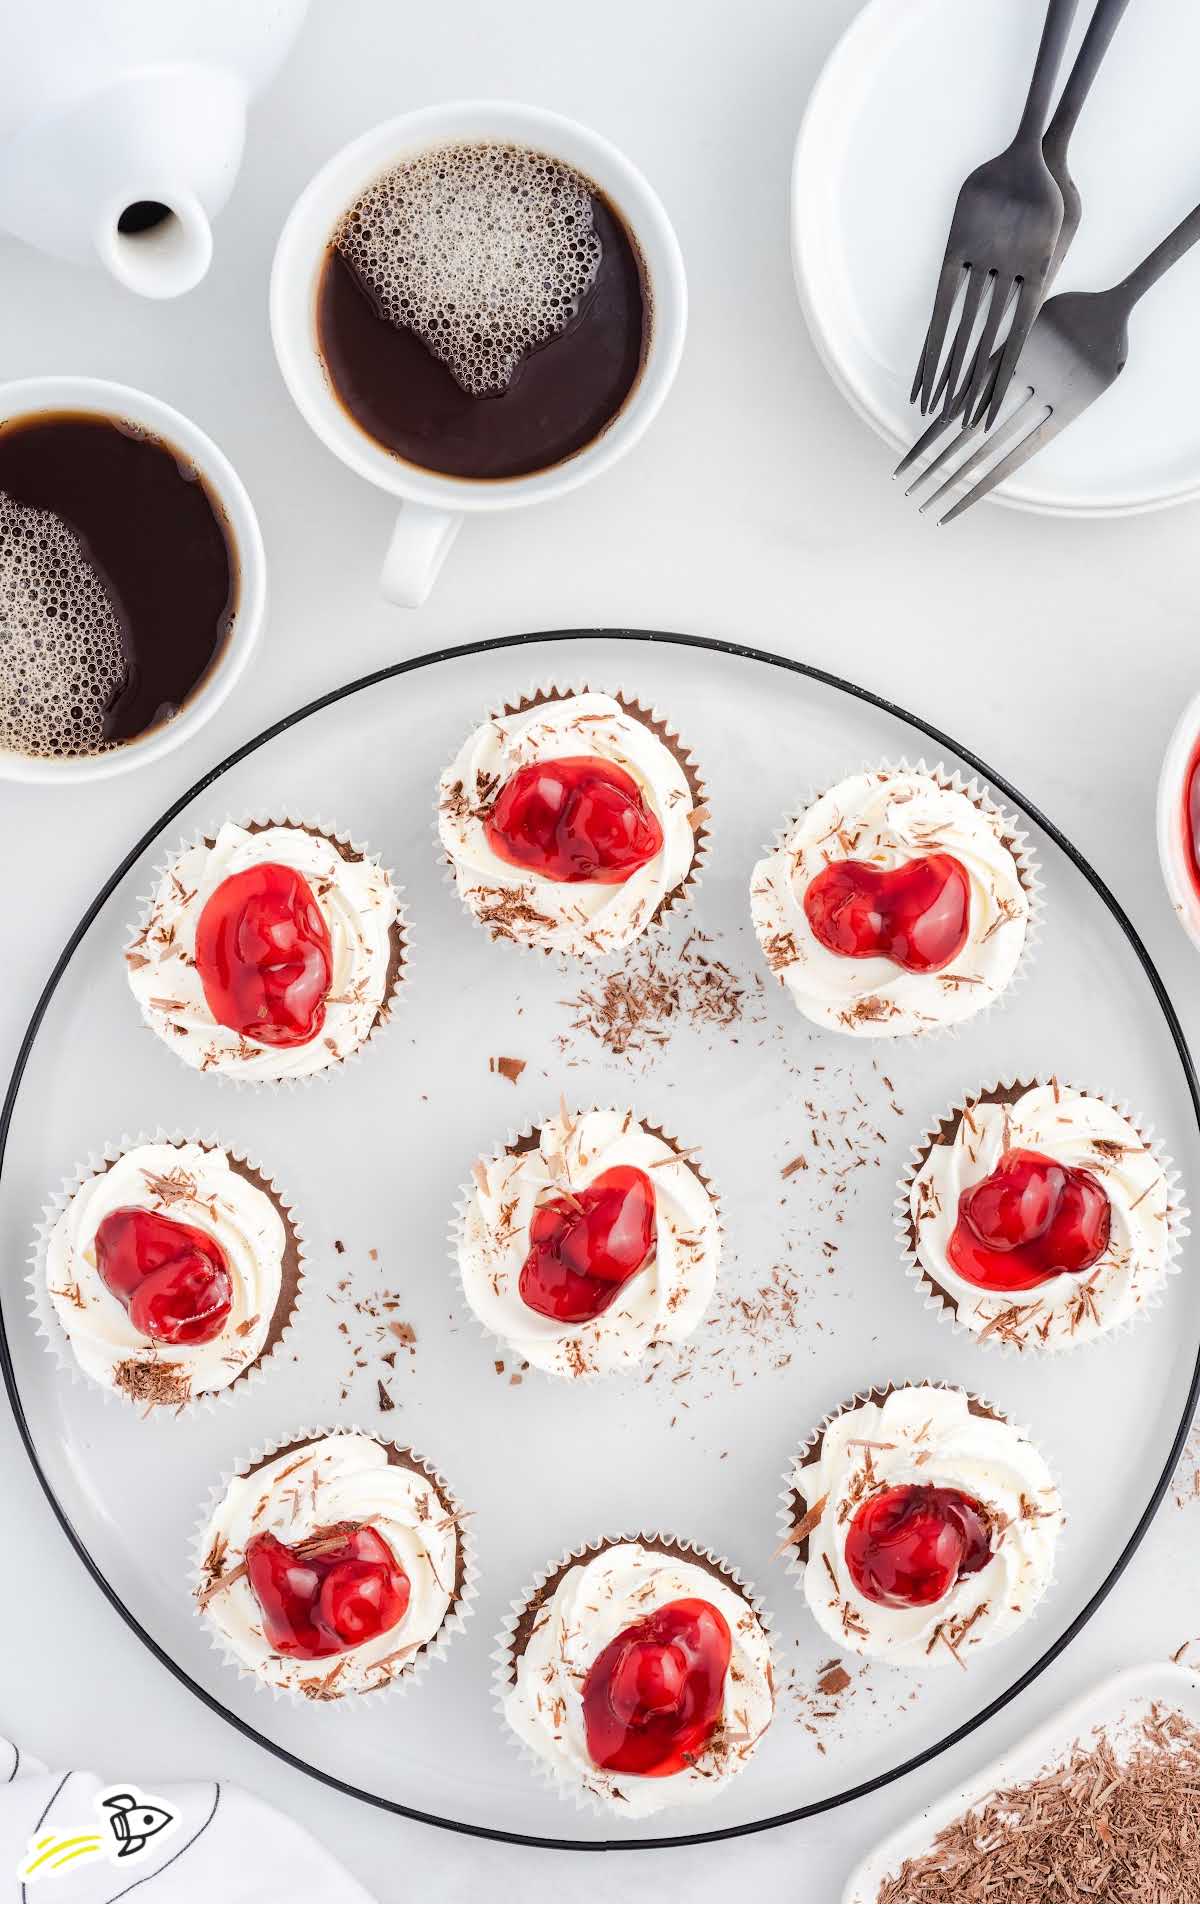
Keep in the refrigerator until ready to serve. Add chocolate shavings before serving.
How To Serve
Delight your sweet tooth with this delicious cheesecake recipe. Serve up scoops of creamy vanilla ice cream on the side to contrast the tangy sweetness of the cake.
Pair it with a mug of homemade hot chocolate or a pumpkin spice latte for an extra indulgent drink.
If you enjoy easy-to-serve treats, this roundup of mini desserts has plenty of inspiration. Our mini apple cheesecakes and Reese’s peanut butter cup mini cheesecakes are two more decadent recipes that we know you will love.
MORE CHEESECAKE RECIPES
Storage
Here’s what you need to know about storing your cheesecakes to keep them fresh and delicious.
MAKE AHEAD: If you’re planning ahead, you can prepare these mini Black Forest cheesecakes in advance.
Simply follow the recipe up to the point of adding the cherry pie filling and whipped cream topping.
Once you’ve assembled the cheesecakes in their cupcake liners, cover them tightly with plastic wrap or aluminum foil and place them in the refrigerator.
They can be stored in the fridge for up to 24 hours before adding the toppings for serving.
IN THE FRIDGE: Store any leftover cheesecakes in an airtight container in the refrigerator for up to four days.
IN THE FREEZER: You can freeze the un-topped cheesecakes for up to one month. Store them in an airtight container labeled with the best-by date.
Allow the cheesecakes to thaw overnight in the refrigerator before topping and serving.
Why We Love This Recipe
IRRESISTIBLE FLAVOR COMBINATION: This recipe combines the classic flavors of Black Forest cake with the creamy indulgence of cheesecake. The rich chocolate cookie crust, velvety cheesecake filling, and tart cherry topping create a perfect harmony of sweet and tangy flavors that are simply irresistible.
MINI AND ADORABLE: These mini cheesecakes are not only delicious but also adorable. Their individual serving sizes make them ideal for portion control, and they’re perfect for serving at gatherings, parties, or as a special treat for yourself.
As rich and delicious as a black forest cake, this mini black forest cheesecake recipe is the perfect way to indulge. The rich chocolate, creamy cheesecake, and tart cherries work together to create a heavenly dessert that will delight your senses.
FREQUENTLY ASKED QUESTIONS
You can prepare these little cheesecakes ahead of time. Leave off the topping and wrap it in plastic wrap before storing it in the freezer. Thaw in the fridge overnight and top with cherries and whipped topping when you are ready to serve it.
If the center looks set but still jiggles when you move the pan, your cheesecake is done.
To soften the cream cheese quickly, cut the cream cheese into cubes and place it on a plate for about 20 minutes.
More Recipes You’ll Love
- Carrot Cake Cheesecake
- Pecan Pie Cheesecake
- No Bake Blackberry Cheesecake
- Mini Blueberry Cheesecake
- No Bake Black Forest Cheesecake


Mini Black Forest Cheesecake
Ingredients
Crust
- 10 Oreos, or generic version with the cream centers
- 3 tablespoons salted sweet cream butter, melted and cooled
Chocolate Cheesecake Filling
- ½ cup granulated sugar
- 3 tablespoons cocoa powder, unsweetened
- 1 tablespoon all-purpose flour
- 8 ounces cream cheese, softened
- 4 tablespoons sour cream
- 2 teaspoons pure vanilla extract
- 2 large eggs, room temperature
Topping
- 2 cups whipped topping, thawed
- 1 cup cherry pie filling
- Chocolate shavings, optional garnish
Instructions
- Preheat the oven to 325°F. Line a regular muffin tin with cupcake liners. Lightly spray the liners with nonstick cooking spray. Set it aside.
- Add the Oreos to either a food processor or a gallon ziplock bag. If you are using a food processor, pulse until the cookies are crumbs. If using the ziplock bag, you can pound the cookies with either a mallet or a rolling pin.
- Add the crushed cookies and the melted and cooled butter to a small mixing bowl. Stir to combine completely.
- Use a 1 tablespoon cookie scoop and scoop the buttered crumbs into each cupcake liner. Tamp down the crumbs.
- Add the sugar, cocoa powder, and flour to a small bowl. Whisk to combine. Set it aside.
- Using either a stand mixer or a medium-sized mixing bowl and a handheld mixer on medium-high speed, beat together the softened cream cheese, sour cream, and vanilla for 1½ to 2 minutes until completely smooth.
- Add in the sugar and cocoa mixture. Continue to mix for another 1 to 1½ minutes until well incorporated.
- Lower the mixer speed to low and add the eggs, one at a time, beating well after each egg.
- Spoon the filling on top of the cookie crust ⅔ full (about 2 tablespoons)
- Bake for 20 minutes. Turn the oven off and leave the pan in the oven, with the oven door slightly ajar for a further 5 minutes. Remove the pan from the oven and allow the cheesecakes to rest for 30 minutes. Place the pan in the fridge and allow the cheesecakes to chill for 2 hours.
- Just before serving, add the whipped topping to a disposable decorator’s bag fitted with a star-shaped decorator’s tip or a quart-size ziplock bag with a corner snipped off. Using even and steady pressure, squeeze the whipped topping in a circular pattern on top of the cheesecakes.
- Spoon 1 tablespoon of the cherry pie filling in the center of the whipped topping. Keep in the refrigerator until ready to serve. Add chocolate shavings before serving.
Notes
- Parchment paper liners or foil-lined wrappers are the easiest to peel from the cheesecake filling.
- Always make sure that your cream cheese is at room temperature. This will help ensure that there are no lumps in your cream cheese mixture.
- Oven temperatures vary and may need to be recalibrated periodically to ensure they are accurate. Make sure to keep a close eye on your cheesecake as the suggested baking time approaches.
Nutrition


Leave a Comment