


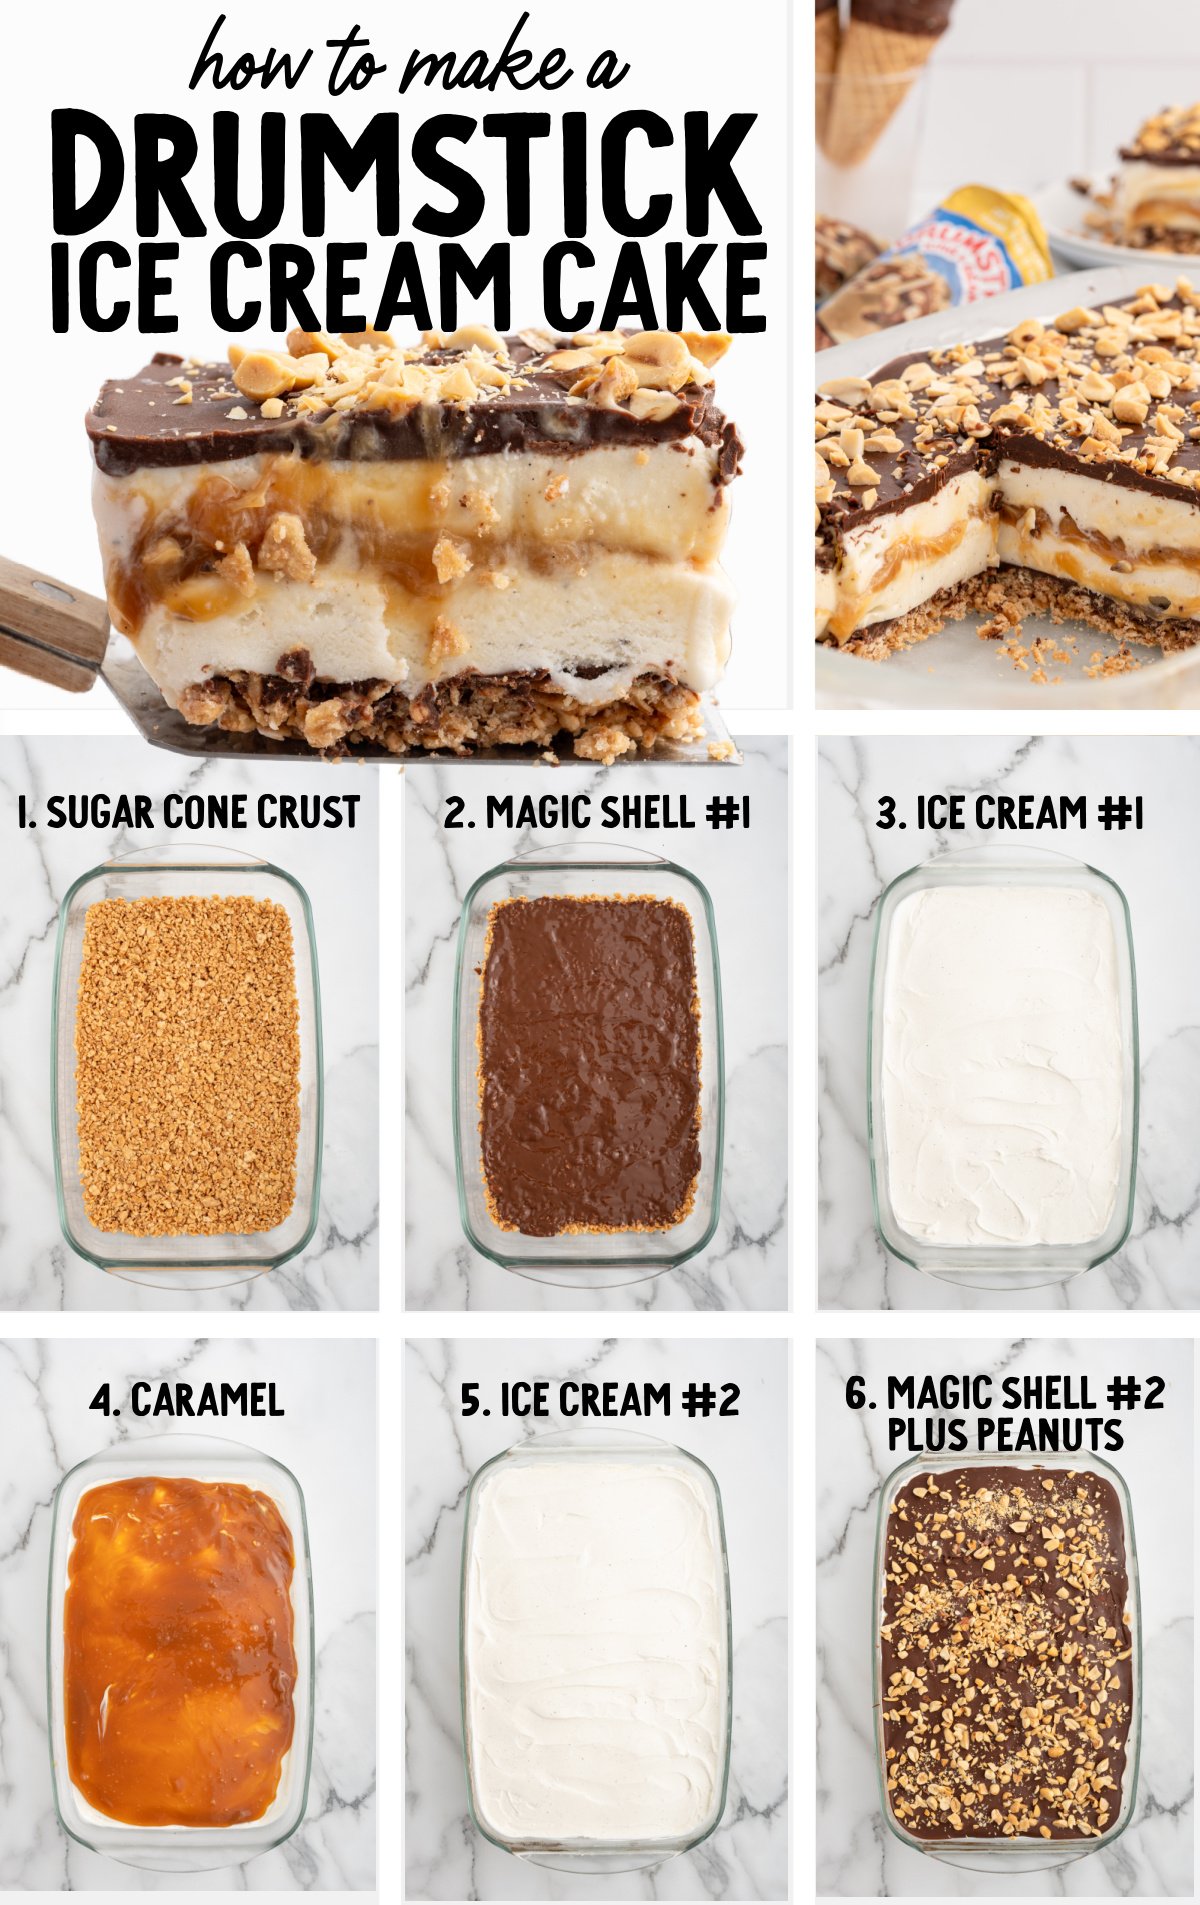
Creating a Drumstick ice cream cake that perfectly captures the nostalgic taste of a classic Drumstick cone is no small feat, but we’ve done just that with this recipe. This easy layered ice cream cake blends everything you love about the classic Drumstick ice cream cones: Sugar cones, gooey chocolate, ice cream, peanuts, and caramel sauce, of course!

Drumstick Ice Cream Cake Ingredients

Ingredients You’ll Need
- 3 cups coarsely crushed sugar cones
- ½ cup unsalted butter
- 21.75 ounces chocolate fudge magic shell
- 3 quarts vanilla ice cream
- 16.6 ounces salted caramel sauce ( or homemade salted caramel sauce)
- ½ cup dry roasted peanuts
Substitutions and Additions
- If sugar cones aren’t available, you can use waffle cones, which will provide a similar crunch.
- Try using chocolate or caramel ice cream instead of vanilla, or a combination of your favorite ice cream flavors.
- If you can’t find Magic Shell topping, simply use hot fudge.
Tips For Making This Unique Ice Cream Cake
Making The “Classic Drumstick” Crust
Use a food processor to crush the sugar cones until you achieve a coarse texture; this will form the crunchy sugar cone crust. It’s essential not to grind them too finely—keeping some texture is key to achieving that authentic cone-like crunch.
*To crush the sugar cones without a food processor, you can place them in a heavy-duty Ziploc bag and crush them with a rolling pin.

Tips for Creating the Layers
The secret to a showstopping Drumstick Ice Cream Cake is all in the layers. Each one brings its own texture and flavor—crunchy, creamy, gooey, and rich—and when stacked just right, they create that irresistible mix that tastes like the ultimate frozen treat.
These tips will help you build each layer perfectly every time:
🍦 Sugar Cone Crust
Don’t over-process: Pulse just until coarse crumbs form—aim for texture, not dust.
Use a flat-bottomed glass: Press the crumbs evenly and firmly into the pan to create a solid base that doesn’t crumble when sliced.
🍫 Magic Shell Layer (1st Layer)
Spread quickly: The magic shell sets fast on cold crust, so work swiftly with an offset spatula to get full coverage.
Freeze before the next step: Chill the first two layers to keep them distinct.
🍨Vanilla Ice Cream Layers
Let it soften just enough: Ice cream should be soft enough to spread but not melted. Stir it in a bowl for an even, creamy texture.
Smooth with an offset spatula: This helps level the layer and creates a clean surface for the next ingredient.
Freeze between layers: Don’t skip this—each layer needs time to firm up so it doesn’t blend with the next.
🍯 Salted Caramel Layer
Spread gently: Work quickly but gently to avoid melting the ice cream underneath.
Keep the caramel layer thin and even: Too much in one spot will make slicing messy later.
🍫 Top Magic Shell & Peanuts
Pour and spread FAST: The chocolate sets immediately on the cold ice cream, so move quickly to spread it close to the edges.
Add peanuts while it’s wet: Sprinkle them on before the chocolate hardens to make sure they stick.
How To Serve A Drumstick Dessert
Use a Hot Knife for Slicing – When it’s time to serve, run a knife under hot water, dry it off, and then use it to slice through the frozen cake. The heat will help the knife glide through the layers, making clean cuts.
Slice the Drumstick ice cream cake into squares. You can even serve on chilled plates to keep the cake firm.
Storing An Ice Cream Cake
MAKE AHEAD: You can prepare the entire cake up to a week in advance. Follow the recipe instructions, then cover the dish tightly with aluminum foil or plastic wrap to prevent freezer burn. When you’re ready to serve, let the cake sit out for a few minutes to soften slightly before slicing.
IN THE FREEZER: Store the Drumstick ice cream cake in the freezer, covered tightly with aluminum foil or plastic wrap. It will stay at its best for about a week.

If you’ve ever fought someone for the last Drumstick cone in the box… this one’s for you. Imagine everything you love about that classic ice cream treat—crunchy cone, rich fudge, creamy vanilla, salty caramel, and roasted peanuts—layered into one glorious no-bake cake.
It’s part childhood nostalgia, part grown-up indulgence, and 100% guaranteed to steal the show at any gathering.
More Easy Ice Cream Dessert Recipes


Drumstick Ice Cream Cake
Ingredients
- 3 cups coarsely crushed sugar cones, from 18 cones
- ½ cup unsalted butter, melted
- 21.75 ounces chocolate fudge magic shell, three 7.25-ounce bottles (divided, 1 – 7.25 ounce bottle to top the crushed sugar cone layer and 2 – 7.25 ounce bottles to top the vanilla ice cream)
- 3 quarts vanilla ice cream
- 16.6 ounces salted caramel sauce
- ½ cup dry roasted peanuts, chopped
Instructions
- To a food processor, add the sugar cones. You may need to break them up slightly before adding them to the bowl of your food processor to allow all the sugar cones to fit inside the bowl with the lid on. Pulse the sugar cones for 30 seconds to 1 minute or just until coarse crumbs are formed. You do not want large pieces however, you still want the sugar cone crumbs to have some texture.
- Once the crumbs are a coarse consistency, with the food processor running, slowly drizzle the melted unsalted butter into the bowl of the food processor just until all the crumbs are evenly coated with the melted butter.
- Transfer the butter coated sugar cone crumbs to a freezer safe 9×13 inch pan and press them into an even layer in the bottom of the dish.
- Pour one of the 7.25 ounce bottles of chocolate fudge magic shell evenly over the sugar cone layer. Using an offset spatula, spread out the chocolate fudge magic shell to evenly cover the sugar cone crumbs in a thin layer.
- Place the dish into the freezer for 15-20 minutes to allow the sugar cone and chocolate fudge magic shell layers to firm up before adding the remaining layers of the Drumstick ice cream cake.
- While the sugar cone crumbs are freezing, remove one of the 1.5 quart containers of vanilla ice cream from the freezer and set it onto the counter at room temperature to thaw and soften to a spreadable texture. You can transfer the softened vanilla ice cream to a large mixing bowl and use a rubber spatula to stir the thawing ice cream to create a uniform consistency that can be easily spread.
- Spread the softened vanilla ice cream evenly over the hardened chocolate fudge magic shell layer. Return the dish to the freezer for 30 minutes to allow the vanilla ice cream layer to harden.
- Remove the dish from the freezer and pour the salted caramel sauce over the frozen vanilla ice cream layer and, using a small offset spatula, spread it into an even layer. You want to cover as much of the frozen vanilla ice cream layer as possible before it starts to melt and blend with the salted caramel sauce.
- Return the dish to the freezer for 15-20 minutes.
- While the salted caramel layer is freezing, remove the second 1.5 quart container of vanilla ice cream from the freezer to thaw to a spreadable consistency.
- Once the vanilla ice cream is softened and the caramel sauce is firmed up, spread the softened vanilla ice cream evenly over the salted caramel layer using a small offset spatula to smooth the ice cream to an even layer.
- Return the Drumstick ice cream cake to the freezer for 30 minutes to allow the second layer of vanilla ice cream to harden.
- Remove the Drumstick ice cream cake from the freezer. Working very quickly as the chocolate fudge magic shell will harden very quickly once it hits the frozen ice cream, pour the remaining 2 – 7.25 ounce bottles of chocolate fudge magic shell evenly over the second layer of vanilla ice cream. Spread quickly, as close to the edges as possible.
- Top the chocolate fudge magic shell with the chopped dry roasted peanuts.
- Return the Drumstick ice cream cake to the freezer for a minimum of 8 hours, or up to overnight, to allow the vanilla ice cream layers to firm up completely before slicing and serving.
Notes
- Use a Metal Spatula for Spreading: When spreading the ice cream and caramel layers, a metal spatula works really well because it stays cold and helps create smoother, more even layers. A silicone spatula is a good choice if you don’t have a metal offset spatula.
- Chill Your Spatula Between Uses: If possible, keep a second spatula in the freezer while working. When one gets sticky or warm, swap it out with the chilled one to keep your layers neat.
- Work Quickly with the Chocolate Shell: When pouring the chocolate fudge magic shell, work quickly and pour evenly. The magic shell hardens almost instantly upon contact with the cold ice cream, so you won’t have much time to spread it out.
- Use a Hot Knife for Slicing: When it’s time to serve, run a knife under hot water, dry it off, and then use it to slice through the frozen cake. The heat will help the knife glide through the layers, making clean cuts.
Nutrition


Leave a Comment