


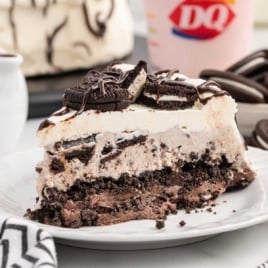
This Oreo Blizzard Cake is what happens when your favourite Dairy Queen treat meets homemade magic—more Oreo, more fudge, more everything. It’s easy to make, slices like a dream, and blows the store-bought version out of the water.

DQ Oreo Ice Cream Cake -Ingredients Overview

Ingredients You’ll Need
- ½ quart chocolate ice cream
- ½ quart cookies and cream ice cream
- 1 (11.75 ounce) container hot fudge sundae topping
- 45 Oreo cookies with filling
- ½ cup salted sweet cream butter
- 2 ½ cups cold heavy whipping cream
- 1 ½ cup powdered sugar
- 2 teaspoons clear vanilla flavoring
Ingredient Substitutions
Chocolate Ice Cream: You can use any of your favorite ice cream flavors. Try swapping out the chocolate ice cream for vanilla, mint chocolate chip, or even coffee ice cream for a bolder taste.
Clear Vanilla Flavoring: If you don’t have clear vanilla, regular vanilla extract will work too. The frosting might take on a slight off-white tint, but it will still taste delicious.
Recipe Tips For DQ Desserts
Make sure the cookie crumbs are evenly spread to avoid uneven baking. Let them cool completely to enhance their crunchiness in the final assembly.

Use a silicone spatula to help spread and even the layer of hot fudge. This will look better when the cake is cut.

Mixing the cookies in thoroughly ensures that each scoop of the ice cream layer has chunks of Oreo, enhancing the flavor and texture.

Prevent The Cake From Melting While Assembling It
- Line a springform pan with plastic wrap and place it in the freezer to chill. This step helps in easy removal of the cake once it’s set.
- Before you whip your frosting, place your mixing bowl in the freezer for about 30 minutes.
- Using cold equipment is very helpful when making whipped cream, as it helps the fat in the cream stabilize quicker when whipped.Keep it chilled until you’re ready to frost the cake.
- Work quickly to prevent the ice cream from melting. If needed, chill the cake in intervals during frosting if your kitchen is warm.
- Freeze the entire setup for four to six hours, or ideally overnight, to ensure everything sets perfectly.
How To Serve Homemade Oreo Ice Cream Cake
Scatter over the remaining chopped Oreos, then finish with a generous drizzle of chocolate syrup. Pop the cake back into the freezer to firm up.
When it’s time to serve, just let it sit on the counter for 10 to 15 minutes—makes slicing much easier (and neater!).

For clean, sharp slices, run a knife under hot water, wipe it dry, then slice through the cake. Rinse and repeat between cuts—yes, it’s a little extra, but totally worth it for those perfect layers.
Storing A Homemade Ice Cream Cake
This is a perfect make-ahead dessert. Once assembled, freeze for up to one month—just wrap tightly or pop into an airtight container to avoid freezer burn.
Important: This lives in the freezer, not the fridge (or it’ll melt). Take it out 5–10 minutes before slicing so it softens slightly for easy cutting.

Our Dairy Queen copycat Oreo cookie ice cream cake brings together all the rich, creamy goodness you love in an easy-to-make dessert. It’s a perfect treat for any occasion, delivering delicious results every time.
More Copycat Dairy Queen Ice Cream Cakes
- Dairy Queen Copycat Cookie Dough Ice Cream Cake
- Original Copycat Dairy Queen Ice Cream Cake
- Chocolate Blizzard Ice Cream Cake


Dairy Queen Copycat Oreo Cookie Ice Cream Cake
Ingredients
Ice Cream Cake Layers
- ½ quart chocolate ice cream
- ½ quart cookies and cream ice cream
Hot Fudge Layer
- 11.75 ounces hot fudge sundae topping
Cookie Crunch Layer
- 1 Oreo cookies with filling, 1 lb 2.12 ounces (divided into 25 crushed for cookie layer, 12 chopped for cookies and cream layer and 8 chopped for topping)
- ½ cup salted sweet cream butter, melted and cooled
Whipped Cream Frosting
- 2 ½ cups cold heavy cream
- 1 ½ cup powdered sugar
- 2 teaspoon clear vanilla flavoring
- chocolate syrup, optional
Instructions
- Line a 9-inch springform pan with plastic wrap. Place the springform pan in the freezer while you prepare the baked and buttered cookie layer.
- Heat the oven to 350°F. Line a baking sheet with parchment paper.
- Add the 25 crushed Oreo cookies to a small mixing bowl.
- Stir in the melted and cooled butter until the cookie crumbs are completely coated.
- Evenly spread the coated cookie crumbs on the lined baking sheet. Bake for 7 to 8 minutes. Remove from the oven and allow the cookie crumbs to completely cool. Once cooled, you will need to break the cookie bits into bite sized pieces.
- While the cookie crumbs are baking, remove the chocolate ice cream from the freezer and allow it to thaw slightly. (This will make spreading the ice cream into the pan much easier. Also, remember all freezers freeze differently, so it may take longer/lesser time to thaw enough to work with)
- Once the ice cream has thawed for 15 to 20 minutes, evenly spread the chocolate ice cream layer into the bottom and up the sides of the lined springform pan. Place it back in the freezer for 30 minutes to 1 hour.
- Just before you are ready for the hot fudge layer, remove the lid to the hot fudge and place in the microwave for 20 to 25 seconds. (This will soften the hot fudge, making it easier to spread on top of the chocolate ice cream layer)
- Using either a silicone spatula or an offset spatula, evenly spread the hot fudge over the top of the chocolate ice cream layer.
- Evenly sprinkle the baked cookie crumbs over the top of the hot fudge layer. Return to the freezer for 1 hour.
- 15 to 20 minutes before you are ready to spread the cookies and cream ice cream layer, remove the cookies and cream ice cream from the freezer to thaw slightly.
- Stir in 10 chopped Oreo cookies into the cookies and cream ice cream.
- Remove the springform pan from the freezer (you may need to run a knife around the edge to loosen), and evenly spread the cookies and cream ice cream on top of the cookie crunch layer. Return the springform pan to the freezer for 4 to 6 hours, or overnight.
- 30 minutes before you are ready to frost the ice cream cake, if you are using a stand mixer, place the metal bowl in the freezer. If you are using a handheld mixer, place your mixing bowl, preferably a metal mixing bowl, in the freezer for 30 minutes.
- Remove the bowl from the freezer and add the heavy cream, powdered sugar, and clear vanilla flavoring. Beat on medium until the powdered sugar is incorporated, then beat on high until stiff peaks form, for about 3 to 4 minutes.
- Separate out 1 cup of whipped cream frosting and place in a decorator’s piping bag fitted with a star-shaped tip.
- You will need to work quickly, especially if the weather is warm. Remove the ice cream cake from the freezer.
- Release the outer portion of the springform pan. Using either a cake lifter or a large sturdy spatula, remove the plastic wrap and place the ice cream cake on either a serving plate or a round disposable cake board.
- Using either a silicone spatula or an offset spatula, quickly frost the sides and top of the ice cream cake. If your kitchen is on the warmer side, you can place the cake back in the freezer for 30 minute intervals as needed to chill the cake.
- Using even pressure, holding the decorator’s piping bag a half inch above the edge of the top of the cake, pipe either a shell pattern or swirl pattern around the edge of the ice cream cake.
- Sprinkle the remaining 10 chopped Oreo cookies on the top of the ice cream cake.
- Drizzle chocolate syrup over the ice cream cake. Place the cake back into the freezer until you are ready to slice and serve.
Notes
- Leveling the Ice Cream Layers: Use a small offset spatula to smooth out the ice cream layers evenly. This will create a more professional-looking cake with uniform layers.
- Avoid Overmixing the Ice Cream: When mixing the chopped Oreos into the cookies and cream ice cream, be gentle to avoid breaking down the cookies too much. This keeps the texture varied and enjoyable.
- Cutting the Cake: To get clean slices, warm a knife under hot water, wipe it dry, and then cut through the ice cream cake. Repeat this process for each slice to maintain a neat presentation.
Nutrition


Leave a Comment