


With chocolate chip cookie dough brownie bombs, dessert lovers don’t have to choose between cookies and brownies—they’re all in one! These decadent treats feature gooey egg-free chocolate chip cookie dough surrounded by fudgy brownies, then coated in rich melted chocolate. Whether you’re making them for a party or just to satisfy your own sweet tooth, this bite-sized treat is the ultimate indulgence.

What You Need To Know
- MAIN INGREDIENTS: fudgy brownie mix, all-purpose flour, light brown sugar, granulated sugar, unsalted butter, vanilla extract, mini chocolate chips, dark chocolate melting wafers, milk chocolate melting wafers.
- QUICK STEPS: Bake brownies, heat-treat flour, make cookie dough, roll into cookie dough balls, flatten brownies, wrap brownie around dough, freeze, coat in melted chocolate, drizzle milk chocolate.
- TOTAL TIME AND YIELD: Approximately 4 hours 15 minutes, yields 45-48 pieces
Chocolate Chip Cookie Dough Brownie Bombs Ingredients
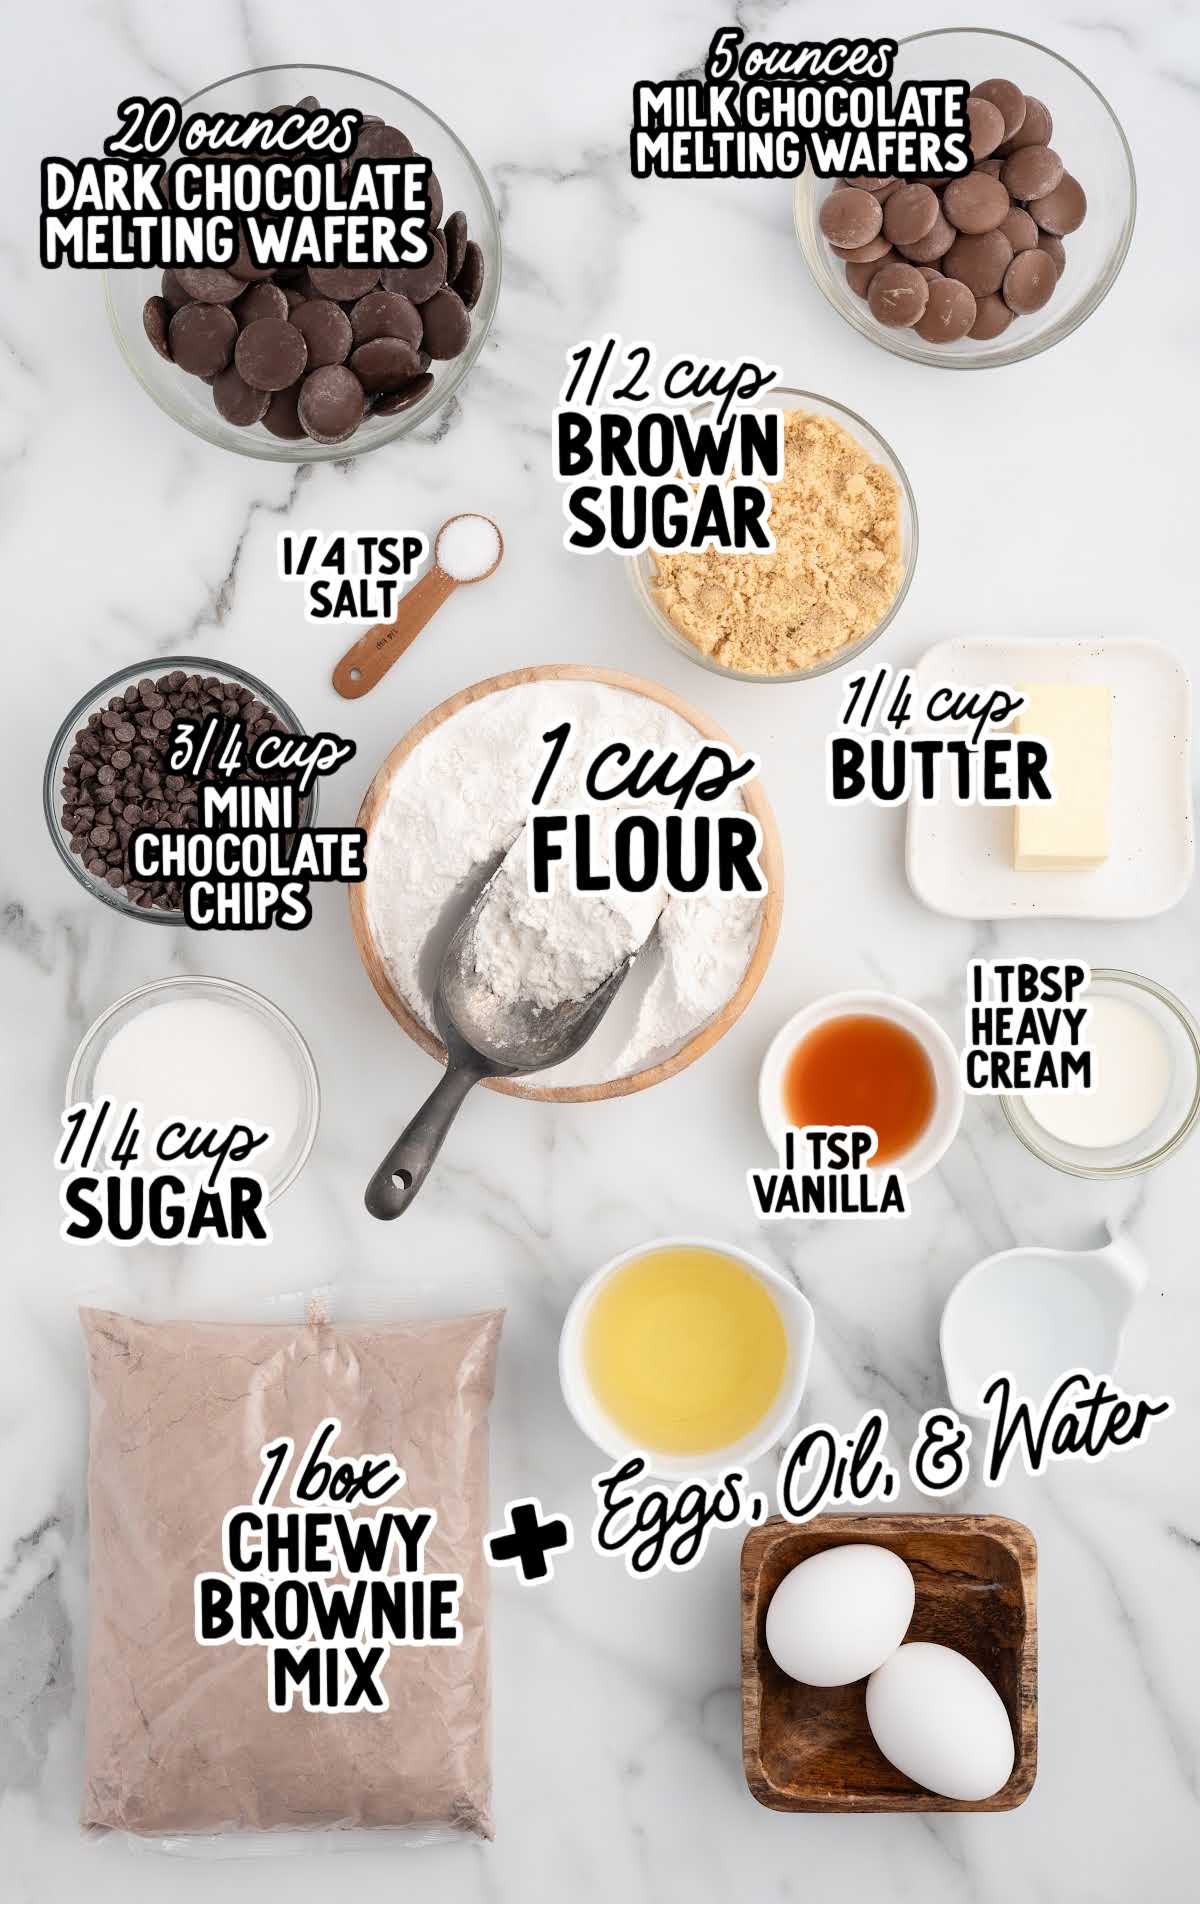
Fudgy Brownie Mix: Using a chewy fudge brownie mix ensures a rich, fudgy texture that’s sturdy enough to wrap around the cookie dough without breaking.
Eggs, Oil, and Water – These ingredients are needed to prepare the brownie mix, helping create a rich and moist brownie that’s easy to mold.
All-Purpose Flour (Heat-Treated): Since this is an egg-free cookie dough, the flour is heat-treated to eliminate bacteria, making it safe to eat raw while keeping the dough soft.
Mini Semi-Sweet Chocolate Chips: Smaller chocolate chips distribute evenly throughout the dough, ensuring chocolate in every bite without overwhelming the texture.
Dark & Milk Chocolate Melting Wafers: Melted dark chocolate wafers form a smooth, glossy coating that hardens into a crisp shell, balancing the sweetness of the cookie dough. The milk chocolate drizzle adds a decorative finish and a touch of extra sweetness.
How To Heat Treat Flour
When making chocolate chip cookie dough brownie bombs, heat-treating flour is a critical step to ensure the cookie dough is safe to eat. Raw flour can sometimes contain harmful bacteria, so this extra step eliminates any potential risks and makes the dough completely edible.
- Preheat the Oven: Set your oven to 300°F.
- Spread the Flour: Evenly spread the flour on a parchment-lined baking sheet. This prevents sticking and makes cleanup easy.
- Bake the Flour: Place the baking sheet in the oven and bake for five to seven minutes. Keep an eye on it to prevent browning or burning.
- Cool Completely: Remove the flour from the oven and allow it to cool fully before using it in your recipe. Warm flour can clump when mixed with other ingredients, so cooling is essential.
Alternatively, you can heat-treat flour in the microwave:
- Place the flour in a microwave-safe bowl.
- Heat in 30-second intervals, stirring between each, until the flour reaches 165°F. Use a food thermometer to check the temperature.
- Let the flour cool before mixing it into the cookie dough.
Heat-treating flour is a simple yet essential step that makes your cookie dough balls both safe and delicious, so don’t skip it!
Helpful Tips For Making This Brownie Bites Recipe
Making chocolate chip cookie dough brownie bombs is easier with a few tips. These suggestions will help you create a dessert that’s as delicious as it is impressive.
- Soften Butter Properly
Allow the butter to come to room temperature for smooth mixing. Softened butter creates a soft dough with a creamy texture, ensuring the cookie dough is easy to roll. - Use a Cookie Dough Scoop
Using a cookie dough scoop ensures consistent sizing for the cookie dough filling, which helps the bombs cook evenly and look uniform. A mini scoop (about ½ tablespoon) works best for this recipe. - Freeze the Dough Balls
Freezing the cookie dough balls for at least 30 minutes makes them firmer and easier to wrap with the brownie layer. This step also helps the bombs hold their shape during assembly. - Flatten Brownie Squares Carefully
When flattening the brownie squares, use the warmth of your hands to gently shape them without causing brownie cracks. If the brownies feel too stiff, let them sit at room temperature for a few minutes. - Use Quality Chocolate for Coating
High-quality melting wafers melt smoothly and give a glossy finish. If the melted chocolate feels too thick, add a small amount of coconut oil for better consistency (one teaspoon of coconut oil per cup of chocolate). - Work in Batches
Keep the frozen cookie dough balls in the freezer and only work with a few at a time. This prevents them from softening too much and becoming difficult to handle. - Drizzle Chocolate for a Finishing Touch
Use a small spoon or piping bag for an even drizzle of milk chocolate. It adds a decorative touch and enhances the flavor of the decadent dessert.
How To Dip Into Chocolate
Follow these steps to dip your chocolate chip cookie dough brownie bombs with ease:
- Position the Bomb: Place a brownie bomb on the prongs of a fork so it’s secure but not squished.
- Dip in Chocolate: Lower the bomb into the melted chocolate, using a spoon to coat any uncovered areas.
- Remove Excess: Lift the bomb out and gently tap the fork on the bowl’s edge to shake off extra chocolate.
- Smooth the Coating: If needed, use the back of a spoon to smooth out uneven areas while the chocolate is wet.
- Transfer to Sheet: Slide the bomb off the fork onto a parchment-lined baking sheet. Use a second fork or toothpick to help if it sticks.
- Tidy the Base: Clean up any pooling chocolate around the base with a knife or spatula for a neat finish.
How To Customize This Brownie Bomb Recipe
The best thing about chocolate chip cookie dough brownie bombs is how easy it is to customize the original recipe. Whether you want to add a personal touch or change them for a special occasion, here are a few fun and creative ways to make them your own:
- Try a Different Brownie Base
Experiment with flavored brownie mixes, like dark chocolate, salted caramel, or red velvet, to complement the cookie dough. A fudgy brownie mix works best for wrapping around the dough. - Add Toppings
After dipping the bombs in chocolate, sprinkle them with crushed nuts, flaked sea salt, shredded coconut, or edible glitter before the coating sets. These toppings add texture and make the bombs look extra special. - Mix Up the Chocolate Coating
Instead of using just dark chocolate, try milk, white, or even colored candy melts to match a holiday or event theme.
Troubleshooting Brownie Bomb Recipe
Brownies Cracking When Wrapping the Dough
Solution: Let the brownies come to room temperature if they’ve been chilled. Flatten gently with the warmth of your hands, and don’t press too hard. Slightly moisten your hands if needed to prevent tearing.
Cookie Dough Too Sticky to Roll
Solution: Chill the dough in the fridge for 10–15 minutes before rolling. Lightly coat your hands with flour or powdered sugar if it’s still sticky.
Melting Chocolate Is Too Thick
Solution: Add one teaspoon of coconut oil per cup of melted chocolate. Stir until smooth. Avoid adding water, as it can cause the chocolate to seize.
Cookie Dough Balls Falling Apart When Wrapping with Brownies
Solution: Make sure the cookie dough balls are frozen solid before wrapping. If they’ve softened, place them back in the freezer for 15–20 minutes.
Chocolate Coating Cracks After Setting
Solution: Let the bombs sit at room temperature for five to ten minutes after freezing before dipping them into the warm chocolate.
Bombs Stick to the Baking Sheet
Solution: Use high-quality parchment paper or a silicone baking mat to prevent sticking. Trim any pooling chocolate edges once it hardens.
Uneven Coating or Clumping
Solution: Tap the fork on the edge of the bowl after dipping each bomb to remove excess chocolate. Work quickly and carefully to smooth the coating.
How To Store This Brownie Bomb Dessert
Properly storing your chocolate chip cookie dough brownie bombs is key to keeping them fresh and delicious. Whether you’re making them ahead or saving leftovers, these tips will help you keep them at their best.
MAKE AHEAD: This recipe can be made ahead in stages. Bake and cool the brownies, and prepare the cookie dough balls up to two days in advance. Store the rolled dough balls in an airtight container in the freezer until you’re ready to assemble.
IN THE FRIDGE: Store finished brownie bombs in an airtight container in the fridge. They will stay fresh for up to one week. For the best texture, let them sit at room temperature for about 10–15 minutes before serving.
IN THE FREEZER: To freeze, place the coated bombs on a parchment-lined tray and freeze until firm. Transfer them to a freezer-safe container or bag, separating layers with parchment paper. They’ll last up to three months.
Let the brownie bombs thaw in the fridge overnight or at room temperature for about 30 minutes before serving.
REHEATING: These brownie bombs are best enjoyed chilled or at room temperature, so reheating isn’t necessary.
More Treats To Try
Chocolate Chip Cookie Dough Brownie Bombs Frequently Asked Questions
Use a sharp knife and clean it between cuts to avoid sticking. Let the brownies cool completely before slicing for cleaner edges.
Yes, you can use pre-made cookie dough for convenience. Look for varieties that are egg-free or labeled as safe to eat raw.
Yes, you can add three to five drops of oil-based flavoring, like peppermint or orange, to the melted chocolate for extra flavor. Start with three drops, taste, and add more if desired.
Avoid water-based extracts, as they can cause the chocolate to seize.
These chocolate chip cookie dough brownie bombs combine rich brownies, creamy cookie dough, and smooth chocolate coating for a dessert that’s as fun to make as it is to eat. Perfect for parties or treating yourself, they’re a guaranteed hit every time!


Chocolate Chip Cookie Dough Brownie Bombs
Ingredients
Brownie
- 18.3 ounces Chewy Fudge brownie mix, plus the ingredients called for on the box mix for the brand used – eggs, oil and water. Baked according to package directions for a 9×13 straight sided pan
Chocolate Chip Cookie Dough
- 1 cup all-purpose flour
- ¼ cup unsalted butter, softened to room temperature
- ½ cup light brown sugar, packed
- ¼ cup granulated sugar
- 1 teaspoon vanilla extract
- 1 tablespoon heavy cream, cold
- ¼ teaspoon salt
- ¾ cup mini semi-sweet chocolate chips
Chocolate Coating
- 20 ounces dark chocolate melting wafers, melted according to package directions
- 5 ounces milk chocolate melting wafers, melted according to package directions
Instructions
- Prepare and bake the boxed brownie mix according to the package directions for a 9×13 straight sided pan. Line the pan with parchment paper, with enough to overhang the sides of the pan, to make it easy to lift the cooled brownies out of the pan when ready to slice.
- Once the brownies have cooled completely, lift the entire sheet of brownies out of the pan and place them onto a large cutting board. Using a very sharp knife, evenly trim off the edges (approximately ¼-⅓ inch) of the brownies that are crisp and discard. The harder edges do not roll around the cookie dough balls very well.
- Cut the large rectangle of brownie into 6 (approximately 1 ¼ – 1 ½ inch) rows going the length of the brownie, then 8 (approximately 1 ¼ – 1 ½ inch) rows going the width of the brownie. This should yield 48 1 ¼ – 1 ½ inch squares. Set aside.
- Preheat the oven to 300°F. Line a large baking sheet with parchment paper.
- Evenly spread the all-purpose flour over the parchment paper
- Allow the flour to be heat treated in the oven for 5-7 minutes, being careful to keep an eye that the edges of the flour do not burn, to destroy any potential bacteria since the flour will be used in an edible cookie dough.
- Remove the flour from the oven and allow it to cool completely before adding it to the rest of the cookie dough ingredients.
- Using a stand mixer or a large bowl and a handheld mixer on medium-high speed, cream together the butter, light brown sugar, granulated sugar and vanilla extract until smooth and fluffy.
- Slow the mixer speed to low and mix in the heavy cream until fully incorporated.
- Slowly incorporate the all-purpose flour, half cup at a time, and salt. Mix just until all the flour has been fully incorporated.
- Using a large wooden spoon, stir in the mini semi-sweet chocolate chips until evenly distributed.
- Using a mini (approximately ½ tablespoon) cookie scoop, or melon baller, scoop out a level amount of cookie dough and gently roll in the palm of your hand to create a smooth ball. Place the rolled mini chocolate chip cookie dough ball onto the prepared baking sheet and repeat until all the dough has been scooped and rolled. You should have between 45-48 mini cookie dough balls depending on how big your scoop is.
- Place the tray of rolled cookie dough balls into the freezer for 30-45 minutes or until frozen solid. This will make it easier to wrap the brownie squares around the cookie dough balls.
- Once the cookie dough balls are frozen solid, remove them from the freezer and set them on the counter next to the brownie squares.
- In the palm of your hand, flatten a single brownie square as flat as you can without the brownie breaking apart.
- Place a frozen cookie dough ball into the center of the flattened brownie. Carefully wrap the brownie up and around, the sides of the cookie dough ball being sure to tightly cover the cookie dough ball with the flattened brownie. This can get messy but you really want to cover the entire cookie dough ball with the brownie. Place the brownie covered cookie dough ball back onto the tray and repeat until all the cookie dough balls have been covered with brownie.
- Place the tray back into the freezer for 1-2 hours (up to overnight) or until the chocolate chip cookie dough brownie bombs are very firm.
- When ready to coat the chocolate chip cookie dough brownie bombs in melted chocolate remove the baking sheet from the freezer. Line a separate large rimmed baking sheet with parchment paper and set aside.
- Melt the dark chocolate wafers in a medium bowl, according to package directions, and stir to a smooth consistency.
- Using a fork, dip a brownie bomb into the melted chocolate, coat completely in chocolate then gently tap the fork on the side of the bowl to allow any excess chocolate to drip back into the bowl. Place onto the parchment paper lined baking sheet and repeat until all the chocolate chip cookie dough brownie bombs have been coated.
- In a separate small bowl melt the milk chocolate wafers, according to package directions, and stir to a smooth consistency.
- Using a small spoon, or filling a small pastry bag with the tip cut off, drizzle the melted milk chocolate in a striped pattern across the tops of each of the dark chocolate coated chocolate chip cookie dough brownie bombs. Allow the chocolate to harden for 10-15 minutes before serving.
Notes
- If you do not want to make a homemade version of edible chocolate chip cookie dough, you can substitute with a store bought brand that is labeled safe to eat raw. Brands such as Pillsbury or Nestle can be found in the refrigerated or frozen sections of the grocery store.
- Chocolate flavored almond bark can also be used to coat the chocolate chip cookie dough balls. Melt according to package directions.
You can add an additional garnish to the top of the chocolate chip cookie dough brownie bombs, while the chocolate is still soft, with a sprinkle of semi-sweet mini chocolate chips. - When covering the frozen chocolate chip cookie dough balls with the brownie, if it starts to crack, just keep pressing until fully coated and all the brownie sticks. You can turn the piece of brownie over in your hand so that the crackly, shiny, top is facing the palm of your hand and the underside of the brownie is facing up. This can help the brownie to stick to the cookie dough a little better if needed.
- You can make your boxed brownie mix up to 24 hours ahead of time. Once the pan of brownies has cooled completely, wrap tightly with plastic wrap until ready to use in the recipe.
Nutrition


Leave a Comment