


If you’re a Twix lover like me, these thumbprint cookies are about to become your new obsession. They combine buttery shortbread cookies with gooey caramel and rich chocolate—all the best parts of a Twix bar—baked into a homemade treat that feels nostalgic.

Whether you’re baking for Christmas, a bake sale, or just because you’re craving something special, this Twix cookie recipe is guaranteed to impress.
Ingredients Needed To Make These Cookies
Every ingredient plays its part in bringing that classic Twix flavor to life—the buttery cookie, the chewy caramel, and the smooth chocolate drizzle. Here’s what you’ll need:

We’ve tested a few different options along the way and here’s what worked best.
CHOCOLATE – We found milk chocolate melting wafers the easiest to work. A baking bar or chocolate chips will work, but melt them slowly—chocolate can seize if overheated, and once that happens, there’s no fixing it
CARAMEL – We love using Werther’s Original Chewy Caramels (not sponsored) because they melt smoothly and give the centers that perfect soft chew. If you use another brand, and the caramels are a bit firm, stirring in a tablespoon of cream keeps the filling silky.
The first time I made these, my son said, “They taste just like Twix—only fresher.”

That’s exactly what we were aiming for. I wanted to create a cookie that had all the familiar flavors of a candy bar but felt homemade and thoughtful.
These quickly went into rotation for for holiday cookie trays and gifts.
After dialing in the chocolate and caramel, the next challenge was getting the cookie base just right. I wanted something tender but still strong enough to hold the filling without collapsing.
The key turned out to be chilling the dough before baking. That simple step kept the cookies from spreading, gave the base its shortbread-like texture and held the indents deep enough for the caramel.

Likewise, you’ll want to work in batches and keep the unbaked dough balls in the freezer until each tray is ready to bake. Warm dough = spread-out cookies.
Let the cookies cool completely before filling—adding caramel to warm cookies can cause it to soak in instead of sitting neatly in the center. Spoon in just under a teaspoon so it doesn’t overflow once the chocolate goes on top.

For the drizzle, use a piping bag or even a small spoon. The key is a steady hand and working while the caramel is still soft so everything sets together. That way you get clean layers of chewy caramel and glossy chocolate with every bite.

Twix Thumbprint Cookies
Ingredients
Cookie Dough
- 1 cup unsalted butter, softened to room temperature
- ¾ cup granulated sugar
- 2 large egg yolks, room temperature
- 1 teaspoon vanilla extract
- 2 ⅓ cups all-purpose flour
- ½ teaspoon salt
- 35 soft chewy caramel candies, unwrapped (Werther’s Original Chewy Caramels)
- 2 tablespoons heavy cream
- 4 ounces milk chocolate melting wafers (approximately ½ cup)
Optional Garnish
- Flaky sea salt, Maldon or Fleur de Sel
Instructions
- Line two large rimmed baking sheets with parchment paper and set aside.
- To a large mixing bowl add the unsalted butter and granulated sugar. Beat on medium-high speed, using a handheld or stand mixer, for 1-2 minutes or until light and fluffy.
- Add the egg yolks and vanilla extract to the bowl and beat again for another 1-2 minutes or until the egg yolks are fully incorporated.
- Add the all-purpose flour and salt to the bowl and mix on low speed for 2-3 minutes or until the dough comes together to form a rough ball. The cookie dough should be thick and not crumbly.
- Using a 1 inch (approximately 1 tablespoon) small cookie scoop, scoop out a level amount of cookie dough. Place the dough into the palm of your hand and gently roll to form a smooth ball. Place the rolled cookie dough ball onto one of the prepared baking sheets and repeat until all the dough balls have been formed. The dough balls should be placed about 1-1 ½ inches apart on the baking sheet.
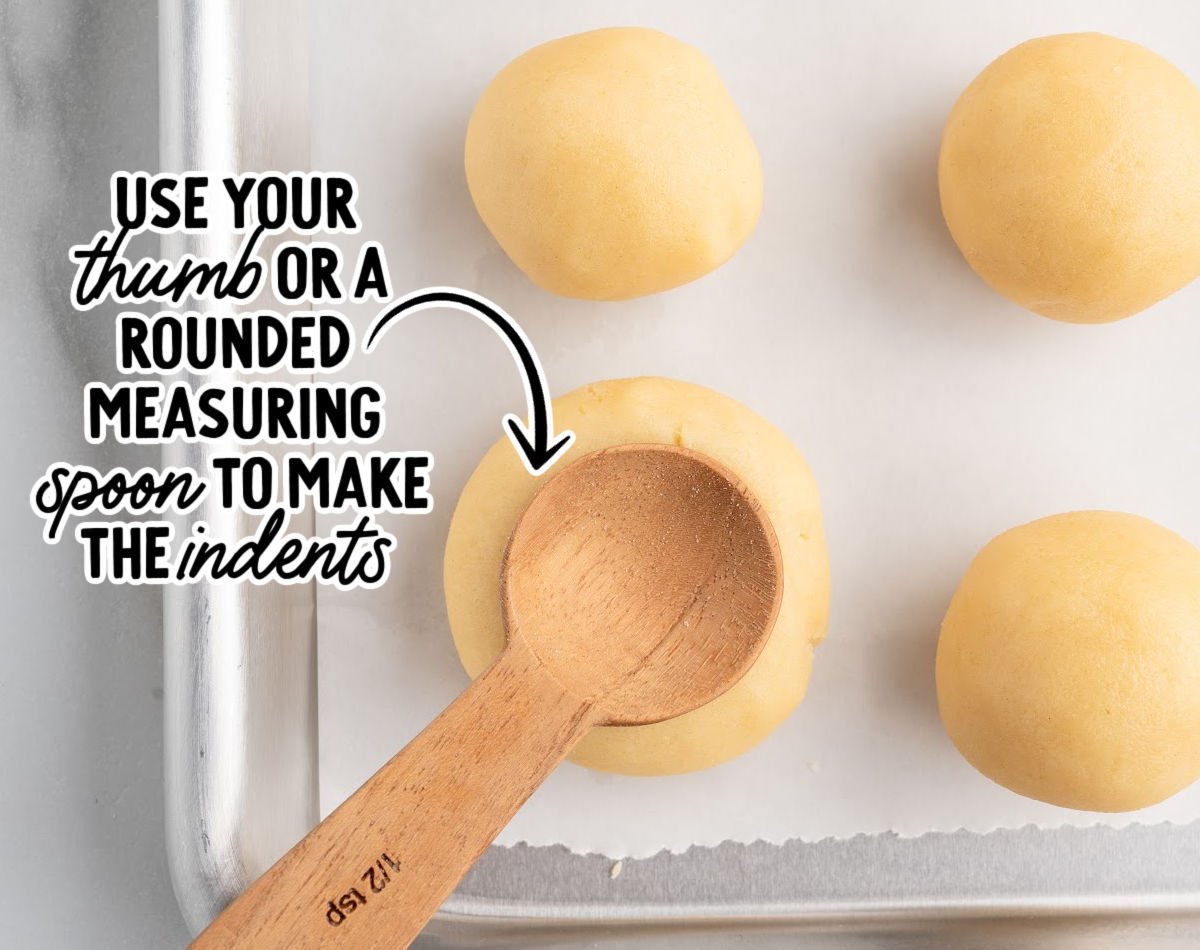
- Using your thumb, or a small (½ teaspoon) rounded measuring spoon, press an indent into the center of each rolled cookie dough ball. You can dip your thumb, or the back of the measuring spoon, into a small amount of flour to keep the dough from sticking when being pressed. Be sure to smooth together any cracked edges that may form when pressing the dent into the center of the cookie dough balls.
- Place the baking sheet of formed thumbprint cookies into the freezer to chill the cookies for 30 minutes. This will help to ensure that the cookies hold their shape, and do not spread too much, when baked.
- Preheat the oven to 350°F.
- Remove the baking sheet from the freezer. On the second prepared baking sheet, place 12 chilled thumbprint cookies approximately 2 inches apart. Place the first baking sheet back into the freezer while each batch of cookies bakes.
- Bake the thumbprint cookies for 13-14 minutes or just until lightly golden around the bottom edges of the cookies.
- When the cookies come out of the oven, you may need to gently press down the indents in the center of each cook as they may puff a little when baking. Allow the cookies to cool on the baking sheet for 5 minutes before transferring them to a large cooling rack to cool completely.
- Repeat steps 9-11 until all the thumbprint cookies have baked and cooled.
- In a medium bowl, add the unwrapped soft chewy caramel candies and the heavy cream. Microwave on high for 30 seconds, stir and microwave again in 30 second increments, being sure to stir the caramels in between each heating, until the caramels are fully melted and stirred to a smooth consistency.
- Using a small scoop, or teaspoon measure spoon, spoon a little less than 1 teaspoon of the warm caramel sauce into the center of each thumbprint cookie being careful not to overfill the indentation of the cookie.
- In a small bowl, melt the milk chocolate wafers according to package directions (in the microwave for 30-40 second increments stirring between heating times) and stir until smooth.
- Transfer the melted milk chocolate to a small piping bag with the end snipped off, or use a small spoon, and drizzle the milk chocolate across the tops of all the cookies in a decorative pattern. If adding the optional garnish of flaky sea salt, you will need to sprinkle a small amount onto the cookies while the caramel and milk chocolate are still soft to ensure the flaky sea salt sticks to the cookies.
- Allow the twix thumbprint cookies to sit for 10 minutes, to allow the chocolate drizzle to harden, before plating and serving.
Notes
- We prefer using the Werther’s Original Chewy Caramels for this recipe as I find that they melt the best and yield the best result. You can use other brands of soft caramels however, you may need to add an additional one tablespoon of heavy cream if your caramels are a little harder before melting.
- You can substitute a four ounce milk chocolate baking bar (not a candy bar) or ½ cup milk chocolate chips for the milk chocolate melting wafers.
Nutrition

Storage Instructions
These Twix cookies keep well at room temperature in an airtight container for up to four days — or in the fridge for up to a week. The cookies can also be frozen after baking, but it’s best not to add the caramel or chocolate.
Make Ahead Freezer Instructions
- Roll, shape, and press the thumbprints as directed, then freeze the cookie dough balls on a tray until solid.
- Transfer them to a freezer-safe bag or airtight container and store for up to two months.
- When you’re ready to bake, place the dough straight onto a baking sheet—no need to thaw. Just add one to two extra minutes to the bake time and keep a close eye so they don’t overbake.
- Once baked, continue with the caramel and chocolate as directed.


Leave a Comment