Pie Crust Recipe
This homemade pie crust recipe is simple to make and results in a flaky texture and a delicious pie once you add your juicy filling.
Servings: 1 pie crust
Calories: 1527kcal
Equipment
- Food processor
- 9-inch pie dish (ceramic used)
- Plastic wrap
- Rolling Pin
- parchment paper
- Pie weights (commercial weights, dry rice or dry beans)
- Large rimmed aluminum baking sheet
Ingredients
- 1 ½ cups all-purpose flour, plus additional for dusting the work surface for rolling out the dough
- ½ cup unsalted butter, very cold and cubed
- 2 teaspoons granulated sugar
- ¼ teaspoon salt
- 4 to 6 tablespoons ice water (start with 4 tablespoons water then add more, one tablespoon at a time, if needed)
Instructions
- To the bowl of a food processor add half (¾ cup) of the all-purpose flour and cubed butter. Pulse 10 to 15 times or just until coarse crumbs form and all the butter is coated in the flour. Add the remaining half (¾ cup) of the all-purpose flour, granulated sugar and salt. Pulse 3 to 4 more times to fully incorporate.
- Remove the lid from the food processor and spoon 4 tablespoons of the ice water (remove any pieces of ice that may get into the mixture) over the flour mixture. Return the lid and pulse just until all the flour is moistened and the dough starts to come together. The dough mixture will look like very coarse sand but will easily come together when pressed between your fingers. If it is dry and crumbly, add an additional 1 to 2 tablespoons of water and pulse just until combined. Be careful not to overmix the dough or too much gluten will develop and the dough can be tough and may shrink too much when baked.
- Carefully remove the blade from the food processor, then turn out the dough mixture onto a piece of plastic wrap. Using the palms of your hands, gently press the dough together to form a ball, then flatten the ball to a disc about 6-inches wide by ¾ to 1 inch thick. Wrap the dough with the plastic wrap and refrigerate for at least 1 hour or up to 2 days.
- Lightly sprinkle 1 to 2 tablespoons of additional flour to a clean work surface. Remove the chilled dough from the plastic wrap and place onto the prepared surface. Allow the dough to rest for 3 to 5 minutes at room temperature before rolling out to a 15 to 16 inch circle that is approximately ⅛ inch thick. If the edges start to crack, you can gently press them back together and continue rolling out the dough.
- Using the rolling pin, gently roll up the pie crust to transfer it to your 9-inch pie dish. Allow the dough to settle into the dish as you unroll it off the pin. Gently press the dough into the sides of the dish without stretching, which can cause shrinking when baked.
- Using a small sharp knife, trim off any excess dough from the edges leaving a 1-inch overhang of dough. Carefully tuck under the dough to form a smooth, thick crust that comes all the way to the edge of the pie dish.
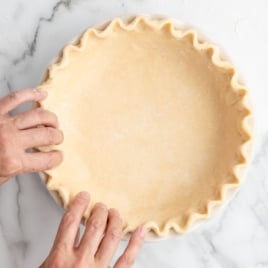
- Crimp the edges of the crust to form a decorative border. You can use any method of crimping you prefer (the pinch, also known as the flute, method was used for this crust). Be sure to press the dough firmly to the top of the pie dish when crimping. This helps keep the crust from shrinking too much when baked.
- Lightly cover the pie crust with a piece of plastic wrap and chill for an additional 30 to 45 minutes. Once chilled in the dish, you can either fill your crust with your preferred filling, following your specific recipe’s directions for filled pie baking. If you are blind-baking your pie crust you will need to follow the steps below.
Par-Baked and Blind-Baked Pie Crust (for pies that do not require being filled then baked fully in the oven)
- Once the dough has chilled in the pie dish, preheat the oven to 375°F.
- Remove the plastic wrap from the chilled pie crust. Place a large piece of parchment paper gently into the pie crust, carefully forming it up the sides. Add the pie weights to the parchment being sure to fill the dish at least two-thirds to three-quarters full. Spread the weights evenly in the dish to help the crust from shrinking, or bubbling, when baked.
- Place the pie crust filled with weights onto a large aluminum baking sheet then transfer to the center rack of the preheated oven. Bake for 20 minutes.
- Remove the pie crust from the oven and carefully lift out the weights using the edges of the parchment paper, then set them onto a heat-safe plate to cool.
- Using the tines of a dinner fork, poke holes all over the bottom, and up the sides, of the partially baked crust. This helps to keep the crust from bubbling up while it finishes baking.
- If your recipe calls for a par-baked crust, return the crust to the oven and bake for an additional 6 to 7 minutes, just until the bottom is set but not browned. Then proceed with filling and baking according to your recipe’s instructions.
- If your recipe calls for blind-baking (fully baked and cooled crust before filling) return the pie crust to the oven, once the pie weights and parchment are removed, and bake for another 15 to 20 minutes or until lightly golden and fully baked on the bottom. Allow the pie crust to cool completely before adding a chilled filling, or use according to your recipe’s instructions.
Notes
- This recipe is for a single 9-inch pie crust. If you are making a pie that requires a double crust, it is best to make a second batch of dough as doubling the recipe in the food processor can cause you to overwork the gluten in the flour when mixing. When the gluten is overworked, it creates tough dough that can shrink too much when baked.
- If using a good quality metal 9-inch pie dish, you will not need to place the dish onto a large baking sheet for baking as they can handle going from a cold refrigerator to a hot oven without warping or cracking. The reason for the use of the aluminum baking sheet is to slowly, and evenly, distribute the heat to the cold ceramic or glass pie dish. Some brands of pie dishes do not stand up to the extreme temperature changes well and can crack when placed into the preheated oven.
Nutrition
Calories: 1527kcal | Carbohydrates: 151g | Protein: 20g | Fat: 94g | Saturated Fat: 59g | Polyunsaturated Fat: 4g | Monounsaturated Fat: 24g | Trans Fat: 4g | Cholesterol: 244mg | Sodium: 601mg | Potassium: 228mg | Fiber: 5g | Sugar: 9g | Vitamin A: 2836IU | Calcium: 58mg | Iron: 9mg
