Freezer Enchiladas
Easy freezer enchiladas made with shredded chicken, cheese, and red sauce are perfect for meal prep, make-ahead dinners, or stocking the freezer.
Servings: 4
Calories: 1191kcal
Equipment
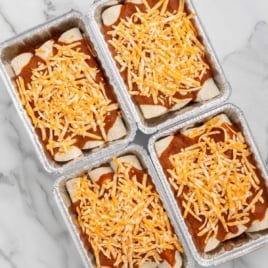
- 4 small (5x8 inch) disposable aluminum pans, optional for individual portion sized servings or 1 large (9x13 inch) disposable aluminum pan for a family sized portion for freezing and baking
Ingredients
- 1 tablespoon unsalted butter
- ¾ cup small diced sweet yellow onion, vidalia
- 1 tablespoon minced garlic
- 4 ounce can diced mild green chilis
- 1- ounce packet taco seasoning
- ¾ cup sour cream
- 3 cups shredded rotisserie chicken meat, white and dark meat from a 2 pound cooked and cooled rotisserie chicken
- 3 cups shredded colby-jack cheese, divided (1 cup for the chicken filling and ½ cup per pan for a total of 2 cups)
- 12 6-inch fajita size flour tortillas
- 19 ounces red enchilada sauce, divided ½ cup sauce per pan (approximately 2 cups)
- 2 tablespoons chopped fresh cilantro, optional garnish
Instructions
- Place 4 small (5x8 inch) disposable aluminum pans onto the counter and lightly spray the inside of each pan with nonstick cooking spray. Set aside.
- In a medium skillet, over medium-high heat, add the unsalted butter, diced sweet yellow onion and minced garlic. Cook for 2-3 minutes or until the onions are tender.
- Add the diced green chilis and taco seasoning to the skillet, stirring to combine, and cook for an additional 1 minute.
- Turn off the heat to the skillet and stir in the sour cream until all the ingredients are fully combined.
- To a large mixing bowl, add the cooked onion mixture, shredded rotisserie chicken and 1 cup shredded colby jack cheese gently stirring to combine all the ingredients.
- Place a single flour tortilla onto a plate. Add ⅓ cup chicken filling into the center of the flour tortilla and carefully roll the tortilla to form the shape of an enchilada.
- Place the filled, and rolled, tortilla into one of the prepared aluminum pan, seam side down, and repeat with two more tortillas until you have a total of 3 filled and rolled tortillas in a single aluminum pan. Repeat steps 5 and 6 until all the aluminum pans are filled with three enchiladas each.
- Divide the red enchilada sauce evenly among the four pans of enchiladas by carefully pouring approximately ½ cup red enchilada sauce over the tops of the enchiladas in each aluminum pan.
- Divide the remaining shredded colby jack cheese evenly among the four aluminum pans by topping each pan of enchiladas with ½ cup of shredded cheese.
- Cover each of the pans of freezer enchiladas with a piece of aluminum foil tightly sealing the pans around all the edges. Place the aluminum pans of enchiladas into the freezer, in a single layer, for a minimum of 8 hours, up to overnight, to allow the enchiladas to freeze solid before stacking them for longer storage in the freezer.
- When ready to bake, remove as many aluminum pans of enchiladas as desired and place into the refrigerator to thaw completely. Once thawed, remove the aluminum foil cover from each pan.
- Preheat the oven to 375°F and bake uncovered for 25-30 minutes or until the cheese is bubbly and lightly golden. Remove from the oven and allow the enchiladas to cool for 3-5 minutes before garnishing with fresh chopped cilantro if desired and serving.
Notes
- If you do not need to make four individual serving containers of these freezer enchiladas, you can use a single 9x13 disposable aluminum pan and place all 12 filled and rolled enchiladas in a single layer in the pan. Cover tightly with a sheet of aluminum foil and freeze for up to 2 months then thaw and bake according to recipe instructions. You may need to add a few extra minutes of bake time for the larger sized pan.
- I like to take my trays of enchiladas out of the freezer in the morning, and place them into the refrigerator to thaw, so that they are ready to bake in the evening for a quick and easy weeknight meal.
- These freezer enchiladas can be baked from frozen however, you will need to bake them tightly covered with a sheet of aluminum foil for 30 minutes, then uncovered for an additional 10-15 minutes or until the cheese is bubbly and lightly golden.
- If baking from frozen, lightly spray the side of aluminum foil that faces the cheese, with non-stick cooking spray. This will help keep the cheese from sticking to the aluminum foil when baked and melted.
- If you do not want to use rotisserie chicken for this recipe, you can cook and shred 2-3 large boneless skinless chicken breasts to yield the 3 cups shredded chicken needed.
- The shredded colby-jack cheese can be substituted with shredded cheddar, shredded monterey jack or a combination of any of these cheeses. I prefer to buy the blocks of cheese and shred them by hand as I find that the shredded block cheese melts better when heated than the bags of pre-shredded cheese.
Nutrition
Calories: 1191kcal | Carbohydrates: 69g | Protein: 84g | Fat: 65g | Saturated Fat: 33g | Polyunsaturated Fat: 4g | Monounsaturated Fat: 13g | Trans Fat: 0.1g | Cholesterol: 297mg | Sodium: 3743mg | Potassium: 378mg | Fiber: 8g | Sugar: 17g | Vitamin A: 2953IU | Vitamin C: 19mg | Calcium: 875mg | Iron: 6mg
