January 23, 2024
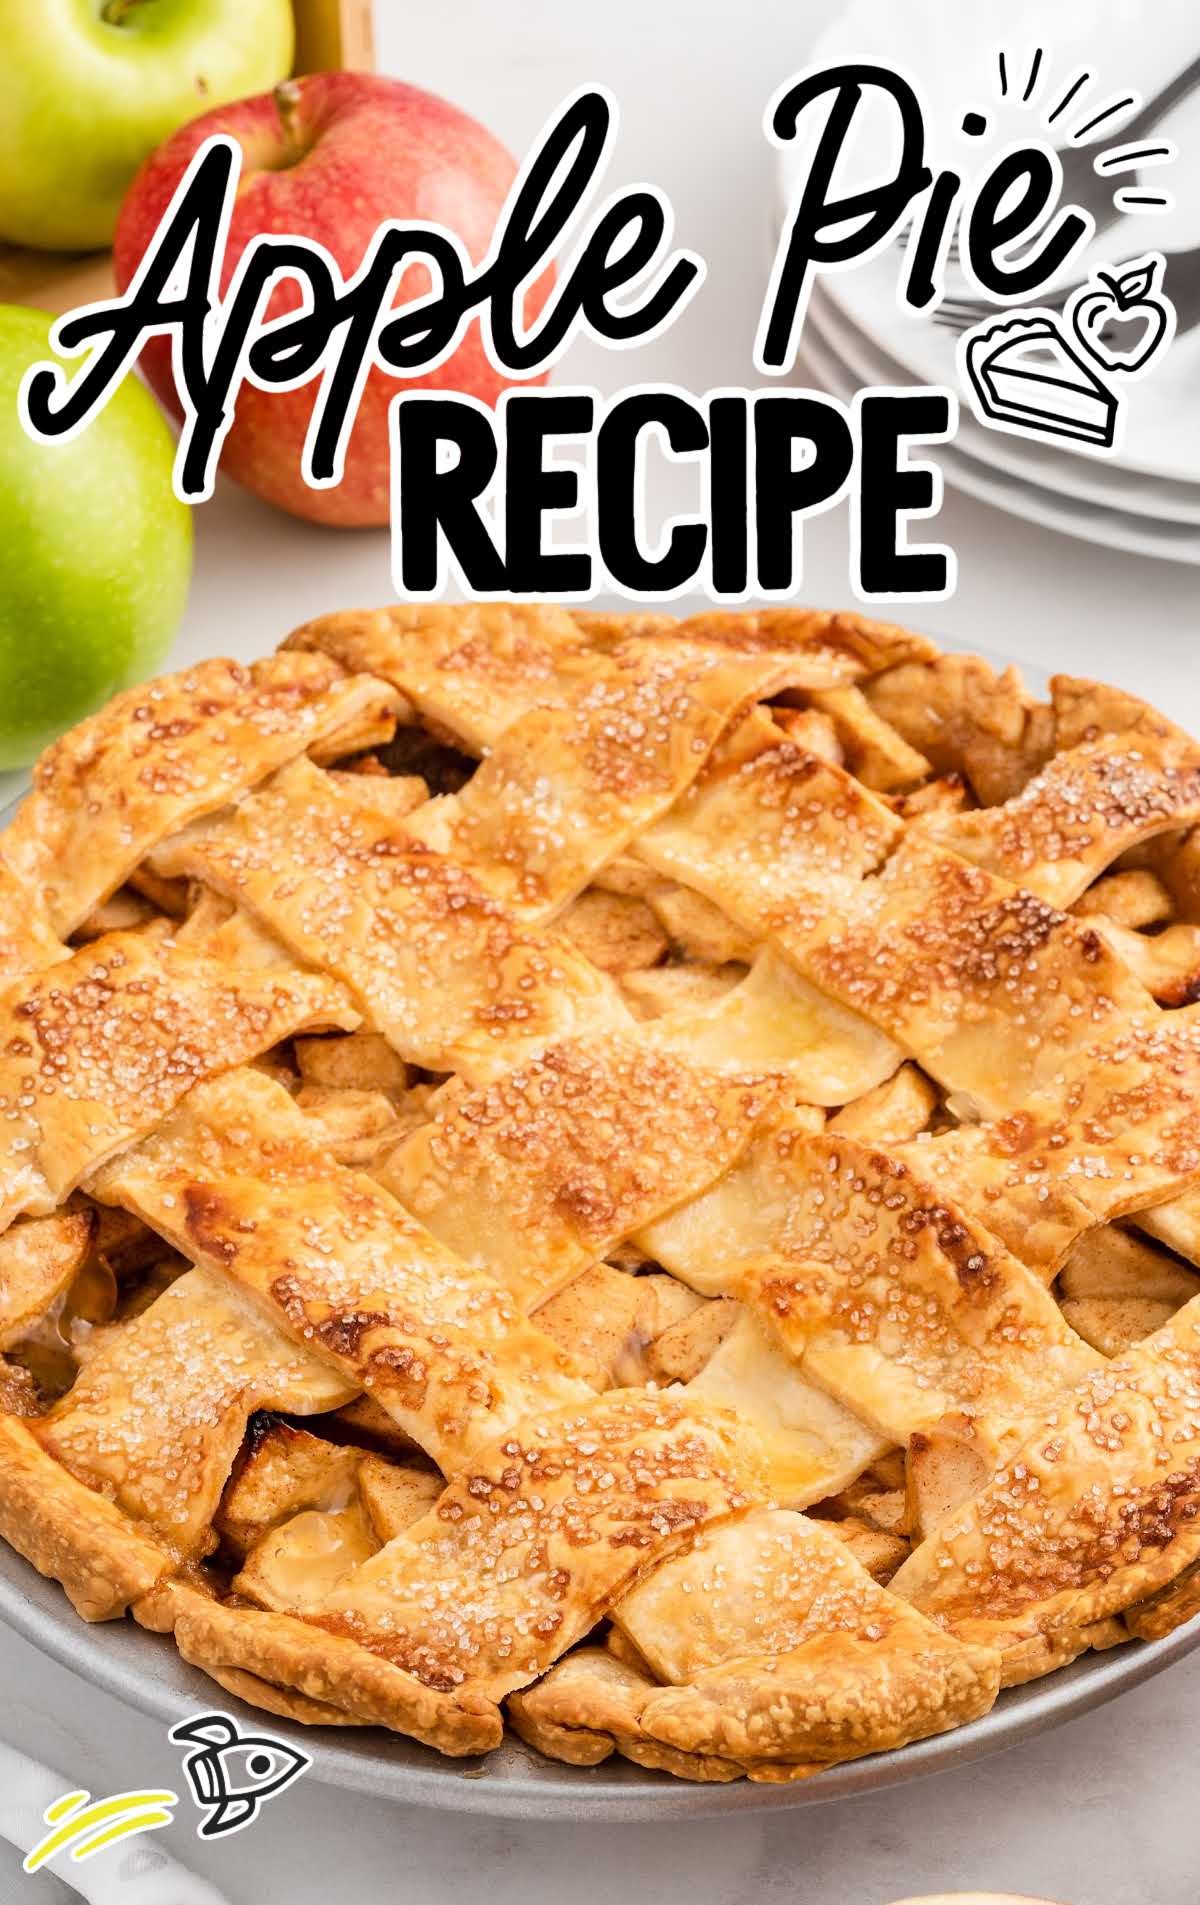
Review RecipeTraditional Apple Pie Recipe

This easy apple pie recipe is so simple to make and is full of the best, rich flavor!
Jump to Recipe

Table of Contents
There’s nothing like this classic apple pie recipe. Just saying the words “homemade” and “freshly baked” conjures up thoughts of a steaming apple pie filling inside a buttery flaky crust that’s sure to be a hit.
Apple Pie Ingredients
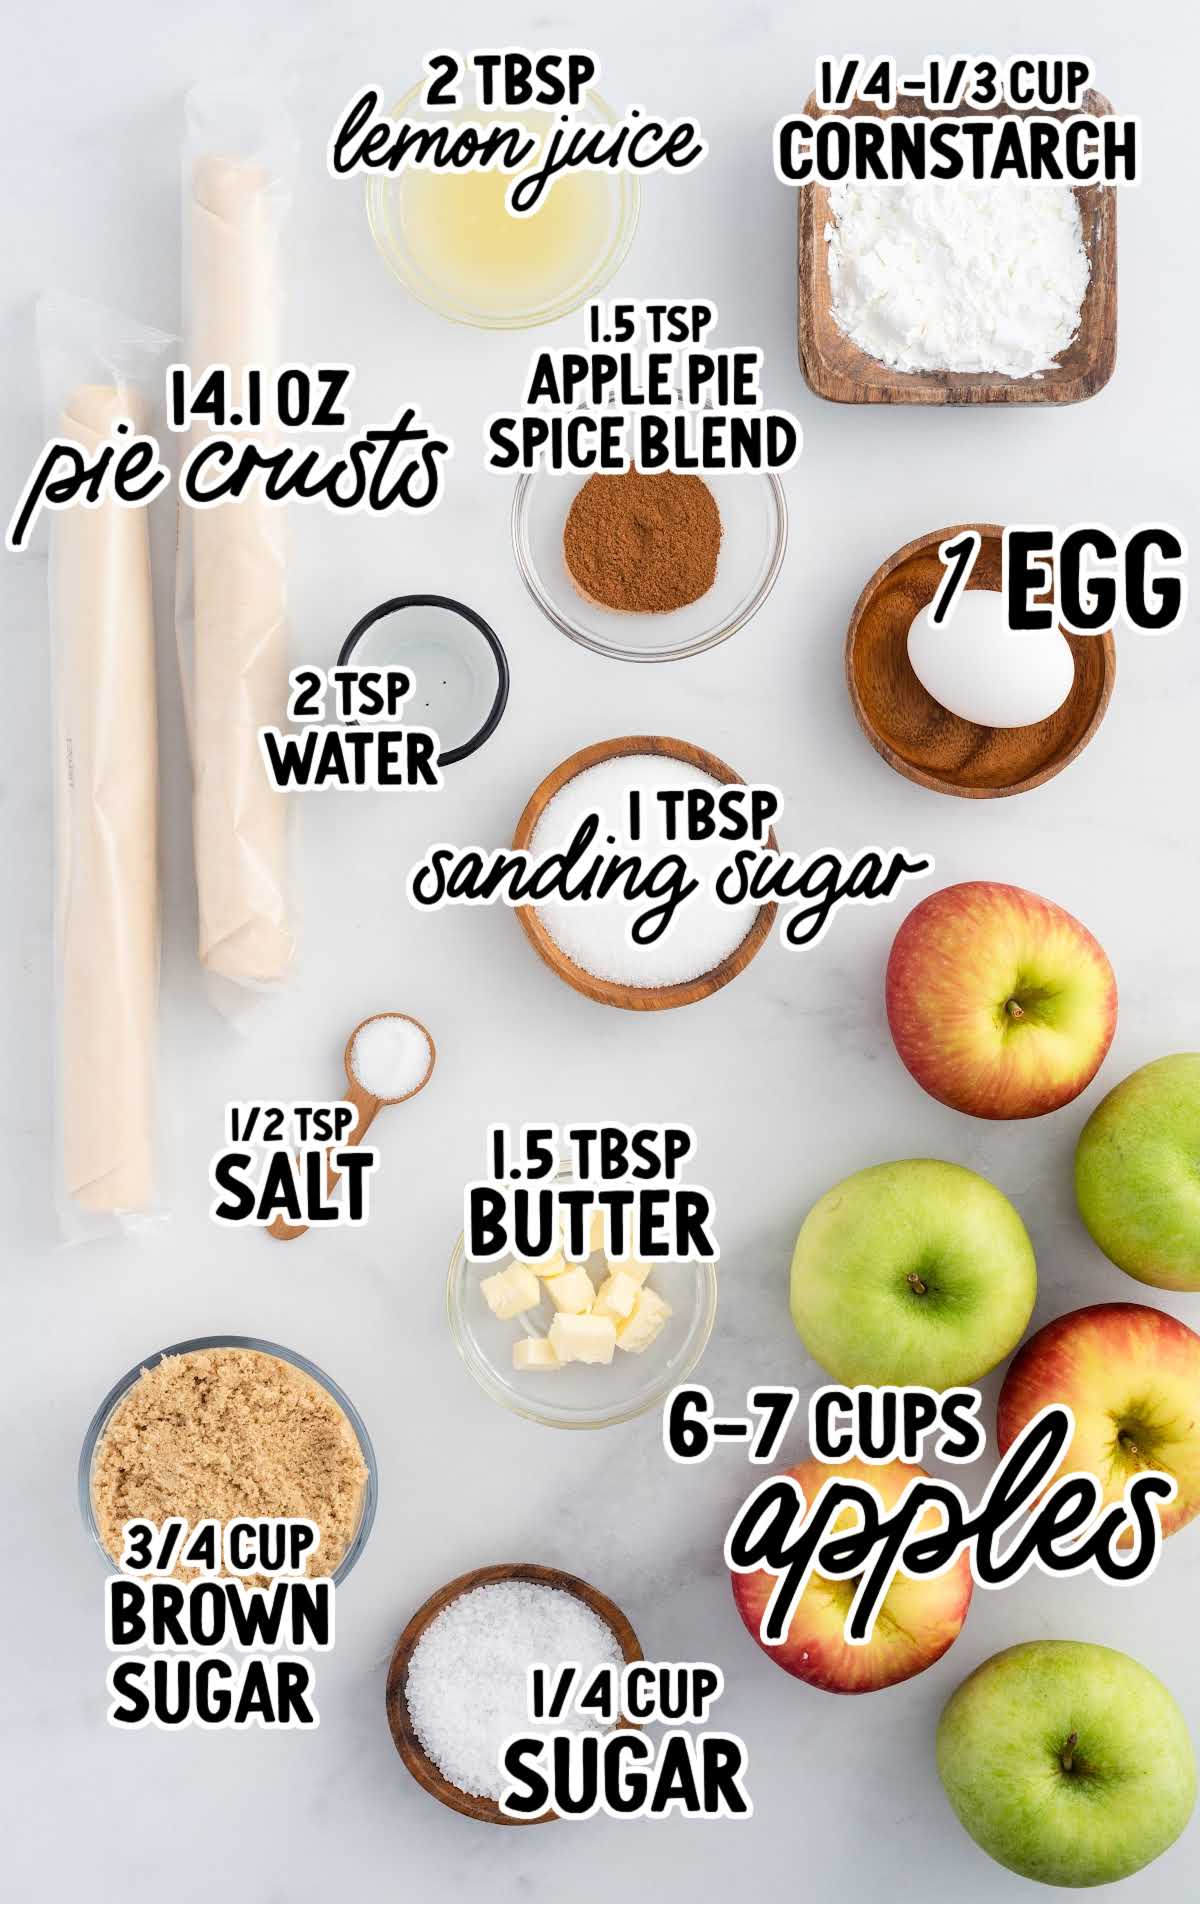
You’ll need:
- 6 to 7 cups of sliced apples (from a combination of 3 large Granny Smith and 3 large Honeycrisp apples)
- ¾ cup of light brown sugar
- ¼ cup of granulated sugar
- 1½ teaspoons of apple pie spice blend
- ½ teaspoon of salt
- 2 tablespoons of fresh lemon juice
- 1 (14.1-ounce) package of Pillsbury ready-made pie crusts (you will use both crusts)
- ¼ to ⅓ cup of cornstarch (this amount will vary based on the amount of liquid your apples yield. I had 1 cup of liquid and used ⅓ cup of cornstarch for this pie. If you have less liquid, you can stick with the ¼ cup cornstarch)
- 1½ tablespoons of unsalted butter, cold, cut into small cubes
- 1 egg
- 2 teaspoons of water
- 1 tablespoon of coarse sanding sugar, optional
What Apples Are Best For Apple Pie?
It is up to your personal preference which apple you use for this recipe. We recommend a combination of Granny Smith and Honeycrisp as it has the best balance of sweet and tart flavors. You can also use Pink Lady as another great choice.
What Apples Should Not Be Used For Apple Pie?
Gala, Fuji, and Red Delicious apples won’t hold up in the oven, resulting in a mushy pie.
Traditional Apple Pie Substitutions And Additions
APPLES: I like to use a combination of apples for the most flavorful apple pie. Granny Smith and Honeycrisp are my go-to choices year-round, as they can readily be found in grocery stores.
However, if you are in an area that has apple orchards, I highly suggest going to your local orchards and speaking with them to get other great options for baking apples. There are so many choices that would be delicious from the orchards that you just can not find in grocery stores.
CRUST: I always keep ready-made pie crusts in my refrigerator for ease of use and convenience. You can substitute your favorite homemade pie crust recipe if you prefer. Make sure your recipe yields two 9-inch crusts.
APPLE PIE SPICE: There are lots of great apple pie spice blends readily available in the spice aisle of your grocery store. You can substitute the spice blend for 1 teaspoon cinnamon, ¼ teaspoon nutmeg, and ¼ teaspoon allspice in the recipe.
CORNSTARCH: Tapioca starch/flour is a great alternative to use as a thickener for the juices in your apple pie. You will just want to follow the package instructions for use with the amount of liquid that your apples gave off after their 1-hour rest.
How To Make Lattice Apple Pie
OUR RECIPE DEVELOPER SAYS
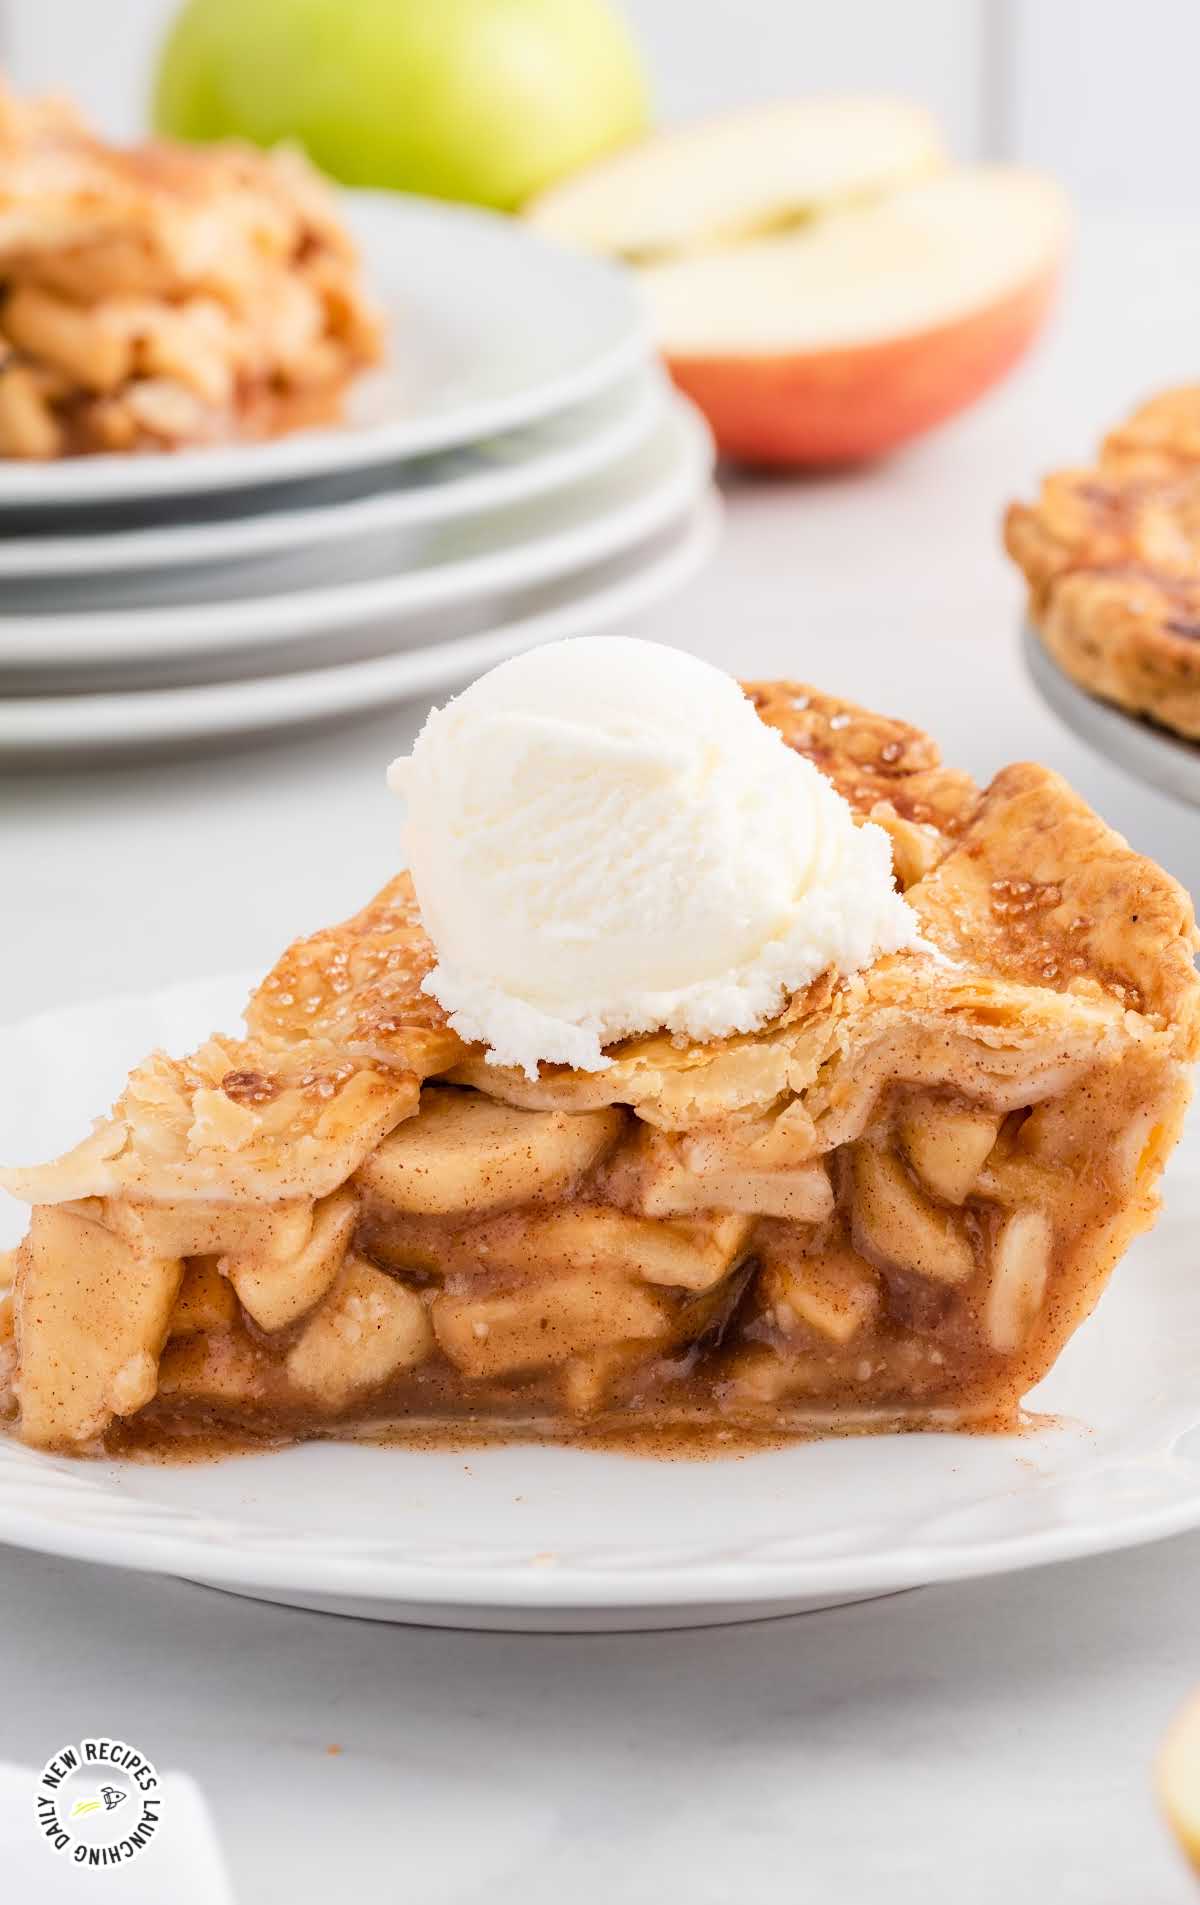
I like to make my apple pies the day before I want to serve them. This is to allow them to cool completely and have all the juices firm up so that you can get a nice beautiful slice for serving. You can heat up individual slices in the microwave for 30 to 45 seconds and then add a scoop of vanilla ice cream.
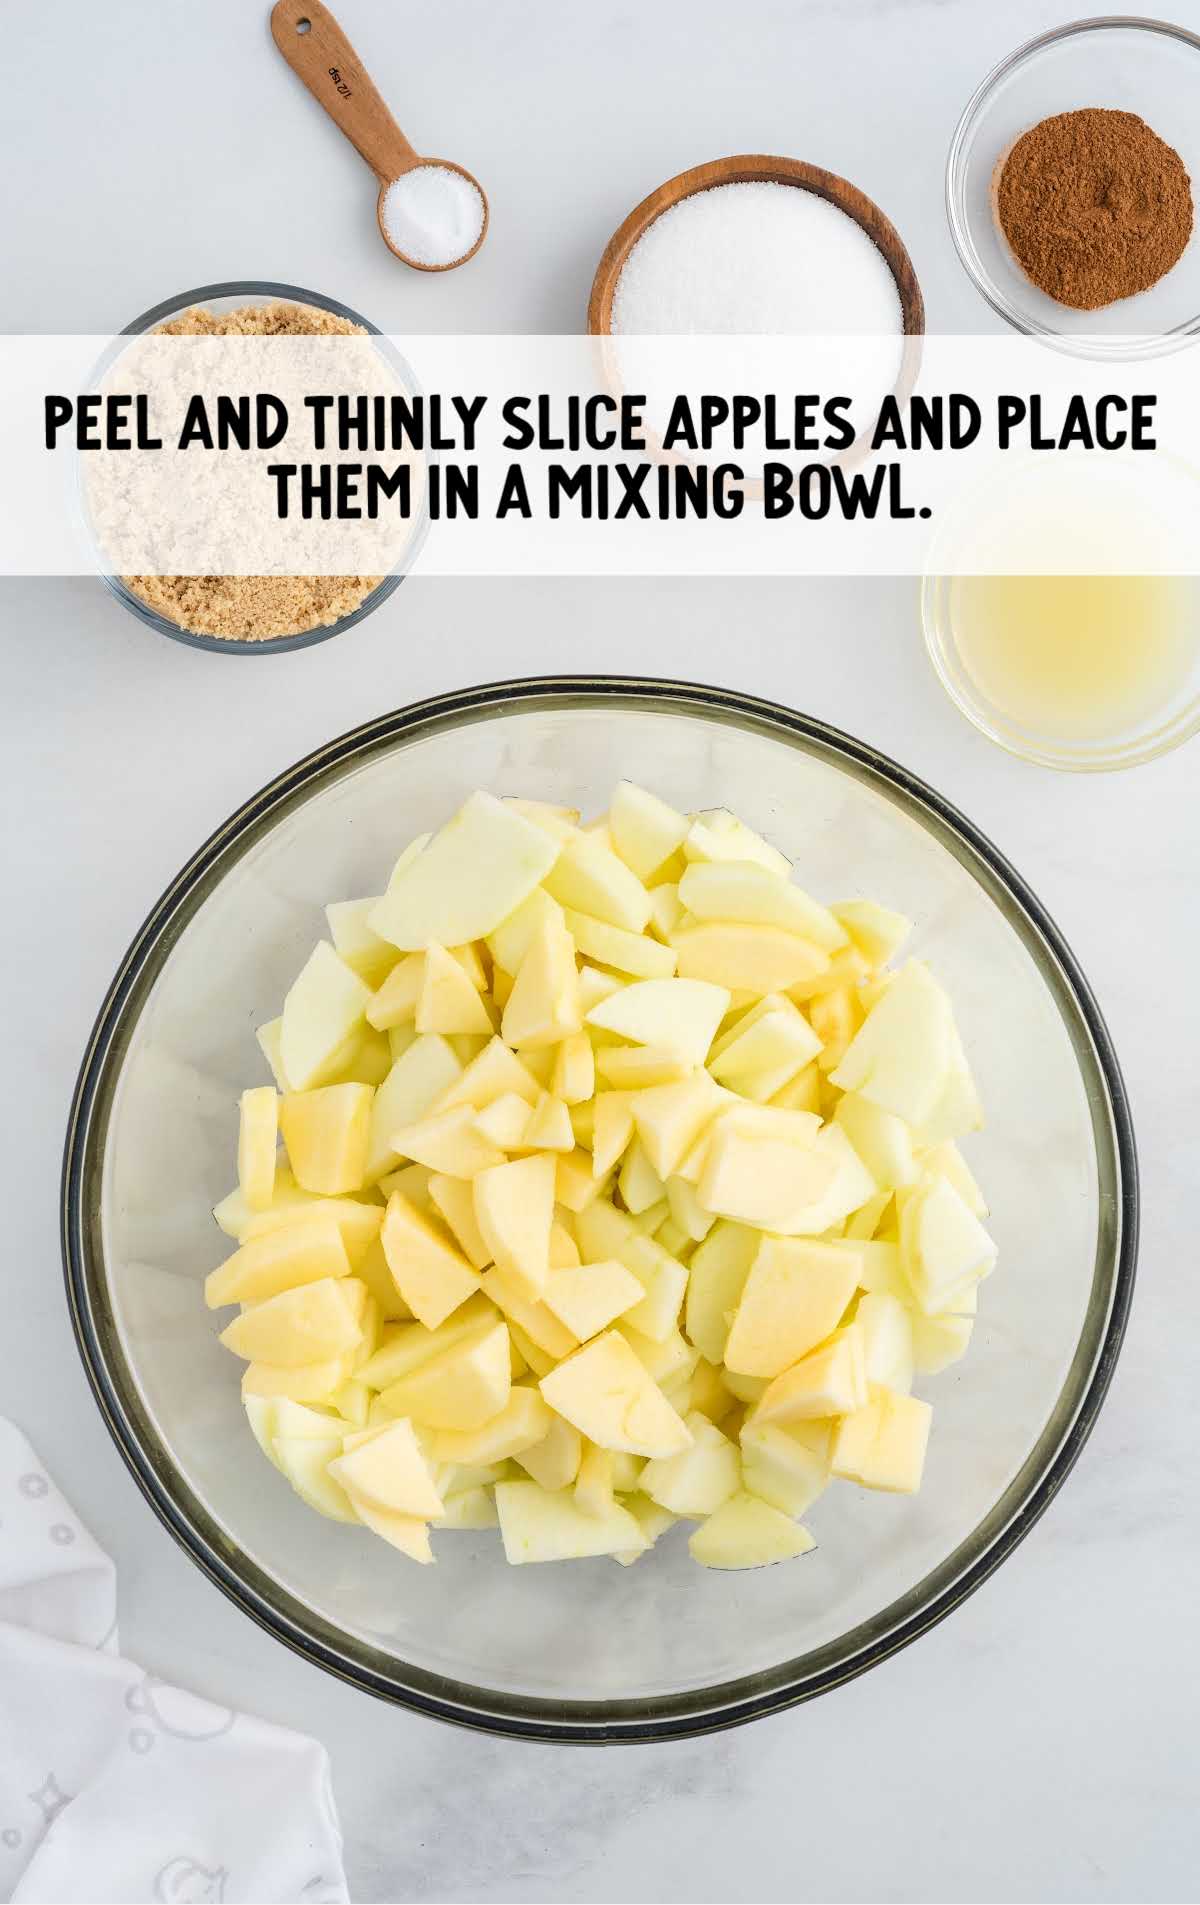
STEP ONE: Peel, core, and slice the Granny Smith and Honeycrisp apples into ¼-inch slices. Cut those slices in half so you have smaller, bite-size pieces of apples. Place the apples into a large mixing bowl.
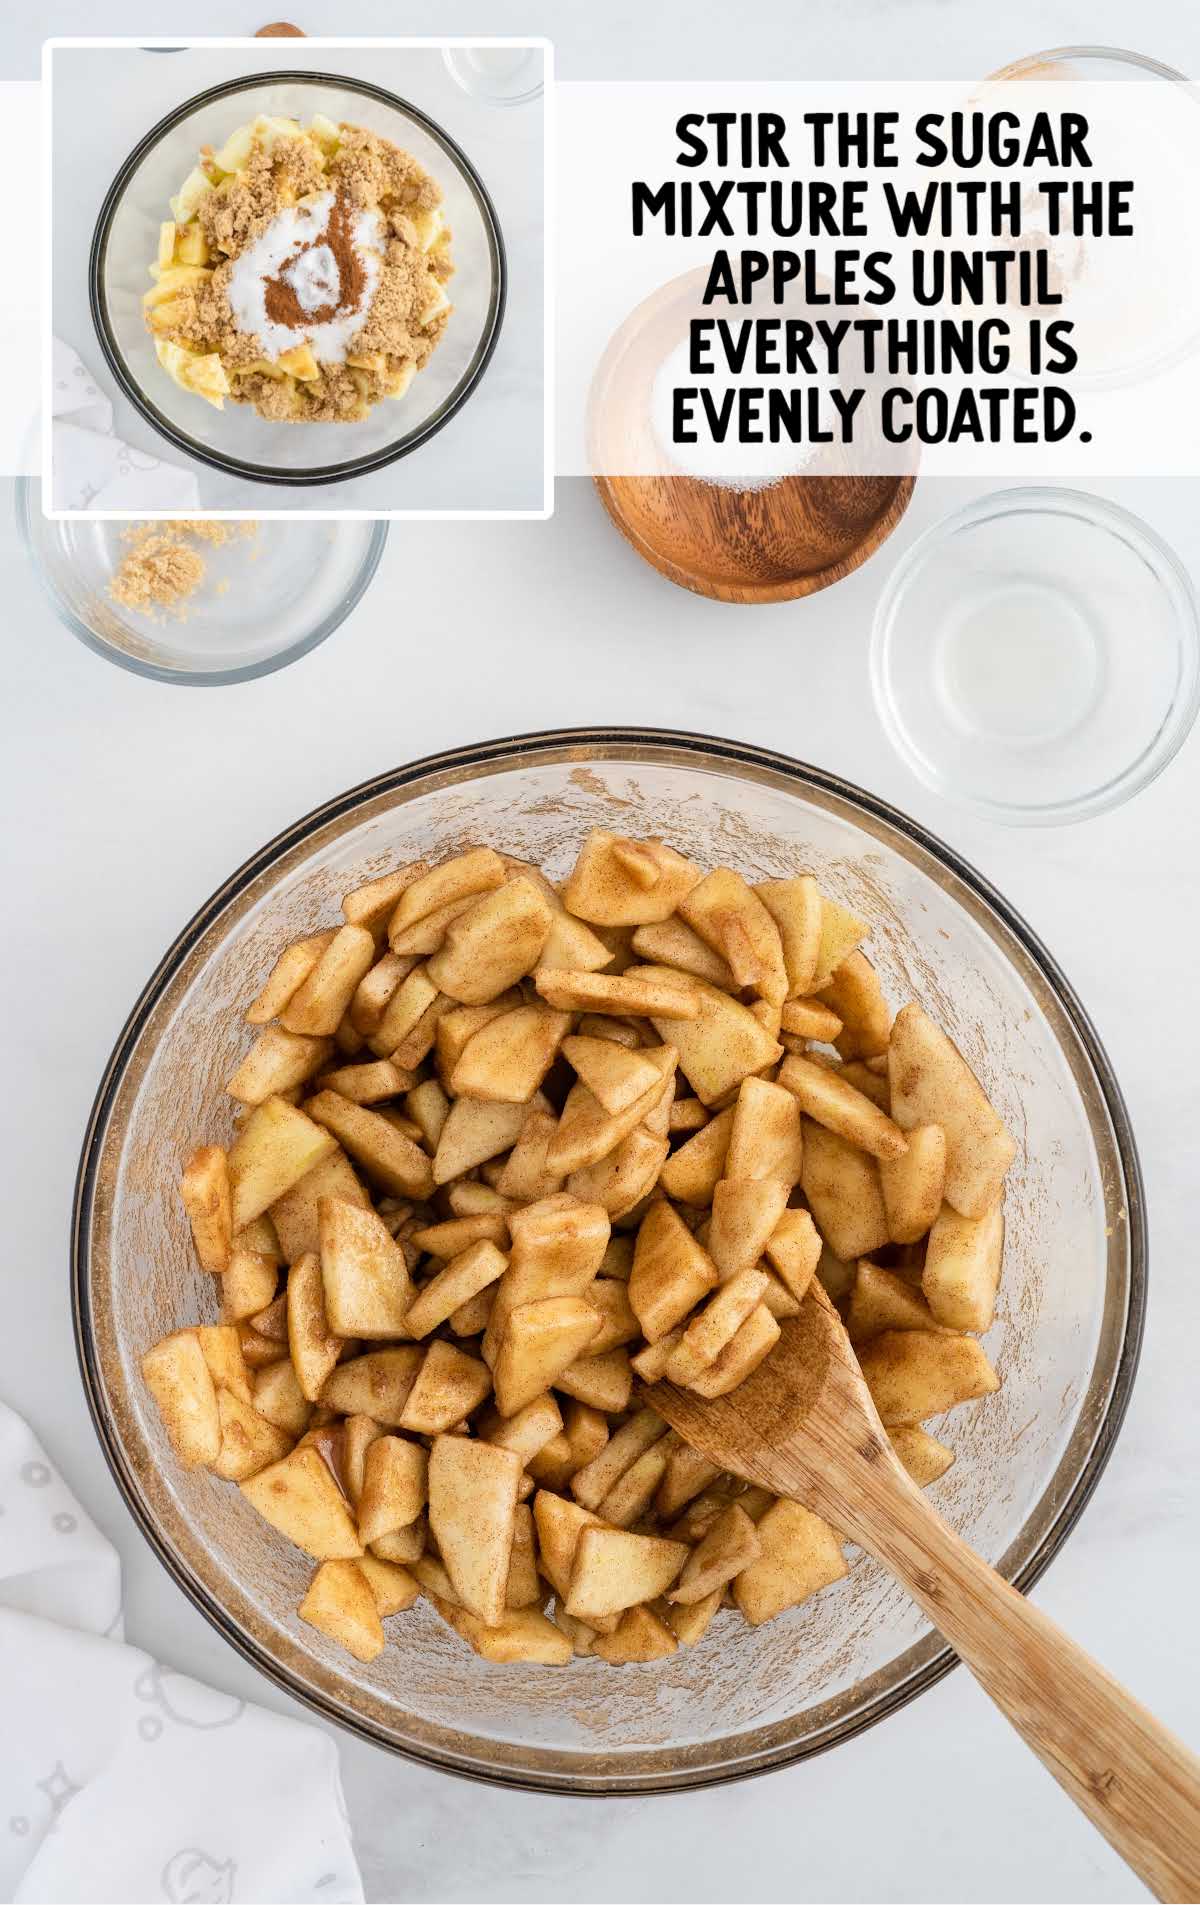
STEP TWO: Add the light brown sugar, granulated sugar, apple pie spice blend, salt, and lemon juice to the apple slices. Stir to evenly coat all the apple slices in the sugar and spices. Set aside for 1 hour to allow the juices to come out of the apples.
STEP THREE: Preheat the oven to 400°F. Place a 9-inch pie plate on top of a parchment-lined rimmed baking tray. This will make sure that any juices that may bubble out from your pie do not spill into your oven and create a mess.
STEP FOUR: While your oven is preheating, thaw and unroll both your pie crusts according to the package instructions.
STEP FIVE: Place one of the unrolled pie crusts into the pie plate.
STEP SIX: Using a slotted spoon, transfer the apples into the pie crust. Spread them out into an even layer. Do not pack them in tight.
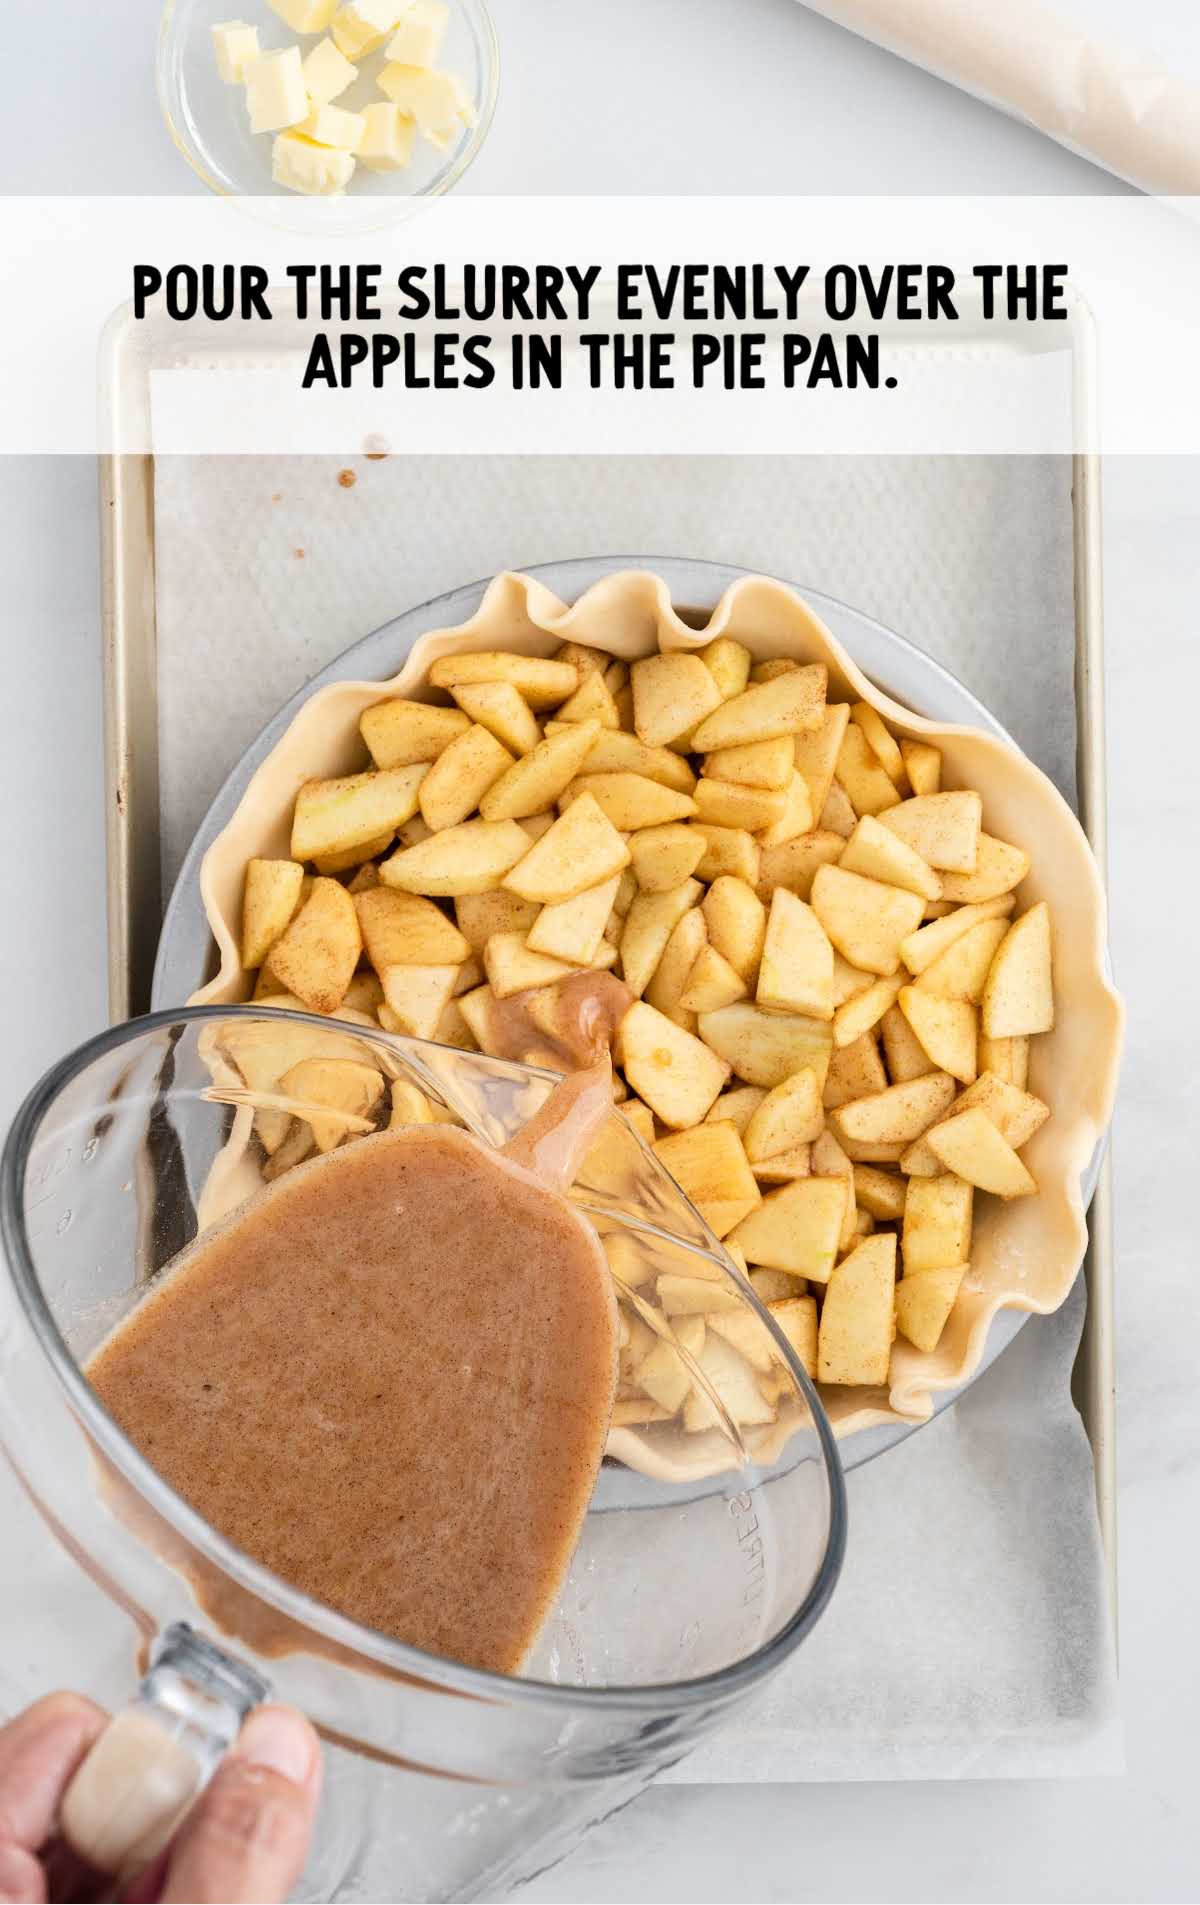
STEP SEVEN: Add the cornstarch to the bowl with the remaining juices and whisk to create a slurry. You do not want any lumps of cornstarch remaining. Pour the slurry evenly over the apples in the pie pan.
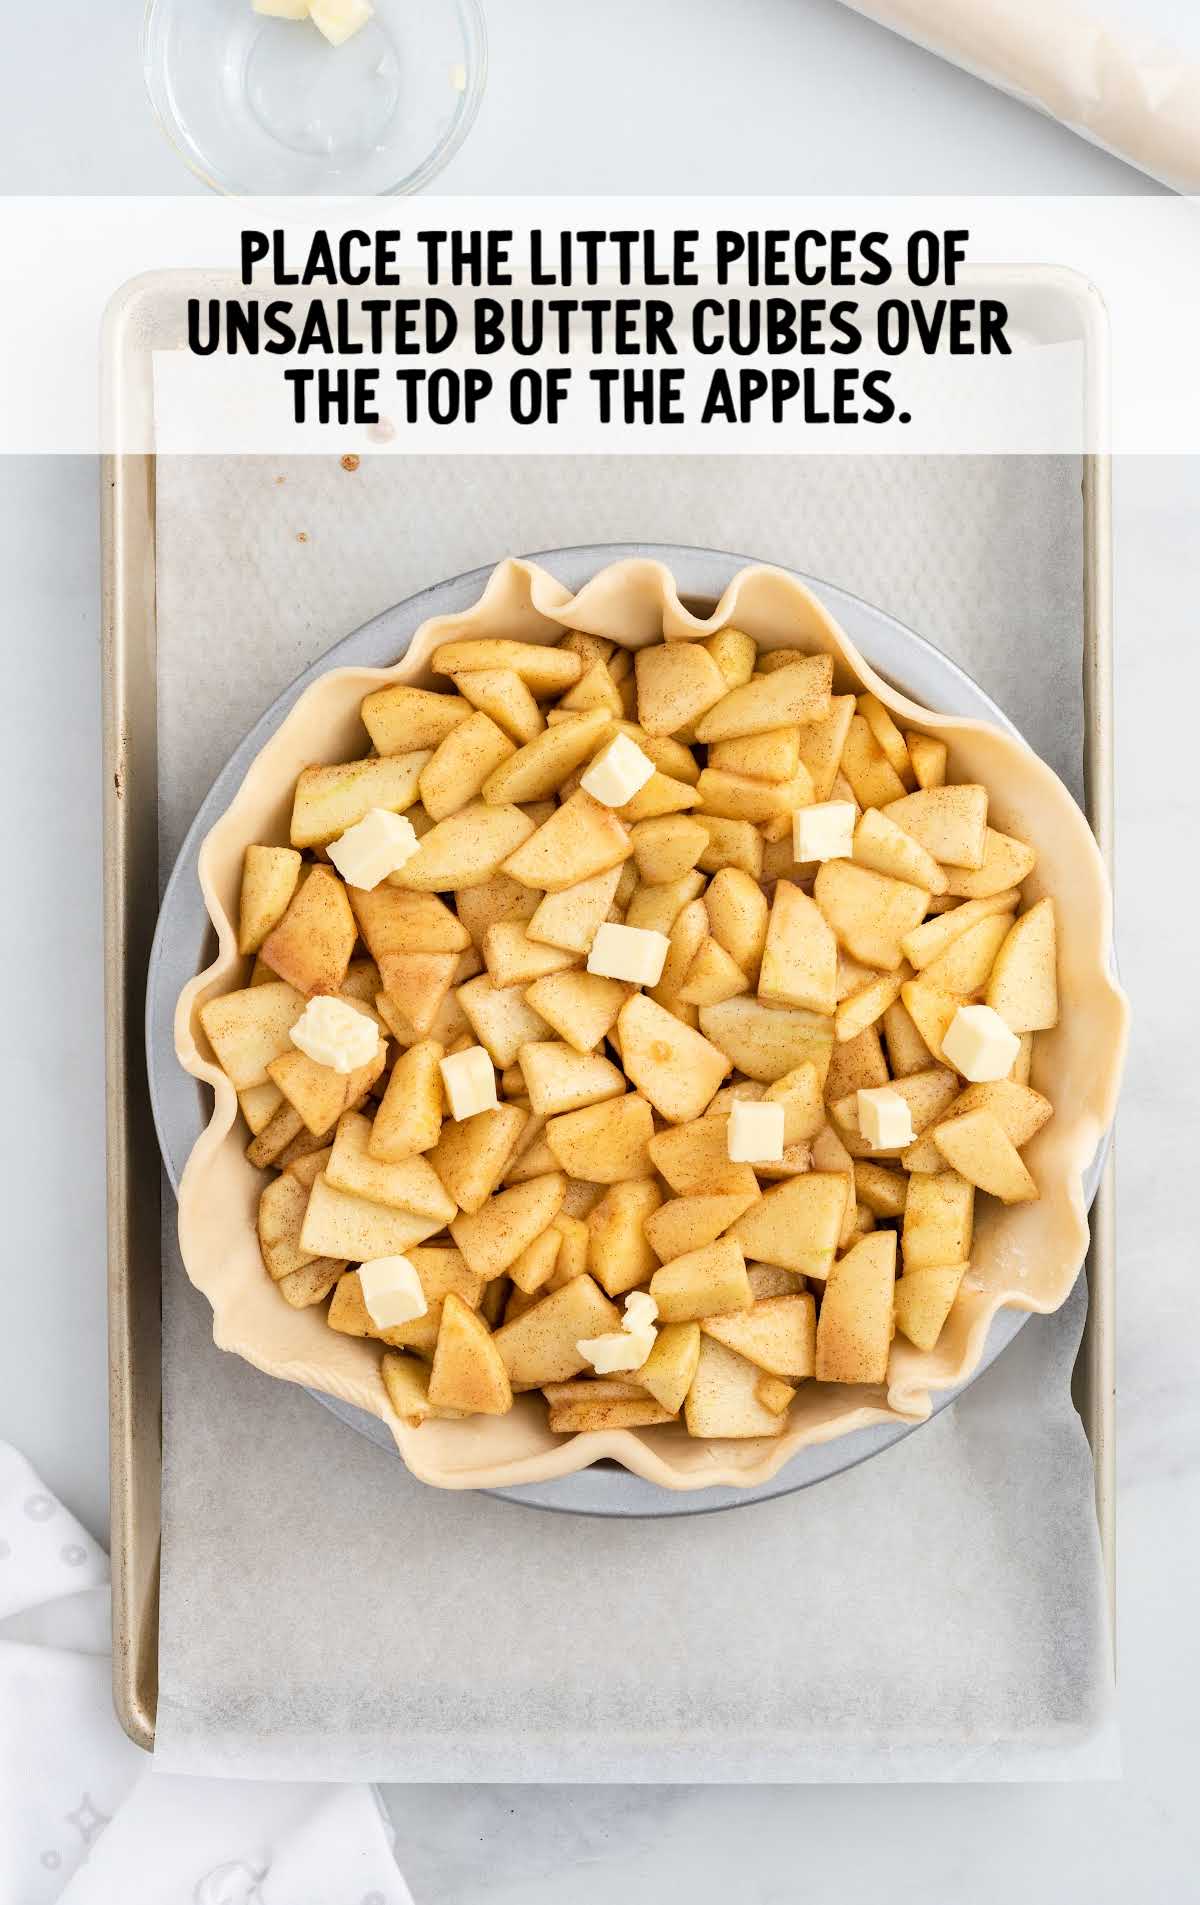
STEP EIGHT: Randomly place the little pieces of unsalted butter cubes over the top of the apples.
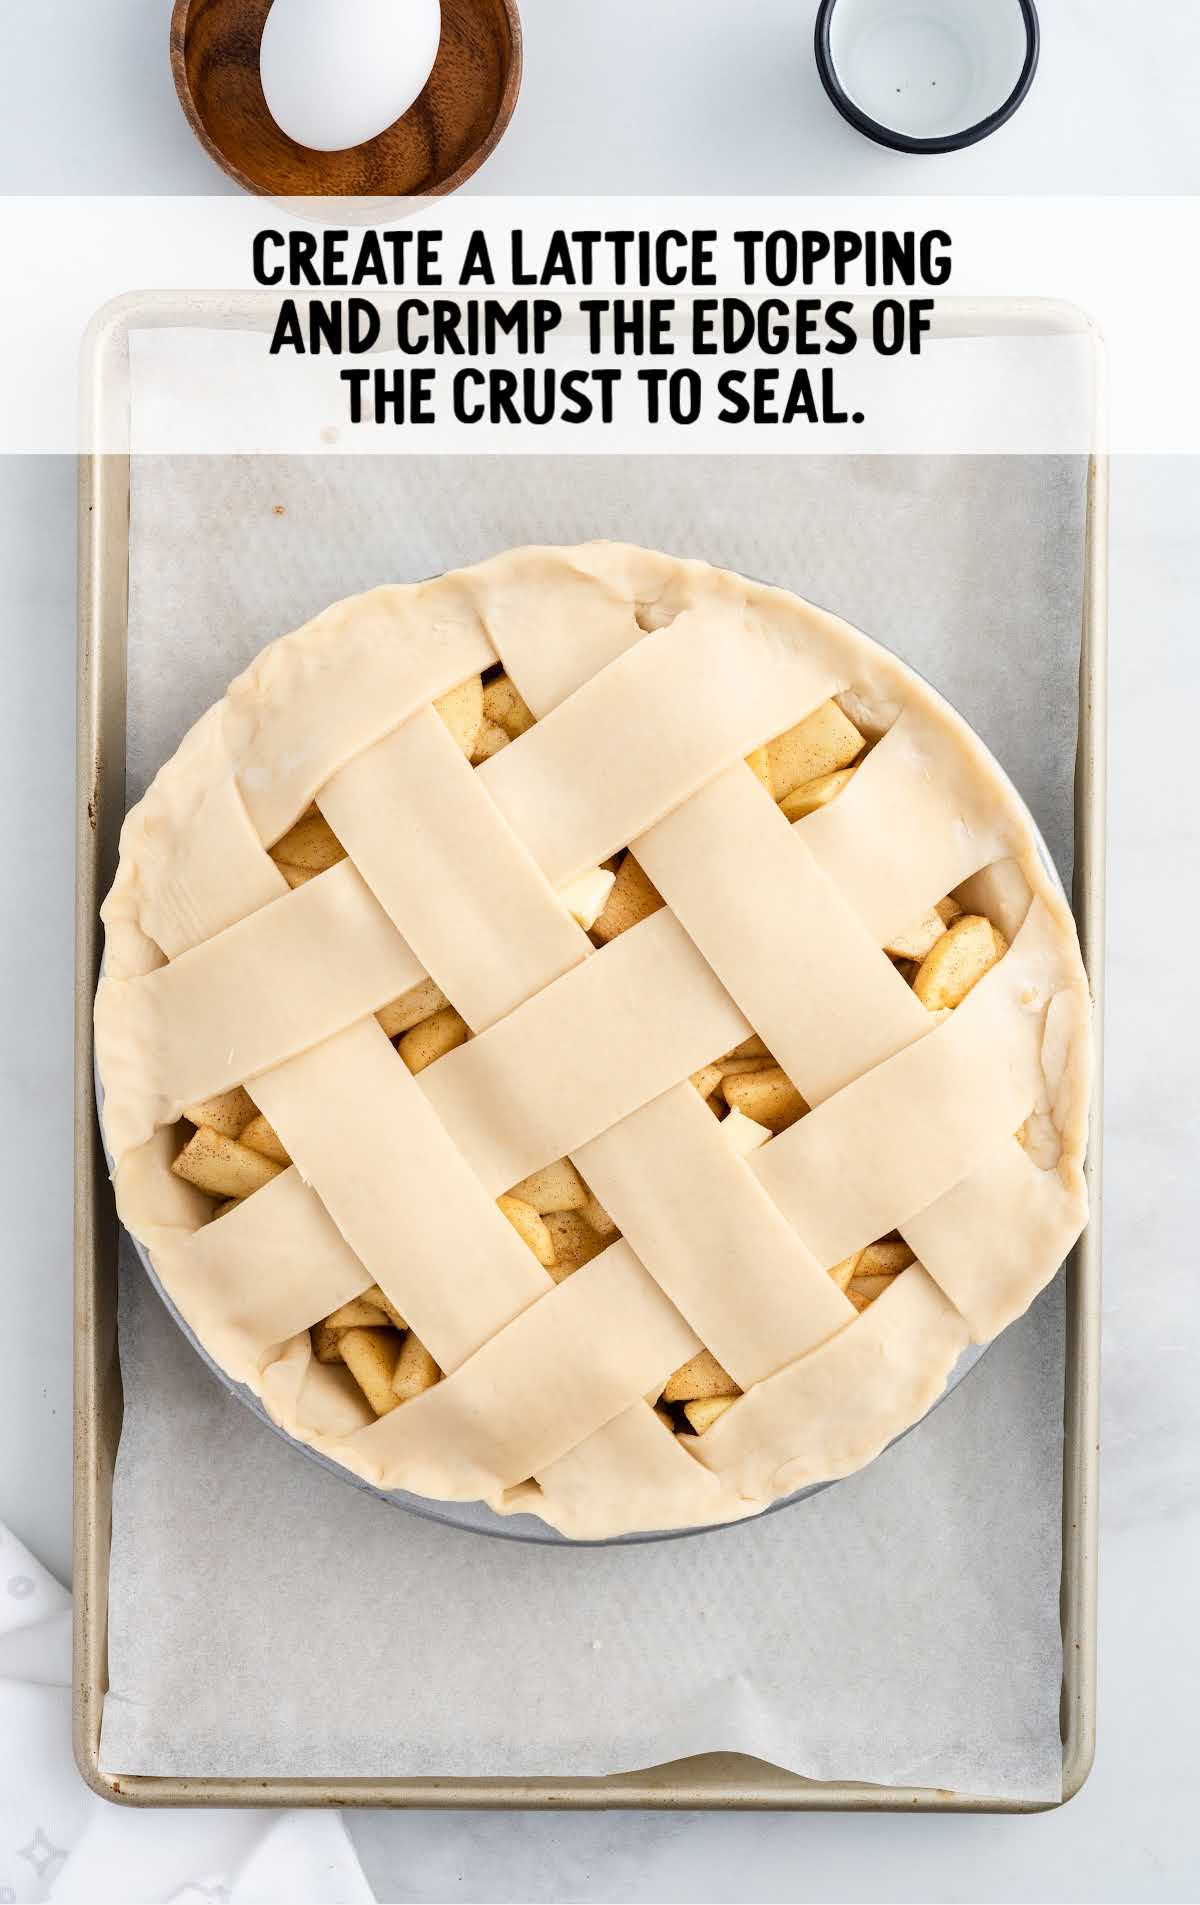
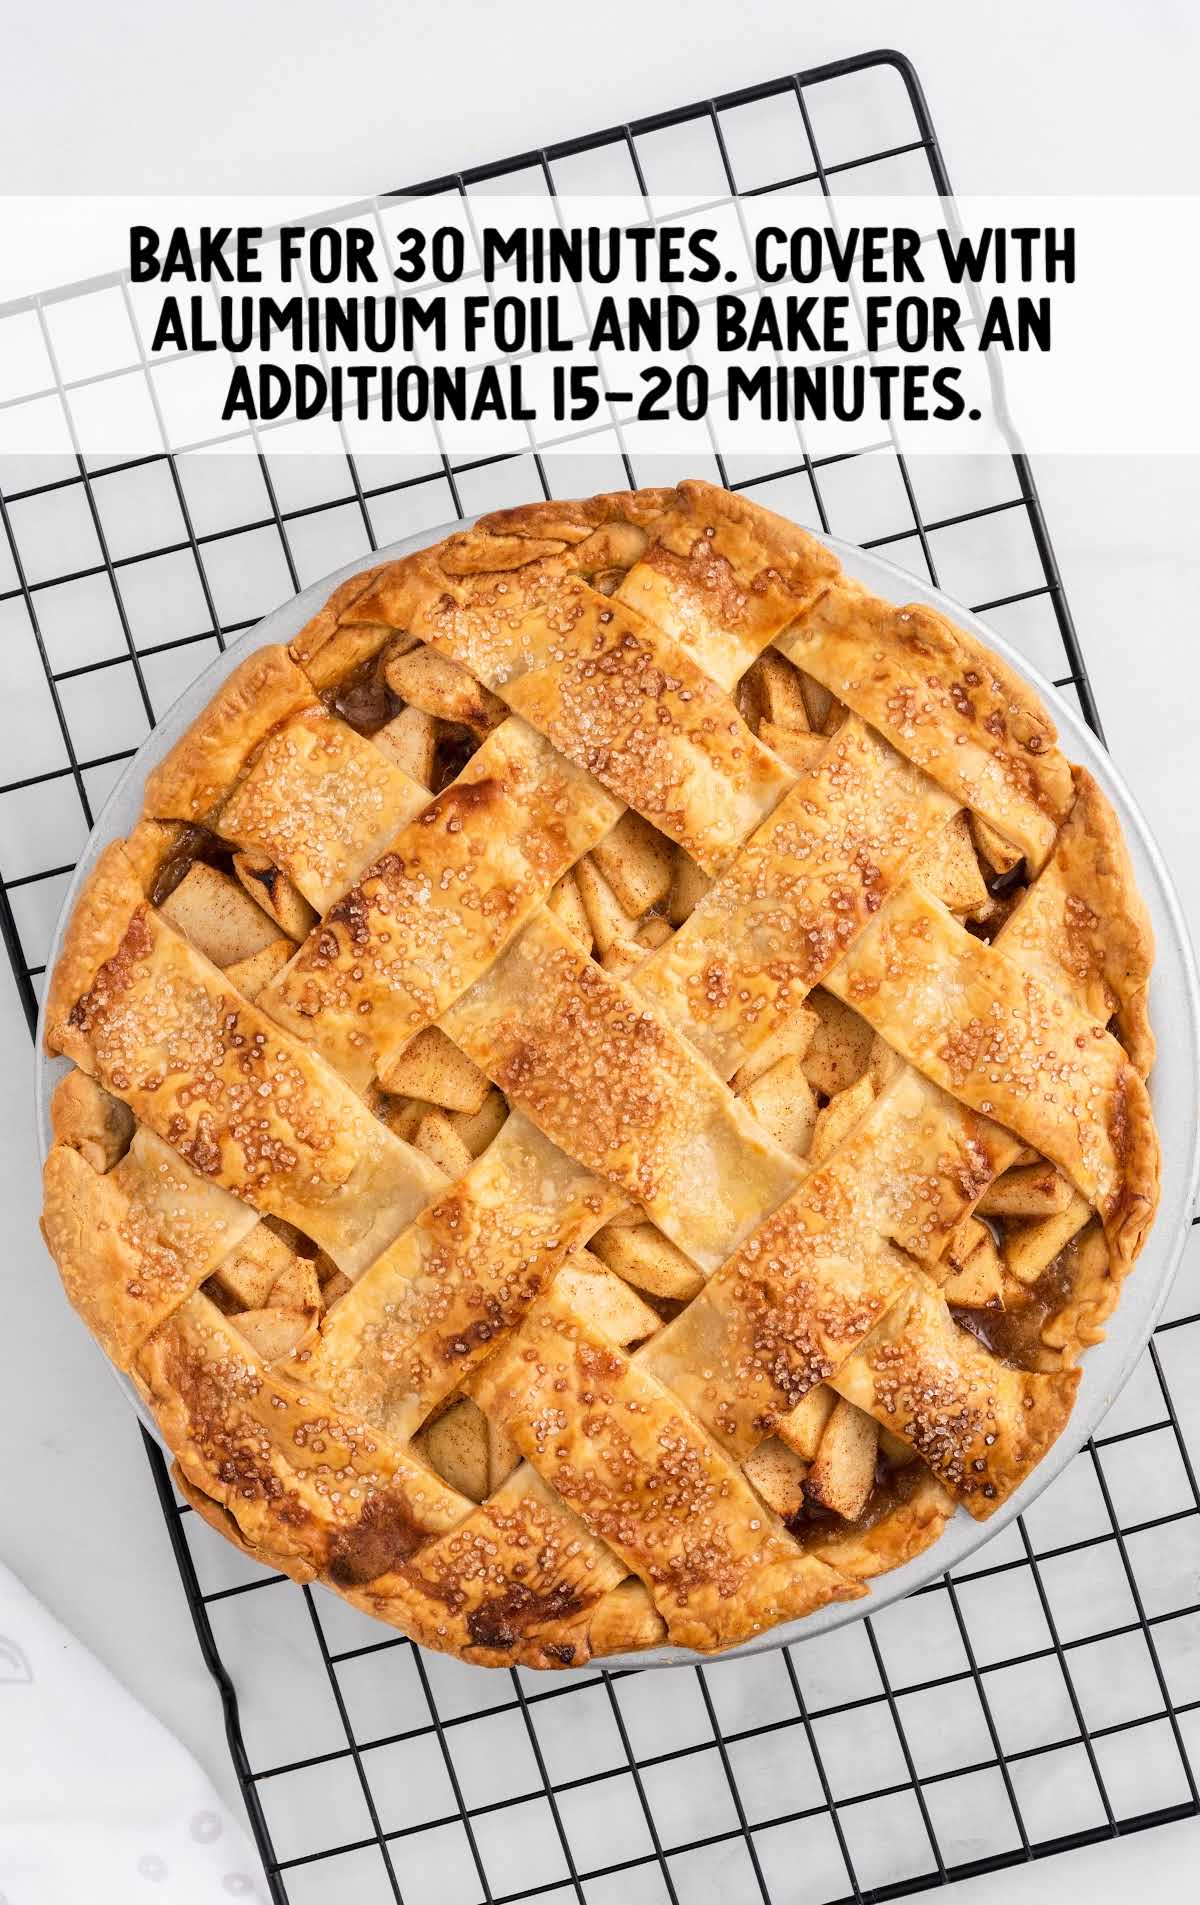
STEP NINE: Using a sharp paring knife, cut 1½-inch strips from the second unrolled pie crust. You will create a lattice topping and crimp the edges of the crust to seal.
PRO TIP:
I love a lattice top crust for my apple pies. These are very easy to do and there are so many tutorials online that will give you step-by-step instructions. If they intimidate you, or you just prefer a solid top crust that is fine too.
You just want to make sure you have at least 4 to 6 slits in the top crust as vents to allow the steam to escape while your apple pie is baking. If you do not have the vents, then your top crust will expand and your juices will not be able to cook down as all the steam will be trapped.
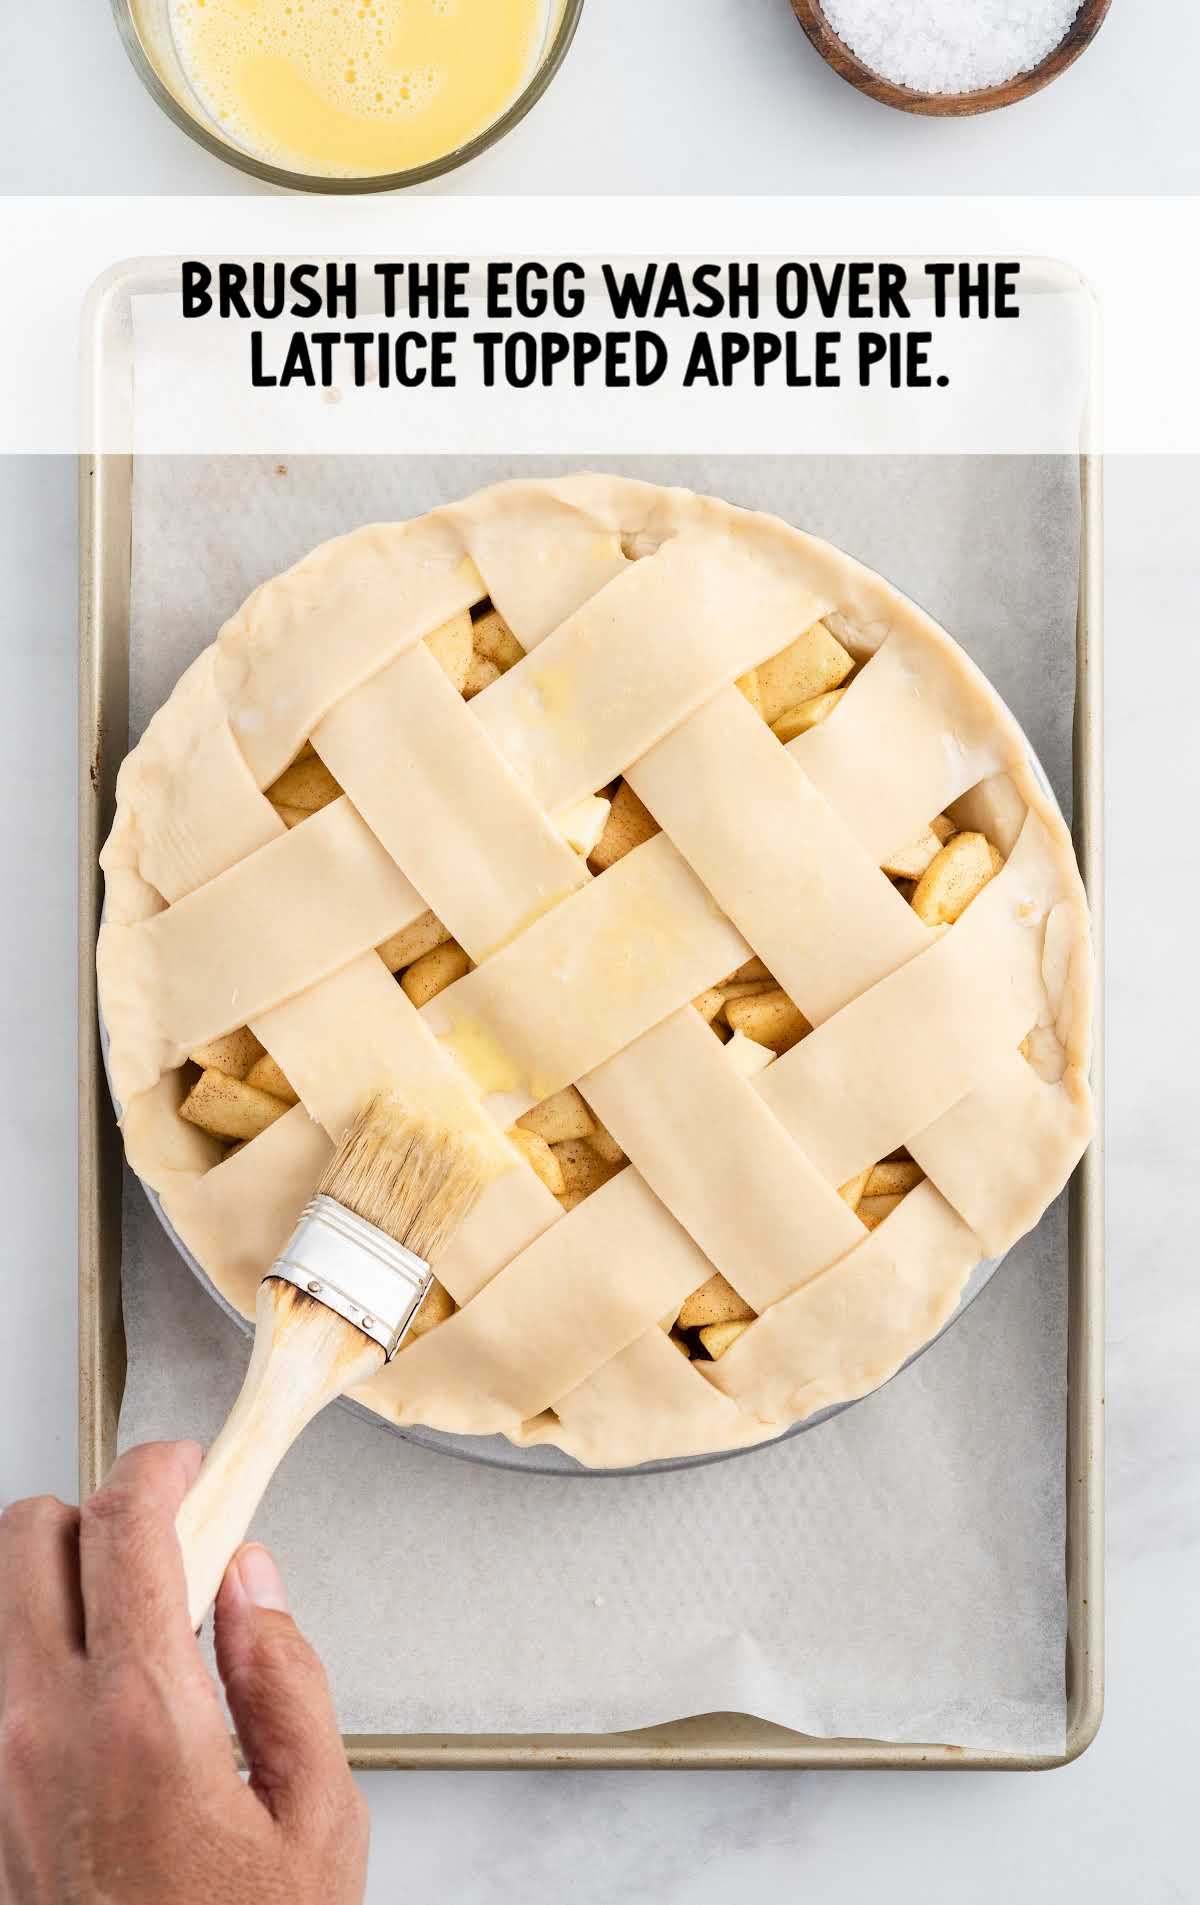
STEP TEN: In a small bowl, whisk together the egg and water to create an egg wash. Using a pastry brush, brush the egg wash over the lattice-topped apple pie.
STEP ELEVEN: Sprinkle the coarse sanding sugar over the top of the lattice crust. The egg wash will help keep the sanding sugar adhered to the crust. This is an optional step, but it does create a beautiful crust with a great little crunch to it.
STEP TWELVE: Bake for 30 minutes. At this point, you may want to tent your apple pie with aluminum foil to prevent your crust from over-browning. Bake for an additional 15 to 20 minutes.
PRO TIP:
Oven temperatures vary and may need to be recalibrated periodically to ensure they are accurate. Make sure to keep a close eye on your pie as the suggested baking time approaches.
STEP THIRTEEN: Allow your apple pie to cool completely before slicing and serving.
How Long To Bake An Apple Pie?
An apple pie will take between 45 and 50 minutes to bake.
PRO TIP:
Make sure you use a very sharp serrated knife to get a nice clean cut when slicing your apple pie.
How To Serve This Recipe For Apple Pie
Apple pie is such a classic recipe, so if you choose to, you can keep it simple and traditional. But if you want to get a bit creative, there are loads of different ways to serve up your apple pie!
Of course, we have to mention vanilla ice cream or whipped cream. These are especially delicious over a warm, freshly baked apple pie.
You can also sprinkle a bit of extra cinnamon over the top, and it’s like you have your very own cinnamon roll apple pie! Another way we like to serve this apple pie recipe is with caramel sauce. Who doesn’t love caramel?
Finally, we must mention putting cheese on your apple pie. Many love this option. Most people prefer a slice of cheddar cheese melted over the top. You can also serve a cheese wedge on the side for a nice complement.
Don’t miss our apple crisp and apple pie bites too. Both are delectable apple recipes that you will love.
MORE PIE RECIPES

How To Store Apple Pie
ON THE COUNTER: Store leftovers on the counter for 2 to 3 days. The longer it sits, the soggier the crust will get, so you do not want to make this apple pie more than 24 hours ahead of time for best serving results.
IN THE FRIDGE: Your apple pie can also be stored in the fridge for up to four days.
IN THE FREEZER: You can most definitely freeze this perfect apple pie. To do so, make sure you use aluminum or plastic wrap. You could also use a heavy-duty freezer bag. It’s recommended to use the pie within 3 to 4 months after storing it.
Can You Freeze Apple Pie?
This classic apple pie recipe can be frozen well covered for up to four months.
Does Apple Pie Need To Be Refrigerated?
Apple pie will be fine on the counter for 2 to 3 days. For longer storage, you can keep it in the fridge for up to four days.
How Long Does Apple Pie Last?
Apple pie will last for 2 to 3 days on the counter.
This Is The Best Recipe For Apple Pie
All in all, you can’t go wrong with this homemade apple pie recipe. As someone who loves baking, this is a recipe that I must have in my recipe book. I love that this is so easy to put together and tastes amazing with its buttery crust and tender apples.
Best Apple Pie FAQs
Can I use homemade pie crust?
It is up to you whether you use homemade or store-bought pie crust. Both will taste delicious with your apple pie.
What is the secret to making an apple pie?
Using firm apples with a mixture of sweet and tart will result in the best-tasting pie. Using cold ingredients will also give you a delicious pie.
Should I cook apples before putting them in a pie?
This recipe doesn’t pre-cook the apples before putting them in the pie, but you can if you’d like.
Should you prebake the bottom crust of an apple pie?
While it isn’t necessary, you can pre-bake the bottom crust of the apple pie.
How do you keep the bottom crust of apple pie from getting soggy?
You can prebake the bottom crust of your apple pie to avoid the risk of a soggy crust.
Is lemon juice necessary for apple pie?
It isn’t absolutely necessary, but adding lemon juice to the apple pie will add a bit of acidity to the pie and help prevent the apples from browning.
More Recipes You’ll Love
- Strawberry Cheesecake Pie
- Peanut Butter Pie
- Oreo Pie
- Blueberry Hand Pies
- Sweet Potato Pie
- No-Churn Cotton Candy Ice Cream
- Mini Key Lime Pies
- Apple Dapple Cake
- Impossible Pumpkin Pie Cupcakes
- Buckeye Pie
- Caramel Apple Dip
- Chocolate Chip Pie
- Apple Slab Pie
- Apple Pie Filling
- No Bake Coconut Cream Pie
- Chocolate Meringue Pie
- Easy Apple Dumplings
- S’mores Hand Pies
- Cinnamon Roll Bread
- French Pie
- Millionaire Pie
- Chocolate Cherry Pie
- Mississippi Mud Pie
- Mini Cinnamon Roll Cheesecakes Recipe
- Cinnabon Cinnamon Rolls
- Strawberry Cinnamon Rolls


Recipe For Apple Pie
This easy apple pie recipe is so simple to make and is full of the best, rich flavor!
Prep Time 1 hour 20 minutes
Cook Time 50 minutes
Total Time 2 hours 10 minutes
Servings 8
Ingredients
- 6 to 7 cups sliced apples, from a combination of 3 large Granny Smith and 3 large Honeycrisp apples
- ¾ cup light brown sugar
- ¼ cup granulated sugar
- 1½ teaspoons apple pie spice blend
- ½ teaspoon salt
- 2 tablespoons fresh lemon juice
- 1 package Pillsbury ready-made pie crusts, you will use both crusts (14.1-ounce package)
- ¼ to ⅓ cup cornstarch (this amount will vary based on the amount of liquid your apples yield. I had 1 cup of liquid and used ⅓ cup cornstarch for this pie. If you have less liquid you can stick with the ¼ cup cornstarch)
- 1½ tablespoons unsalted butter, cold and cut into small cubes
- 1 egg
- 2 teaspoons water
- 1 tablespoon coarse sanding sugar, optional
Instructions
- Peel, core, and slice the Granny Smith and Honeycrisp apples into ¼-inch slices. Cut those slices in half so you have smaller, bite-size pieces of apples. Place the apples into a large mixing bowl.
- Add the light brown sugar, granulated sugar, apple pie spice blend, salt, and lemon juice to the apple slices. Stir to evenly coat all the apple slices in the sugar and spices. Set aside for 1 hour to allow the juices to come out of the apples.
- Preheat the oven to 400°F. Place a 9-inch pie plate on top of a parchment-lined rimmed baking tray. This will make sure that any juices that may bubble out from your pie do not spill into your oven and create a mess.
- While your oven is preheating, thaw and unroll both your pie crusts according to the package instructions.
- Place one of the unrolled pie crusts into the pie plate.
- Using a slotted spoon, transfer the apples into the pie crust. Spread them out into an even layer. Do not pack them in tight.
- Add the cornstarch to the bowl with the remaining juices and whisk to create a slurry. You do not want any lumps of cornstarch remaining. Pour the slurry evenly over the apples in the pie pan.
- Randomly place the little pieces of unsalted butter cubes over the top of the apples.
- Using a sharp paring knife, cut 1½-inch strips from the second unrolled pie crust. You will create a lattice topping and crimp the edges of the crust to seal.
- In a small bowl, whisk together the egg and water to create an egg wash. Using a pastry brush, brush the egg wash over the lattice-topped apple pie.
- Sprinkle the coarse sanding sugar over the top of the lattice crust. The egg wash will help keep the sanding sugar adhered to the crust. This is an optional step but it does create a beautiful crust with a great little crunch to it.
- Bake for 30 minutes. At this point, you may want to tent your apple pie with aluminum foil to prevent your crust from over-browning. Bake for an additional 15 to 20 minutes.
- Allow your apple pie to cool completely before slicing and serving.
Notes
- I like to make my apple pies the day before I want to serve them. This is to allow them to cool completely and have all the juices firm up so that you can get a nice beautiful slice for serving. You can heat up individual slices in the microwave for 30 to 45 seconds and then add a scoop of vanilla ice cream.
- I love a lattice top crust for my apple pies. These are very easy to do and there are so many tutorials online that will give you step-by-step instructions. If they intimidate you, or you just prefer a solid top crust that is fine too. You just want to make sure you have at least 4 to 6 slits in the top crust as vents to allow the steam to escape while your apple pie is baking. If you do not have the vents then your top crust will expand and your juices will not be able to cook down as all the steam will be trapped.
- Oven temperatures vary and may need to be recalibrated periodically to ensure they are accurate. Make sure to keep a close eye on your pie as the suggested baking time approaches.
- Make sure you use a very sharp serrated knife to get a nice clean cut when slicing your apple pie.
Nutrition
Calories: 452kcal | Carbohydrates: 72g | Protein: 4g | Fat: 17g | Saturated Fat: 6g | Polyunsaturated Fat: 2g | Monounsaturated Fat: 7g | Trans Fat: 1g | Cholesterol: 26mg | Sodium: 386mg | Potassium: 196mg | Fiber: 4g | Sugar: 38g | Vitamin A: 148IU | Vitamin C: 6mg | Calcium: 40mg | Iron: 2mg
Have You Tried This Recipe?Follow me on Pinterest @spaceshipslb

Even More Recipes You’ll Love
- Air Fryer Pineapple
- Crack Cake
- Chocolate Cake with Whipped Cream Frosting
- Pumpkin Roll Recipe
- Pumpkin Donuts
- Coconut Blossoms
- Easy Coffee Smoothie Recipe
- Crazy Cake
- Moist Blueberry Bread
- Cherry Cupcakes


Comments
Toni Thomason says
A classic dish that is perfect.
Treena says
Absolutely delicious! I served it hot out of my oven with a scoop of vanilla ice cream.
S Weedon says
I like my pie with Blue Bell Homemade Vanilla Ice Cream!
Carla says
Best apple pie I’ve ever made!! Yum!